The help article to process already set-up website leads is here; please, click the link to access it.
If you need to invite a 3rd-party user to VIEW only our developer documentation, please click here.
Rave offers an optional Website Lead integration module that lets leads submitted through 3rd-party sites like your website, META, and Google flow directly into Rave Build CRM, helping your team capture and manage new leads without manually entering their details.
We have 3 sources of leads available; this article covers META-sourced leads.
- Website - Live for use. The setup help article is available here.
- Google - Live for use. The setup help article is available here.
When Website Leads is enabled, both the Source of Lead and New Enquiry Branch and Company reports include three extra columns: UTM Source, UTM Medium, and UTM Campaign.
Permissions Required
To access these instructions, you must have the Branch Setting: Integrations + Website Leads enabled.
The permission sits under Manage Users - Branch Settings and is called Website API Tokens. You need the edit version in order to make changes/ set up this feature.
By default:
Franchised businesses: Head Office and Marketing groups have access.
Non-franchised businesses: Branch Owner and Marketing roles have access.
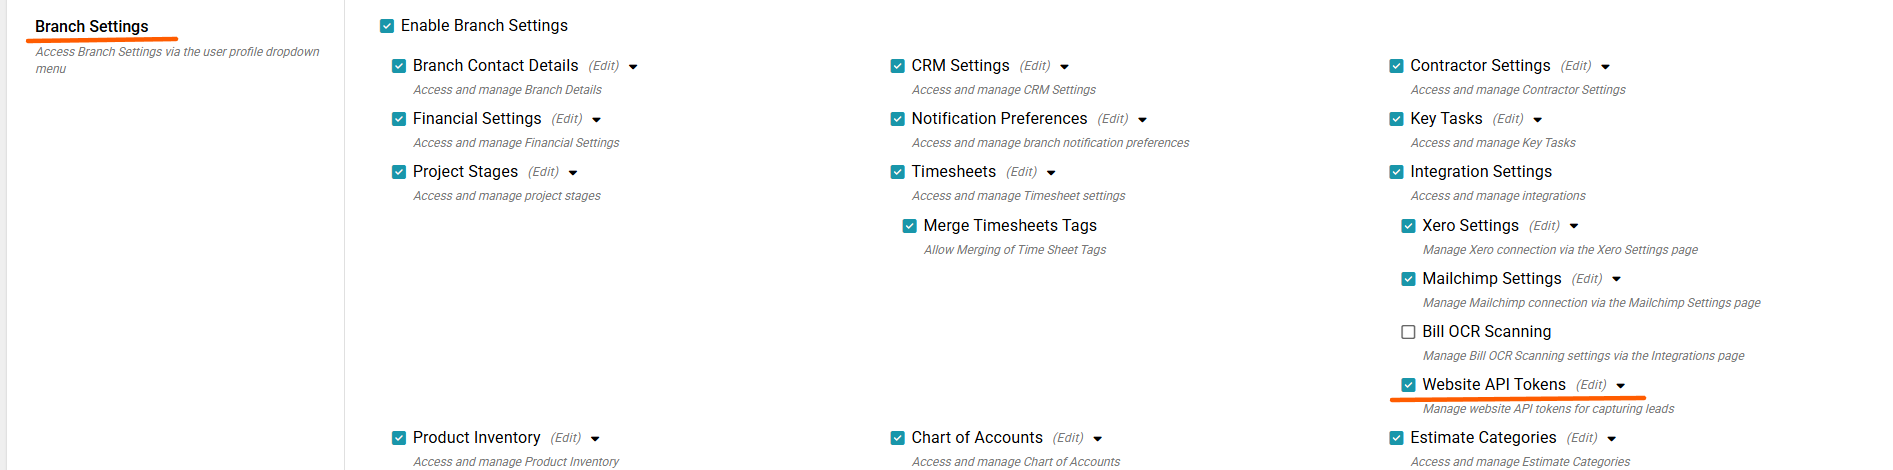
How to Enable Website Leads
Open your Branch Settings.
Navigate to Integrations then Website Leads
Click Manage
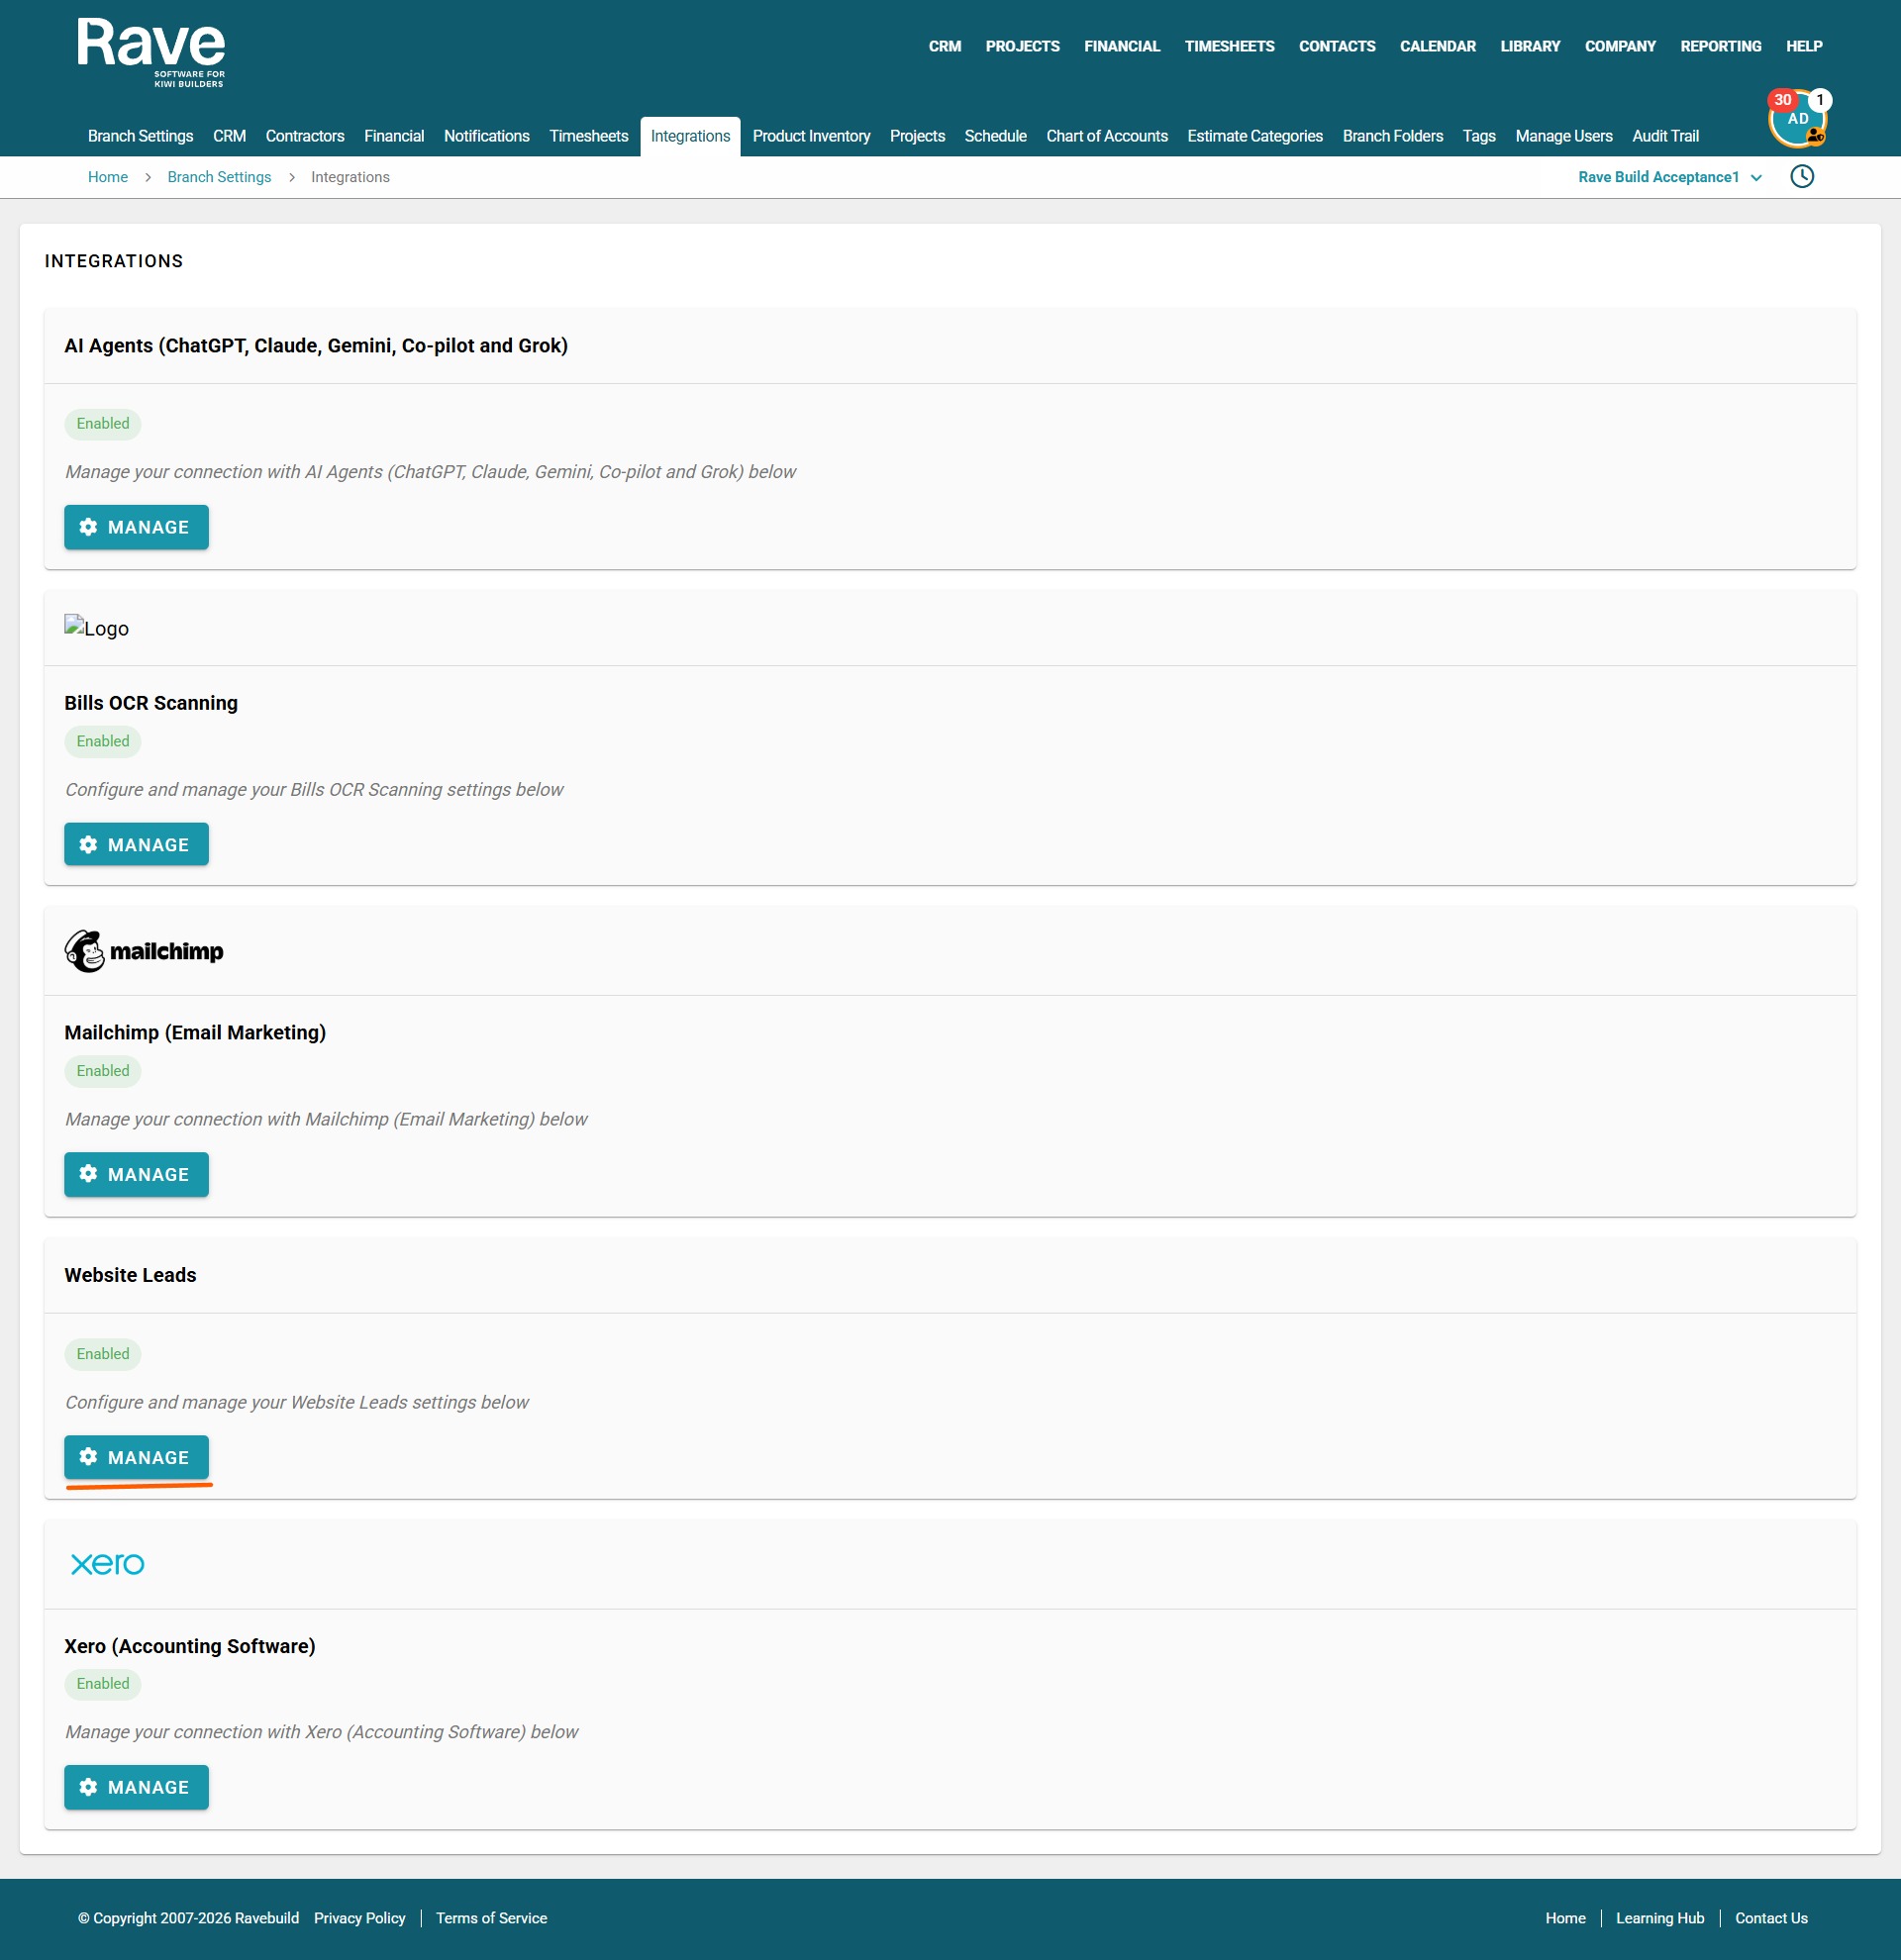
The Website Leads area contains two tabs:
- General – configure your Website Leads settings.
- Sources – connect your website to Rave using the API or Embed Form.
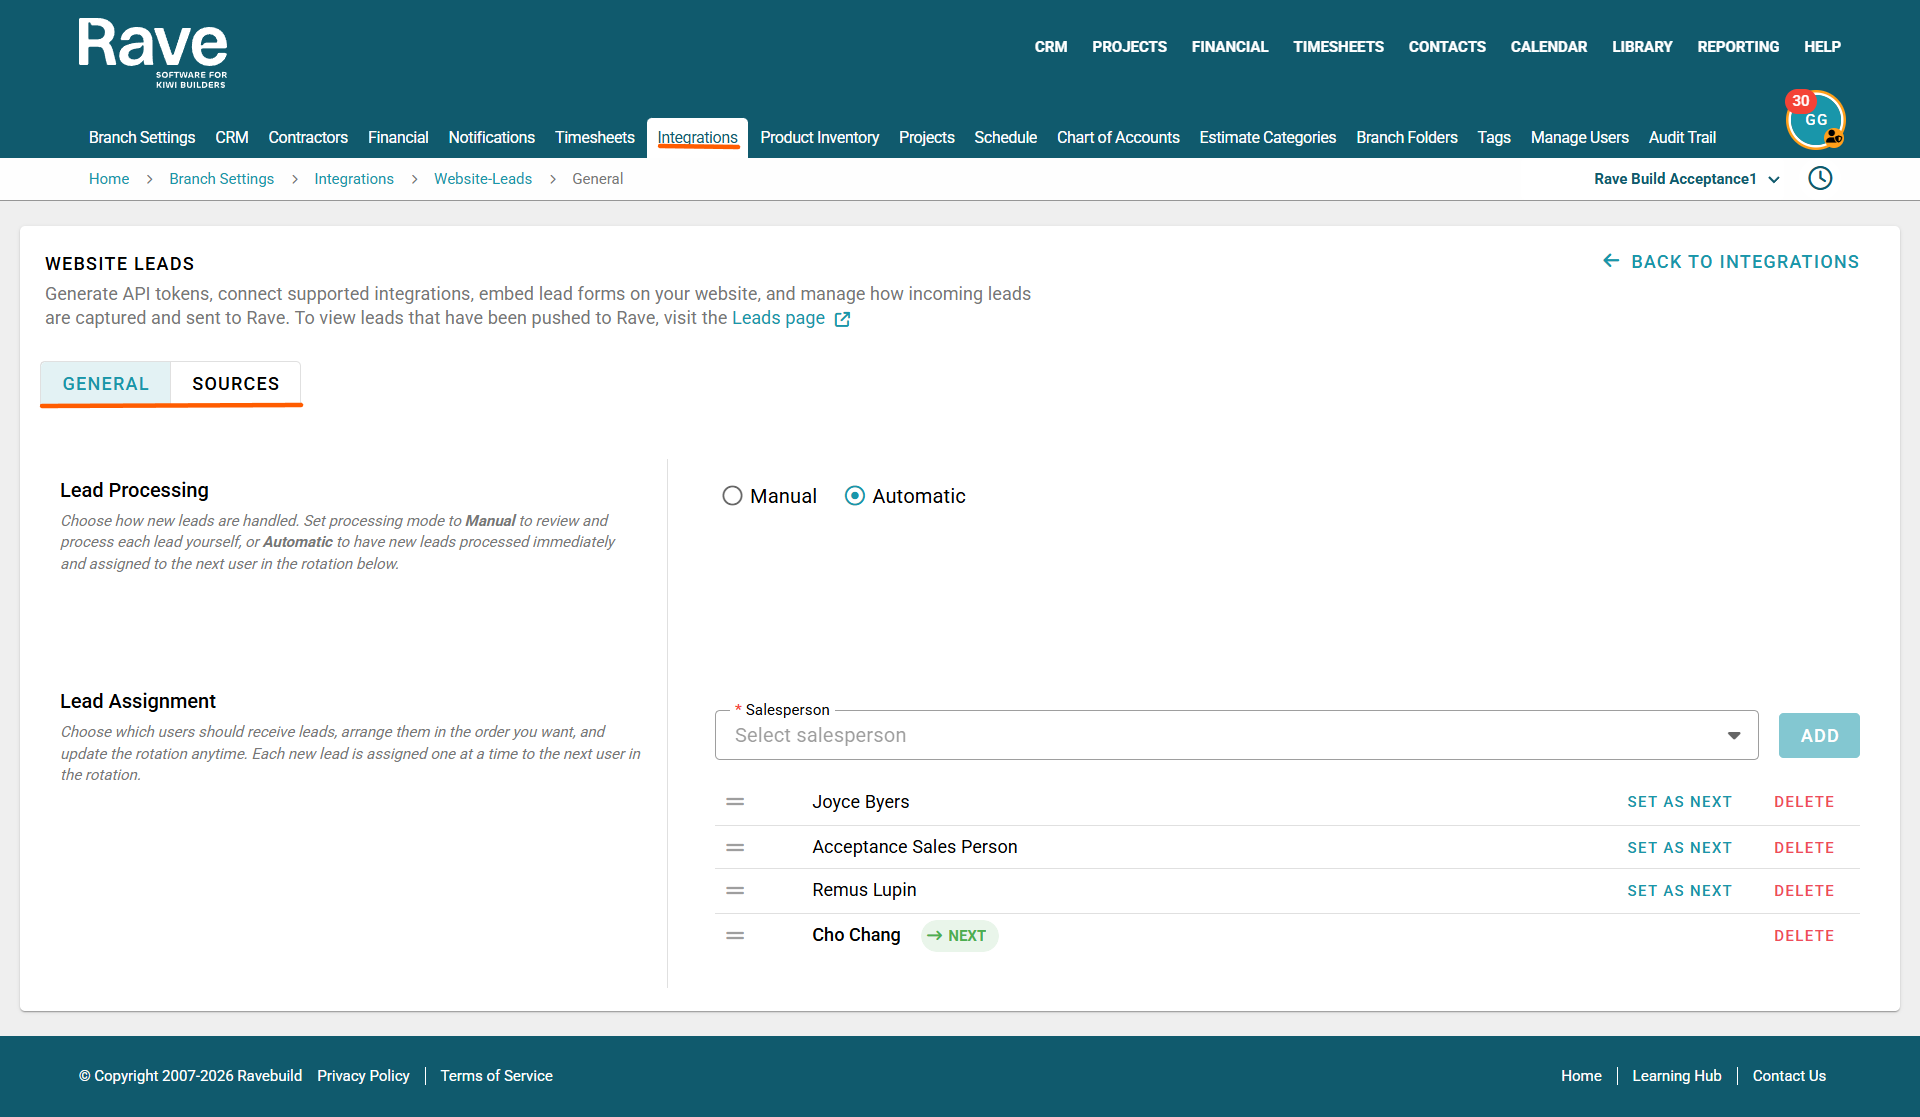
Open the General tab to configure how new website leads are handled after they arrive in Rave.
Lead Processing
Choose how you want new leads to be processed:
- Manual – new leads are held for review so your team can check and process each lead themselves.
- Automatic – new leads are processed immediately and assigned to the next salesperson in the rotation.
Select the option that best suits your sales process.
Lead Assignment
The Lead Assignment section controls which salespeople receive automatically assigned website leads.
To set up the assignment rotation:
- Select a Salesperson from the dropdown.
- Click Add.
- Repeat this for each salesperson you want included in the rotation.
- Arrange the salespeople in the order you want leads to be assigned.
Each new lead is assigned one at a time to the next salesperson in the rotation.
The salesperson marked Next will receive the next automatically assigned lead.
You can select Set as Next beside another salesperson if you need to change who receives the next lead.
Select Delete to remove a salesperson from the website lead assignment rotation.
How to Set Up Meta Leads in Rave
Rave’s Meta Lead Ads integration allows leads submitted through your Facebook and Instagram Lead Ads forms to flow directly into Rave.
Once connected, you can choose which Meta pages and forms to sync, map your lead form fields to Rave, and control which forms actively capture leads.
Before you begin setting up the integration, make sure you have:
- Access to the relevant Facebook/Meta account
- Permission to manage the Meta pages you want to connect
- Access to Branch Settings > Integrations in Rave
- At least one Meta Lead Ad form created
From the Branch Settings / Integrations / Website Leads / Sources page
Select Sources > Meta
If Meta has not yet been connected, the integration will show as Disconnected.
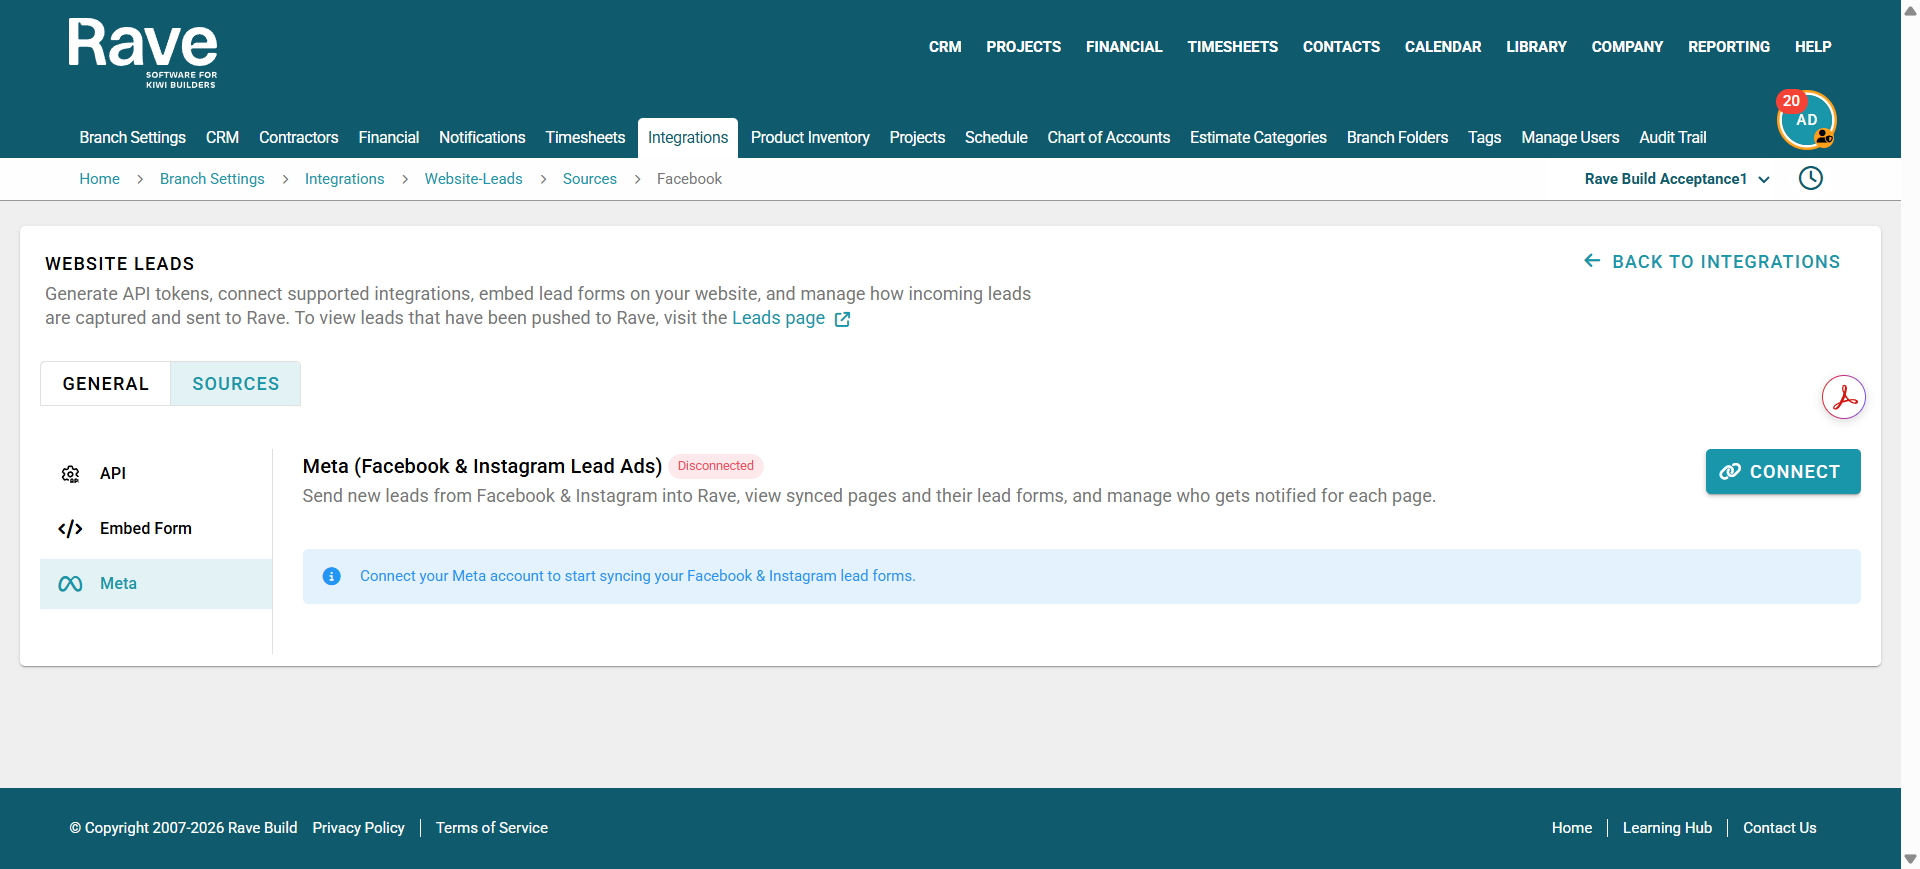
Select Connect to connect your Meta account
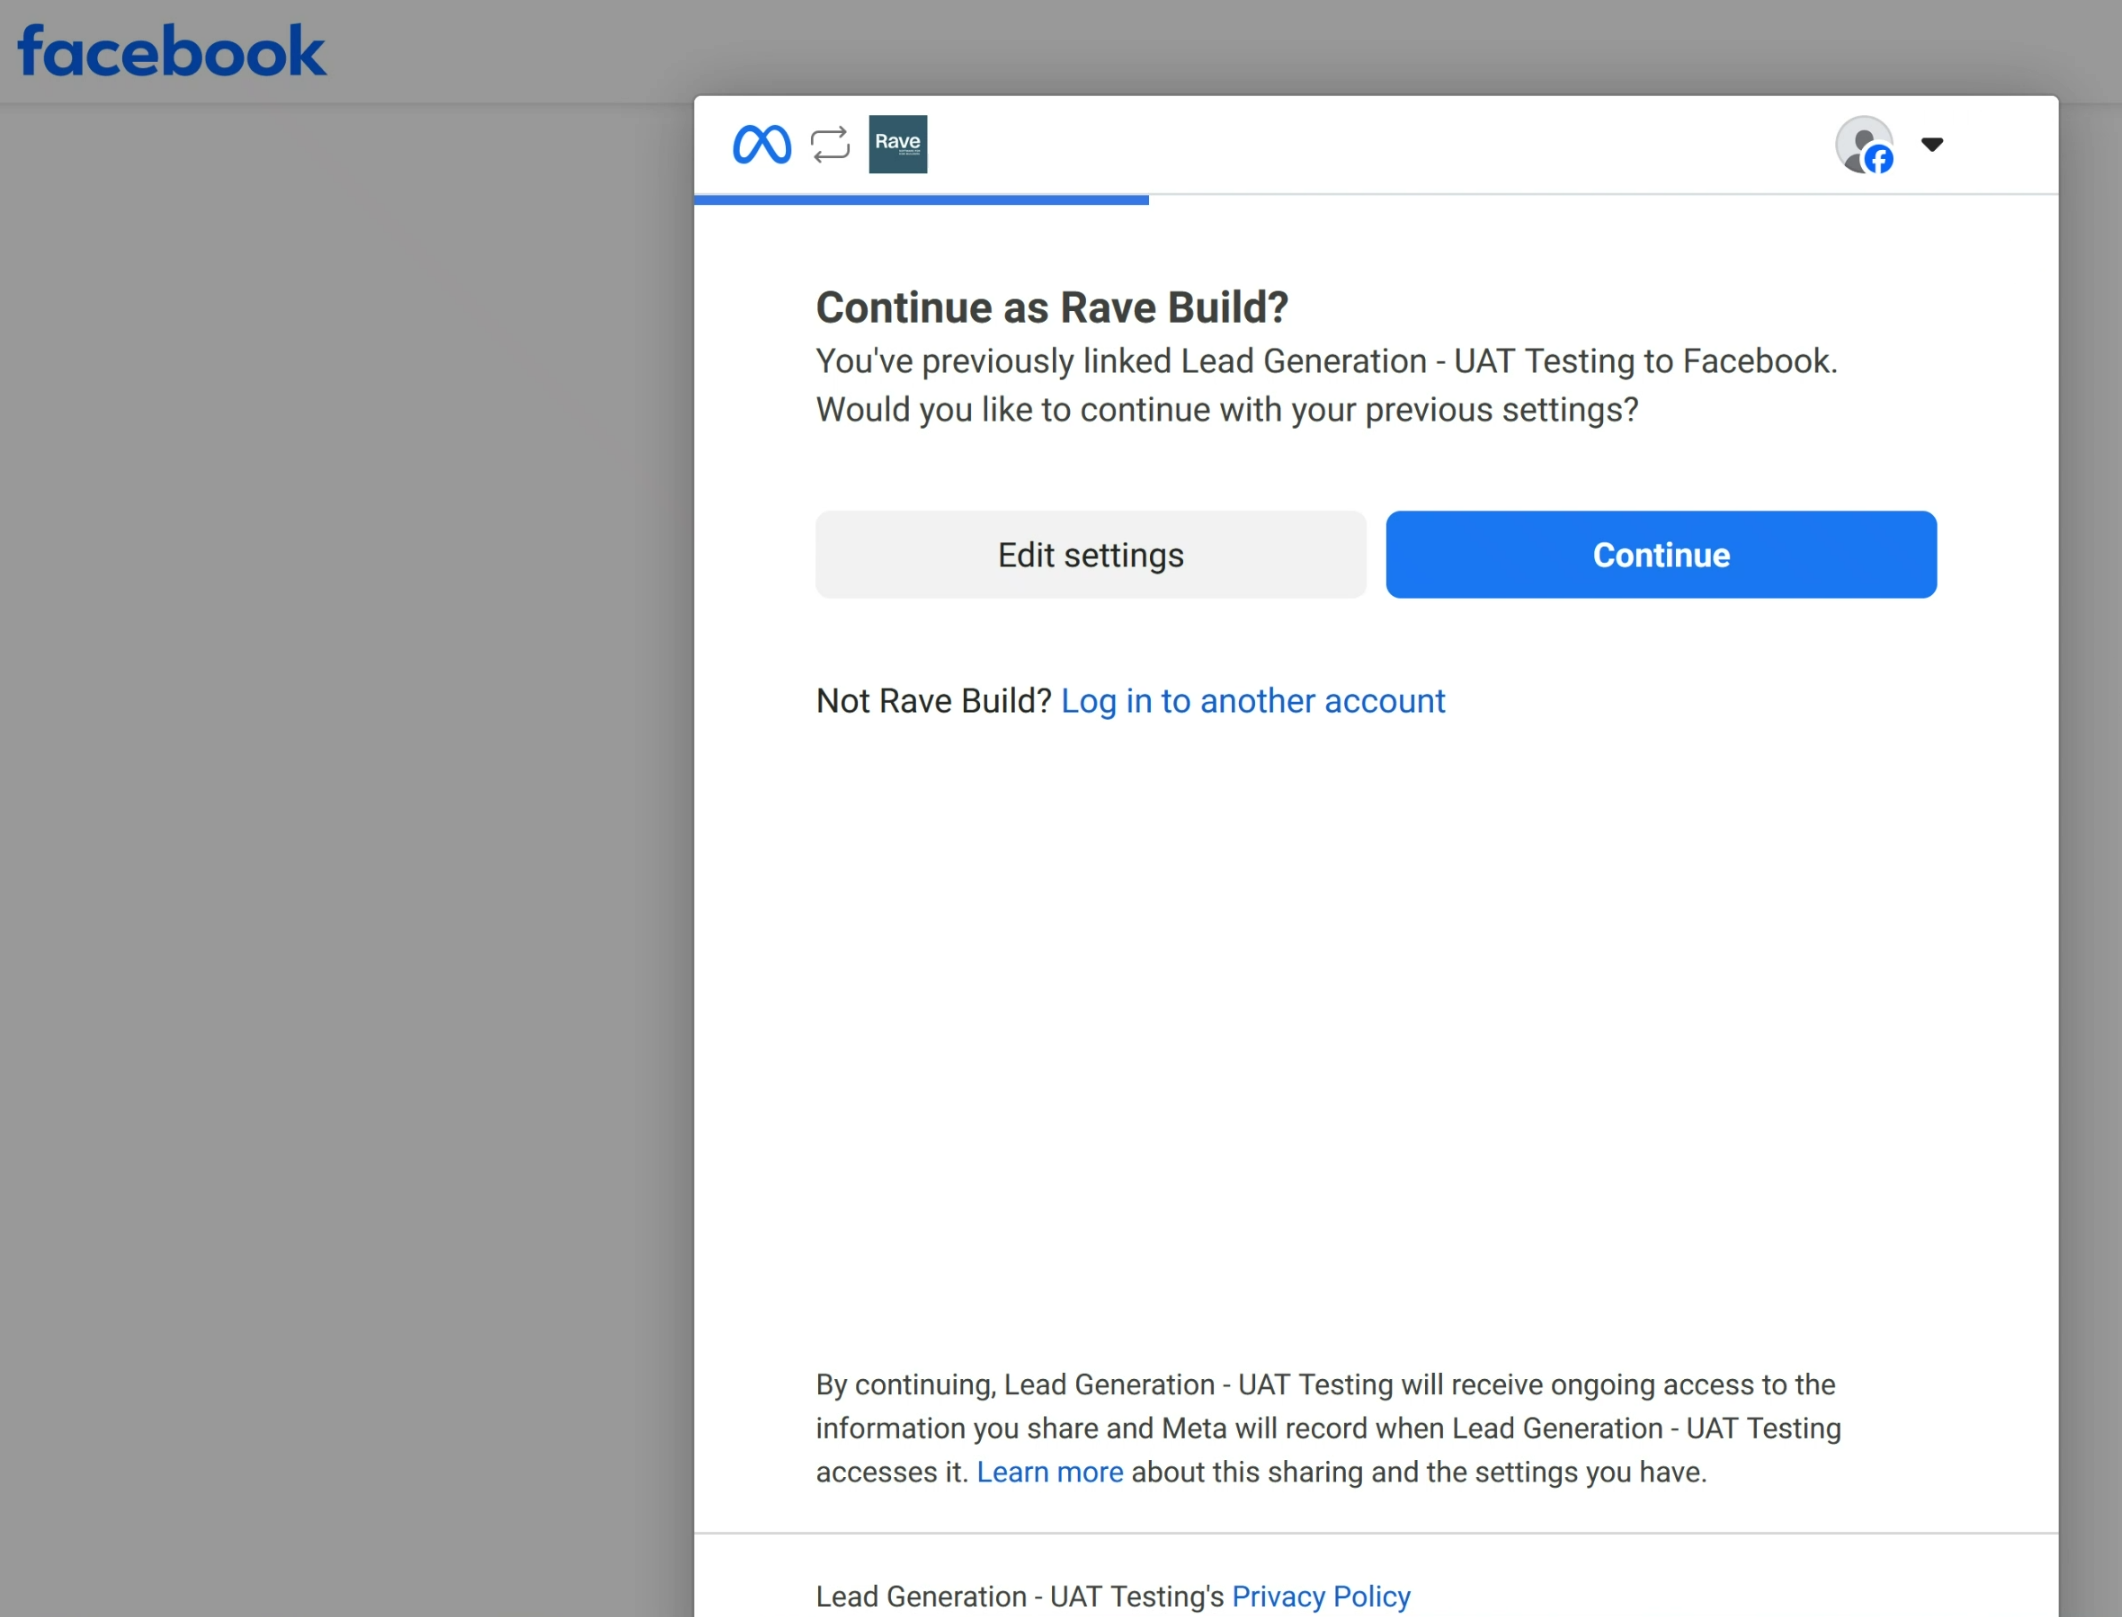
A Facebook/Meta window will open.
If the correct Facebook account is already displayed, select Continue.
If required, you can also select:
- Edit settings to review or change the permissions being provided to Rave
- Log in to another account if you need to connect a different Meta account
Follow the Meta prompts to complete the connection.
Important: Make sure the Meta account you connect has access to the Facebook pages and Lead Ad forms you want to use with Rave.
Check your connected pages. Once the connection is complete, you'll be redirected back to Rave.
The Meta integration will now show as Connected.
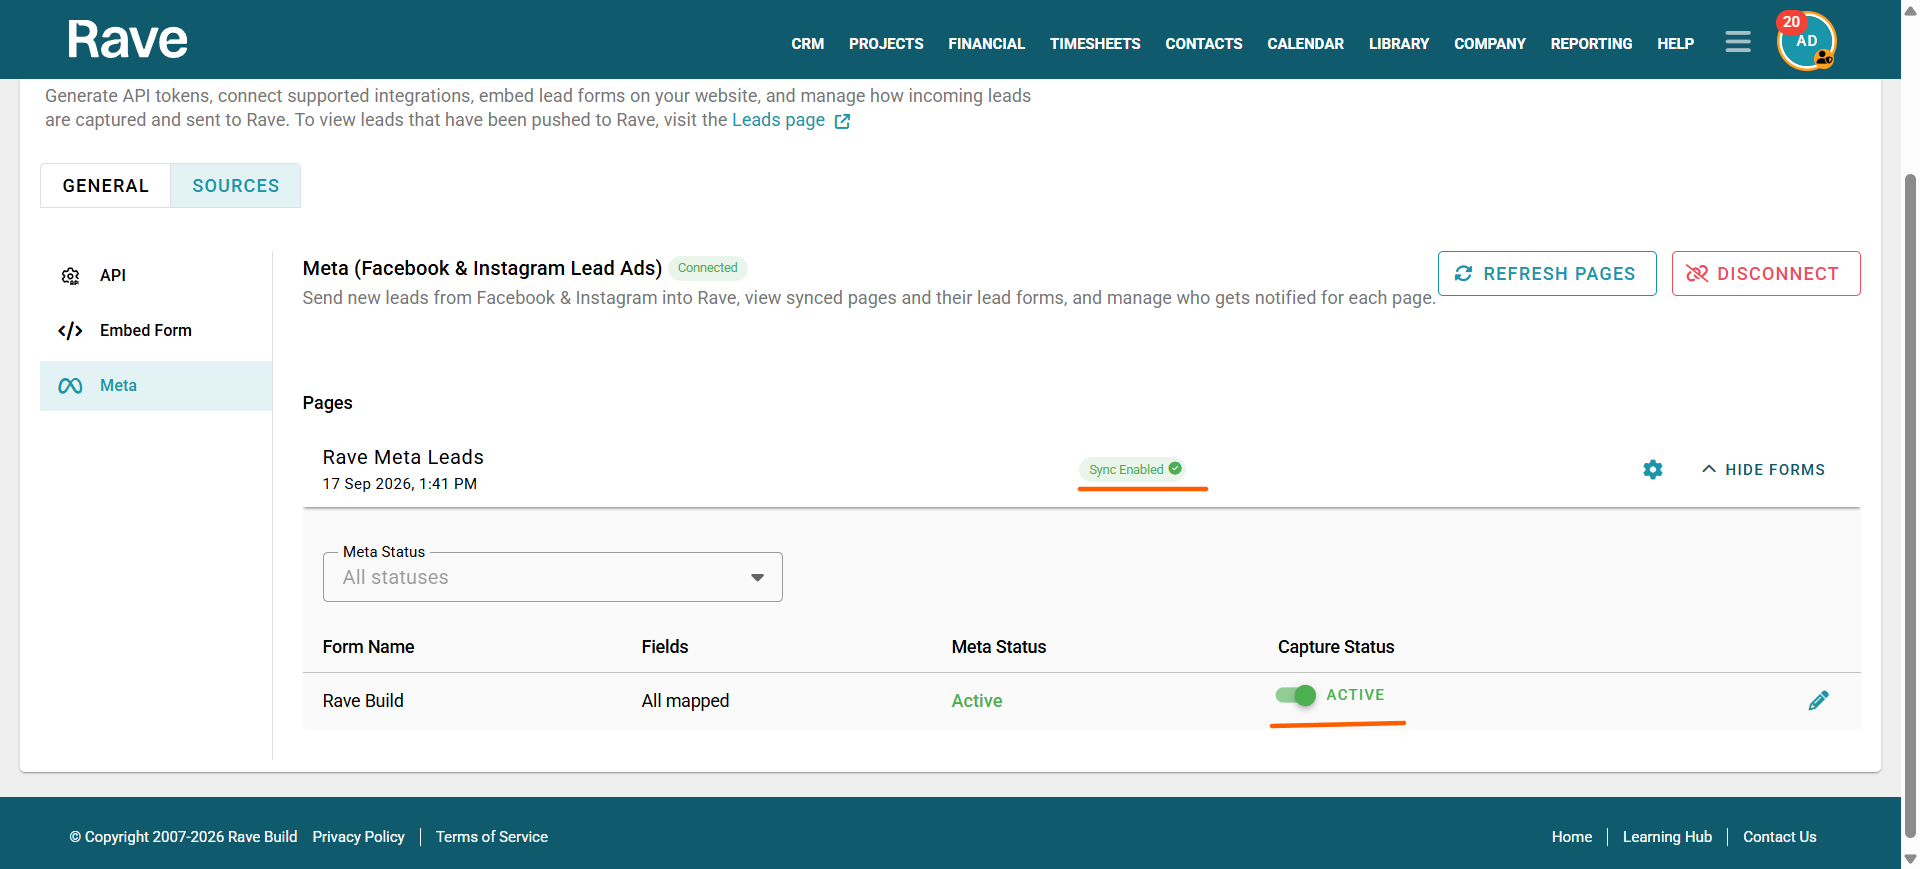
Under Pages, you will see the Facebook pages available through your connected Meta account.
Each page will also show whether Sync Enabled is active.
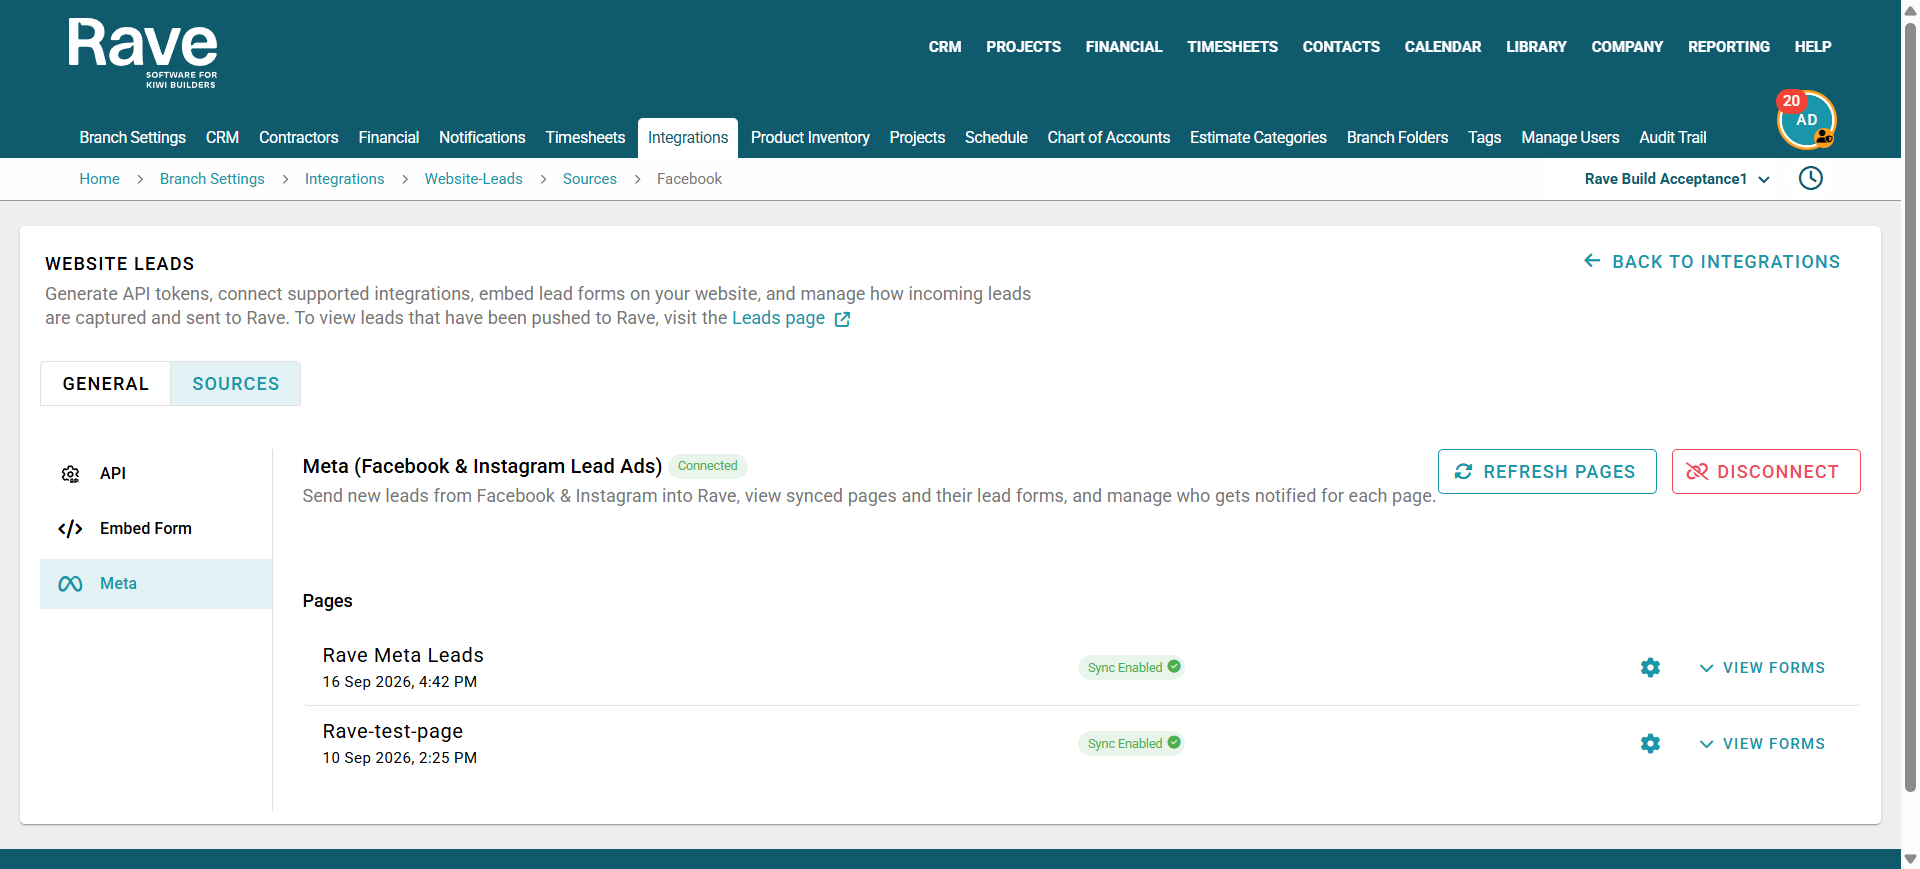
If a page you expect to see is missing, select Refresh Pages. This will refresh the page information being received from Meta.
View the Meta Lead Forms
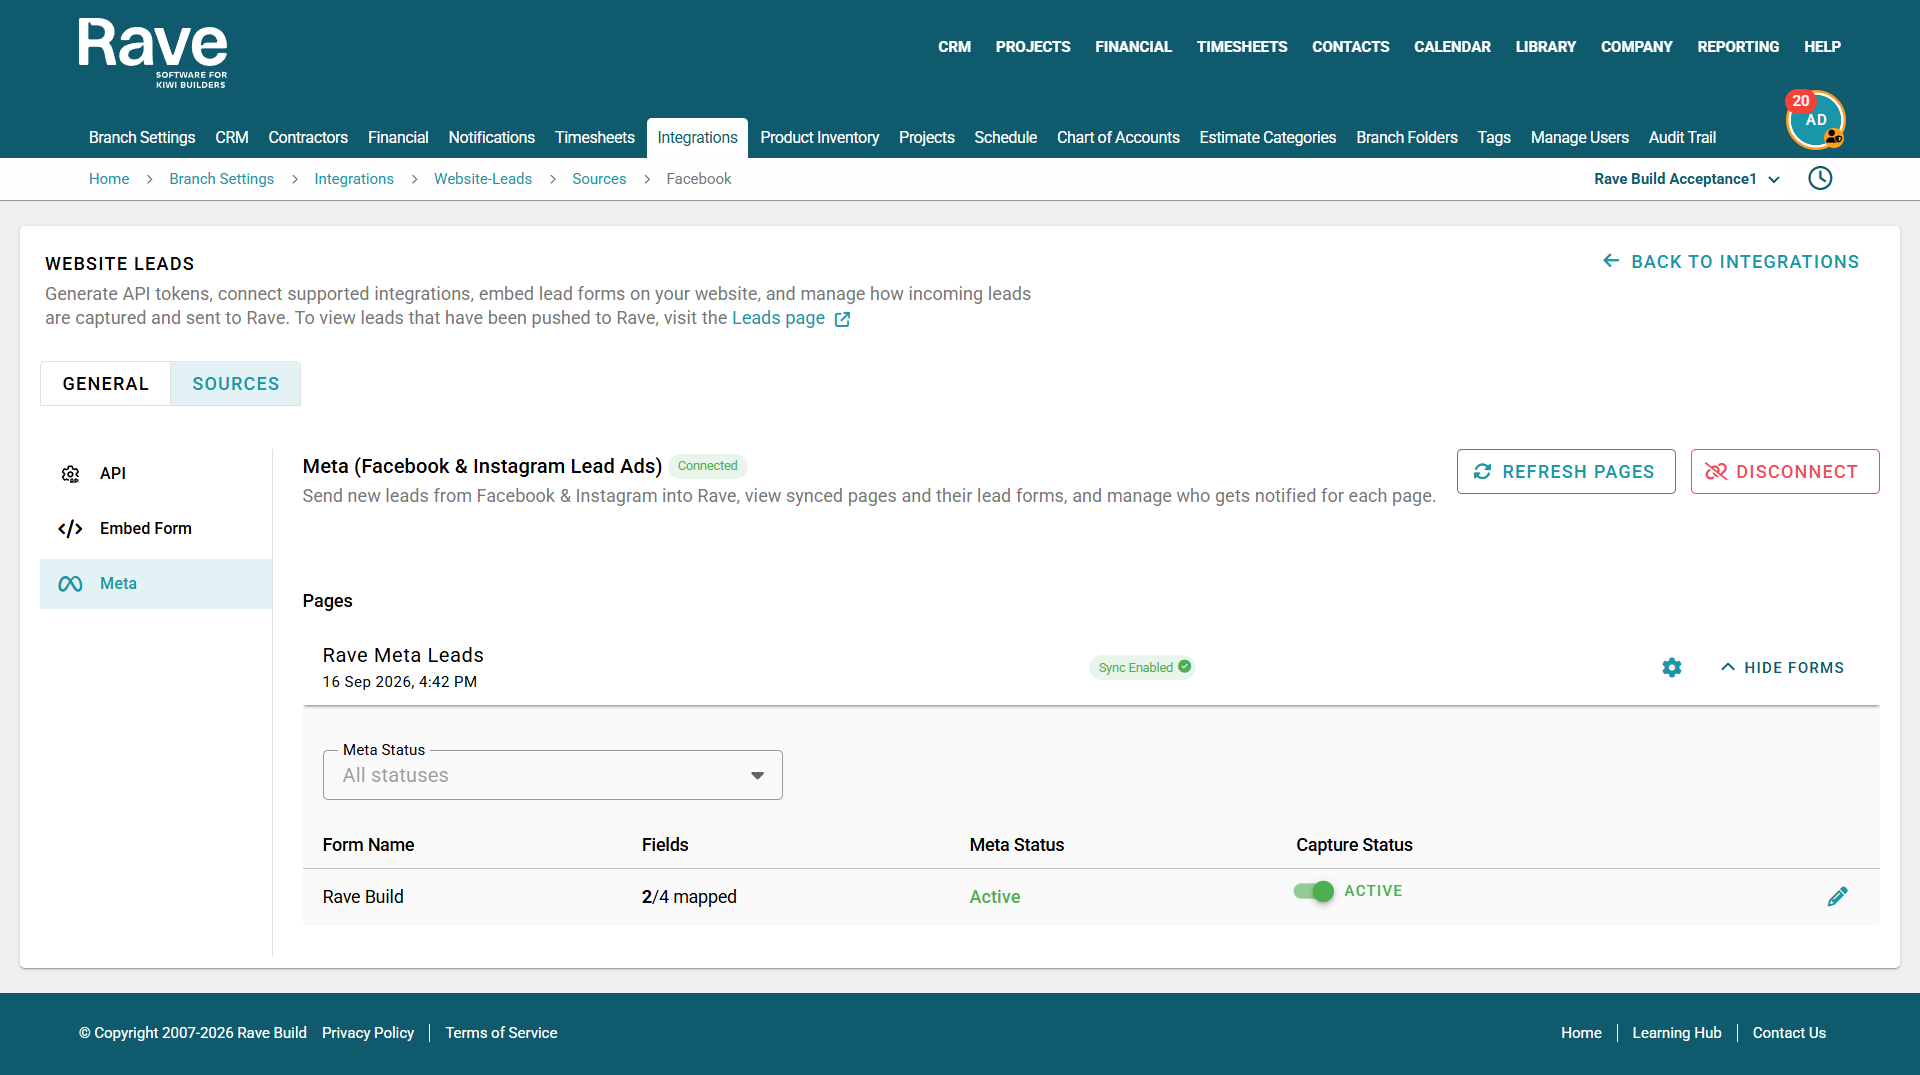
Find the page you want to configure and select View Forms.
This will expand the page and display the Lead Ad forms associated with it.
For each form, Rave displays:
- Form Name – the name of the Meta Lead Ad form
- Fields – how many fields have been mapped to Rave
- Meta Status – whether the form is active in Meta
- Capture Status – whether Rave is currently capturing leads from that form
Map your Lead Form fields
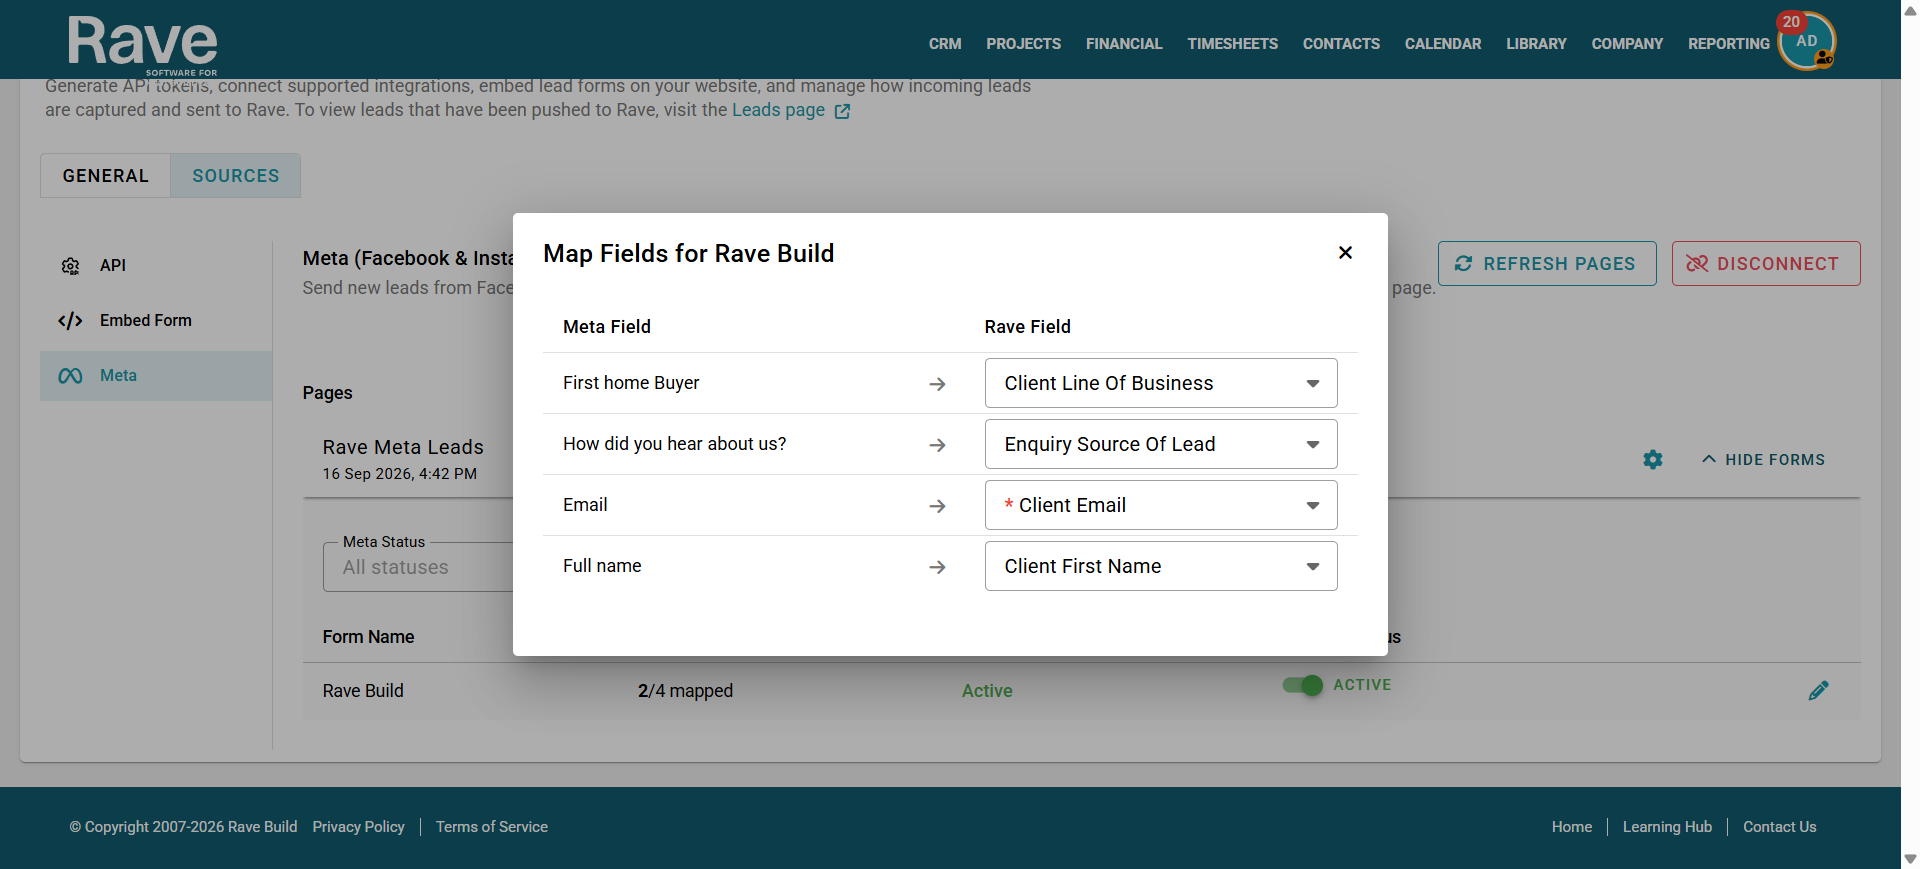
Select the pencil icon beside the form you want to configure.
Map the fields from your Meta Lead Ad form to the corresponding fields in Rave.
The Fields column shows how many fields have been mapped.
For example: 2/4 mapped means that 2 of the 4 fields available on the Meta form have been mapped to Rave.
Tip: Review the field mapping before turning lead capture on to make sure important information such as name, email and phone number is being sent to the correct Rave fields.
Sending Meta leads to different branches
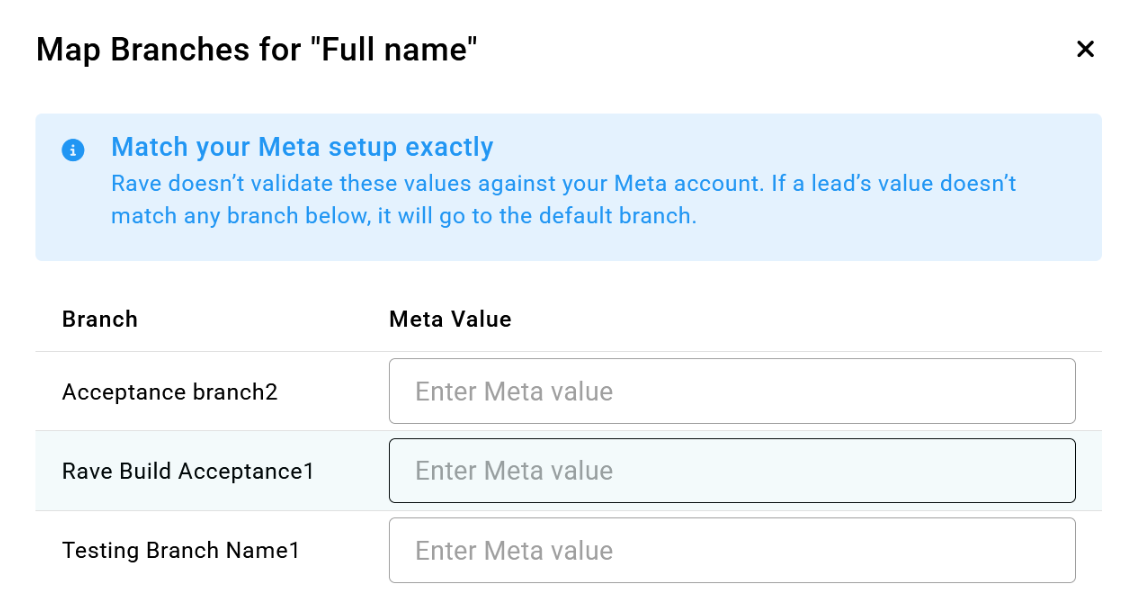
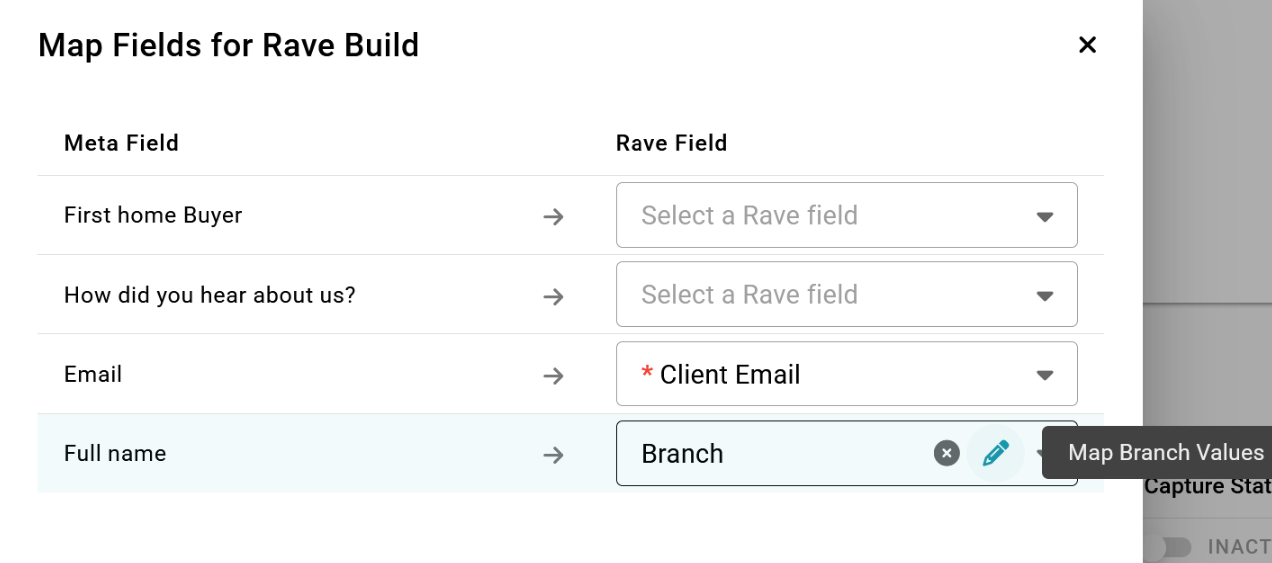
1. Add a question to your Facebook lead form that asks which branch or location the enquiry is for.
2. In Rave, map that question to the Branch field.
3. For each branch, type the answer that should send leads there (for example "Auckland"). Capitals don't matter.
4. A lead whose answer matches one of those values goes to that branch.
5. If the answer is blank or matches nothing, the lead goes to the branch that connected the Facebook page.
Turn on lead capture
Once the form has been configured, make sure Capture Status is set to Active.
When Capture Status is active, new leads submitted through that Meta Lead Ad form can be sent into Rave.
Page Settings
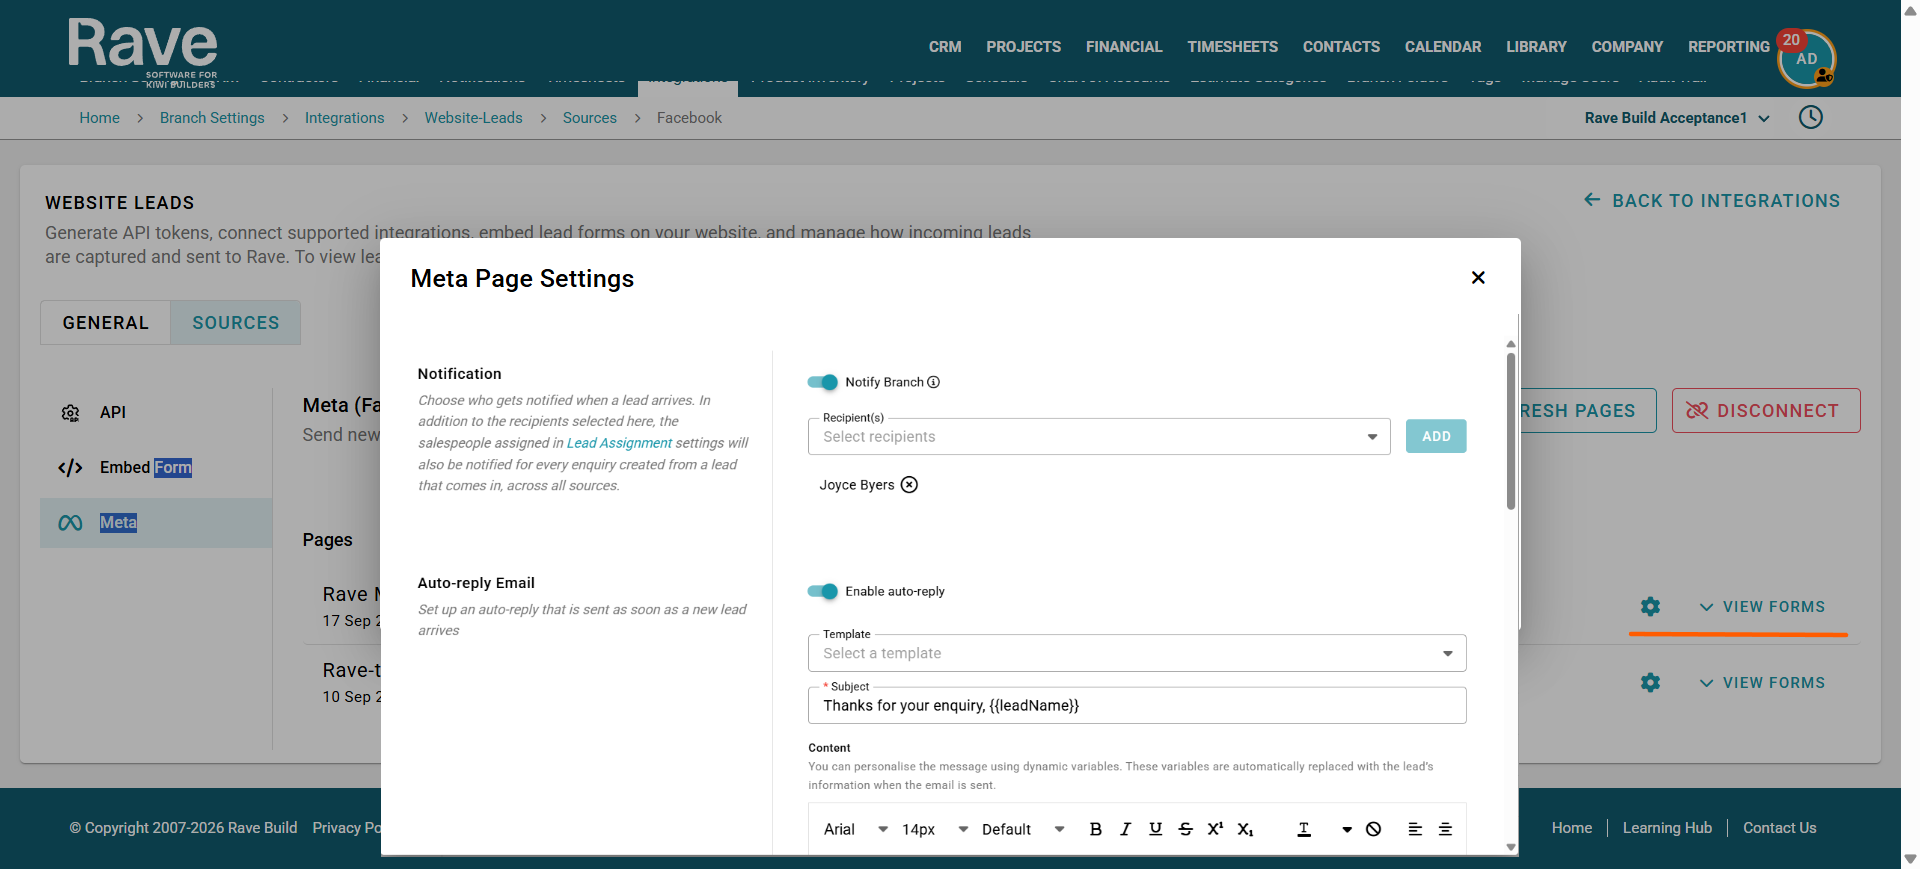
Select the Cog icon next to View forms. This will allow you to choose who gets notified in the branch of new leads before the lead assignment assigns the lead to a new salesperson.
You can also create an auto-reply email for your Meta leads with personalisation, images, hyperlinks and branch information.
Viewing your Meta leads
Once leads start coming through from Meta, you can view them in the Leads area in Rave.
From there, you can review the information received and process the lead into your CRM as required.
Refreshing Meta pages and forms
If you create a new page or Lead Ad form in Meta and it does not immediately appear in Rave, go to:
Branch Settings > Integrations > Website Leads > Sources > Meta
Then select Refresh Pages. This updates the pages and forms available from Meta.
Turning off a Meta Page Sync
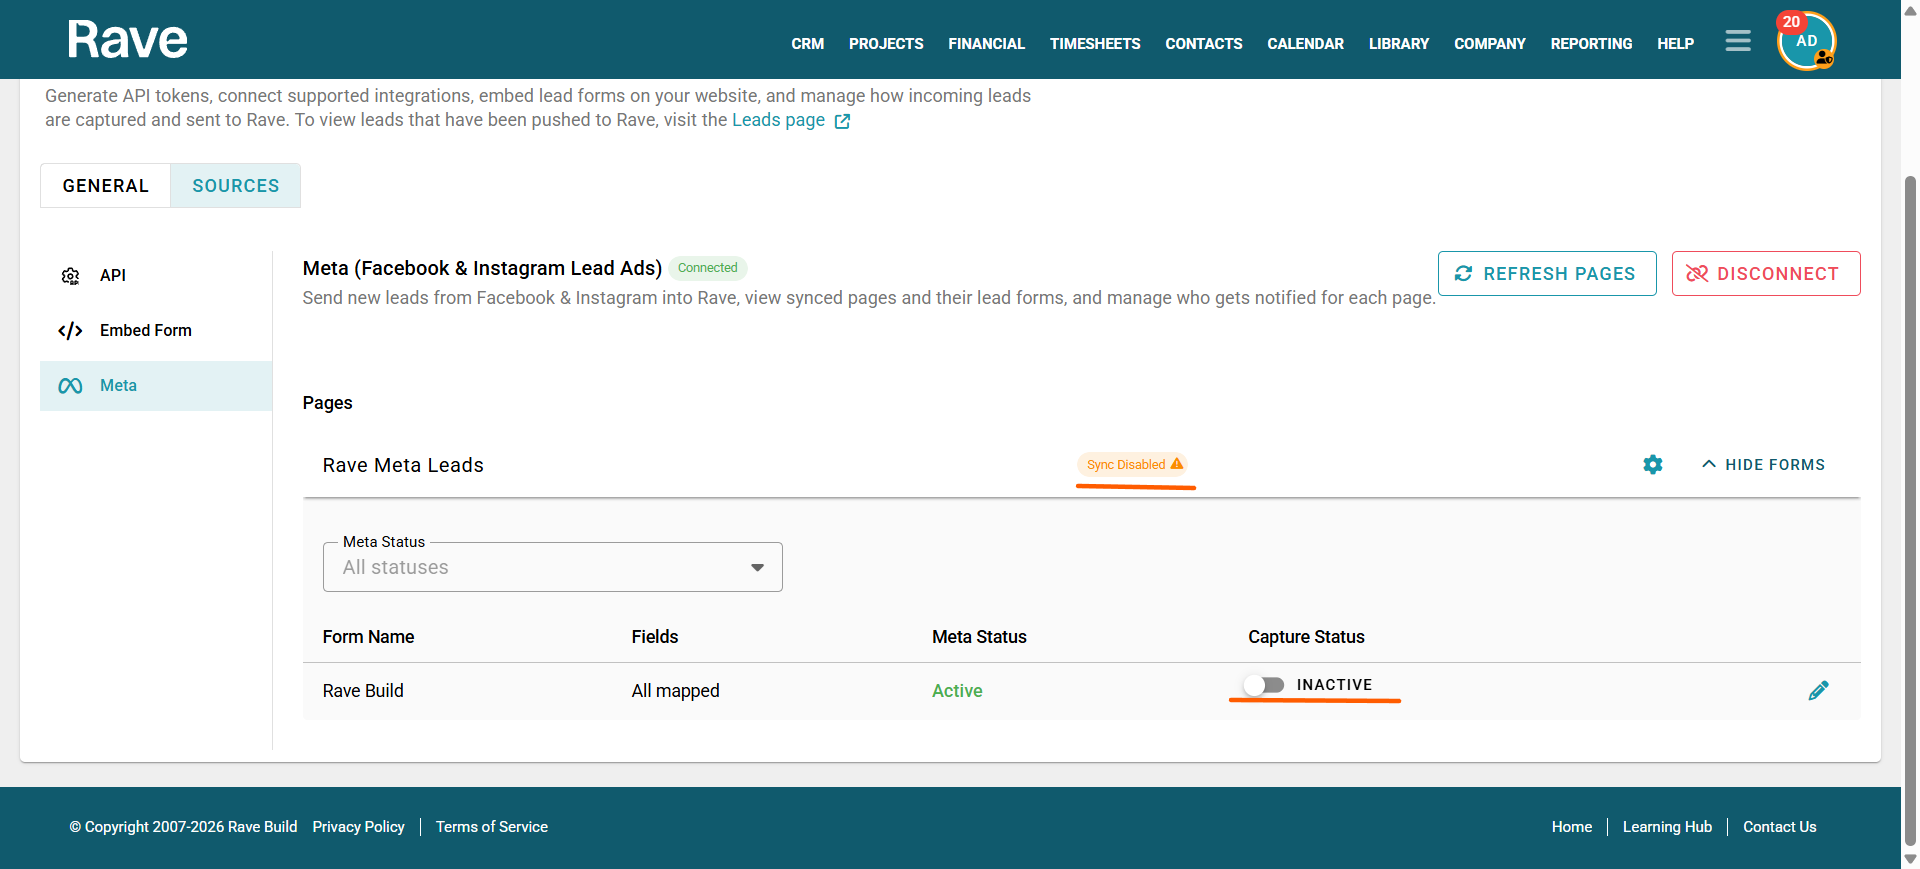
If you need to stop syncing a Meta form, slide off the Capture Status on that Page so it says inactive. The orange Sync Disabled icon will appear. To resync, slide it back on Capture Status, and the Sync Enabled icon will go green.
Disconnecting Meta
If you need to remove the connection, Select Disconnect.
Once disconnected, Rave will stop receiving new leads through the Meta integration.
Note: Disconnecting Meta does not delete leads that have already been received or processed in Rave.
Troubleshooting
If a page or form is not appearing:
- Confirm the Meta account you connected has access to the required Facebook page.
- Check that the Lead Ad form has been published in Meta.
- Select Refresh Pages in Rave.
- Check that Sync Enabled is showing against the relevant page.
- Check that Capture Status is set to Active for the form.
- Review the field mapping to make sure the required Meta fields have been mapped to Rave.
If the issue continues, contact Rave Support for assistance.
Was this article helpful?
That’s Great!
Thank you for your feedback
Sorry! We couldn't be helpful
Thank you for your feedback
Feedback sent
We appreciate your effort and will try to fix the article