The following is a full training video for Rave Checklists - for step-by-step written instructions, please refer to the help article links and guide added below.
To Access the article on Adding/Editing Checklists and Todo's, click here.
To Access the article on Checklist Permissions, click here.
To Access the article on Branch Settings Checklist Status Groups, click here.
To Access the article on saving to a template and loading from a template, click here.
To Access the article on the Checklist Template menu, including CSV import, click here.
Checklist notifications allow you to control when you are notified about activity on project checklists and Todos.
You can choose to receive notifications by Email, Internal Rave notification, or both.
Checklist notifications in Rave are controlled at two levels:
- Your Profile Notification Preferences
- The Project Checklist Notification Settings
For a checklist notification to be received, the relevant notification must be enabled at both levels.
This means that even if you have checklist notifications turned on in your personal profile, you will not receive notifications for a project unless checklist notifications are also enabled for you on that specific project.
Accessing Checklist Notification Preferences at Profile Level
To manage your checklist notifications:
- Click your profile icon in the top-right corner of Rave.
- Open Notification Preferences.
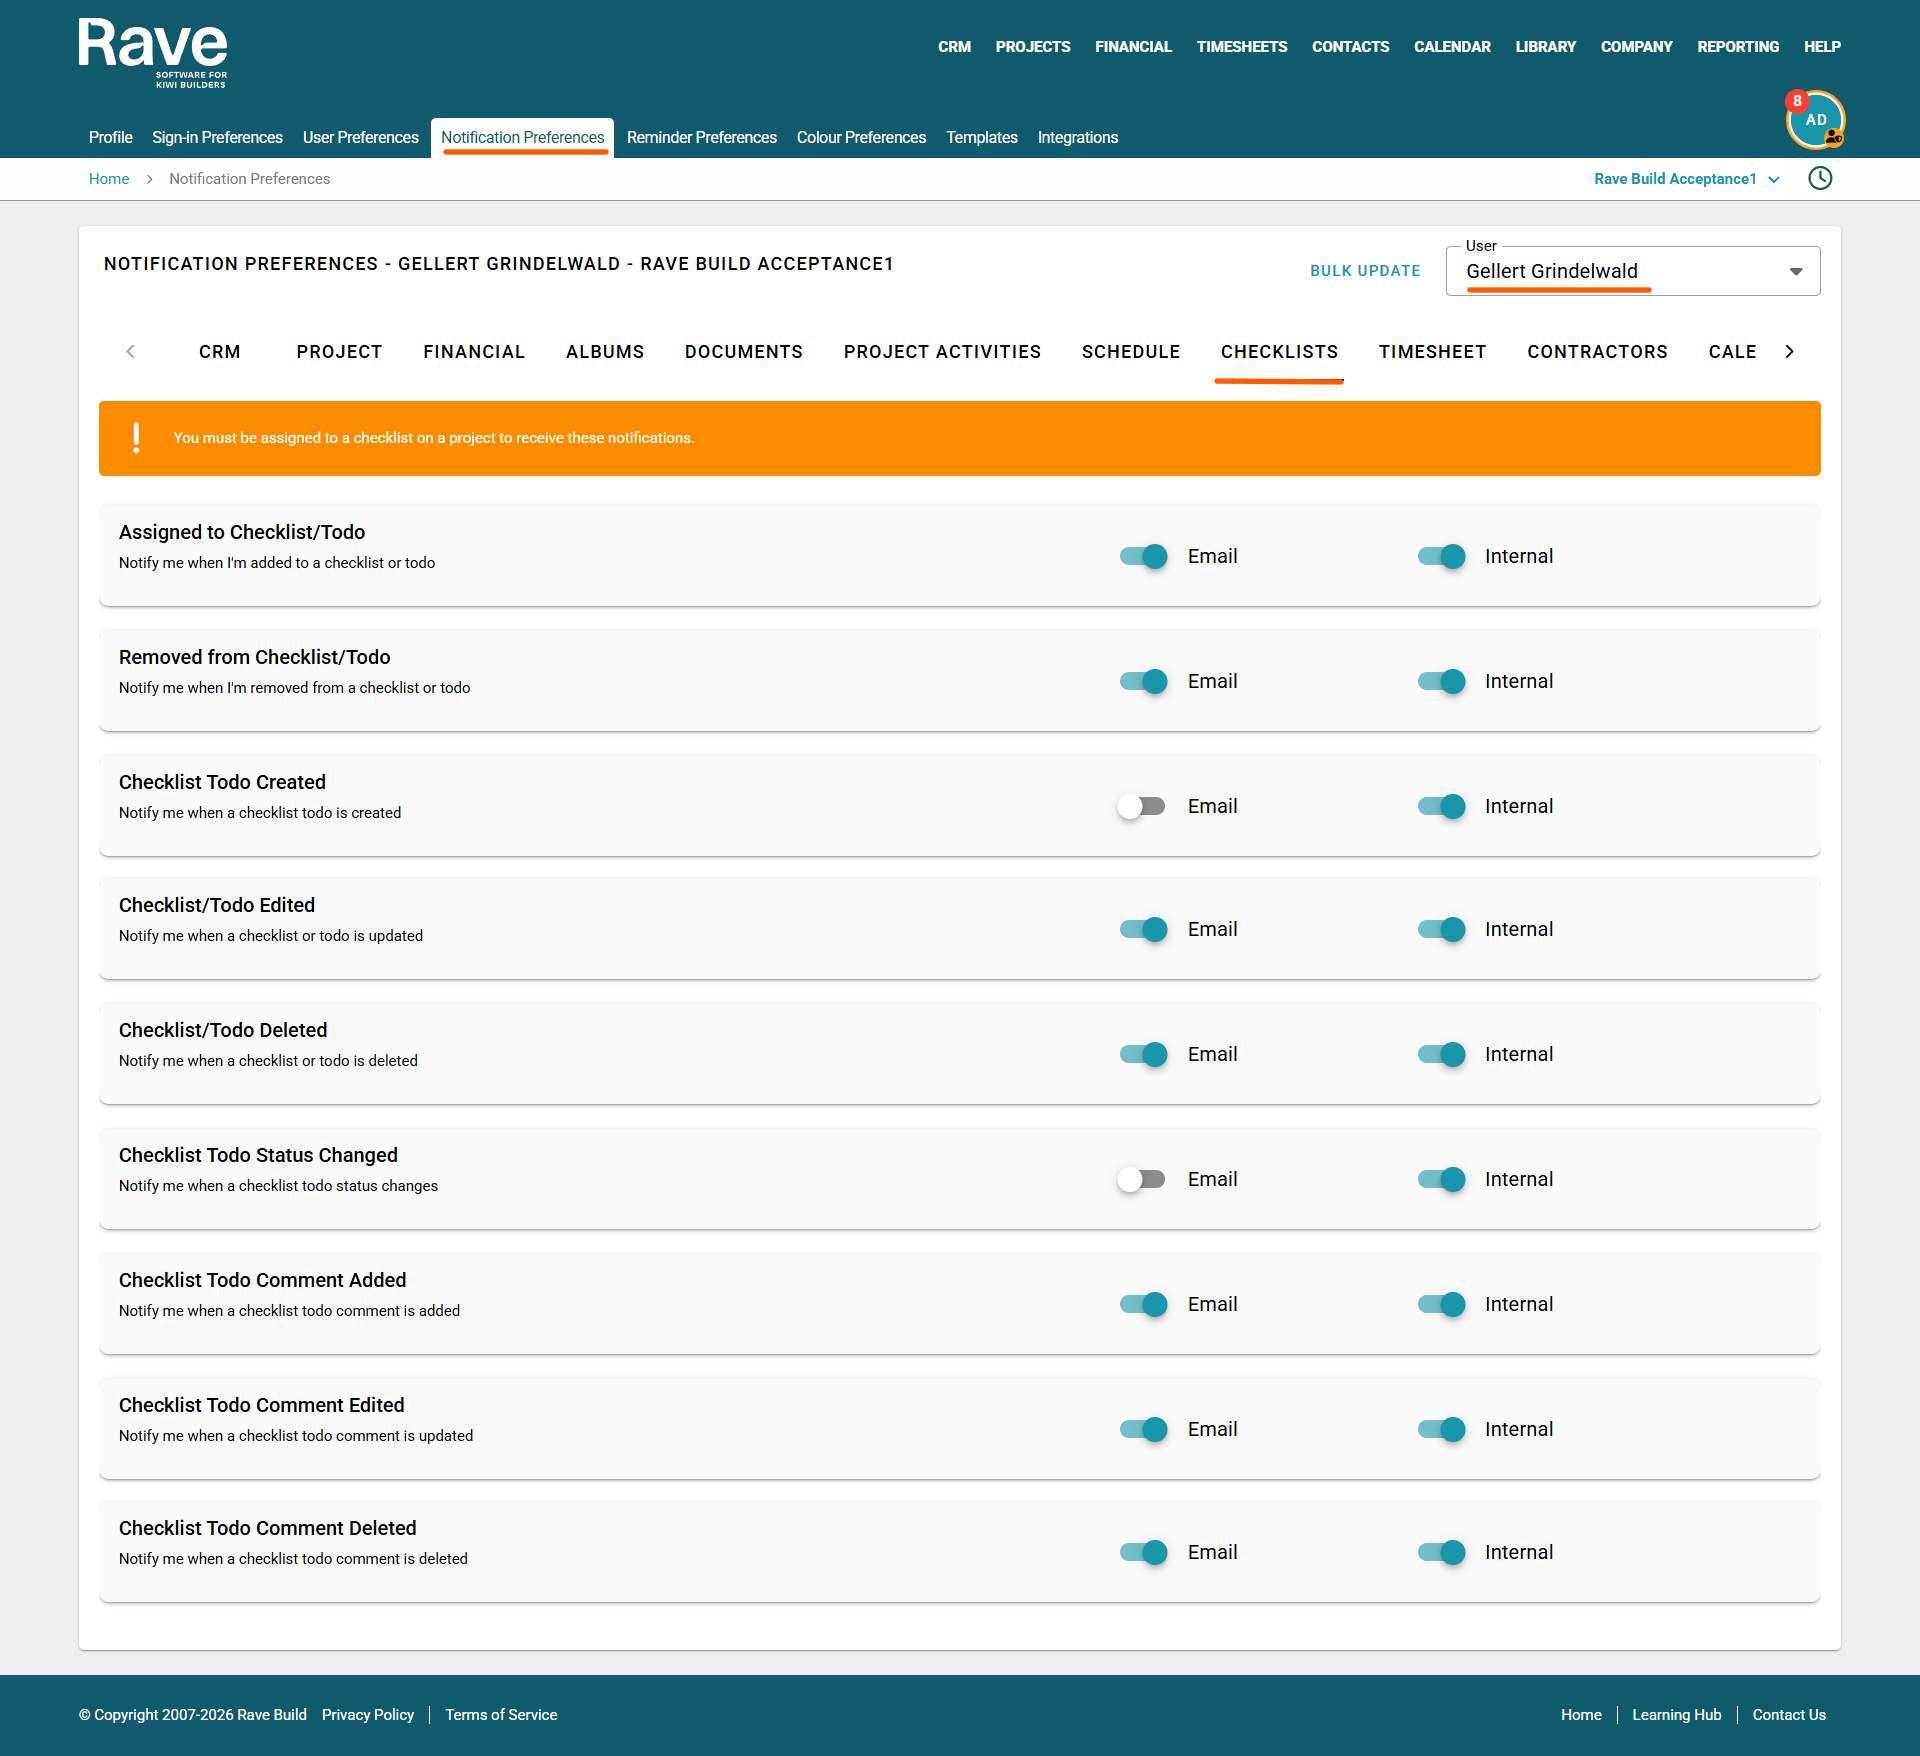
- Select the Checklists tab.
- If you have permission to manage another user's preferences, select the required user from the User dropdown.
Important: You must be assigned to a checklist or Todo on a project to receive checklist notifications.
Available Checklist Notifications
You can individually control the following notifications:
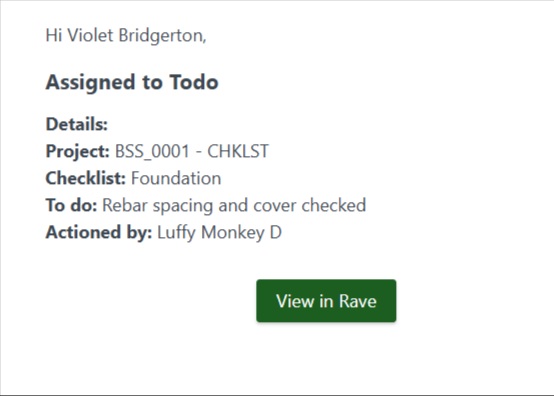
- Assigned to Checklist/ToDo – Notifies you when you are added to a checklist or ToDo.
- Removed from Checklist/ToDo – Notifies you when you are removed from a checklist or ToDo.
- Checklist ToDo Created – Notifies you when a checklist ToDo is created.
- Checklist/ToDo Edited – Notifies you when a checklist or ToDo is updated.
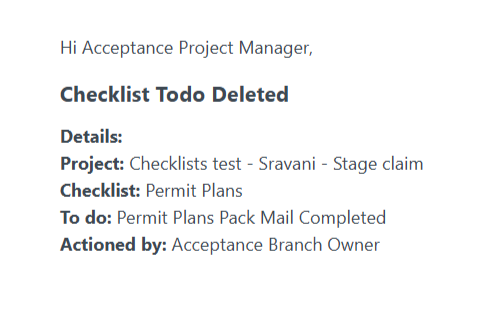
- Checklist/ToDo Deleted – Notifies you when a checklist or ToDo is deleted.
- Checklist ToDo Status Changed – Notifies you when the status of a checklist ToDo changes.
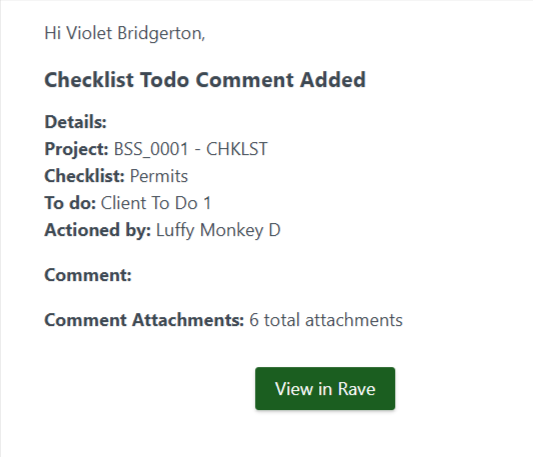
- Checklist ToDo Comment Added – Notifies you when a comment is added to a checklist ToDo.
- Checklist ToDo Comment Edited – Notifies you when a checklist ToDo comment is updated.
- Checklist ToDo Comment Deleted – Notifies you when a checklist ToDo comment is deleted.
Choosing How You Are Notified
Each notification has two options:
Email sends the notification to the email address associated with your Rave user account.
Internal displays the notification within Rave.
Use the sliders beside each option to turn the notification on or off. You can enable both options if you would like to receive the same notification by email and within Rave.
Updating Multiple Users
If you have the appropriate permissions, the Bulk Update option at the top of the Notification Preferences page can be used to update notification settings across multiple users.
Your notification preferences can be changed at any time, allowing you to choose which checklist activity you need to stay informed about while reducing notifications that are not relevant to you.
Bulk Updating User Profile Checklist Notifications
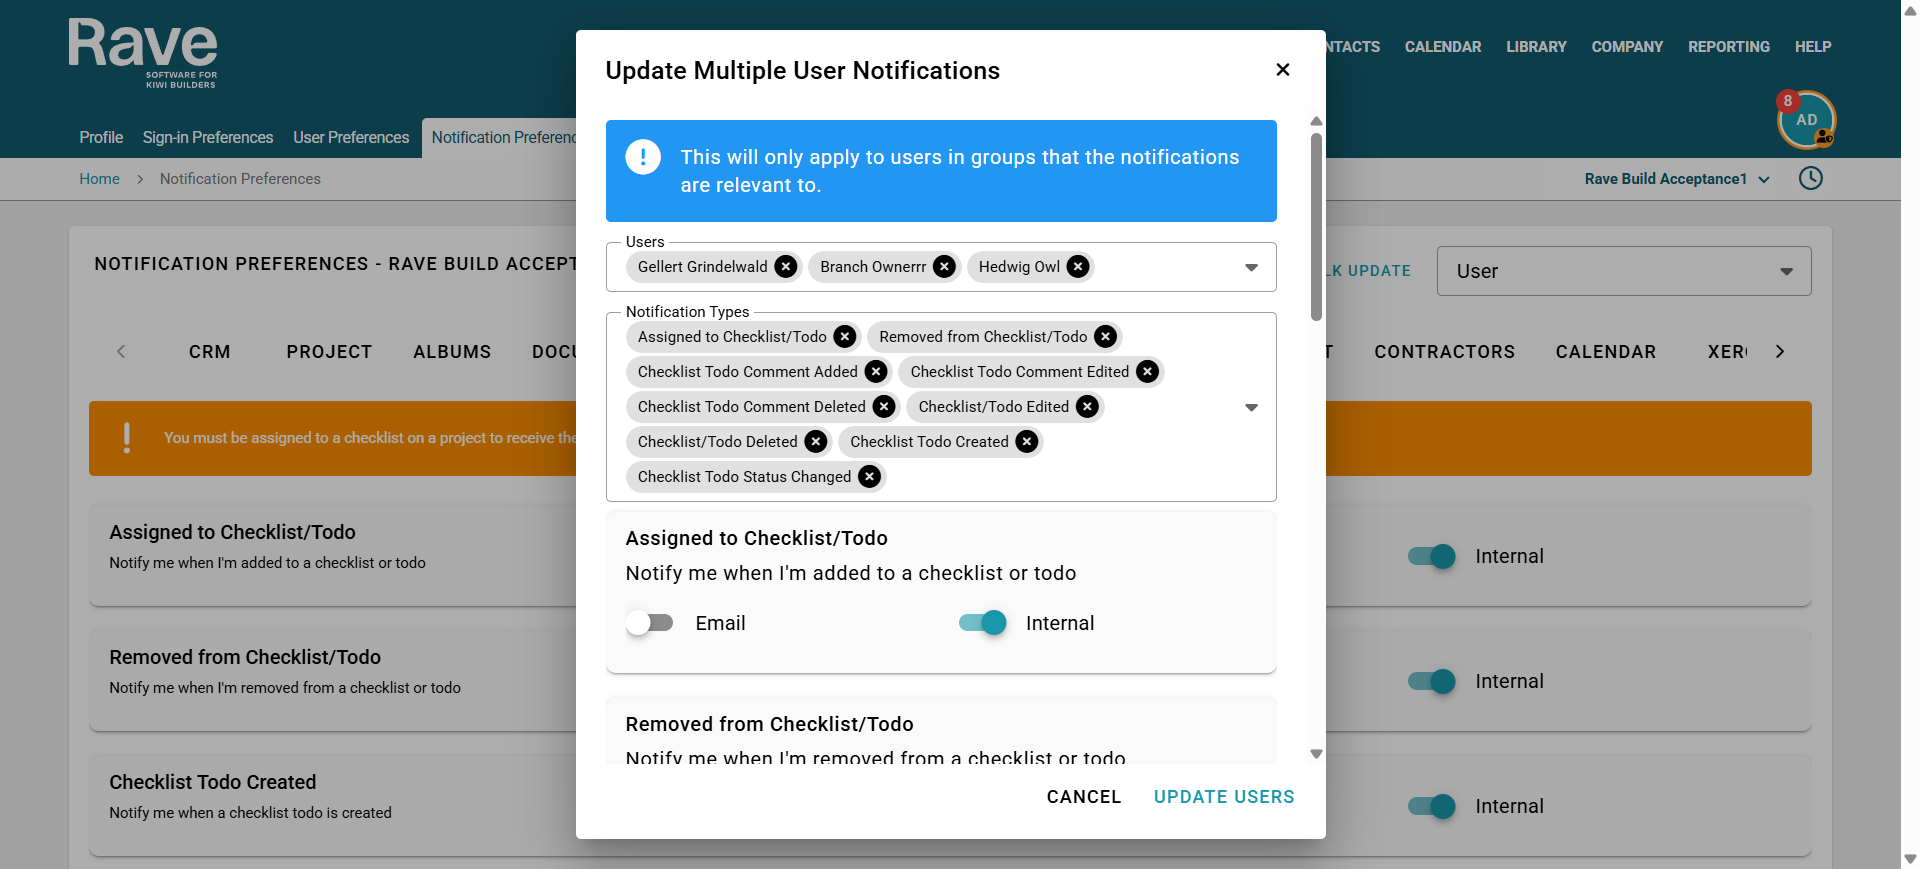
If you need to update Checklist notification preferences for multiple users at once, you can use the Bulk Update option from Notification Preferences.
This is useful when you want several users to receive the same Checklist notifications without updating each profile individually.
How to Bulk Update Checklist Notifications
Go to:
Profile → Notification Preferences → Checklist
Then click Bulk Update.
1. Select the users
From the Users dropdown, select the users whose Checklist notification preferences you want to update.
You can select multiple users at once.
Note: Notification settings will only be applied to users in groups where the selected notification type is relevant.
2. Select the notification types
Choose one or more Checklist notification types you want to update.
These may include:
- Assigned to Checklist/Todo – when the user is added to a Checklist or Todo
- Removed from Checklist/Todo – when the user is removed from a Checklist or Todo
- Checklist Todo Created
- Checklist/Todo Edited
- Checklist/Todo Deleted
- Checklist Todo Comment Added
- Checklist Todo Comment Edited
- Checklist Todo Comment Deleted
- Checklist Todo Status Changed
Once selected, the notification options will display below.
3. Set the notification preferences
For each selected notification type, use the sliders to choose how the selected users should be notified.
Depending on the notification, you may be able to enable or disable:
Email – sends the user an email notification.
Internal – sends the notification through Rave.
Set the sliders to match the notification preferences you want applied to all selected users.
4. Update the users
Once you are happy with your selections, click Update Users.
The selected notification preferences will then be applied to all applicable users.
Important: Project Checklist Notifications
Profile Checklist notifications control which notifications a user wants to receive, but the relevant Project Checklist notifications must also be enabled.
If a notification is switched on at profile level but is not enabled for that Checklist within the project, the user will not receive the notification.
Users must also meet any applicable Checklist or assignment requirements for the notification to be triggered.
Project Level Checklist Notifications
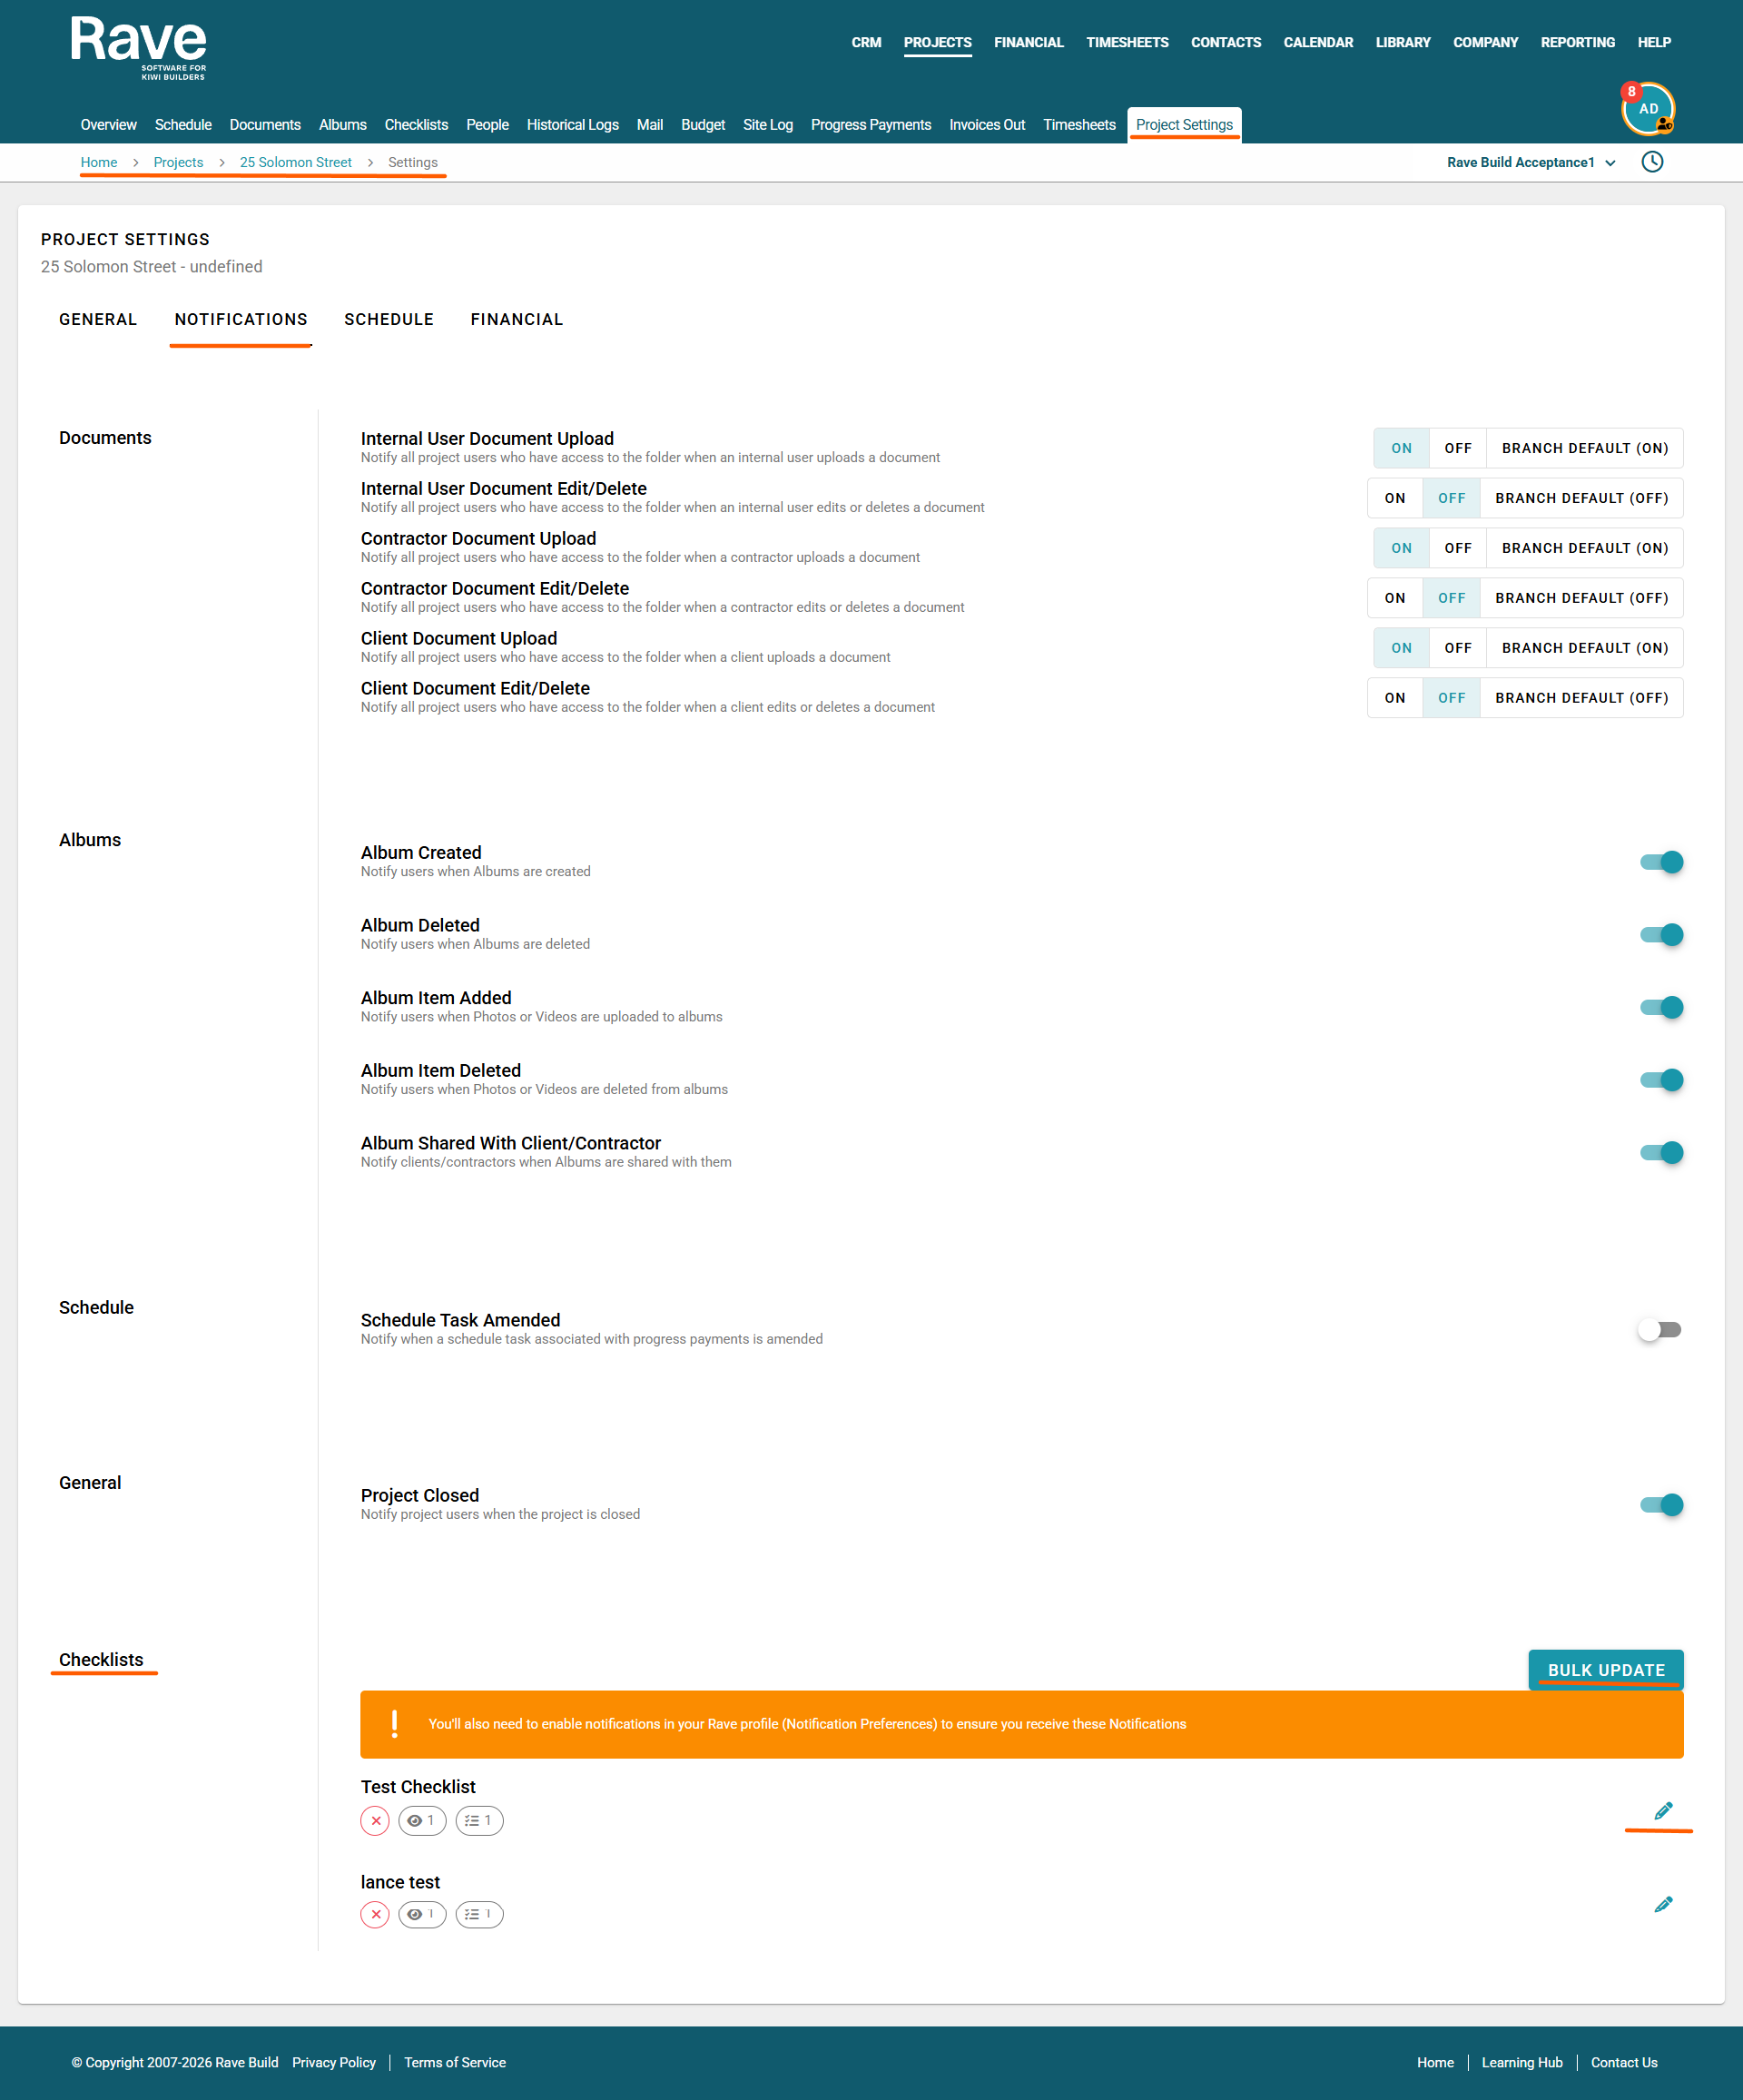
Your Project Checklist Notification Settings control whether your profile-specific notifications are enabled for you on that particular project. Think of the profile setting as your overall preference, and the project setting as the project-level switch. This allows you to opt out of certain checklist notifications at a project level while ensuring you dont miss out on others.
Important: Both Profile Notification and Project Notification settings must be enabled for the notification to be sent.
Managing Checklist Notifications on a Project
To manage checklist notifications for a specific project:
- Open the required Project.
- Click Project Settings - Notifications.
- Locate the Checklists section.
- Select or edit the required checklist by using the pencil icon.
- Find the user you want to manage.
- Use the sliders to enable or disable the required checklist notifications.
Bulk Updating Checklist Notifications
If you need to update checklist notification settings for multiple users at once, use the Bulk Update option.
- Click Bulk Update.
- Select the Checklist(s) you want to update notifications for.
- Select the users you want to update.
- Adjust the notification sliders to match the settings you want to apply.
- Save the changes.
This is the quickest way to apply the same checklist notification settings across multiple users or multiple checklists without updating each user individually.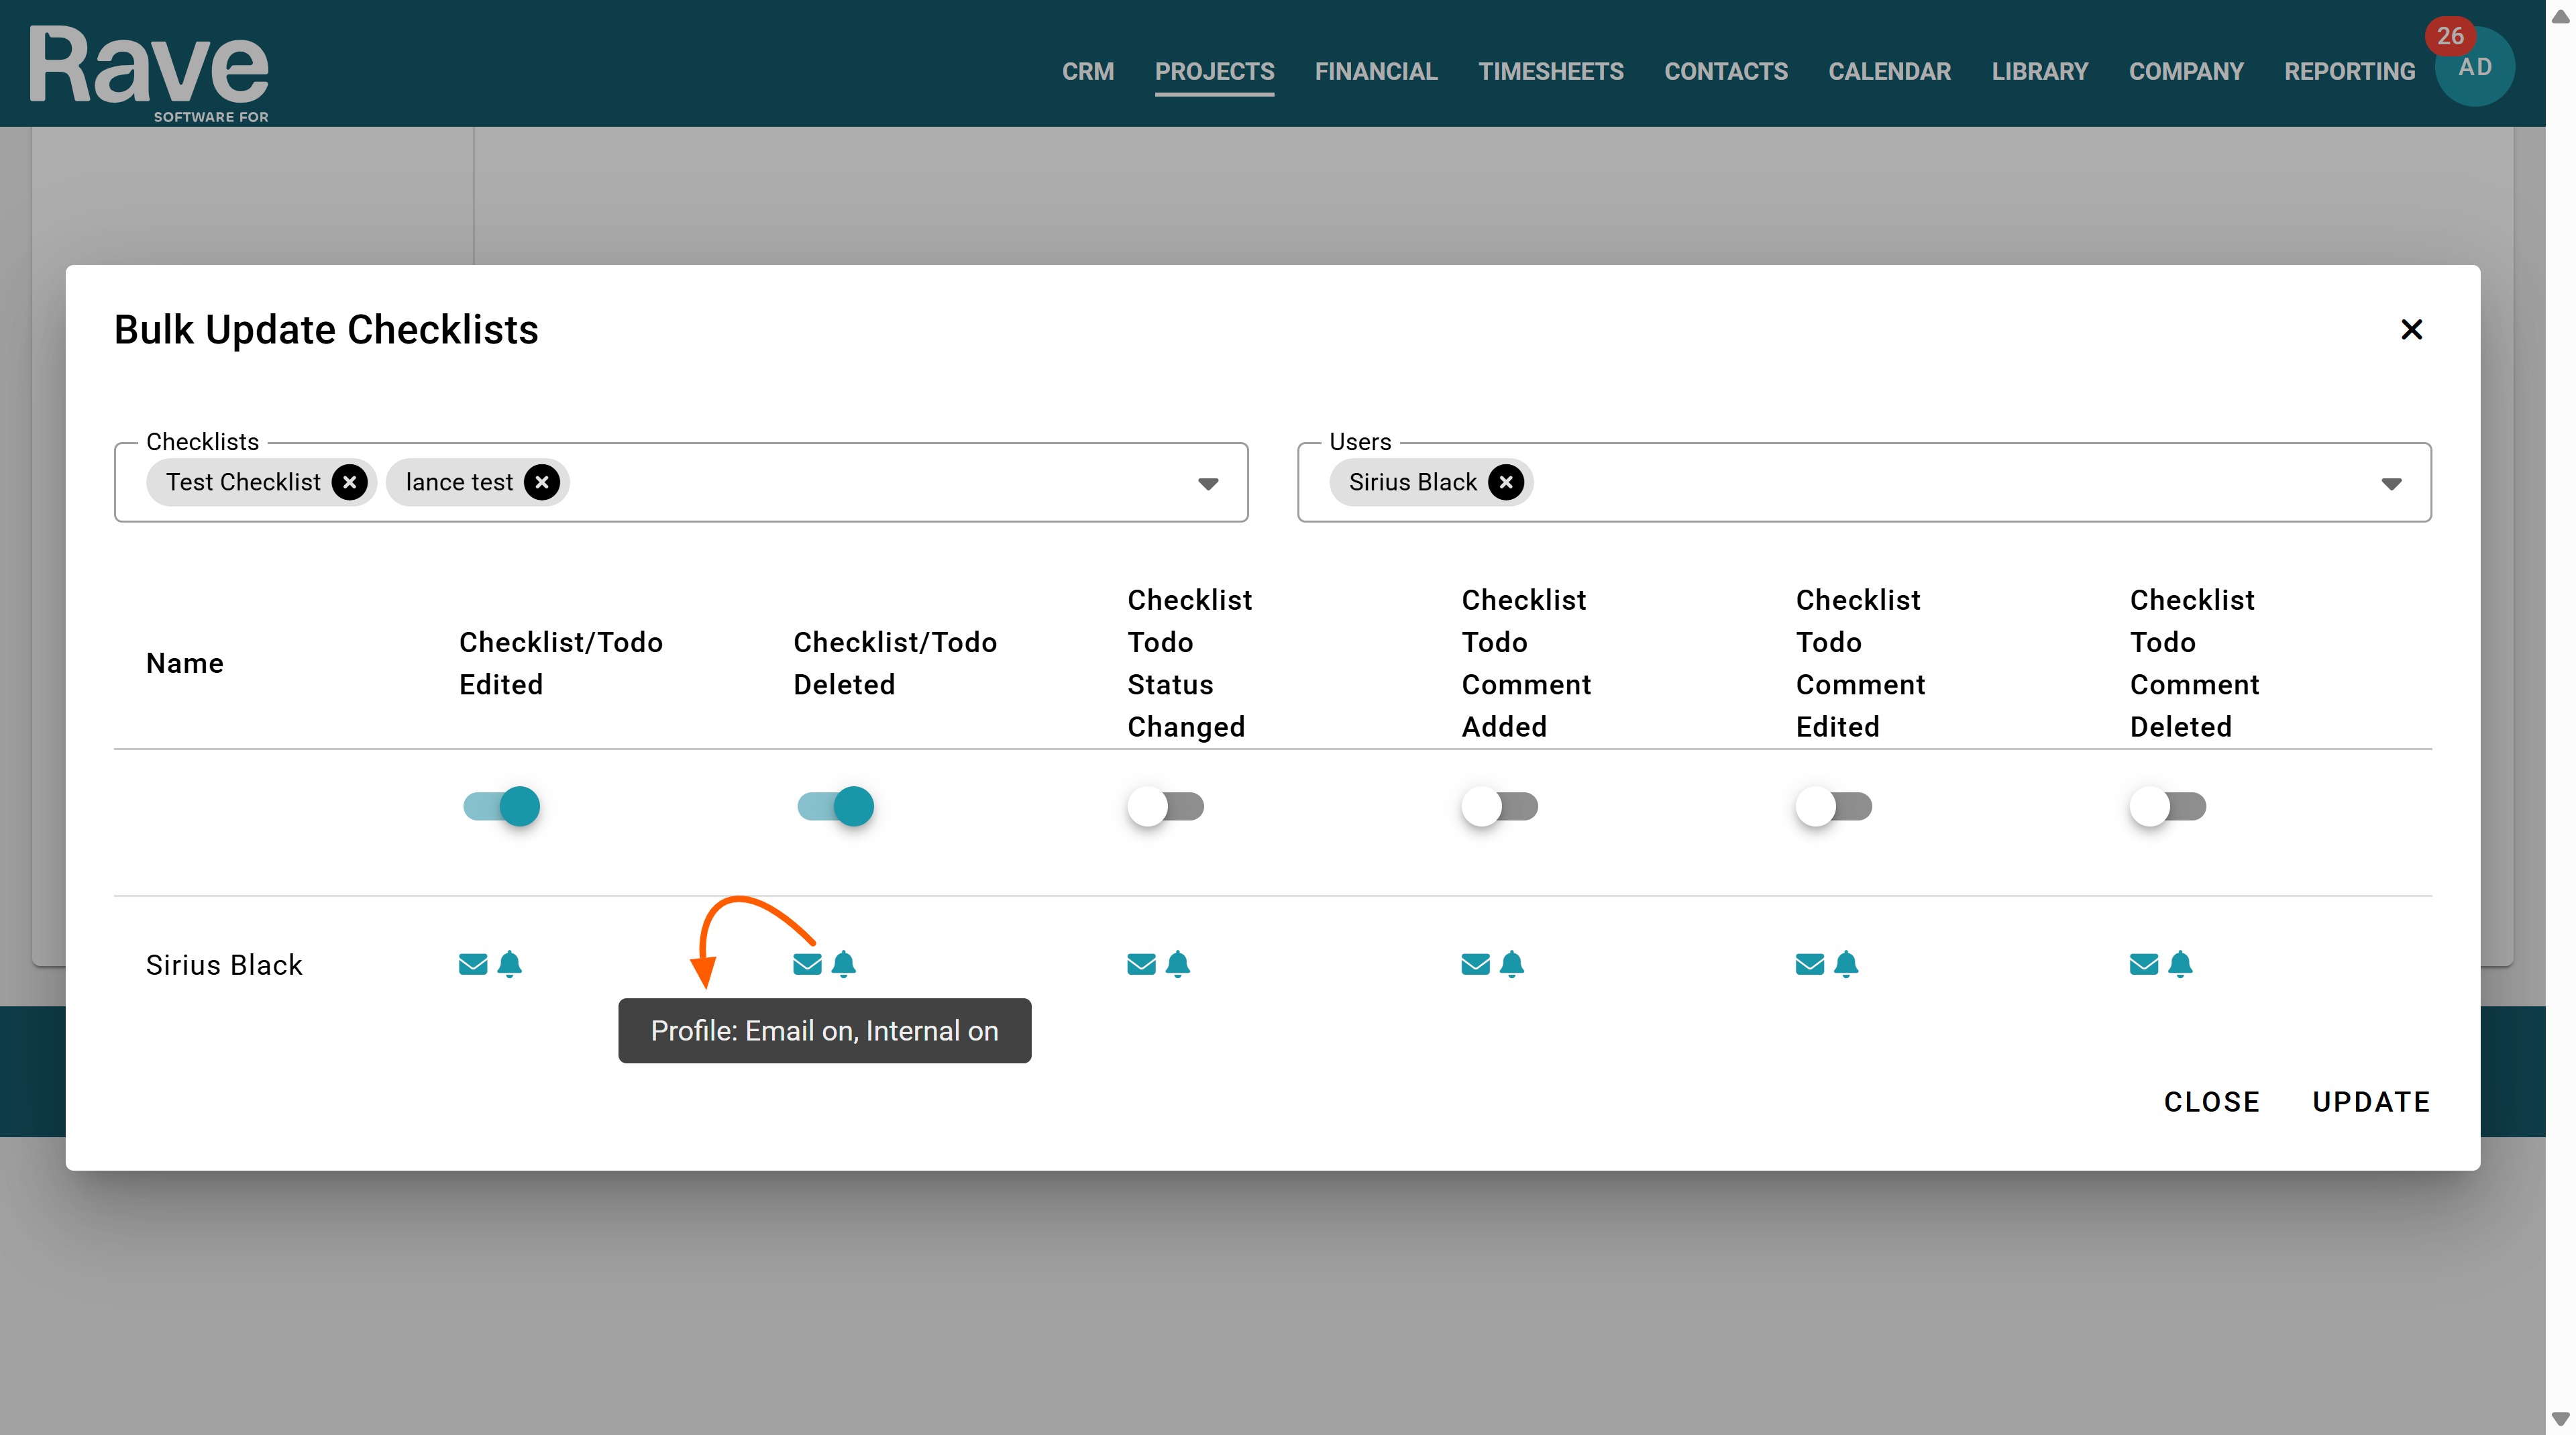
Available project-level checklist notification options include:
- Checklist ToDo Created
- Checklist/ToDo Edited
- Checklist/ToDo Deleted
- Checklist ToDo Status Changed
- Checklist ToDo Comment Added
- Checklist ToDo Comment Edited
- Checklist ToDo Comment Deleted
A teal coloured slider indicates that the notification is enabled. While each user is displayed showing their default profile checklist notification settings.
Example
If Checklist Todo Status Changed is enabled in your Profile Notification Preferences, but it is switched off for you in the project's Checklist Notification Settings, you will not receive the notification.
Likewise, if it is enabled at project level but disabled in your personal Profile Notification Preferences, you will not receive it.
The notification must be enabled in both places.
If You Are Not Receiving Checklist Notifications
Check the following:
- You are assigned to the relevant project/checklist where required.
- The notification type is enabled in your Profile Notification Preferences.
- The same notification type is enabled for you in the Project Checklist Notification Settings.
- Your chosen notification method, such as Email or Internal, is enabled in your profile.
Checking both the profile and project-level settings will usually resolve situations where expected checklist notifications are not being received.
Email Notification Samples
Was this article helpful?
That’s Great!
Thank you for your feedback
Sorry! We couldn't be helpful
Thank you for your feedback
Feedback sent
We appreciate your effort and will try to fix the article