RAVE’s financial management system is designed to help you manage all the financial aspects of your projects, including budgeting, bills, and invoices, with ease.
The Quotes sub-tab is where we manage our contractor and supplier quotes to create client proposals or compare against purchase orders and bills for back costing. You will find all you need here to add pricing, edit existing pricing, add a margin for charge-up jobs, add a scope of work for clients or contractors, and much more.
This article covers how to Create a Quote Manually, and Create a Quote from a Quote Request.
To Learn how to Create a Quote from a CSV File, click here.
You can also watch our current Quotes sub-tab training video here - a newer version including recent updates to the Quotes sub-tab will be out soon.
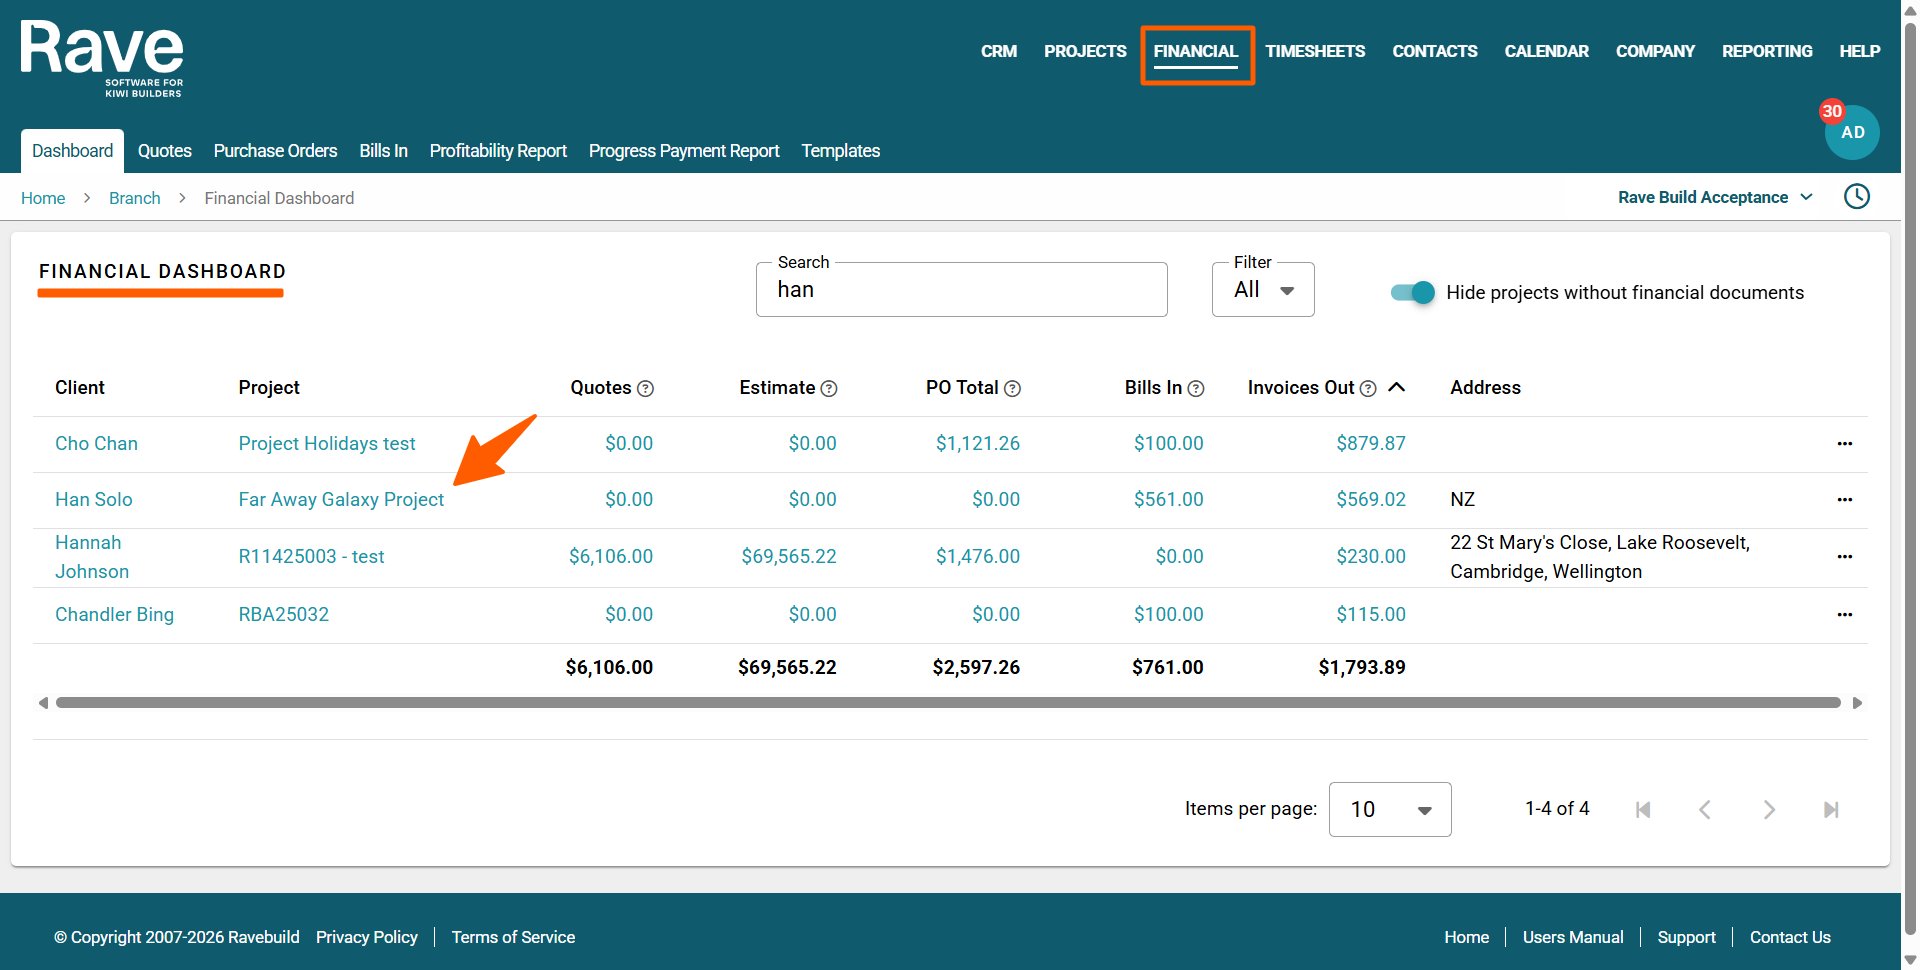
You can access your Project’s financial workflows from either the Financial button or the Project button's Project list, clicking on the project’s reference number, and finally selecting the Budget sub-tab, then Quotes.
How to Create a Quote Manually
To manually load a quote into RAVE, go to your project's Quote sub-tab and click on the + Quote button to the top right of your screen.
This will open a draft quote screen, ready for you to fill in the supplier, category and other form fields. This process is basically the same as loading a quote from a quote request. So, refer to the below 'How to Create a Quote from a Quote Request' step-by-step guide for how to do this.
How to Create a Quote from a Quote Request
To manually load a quote into RAVE that a supplier has emailed back, following your quote request prompt:
- We first go to your project's Quote Request sub-tab, and click on the 3-dot action dropdown to the right of your quote request
- Then click the Copy to Quote option, which opens a draft quote screen, auto-filling details from the quote request, so you can check what's been copied and start filling in the other form fields.
i.e. Rave will fill in the supplier/contractor's name, and take your quote request (QR reference) and associate it with a new quote tender number (QT reference number) – they have the same RAVE project ID number followed by a version number, i.e. -1, -2, -3, etc.
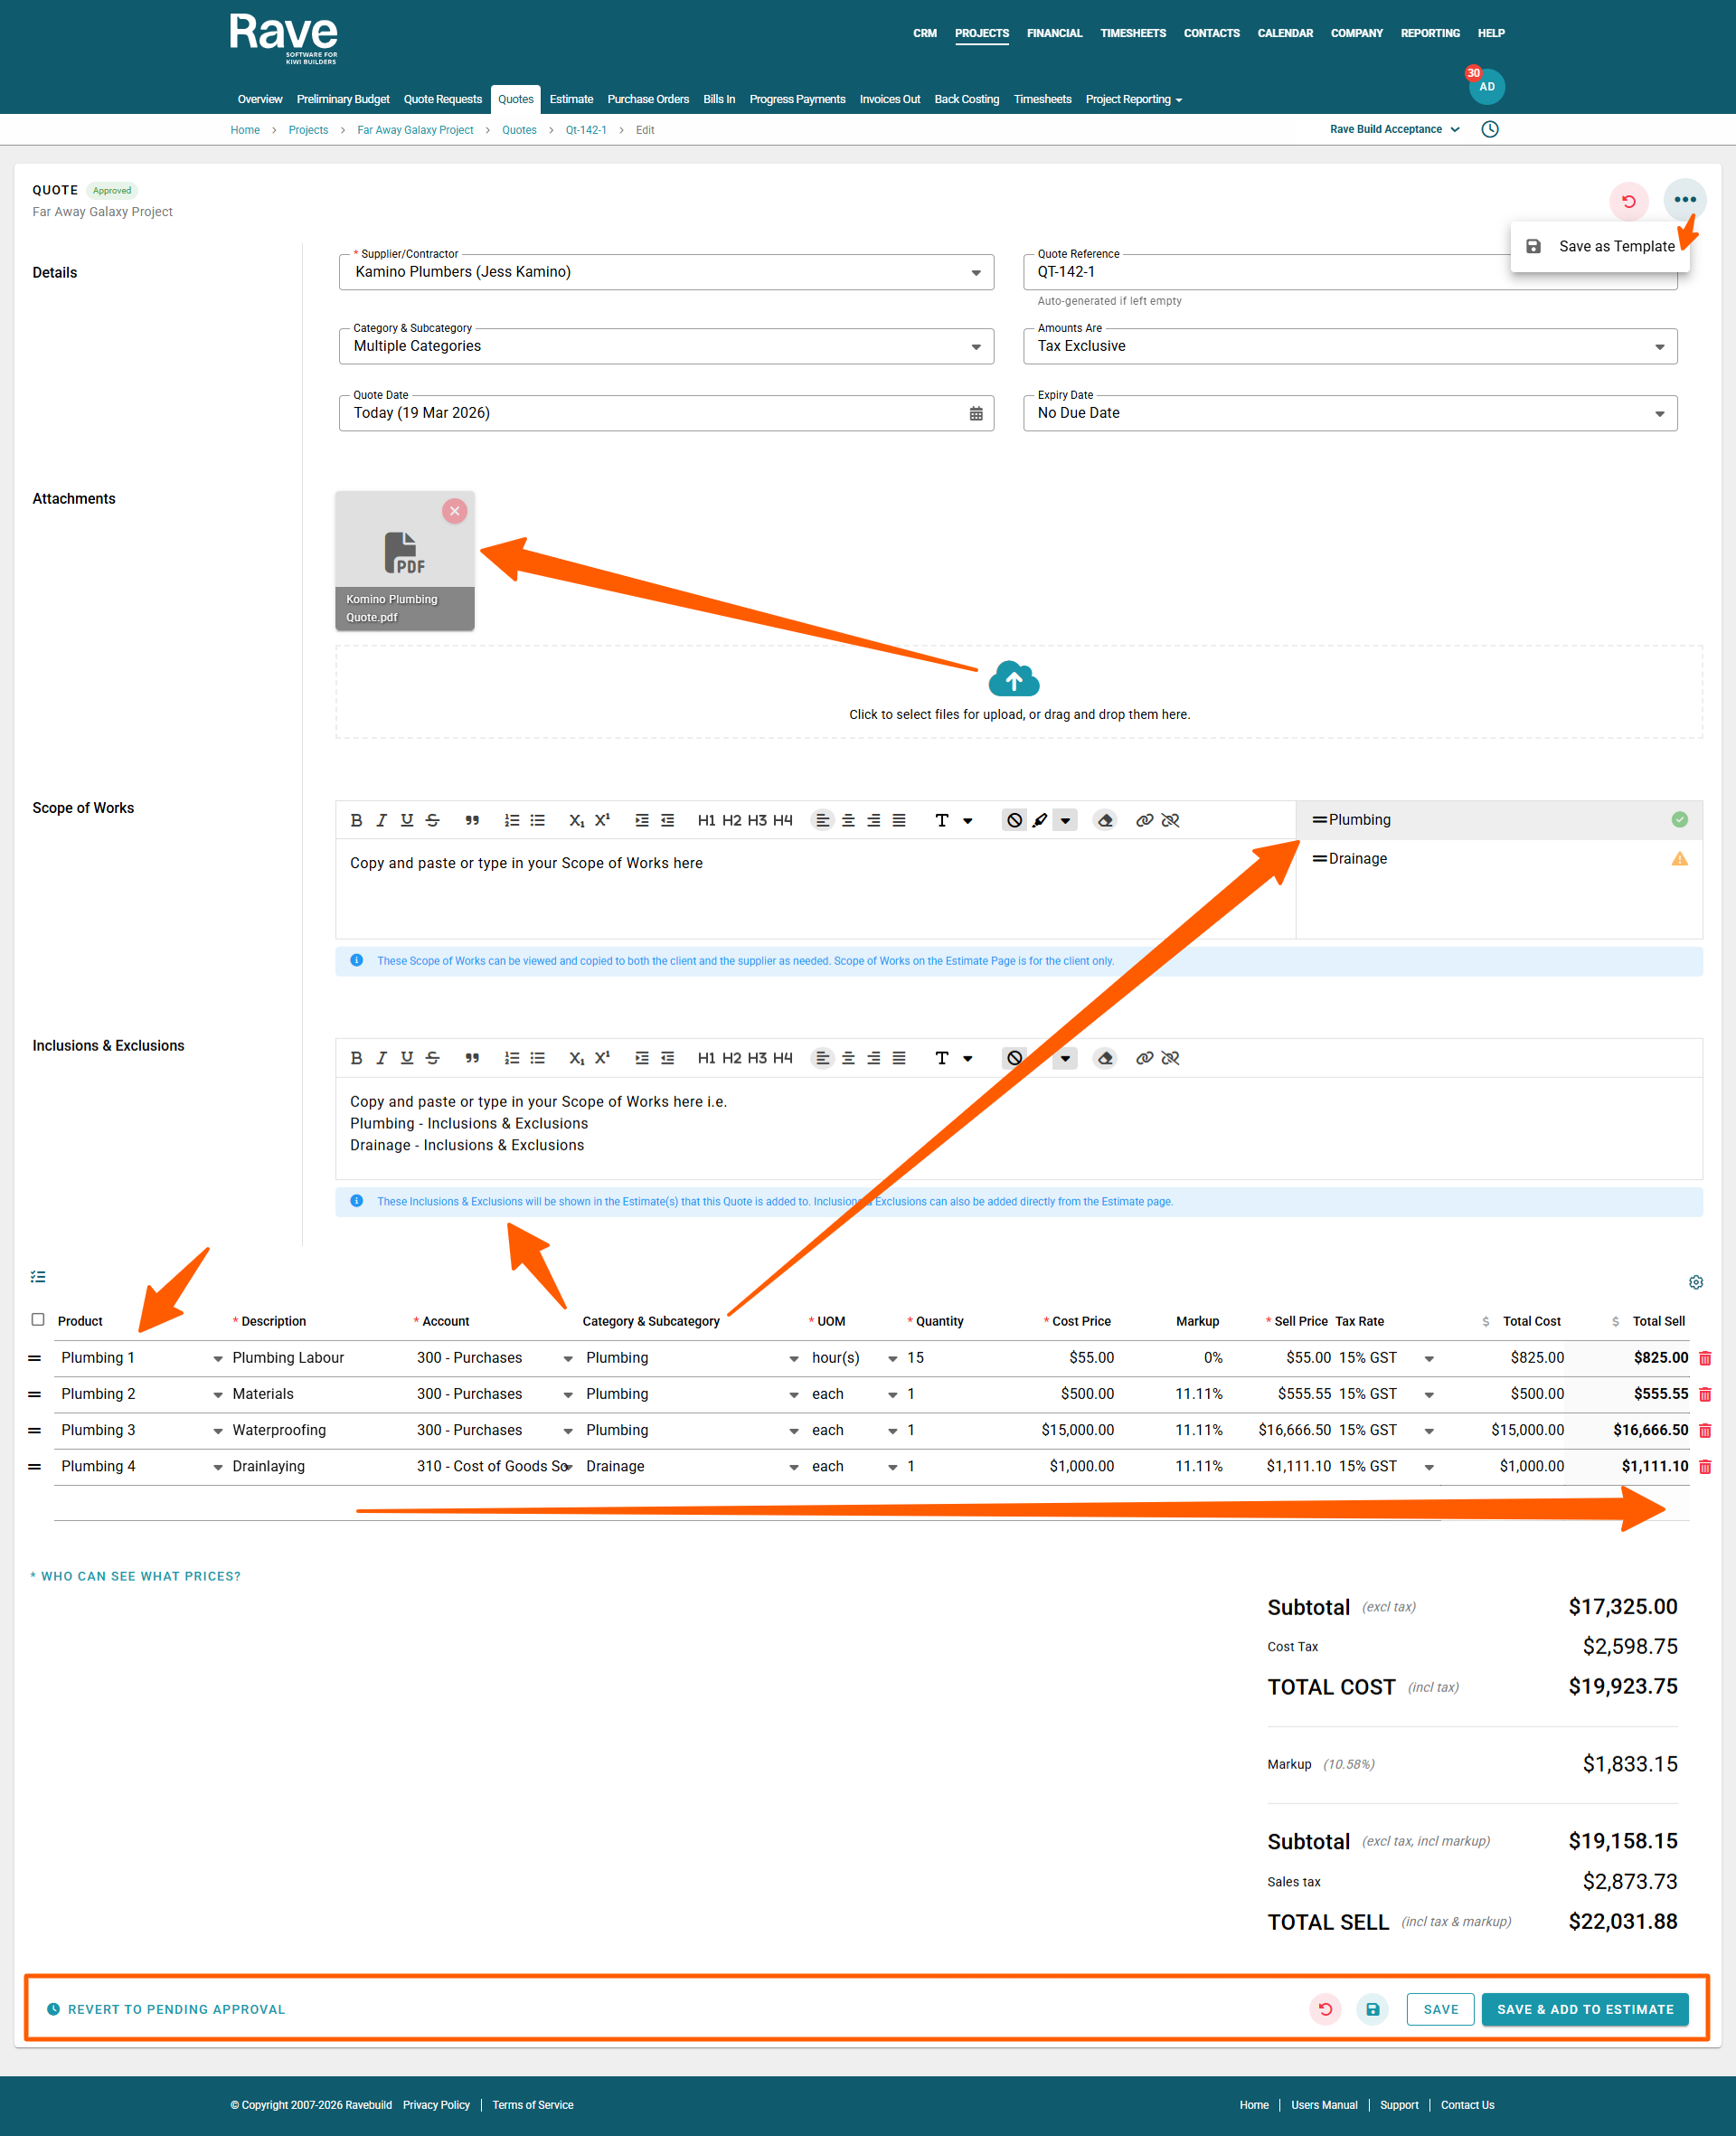
Note: We recommend changing the QT reference number to a description, to make it more visible to you on the back costing page i.e. if it's a builder, you can type in ‘Building Labour’, and follow that up with the supplier's quote number if you want to. - You can drag and drop their quote attachment to the Cloud Icon, or click on the cloud icon to open your file browser
- Copy and paste, or type in, their scope of works
- Copy and paste, or type in, their Inclusions & Exclusions
- If you’ve loaded an inventory list, you can click on the product field and start typing in your inventory code or product description to pre-populate the item details; otherwise, you can manually fill these details in, i.e. you can assign the line item to a specific:
- Account code, category and subcategory
- Unit of Measure and Quantity
- Add in the Cost Price
- And add in the Markup or set a Sell Price – these work in conjunction with each other i.e. type in one and RAVE will calculate the other
Note: If you leave the line item markup blank, it will set the sell price to the cost price on this page, but you can still add an entire project-level markup when creating your proposal via the Estimates sub-tab.
Note: If you are running a ‘Charge Up’ job, you must enter either a markup percentage or a fixed sell price in order to then move on to charge up. - Once you have filled in all of your quote's details, you can select
- Save as Template - to the top right of the screen, to load up for a future quote
- Save - Pending Approval, allowing another person to approve later
- Discard Changes - to cancel changes via the red arrow icon
- Save and Continue Editing - handy when loading a lot of line data, via the teal disc icon
- Approve - to add to your 'back costing' report
- Approve & Add to Estimate - to add to your 'estimate' and 'back costing' pages

Adding a Scope of Works per Category
Because we have two different categories in this example, we can come back up to the Scope of Works category dropdown and assign a different scope of work to each category of the quote.
Then, using the category as a guide, RAVE will position the scope of works below the line items it relates to – or if you have just one category, all of your scope of work details appear at the bottom of all of the line items.
How to List Multiple Inclusions & Exclusions
All Inclusions and Exclusions are managed in the same Inclusions and Exclusions section. You just need to list each item in the order it will appear in your proposal document. And again, you can use the formatting buttons as required to get these details looking right and to highlight specific points.
How to Bulk Manage your Chart of Accounts, Categories & Subcategories, and/or Markup
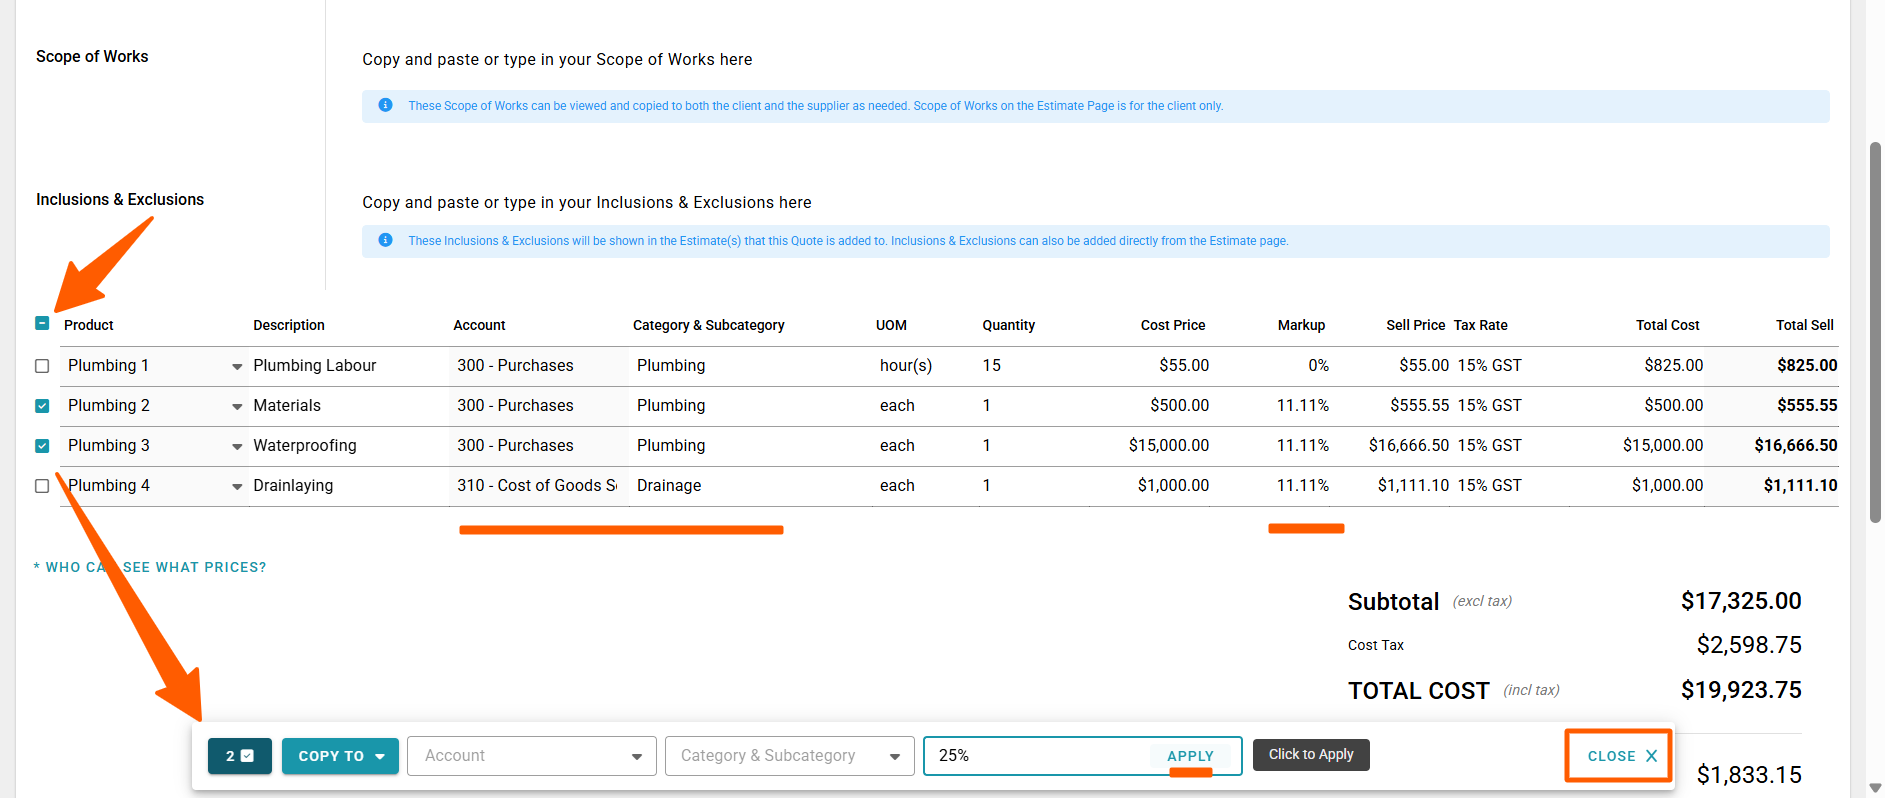
If you need to apply a Chart of Accounts, Category & Subcategory, and/or Markup to multiple lines, you can select the tick box header to the left of your product lines table to select all lines and open a pop-up modal, which will appear at the bottom of your screen.
Then, untick the lines you do not need to update, and click the appropriate selection from the drop-down menus, or apply your markup % or $ value.
Once done, you can close the pop-up modal via the 'Close X' button.
once you have created your quote you can template it for use again and again. While in an approved or pending mode you can click on the three dots and Save As Template (note: no due date must be selected as the quote expiry date to save as a template)

give your quote template a name and click Create.

If you click on Edit, you can still save as a template by clicking on the 3 dots

Was this article helpful?
That’s Great!
Thank you for your feedback
Sorry! We couldn't be helpful
Thank you for your feedback
Feedback sent
We appreciate your effort and will try to fix the article