The following is the recorded version of the help article outlined below.
As part of our new Email Syncing feature coming soon, we have upgraded what was previously known as Messages to Mail. In addition to a refreshed look and feel, the Mail area now includes enhanced functionality designed to improve communication and streamline workflows.
To Read about Project Mail click here.
To access CRM mail you need to have CRM turned on and then to select from the mail options below depending on your preferences.
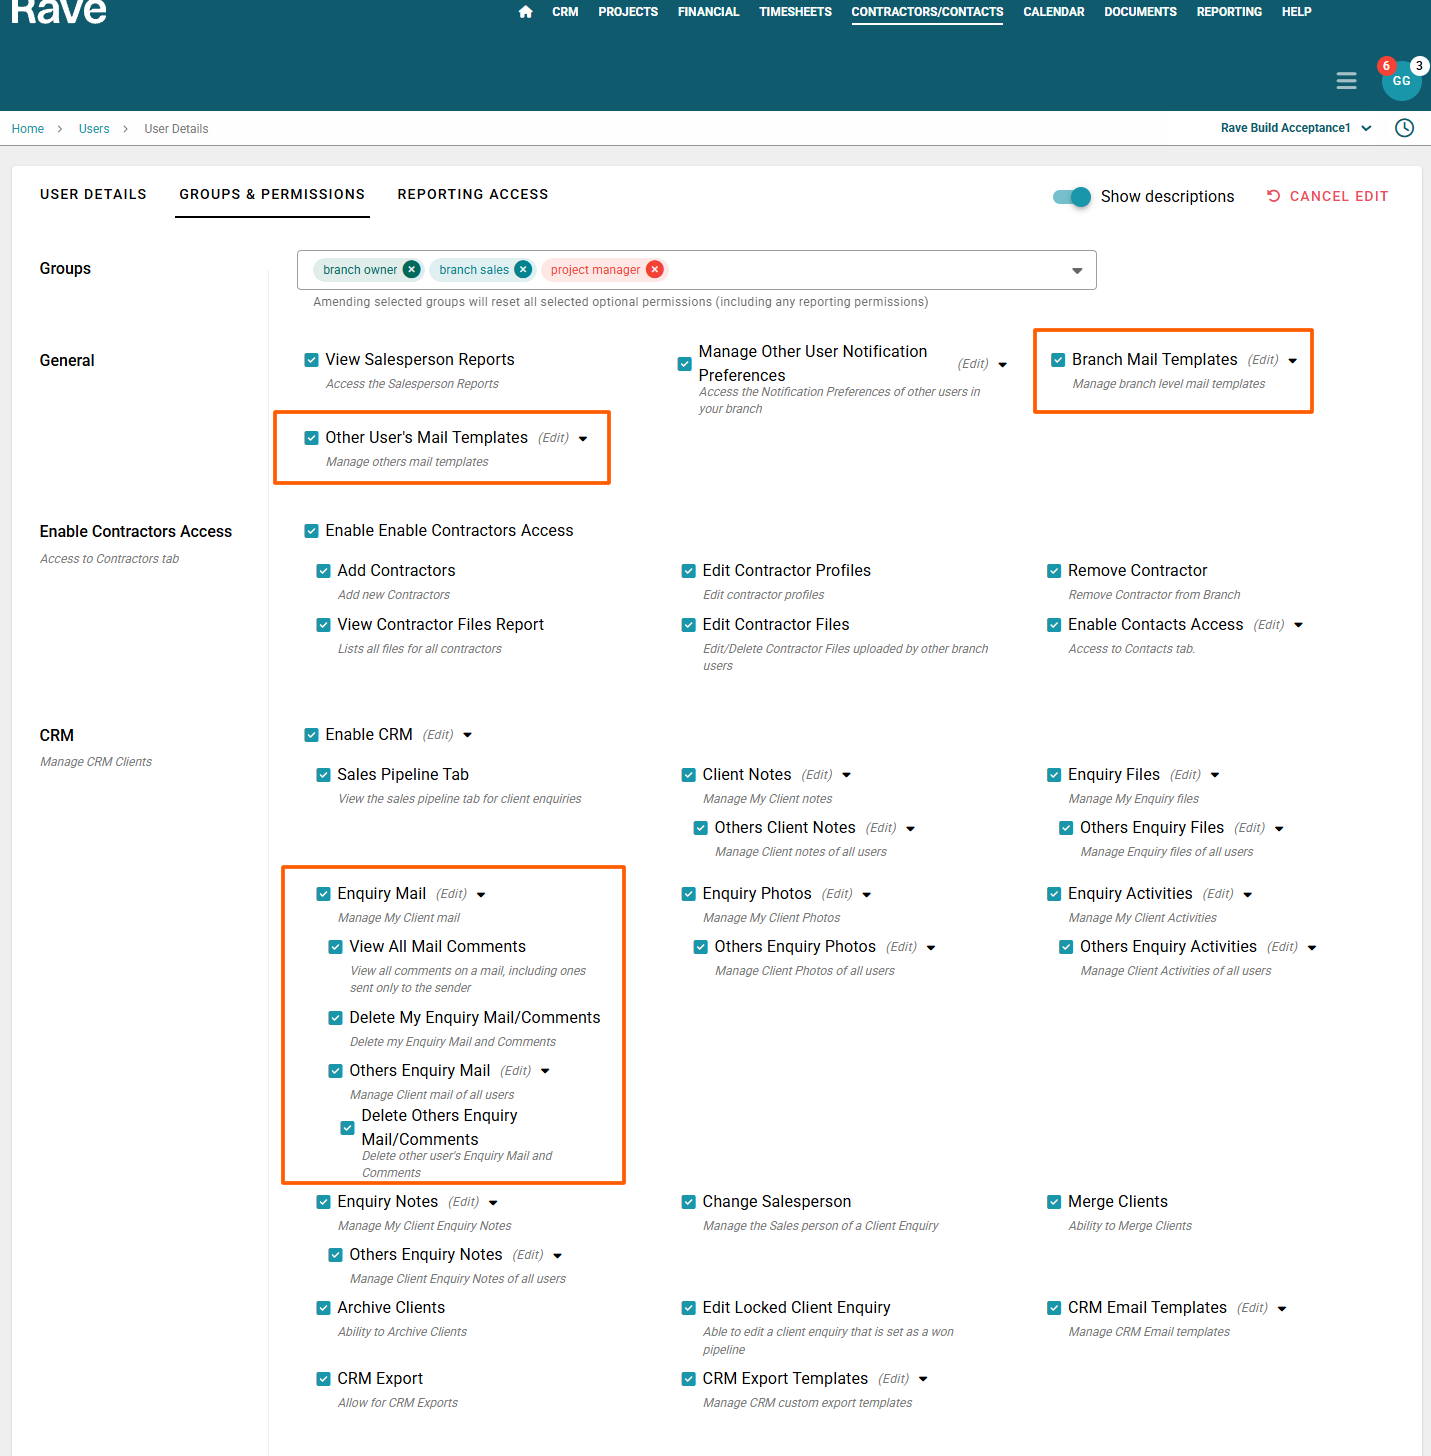
Enquiry Mail - Manage my Enquiry mail
View All Mail Comments - View mine and all others enquiry mail comments including those where the comment/mail was sent to only the sender.
Delete My Enquiry mail - Delete your own Enquiry Mail (This only deletes the record from Rave we cannot recall sent emails)
Others Enquiry mail - View only or Manage Enquiry mail of other users
Delete others Enquiry mail - delete Enquiry mail created by other users (this only deletes the record from Rave we cannot recall sent emails)
If you want to customise Mail Tags you also need the Branch Settting Manage Tags for Mail permission. Note this is usually managed by Owners or Managers in the business only. The help article for setting Mail Tags is here.
There is also a new mail template feature. By default all users will have access to manage their own mail templates with the mail permission turned on
Branch Mail Templates - Manage branch level/shared mail templates *both CRM and Project Mail
Other Users Mail Templates - manage other users mail templates *both CRM and Project Mail.
From the Enquiry screen, you will see the Mail tab along the top row.
Select Mail to open the Enquiry Mail section.
From here you can:
View All Mail created on this enquiry between branch staff and/or the client(s).
Search for content within your mail
Create a new mail
View any existing mail by selecting it

Sending New Mail
Click ‘New Mail’. Fill in:
Load from template: You can choose to create mail from pre created templates by selecting one from the drop down or skip this and create a new mail from scratch.
To: Populates from the enquiry list including clients and staff. Select individually or Select All
Subject: A subject line for your recipients to know the content of your mail
Tag: This is a list of preset or customised Tags you can assign to your mail to help track/find them later.
Mail Body: Compose and format mail.
Visible to others: If you want the mail to be visible only to the creator and the selected participants, you can uncheck “Visible to Others.” This will hide the mail from everyone who is not part of the thread, regardless of their mail permissions.
Attachments: Upload files/images
Send as email: this will send a copy of this internal mail to the participants external email (this box is checked by default)
Required fields: To, Subject, Category, Mail Body. Click Send once complete.

Visibility Options:
You cant update visibility on draft mails as by default drafts can only be viewed by the creator.
You Can update visibility on all your own mail (where you are the sender) both from list and mail overview pages
With permission to edit other user's mail, you can update visibility on other's mail as well.
Saving & Using Mail Templates
To save a new template start a new mail, compose all your content, attachments etc, the Save as Template button will appear to the bottom of the page. Click Save as Template. Depending on your permission you'll have either Save as my Template or Save as Branch Template. Choose which one and press Save.

Saving Mail as Draft
If you don't have time to finish a mail or want to come back to it later you can click Save as Draft. Your mail will then sit under the drafts section for you to pick up when you are ready.

Receiving & Commenting on Mail
New mail appears at the top of the Mail tab inside the Enquiry. New comments are flagged with a red Has Comments tag beside the mail details on the list page. To comment: click on the mail, add comment, attachments, chose to notify sender and recipients and then click Save.

Forwarding Mail
From within a mail you can choose to forward the content to someone not in the original thread. Select Forward which brings up the mail thread for you to choose the new recipient, choose if it should be internal mail only or also external email and then press Send.
Recipients
From within a mail you can choose to add new Participants to an existing mail thread. Select recipients and choose from the drop down menu. Tick the Email New Recipients button and press add. You can only add recipients to mail you have sent.
Deleting Mail
From within a mail with permission, you can delete the mail from Rave. This does not recall external email copies only deletes the record from Rave.
Note you can also Delete mail from the main list by hovering over the date column for the delete icon to appear.
Note: Mail in trash will be permanantly deleted after 90 days

Was this article helpful?
That’s Great!
Thank you for your feedback
Sorry! We couldn't be helpful
Thank you for your feedback
Feedback sent
We appreciate your effort and will try to fix the article