Access this training demo here.
In this ‘Enterprise’ Scheduling FAQ, we will learn how the 'Enterprise' add-on module provides you with more control and options to manage your schedules. In addition to linking tasks (predecessors/successors), and the display critical path scheduling feature, enterprise also unlocks the use of constraints (i.e. must start on, start no earlier than, finish no later than) to provide complete control over your scheduling.
If you need to learn the basics of RAVE scheduling first - please check out our RAVE Scheduling + the ‘Classic’ Scheduling Mode - there is a link to the full video of this tutorial at the top of that article.
For your reference, we have included the 'Enterprise' vs 'Classic' Scheduling Feature List (Jan 2023) image below, and an attachment to the end of this FAQ - so you can see what additional functionality is unlocked with the enterprise scheduling module.
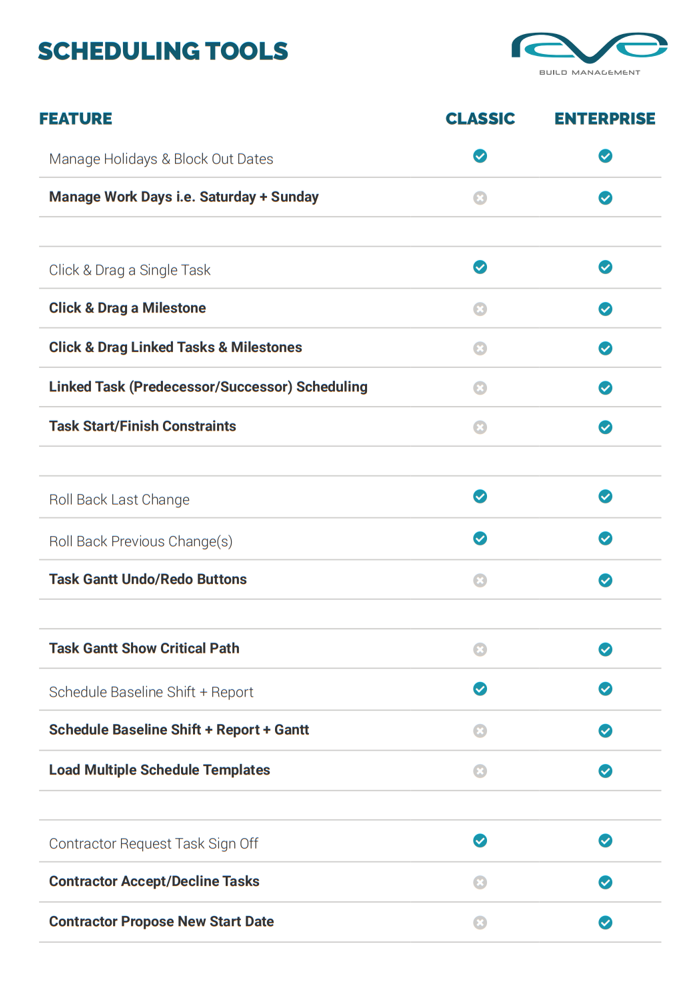
NOTE: RAVE has three scheduling systems - these are:
RAVE's 'Classic' Scheduling - included for all RAVE branches by default - where tasks (and milestones) are ordered by start date - you can move:
- An individual task
- This task + all future milestone tasks
- This task + all future schedule tasks
RAVE's 'Advanced' Scheduling - introduces hourly durations, and task linking (with predecessors/successors) to provide more granular control over your scheduling. The 'Advanced' scheduling mode is primarily for maintenance companies who need to schedule by the hour.
RAVE's 'Enterprise' Scheduling - includes task linking (predecessors/successors) and the use of constraints (i.e. must start on) to provide complete control over your scheduling. The 'Enterprise' scheduling mode is primarily for building companies who want to have greater control of their scheduling, or who have used the likes of Microsoft Projects, and/or the more expensive overseas scheduling software.
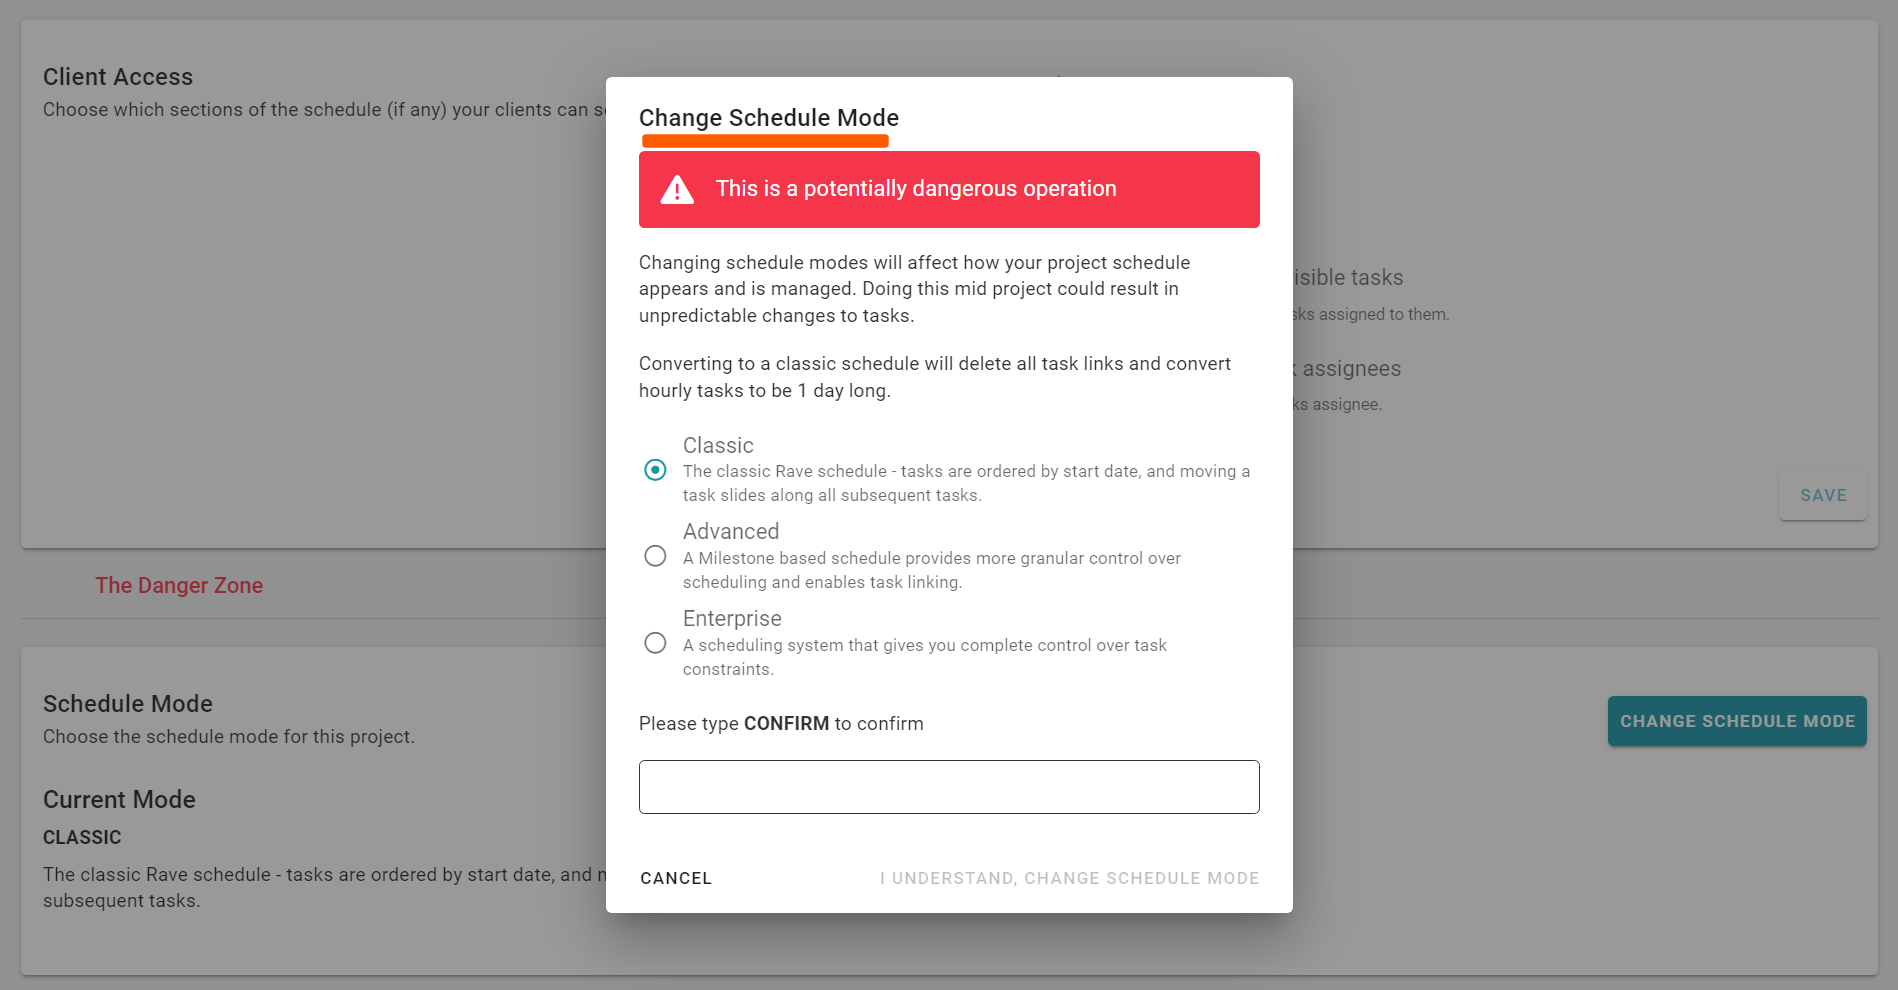
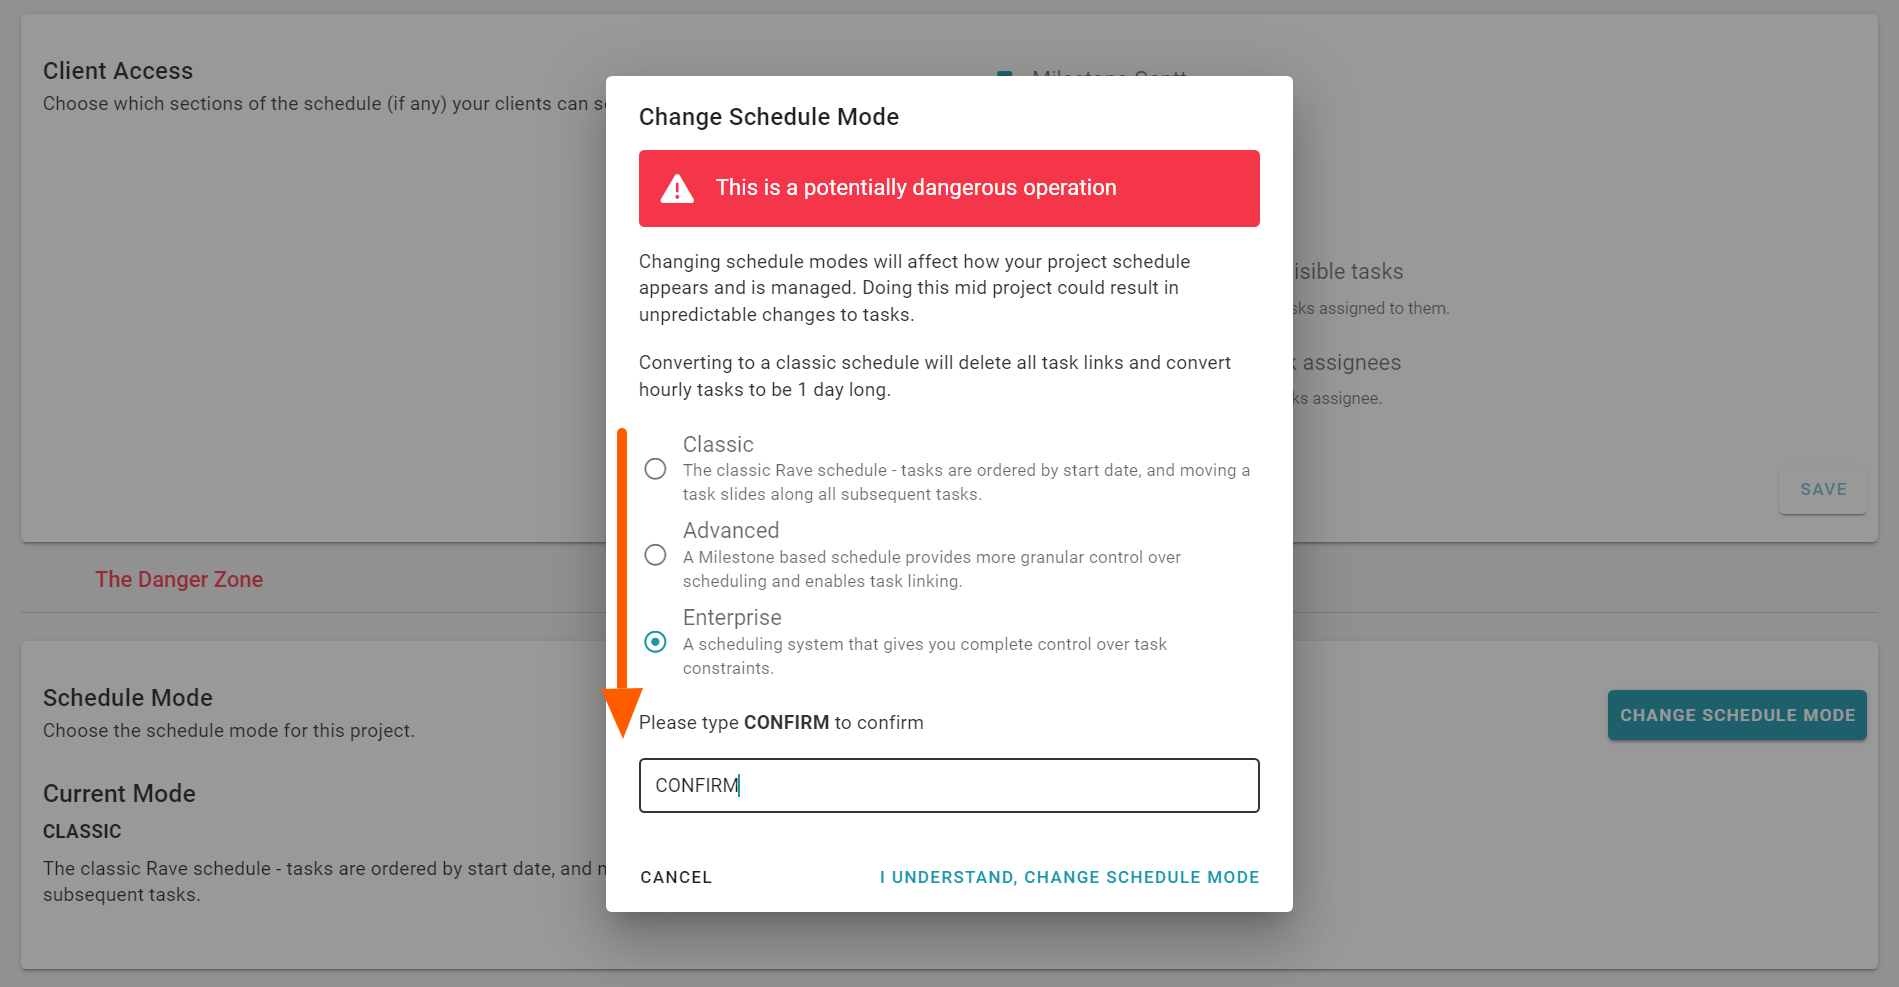
Changing the schedule mode from 'Classic' to 'Enterprise' scheduling
With access to the 'Enterprise' add-on module, we can change the schedule mode from 'Classic' to 'Enterprise at the project level via project's schedule ‘Settings’ page.
Those with branch owner access have the ability to view and change, your default branch-wide schedule settings - setting 'Enterprise' as your scheduling default mode if you want to. The branch-wide schedule settings page is available from the ‘Site|Build / Build Overview / Settings’ sub-tab.
Accessing the Projects 'Settings' page
As this FAQ is about the enterprise functionality, let's change the schedule mode for this job first - that's ‘Site|Build / Build Projects / your target project / Schedule / Settings’ sub-tab.
- We then go down to the bottom of the ‘Settings’ page and click the 'Change Schedule Mode' button
This will open the 'Change Schedule Mode' pop-up - Select the mode you would like to change i.e. 'Enterprise'
- Type in CONFIRM (all in upper case) to unlock the 'I UNDERSTAND, CHANGE SCHEDULE MODE' option
- click the 'I UNDERSTAND, CHANGE SCHEDULE MODE' option to confirm the change.
NOTE: Changing the schedule mode in Rave between ‘Classic’, ‘Advanced’, or ‘Enterprise’ can be a potentially dangerous operation. As classic scheduling does not have links - changing from enterprise/advanced to classic will drop the links off your schedule - you will also lose the additional enterprise/advanced functionality. Making this change mid-project could result in some unpredictable changes to tasks.
The 'Enterprise' Settings Page
Access this demo here.
Before we dive into our enterprise scheduling demo, let's review the additional settings and features that are available with enterprise scheduling.
Working Days – Saturday and Sunday
With enterprise scheduling, you have the ability to make Saturday and Sunday a working day, and manipulate any of the other days of the week as per your standard schedule. This can be set up at a per-project level or as your project-wide default.
If you are a trade working seven days a week, then having all these days ticked might be applicable to your jobs, but for most of our clients Monday to Friday is the norm.
To edit your working days:
- Make your selections by ticking the boxes next to the days of the week, and click ‘Save’.
This will open the Update Working Days pop-up - Click ‘Confirm’ on this pop-up to validate your selections


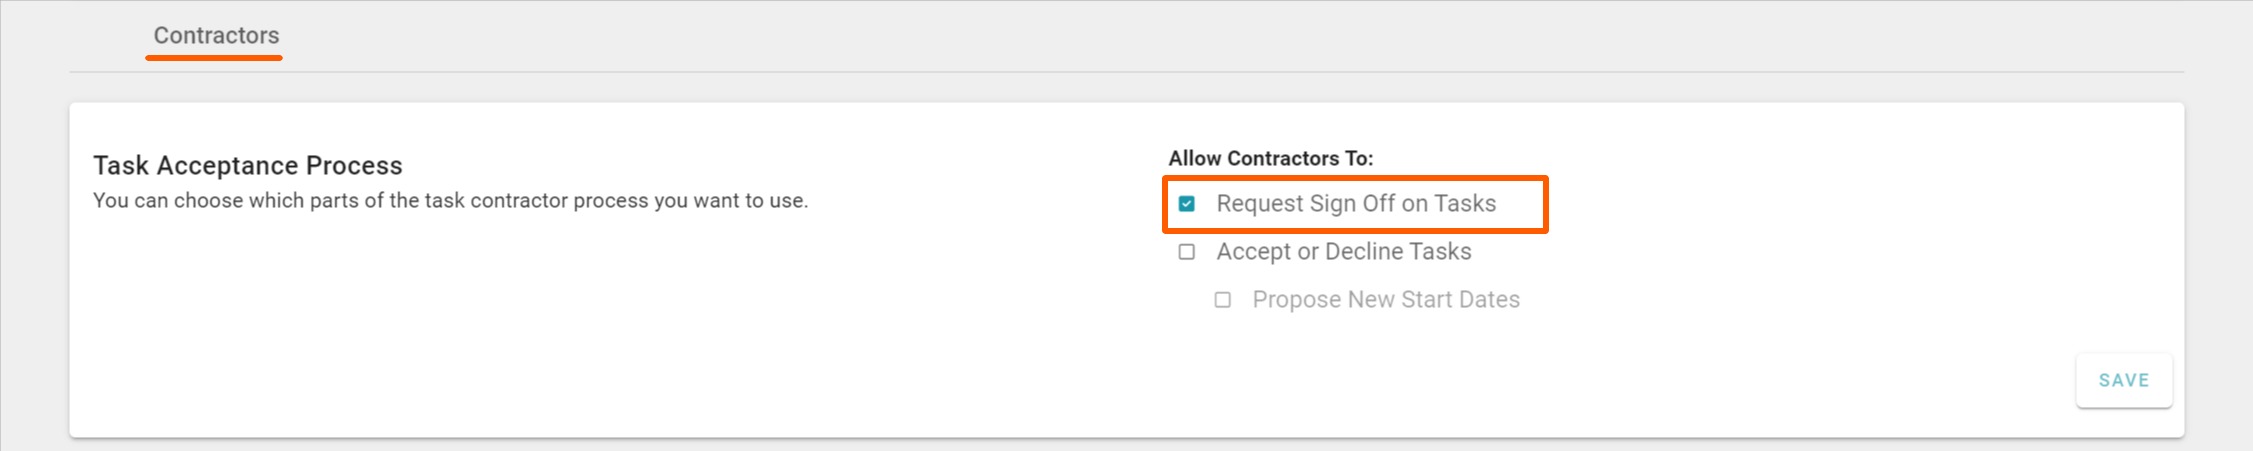
RAVE’s Enterprise 'Contractor Task Acceptance' Workflow
With our 'Classic' (standard) scheduling system, you can give contractors the ability to 'Request sign-off on tasks' (via the project or branches schedule settings page). This means that when the contractor has completed their task, they can let the PM or Site Manager know (via RAVE) that their assigned task has been finished - allowing the PM or Site Manager to check and confirm the work is up to standard before it has been marked off as complete.
Enterprises Accept or Decline Tasks function
With RAVE's optional Enterprise scheduling module, you have the ability to let your contractors Accept or Decline a task (i.e. are they available to do the task on the dates you've set) and also the option to Propose a New Start Date - letting you know what dates they can do if they can't do your selected dates.
This feature is useful once you have put together your schedule, with timelines sorted, tasks assigned to contractors, the project is active, and the schedule activated - so your contractors can see it.

So let's say your concreter has checked your schedule, but is already fully booked out for the Monday and Tuesday that you wanted your concrete pour to be done. However, he is available on Wednesday and Thursday.
Traditionally, when you make your schedule live, you assume that your contractors are available, and will turn up as per their assigned tasks and/or let you know if they are unavailable for the dates you've set up.
But, with the Accept or Decline function enabled, it lets your trades confirm that they can do the tasks when you need them, or not - by accepting or declining your task(s) via RAVE.
Enterprise's Propose a New Start Date function
Furthermore, you can allow your trades to propose a new start date. So, rather than them having to call the project manager to discuss alternative date(s), or declining the task outright, they can propose a new start date via RAVE.
- If the proposed task dates work for the project manager, they can accept the change and update their schedule accordingly - the dates are locked in.
- If the proposed task dates do NOT work for the project manager, the project manager knows they'll need to organise another trade for that day.
Demo of the 'Accept or Decline Tasks' Workflow
Let's have a look at the 'Accept or Decline Tasks' workflow from both the contractors side (logging in as ‘BB8’, our 'dummy' electrical contractor) and also as 'Luke' the Project Manager.
Accepting/Declining Tasks - Contractor Log-in View
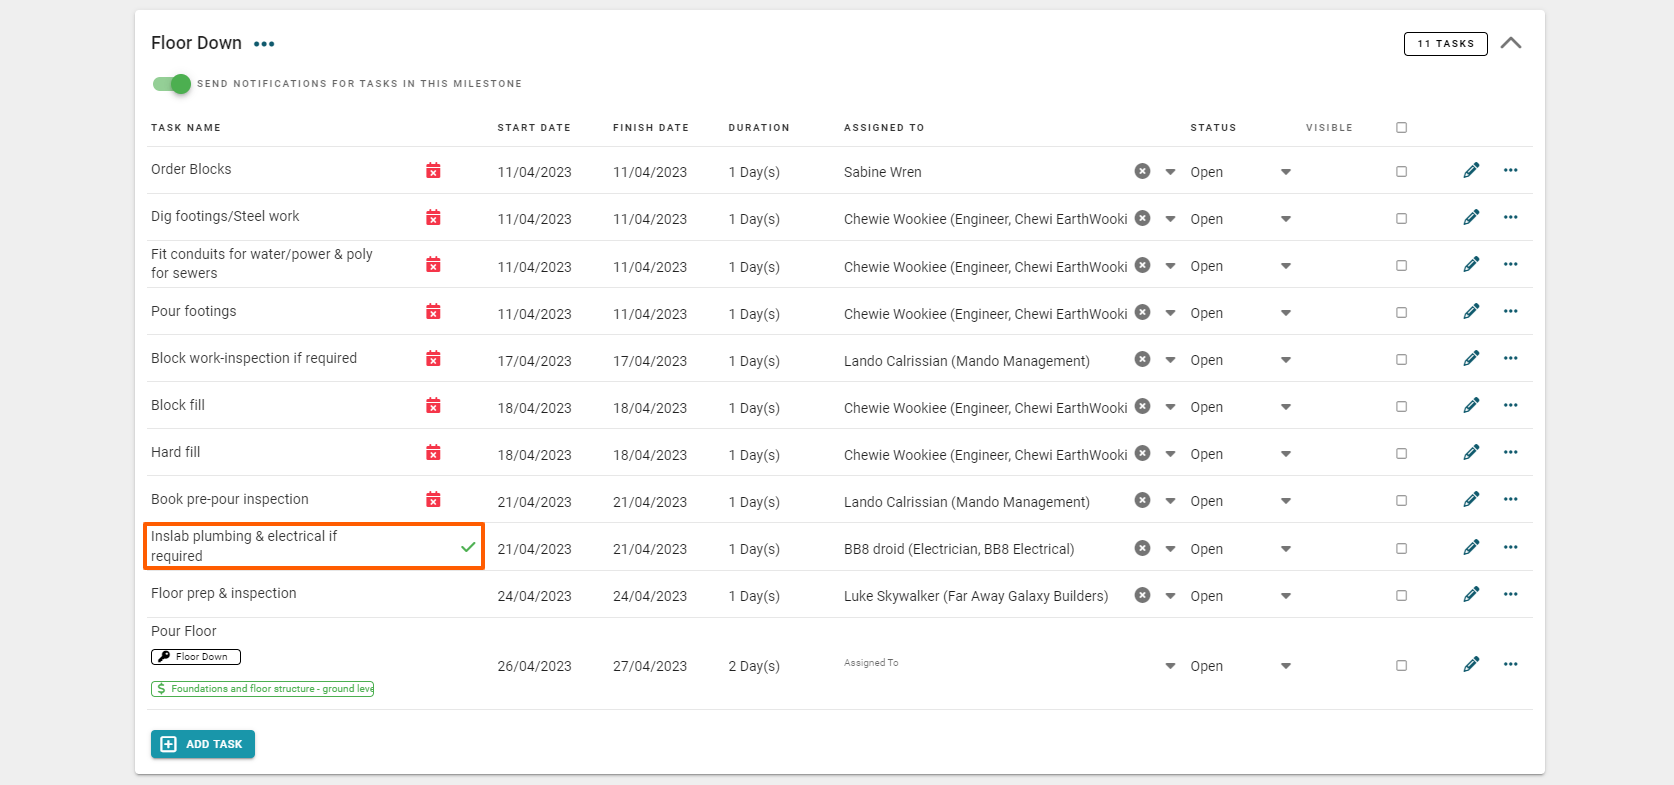
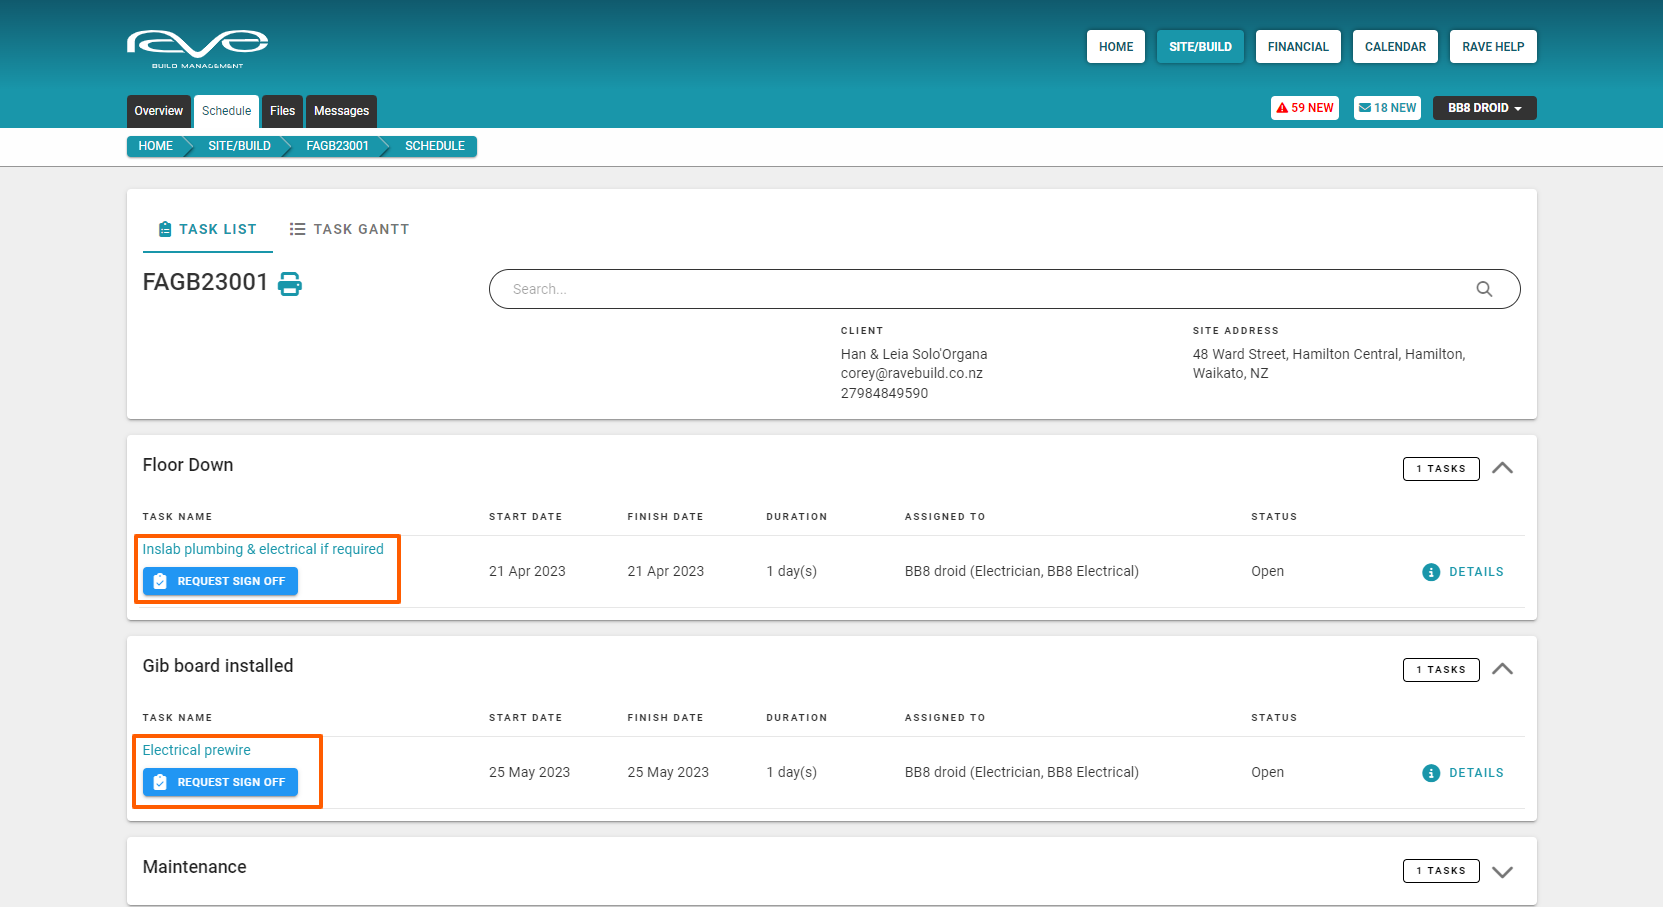
Firstly, logging in as ‘BB8’, opening this particular project, and clicking on the ‘Schedule’ sub-tab, we can see that BB8 has three tasks assigned him - let's test out the different workflows.

Accepting a Task - Contractor Log-in View
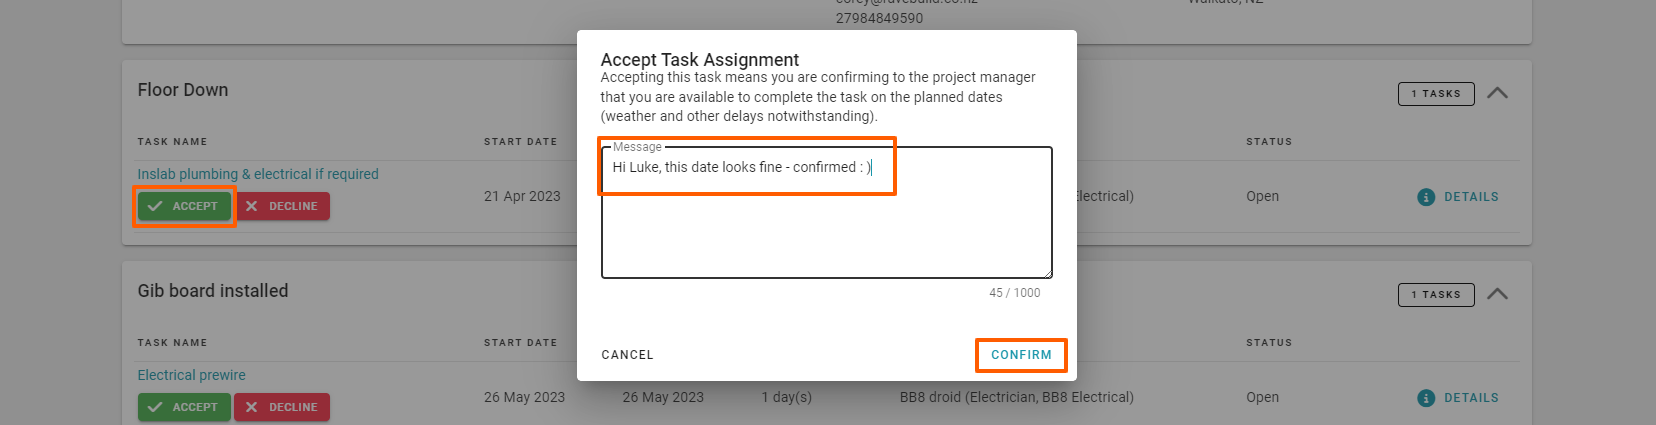
BB8 can do the ‘In slab plumbing & electrical if required’ task as requested, and therefore, clicks the green ‘Accept’ button to confirm.
This will open the contractors 'Accept Task Assignment' pop-up
The contractor has the ability to type in a message, and click 'Confirm’ to accept the task, locking in their acceptance to do that task on the dates required.
After the contractor Accepts the task, they will see a blue ‘Request Sign Off’ button appears. When the task is completed, BB8 can click the ‘Request Sign Off’ button to notify the project manager that this task has been done - ready for the PM or Site Manager to confirm the task has been completed to their level of standard.

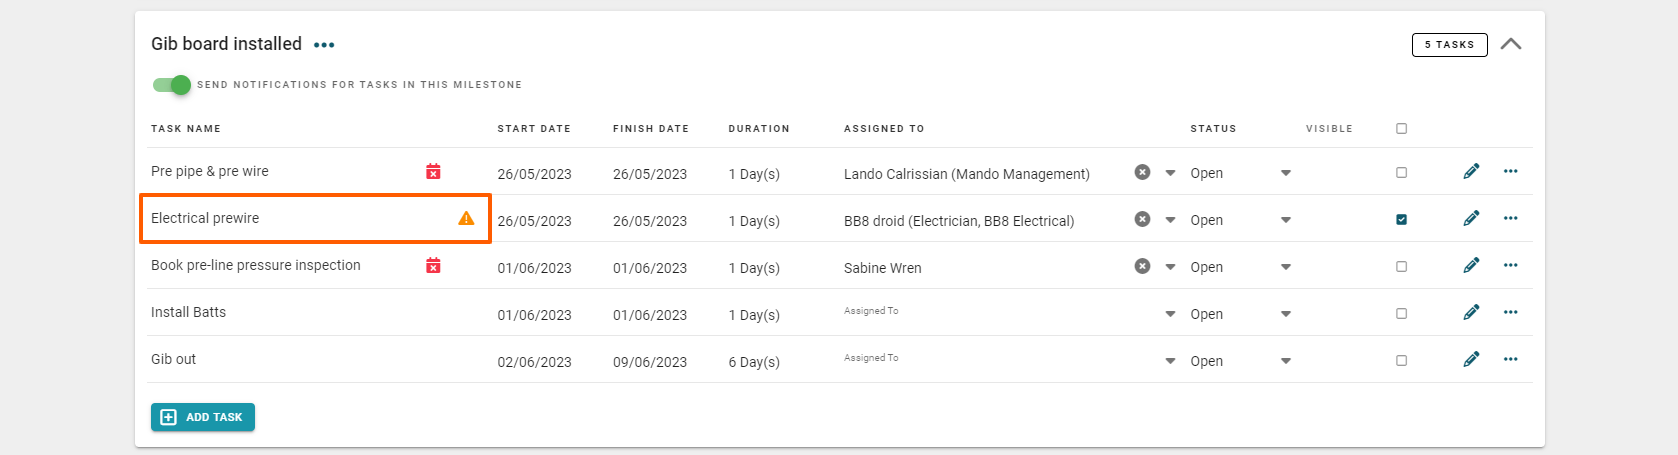
Declining a Task + Propose a New Start Date - Contractor Log-in View
BB8 can NOT do the ‘Electrical pre-wire’ task on the days requested and clicks the red ‘Decline’ button to advise this.
This will open the contractors 'Decline Task Assignment' pop-up
Again, the contractor has the ability to type in a message, and the option of 'Proposing a New Start Date'. If the 'Propose a New Start Date' option is selected, a calendar drop-down will appear, for them to select the dates that they can do the task, and the ‘Confirm’ button to request this reschedule of the tasks.

After the contractor 'Declines' and 'Proposes a New Start Date' on that task, they will see a ‘Reschedule Requested’ tag appear in blue text - the PM is notified, and the ball is now back in the PM's court to decide whether they want to accept when the task can be completed by BB8.
- If the PM accepts the change - the new dates will be locked in, and the blue 'Request Sign Off' button will appear for the contractor.
- If the PM declines the change, and assigns the task to someone else instead, the task will disappear from the contractors view.

Declining a Task - Contractor Log-in View
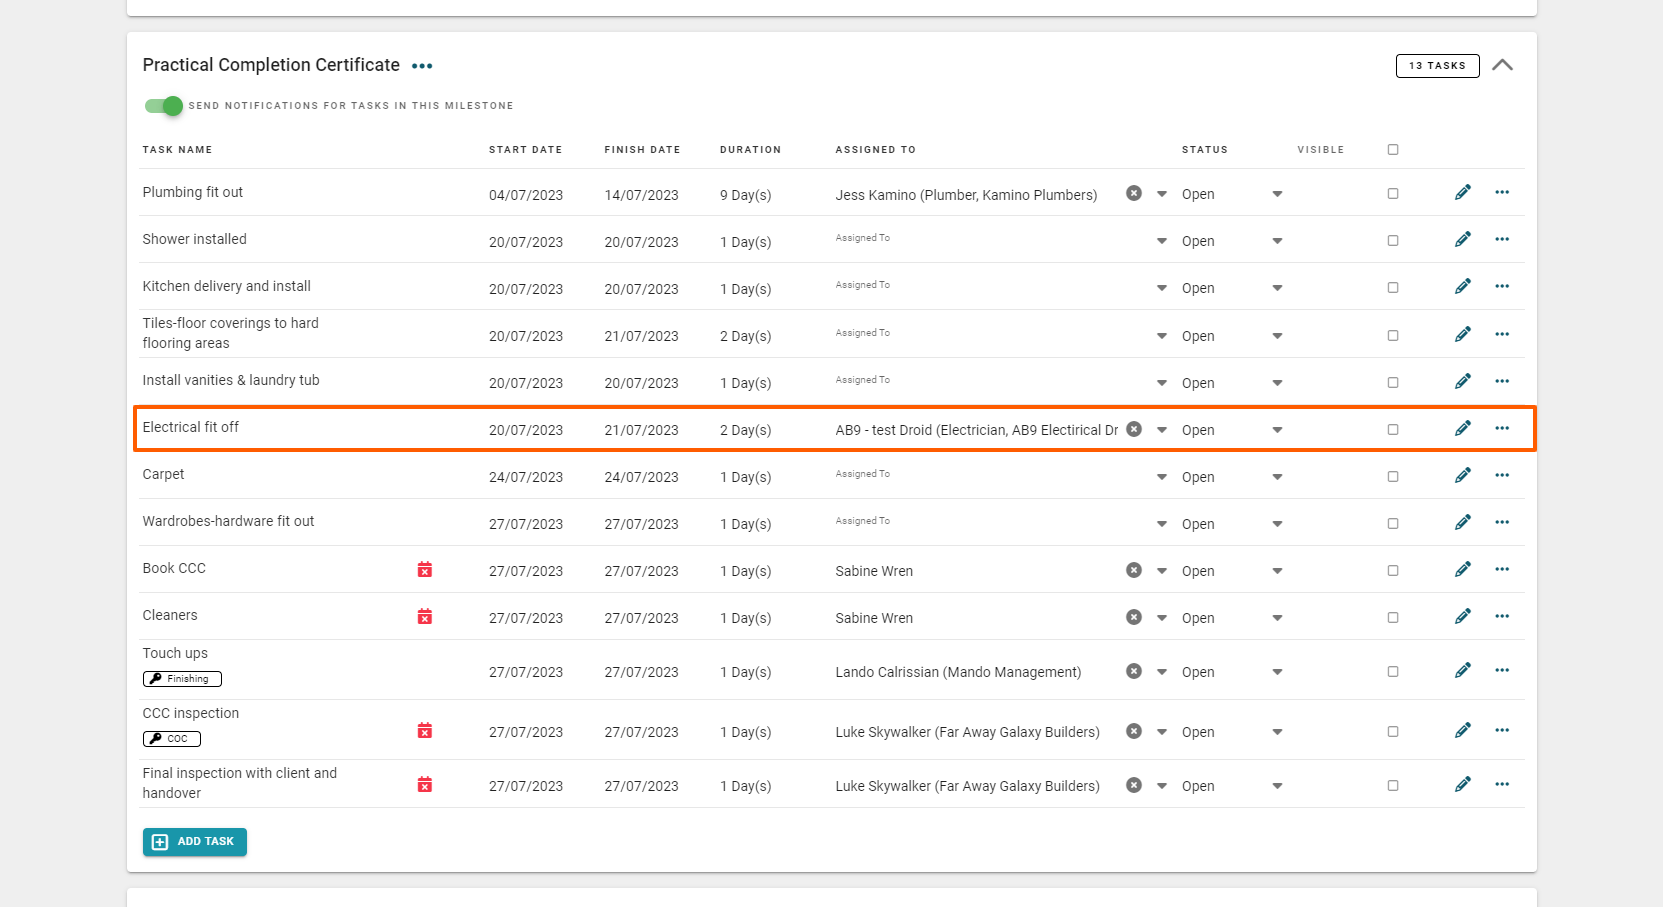
BB8 can NOT do the ‘Electrical fit off’ task at all, and clicks the red ‘Decline’ button to advise this.
This will open the contractors 'Decline Task Assignment' pop-up
Again, the contractor has the ability to type in a message, this time however, he selects the ‘Reject Task’ option.
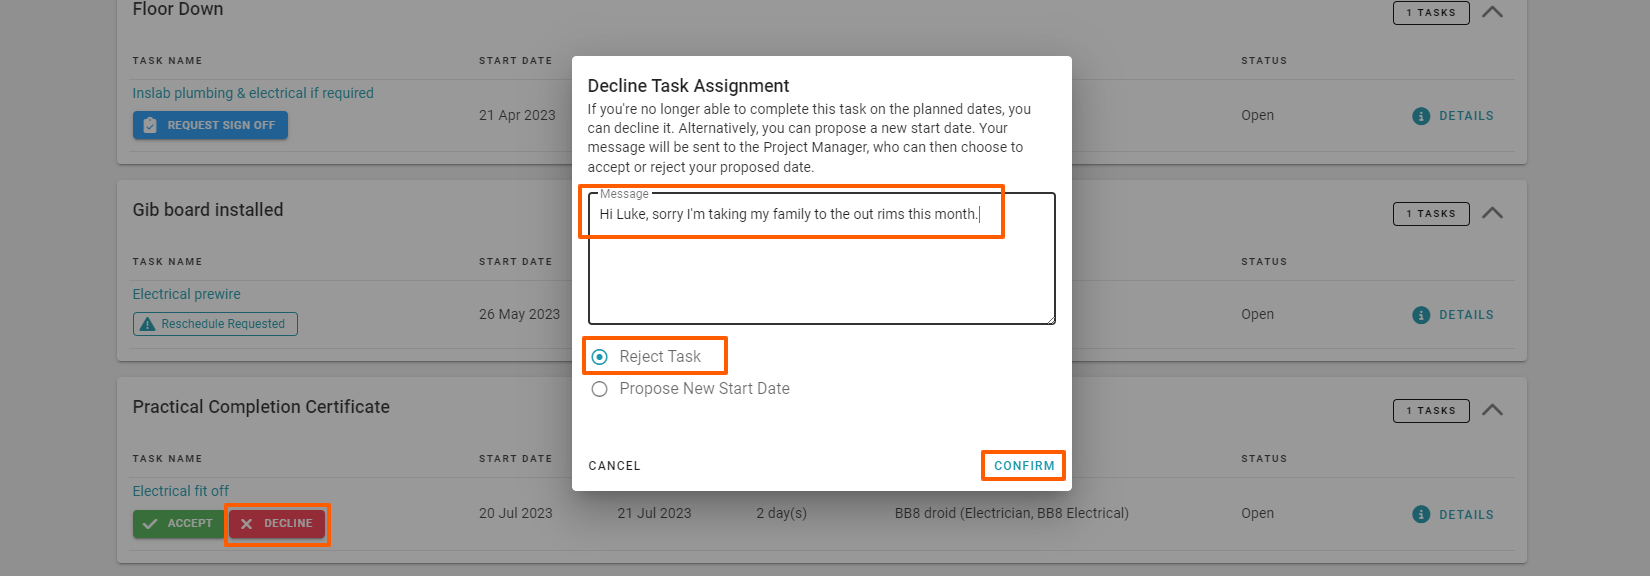
After BB8 confirms 'Declining' the task, they will see that the task is now noted as ‘Declined’ - the PM is notified immediately, allowing the PM to start organising an alternative contractor for the task.

Notification Alerts - Staff User (i.e. PM) Log-in View
Back to our branch user login, and refreshing the page, we can see a number of alerts have popped up - to the top right of the screen. Scrolling through the alerts, we find the following three alerts from our electrical contractor ‘BB8’:
He has accepted the ‘In slab plumbing & electrical’ task.
He has requested a new start date for the ‘Electrical prewire’ task.
He has declined the ‘Electrical fit off’ task.

We can click on any of these alerts and be taken to the specific task to look at more details. Viewing the ‘In slab plumbing & electrical’ tasks comments and photos, we can see that the status is Open - Accepted i.e. the contractor has confirmed he will do the task, on the dates we've requested.
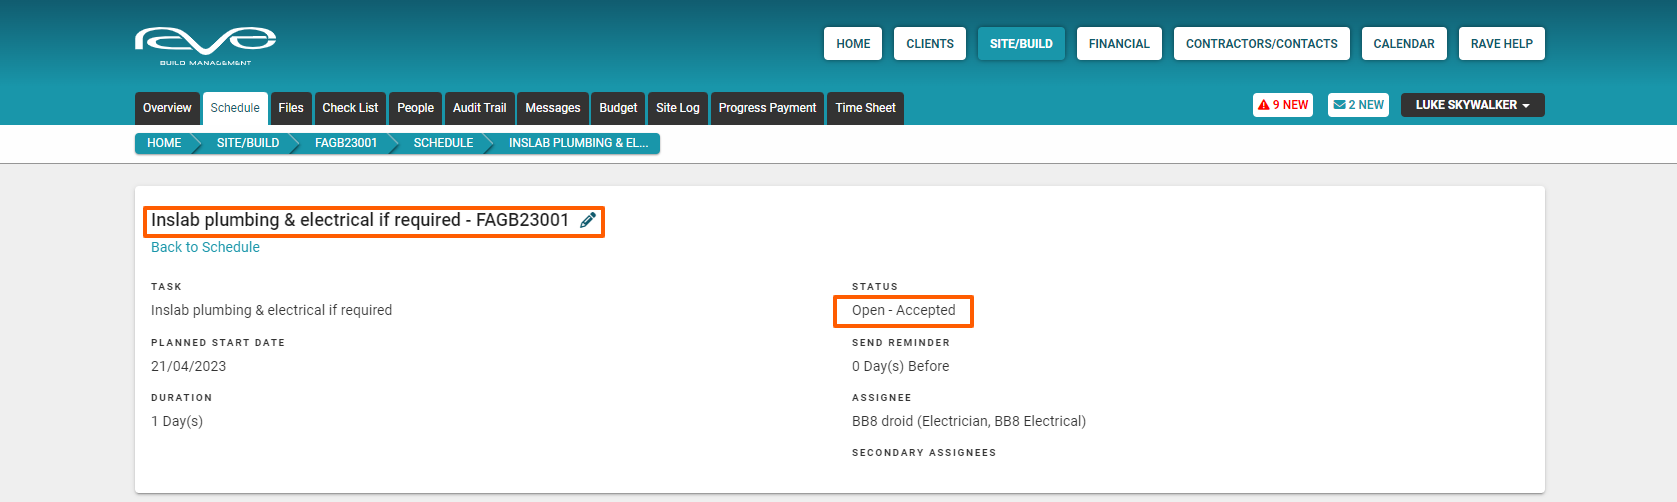
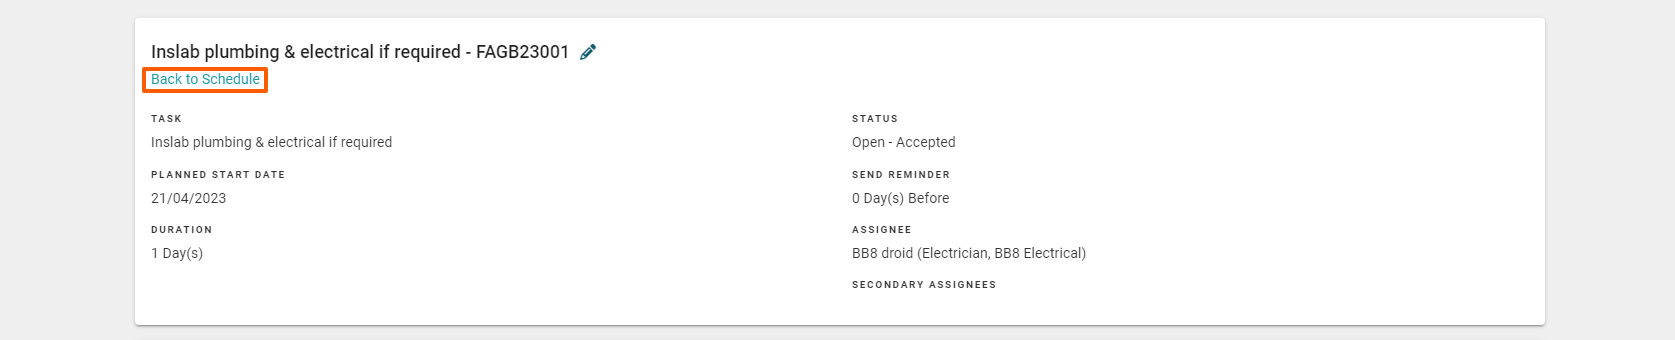
Clicking the 'Back to Schedule' button (to the top left of the page) returns us to the schedule Task List view .
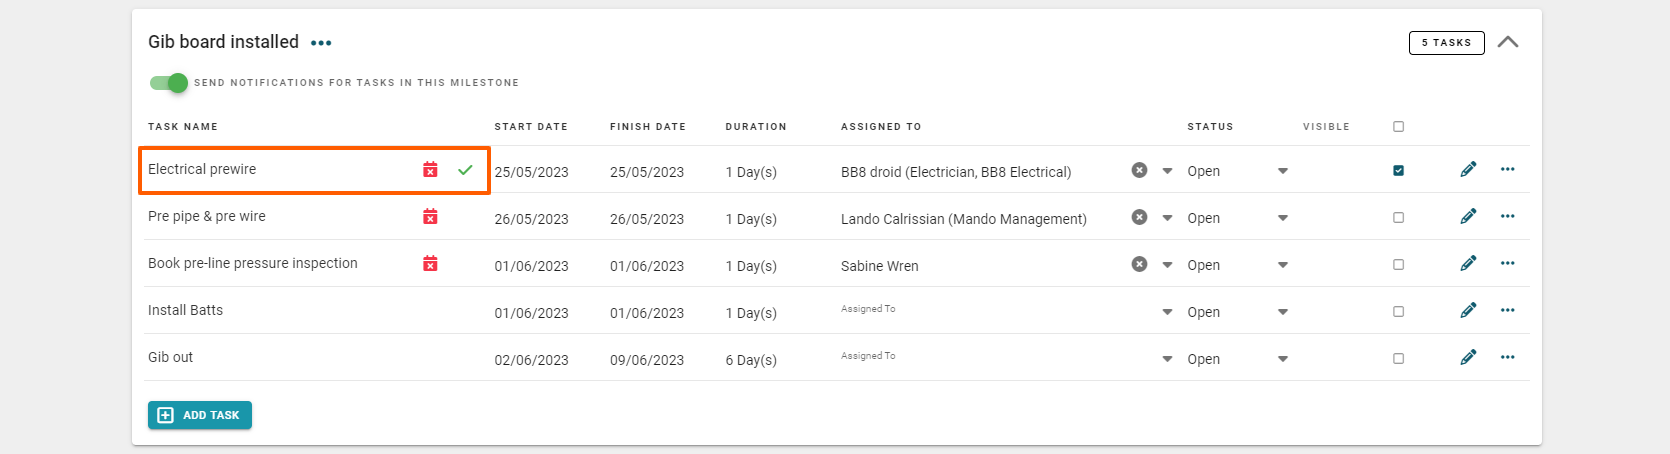
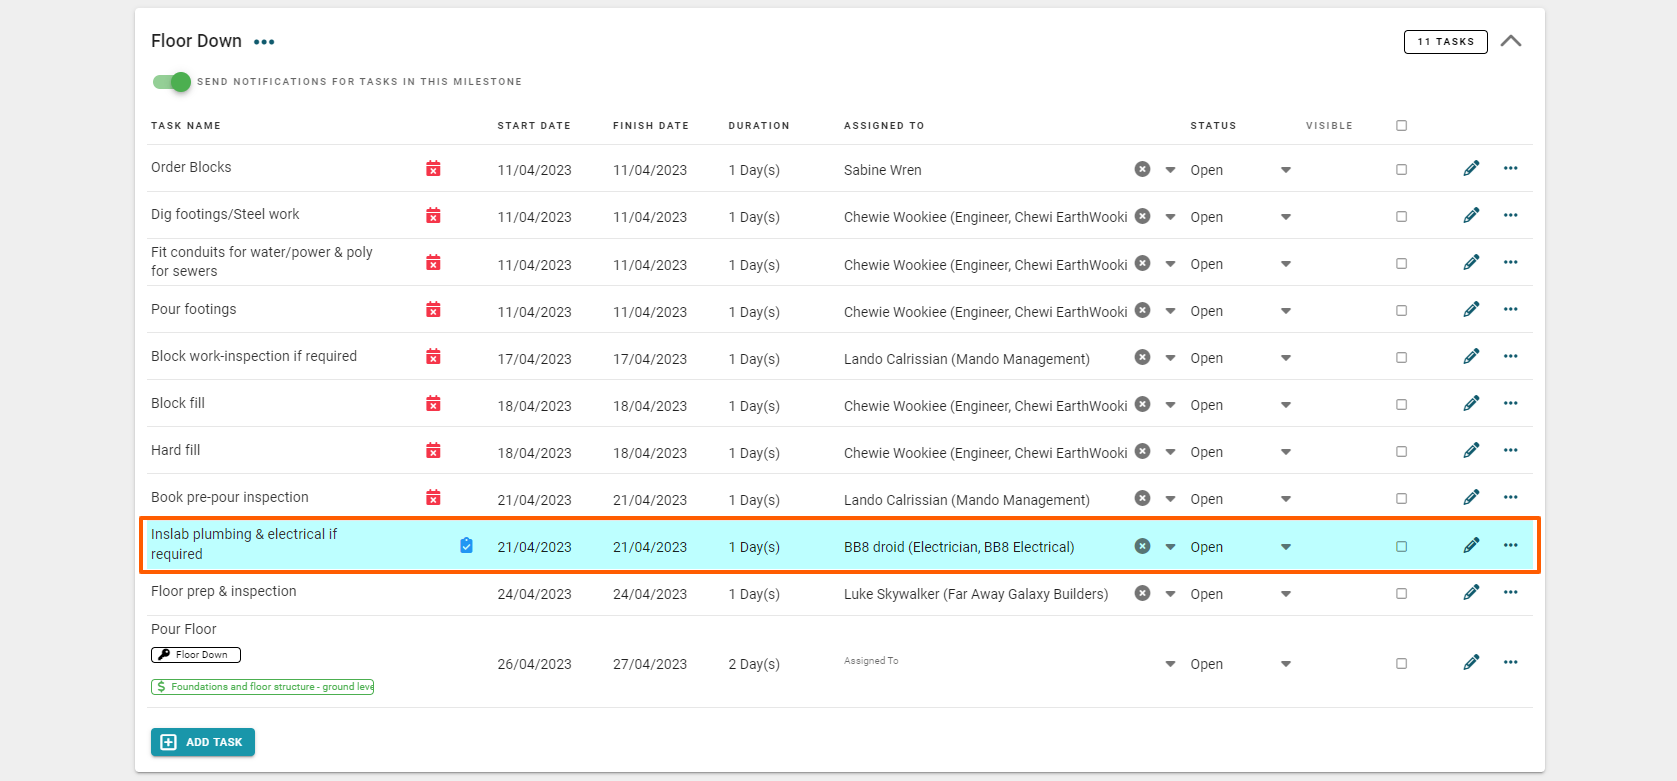
Green Tick icon - Task Accepted
Scrolling down the task list view of the schedule, to the ‘Inslab plumbing & electrical’ task, we can see it has a green tick - this means that the contractor has confirmed that he will do the task on the requested dates.
Orange Triangle icon - Task Declined + Propose a New Start Date
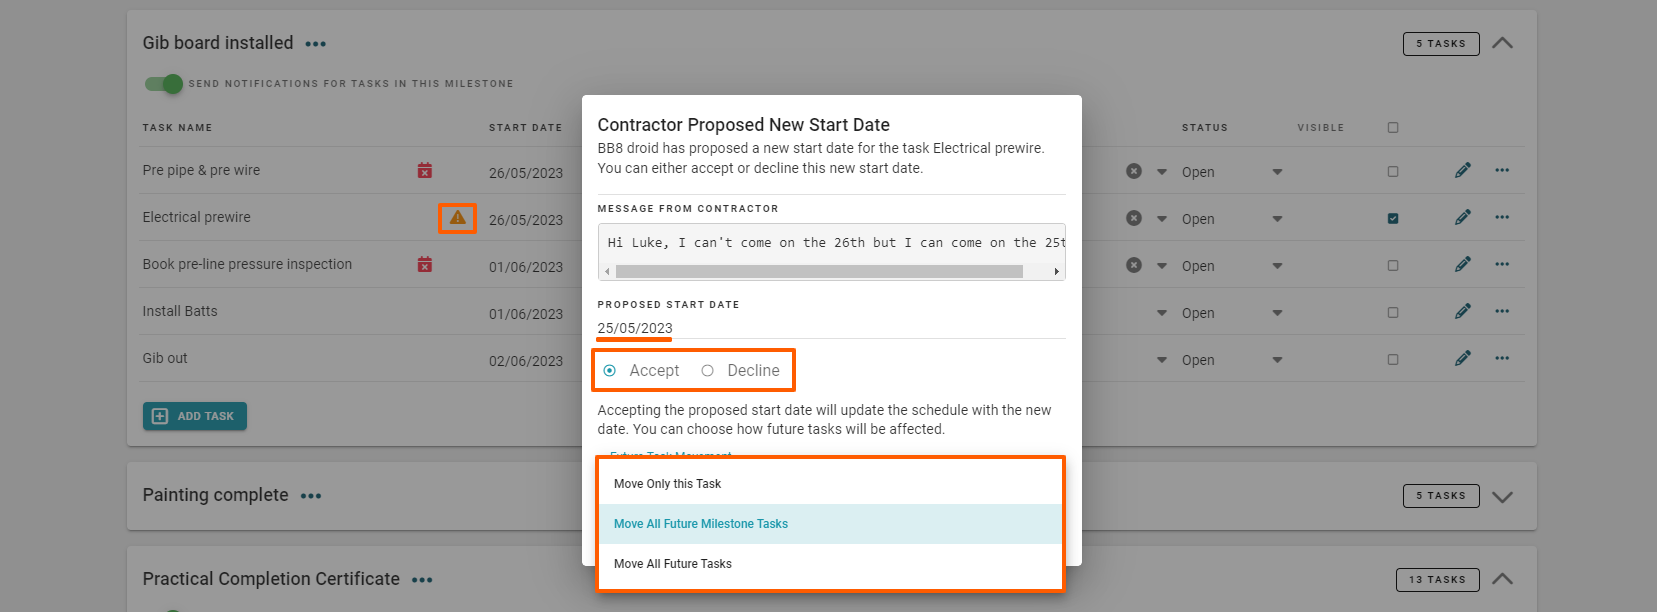
Moving down to the ‘Electrical prewire’ task, we can see it has an orange alert icon - this means that the contractor can't do the assigned task on the dates requested, and they are proposing a new start date.
Clicking on the orange alert icon, will open the 'Contractor Proposed New Start Date' pop-up, displaying the alternative dates proposed by the contractor.
From the 'Contractor Proposed New Start Date' pop-up, we can either select ‘Accept’ or ‘Decline’ the date change request.
If the proposed date(s) DO work for us (the PM/building company) then we can accept them. When we do so, we are given the 3 options of updating the schedule:
- ‘Move Only This Task’
- ‘Move All Future Milestone Tasks’
- ‘Move All Future Tasks’
In this instance, we are going to update this task only, clicking on the 'Move Only This Task' option, actioning this by clicking on the ‘Confirm’ button.
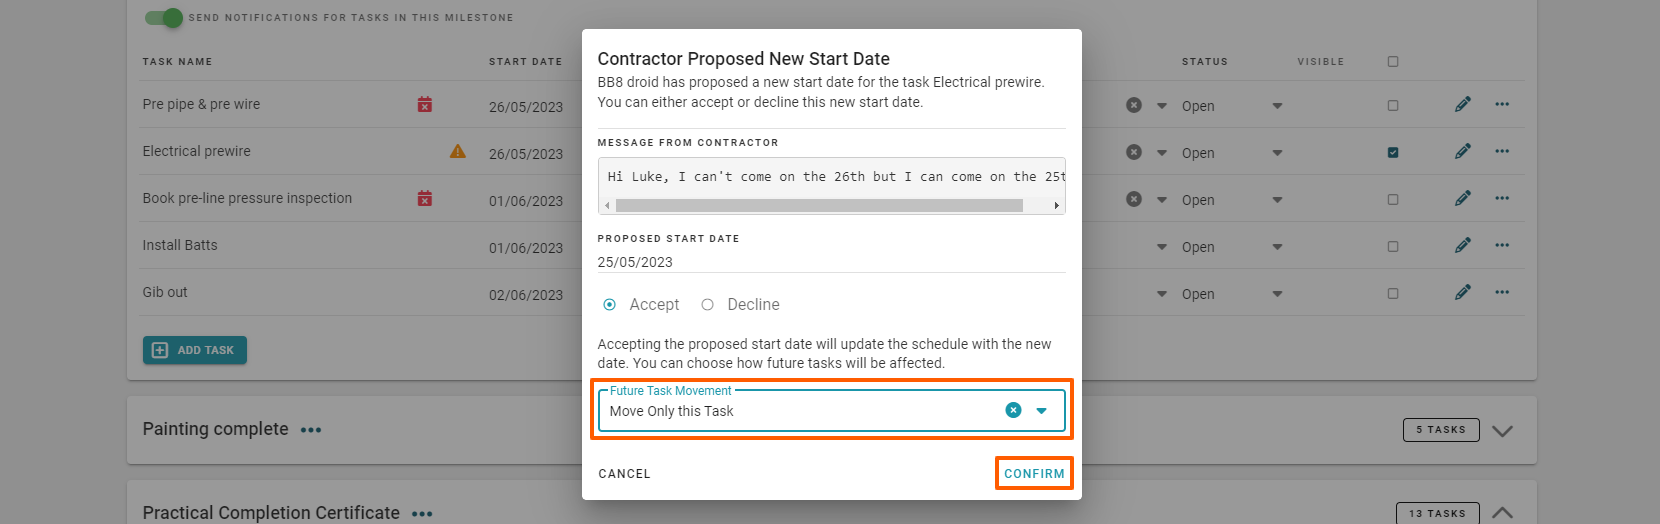
This returns us back to the task list view of the schedule, and we can now see the we can now see that the ‘Electrical prewire’ task has a green tick - the contractor has confirmed that he will do the task on his proposed dates - and you've accepted that.
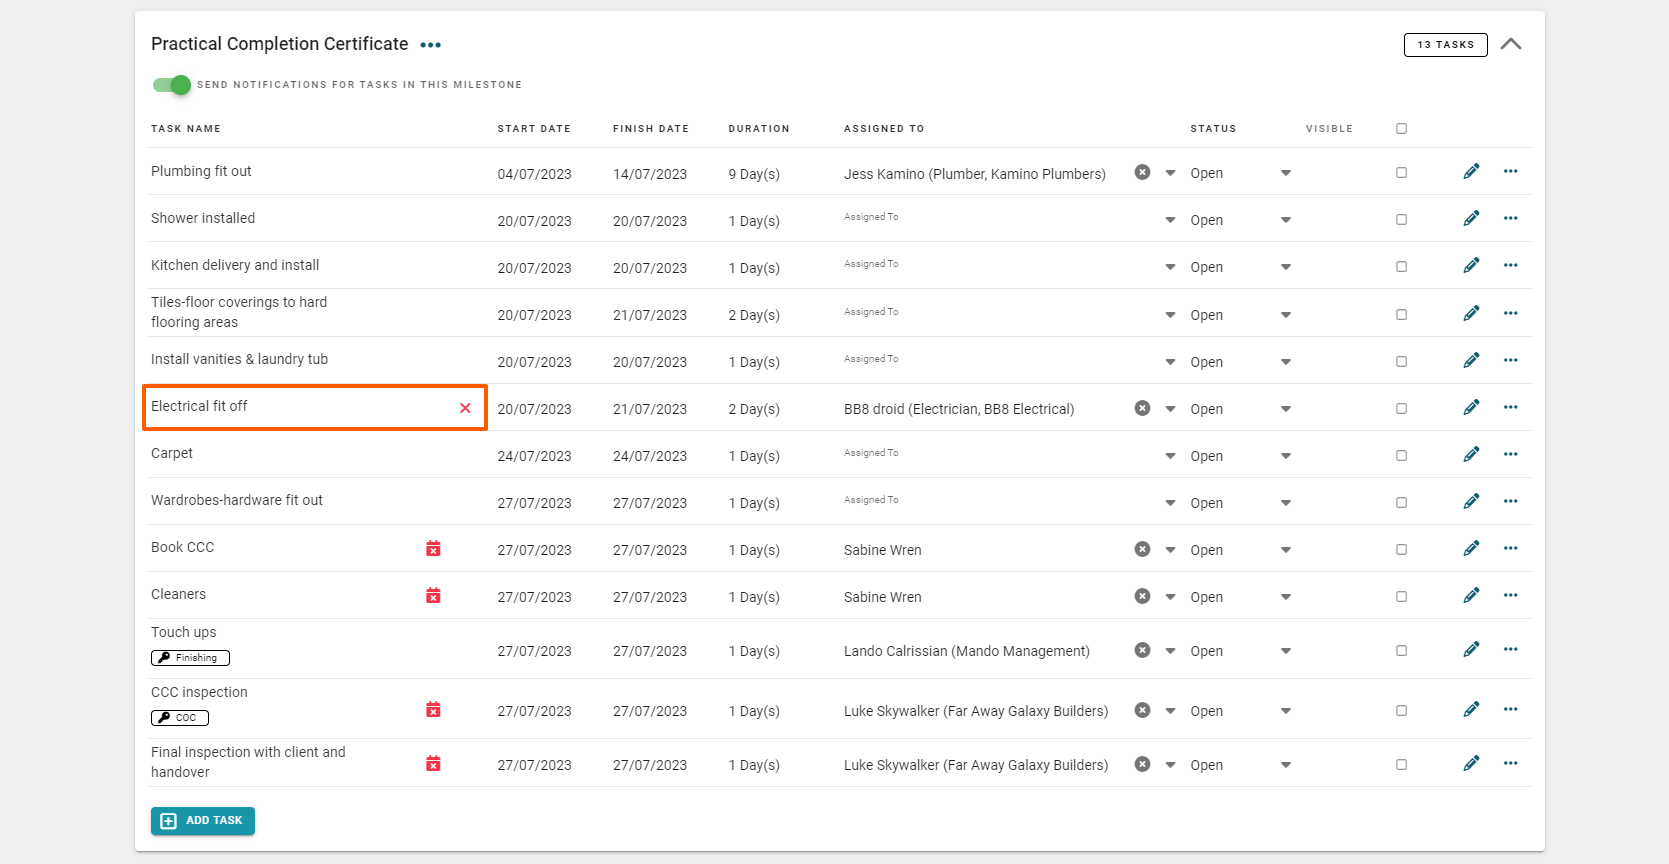
Red Cross icon - Task Declined
Moving down to the ‘Electrical fit off’ task, we can see it has a red cross icon - meaning that the contractor has declined to do this task.
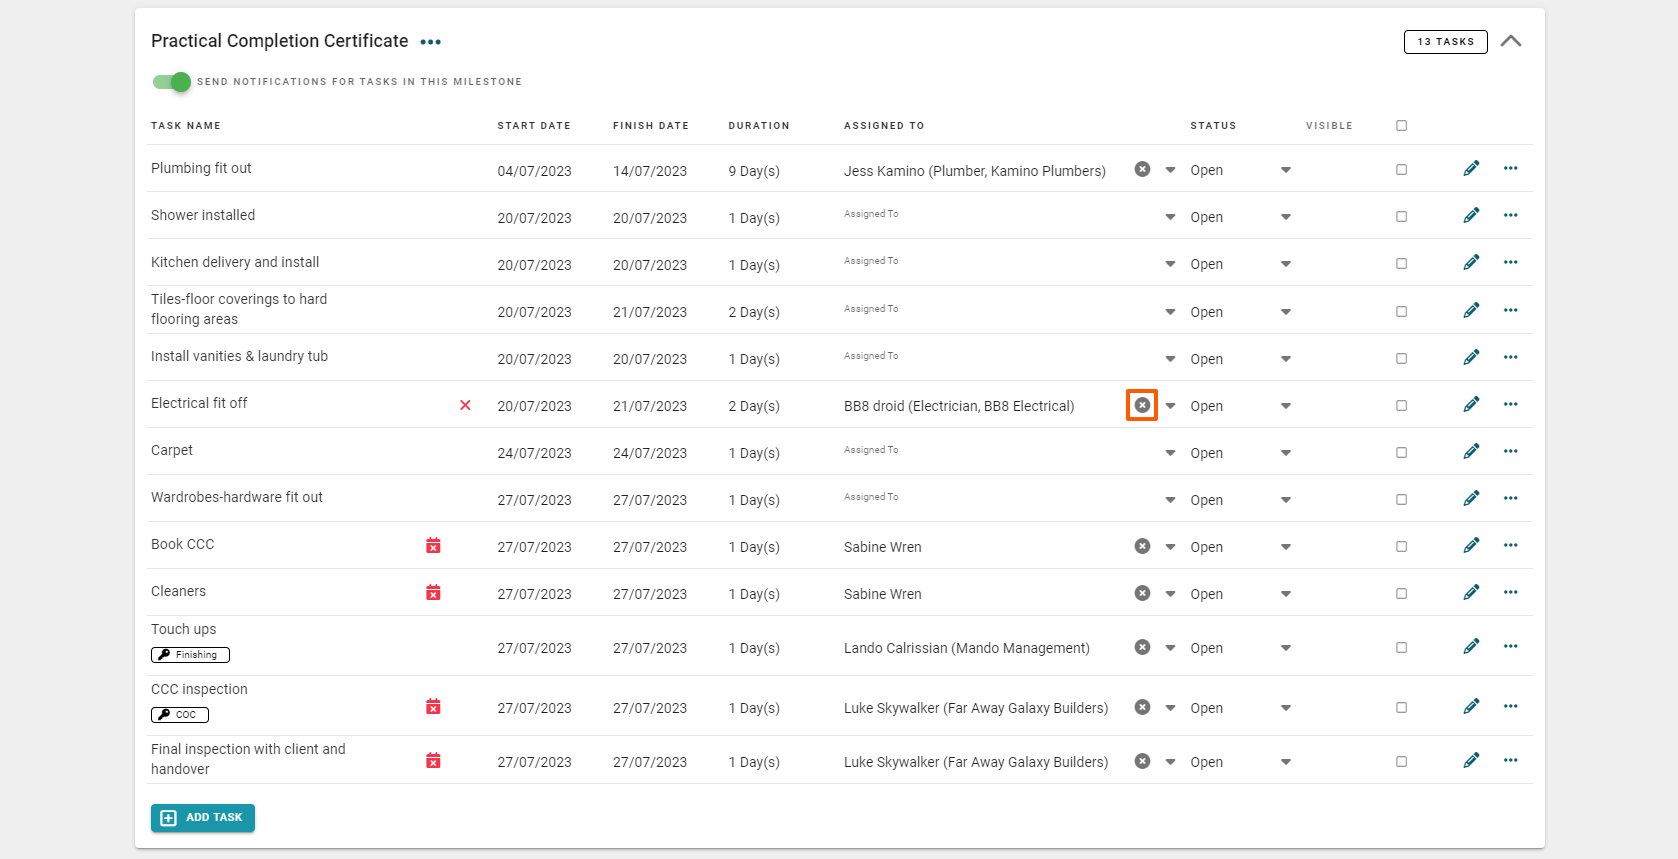
We can now remove the contractor ‘BB8’ from the ‘Assigned To’ field of the project, by clicking on the ‘X’ button to the right of his name. And select an alternative electrical contractor from the 'Assigned To' field to take over this task.
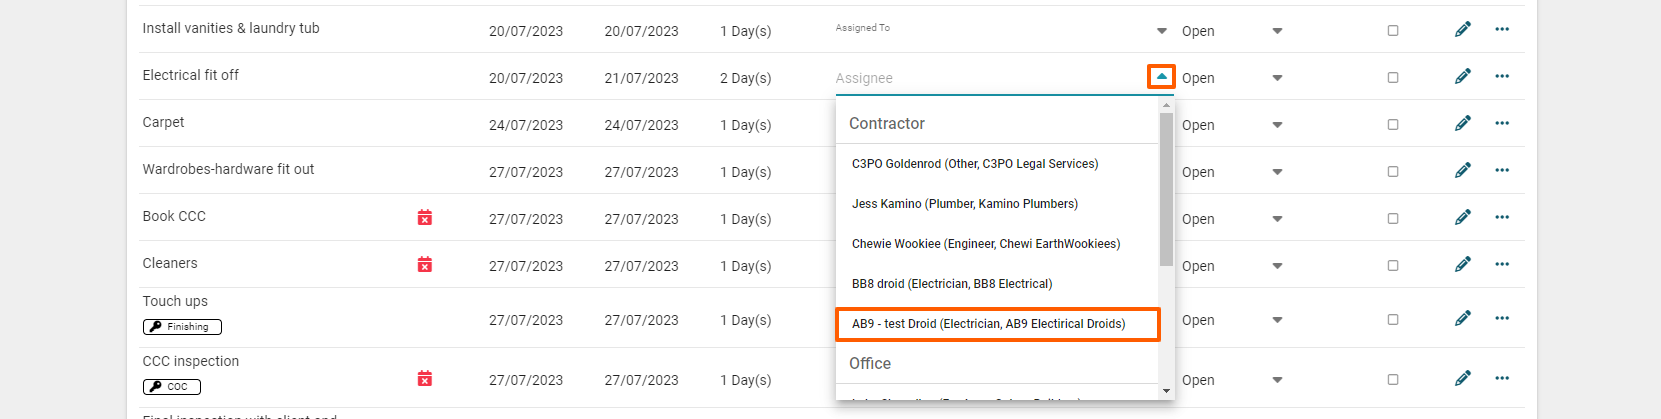
By refreshing the screen, we can see that the assigned contractor has been changed, and that the red cross (declined) icon has disappeared.
RAVE's Scheduling 'Contractor's Request Sign-Off' Workflow
With all of RAVE's scheduling modes ('Classic', 'Enterprise' and 'Advanced'), you can give contractors the ability to 'Request sign-off on tasks' (via the project or branches schedule settings page). This means that when the contractor has completed their task, they can let the PM or Site Manager know (via RAVE) that their assigned task has been finished - allowing the PM or Site Manager to check and confirm the work is up to standard before it has been marked off as complete on the schedule.
Demo of the 'Contractor's Request Sign Off' Workflow
Let's have a look at the 'Accept or Decline Tasks' workflow from both the contractor's side (logging in as ‘BB8’, our 'dummy' electrical contractor) and also as 'Luke' the Project Manager.
Request Sign-Off - Contractor Log-in View
Firstly, by logging in as ‘BB8’, opening this particular project, and clicking on the ‘Schedule’ sub-tab, we can see that BB8 has two tasks assigned to him - let's test out the 'Request Sign-Off' workflow.
NOTE: In the screenshot below, we can see that in this instance, the contractor has a new alert - clicking on the 'your proposed start date for the task Electrical Prewire in FAGB23001 has been accepted' alert, will also take the contractor to that task to view.

Whenever a contractor has finished an assigned task, they can click their task's blue 'Request Sign Off' button to let the project manager know that the task has been done.
This will open the contractors 'Request Sign-Off' pop-up
The contractor has the ability to type in a message, and click 'Confirm’ to notify the PM or Site Manager that the task has been done.

The page will refresh, and the contractor will see that the 'Request Sign-off' status has disappeared, replaced by the orange 'Awaiting Sign-Off' icon - meaning we are awaiting for the PM/Site Manager to confirm he is happy that the task has been completed to their standard.

Awaiting Sign-Off - Staff User (i.e. PM) Log-in View
Back to our branch user login, and refreshing the screen, we can see a number of alerts have popped up - to the top right of the screen. Scrolling through the alerts, we find that our electrical contractor 'BB8' has completed both of these tasks and is requesting sign-off from us. We can click on any of these alerts and be taken to the specific task to look at each in more detail.

Returning to the task list view of the schedule, and scrolling down the screen, we can see that our first 'Awaiting Sign-Off' task, is completely highlighted in blue - this is the primary indicator that a task is awaiting your sign-off. Also, the task has the 'Awaiting Sign Off' blue clipboard icon (with a tick).
At this point, we can either check over the work ourselves or ask our site manager to assess it. Once we are happy that the work has been completed to our satisfaction, we can change the task status to complete - via the task 'Status' column drop-down.

Then, refreshing the screen, we can see that the teal awaiting sign-off status has been removed, as has the blue clipboard icon, and that the task status has been marked off as completed.

Task Completed - Contractor Log-in View
Back to our contractor login, and refreshing the page, we can see that the Awaiting Sign-Off icon has been replaced by the Task Completed icon, and the task status has also changed to Completed.

Enterprise Scheduling - Task Gantt Features
Access this demo here.
Enterprise scheduling opens up a range of handy scheduling features that are best seen via the ‘Task Gantt’ view of our schedule. With our project set to enterprise mode, we can see that there are a few changes on the screen.
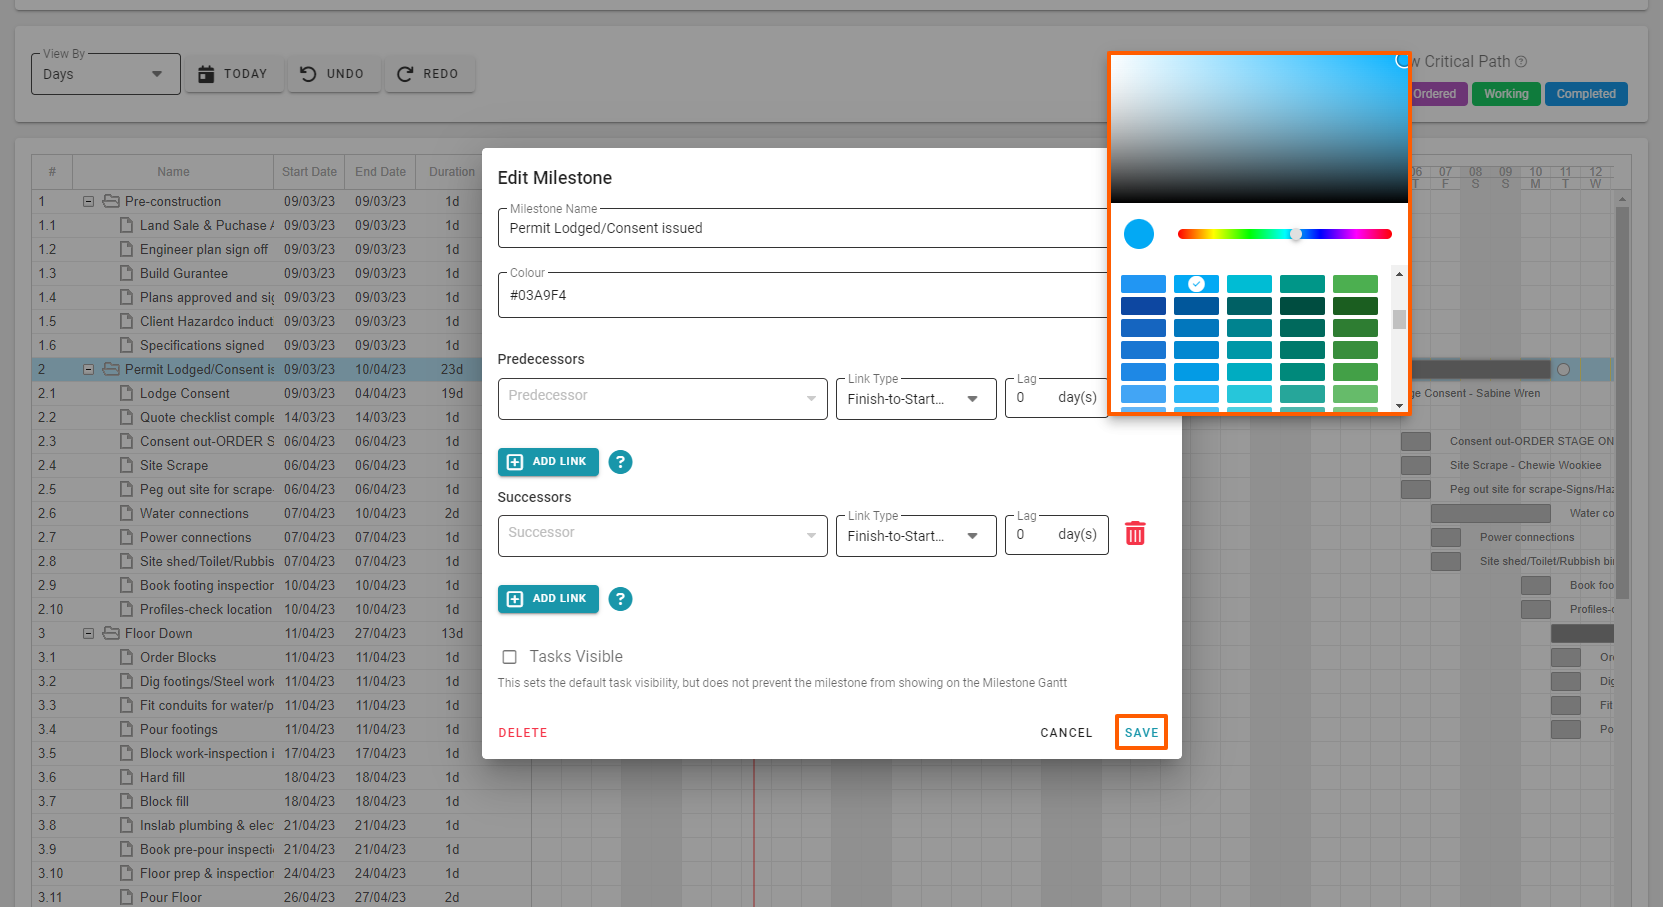
1. Milestones (as well as tasks) are visible on the Gantt view with Enterprise scheduling.
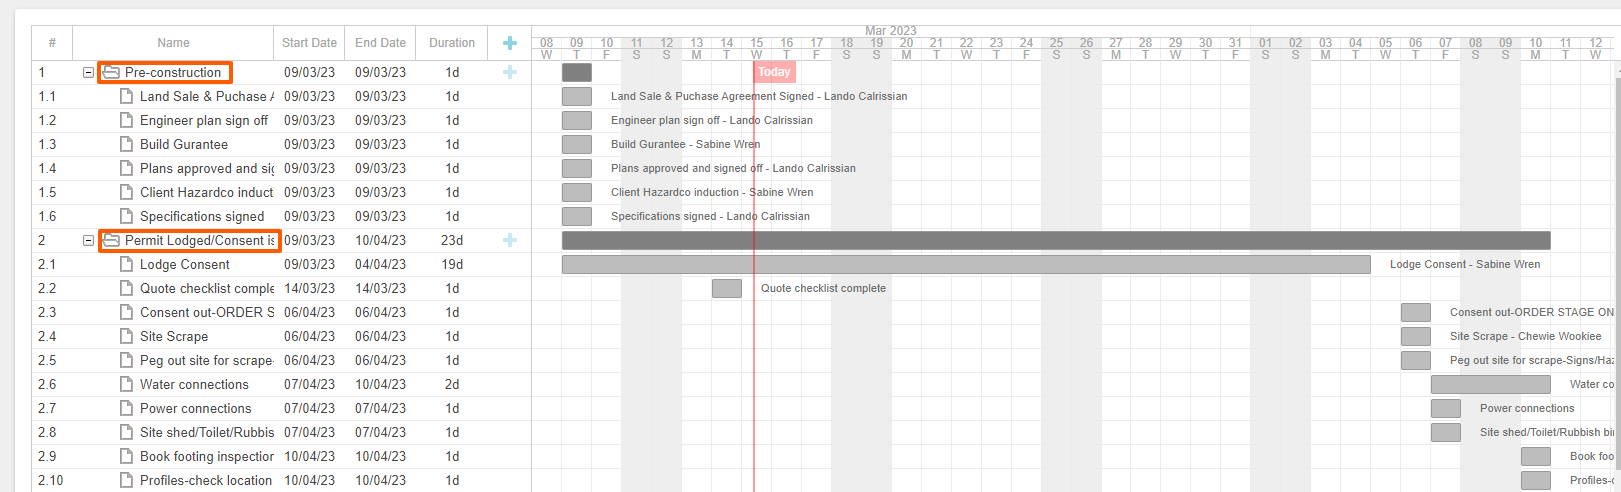
2. Any color-coded milestones are more clearly seen on the Enterprise schedule Gantt view.
NOTE: We cannot color code tasks as this would disrupt the task status views.

3. We can click and drag milestones via Enterprise's gantt view - this also moves their associated tasks
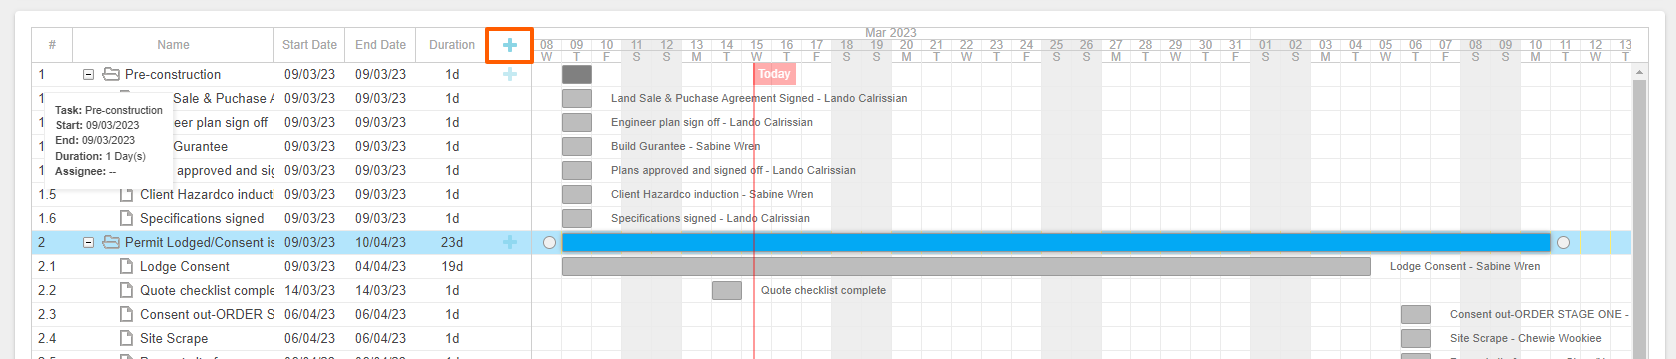
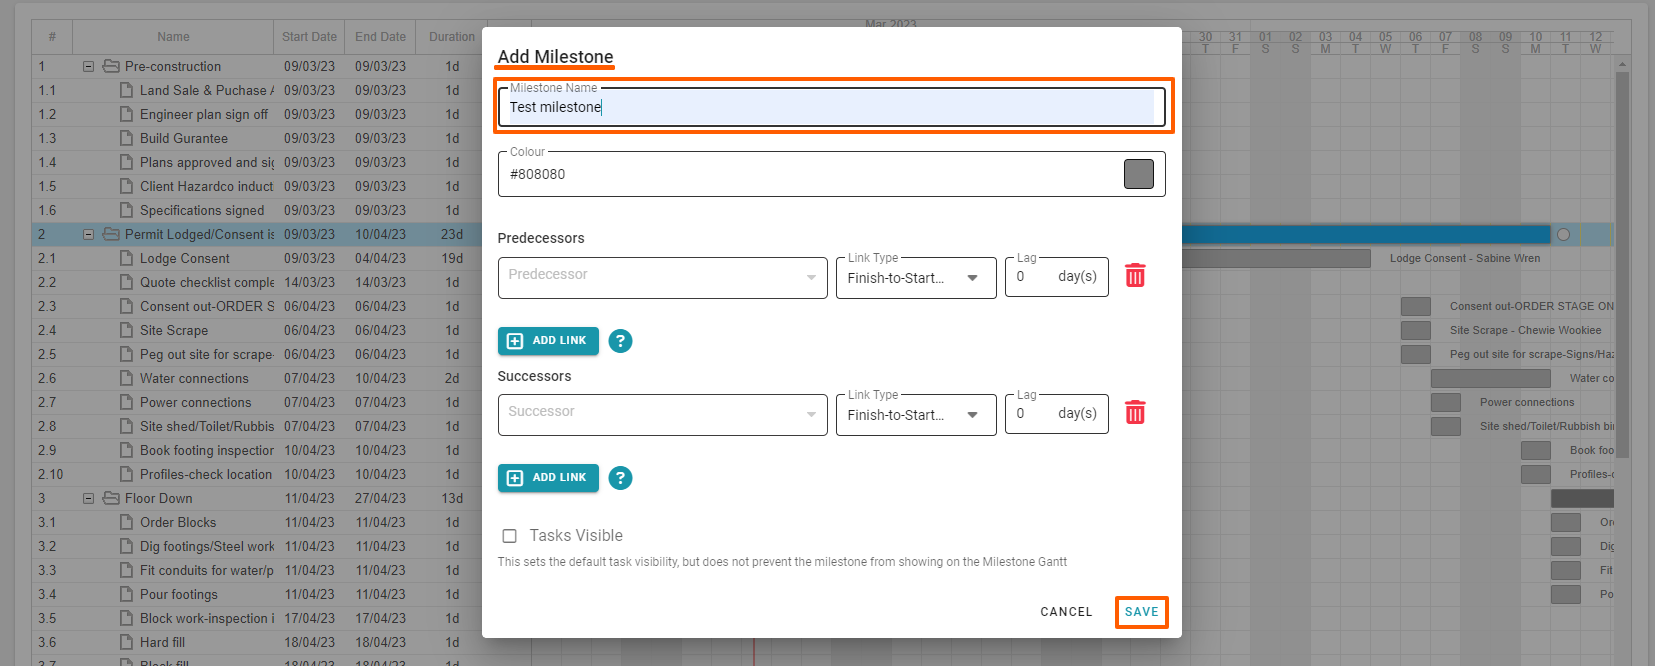
4. We can add milestones and tasks via Enterprise's gantt view
- Add milestones by clicking on the ‘+' icon to the right of the Duration column header
- Add a task by clicking on the '+' icon to the right of the duration of the milestones description
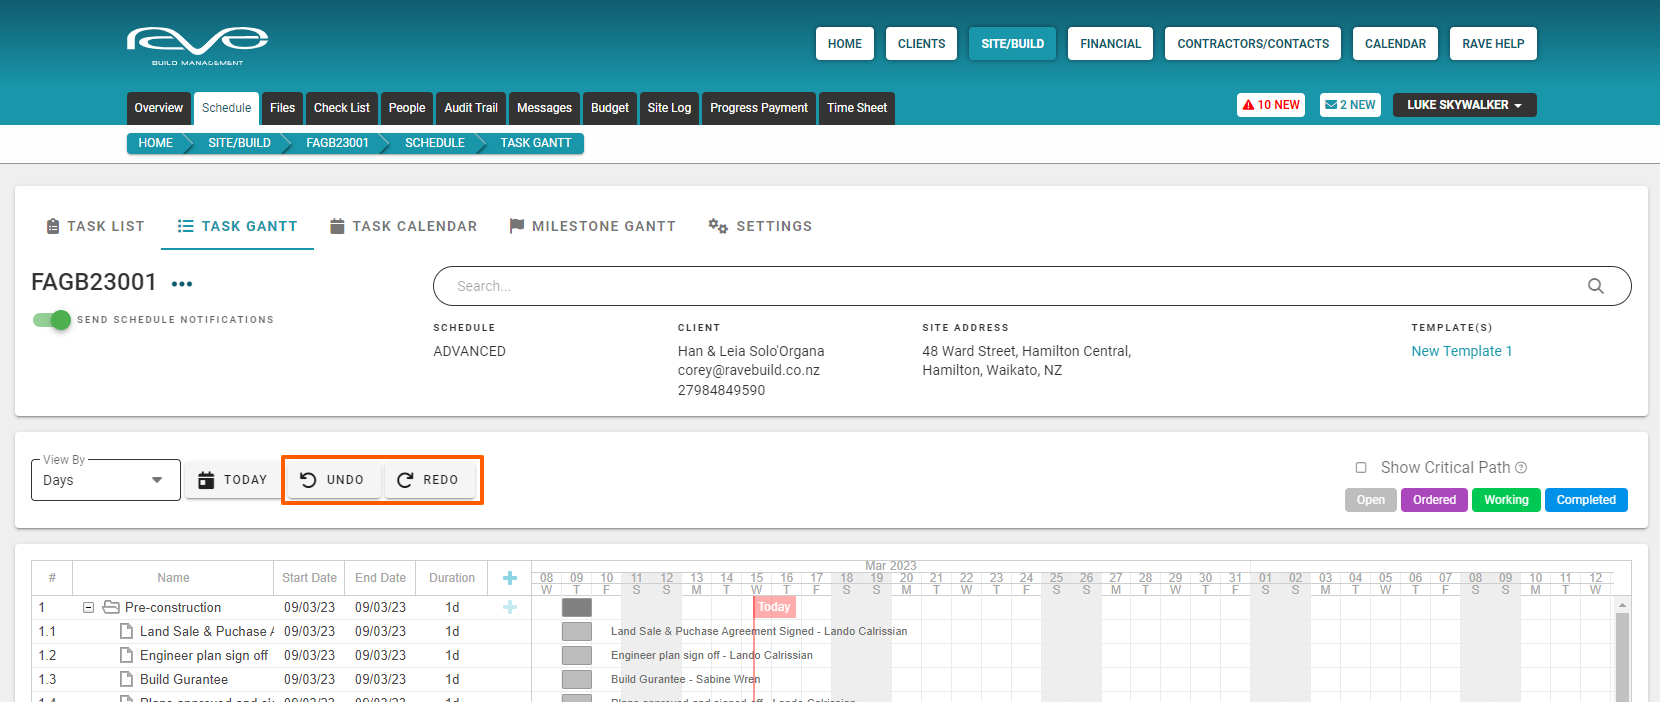
5. Click and drag Undo/Redo buttons
The Task Gantt in Enterprise Scheduling has these handy undo/redo buttons, allowing you to undo any click and drag milestone or task changes - that is in addition to the rollback function available with our classic scheduling.
NOTE: We can undo up to 10 steps backward/forwards. However, refreshing/or moving off the page resets the memory of the undo/redo buttons.
RAVE's 'Enterprise' Schedule Templates
Access this demo here.
With enterprise scheduling, you have additional options around loading templates.
Load a Schedule Template on top of an existing Milestones and/or Schedule Templates
With RAVE's Enterprise scheduling, you have the ability to load a schedule template, on top of existing milestones or schedule templates.
TIP: This gives you the ability to build your schedule in 'blocks', as in, separating out the sales process, the handover to construction, pre-construction, construction, maintenance, and any other 'blocks' of tasks/milestones you want to create.
How to Load a Schedule Template on top of existing Milestones and/or Schedule Templates
The process of loading a template over existing milestones and/or schedule templates is the same as loading a template normally. That is:
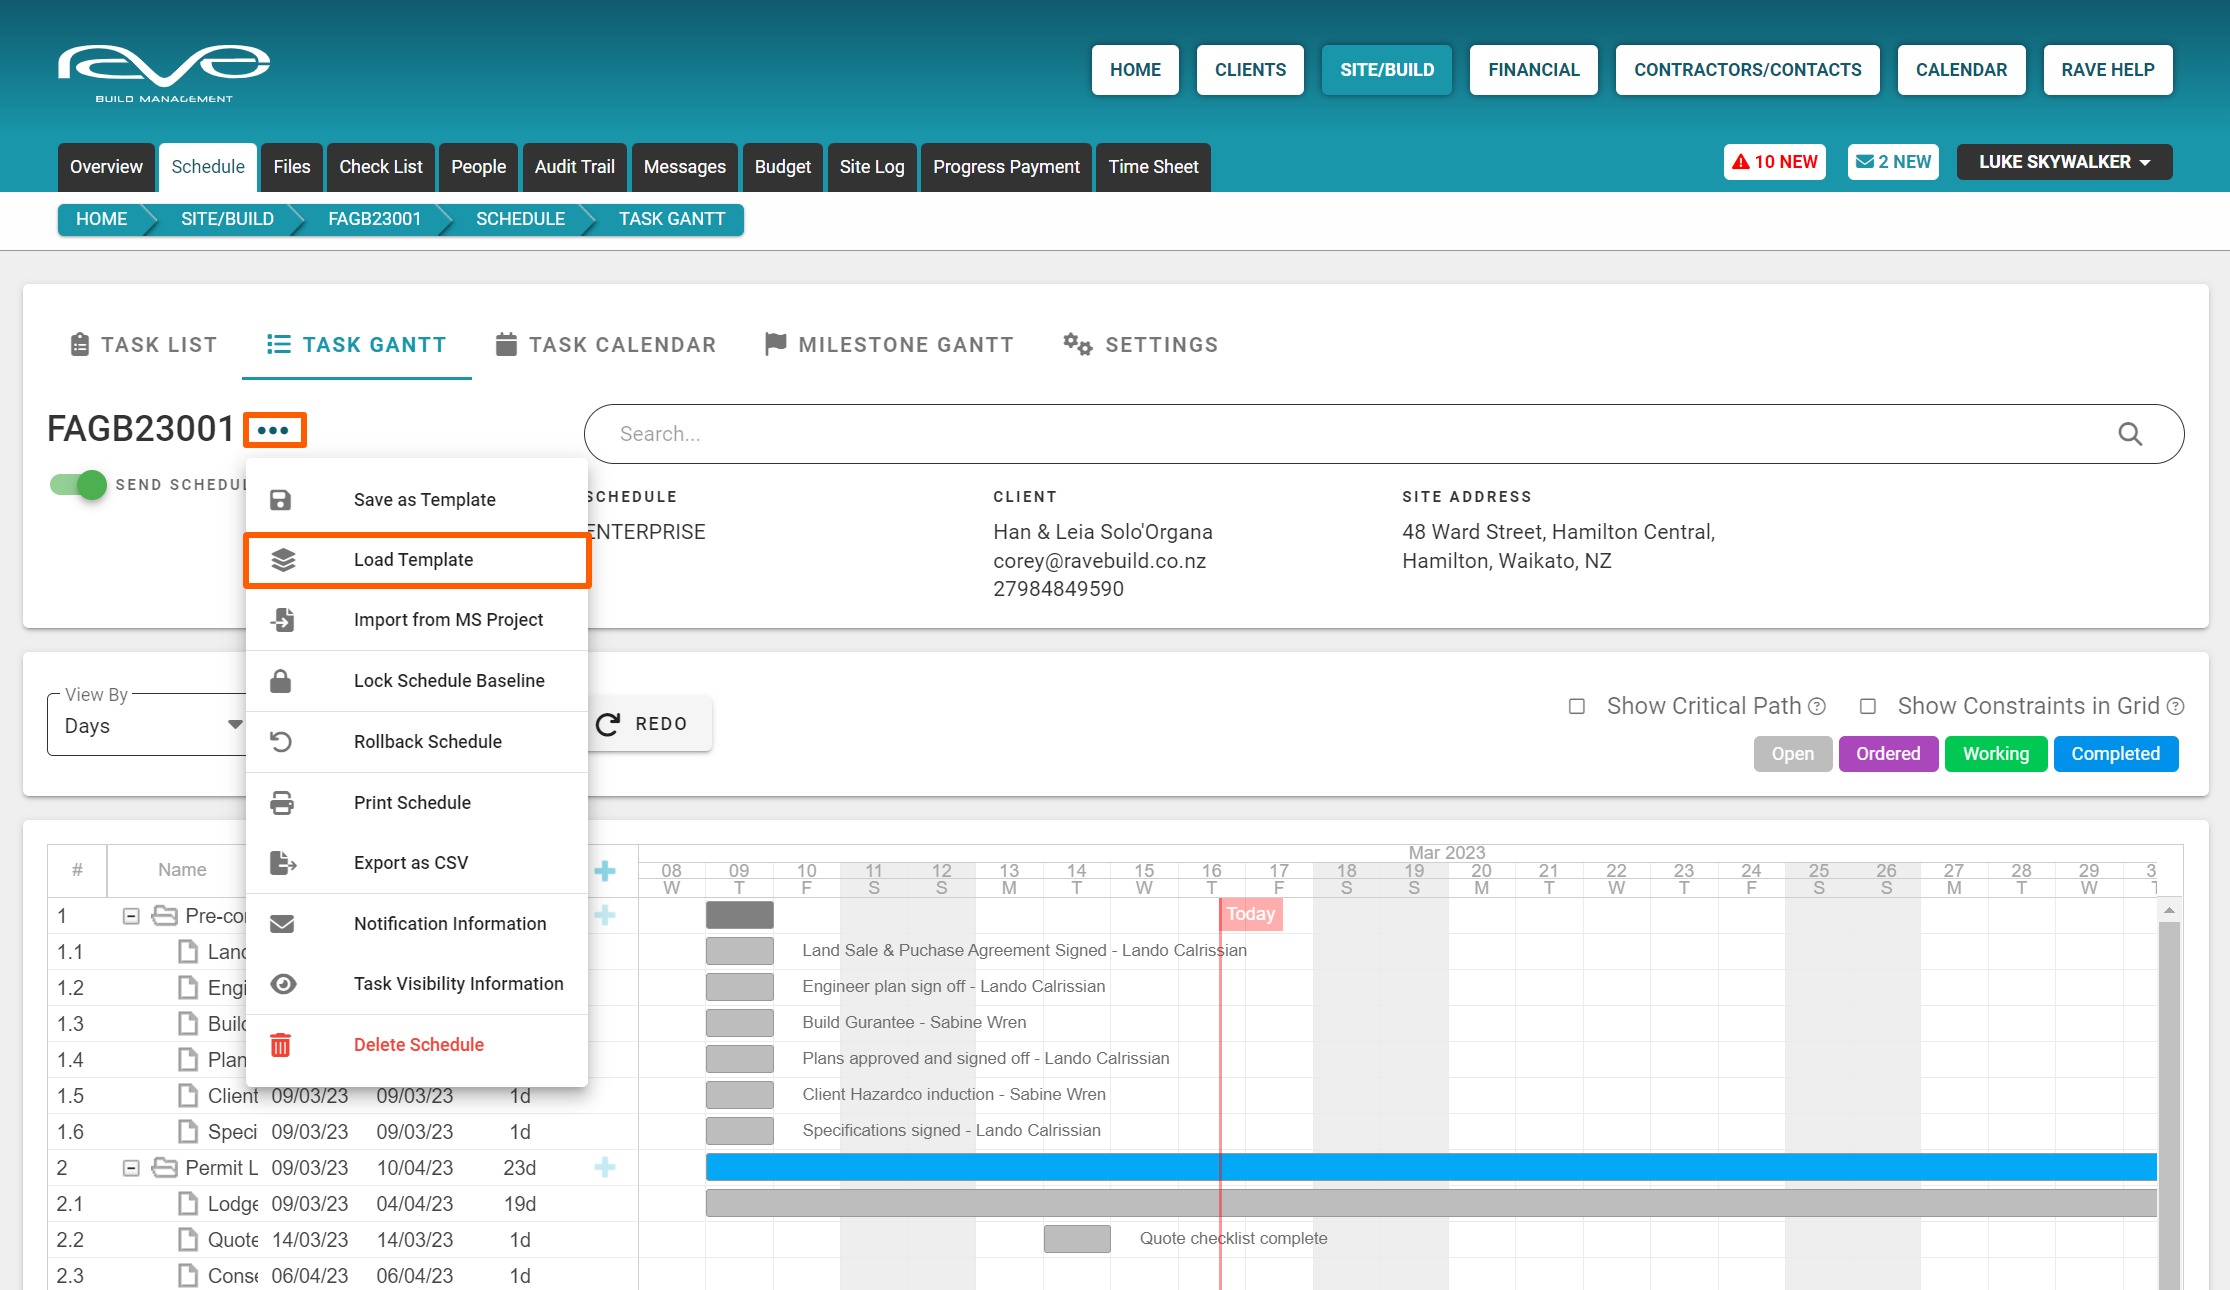
- Going to the task list view of the schedule
- Clicking on the ‘Load Template’ selection (from the meatballs action dropdown button next to the project name) or via the 'Load Template' button to the bottom left of the schedule
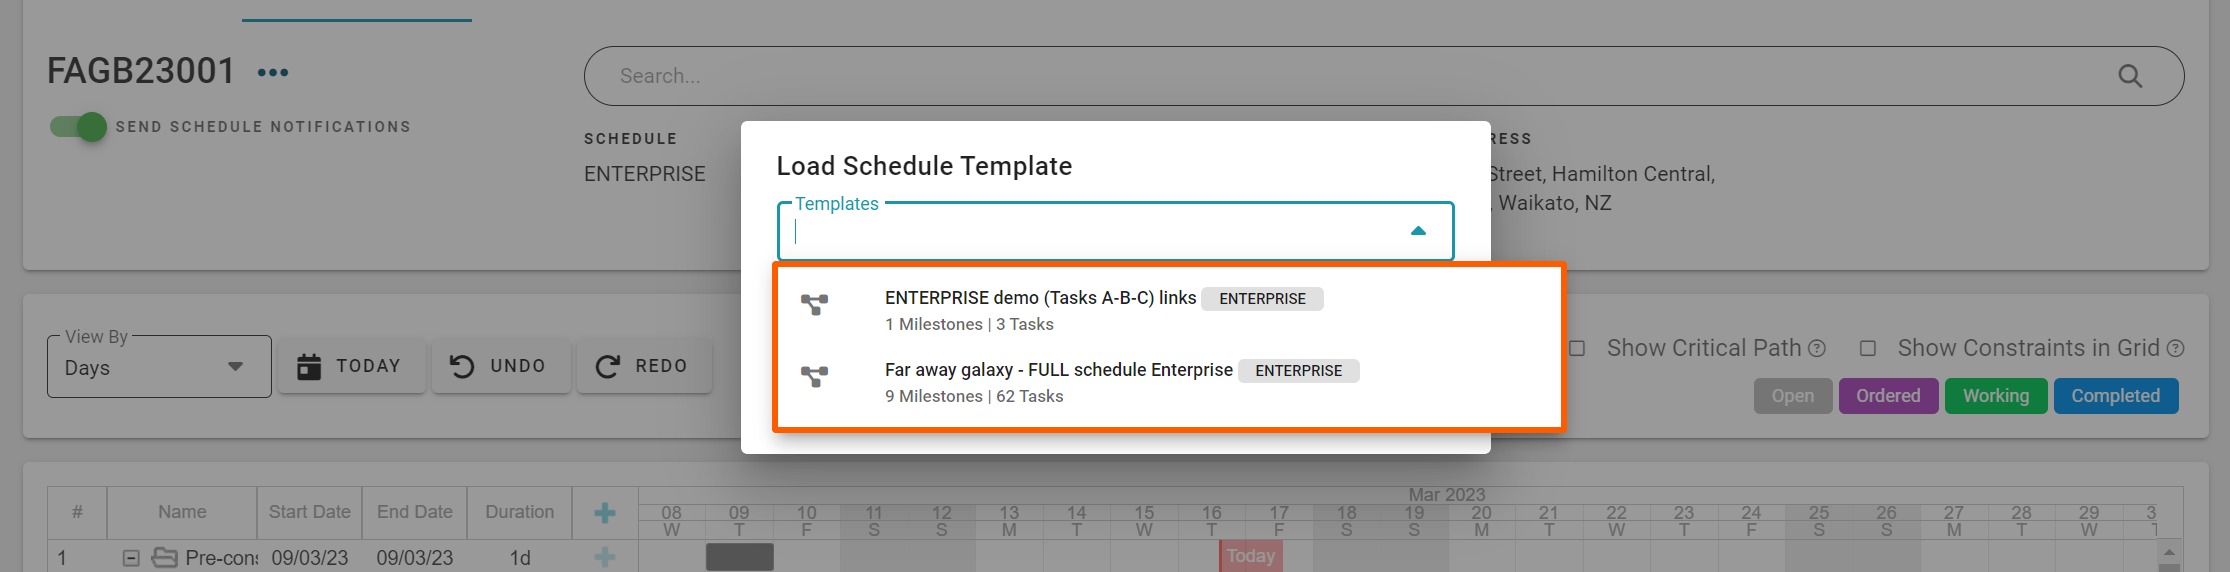
This will open the Load Schedule Template pop-up - Select the desired Template from the selection dropdown
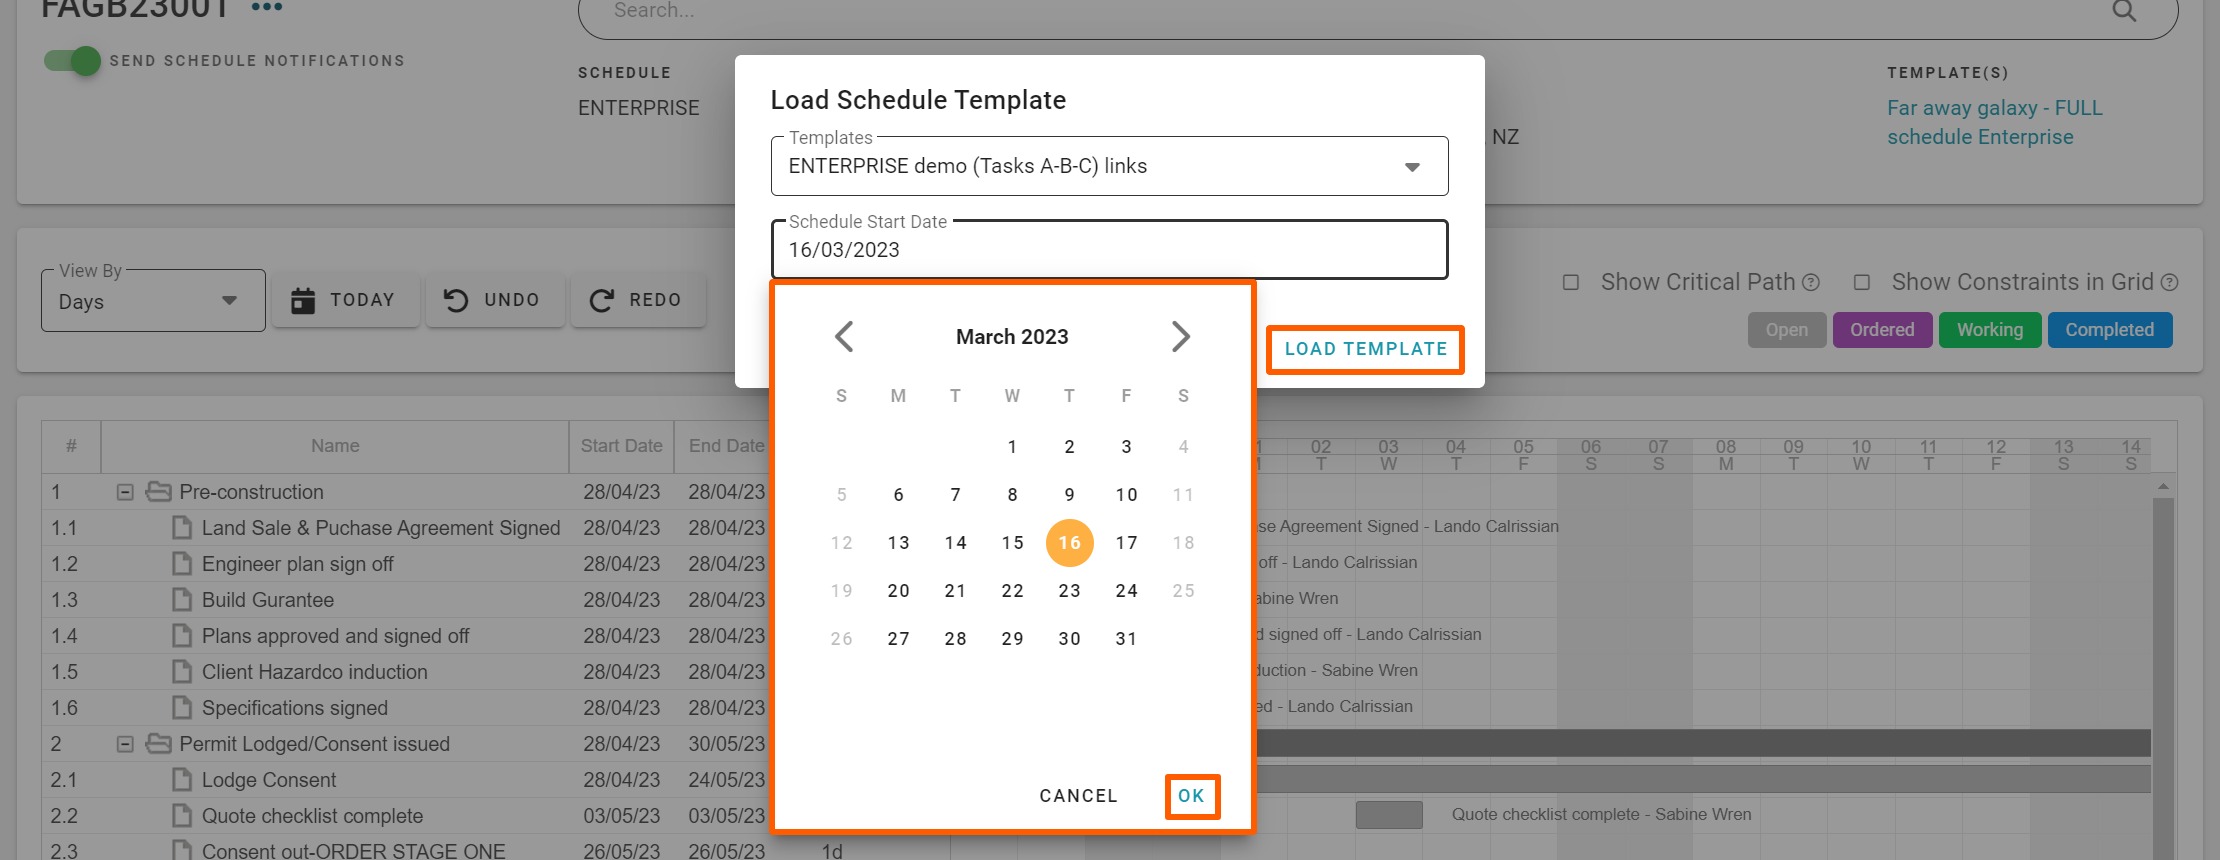
- Click on the Schedule Start Date, select your start date, and click ‘OK’ to confirm
- Finally clicking the ‘Load Template’ button to confirm the addition of your new schedule
NOTE: When loading a schedule template on top of an existing milestone/schedule, it is best to check that the new schedule starts after the last task starts, or finishes before the first task starts, of the existing schedule - to prevent any milestones from crossing over - which can cause issues when moving tasks.

We can now see that we've got a new stage added to the start of this project.
NOTE: Saving an Enterprise schedule template with links already in place, maintains those links when loading that template into a job.


Creating Task Links between Predecessors and Successors
Access this demo here.
Enterprise Scheduling provides a number of scheduling enhancements to provide complete control over your scheduling.
The first is the ability to link tasks and milestones, to other tasks and milestones - creating a set of dependencies that flow into different parts of the schedule, either working in conjunction or in isolation.
i.e. rain might have meant that outdoor work has been delayed, but indoor work can continue - linked tasks allow you to move those outdoor tasks back as a group, without affecting your indoor tasks workflows.
While you can create links via both the task list and the task gantt views - the task gantt view is the easiest view to see and learn how links work, so we'll get started with the task gantt view of the schedule first.
We have 3 task links available - let's look at those now.
Adding a Finish-to-Start Link
The first and most common connection is the ‘finish to start’ link, which means when 'Task A’ (Block work-inspection) is finished, we want the next task, 'Task B’ (Hard fill) to start.

So, to create a ‘finish to start’ link, on the gantt view schedule:
- We first hover over the task block we want to create the task link from (the predecessor)
This will cause a link circle to appear before and after the predecessor task - We click on the circle after the predecessor, then drag down to the start of the target task (the successor)
This will cause link circles to appear before and after the successor task - Drag the link to the circle before the successor task, and once a line is connecting these circles release your mouse
This will cause the 'Edit Link' pop-up to appear with the option for you to add a lag
NOTE: Lags allow you to add a period of time (delay) before the next tag commences/ends - this can be a positive or a negative lag. In this instance, a positive lag delays the successor by 'X' number of days AFTER the predecessor task has finished. A negative lag starts the task 'X' number of days BEFORE the task is due to finish! - Add in your lag period, or leave as '0' days for the successor to start immediately after the predecessor has finished
- Click SAVE to confirm
The page will refresh, and you'll see a link appear - connecting the end of the predecessor to the start of the successor
NOTE: Make note of the direction of the arrow showing that the link is going from the finish of 'Task A’ (Block work-inspection) to the start of 'Task B’ (Hard fill)


Editing the lag period and deleting a lag
If you need to edit/or delete a lag:
- We first hover over the task link
This will cause the task link to glow (have a fuzzy outline) - Double-click on the task link while it is glowing
This will cause the 'Edit Link' pop-up to appear - From here you can change the lag duration (a positive, negative, or zero lag) and click 'Save' to confirm
or you can click on the 'Delete' button (to the bottom left of the pop-up) to delete the lag
Let's say we change the lag from 0 days to 1 day - the gantt will be updated as below


NOTE: To create a negative lag, we just add the '-' in front of the lag number i.e. '-1' day. This means that we want task ‘B’ to start one day before task ‘A’ is due to finish - as per screenshots below.

Adding a Start-to-Start Link
The next connection is the ‘start to start’ link, which means we want 'Task B’ (Inslab plumbing & electrical if required) to start along with the start of 'Task A’ (Block fill).

So, to create a ‘start to start’ link, on the gantt view schedule:
- We first hover over the task block we want to create the task link from (the predecessor)
This will cause a link circle to appear before and after the predecessor task - We click on the circle before the predecessor, then drag down to the start of the target task (the successor)
This will cause link circles to appear before and after the successor task - Drag the link to the circle before the successor task, and once a line is connecting these circles release your mouse
This will cause the 'Edit Link' pop-up to appear with the option for you to add a lag
NOTE: Lags allow you to add a period of time (delay) before the next tag commences/ends - this can be a positive, or a negative lag. in this instance, a positive lag delays the successor by 'X' number of days AFTER the task has started. A negative lag starts the task 'X' number of days BEFORE the task is due to start. - Add in your lag period, or leave as '0' days for the successor to start immediately after the predecessor has started
- Click SAVE to confirm
The page will refresh, and you'll see a link appear - connecting the start of the predecessor to the start of the successor
NOTE: Make note of the direction of the arrow showing that the link is going from the start of 'Task A’ (Block fill) to the start of 'Task B’ (Inslab plumbing & electrical if required)


Adding a Finish-to-Finish Link
Our last connection is the ‘finish to finish’ link, which means we want 'Task A’ (Floor prep and inspection) and 'Task B’ (Pour floor) to finish at the same time.

So, to create a ‘finish to finish’ link, on the gantt view schedule:
- We first hover over the task block we want to create the task link from (the predecessor)
This will cause a link circle to appear before and after the predecessor task - We click on the circle after the predecessor, then drag down to the end of the target task (the successor)
This will cause link circles to appear before and after the successor task - Drag the link to the circle after the successor task, and once a line is connecting these circles release your mouse
This will cause the 'Edit Link' pop-up to appear with the option for you to add a lag
NOTE: Lags allow you to add a period of time (delay) before the next tag commences/ends - this can be a positive or a negative lag. In this instance, a positive lag delays the end of the successor by 'X' number of days AFTER the task has ended. A negative lag ends the task 'X' number of days BEFORE the successor task is due to finish. - Add in your lag period, or leave as '0' days for the successor to finish with the ending of the predecessor
- Click SAVE to confirm
The page will refresh, and you'll see a link appear - connecting the end of the predecessor to the end of the successor
NOTE: Make note of the direction of the arrow showing that the link is going from the end of 'Task A’ (Floor prep and inspection) to the end of 'Task B’ (Pour floor)
Also you'll notice in this instance that Task B has moved above Task A - this is because RAVE schedules cascade by the start date of tasks, and Task B now has a start date earlier than Task A.


You CAN Create Links Between Tasks of Different Milestones
We can add connections between milestones i.e. 'Task A’ (Floor prep and inspection) can be linked to 'Task B’ (Drainlayer) in a different milestone - via any of the Finish-to-Start, Start-to-Start, or Finish-to-Finish processes already covered.


You CAN Create Links Between Different Milestones
We can connect one milestone to another i.e. 'Milestone A’ (Floor Down) can be linked to 'Milestone B’ (Roof Ready) via any of the Finish-to-Start, Start-to-Start, or Finish-to-Finish processes already covered.


Select a Task to View its Links
By selecting a task (clicking on the the task name, or task block), task connections are highlighted in orange, so we can see which links are in play - connections of predecessors flowing into the task, and connections from the task to successors.

Updating the Schedule - Moving Tasks in 'Enterprise' Mode - Task Gantt View
Changing the schedule in 'Enterprise' scheduling mode, via the task gantt view is easy - though we now have the task links, and constraints to also consider.
Click-and-Drag Tasks to Update the Schedule via the 'Enterprise' Task Gantt View
As with Classic scheduling, you can also click-and-drag tasks in Enterprise scheduling - that is:
- Click-and-drag a single task to move it
- Hold shift+click on one task, then while still holding shift, click on another task to create a group of tasks - dragging this group of tasks to move them
- Hold control (ctrl)+click on a number of tasks - dragging this selection of tasks to move them
That is in addition to double-clicking on a task (description or task block) to edit it.
NOTE: Clicking and dragging a task in Enterprise mode, will set that task up with a 'Start No Earlier Than' constraint - meaning that this start date can not move back any earlier via task links, though it can be pushed forwards/later by task links if required.


Why Changing a 'Start Date' Field to Move a Linked Task will FAIL in 'Enterprise' Scheduling
Changing the start date of a successor (linked task) via the edit Task Details pop-up in the task gantt or task list view, or via the start date field of the task list view will not work. This is because the task is held in place by the task link connecting it from the predecessor i.e. trying to change the start date in this way will see the start date snap back in place based on it's link lag duration.
NOTE: You can still use the edit Task Details pop-up to move the Linked Task via the task gantt or task list view - but this is via the Constraints tab - setting a Must Start On/Start No Earlier Than, or other relevant Constraint Type, with the Constraint Date.
RAVE's Critical Path View - Enterprise Scheduling
Access this demo here.
Another feature of Enterprise Scheduling is the ability to see the project's critical path i.e. allows you to see which tasks will affect the completion date of the schedule - before you move them!
The critical path is visible via the Task Gantt view of the schedule, and in this instance, scrolling down the bottom of our gantt chart, we can see that we have a ’90 Days of Maintenance’ task as our final task, at the end of our schedule.

Moving up to the top right of the page, we will find the ‘Show Critical Path’ tick box to the right, above the gantt task status colour coding.

Another feature of Enterprise Scheduling is the ability to see the project's critical path i.e. allows you to see which tasks will affect the completion date of the schedule - before you move them!
This will highlight (in red) the last task(s) of your schedule - by their final end date - and any connected tasks (also highlighted in red) with links to it.

As you can see, the ‘Final inspection with the client and handover’ task is connected with a finish-to-start link with the ’90 days of maintenance’ task. Moving the 'final inspection' task would also move the 'maintenance' task delivery date, thereby becoming part of the critical path - as a result, the 'final inspection' task is also highlighted in red.

Any tasks or milestones that are connected to the final task, in such a way that moving said task or milestone would affect the end date of the final task - becomes part of the critical path.
While turning the critical path on, will hide any task status colours on the schedule gantt, it is a really handy tool to turn on when updating your schedule, to help you keep an eye on any tasks that may potentially push out the delivery date on a project!
Enterprise Scheduling - Constraints
Access this demo here.
Enterprise Scheduling provides a number of scheduling enhancements to provide complete control over your scheduling.
- We have the ability to link tasks and milestones, to other tasks and milestones - creating a set of dependencies that flow into different parts of the schedule, either working in conjunction or in isolation.
- Next is the ability to see the project's critical path i.e. allows you to see which tasks will affect the completion date of the schedule - before you move them!
Another key feature is the ability to apply constraints (date rules) to tasks to provide you with more control over your schedule and timelines i.e. lock in delivery dates, council inspections, and other important dates that must be hit.
Constraints - As Soon As Possible
In RAVE’s enterprise scheduling, all tasks are set to start 'As Soon As Possible'. This means as you move task ‘A’ around, the linked task ‘B’ (and any other linked tasks following task ‘A’) will be scheduled 'as soon as' they can, given the lag set between task ‘A’ and ‘B’ etc. And this is generally how you would want your schedule to flow, but there are some scenarios where set-in dates need to apply.
For example, a post-line council inspection on Tuesday means that the jib fixing must be completed by the end of Monday. So regardless of what else is happening in the schedule, the jib fixing can finish earlier, but the latest finish date needs to be locked in place to meet the council inspection deadline. This is where and how linked tasks with our range of seven constraints can help you.
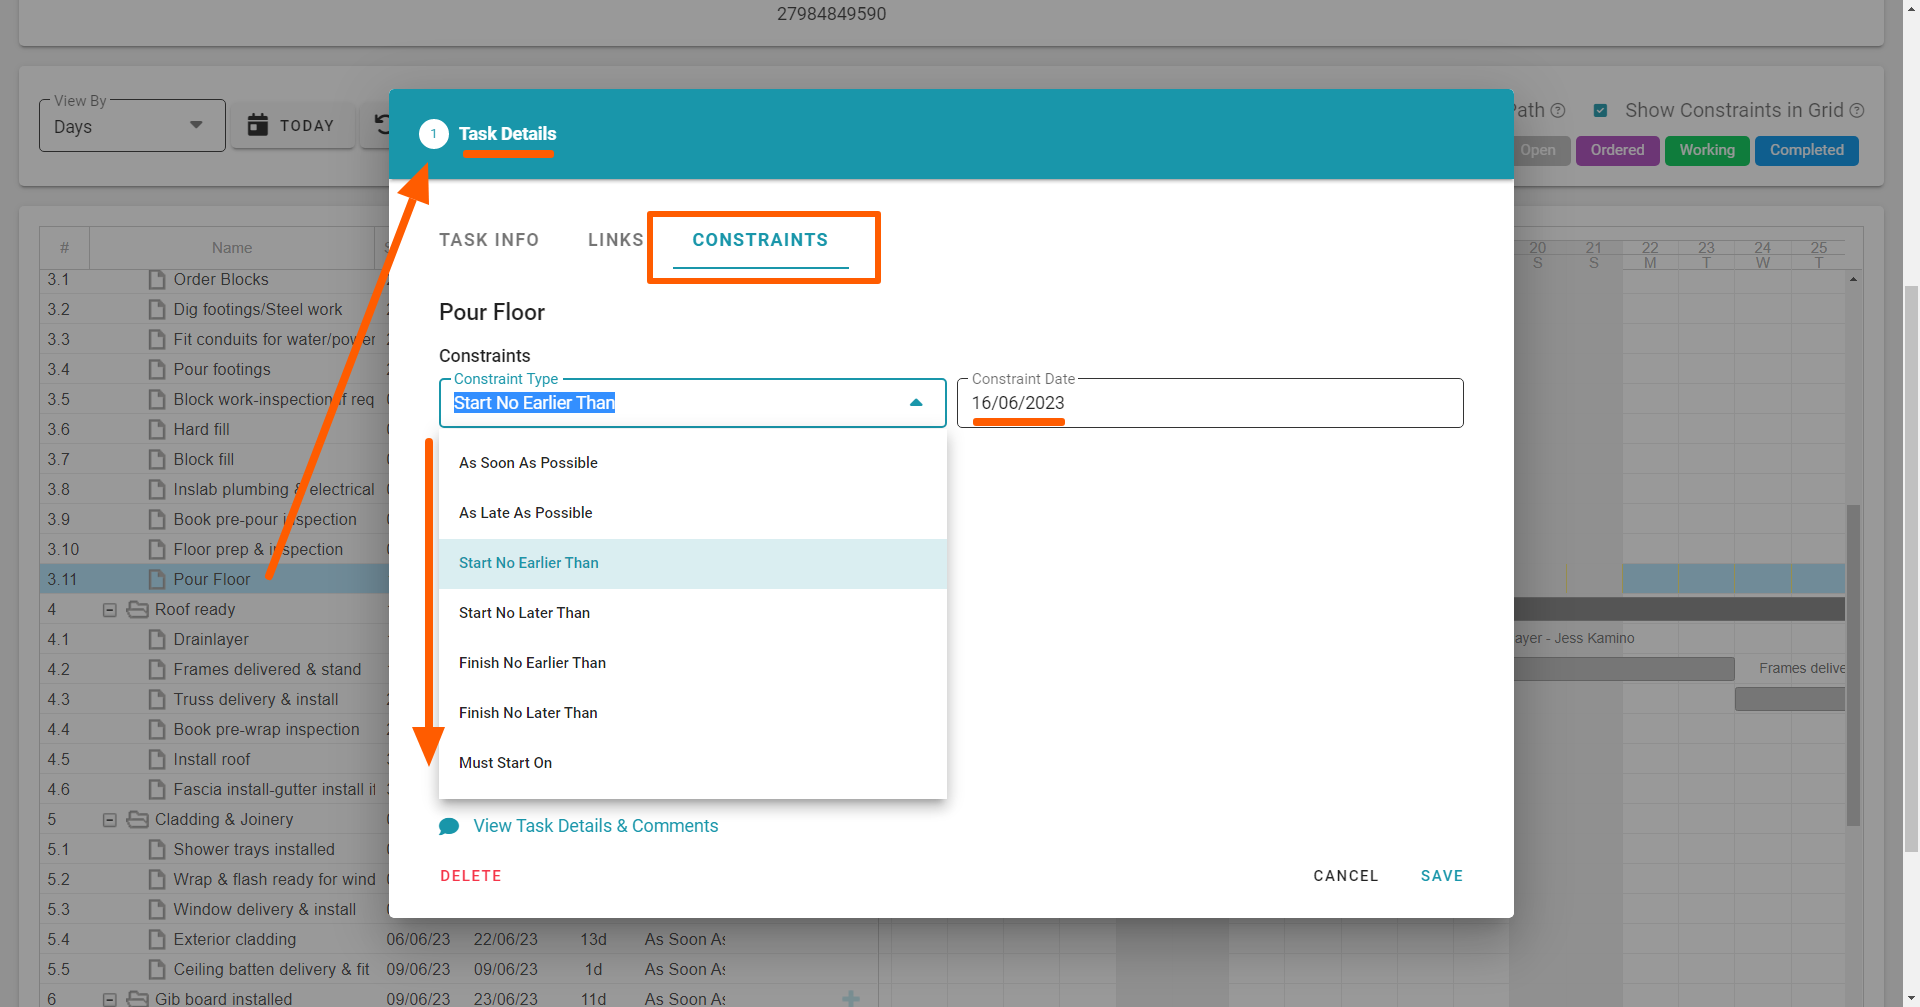
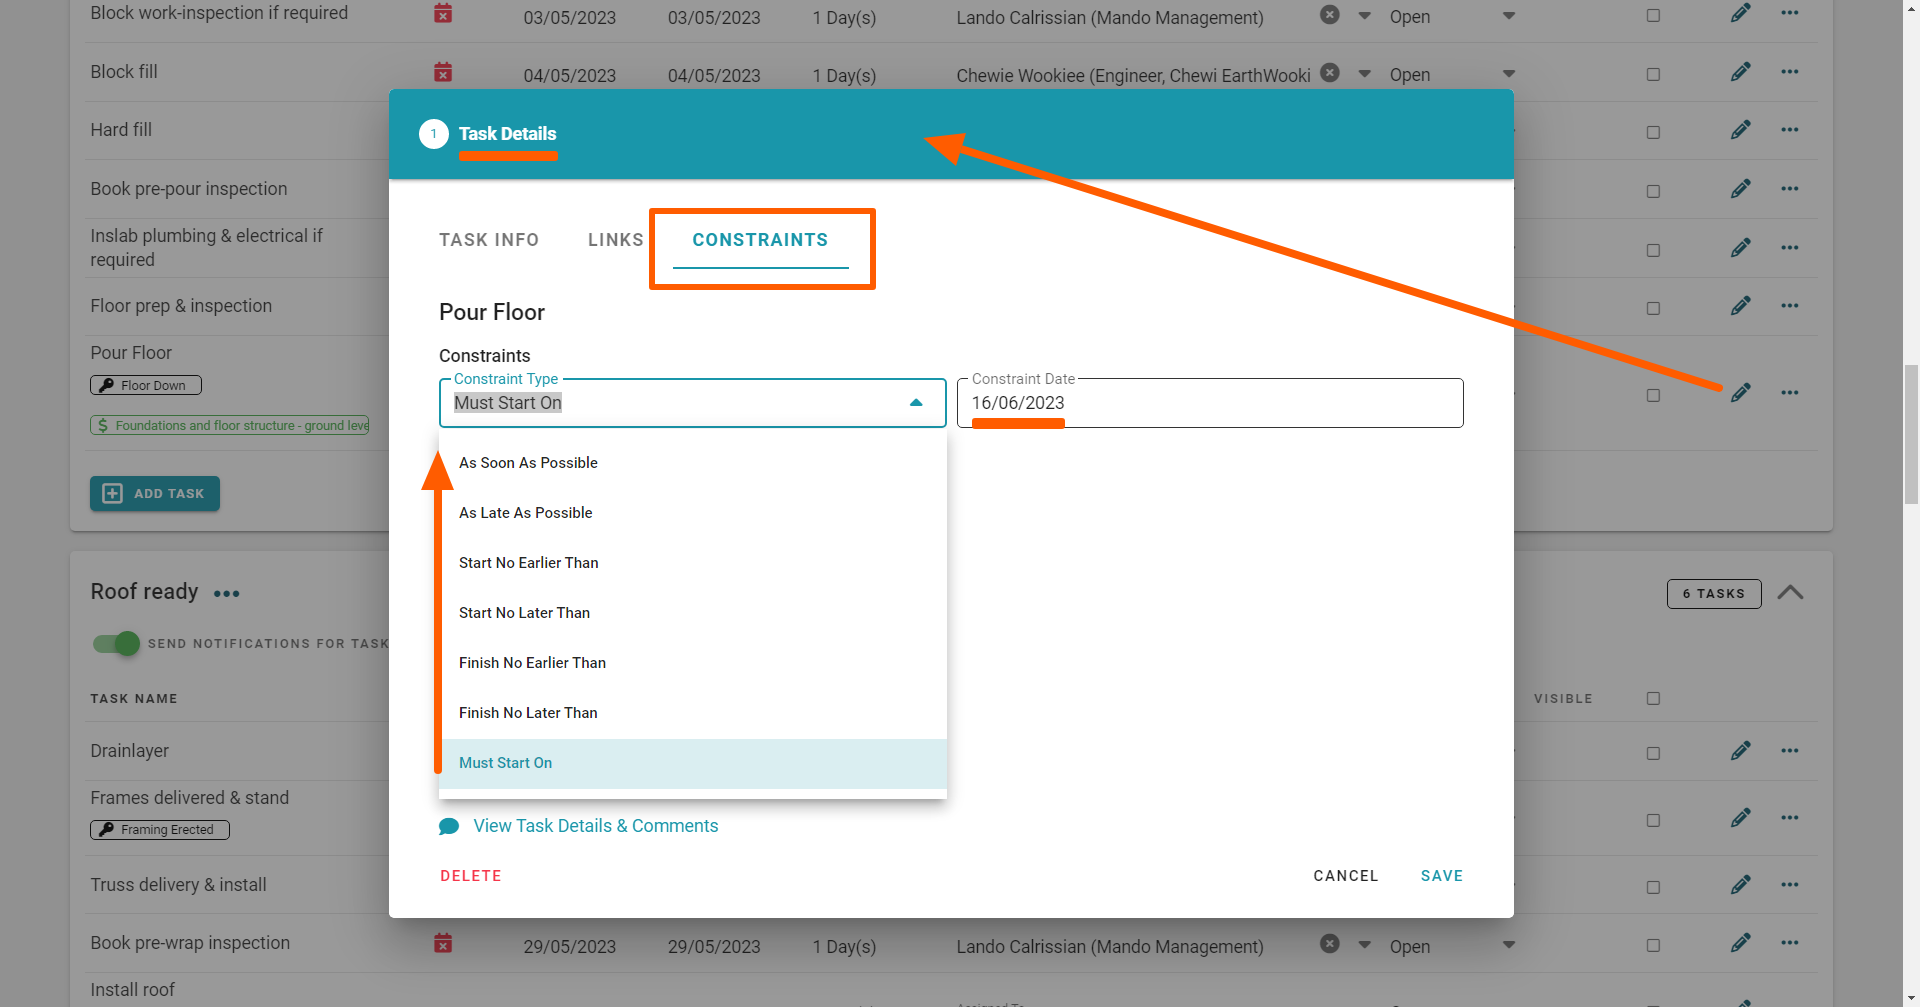
RAVE's 7 Constraint Types and Where to Add Them
We can access our task constraints within the Task Details pop-up (via the edit task pencil icon in the task list view, or double-clicking a task description or block in the task gantt view) via the Constraints tab. Then, clicking on the Constraint Type dropdown we can see the range of constraints available to us.
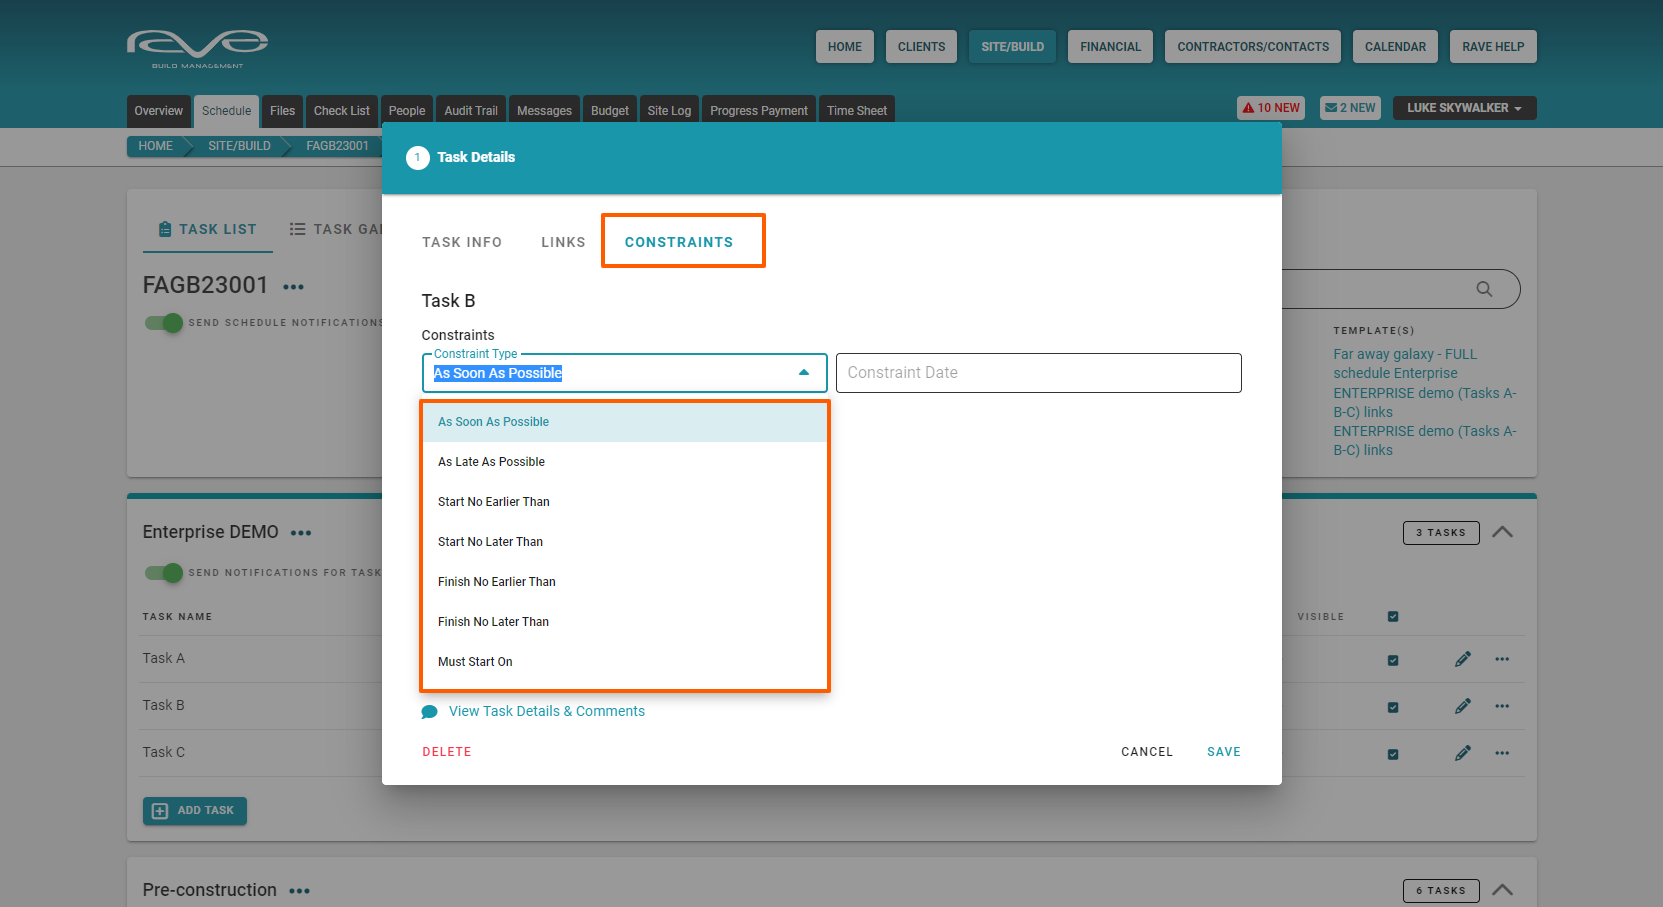
As Soon As Possible + As Late as Possible
The ‘As Soon As Possible’ constraint is the default rule for enterprise scheduling. This means that however task 'A' moves, the start date of task ‘B’ will move as per the lag duration between task ‘A’ and ‘B’. This relationship will be set unless you edit the lag duration, or you change the constraint type applied.
‘As Late As Possible’ is essentially the same, and means that however task ‘A’ moves, the end date of task ‘B’ will move as per the lag between task ‘A’ and ‘B’ plus the duration of task 'B' - again this relationship will be set unless you edit the lag duration, or you change the constraint type applied.
Start No Earlier Than + Start No Later Than
‘Start No Earlier Than’ means that task ‘A’ can push the start date of task ‘B’ back as much as you want, but can only pull task 'B' forward to its start no earlier than constraint date - this pulling forward constraint is locked in unless you edit the constraint date, or you change the constraint type applied.
‘Start No Later Than’ is the opposite. Task ‘A’ can pull the start date of task ‘B’ forward as much as you want, but can only be pushed back to its no later than constraint date - again this pushing back constraint is locked in unless you edit the constraint date, or you change the constraint type applied.
Finish No Earlier Than + Finish No Later Than
‘Finish No Earlier Than’ means that task ‘A’ can push the finished date of task ‘B’ back as much as you want, but can only be pulled forward to its finish no earlier than constraint date - this pulling forward constraint is locked in unless you edit the constraint date, or you change the constraint type applied.
‘Finish No Later Than’ is again the opposite. Task ‘A’ can pull the finish date of task ‘B’ forward as much as you want, but can only be pushed back to its finish no later than constraint date - again this pushing back constraint is locked in unless you edit the constraint date, or you change the constraint type applied.
Must Start On
The ‘Must Start On’ constraint can be used to set absolute dates in the schedule i.e. a council inspection or deadlines that have been set by hard delivery dates. With the ‘Must Start On’ constraint, no matter where I move task ‘A’, the start date for task ‘B’ is locked in place - until you edit the constraint date, or you change the constraint type applied.
NOTE: At this point, enterprise scheduling is not compatible with any hourly task settings. This means hourly scheduling (available with Advanced scheduling) is automatically removed from any project that gets changed to the enterprise scheduling mode.
If you do not already have RAVE's Enterprise Scheduling Module
If you would like to add the Enterprise Scheduling module to your RAVE setup, please contact us via 07 210 2228 or email us at help@ravebuild.co.nz to arrange it.