Access the full demo here.
In this ‘Classic’ Scheduling FAQ, we will learn how easy it is to set up your build schedule, how to customize the schedule settings, and the options to communicate changes for your sub-trades/contractors.

'Classic' Project Schedule Page Navigation
Access this demo here.
After you log into RAVE, we access the project management systems by clicking on the ‘Site/Build’ button at the top right of the page. We find and open the job that we want to manage the schedule for. Then, click on the ‘Schedule’ sub-tab.


Navigation of the Schedule Views + Schedule Screen
We're going to start our navigation of the project's Schedule tab, by starting at the top section of the page - that is summarising our four schedule views and the schedule settings page (available as Schedule sub-tabs to the top left of the screen), before continuing down and across the rest of this top section - we'll go into more detail on each aspect of this screen a little later.
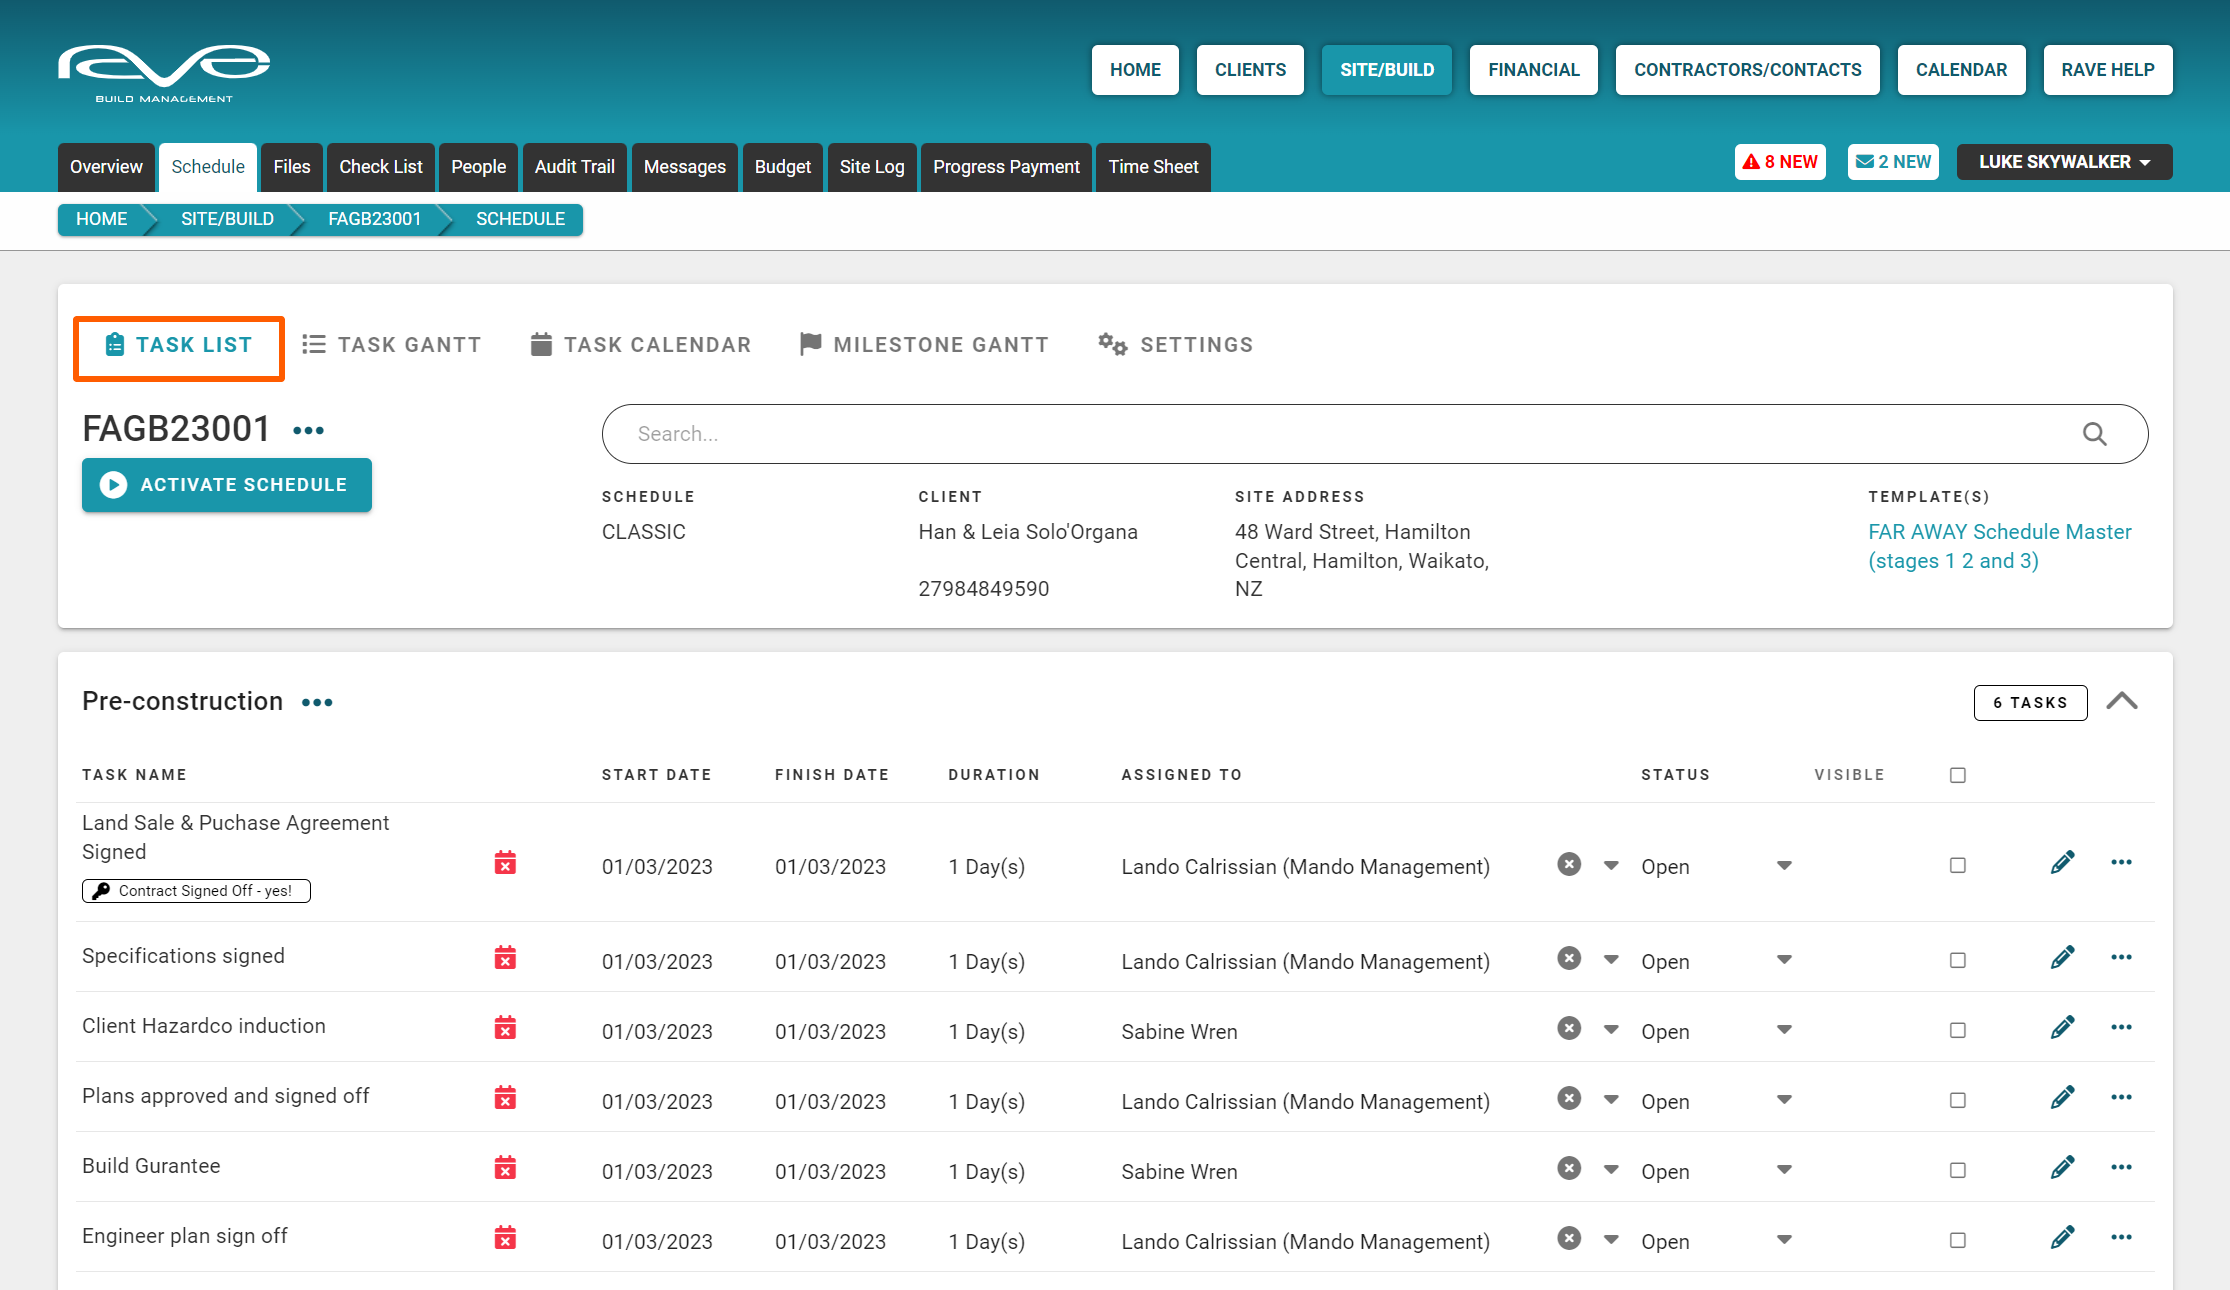
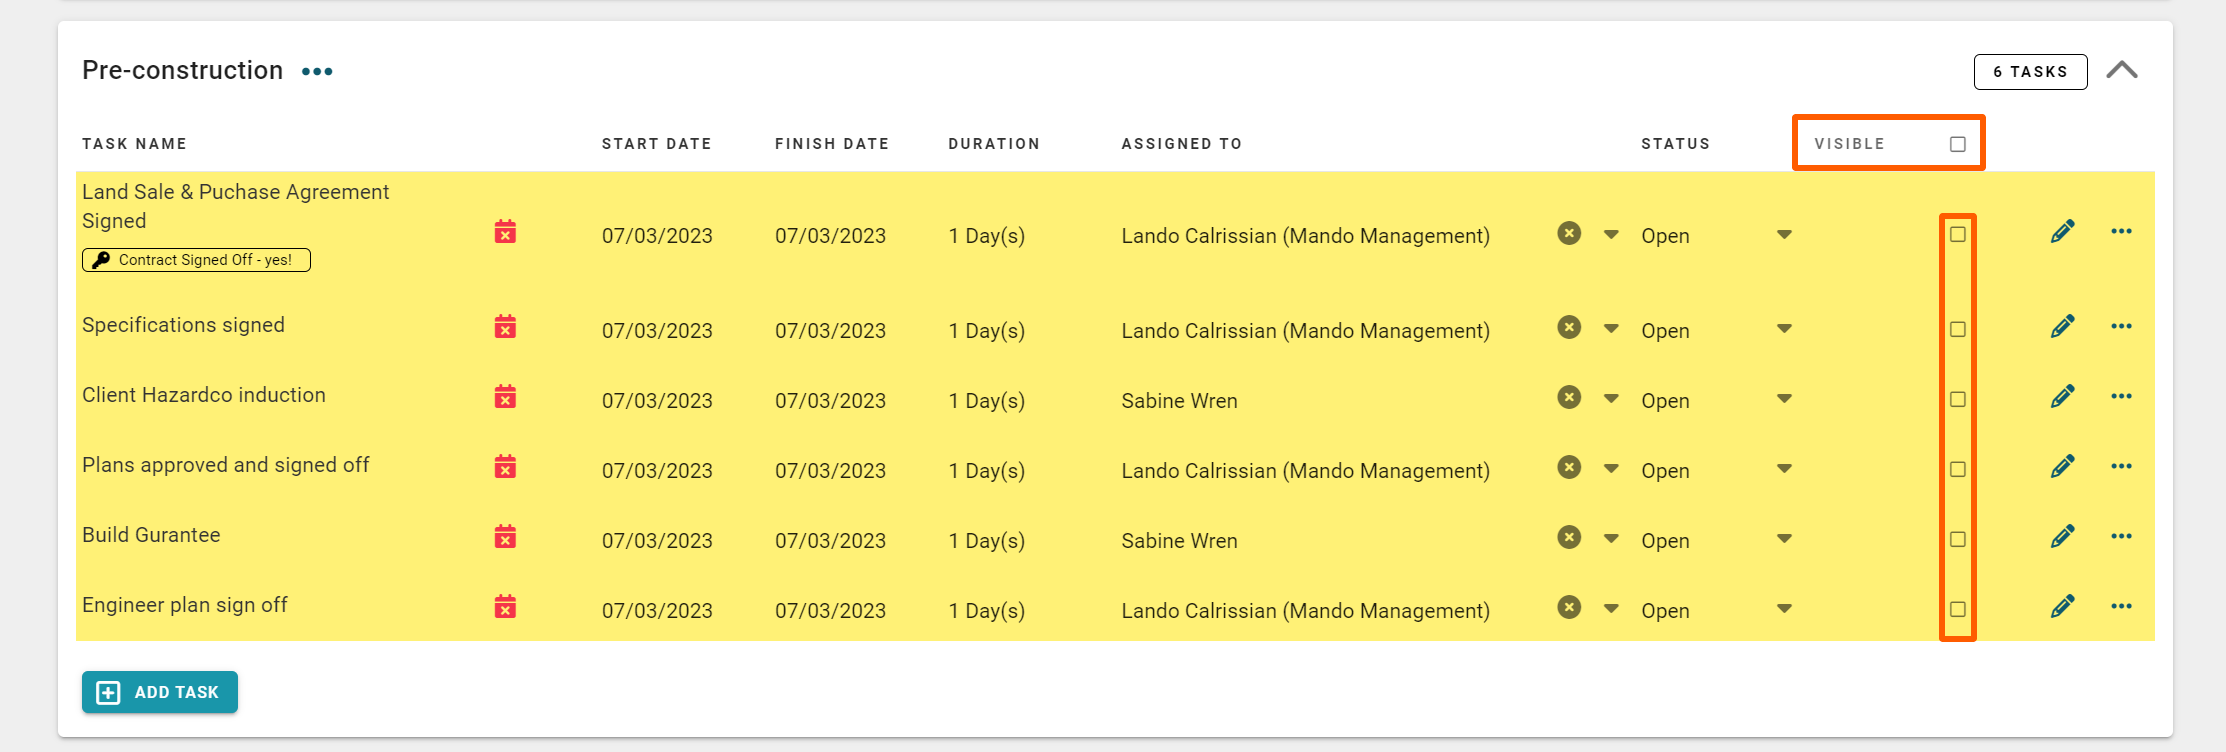
The ‘Task List’ view
Displays the schedule in a Task List format - grouping scheduled tasks into blocks of Milestones (stages)
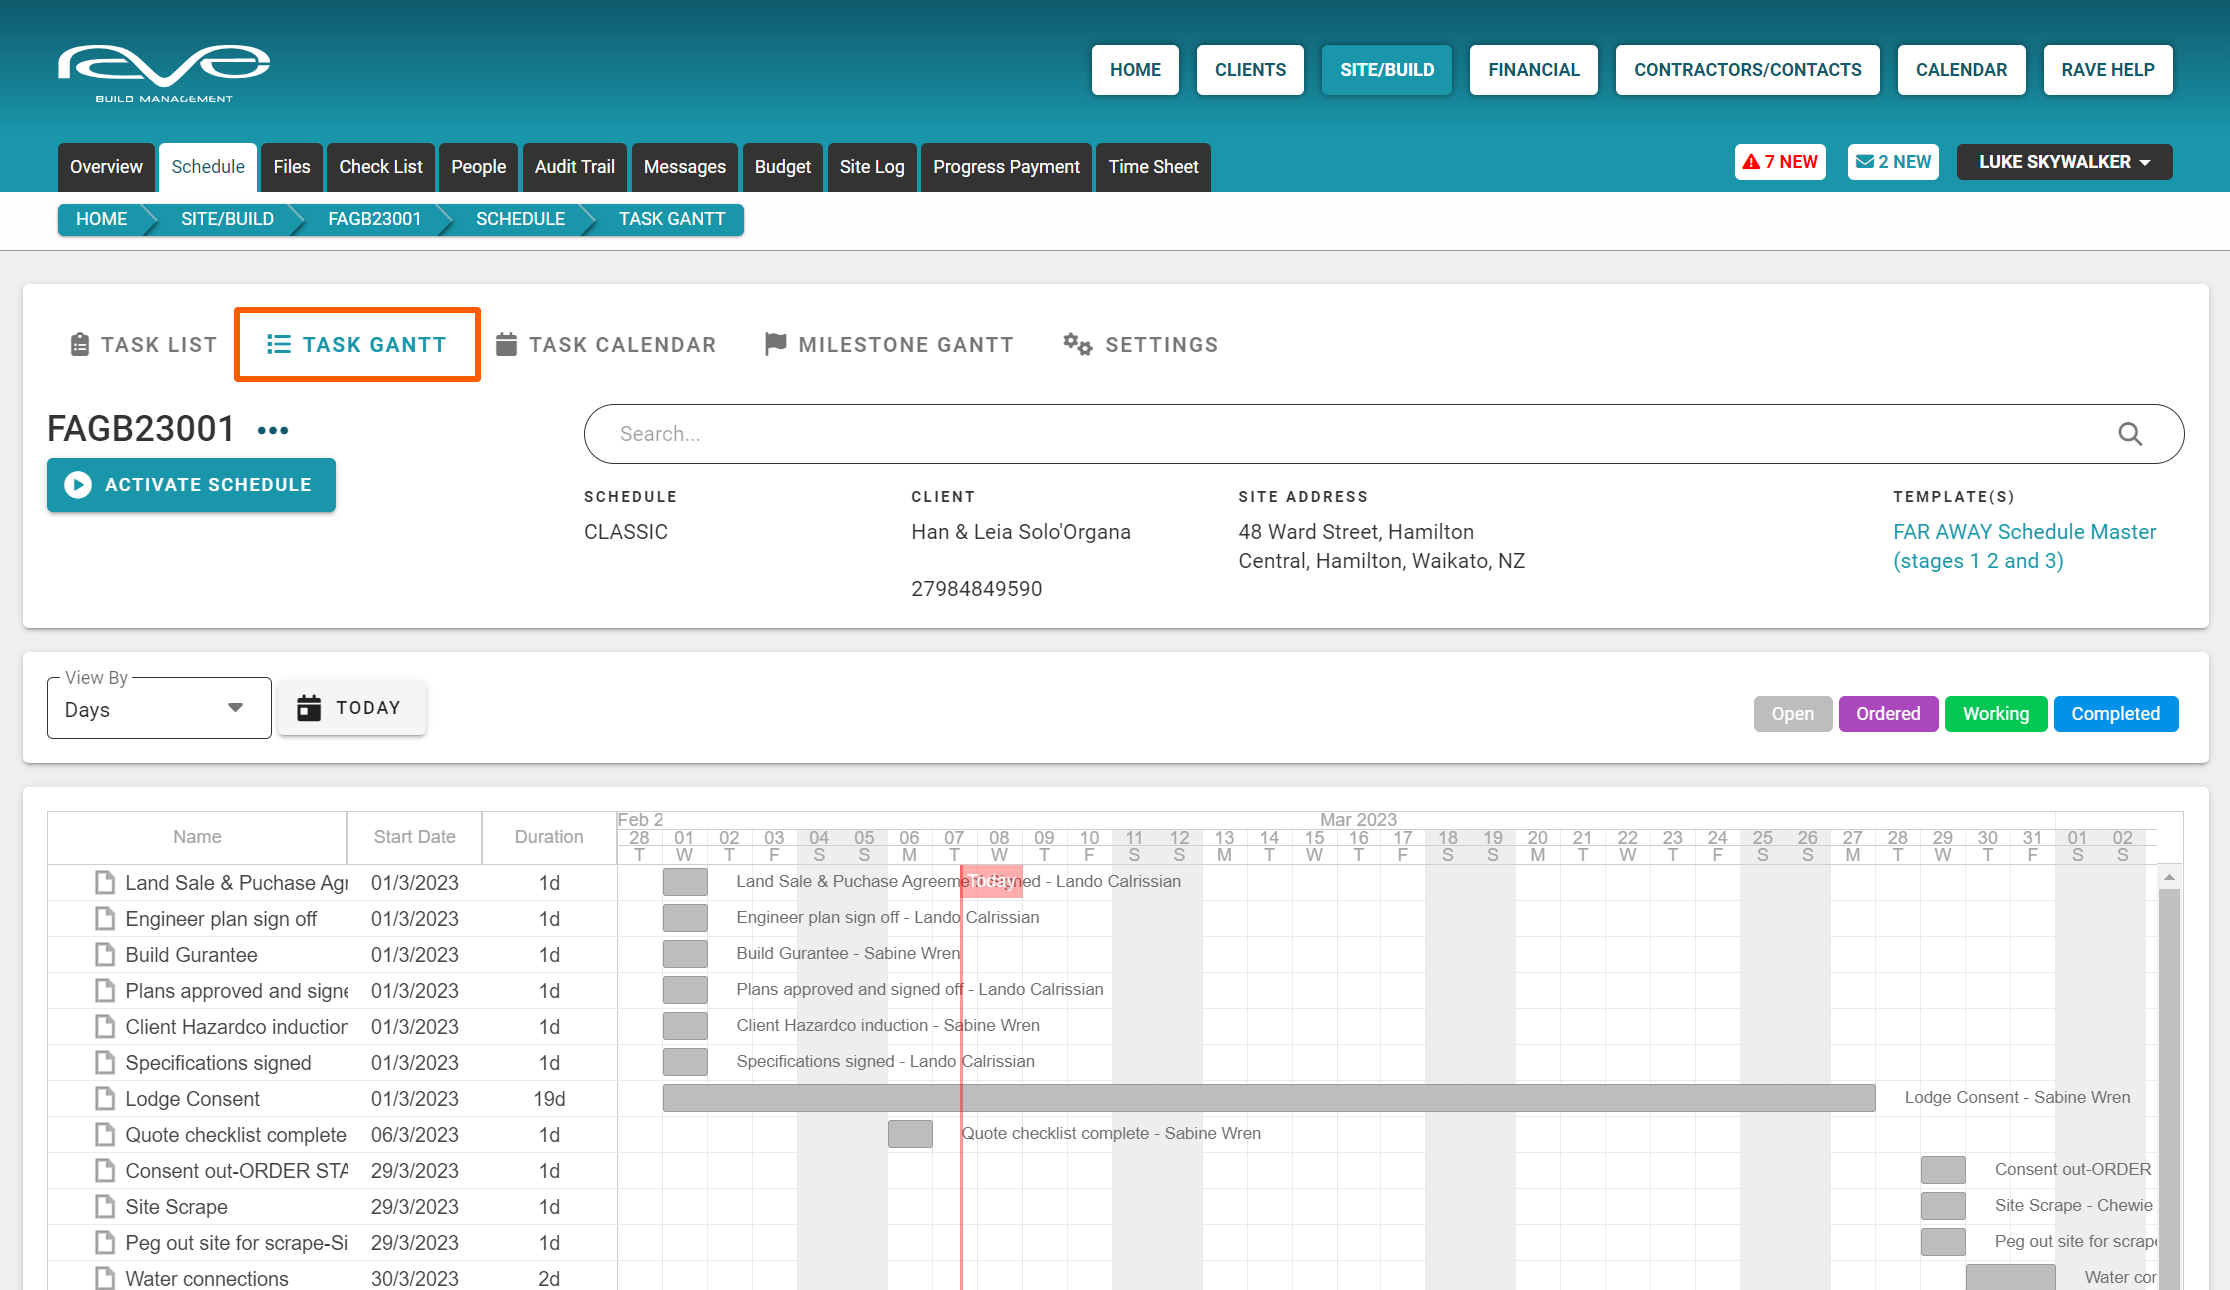
The ‘Task Gantt’ view
Is a Gantt chart view of the schedule - where tasks are listed and also displayed with duration bars
The ‘Task Calendar’ view
Is a month-by-month diary view of tasks in the schedule

The top-level ‘Milestone Gantt’ view
Is a higher-level Gantt chart view of the schedule - where the milestones (instead of tasks) are listed and displayed with duration bars

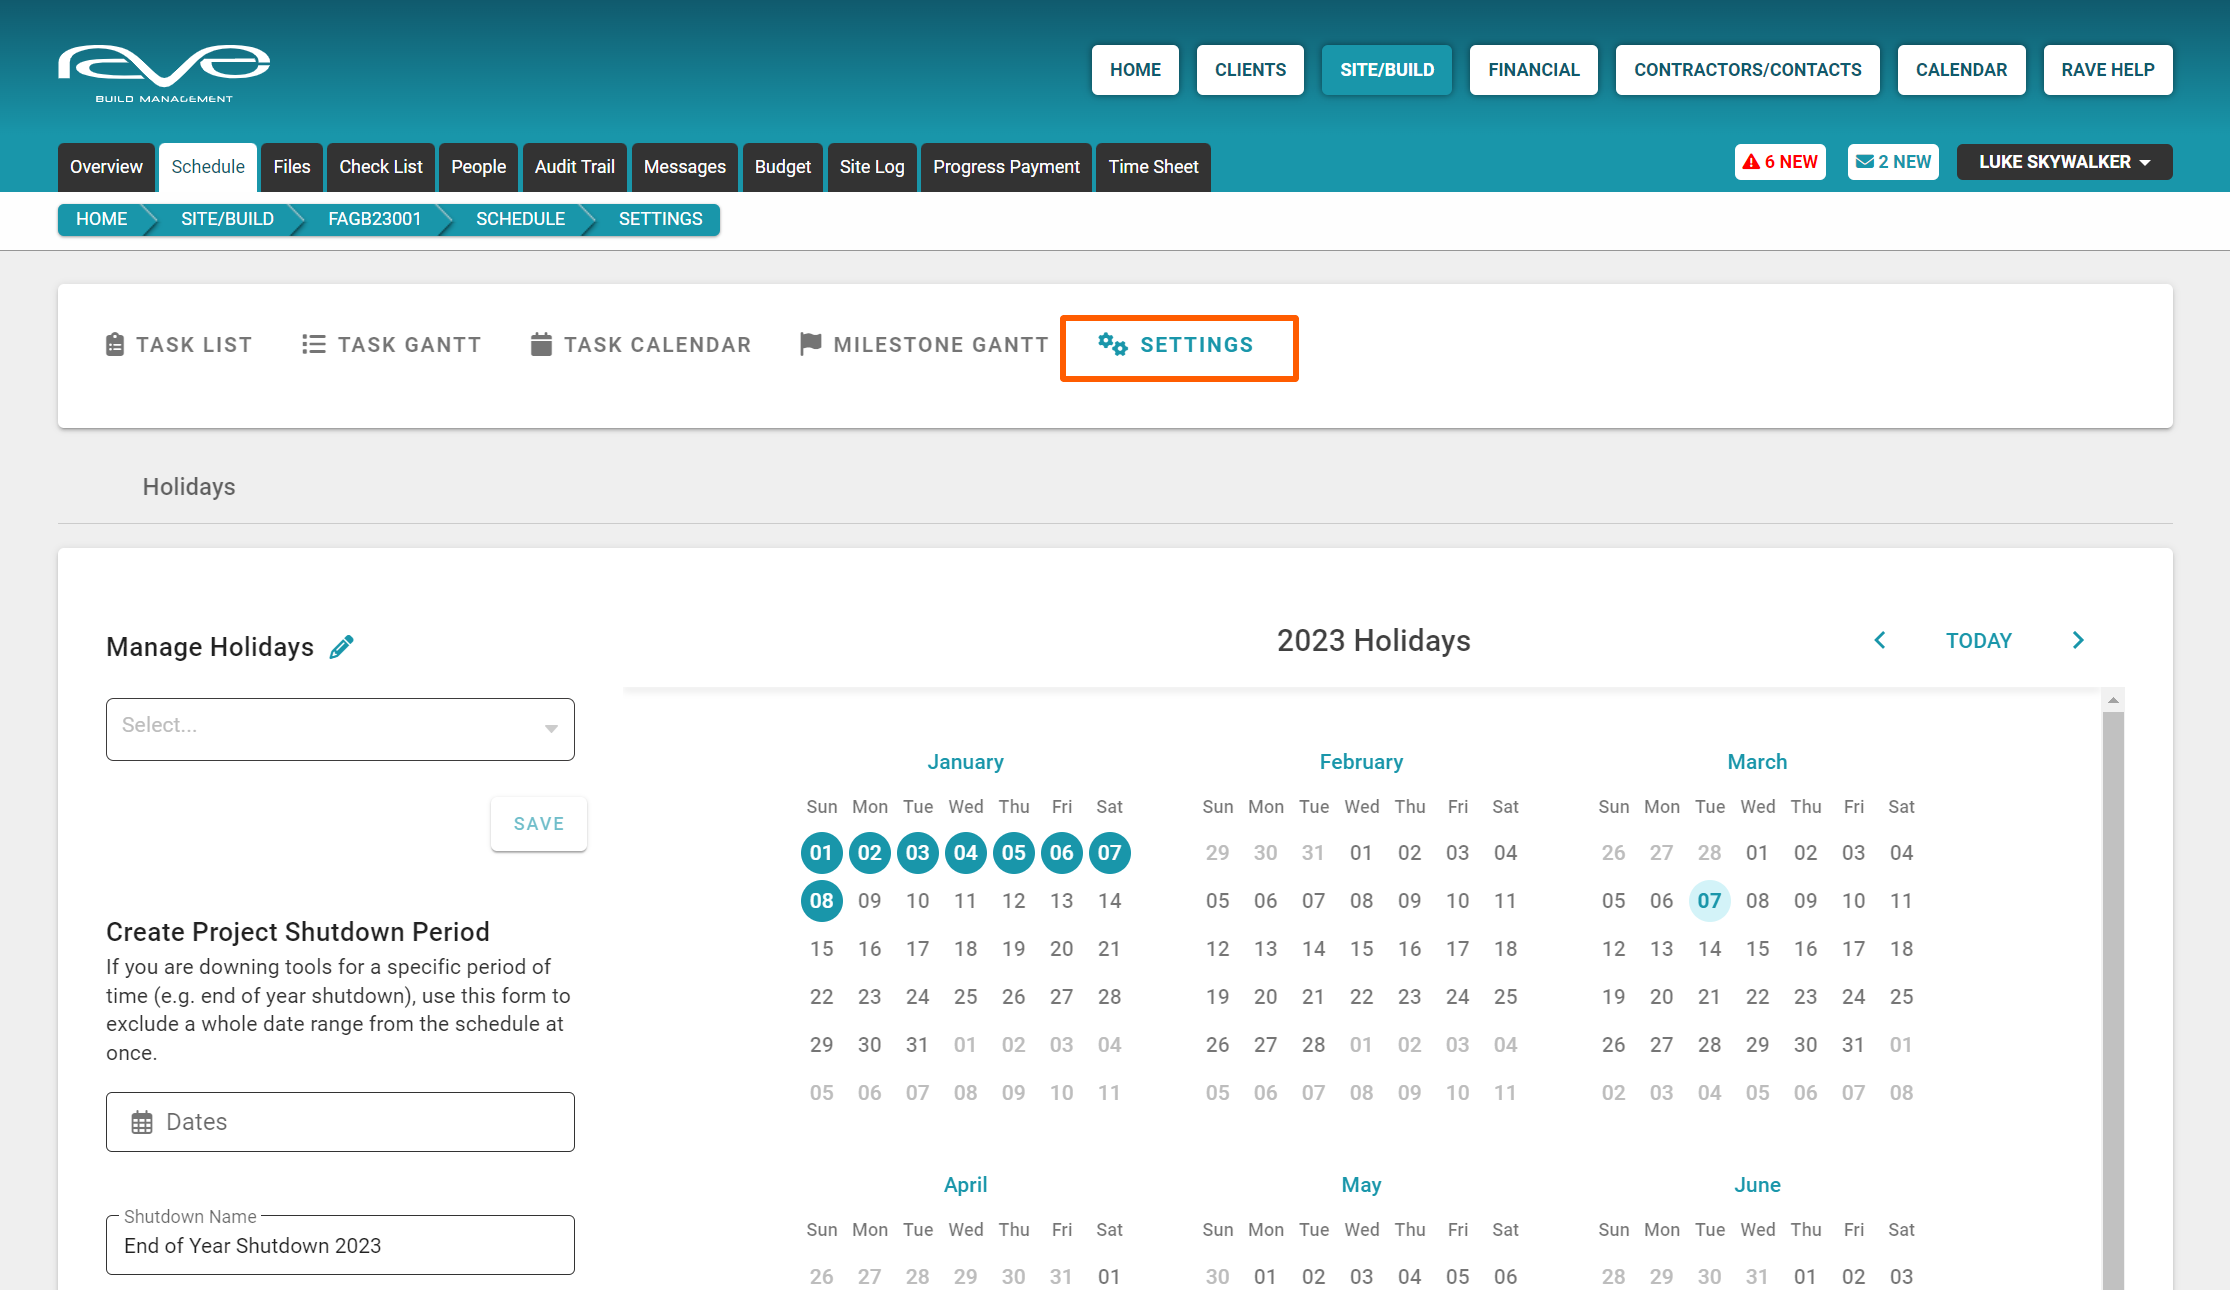
The Project's Schedule ‘Settings’ sub-tab
Is where we can add holidays and adjust the background settings of your schedule.
The Schedule Action Drop-Down menu
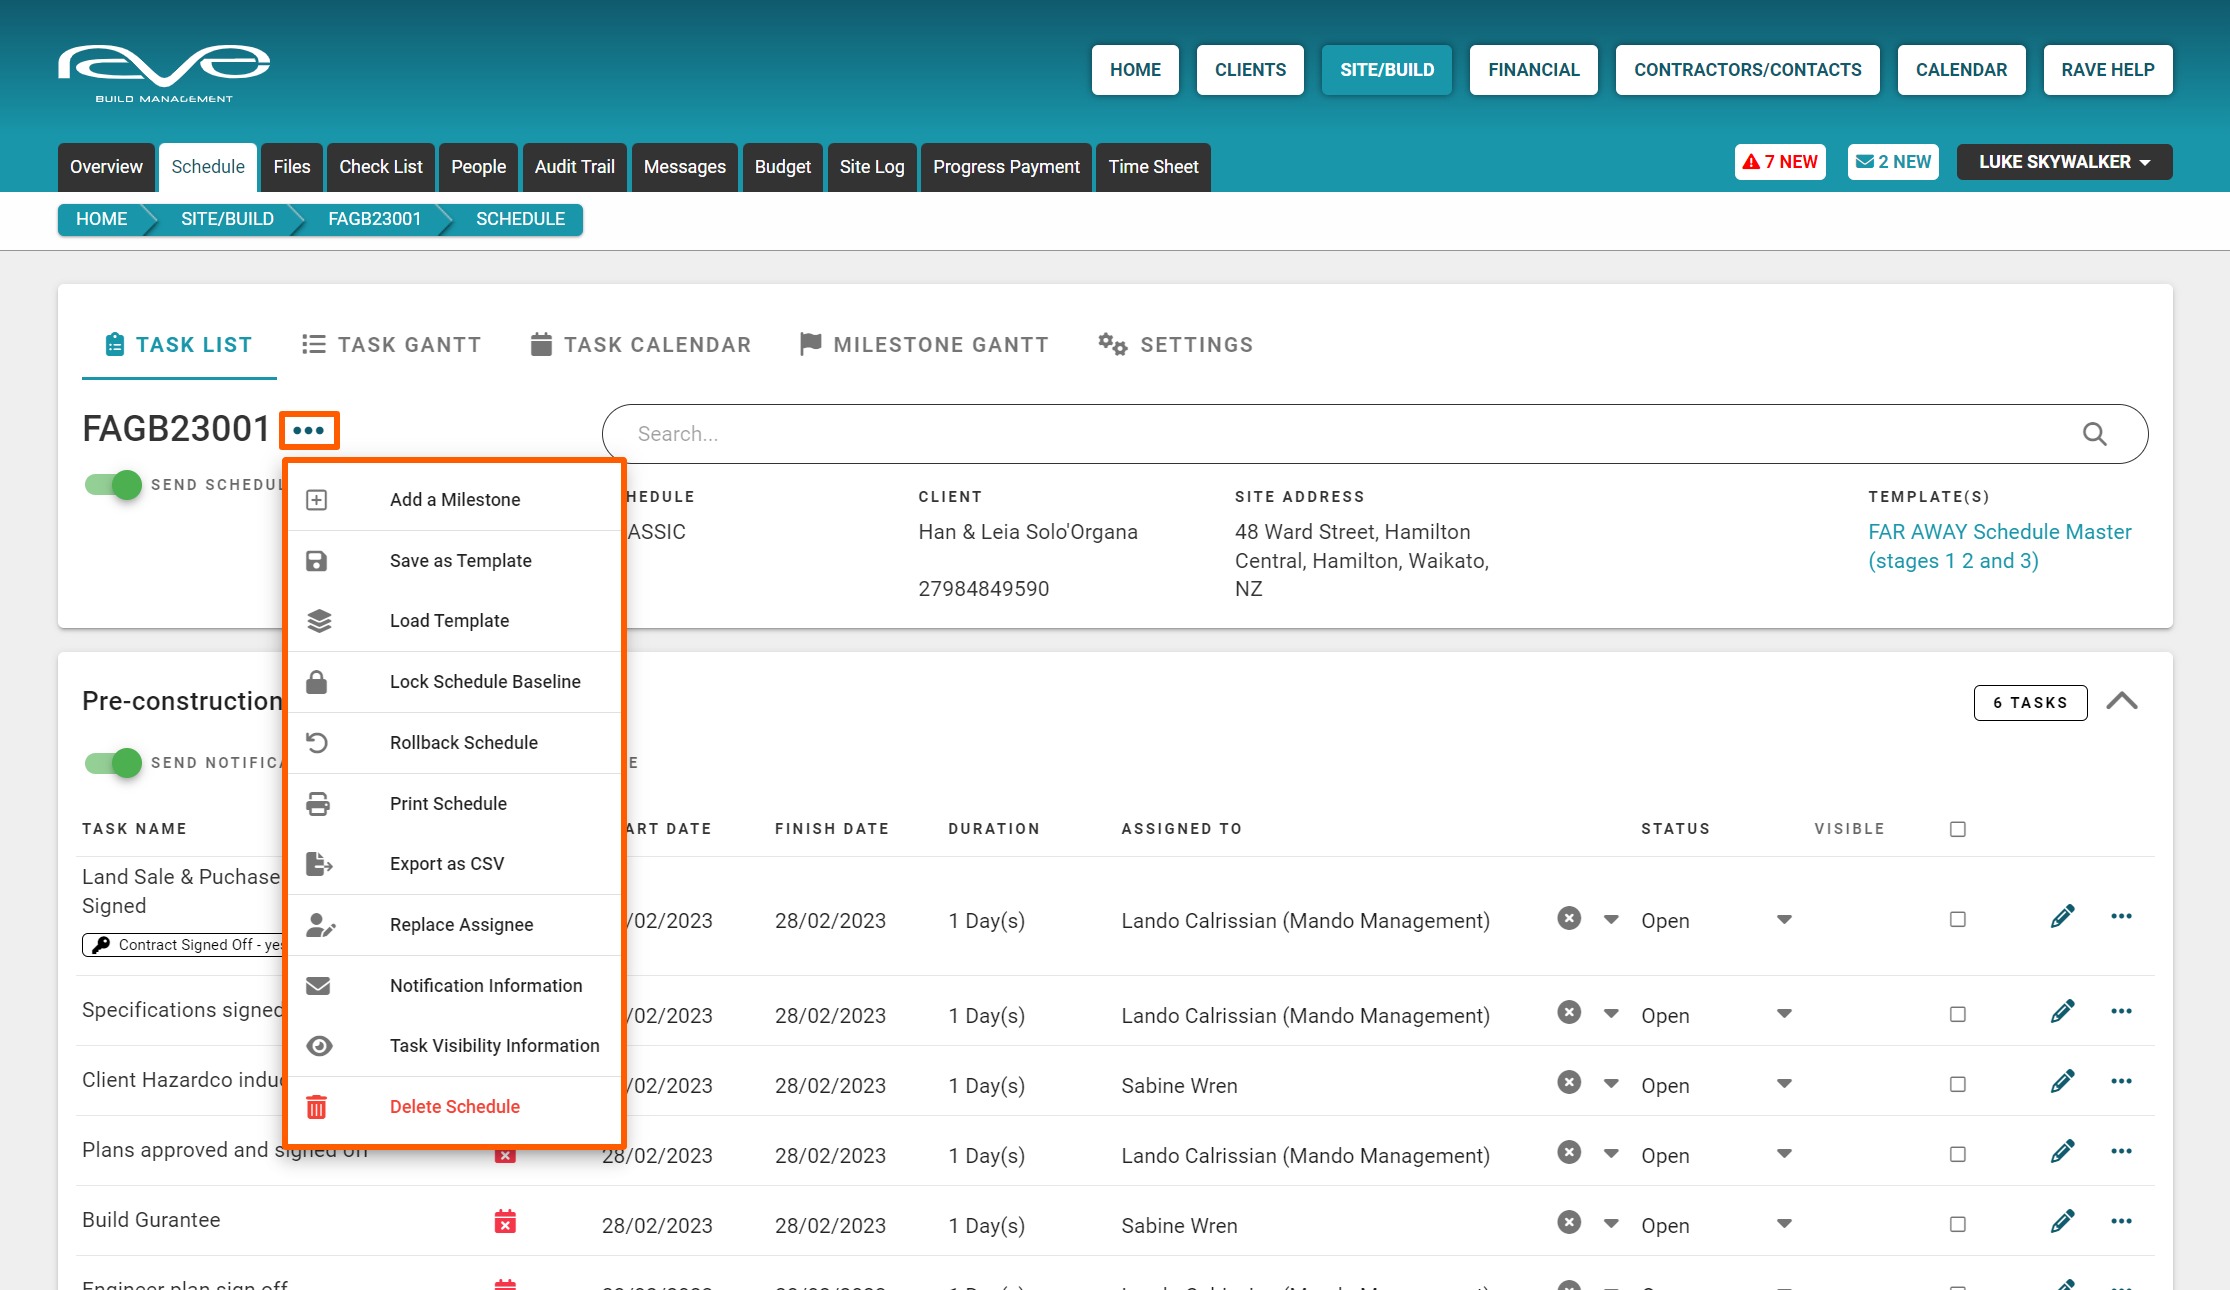
Back to our ‘Task List’ view, the schedule action drop-down menu (the meatballs icon to the right of the job number) is where we can access a number of actions to manage our schedule.

The ‘Activate Schedule’ button
Allows you to hide your schedule until you are ready to share it - even if the project is live (active) and visible to your sub-trades. The schedule is kept hidden until you 'activate' it.

The Schedule Details Pane
Provides additional project details:
- The Schedule Type - Classic, Advanced, and Enterprise - see notes below*
- The Client's Name + Contract Name - if loaded
- The Site Address - if loaded
- The Site Manager Name - if loaded
- The Template(s) loaded to this project

NOTE: RAVE has three scheduling systems - these are:
RAVE's Classic Scheduling - included for all RAVE branches by default - where tasks (and milestones) are ordered by start date - you can move:
- An individual task
- This task + all future milestone tasks
- This task + all future schedule tasks
RAVE's Advanced Scheduling - introduces hourly durations, and task linking (with predecessors/successors) to provide more granular control over your scheduling. The 'Advanced' scheduling mode is primarily for maintenance companies who need to schedule by the hour.
RAVE's Enterprise Scheduling - includes task linking (predecessors/successors) and the use of constraints (i.e. must start on) to provide complete control over your scheduling. The 'Enterprise' scheduling mode is primarily for building companies who want to have greater control of their scheduling, or who have used the likes of microsoft projects, and/or the more expensive overseas scheduling software.
The two ways to build a Schedule in RAVE
Access this demo here.
There are two ways to build a schedule in RAVE:
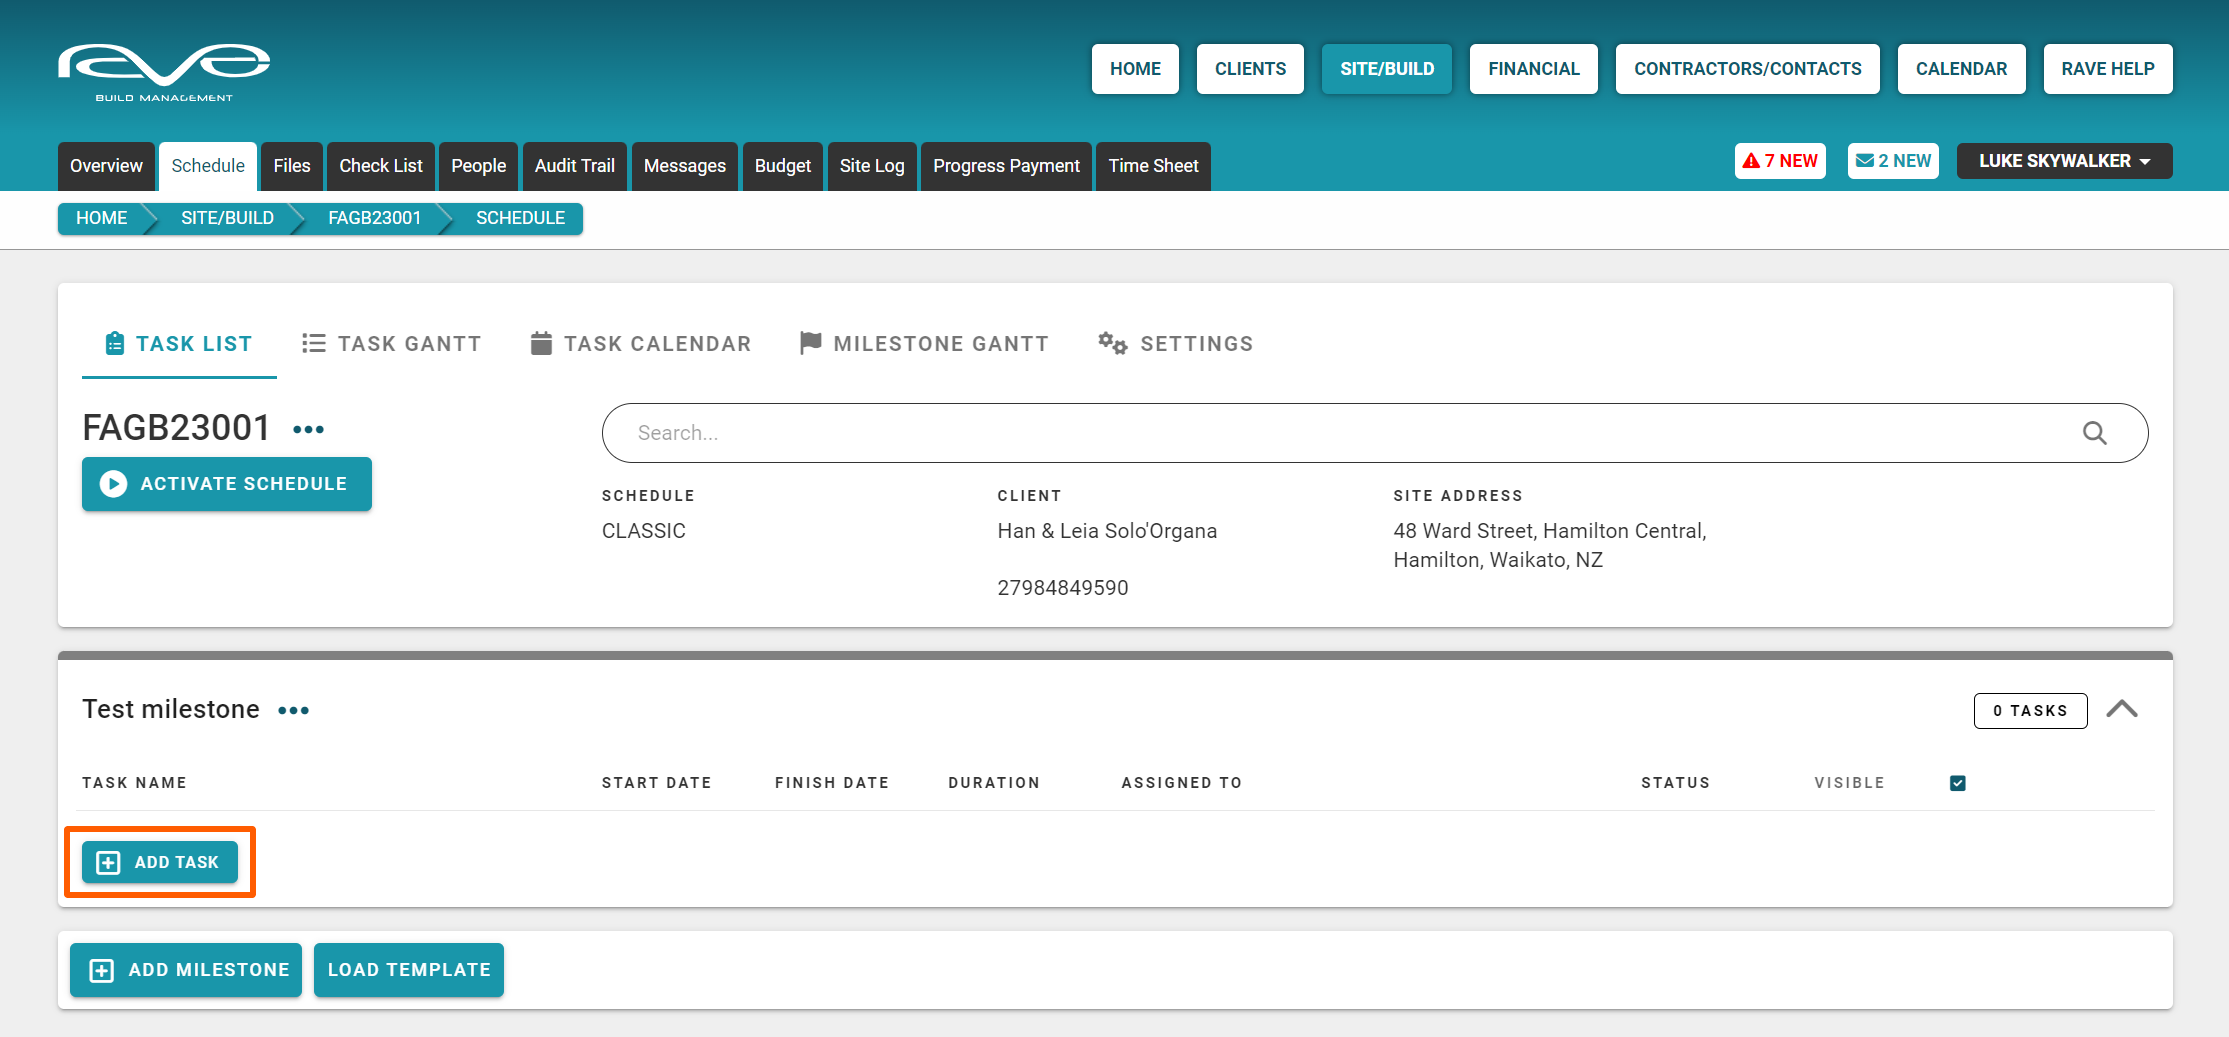
1. Build your Schedule Manually - By Adding Milestones (stages) and Tasks
Firstly, you can build a new schedule by adding milestones and adding tasks to these.
As shown below, we can add a milestone by clicking on the ‘Add Milestone’ button at the bottom left of the schedule screen, or via the 'meatball' action dropdown (next to the job number - FAGB23001), then giving your new milestone a title/name.
Then click the 'Add task' button, to add your tasks as required to fill that milestone out - repeating both steps as needed to complete your new schedule.
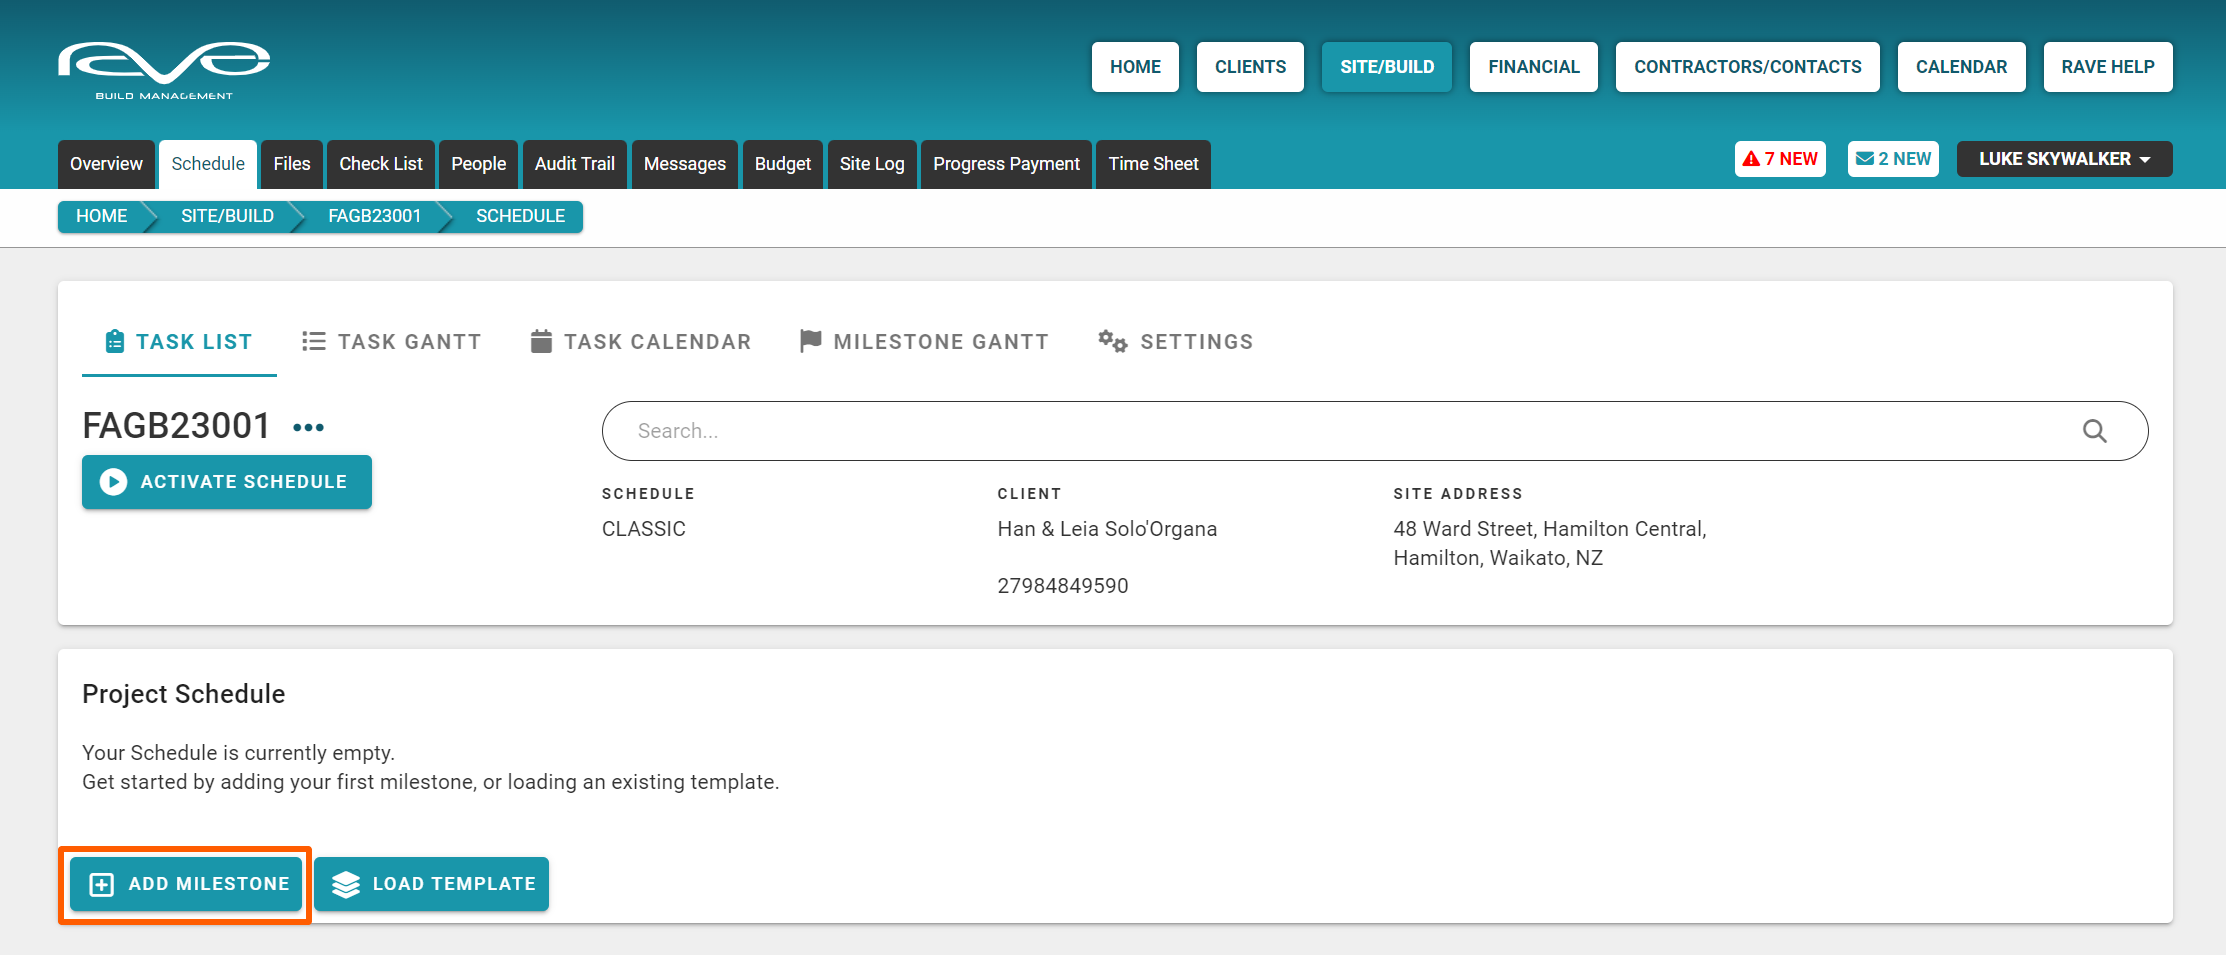
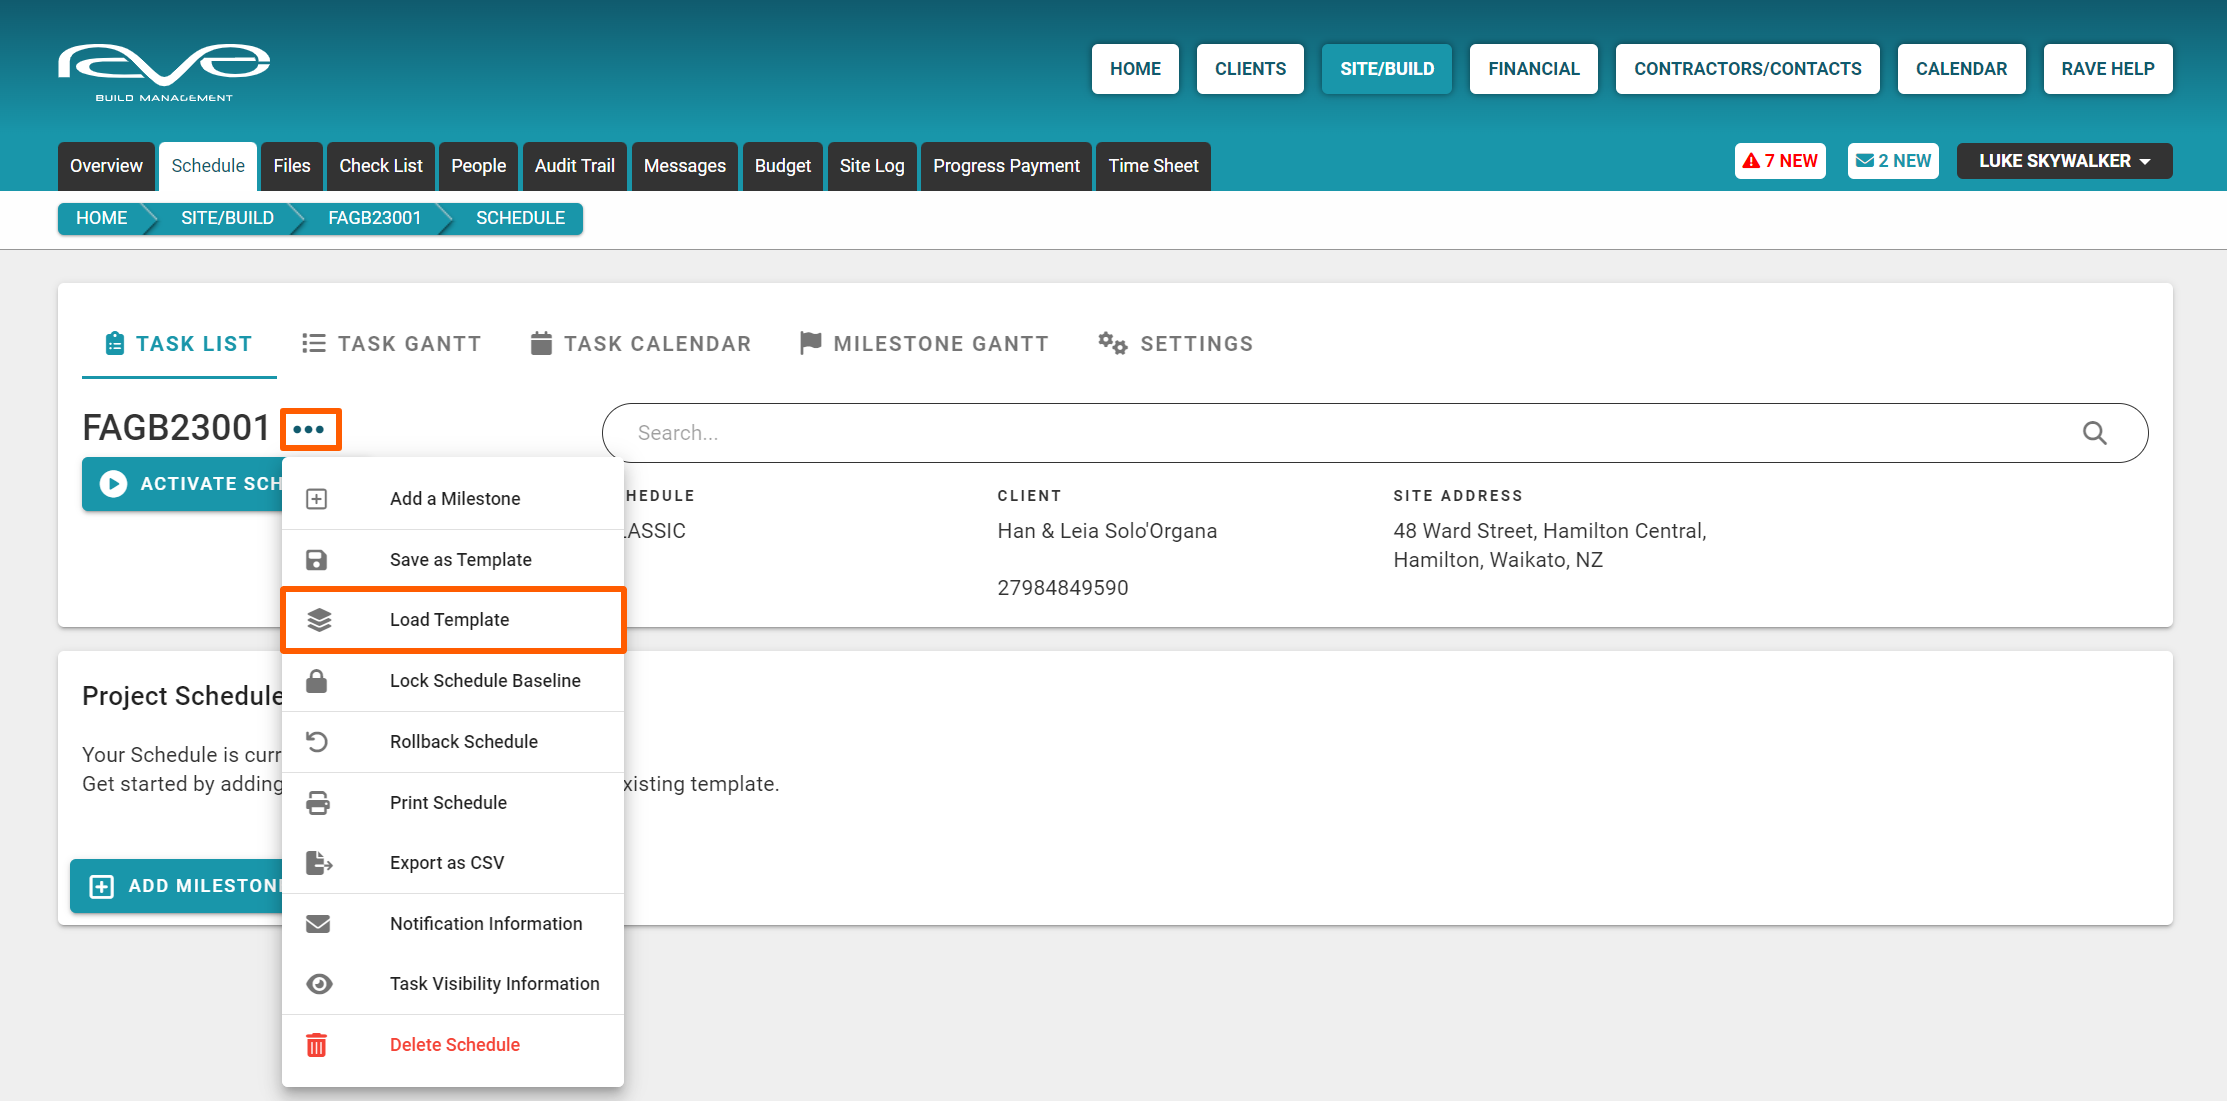
2. Load a Schedule Template
Secondly, you can create a schedule by loading, and editing, a schedule template.
As shown below, you can load an already saved schedule template by clicking on the 'Load Template' button at the bottom left of the schedule screen, or again via the 'meatball' action dropdown - next to the job number - FAGB23001.
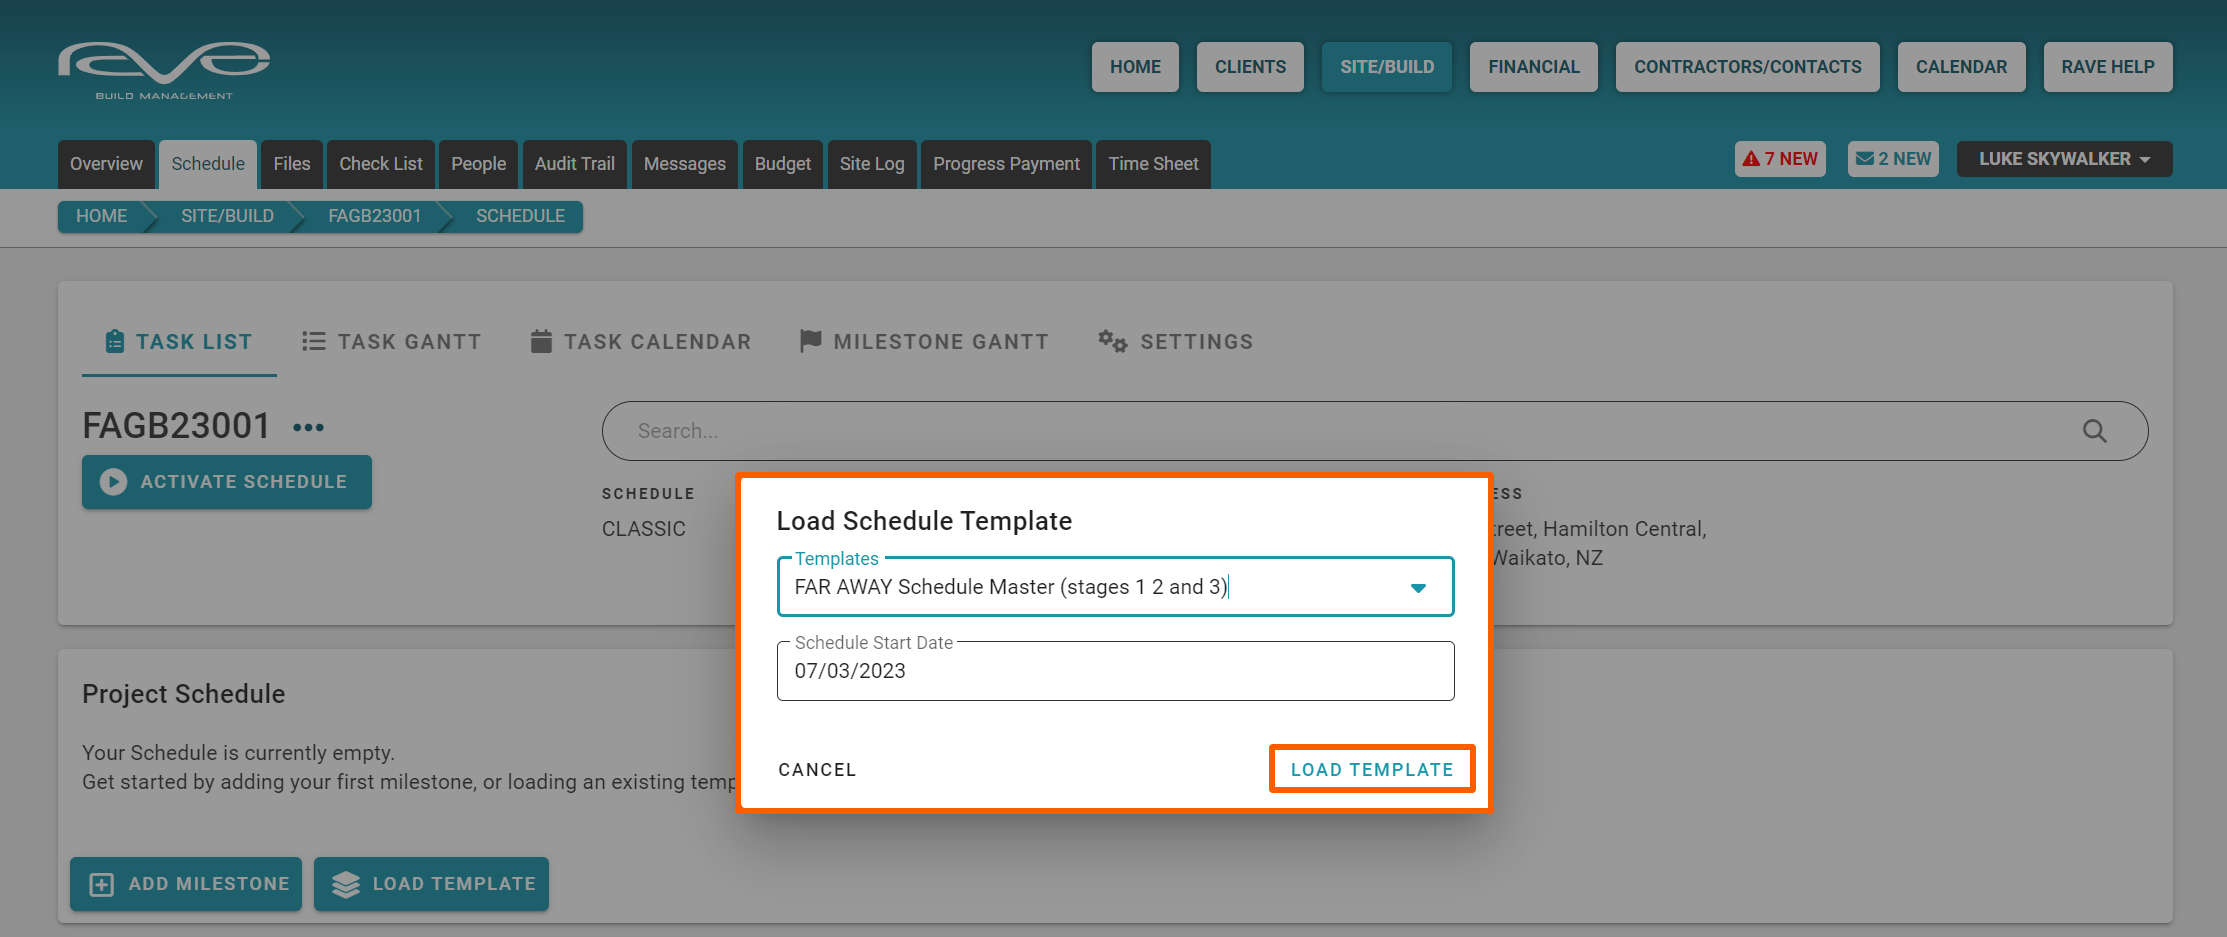
Both options will open the 'Load Schedule Template' pop-up - from here you select your desired pre-saved schedule 'Template' and select the 'Schedule Start Date' - which will set the start date of the first task in the schedule – the rest of the schedule will cascade on from this date once loaded.
Note: The Load Schedule Template pop-up will default to today's date, but this can be easily adjusted by selecting the date you want your schedule to start from, before clicking the ‘LOAD TEMPLATE’ button.

The Task List view of the Schedule
Access this demo here.
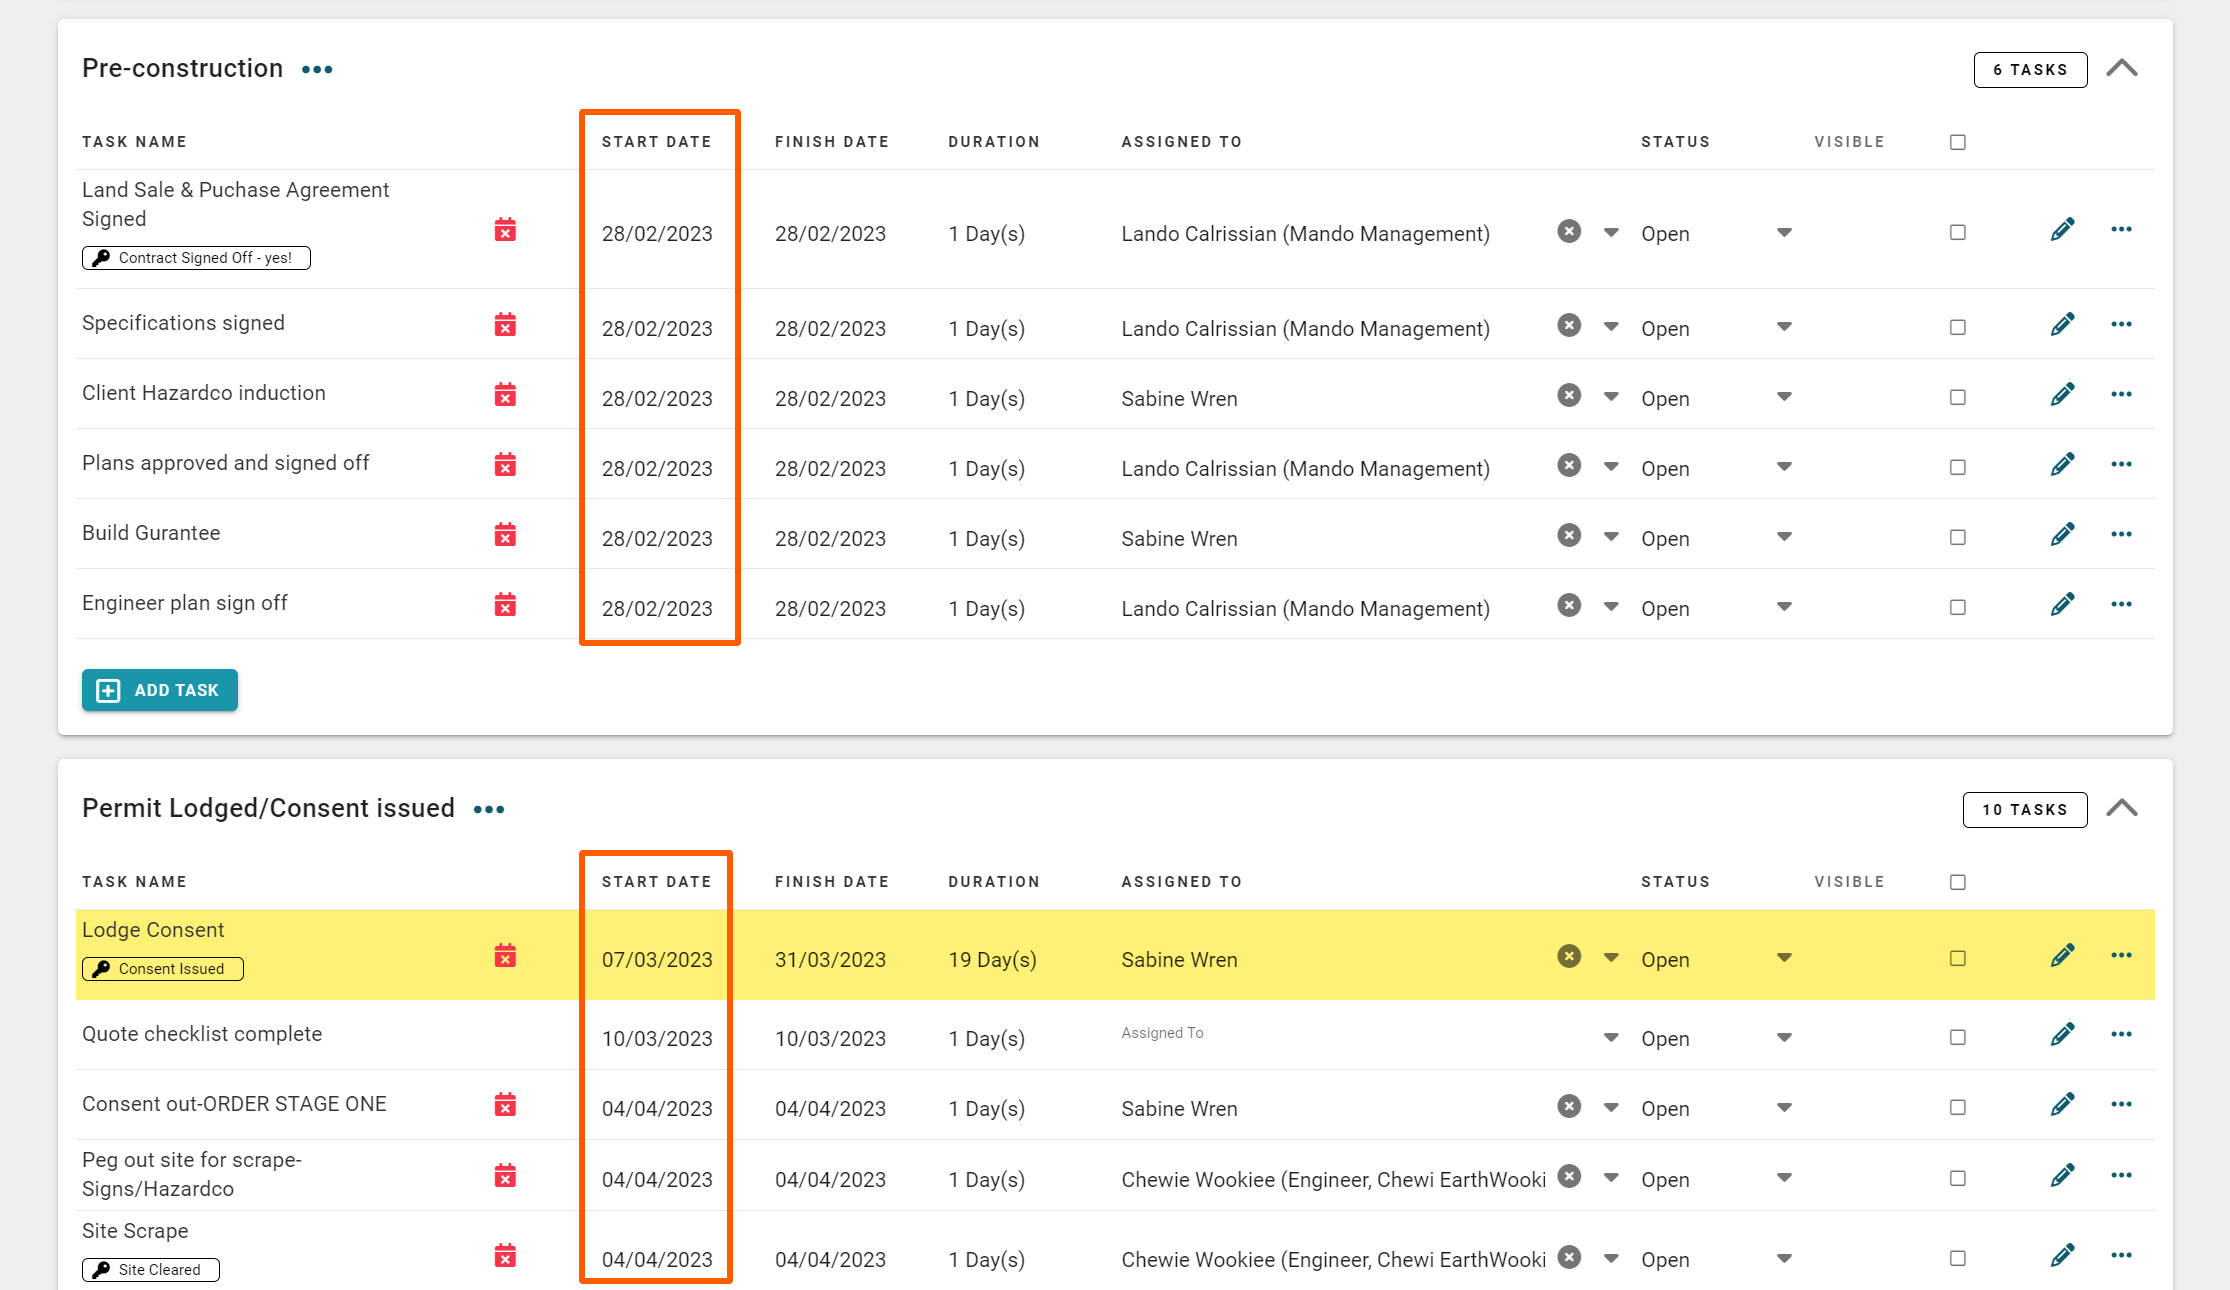
Schedules in RAVE are broken down by milestones (also known as stages) containing tasks - where everything is sorted in start date order:
- Tasks are sorted in start date order, with tasks scheduled on the same day sorted in the order in which they were added/moved to that day.
- Milestones are also sorted in date order - by the start date of the first task in each milestone. If multiple milestones start on the same day, as with tasks, the milestones are sorted in the order in which they were added/moved to that day.

Scheduled Tasks highlighted in Yellow
Any scheduled task highlighted in yellow, lets you know that these tasks are starting today.
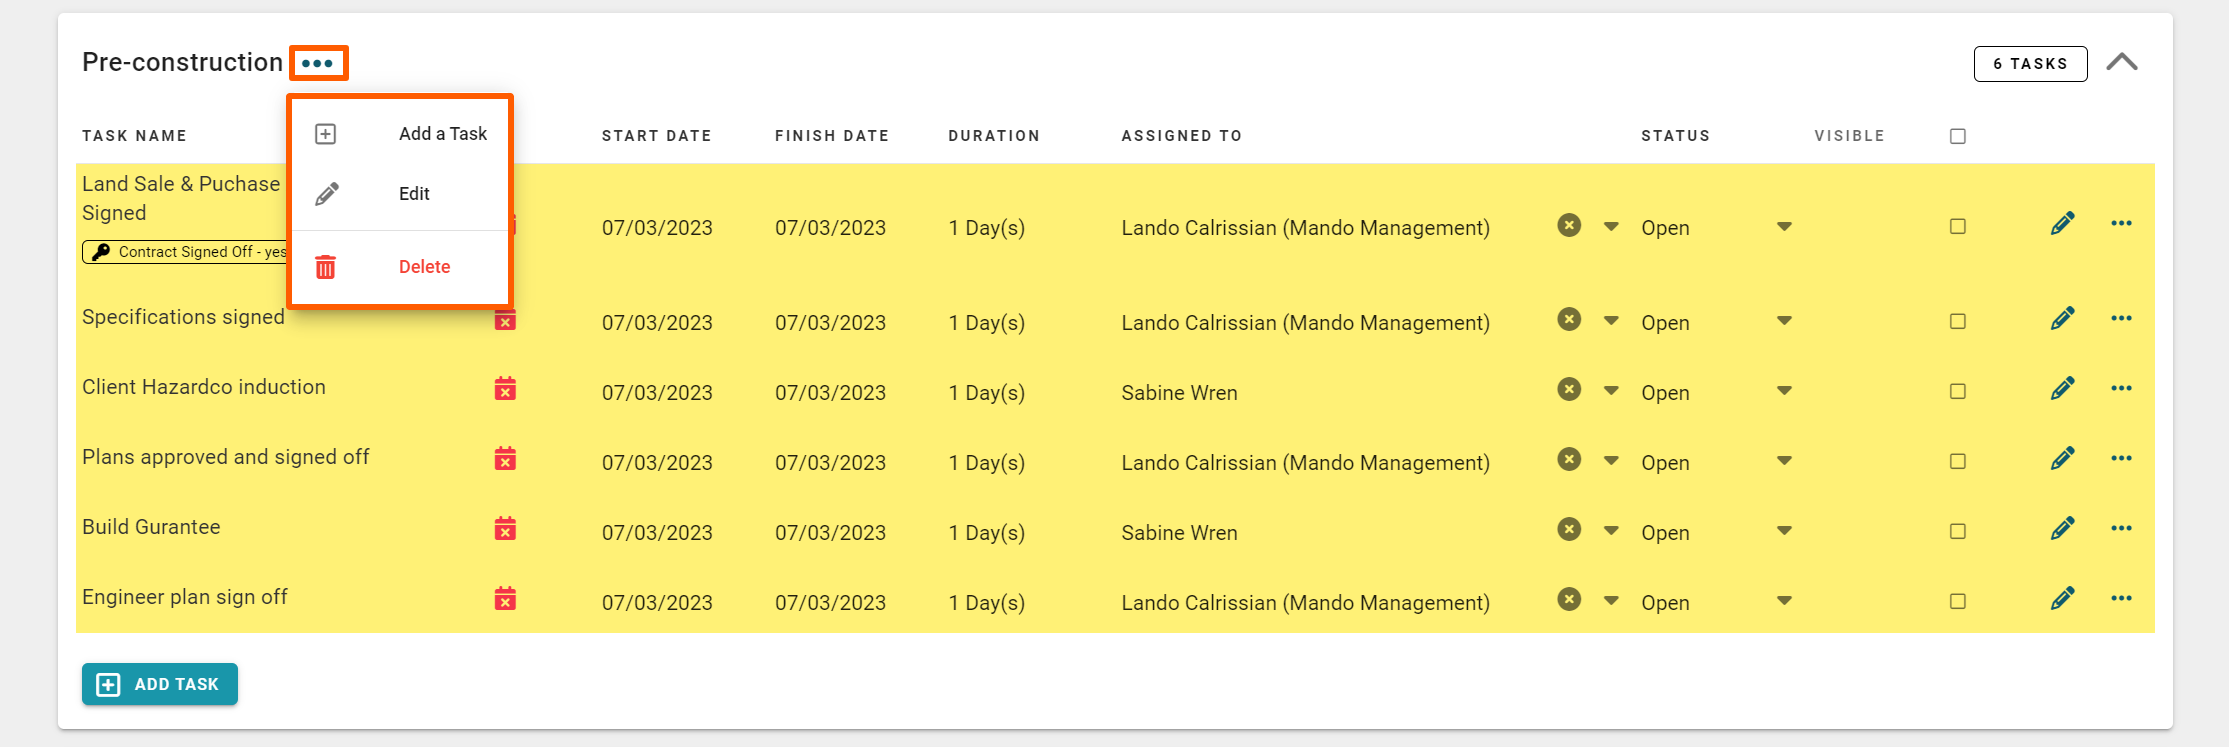
Milestone Editing options
The milestone meatball drop-down menu allows you to:
- Add a task
- Edit the milestone
- Name
- Milestone colour
- Set the milestone's task visibility
- A 'Delete' milestone (and all tasks it contains) button
- A 'Delete' milestone (and all tasks it contains) option
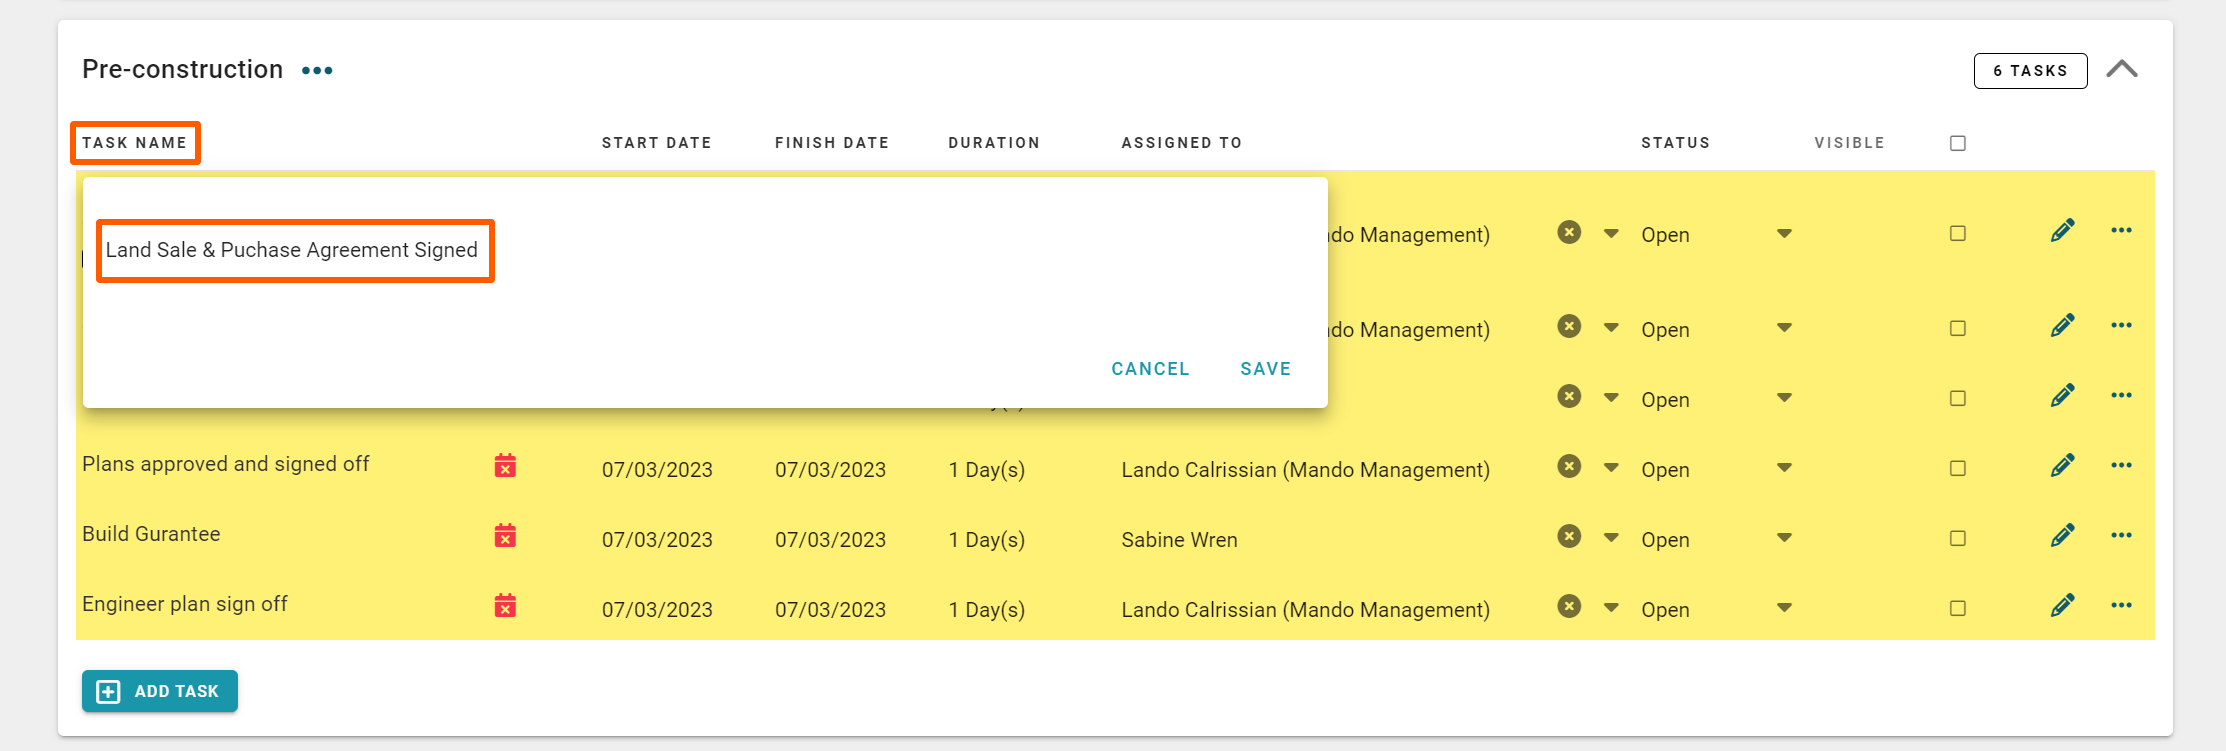
Scheduled Task Elements/Editing Options
Each task has a number of details (fields) that can be edited by clicking on them. This includes:
- The task name
- The task start date
- The task finish date
- The task duration
- The primary person assigned to the task
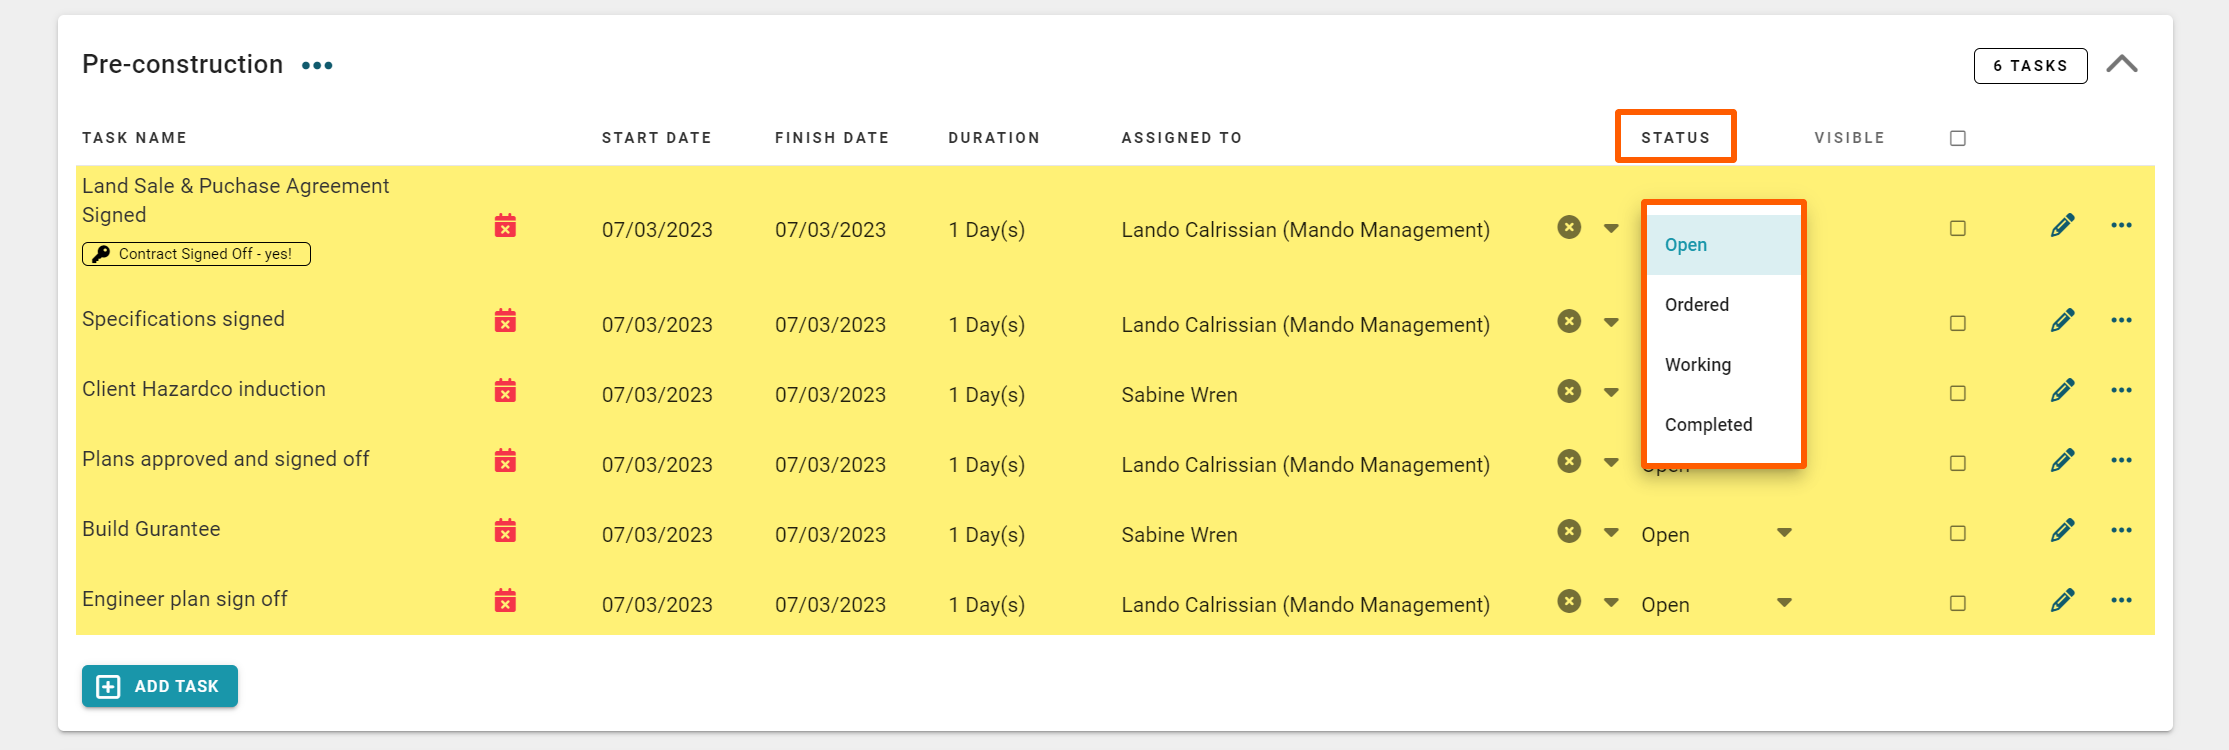
- The task status (open, ordered, working, and completed) where:
- Open i.e. the task hasn't started yet
- Ordered i.e. we are awaiting on a delivery before we can start the task
- Working i.e. work on the task has started, but it is not yet finished
- Completed i.e. the task has been completed to the PM's satisfaction i.e. the PM has signed the task off as completed
- The visibility check box
- Non-visible tasks (not ticked) are viewable by branch users and task assignees only
- Visible tasks (ticked) are viewable by branch users and everyone else who has 'view all visible tasks' permissions set
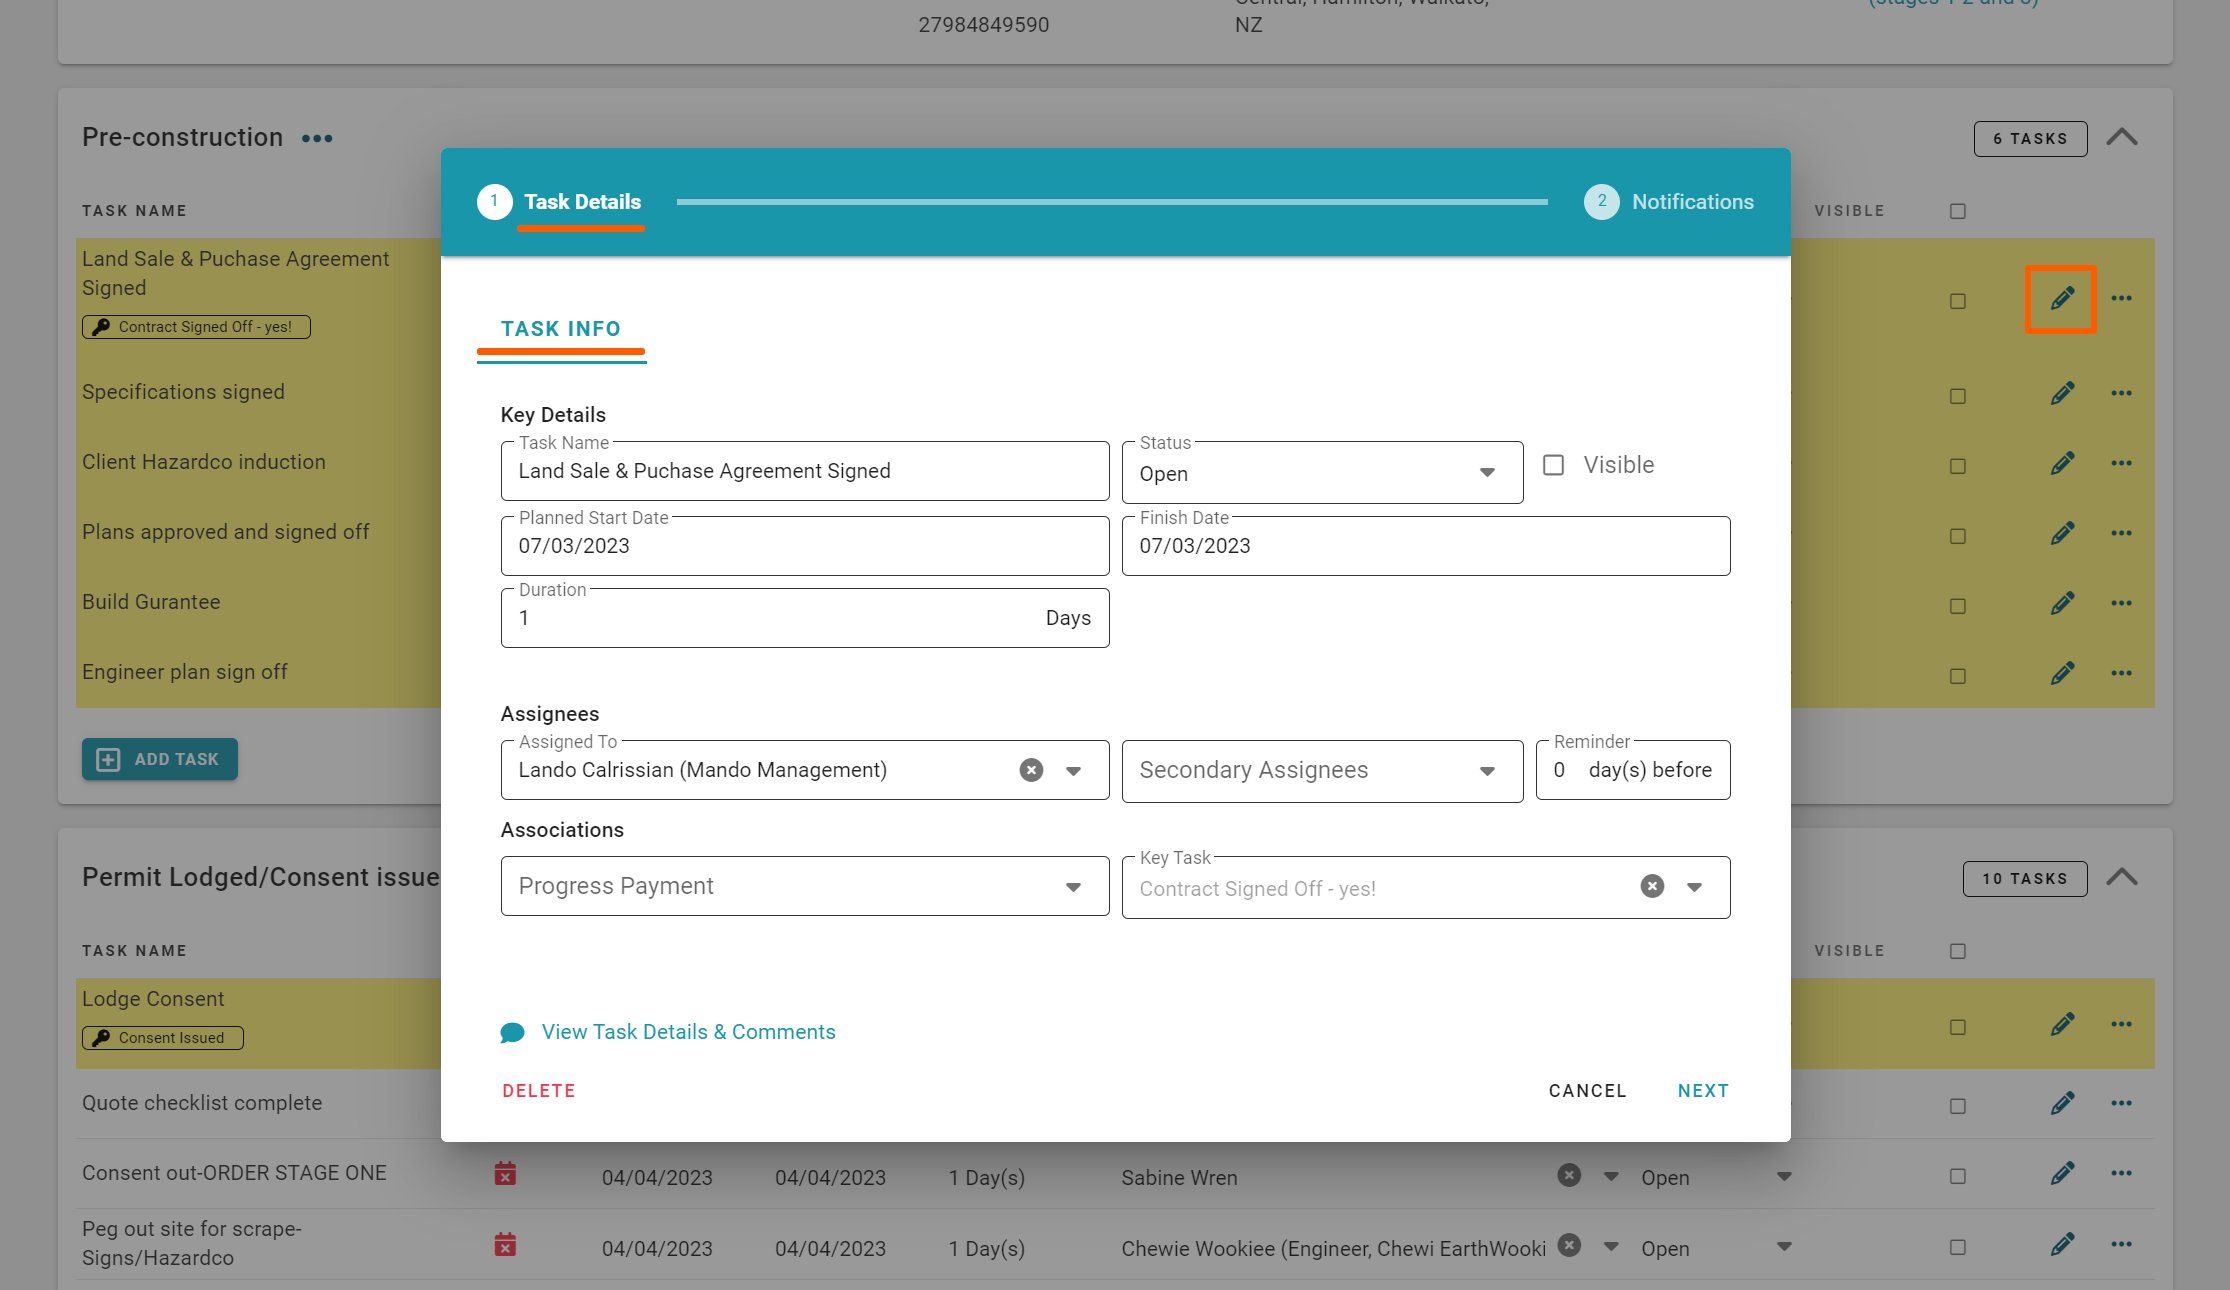
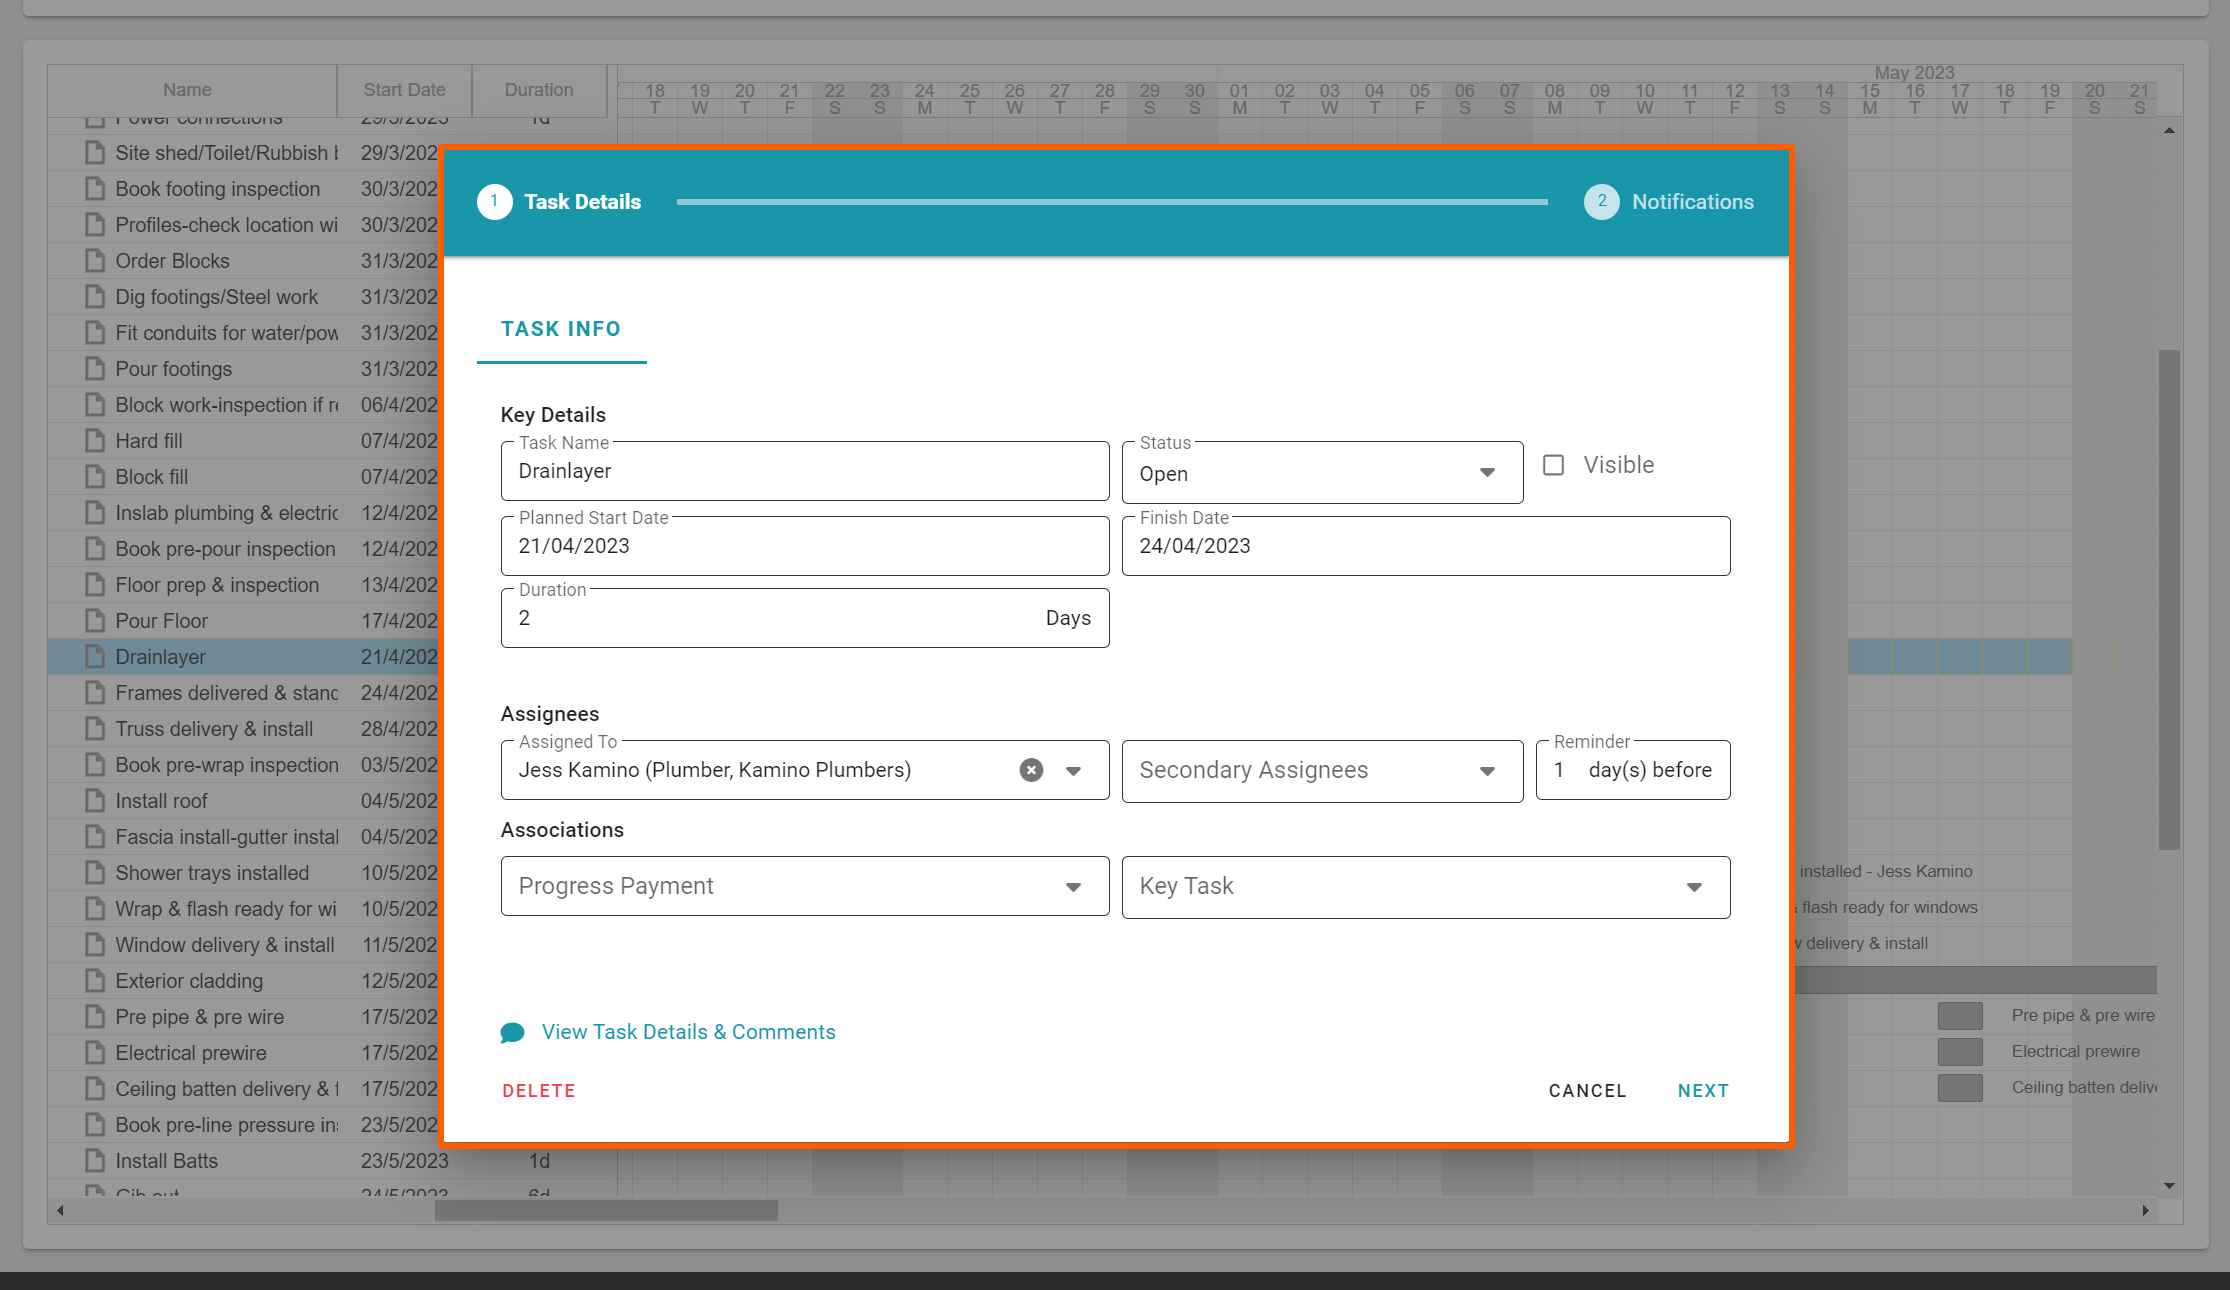
- The task edit (pencil) icon - clicking on this opens the 'Task Details' pop-up, providing access to a few additional task elements - these are:
- Secondary Assignees - others who can access the task and task comments
- Prompt Days - reminders to task assignees that this task is due to start in 'x' number of days
- Progress Payment/Stage Claim linking - covered in our 'Accounts - Progress Payment' training
- Key Task linking - covered in our 'Key Task Build Overview Report' training
- A 'Delete' task button
- The meatball drop-down menu
- View Task Details and Comments - covered in our 'Project Communication' training
- View Task Clashes - spotlighting any other tasks the primary assignee is also assigned to today
- A 'Delete' task option


Updating the Schedule - Moving Tasks in 'Classic' Mode - Task List View
Access this demo here.
We can update the schedule (move a task or tasks) via the task list view in 'Classic' scheduling mode, simply by:
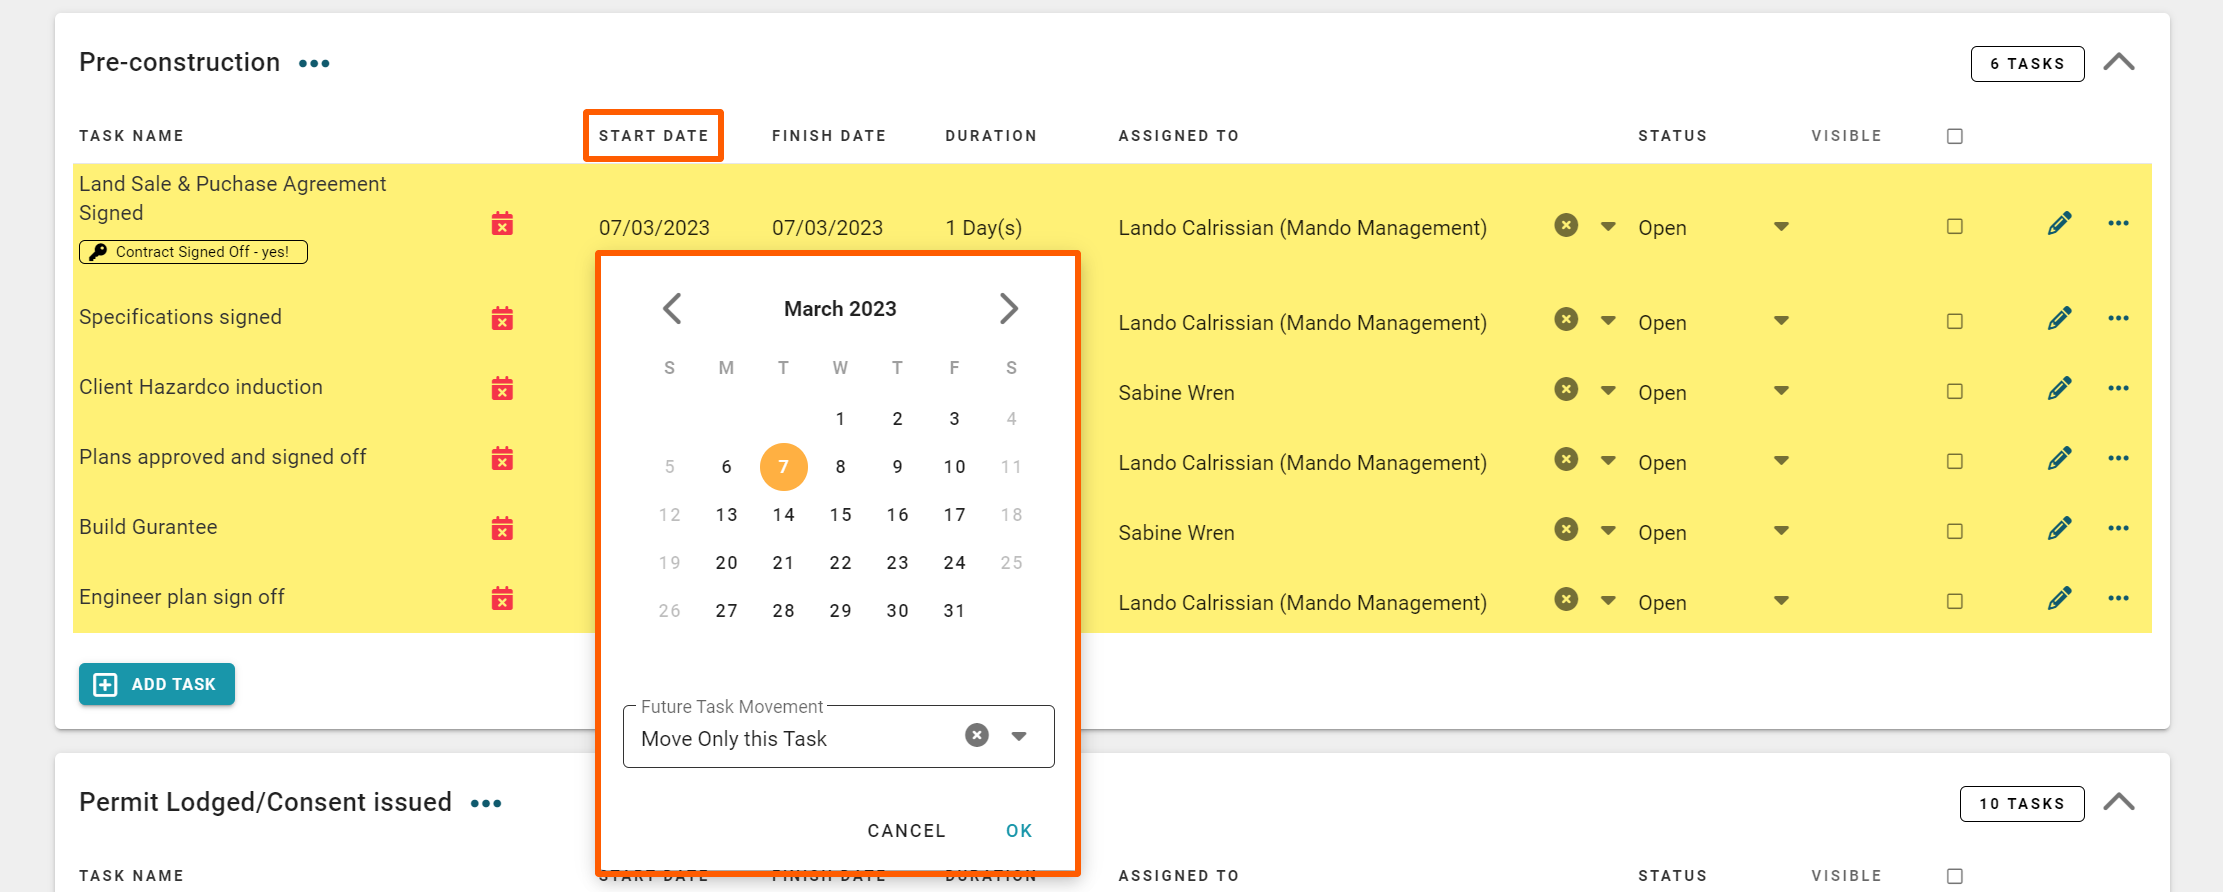
- Clicking on a task's 'Start Date'
This will open a calendar pop-up - Clicking on the date you want to move this task's start date to
- Selecting one of three 'Future Task Movement' options:
- Move Only this Task - will leave the rest of the schedule where it is and just move this particular task to its new start date
- Move All Future Milestone Tasks - will move all of the tasks due to start today* and onwards (for this milestone only) and move those remaining milestone tasks forward/back that number of working days
- Move All Future Tasks - will move all of the tasks due to start today* and onwards (for the rest of the schedule) and move those tasks back a week. will take all of the tasks in the schedule from this date onwards and move those remaining scheduled tasks forward/back that number of working days
IMPORTANT NOTE: Rave does not consider the time of day when selecting 'All Future Tasks' - this means that ALL other tasks starting on this day (even tasks earlier in the Milestone, or in previous milestones) will also move.
- And finally, click the 'OK' button to confirm
If moving future milestone/scheduled tasks, you'll typically see the first task move, then any subsequent future tasks a few seconds afterward.


Updating the Schedule - Moving Tasks in 'Classic' Mode via the pencil icon - Task List View
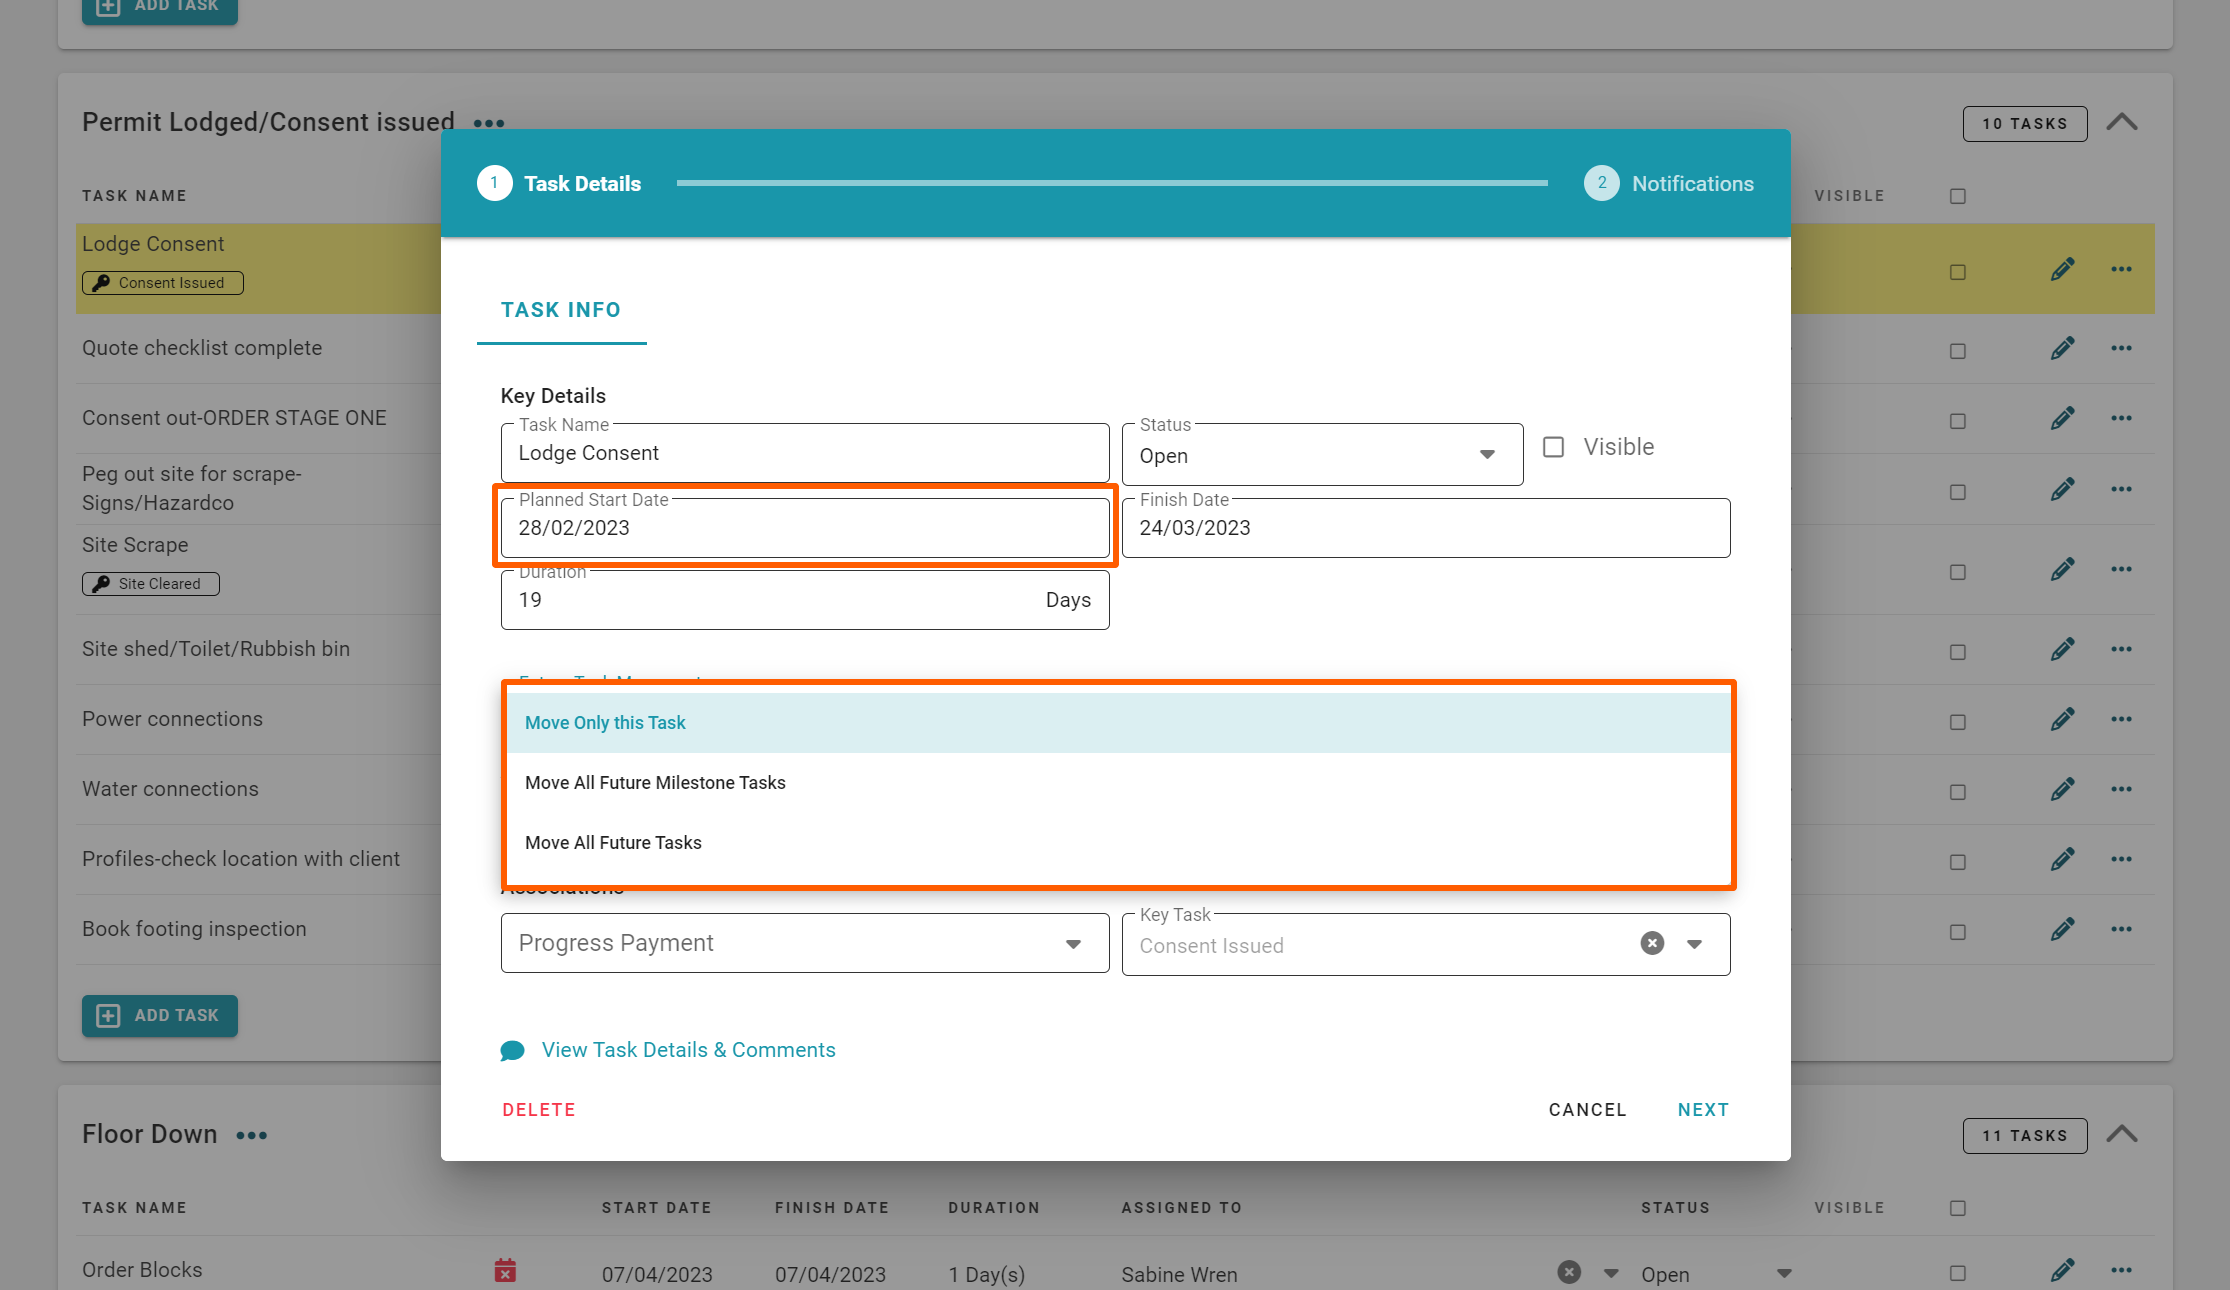
We can also update the schedule via the edit task pop-up (pencil icon) of the task list view, by:
- Clicking on the edit task/pencil icon
This will open a Task Details pop-up - Clicking on a task's 'Planned Start Date' field
This will open a calendar drop-down - Clicking on the date you want to move this task's start date to
- Selecting one of three 'Future Task Movement' options:
- Move Only this Task
- Move All Future* Milestone Tasks
- Move All Future* Tasks
IMPORTANT NOTE: Rave does not consider the time of day when selecting 'All Future Tasks' - this means that ALL other tasks starting on this day (even tasks earlier in the Milestone, or in previous milestones) will also move.
- And finally, click the 'NEXT' button, and 'SAVE' on the next screen to confirm
Again, if moving future milestone/scheduled tasks, you'll typically see the first task move, then any subsequent future tasks a few seconds afterward.


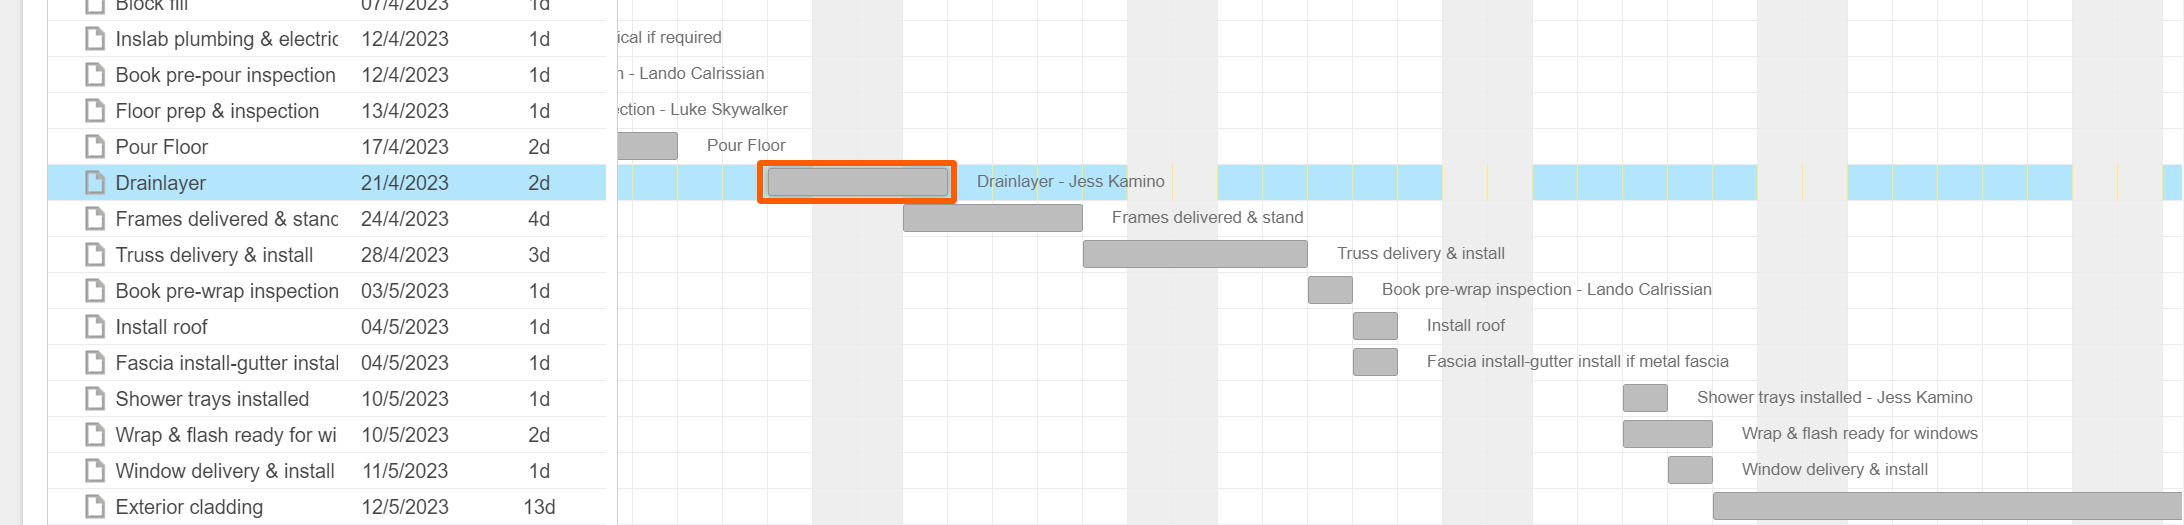
The Task Gantt view of the Schedule - Classic Scheduling
Access this demo here.
As mentioned previously, schedules in RAVE are broken down by milestones (also known as stages) containing tasks - where everything is sorted in start date order i.e tasks cascade down from the start date.
As you can see on this screen, you have the tasks listed on the left, and the gantt chart (a graphical view where tasks are displayed with duration bars) to the right.
Below the Schedule Details Pane, we have a 'View By' drop-down to the left, we can change the scale of the gantt, viewing by days, weeks, fortnights, months, or years - the default being days. Advanced scheduling gives you the ability to view this by hours also.
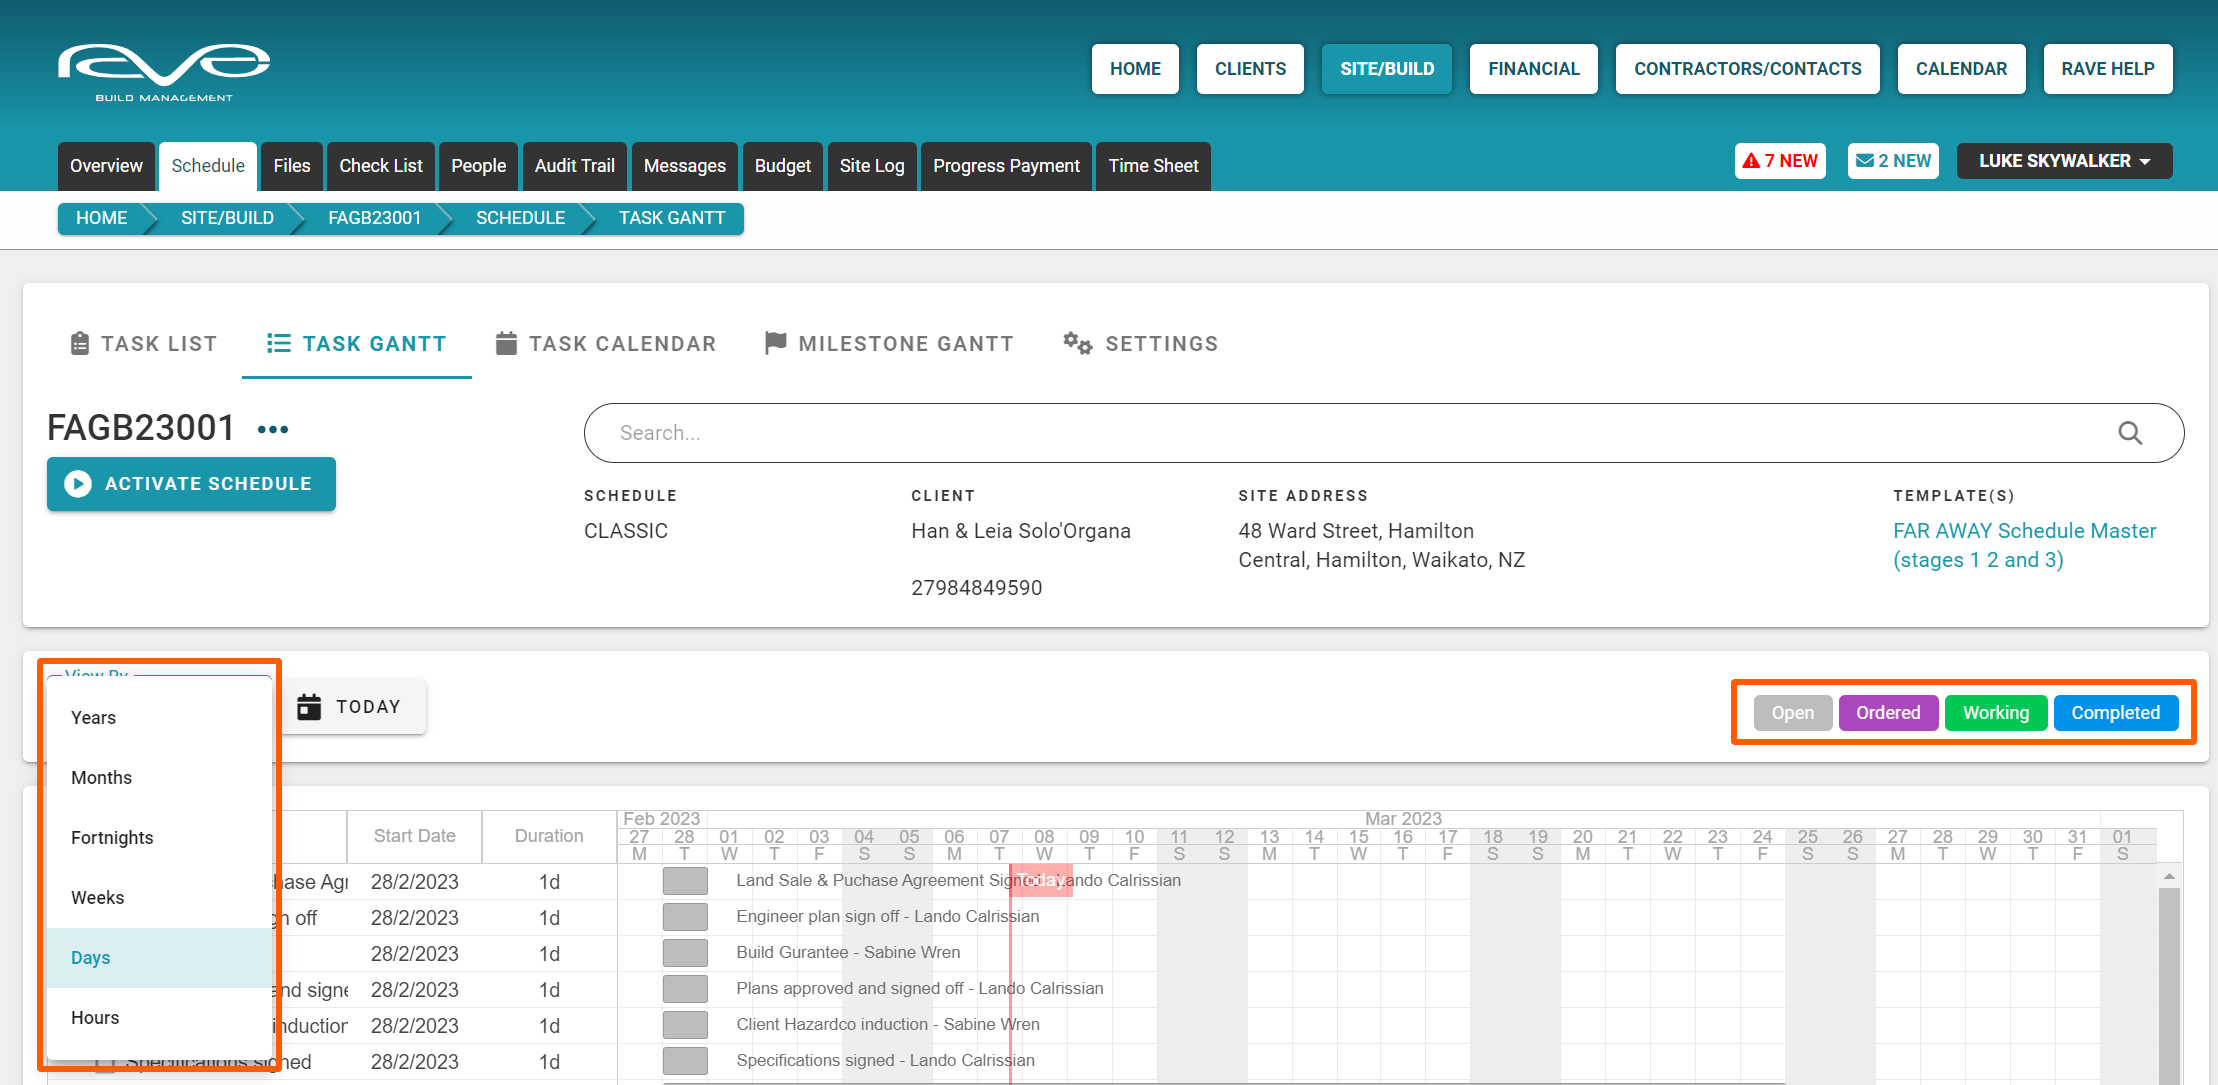
To the far right, we have our task status color coding - these colours will be reflected on the Gantt as we update tasks.
- Open (gray) i.e. the task hasn't started yet
- Ordered (purple) i.e. we are awaiting on a delivery before we can start the task
- Working (green) i.e. work on the task has started, but it is not yet finished
- Completed (blue) i.e. the task has been completed to the PM's satisfaction i.e. the PM has signed the task off as completed
Task Gantt View - Scheduled Task Elements/Editing Options
Each task line has a number of details that can be edited by double-clicking on them. This includes:
- The task name
- The task start date
- The task duration (in days)
On the gantt chart side, we include: - The taskbar block - spread over the duration of days
- The task name
- And the primary task assignee - if assigned
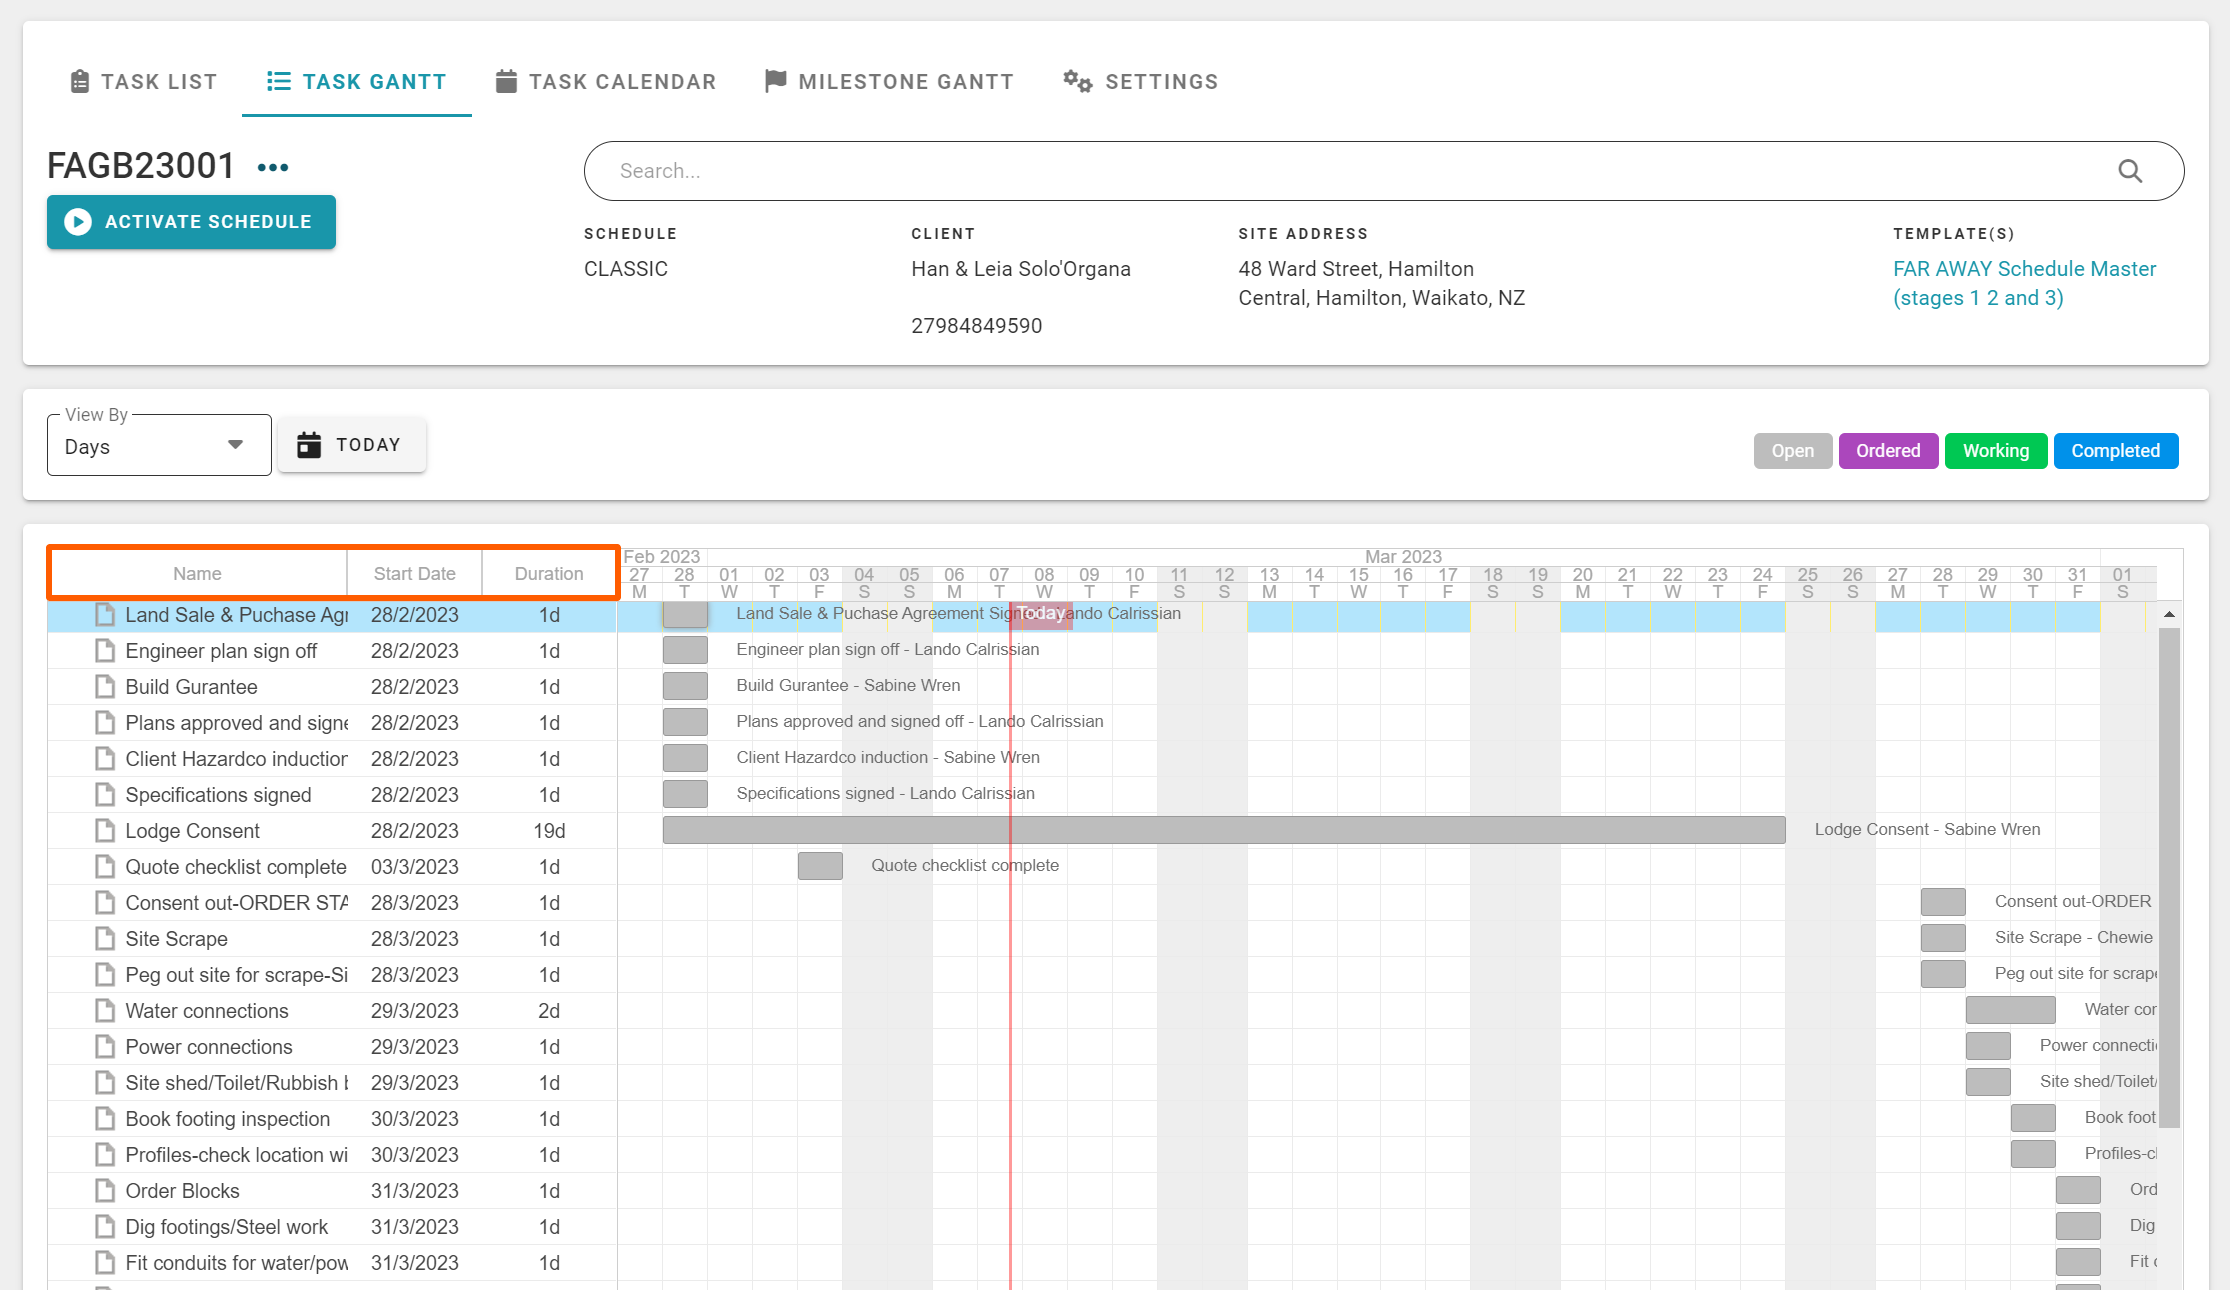
The current day, and time, are highlighted by the 'Today' dateline - if you ever move away from today's date on the gantt, you can always click on the ‘Today’ button, which will snap the view back to include today's date.

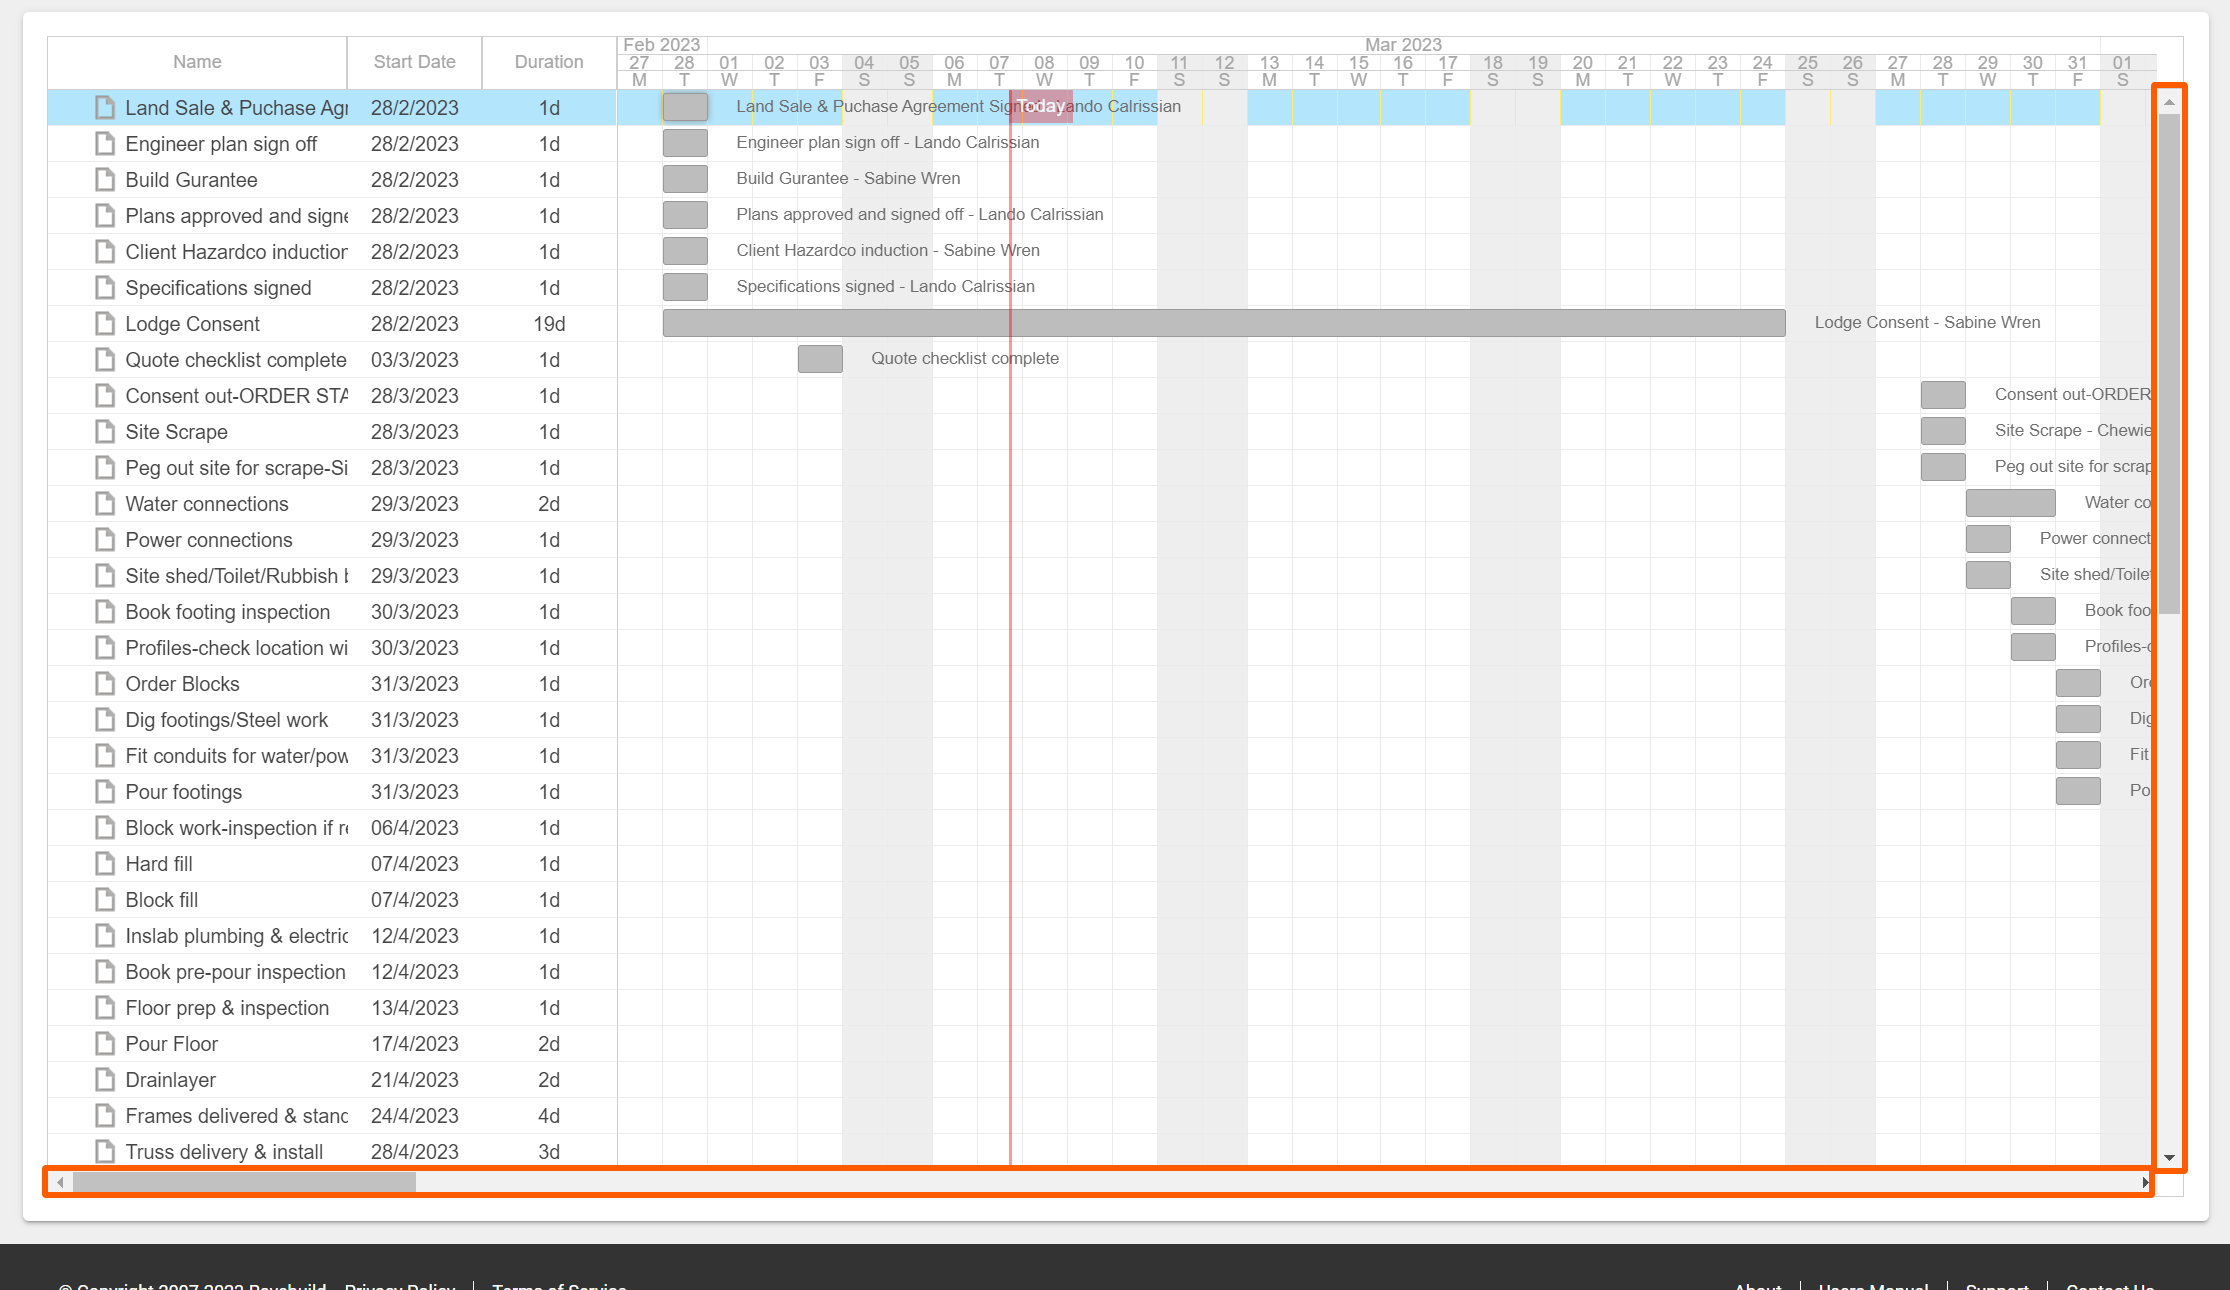
Navigation around the Gantt is controlled by the right and bottom scroll bars. You can also use your mouse to scroll up and down, while holding shift and scrolling up and down to move the Gantt left and right.
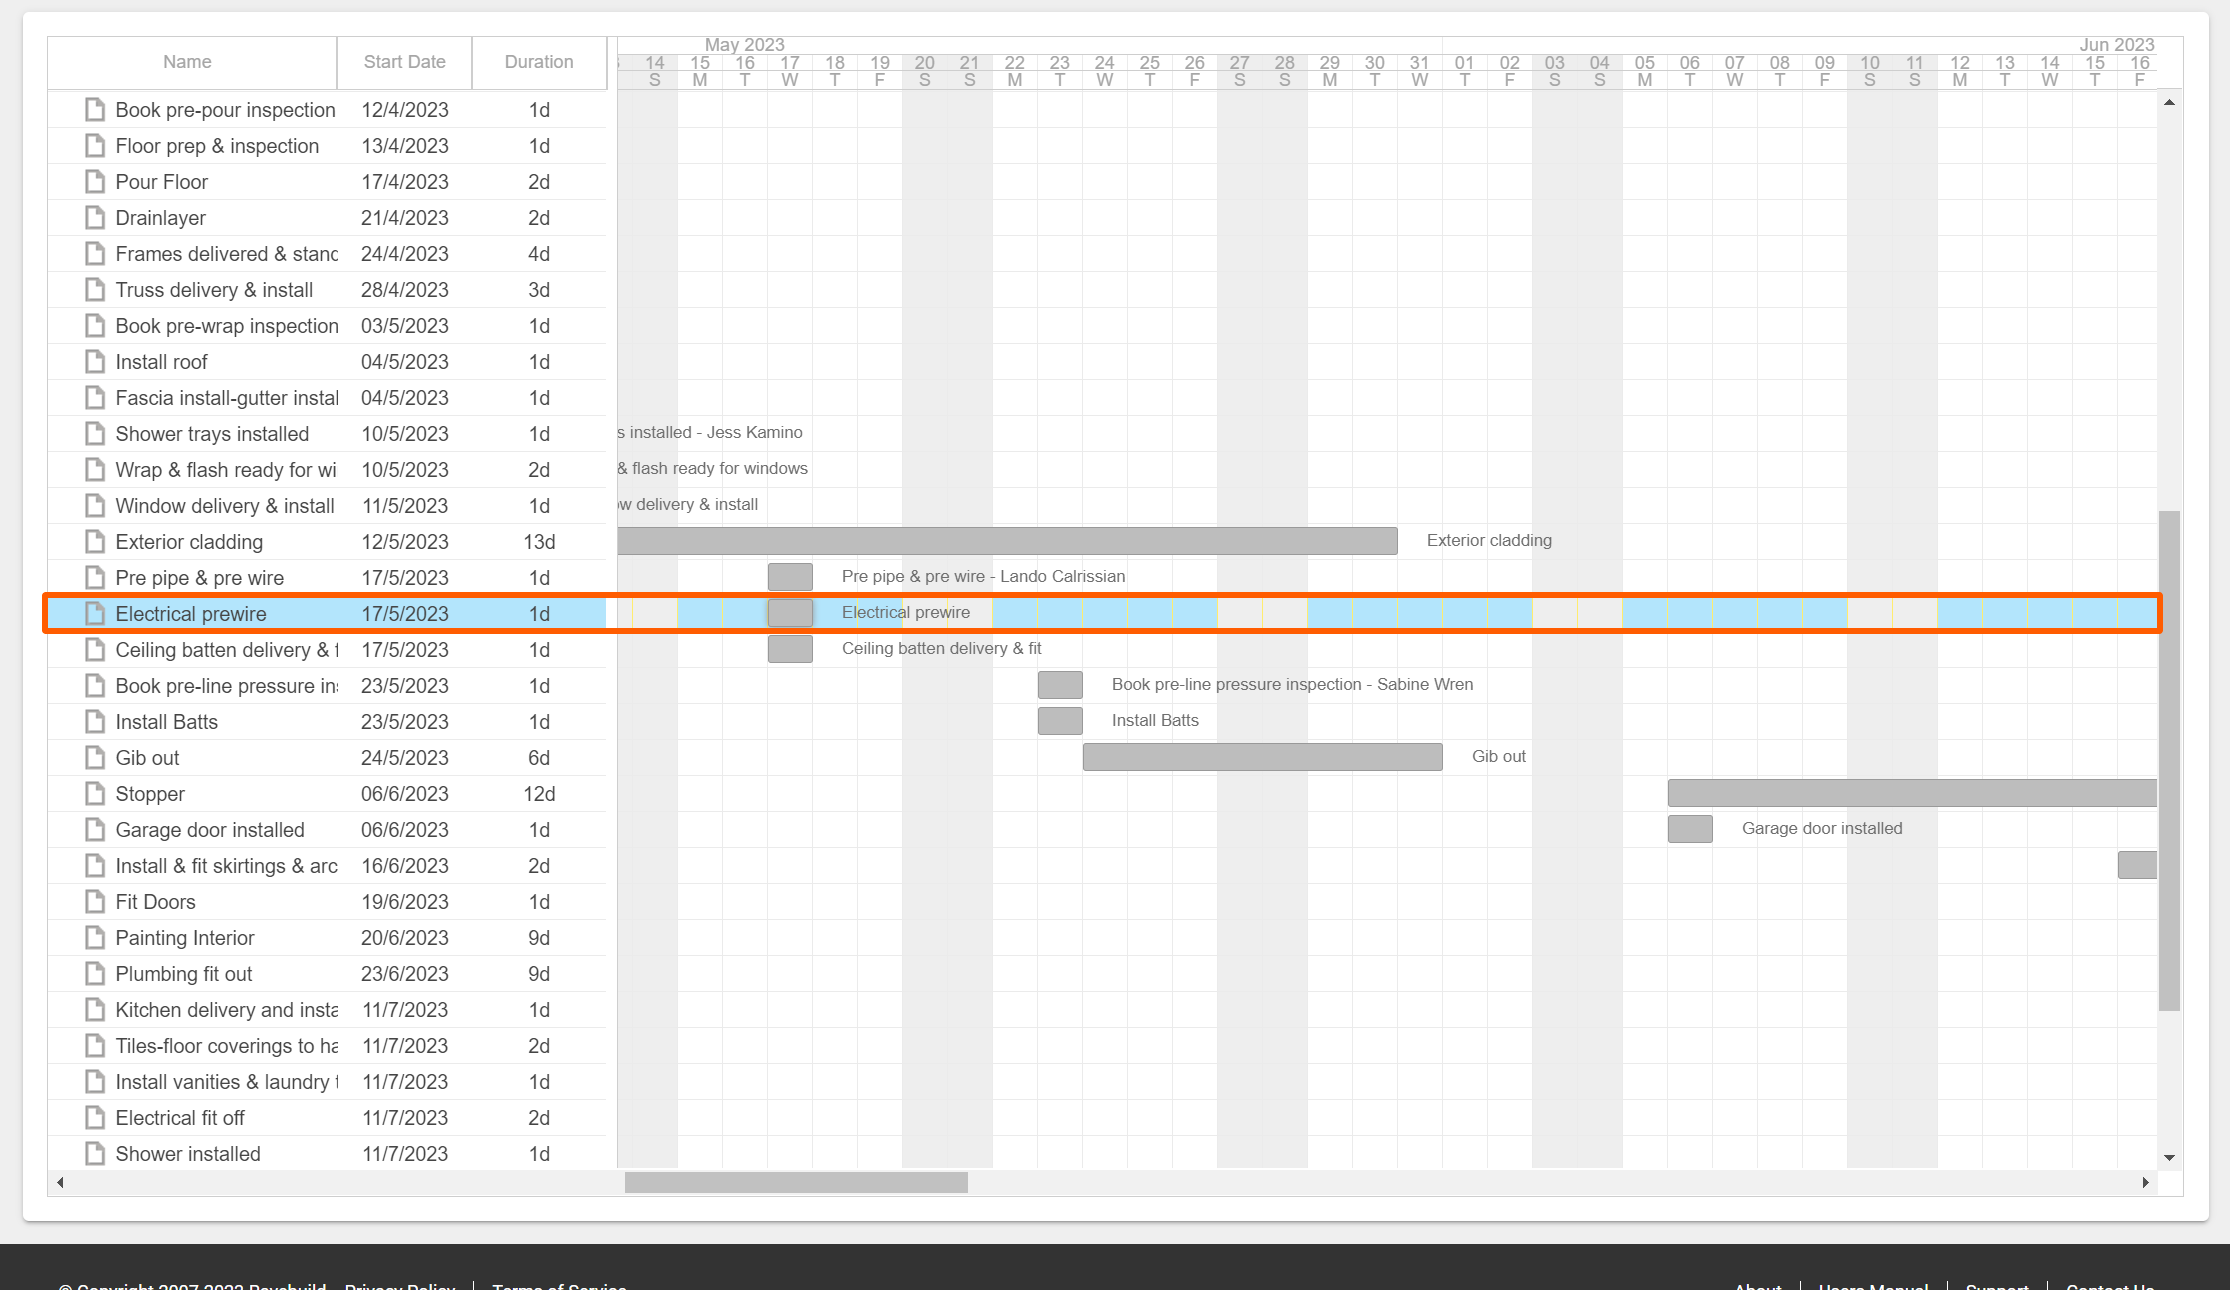
RAVE Tip: Clicking on a task description will shuffle the gantt chart, to make that task visible
Updating the Schedule - Moving Tasks in 'Classic' Mode - Task Gantt View
Access this demo here.
Changing the schedule in 'Classic' scheduling mode, via the task gantt view is super easy.
Click-and-Drag Tasks to Update the Schedule via the 'Classic' Task Gantt View
We have three click-and-drag options, we can:
- Can click-and-drag a single task to move it
- We can hold shift+click on one task, then still holding shift, click on another task to create a group of tasks - dragging this group of tasks to move them
- We can hold control (ctrl)+click on a number of tasks - dragging this selection of tasks to move them
That is in addition to double-clicking on a task to edit it.
Double-Clicking Tasks to Update the Schedule via the 'Classic' Task Gantt View
We can also update the schedule by accessing the Task Details pop-up via the gantt view, that's by:
- Double-clicking on the task you want to change
This will open a Task Details pop-up - Clicking on a task's 'Planned Start Date' field
This will open a calendar drop-down - Clicking on the date you want to move this task's start date to
- Selecting one of three 'Future Task Movement' options:
- Move Only this Task
- Move All Future* Milestone Tasks
- Move All Future* Tasks
IMPORTANT NOTE: Rave does not consider the time of day when selecting 'All Future Tasks' - this means that ALL other tasks starting on this day (even tasks earlier in the Milestone, or in previous milestones) will also move.
- And finally, clicking the 'NEXT' button, and 'SAVE' on the next screen to confirm
Again, if moving future milestone/scheduled tasks, you'll typically see the first task move, then any subsequent future tasks a few seconds afterward.
NOTE: Adding tasks and milestones within classic scheduling, can only be done via the schedules Task List view. If you do need to add milestones and tasks via the Gantt view, we have that functionality in our Advanced and Enterprise scheduling systems. If you really do need this enhance functionality, please contact Rave Build customer support by phone 07 210 2228, or help@ravebuild.co.nz to discuss the advanced and/or enterprise scheduling modules.
Some tips to get started with RAVE 'Classic' Scheduling
Access this demo here.
You can get started with classic scheduling, getting your own schedule up and running by:
- Loading the RAVE master schedule template and making changes straight away
- Loading and Printing the RAVE master schedule template, noting changes on the printout (dates, duration, assignees) before coming back to RAVE to make those changes
- Converting your schedule template into a CSV spreadsheet - and uploading your schedule via the RAVE template section (Site|Build / Templates) we cover how to do this, via this link

The 'Activate Schedule' Button and Pop-up explanation
Access this demo here.
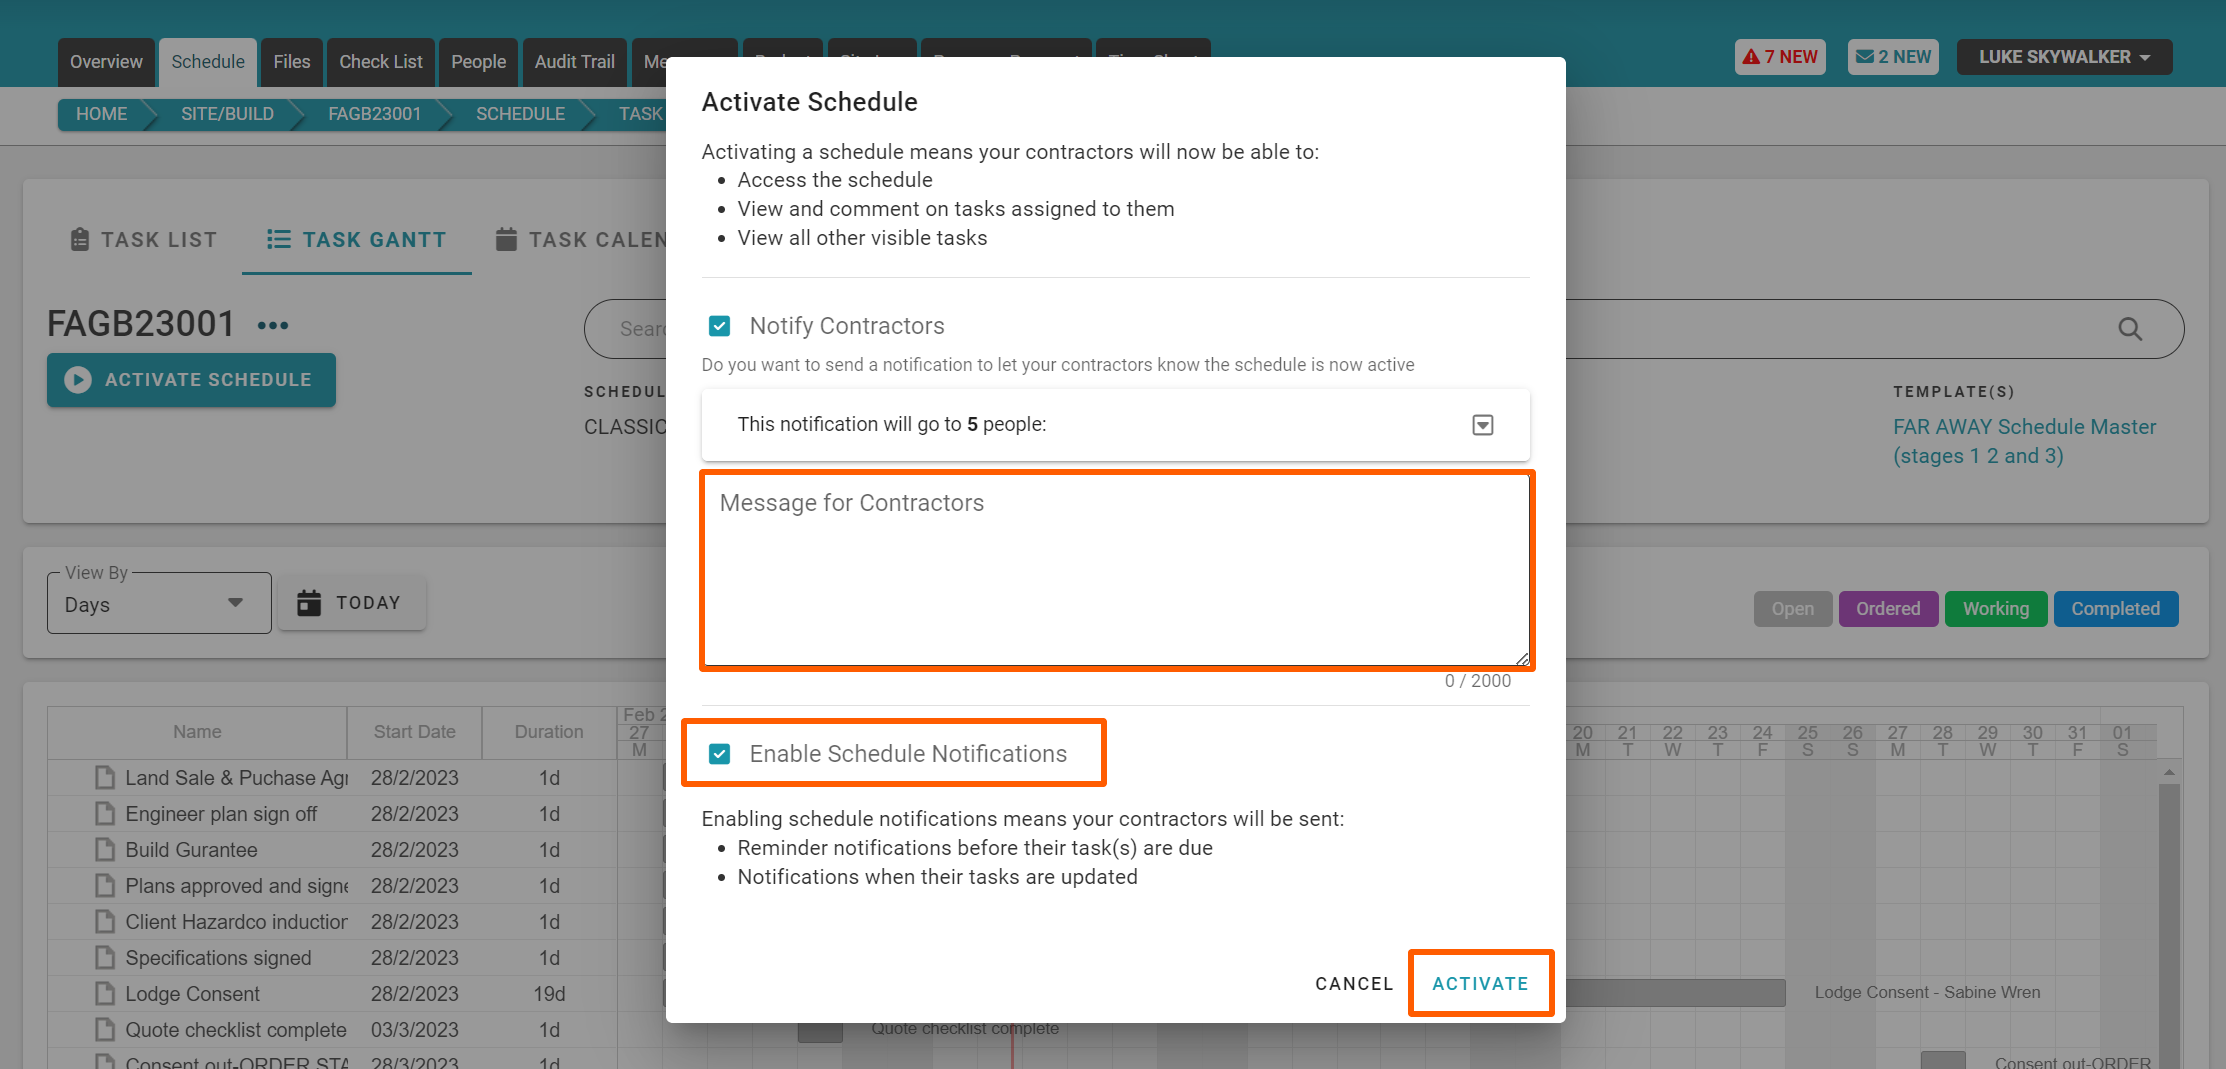
In our project admin/job set-up training, we learned how the active and maintenance build status makes the project details and documentation visible to your contractors and suppliers, but we keep the schedule hidden until you are ready to share it. Making the schedule visible is done via the ‘Activate Schedule’ button.
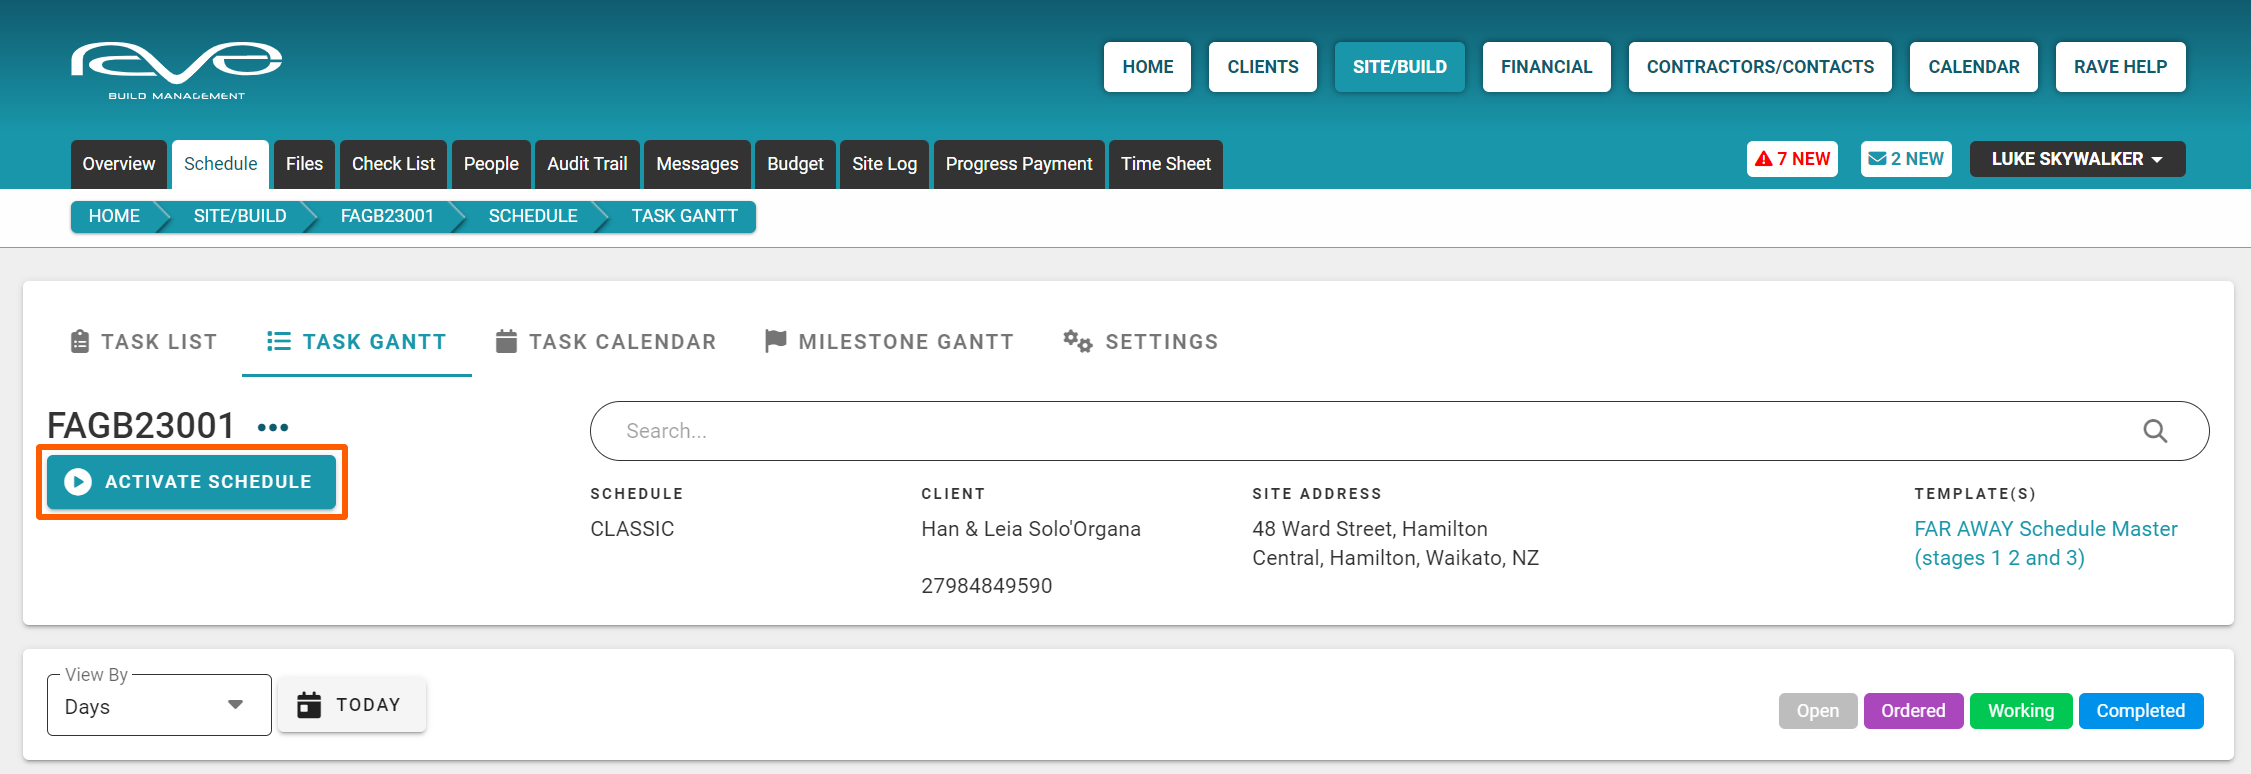
Activating the schedule means the schedule is now live. Your contractors and your clients (if you have given them access to the job and the schedule) will be able to access the schedule, view and comment on tasks assigned to them, and view all other visible tasks if you have given them the 'view all visible tasks' permission.
In addition to making the schedule live, you can also let your trades know that the schedule is now ready to view, by ticking the ‘Notify Contractors’ tick box - via the Activate Schedule pop-up. The notification drop-down to the right, allows you to see all of the contractors given access to this project i.e. who the notification email is going to be sent to.
You can also include a customised message within your activate schedule notification, sent to your contractors.
RAVE HELP TIP: If you need to make changes to your contractor line up i.e. you have spotted an extra electrical company that should not be listed or a trade that is missing from the list, just click off the pop-up, go back to the People's sub-tab, make the changes by adding or removing contractors as required, and go back to the 'Activate Schedule' pop-up to double check.

Finally, you can tick the 'Enable Schedule Notifications' which will allow contractors to receive:
- The reminder notifications for when this task is due to commence
- The prompt notifications (if added to a task) to let them know this task is due to start in 'x' number of days
- And scheduled task change notifications when a task they are assigned to has had a start date change
Once the 'Activate Schedule' pop-up has been set as you need - you can just click the ‘Activate’ button to make the schedule live, send a notification if required, and enable schedule notifications too.
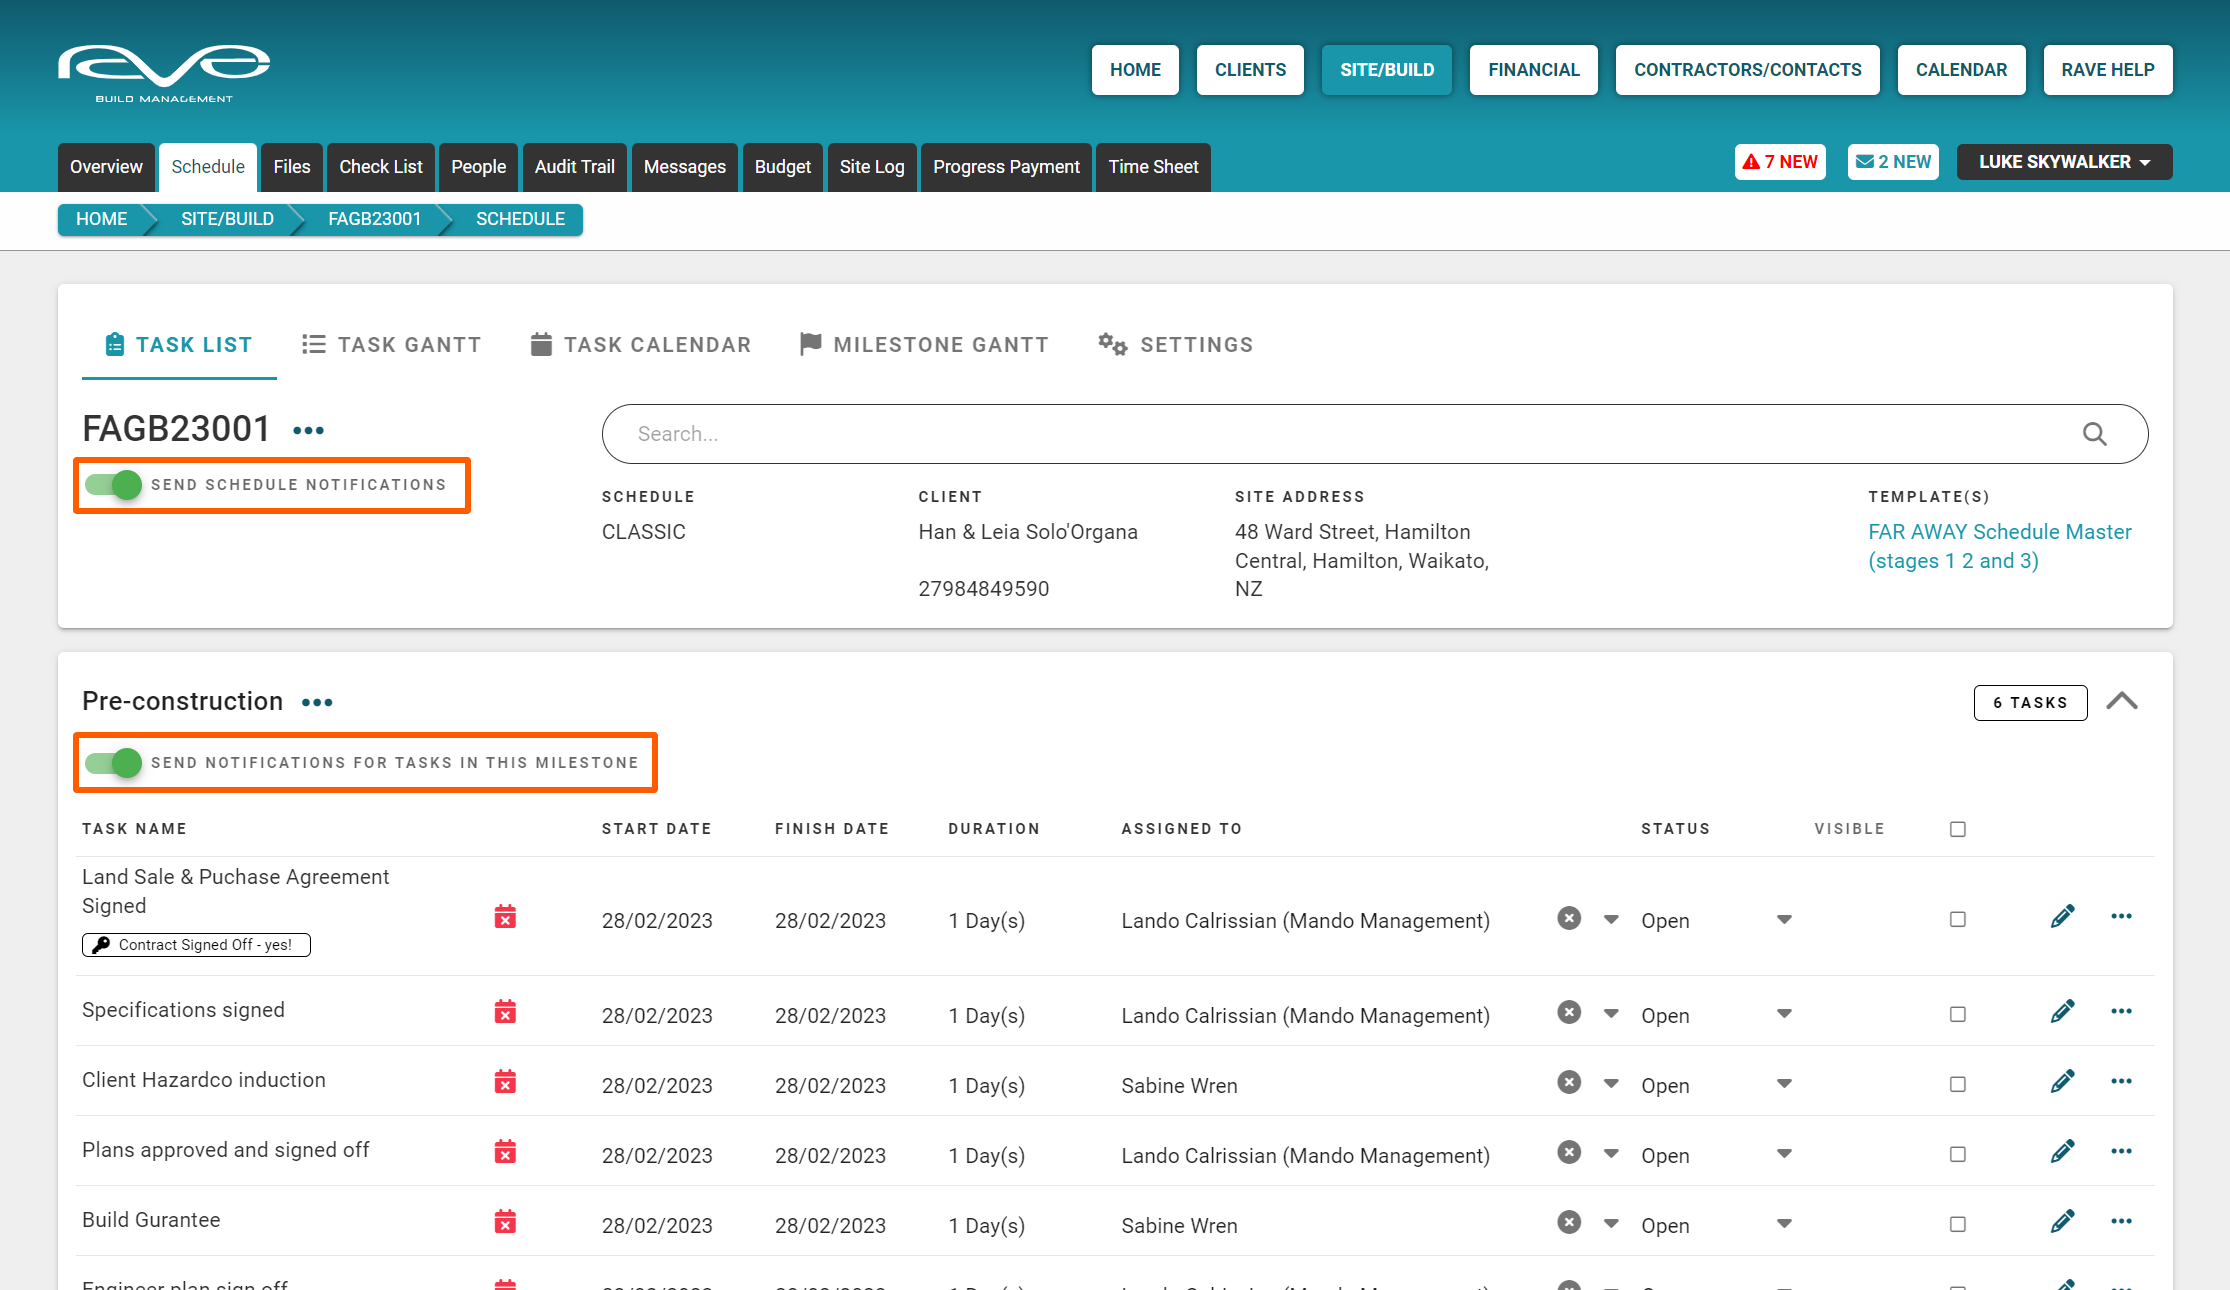
The 'Activate Schedule' button will be replaced by the 'Send Schedule Notifications' switch - which will be turned on (green) if the notifications check box was ticked.
NOTE: The key point here is that activating the schedule is a one-time action. You do not want to activate the schedule until you need to i.e. you have got your schedule set up, tasks assigned out and you want to communicate this information.
Schedule Task Change Notifications
Access this demo here.
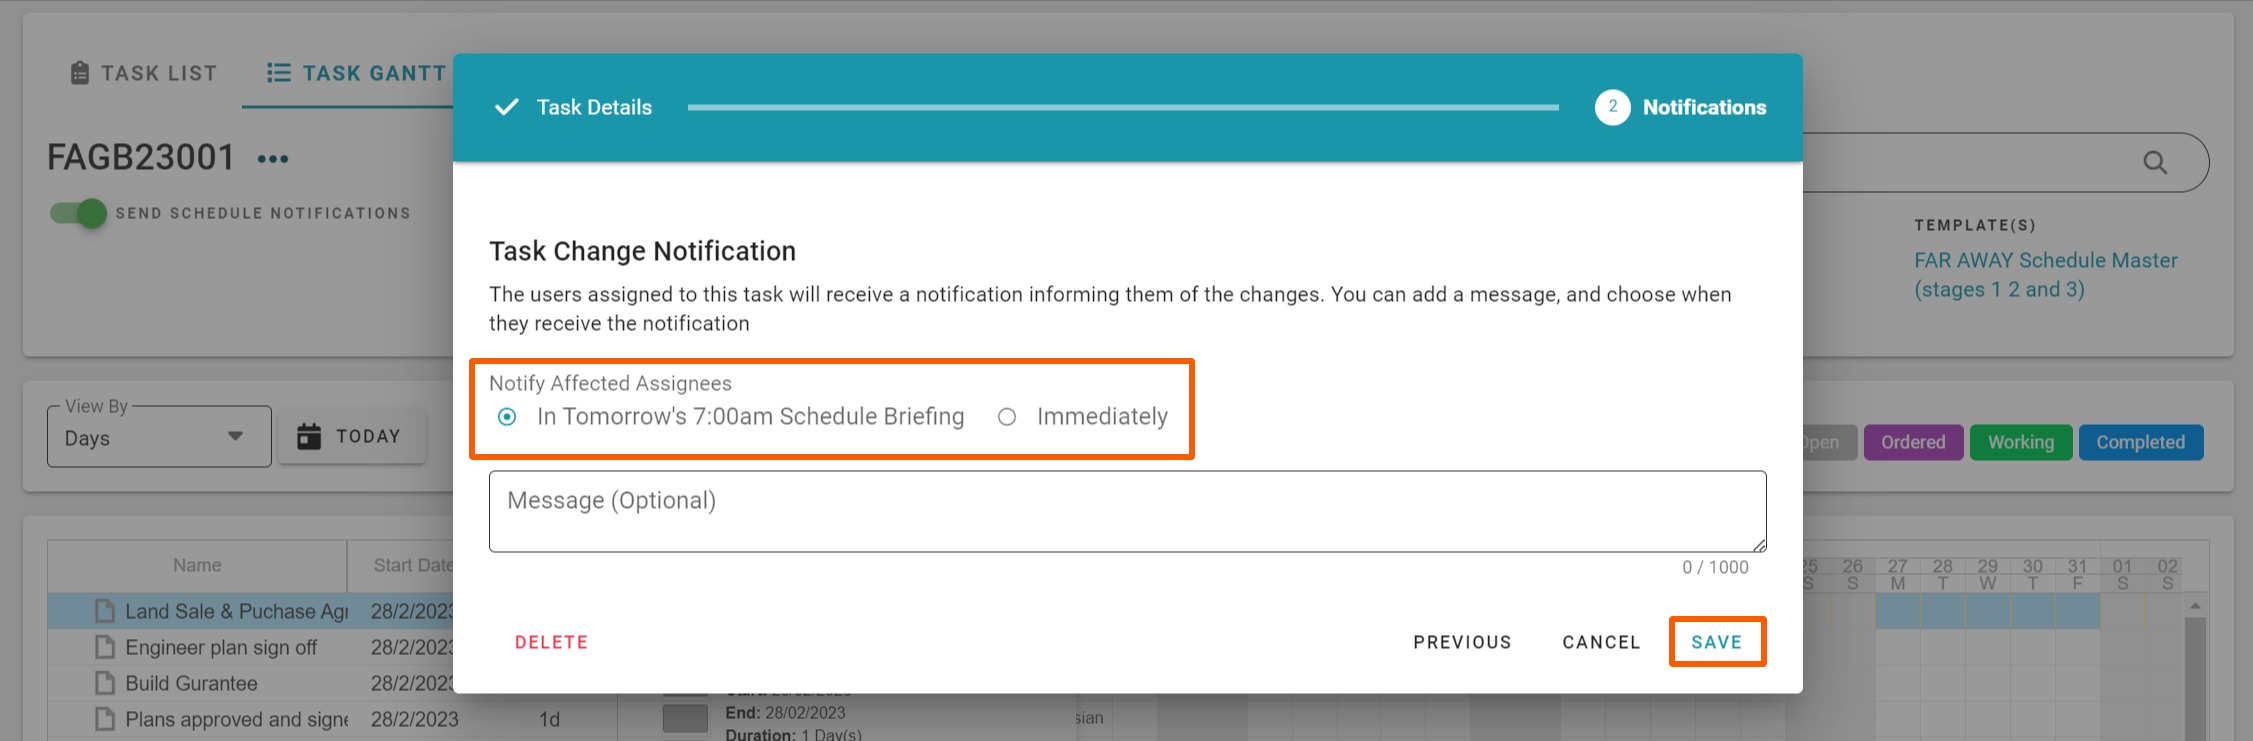
The default for scheduled task change notifications is 7am the next day. So, if notifications are turned on, any changes made up until 11.59pm today will be sent out at 7am tomorrow. You do have the option to change your schedule notification default to immediate or never via the project and branch settings pages - we'll cover these a little later.
The Project & Milestone Schedule Notification Switches
We have two types of notification switches:
- The 'Send Schedule Notifications' switch - below the Job number (to the top left of the schedule) dictates whether the notifications for the whole schedule are on or off.
- The 'Send Notifications for Task in this Milestone' switch - below each Milestone header (to the top left of each milestone) dictates whether notifications for this milestone only are on or off.


Task List Start Date Change Notifications
Quick start date changes made in the task list view will be sent via your default - which is typically set to 7am the next day (unless you have changed it in your schedule or branch settings).
Changing a task start date via the pencil icon (and the 'task details' pop-up) gives you the option of sending an immediate alert via the 'next' screen - but again the default is 7am the next day.
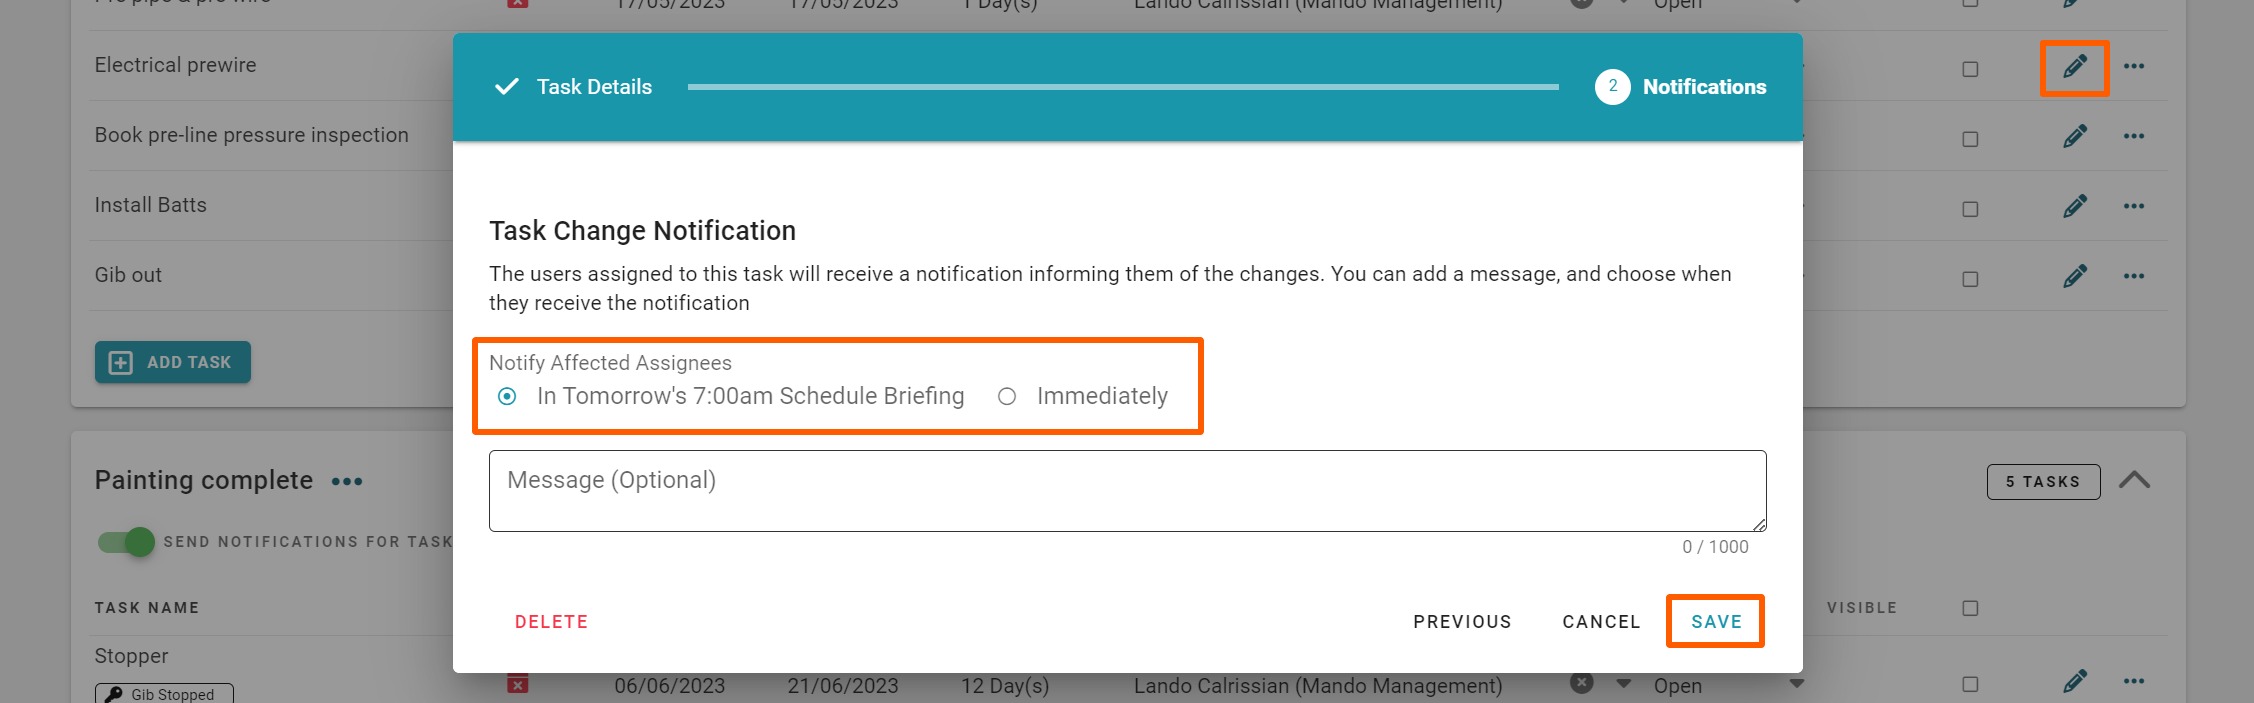
Task Gantt Start Date Change Notifications
Click and drag task changes via the ‘Task Gantt’ view (changing the task start date) will also be sent via your default - which again is typically set to 7am the next day - unless you have changed it in your schedule or branch settings.
Changing a task start date by double clicking on a task (and the 'task details' pop-up) gives you the option of sending an immediate alert via the 'next' screen - but again the default is 7am the next day.

NOTE: We have mentioned (a few times) the 7am next day default for schedule change notifications. This is of course assuming that the project is active, the schedule has been activated, and the notifications master switch and the milestone notification switches are also turned on. Unless all of these points are set, no scheduled task change notifications will go out.
The 'PER' Project and 'ALL' Projects' Settings pages
Access this demo here.
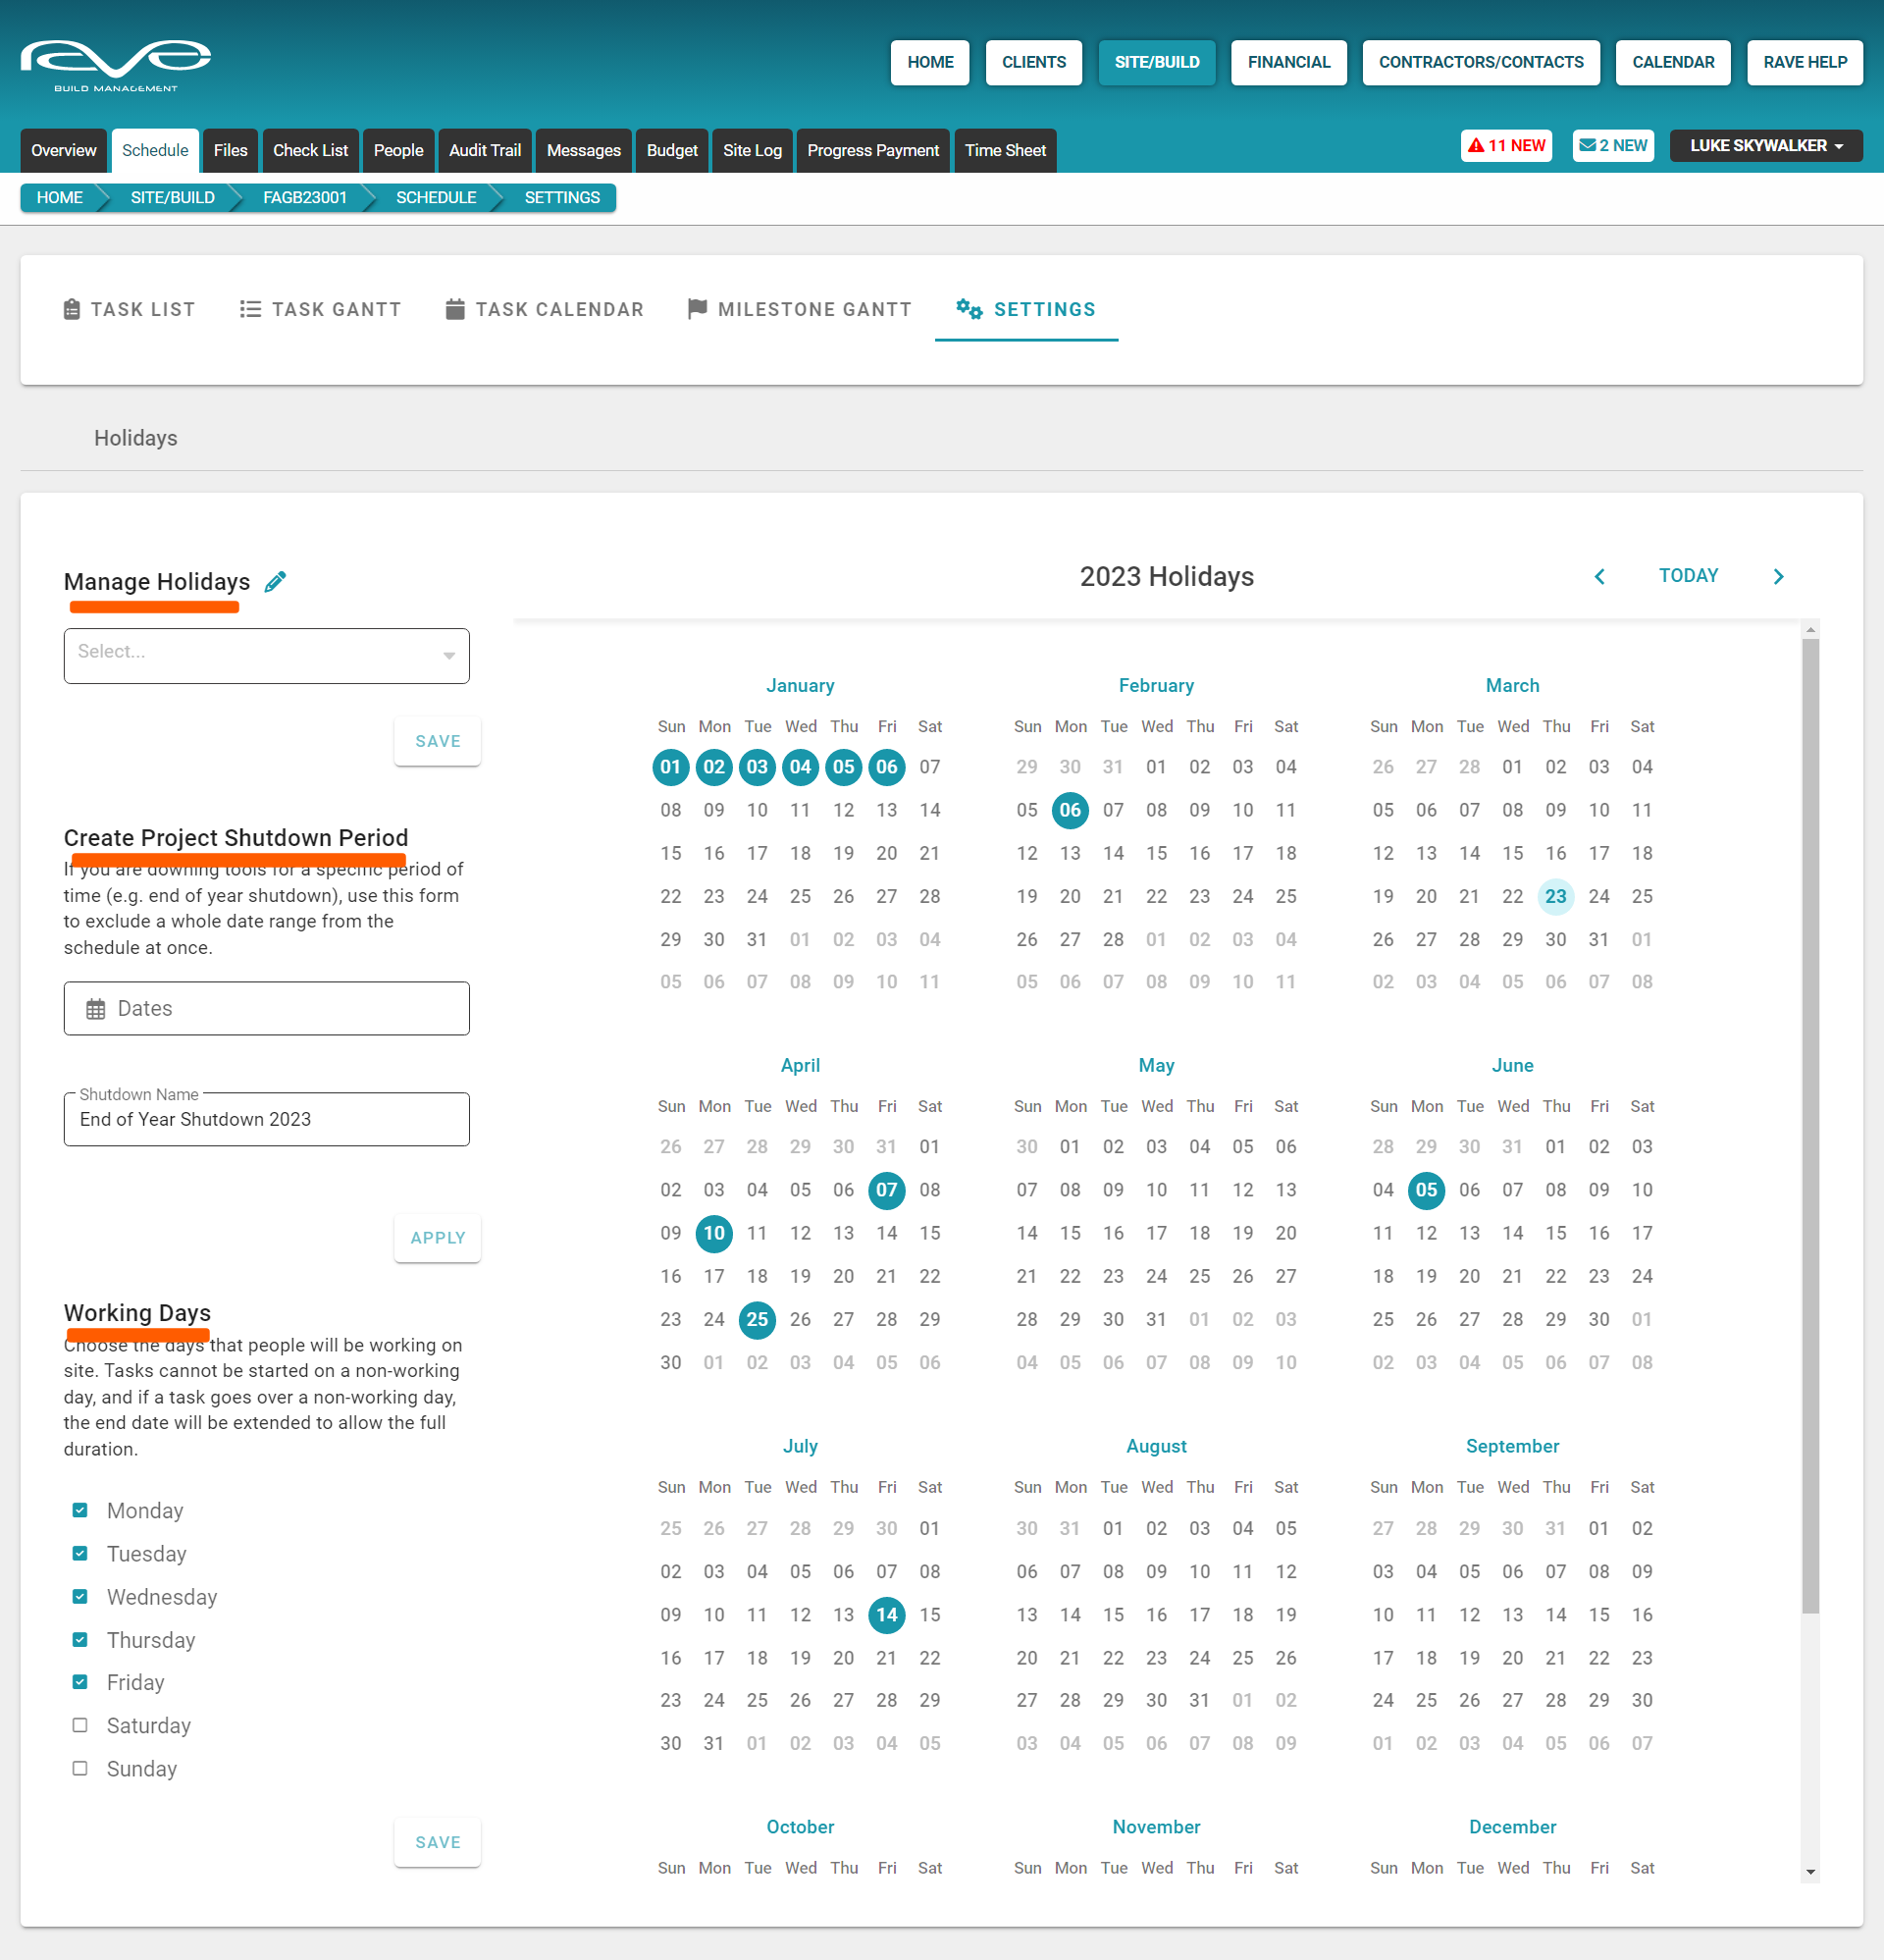
We can set the default for our scheduled task change notifications via our branch-wide 'Settings' page (Site|Build/Build Overview/Settings) and then adjust at a project level via our project's schedule ‘Settings’ page.

The project ‘Settings’ page is where you can adjust other schedule settings at a project level. On this page, you can:
- Manage your national and regional public holidays
- Block out your Christmas shutdown and other block out periods
- Select working days
- Manage schedule information like contractor date clashes
- And the per project setting for schedule change notifications, either the next day 7am schedule briefing, immediate, or never

- Manage your contractor task sign-off settings - and the Advanced/Enterprise scheduling task acceptance, and propose an alternative start date settings
- Add your contractor task sign-off messaging
- Manage your contractor's schedule access and visibility
- Manage your clients’ access and schedule visibility - if you've decided to give your client access to the project
Note: Client access to the project is not automatic and you do need to create and share a login with your client which we cover that in our client portal setup training tutorial.

- Manage the schedule mode between 'Classic' and the optional add-on's of 'Advanced' and 'Enterprise' scheduling

The 'ALL' Projects' Settings page-Branch owner access via Site|Build /Build Overview/ Settings
Access this demo here.
Those with branch owner settings have the ability to view, and change, your default branch-wide schedule settings. The branch-wide schedule settings page is available from the ‘Site|Build / Build Overview / Settings’ sub-tab.
As you can see, the layout for this branch-wide settings page is exactly the same as the per-project settings page, except we have this big orange alert reiterating that changes here will affect ALL of your projects.
This means we have the ability to set our schedule defaults across all projects, and then go into the per-project settings page to adjust the settings at that project level.
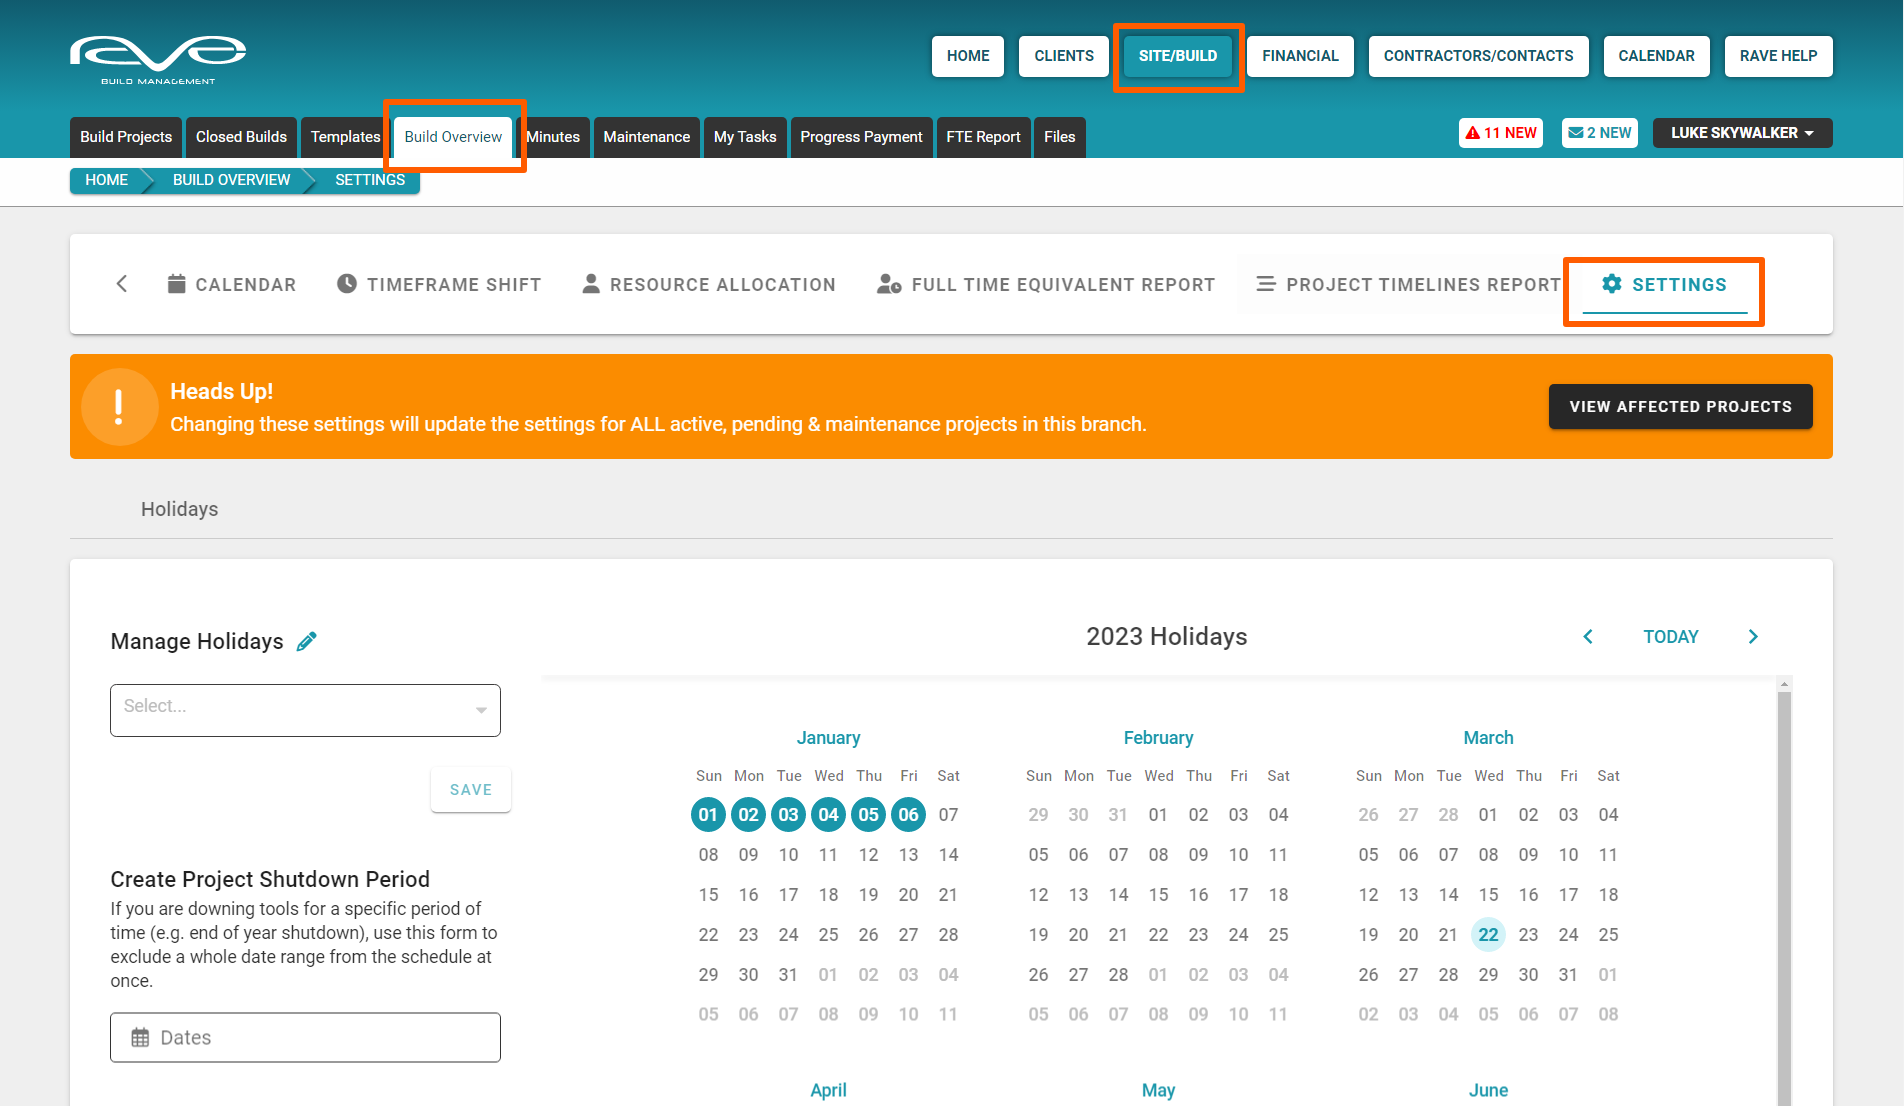
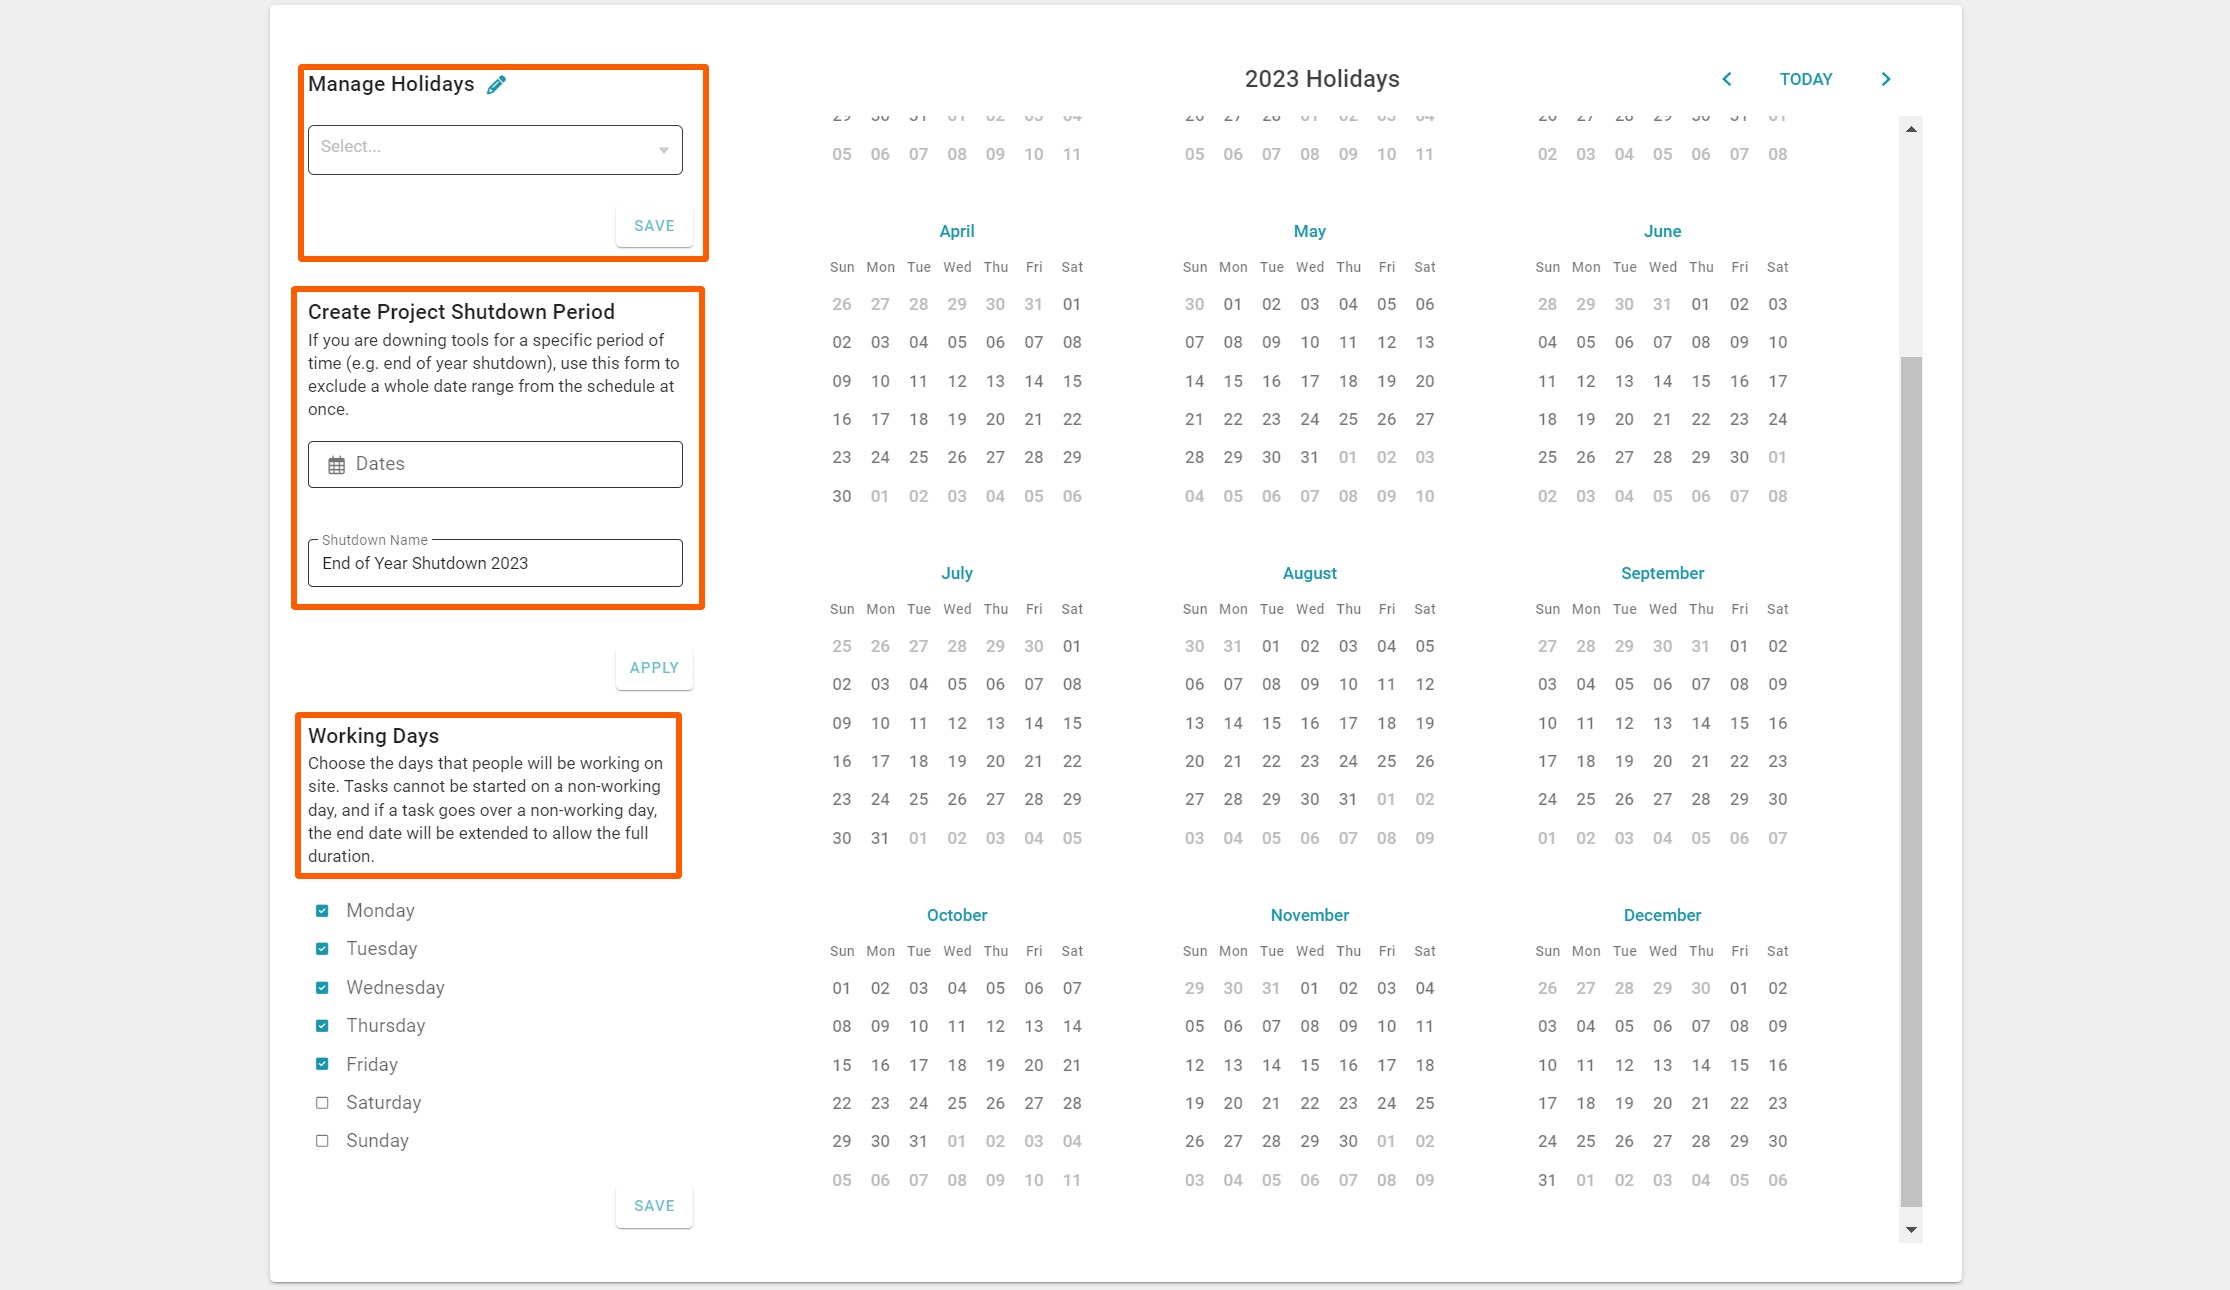
Managing your Schedule's Holiday Settings
Adding (managing) national public, regional holidays, and project shutdown/non-work block-out periods are pretty straightforward.
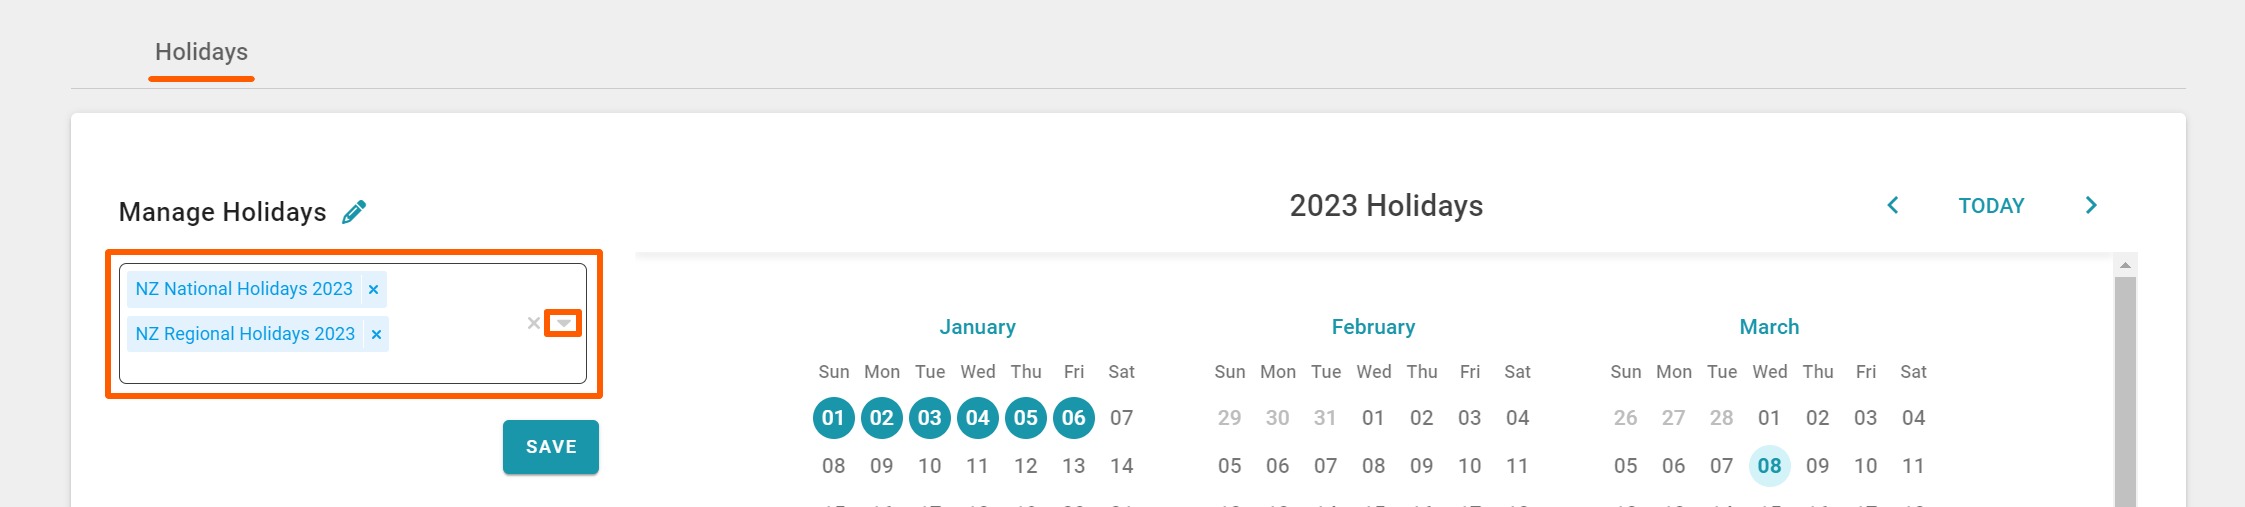
To add national public holidays we:
- Click on the manage holidays drop-down arrow to the top left of the page
- Tick all of the relevant 'NZ National Holidays' checkboxes
- And click the SAVE button to confirm
Note: You can expand the list, to select specific holidays if required, by clicking the expand arrow to the left of each description.
To add a regional holiday we:
- Click on the manage holidays drop-down arrow to the top left of the page
- Expand the required regional holidays list, by clicking the expand arrow to the left of the relevant 'NZ Regional Holidays' checkbox
- Tick all of the relevant 'NZ Regional Holidays' checkboxes
- And click the SAVE button to confirm
Note: Expanding the 'NZ Regional Holidays' listing is necessary - to ensure you do not select all of the regional holidays!
To add a project shutdown/non-work block-out period (i.e. an end of year shut down) we:
- Click on the 'Dates' field below the Create Project Shutdown Period header
- Click on the first non-work date - then move forward to select the last non-work date. This will highlight the selected date range in gold
- Click off the calendar, and type in the shutdown description i.e. End of Year Shutdown 2023
- Then click the 'Apply' button to confirm
With all of the above add holiday steps, it will take a few seconds for the calendar to update - or you may need to manually refresh the screen for it to do so.
Each holiday/non-work day will be highlighted in teal, hovering over any of these will display the description for that non-work day i.e. Anzac Day, End of Year Shutdown 2023, etc
Deleting a holiday/non-work day is also straightforward we:
- Click on the manage holidays pencil to the top left of the page
- From the Manage Holidays pop-up, tick all of the relevant holidays and non-work dates you want to delete
- And click the red 'Delete 'x' Holidays' button (to the bottom right) to confirm your changes
It may take a few seconds for the calendar to update - or you may need to manually refresh the screen for it to do so.

Managing your Schedules' Working Days Settings
Working days with 'Classic' scheduling are automatically set for Monday to Friday, with weekends being non-work days. But with 'Advanced' and 'Enterprise' scheduling, you do have the option of making Saturday and/or Sunday working days within your schedule.

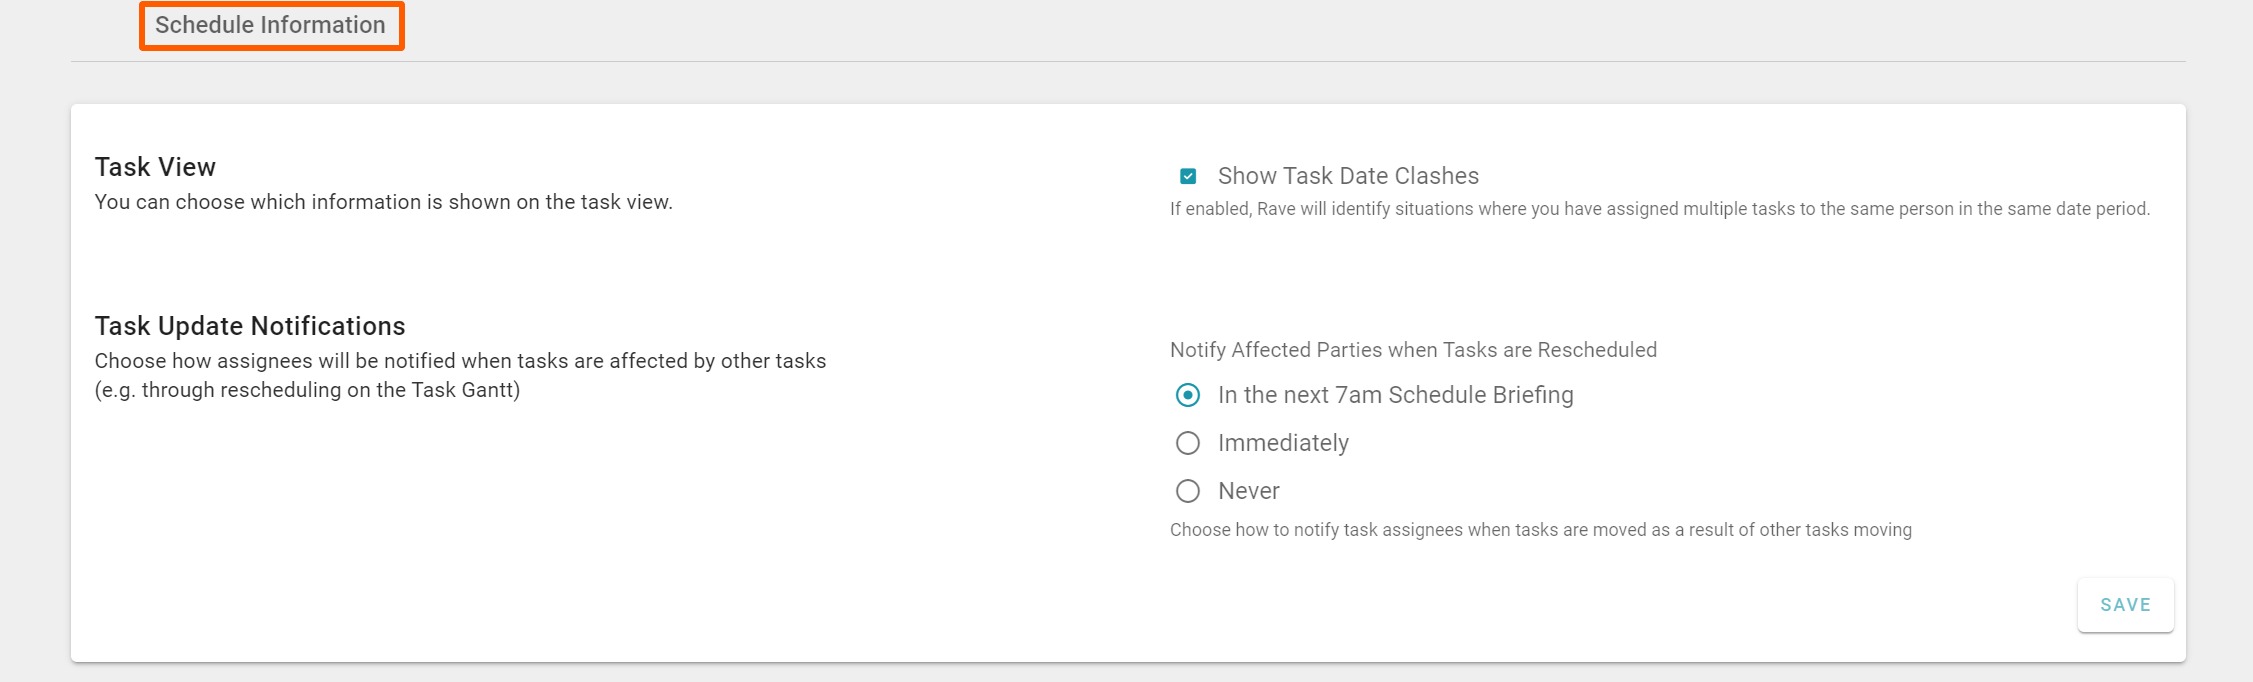
Managing your Schedule Information Settings
You have the ability to set your schedule information defaults across all projects
- The Task View's 'Show Task Date Clashes' tick box lets you know when a contractor has already been assigned to tasks on that date - alerting you that you may need to contact that trade to ensure they are available on the days that you have scheduled them for.
- The ‘Task Update Notifications’ - sets whether a scheduled task start date change notification will go out and when. These can be set to:
- In the next 7am Schedule Briefing - this should be set as your initial branch default
- Immediately - DO NOT set this as your default
- Never - no scheduled task start date change notifications will go out while this is set to never
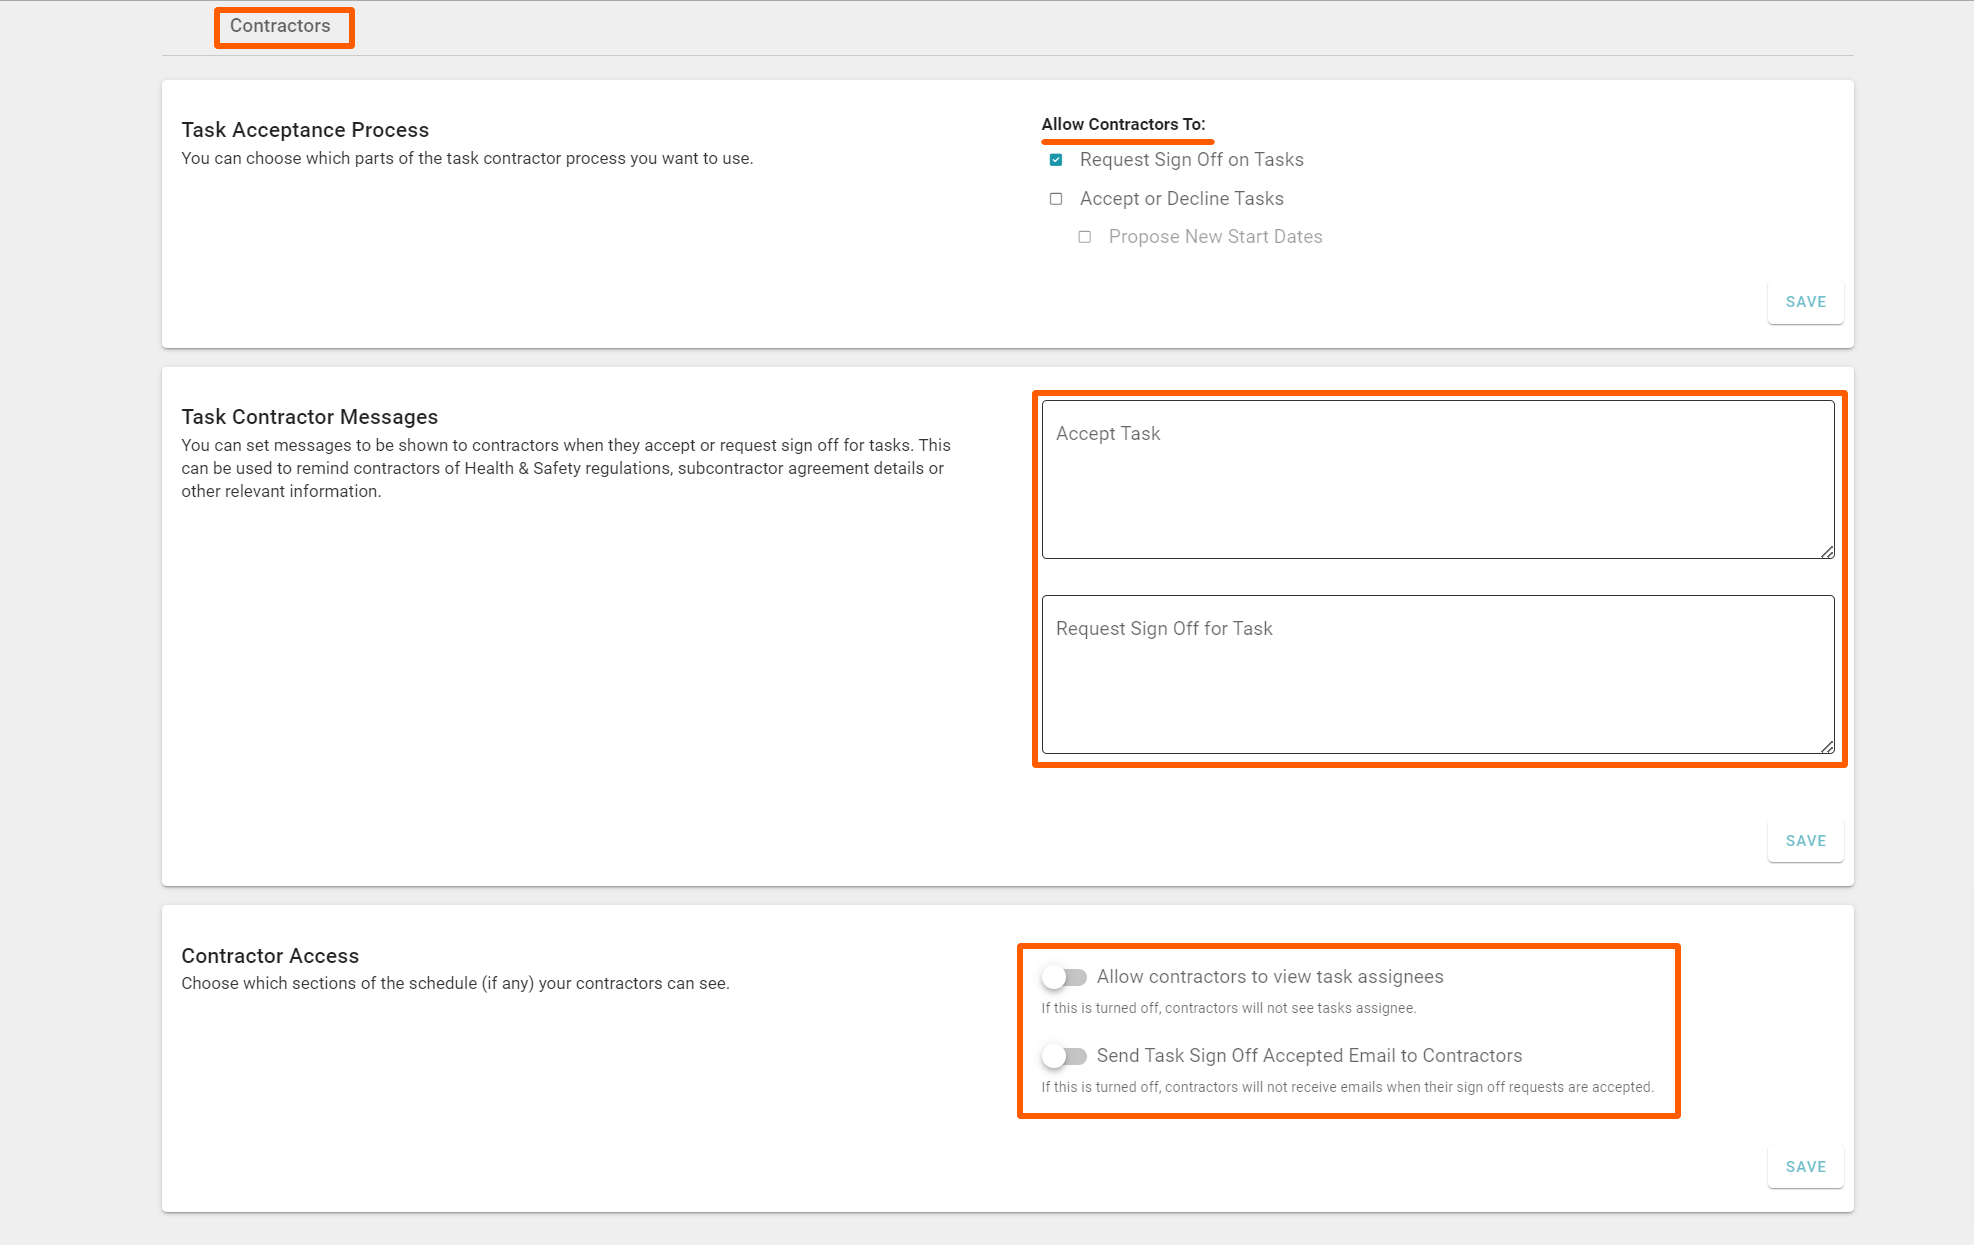
Managing your Schedules' Contractor Settings
You have the ability to set your contractors' task completion and acceptance process
- The 'Request Sign-Off on Tasks' process, allows contractors to tell you that they have completed their assigned tasks. If this check box is not ticked, your contractors will not be able to let you know that they have completed their task, and you will not receive those notifications.
- The ‘Accept or Decline Tasks’ and ‘Propose New Start Dates’ are 'Advanced' and 'Enterprise' scheduling features, allowing your trades to confirm the days that you have booked them in for, to decline their availability to complete a task, and/or to let you know what days they are available to complete a task.
- The ‘Task Contractor Messages’ allows you to customize the messages shown to contractors when they accept or request sign-off of tasks. This can be used to remind contractors of health and safety requirements or other relevant information.
- The ‘Contractor Access’ section allows you to choose which parts of the schedule, if any you want your contractors to see. We've two switches here, the first switch allows you to control whether contractors can see other task assignees, and the second is whether you want to notify contractors when you have marked their assigned tasks off as completed.

Managing your Clients' Schedule Access Settings
Client access to your projects is only possible if you have set them up with a client login - and have given it to them! For those clients that you have given project access to, you have the ability to set your clients level of schedule access:
- Firstly, you have the ability to turn on up to 4 different schedule views:
- Milestone Gantt view - the top-level milestone-only view - generally, this is the best view to give your clients to provide schedule access, with minimal detail
- Task List view
- Task Gantt view
- Task Calendar view
- The following switches only become available if you've given your client access to one of the three 'task views' above
- The 'Allow clients to view all visible tasks' switch allows your client to see other visible tasks in the schedule i.e. other tasks that they are not assigned to
- The 'Allow clients to view task assignees' switch allows your client to also see the primary task assignee i.e. the contractor assigned to the task
NOTE: Client schedule access via the Build Overview/Settings page will become the default across all of your projects. Therefore, it is generally best (safer) to NOT tick any Client schedule Access options here, and instead manage this at the per-project level.

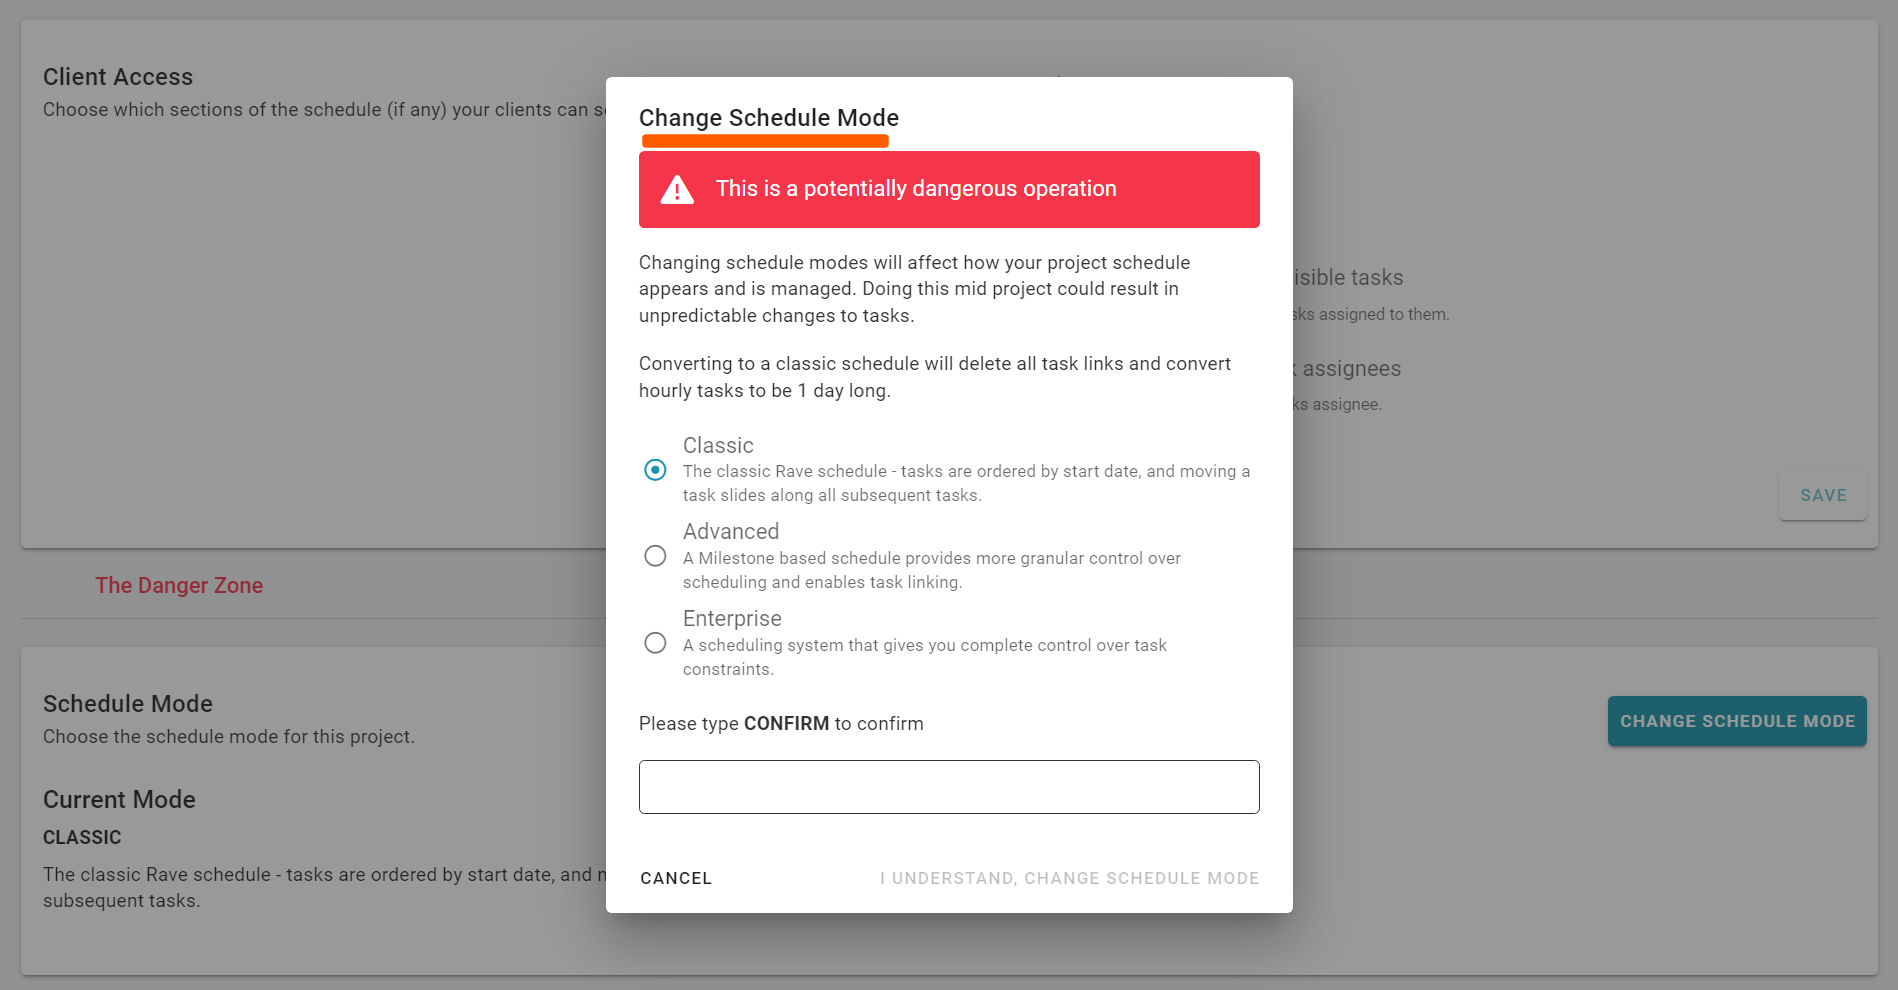
Managing your Projects' Schedule Mode Settings
This section is only relevant if you have the optional 'Advanced' or 'Enterprise' scheduling module - which we go through in detail, in our 'Advanced' and 'Enterprise' Schedule training.
Otherwise, the default scheduling mode for our 'Classic' schedule clients is 'Classic Scheduling' - where you can move:
- This single task
- This task + all future milestone tasks
- This task + all future scheduled tasks
NOTE: RAVE's add-on Advanced Scheduling
Introduces hourly durations, and task linking (with predecessors/successors) to provide more granular control over your scheduling. The Advanced scheduling mode is primarily for maintenance companies who want task linking, and need to schedule by the hour.
NOTE: RAVE's add-on Enterprise Scheduling
Includes task linking (predecessors/successors) and the use of constraints (i.e. must start on) to provide complete control over your scheduling. The Enterprise scheduling mode is primarily for building companies who want to have greater control of their scheduling, or who have used the likes of Microsoft projects, and/or the far more expensive overseas scheduling software.

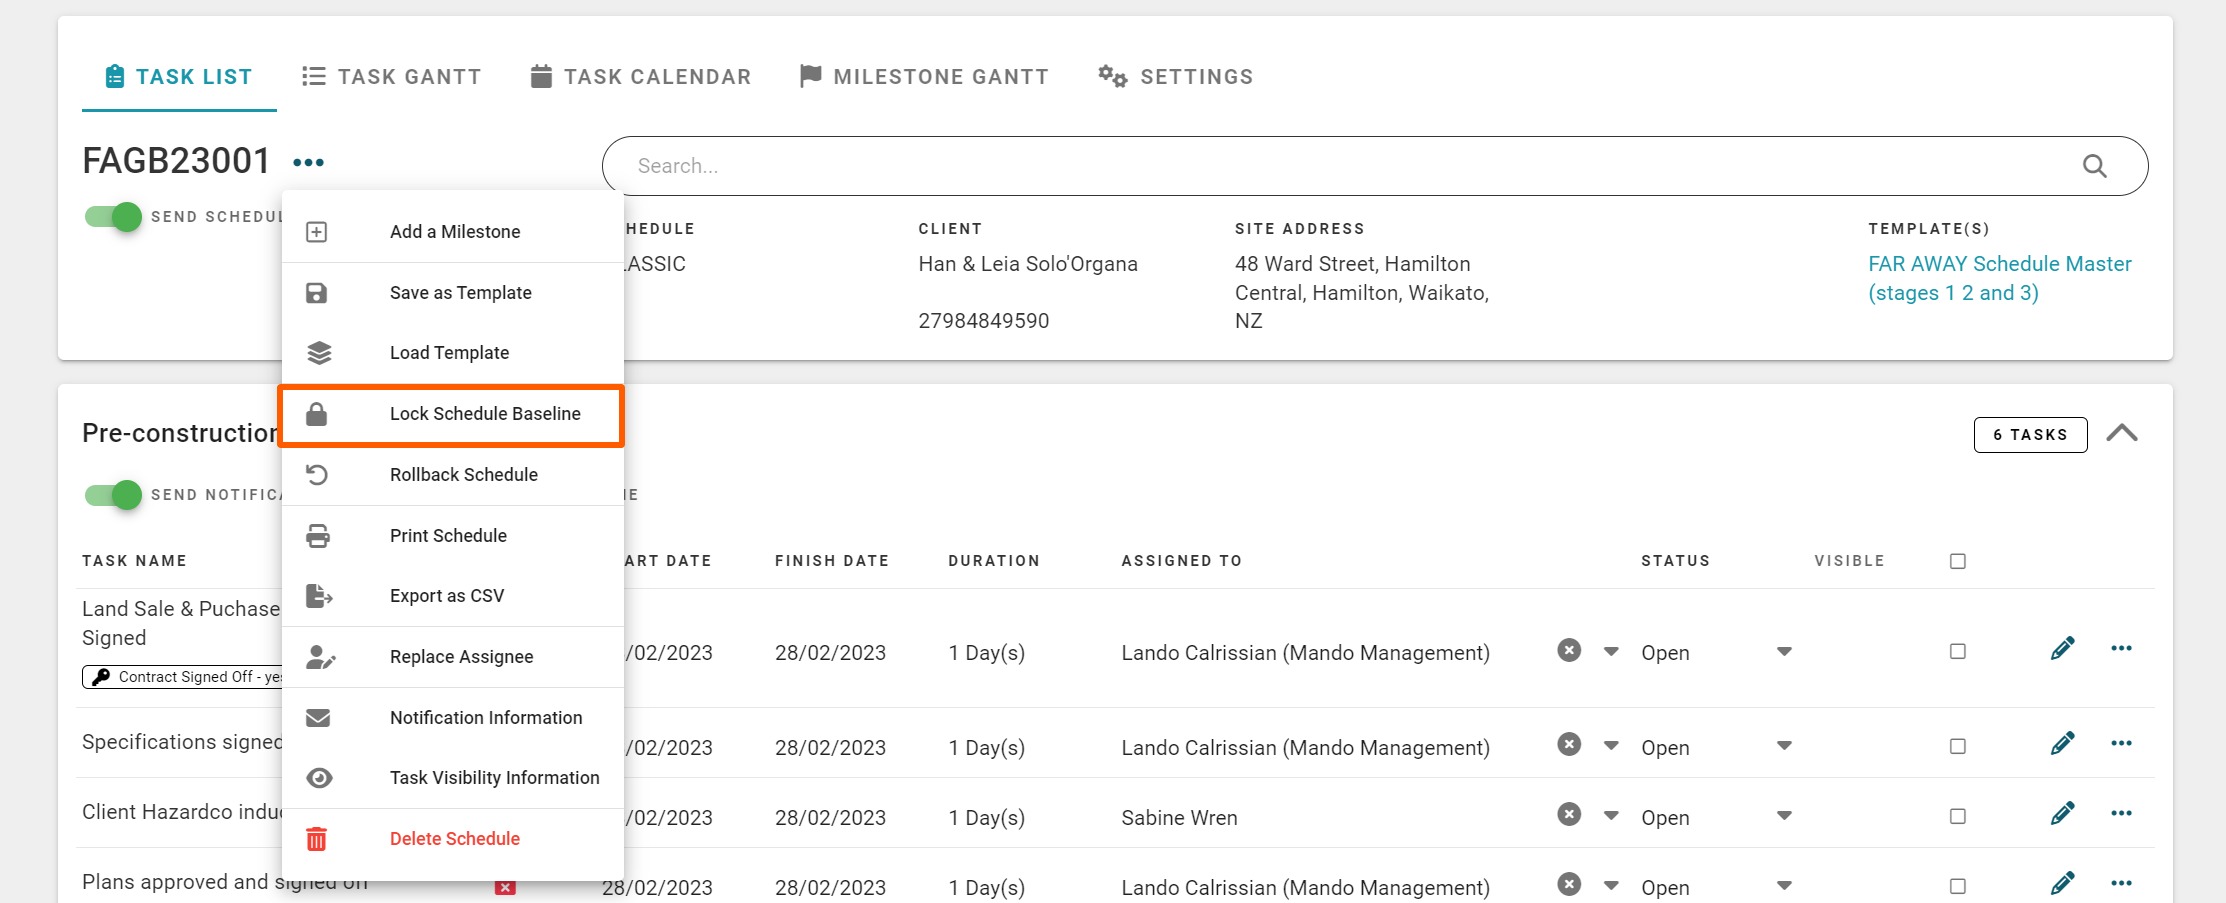
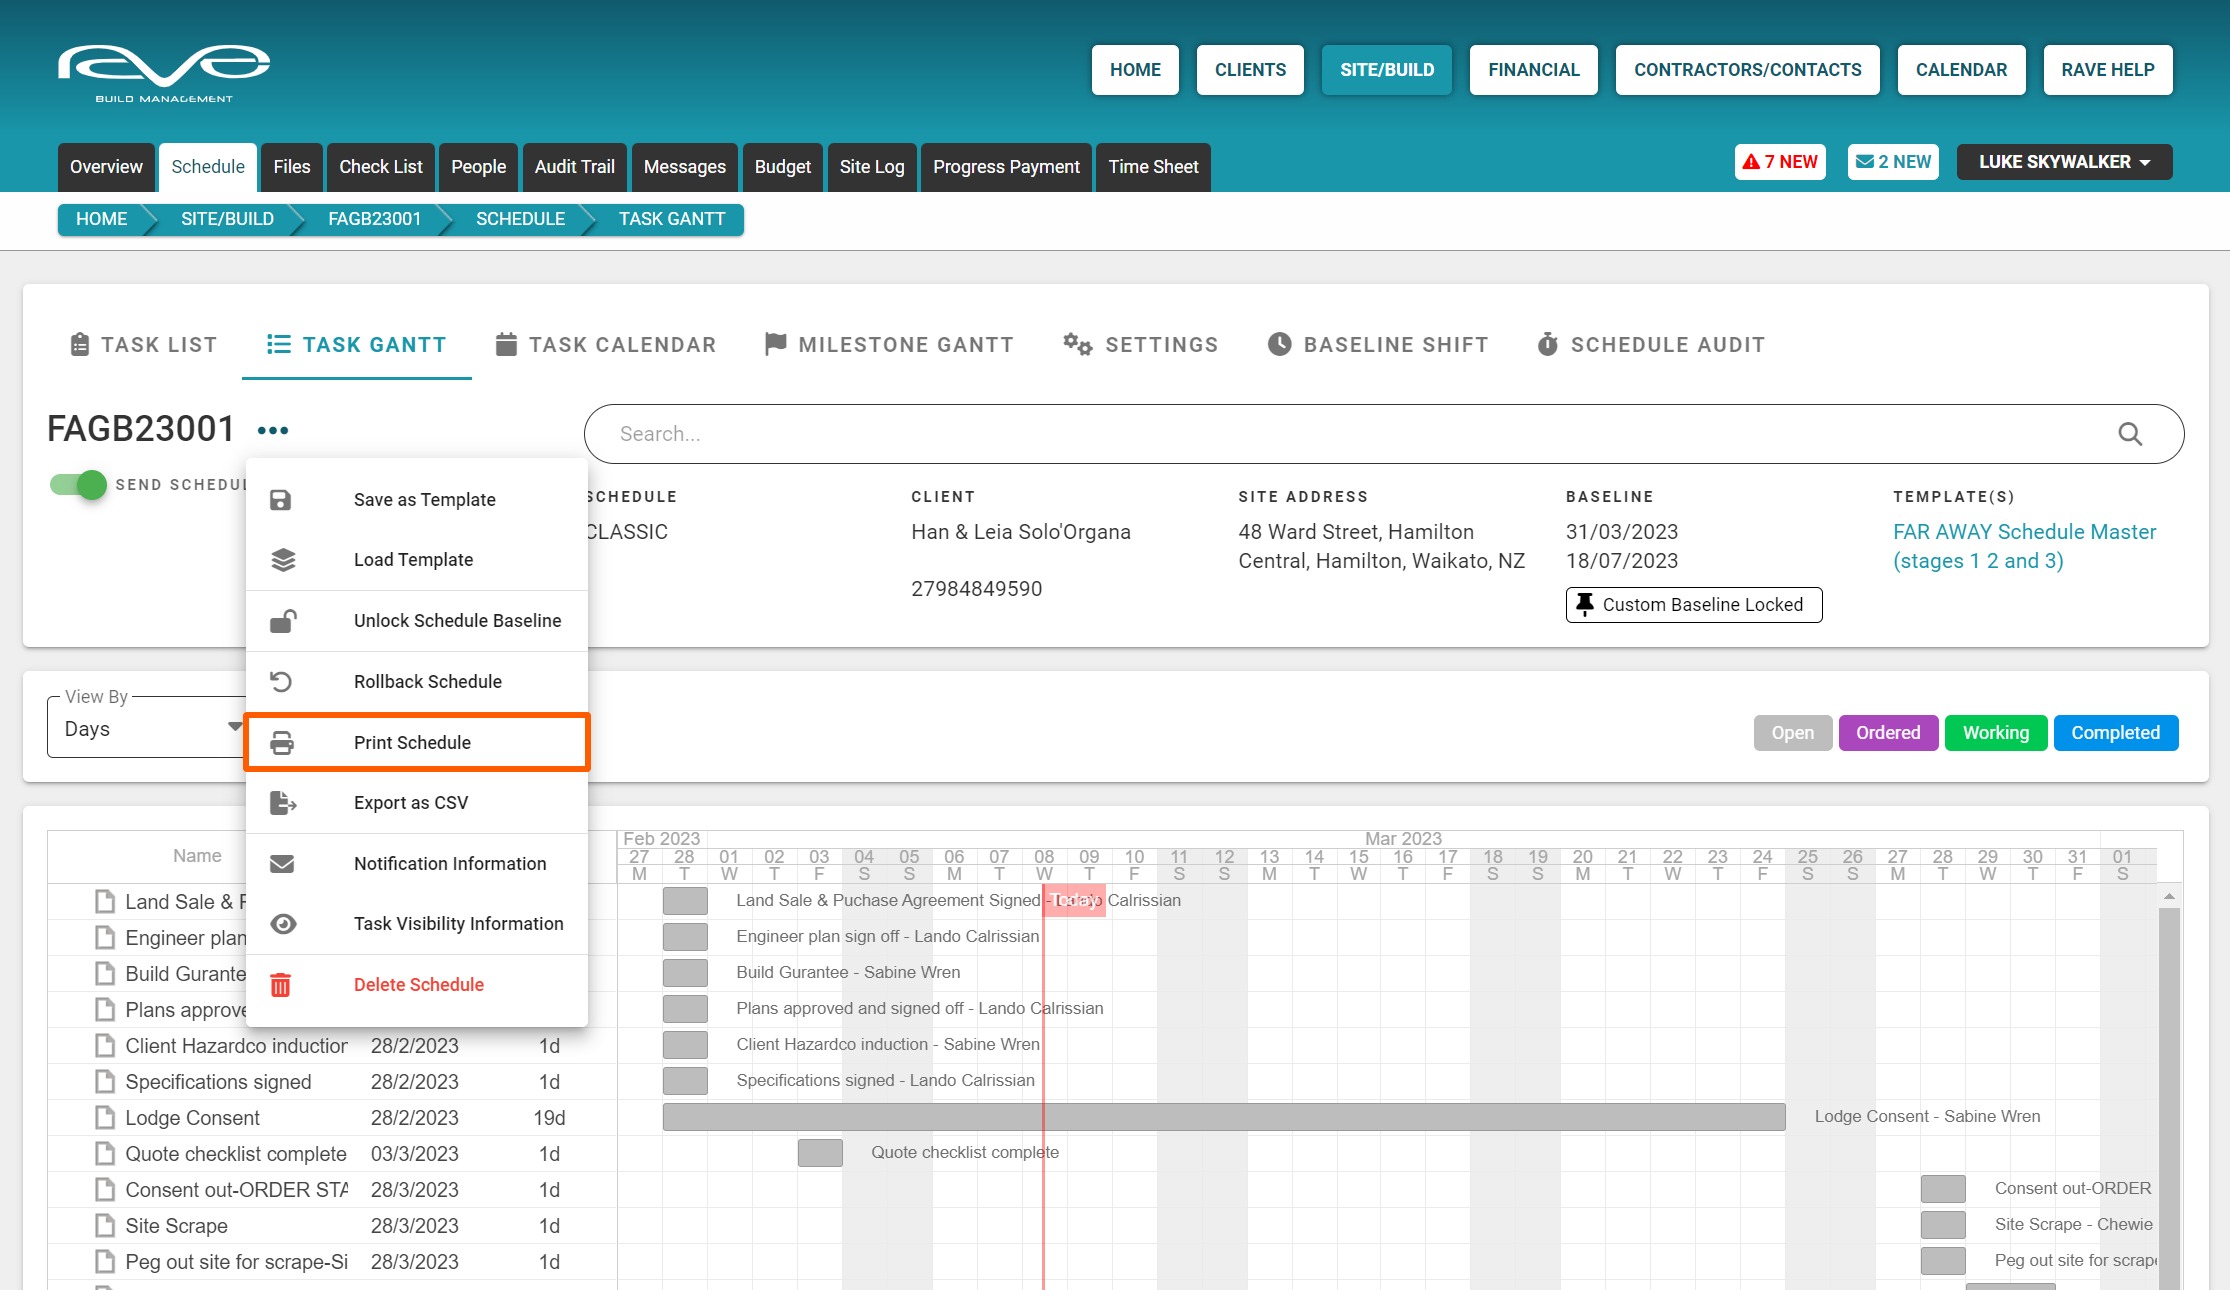
The Schedule Action Drop Down
Access this demo here.
The schedule action drop-down menu (the meatballs icon to the right of the job number via the Task List view) is where we can access a number of actions to manage our schedule. We have already seen how you can 'Add a Milestone' and 'Load a schedule Template' - so let's continue down the list and review the other actions.
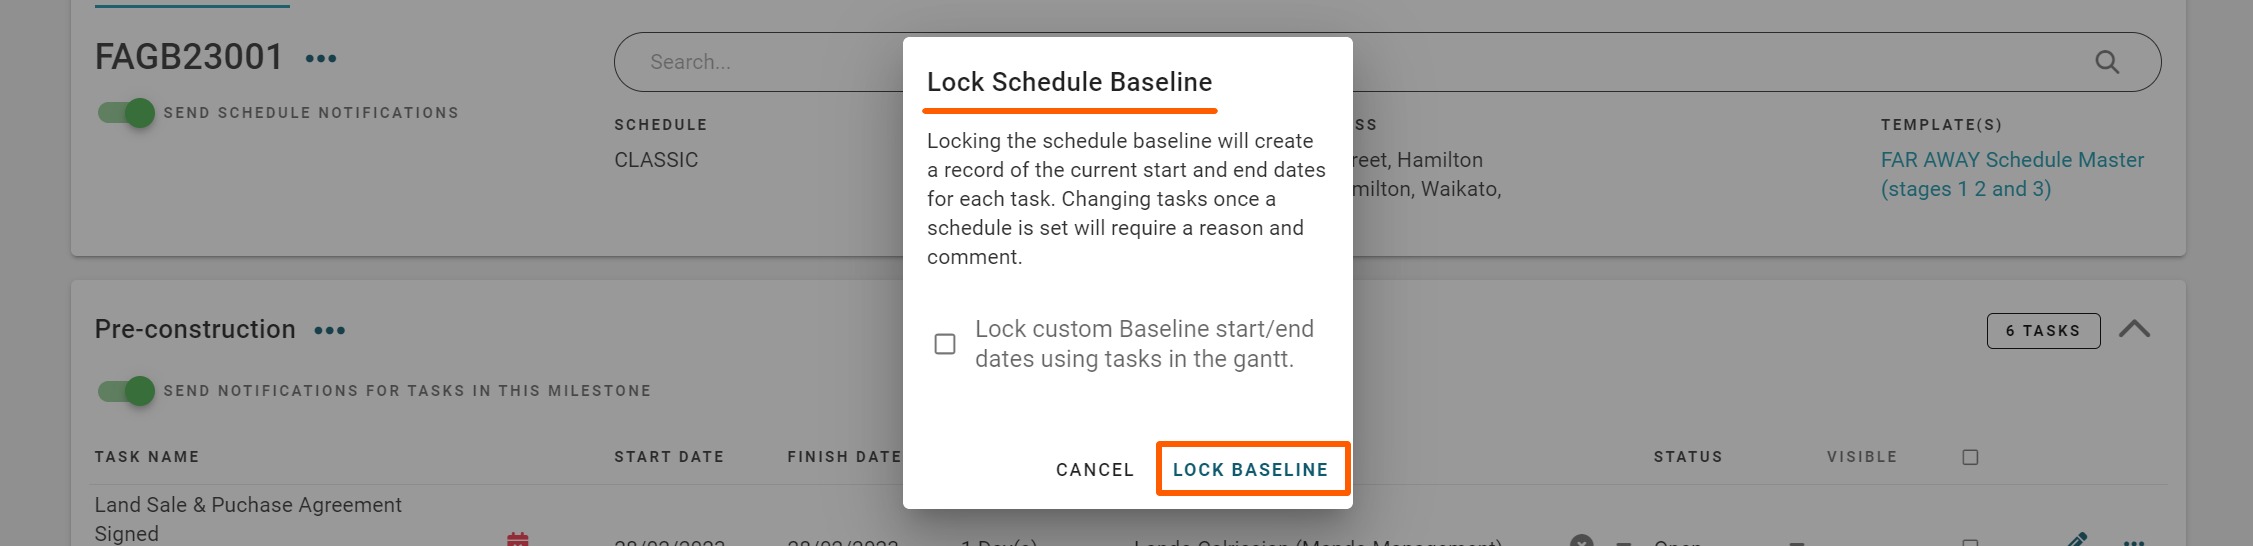
The Lock the Schedule Baseline Action
The ‘Schedule Baseline’ allows you to better track your schedule changes. Once the schedule baseline is locked, every schedule change requires a reason for the change - which can be reviewed later.
You can either set the whole schedule as a baseline, or you can select specific start and finish tasks, to track variances for a specific range of your schedule.
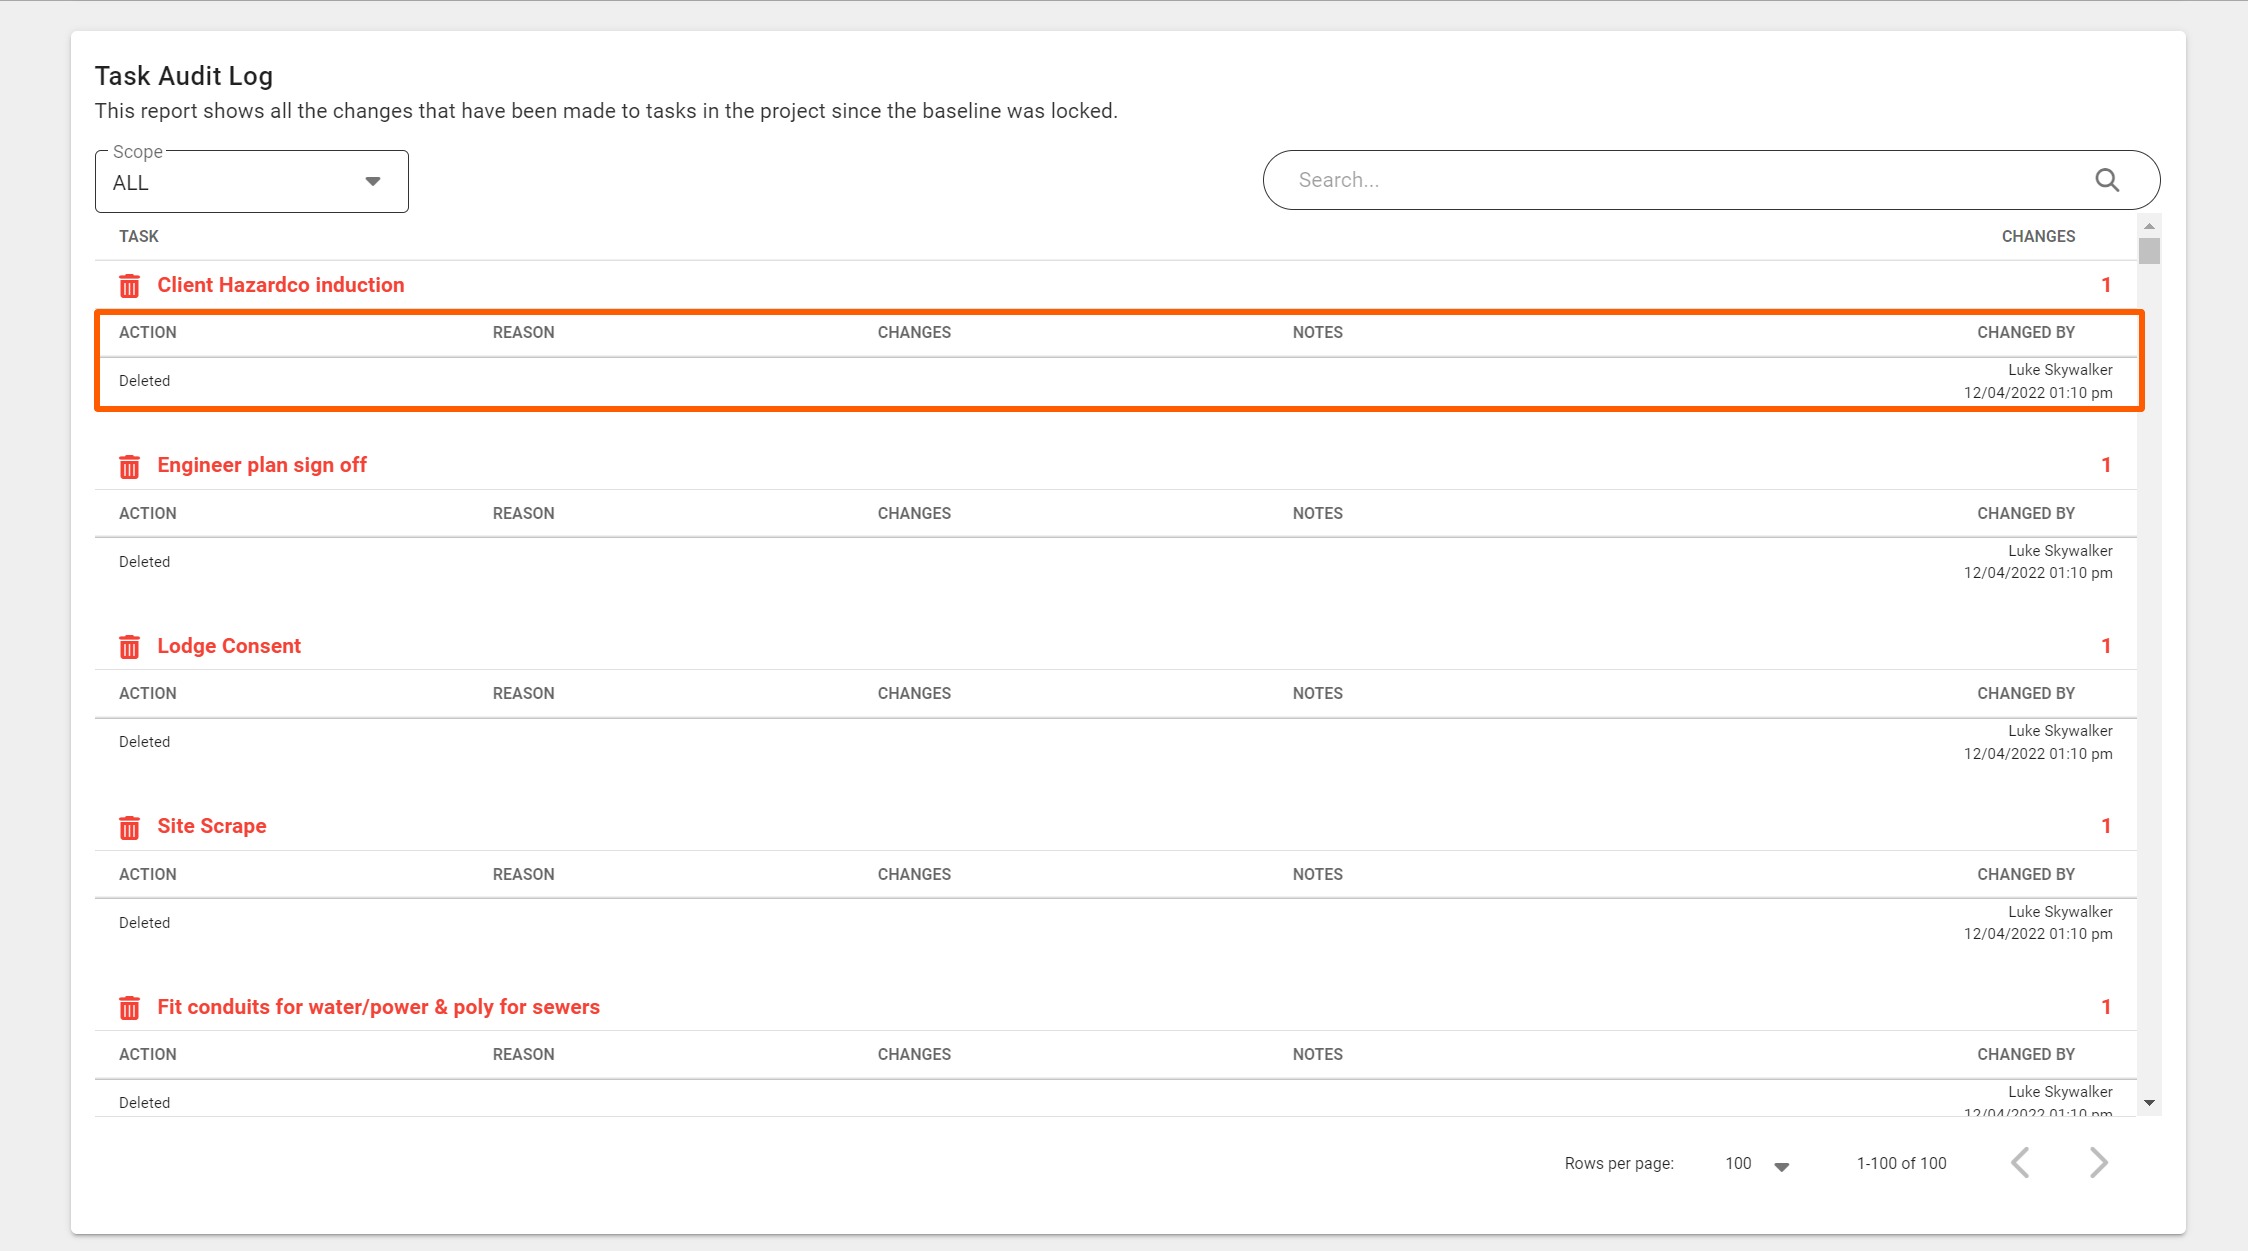
Tracking Schedule Baseline Changes
Once the schedule baseline has been set, any changes are:
- Displayed graphically via the project's ‘Baseline Shift' task gantt - comparing the original dates (yellow) vs the variance as represented by the gray, purple, green, and blue task status colours.
- Those with 'Advanced' and 'Enterprise' scheduling, have access to the 'Schedule Audit' report - where you can access a task's full change history, and the schedule change reason(s) also.


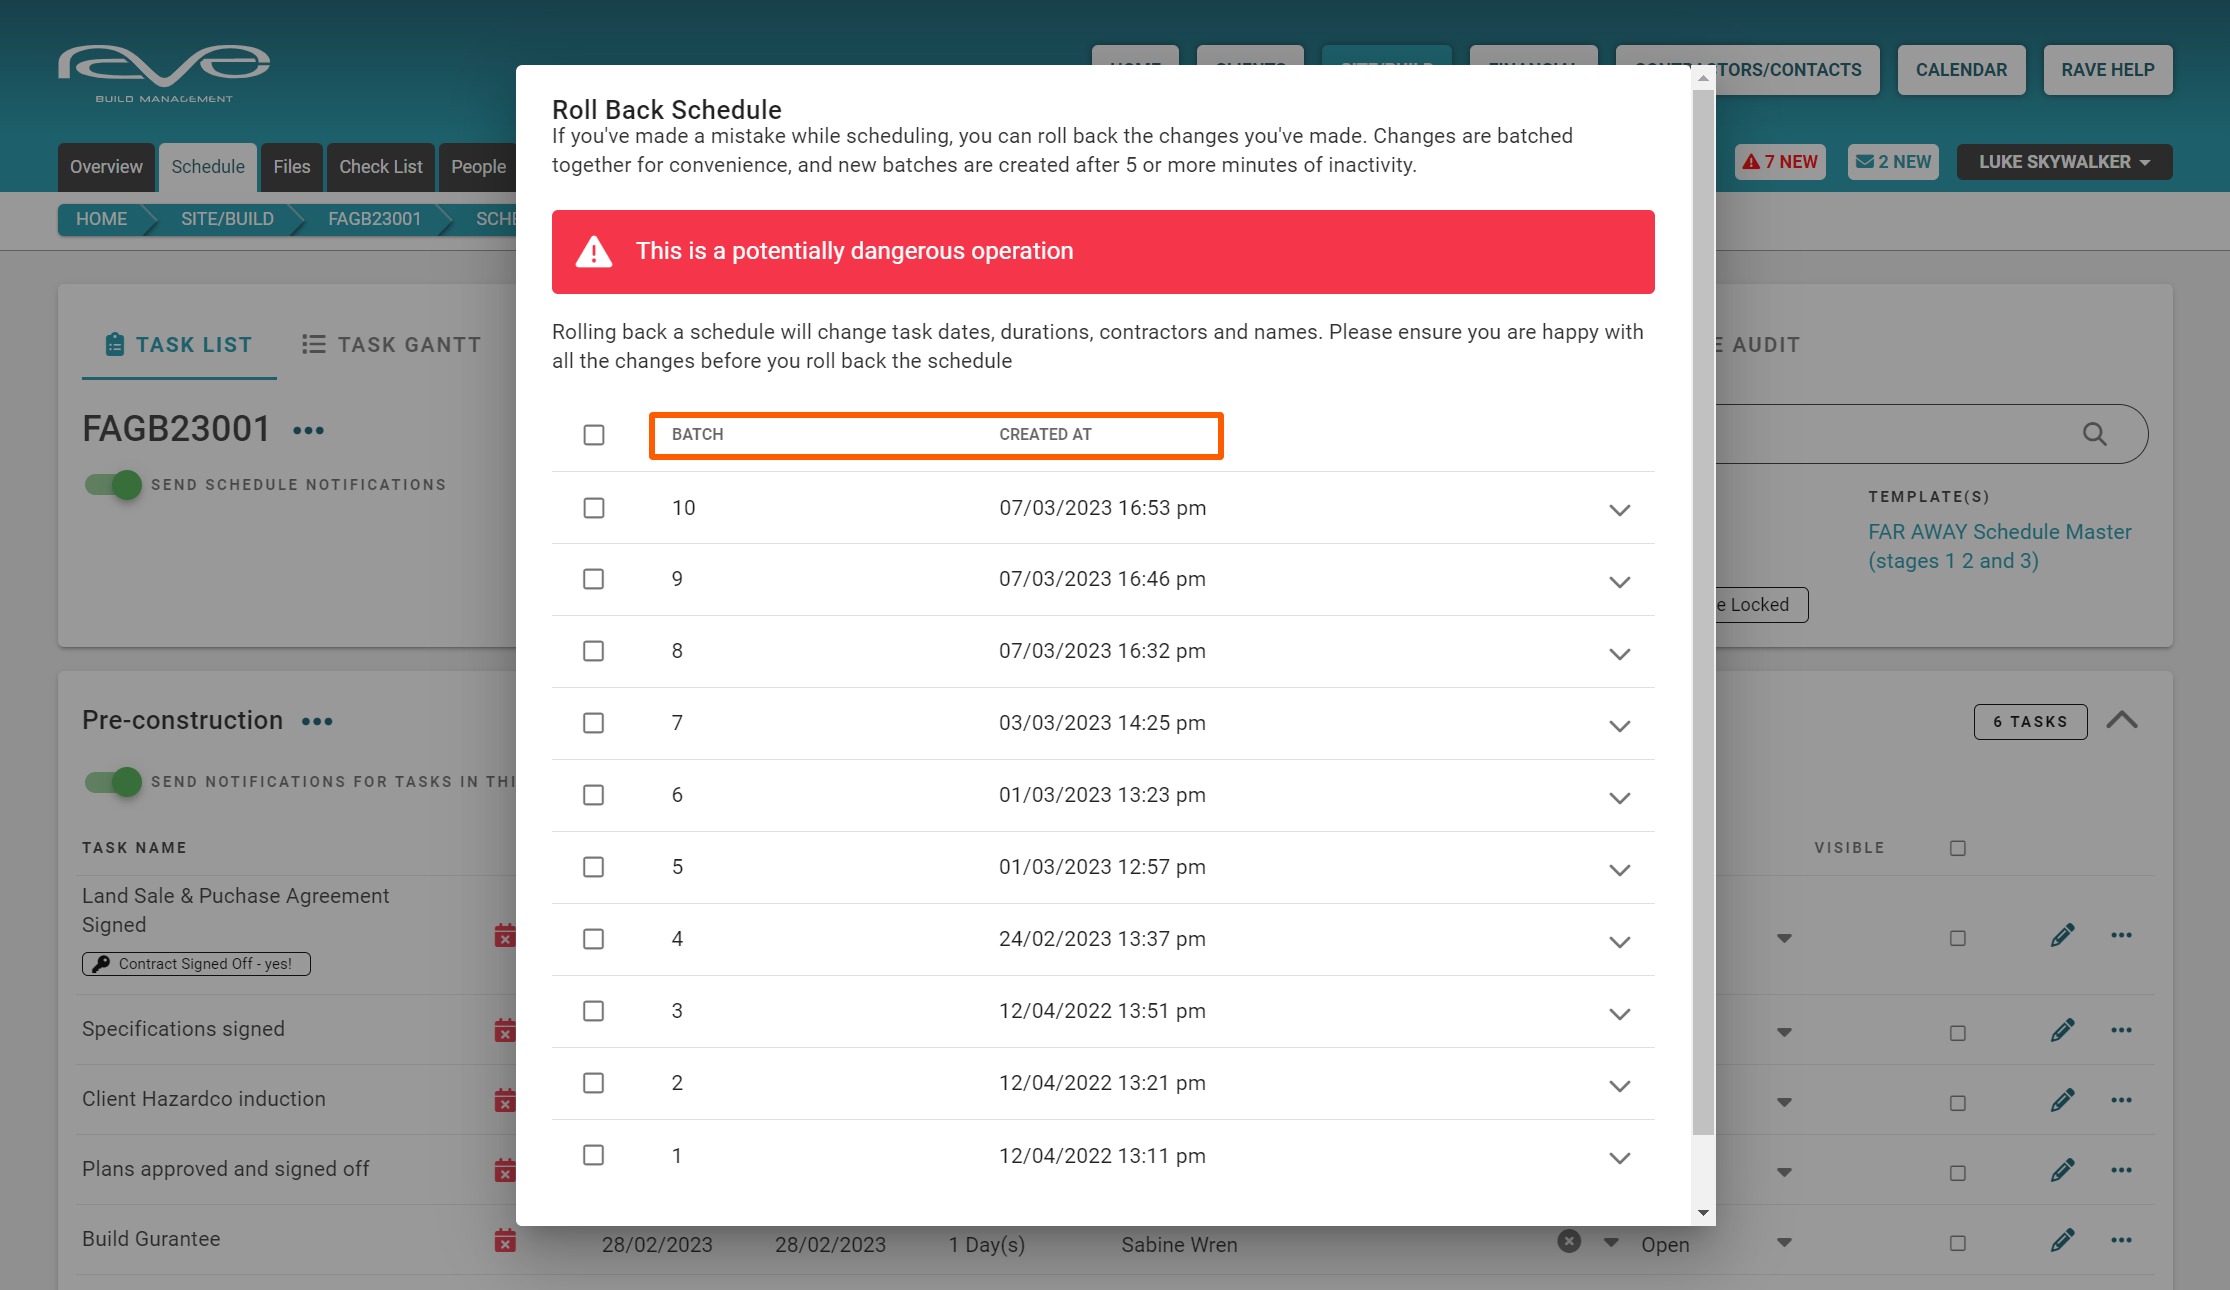
The Rollback Schedule Action
The ‘Rollback Schedule’ function allows you to undo a batch of changes (mistakes) you have made to the schedule.
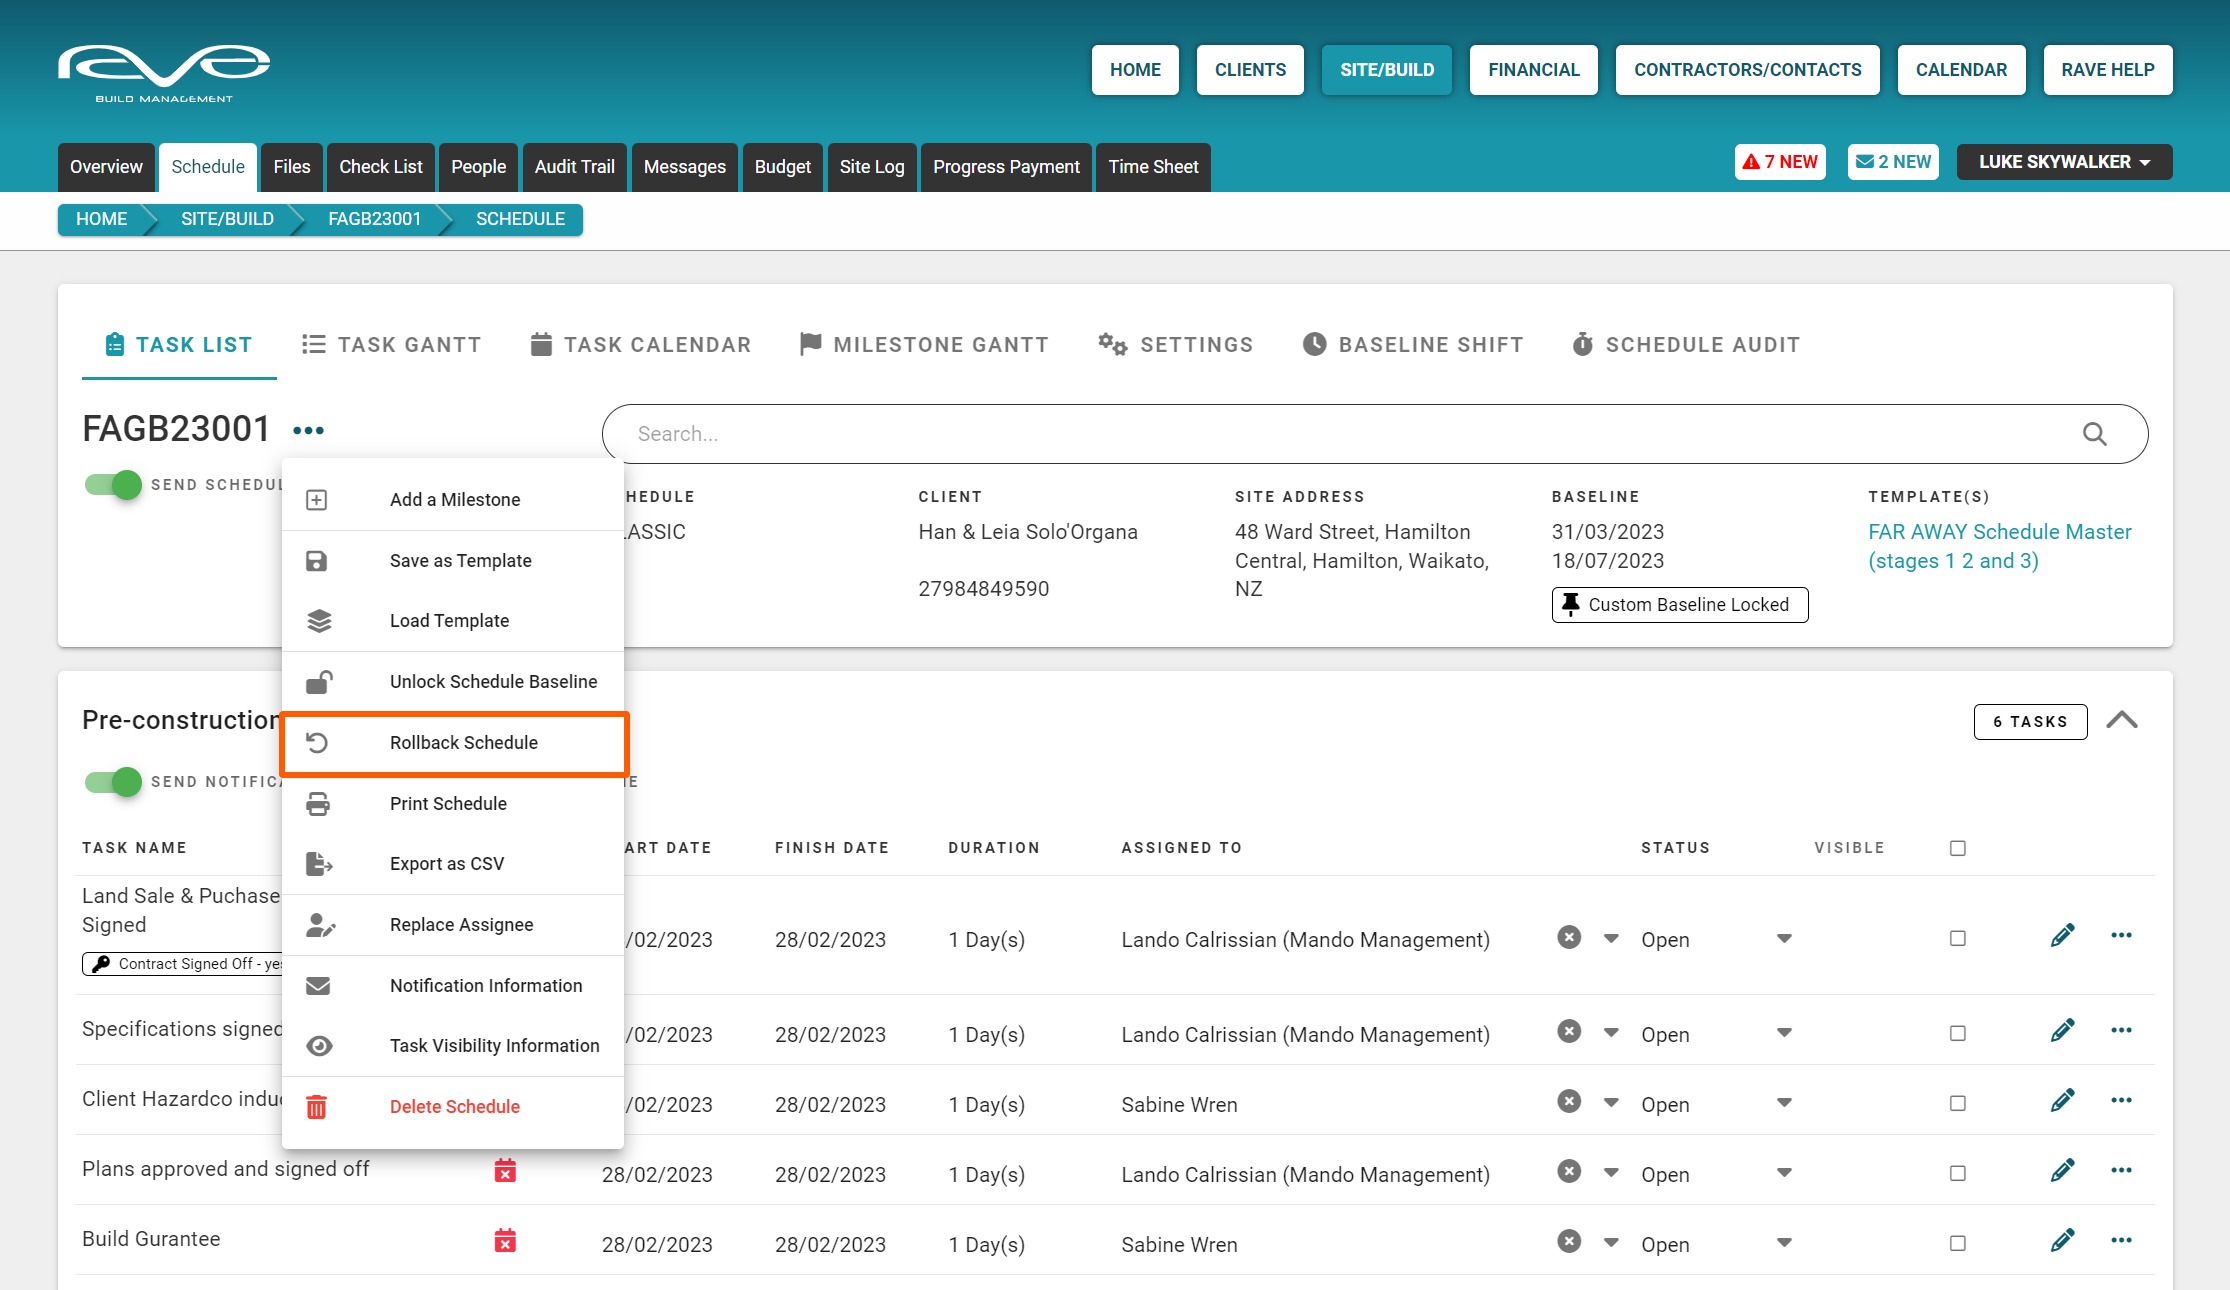
Schedule changes are batched together, with new batches being created after five or more minutes of 'schedule change' inactivity.
Batches are displayed from the most recent back, listing the batch number, and the batch creation times. Clicking on a batch expand arrow, to the right of each batch, displays all the changes that would be reversed.
TIP: Depending on the amount of scheduling work you've done, a batch could involve a number of task changes, so have a look at what is to be rolled back, before you confirm a rollback change.
NOTE: Rollbacks work from the top down, if you wanted to roll back the changes in batch 8, you also need to tick to roll back batches 10 and 9.

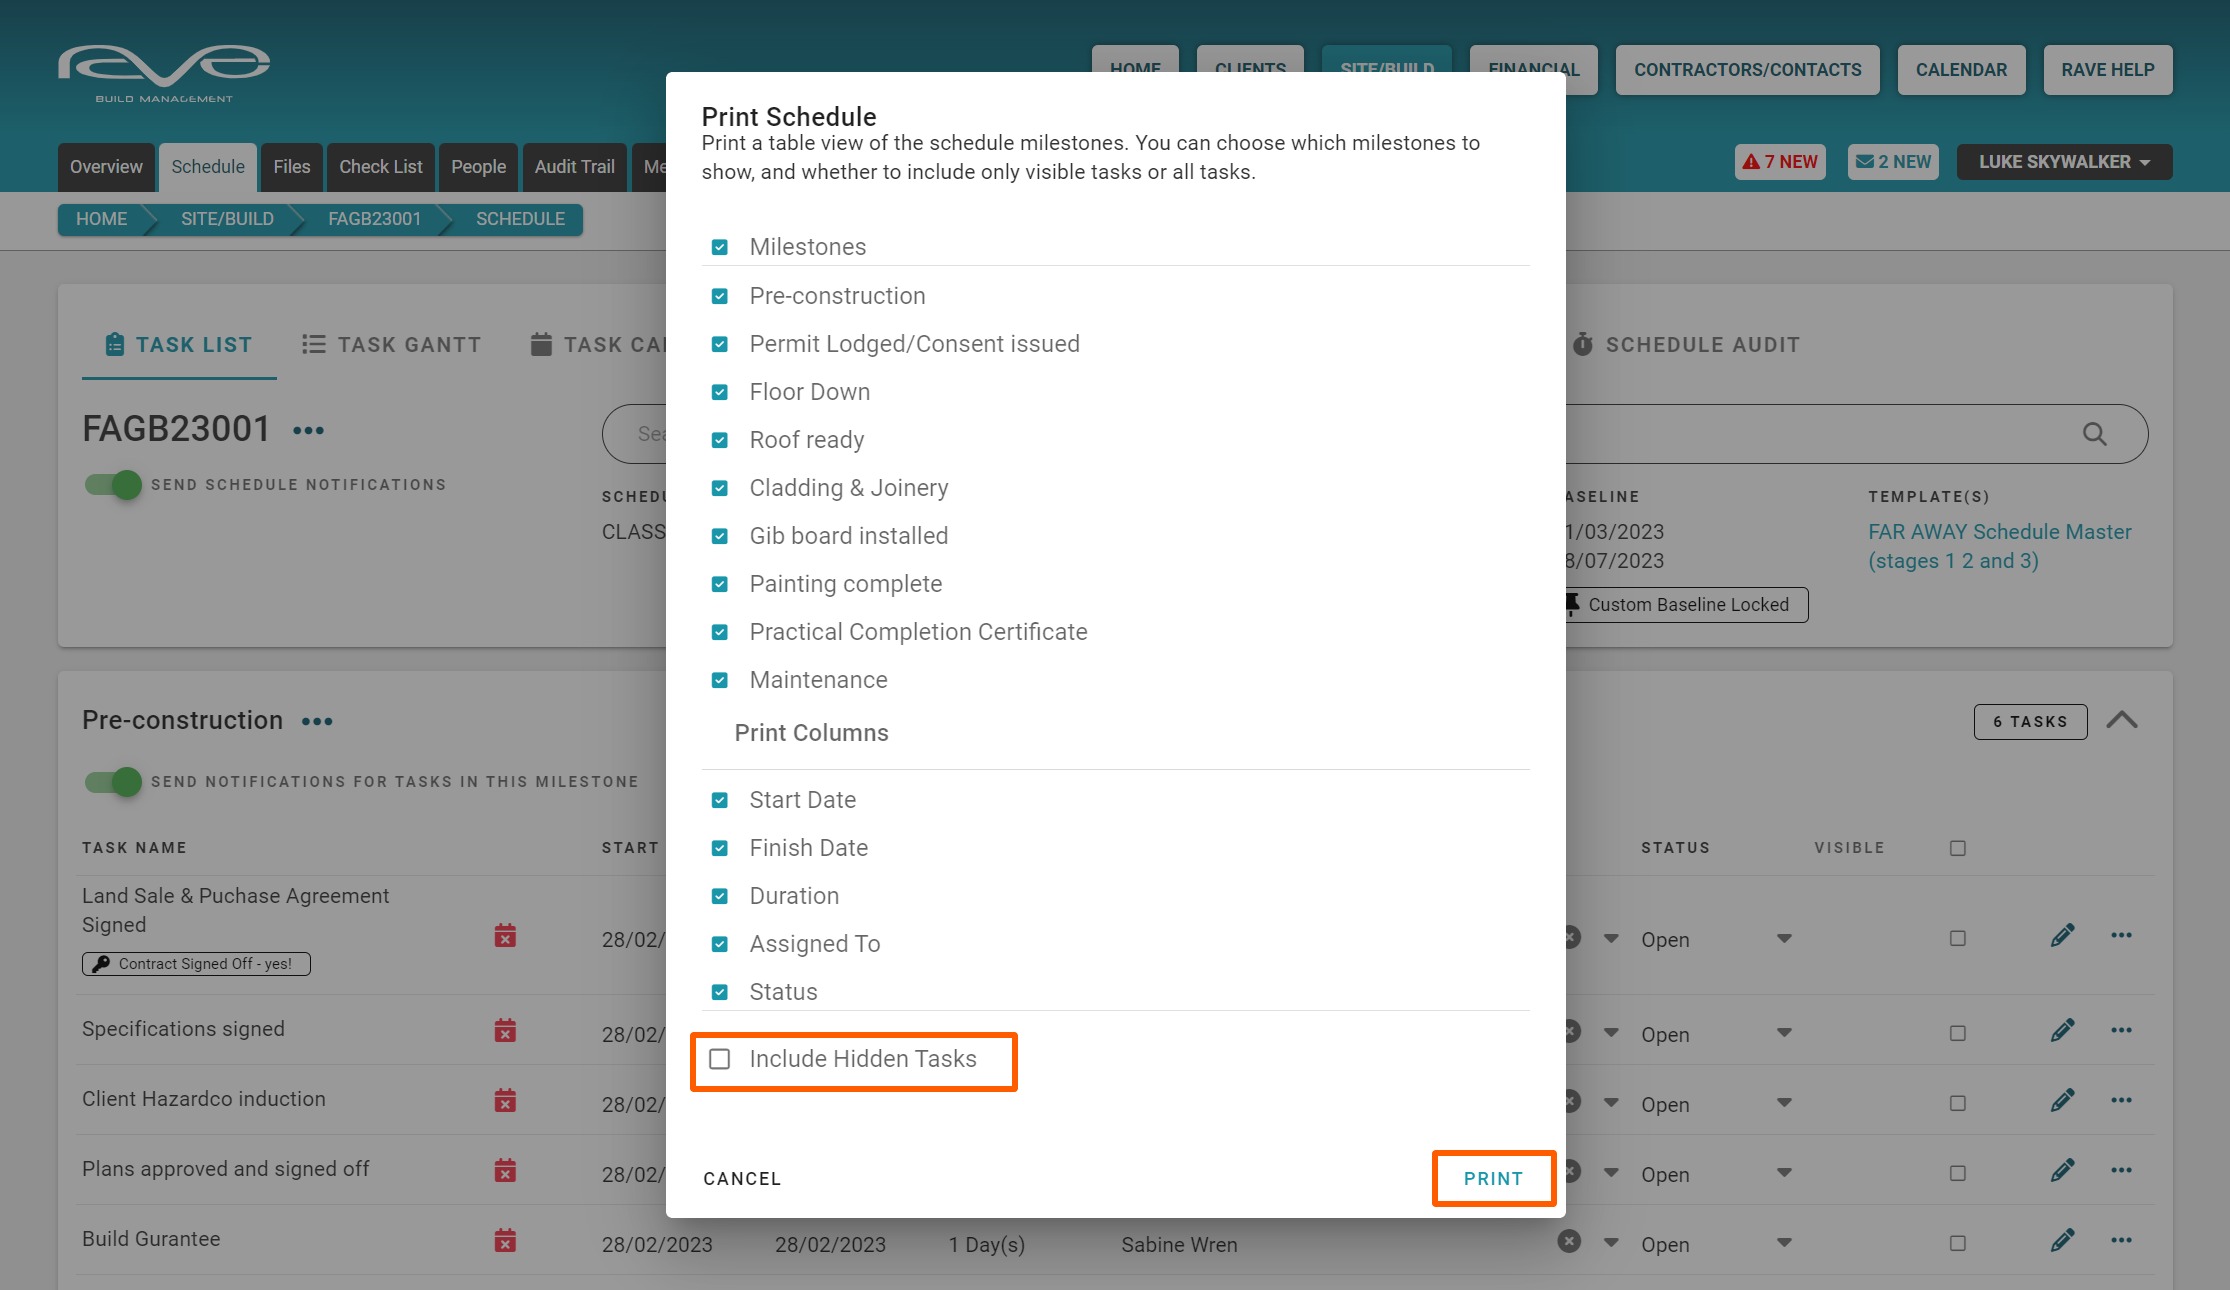
Print the Schedule - Task List view
You have the ability to print, and customise, your task list view of the schedule. Clicking on the Print Schedule option (from the task list view), will cause the Print Schedule pop-up to appear. From here you can
- Select which milestones you want to include in your print-out
- Set the columns to appear on your print-out
- Task start date
- Task finish date
- Task duration
- The primary task assignee
- The tasks' status
- Decide whether you want to include hidden tasks or not
Once you've made your selections, click Print to print this out.

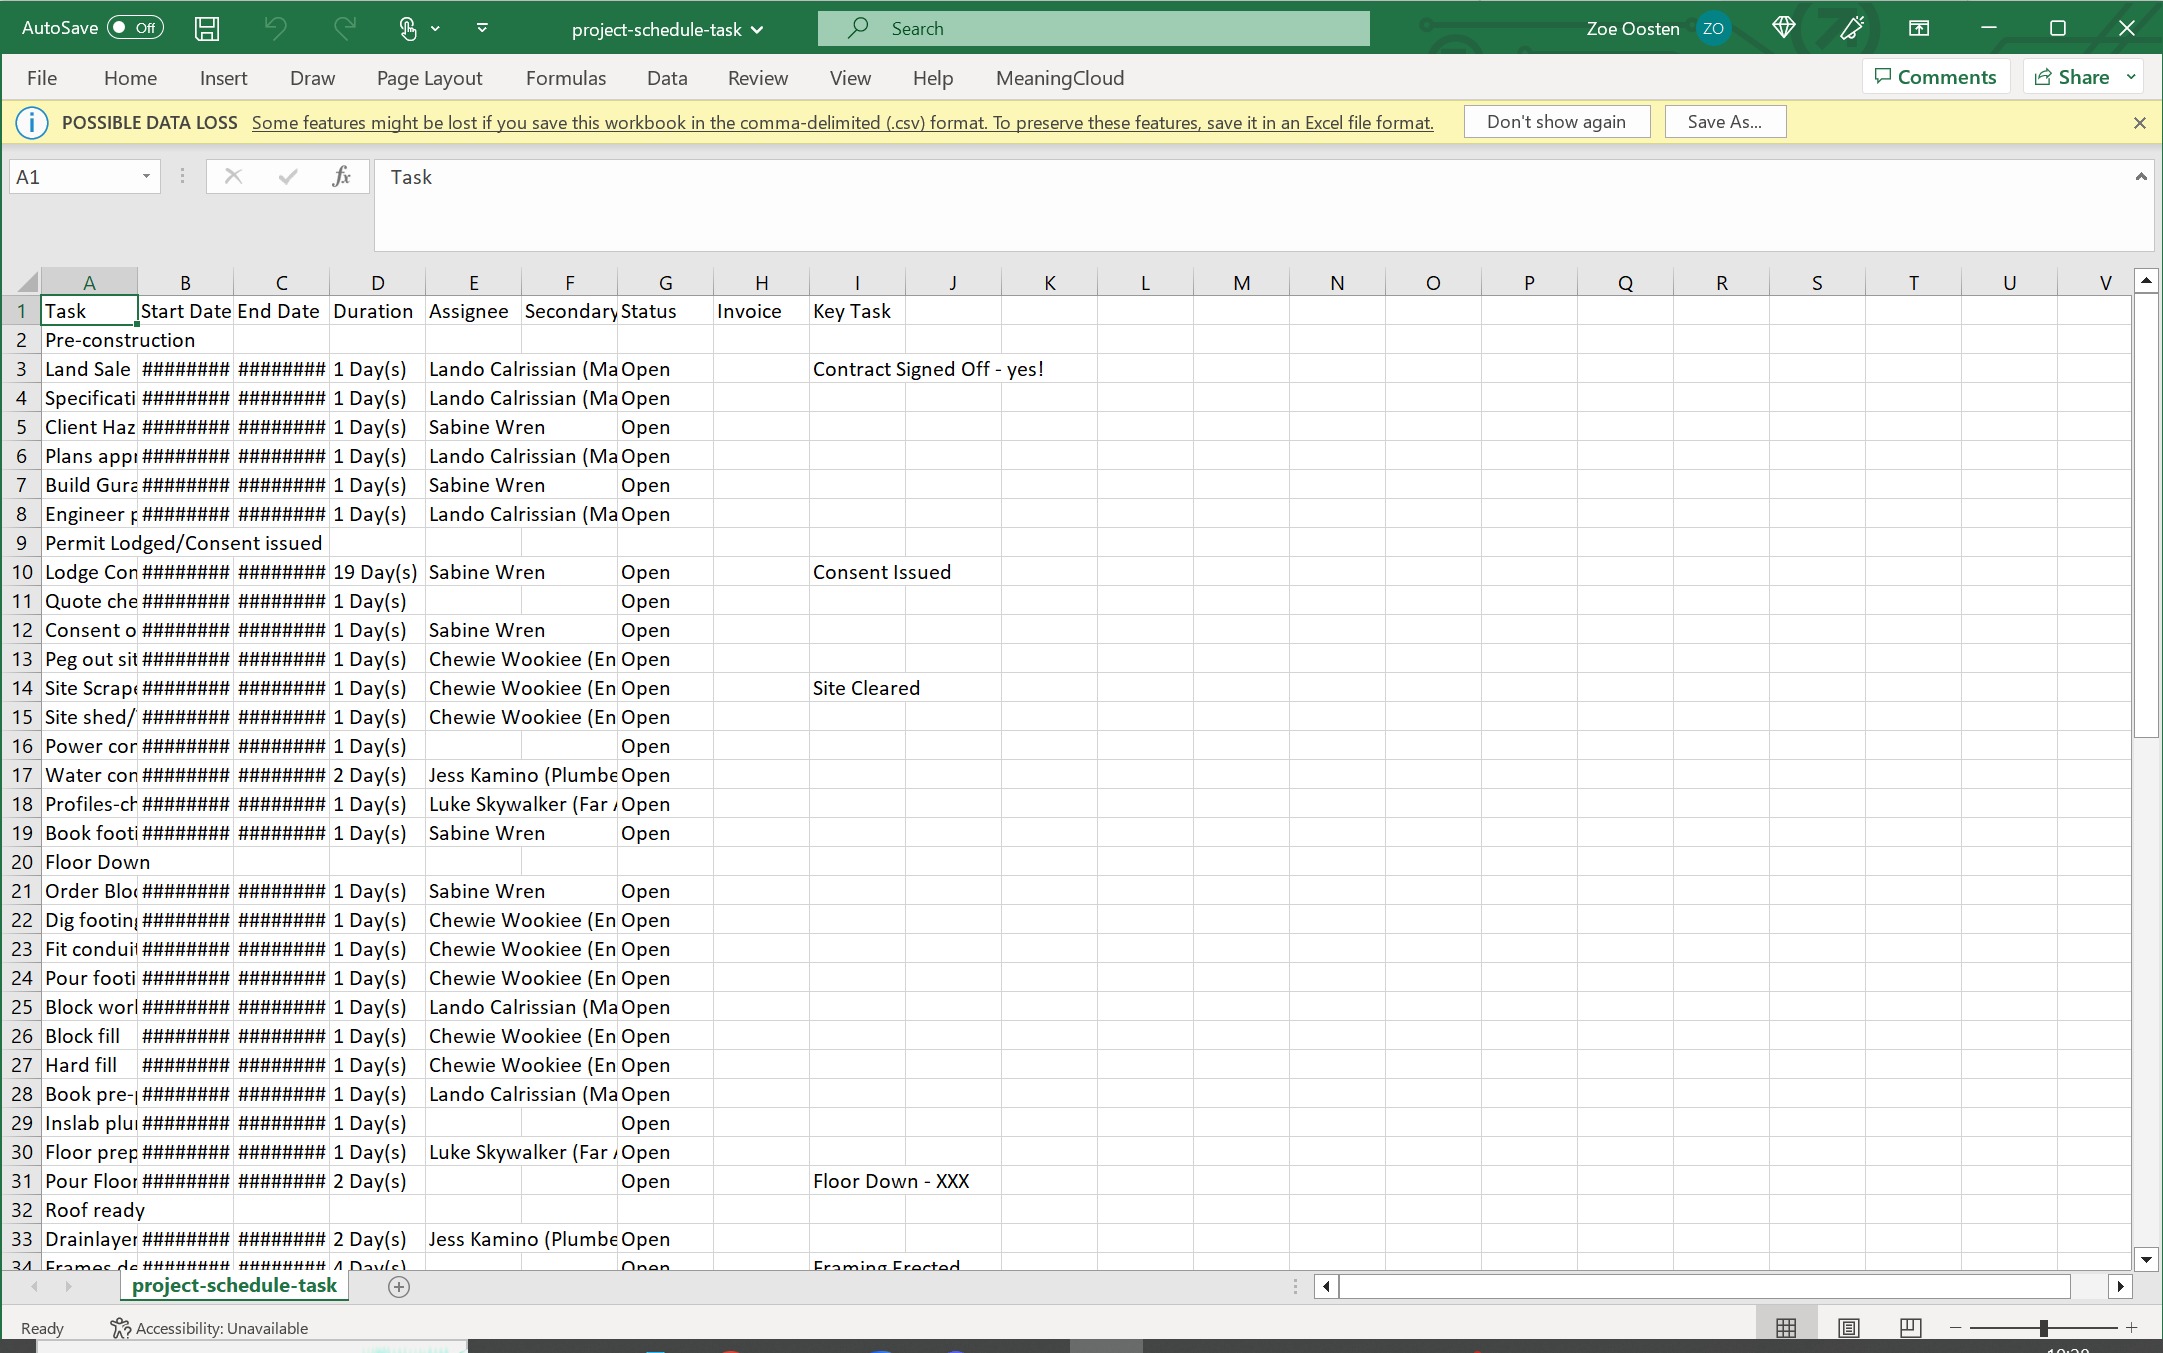
The Export as CSV (spreadsheet) Action
You also have the ability to export your schedule as a CSV file/spreadsheet. Simply clicking on the 'export as CSV' option, will instantly create a CSV version of your schedule, saved to your download section.

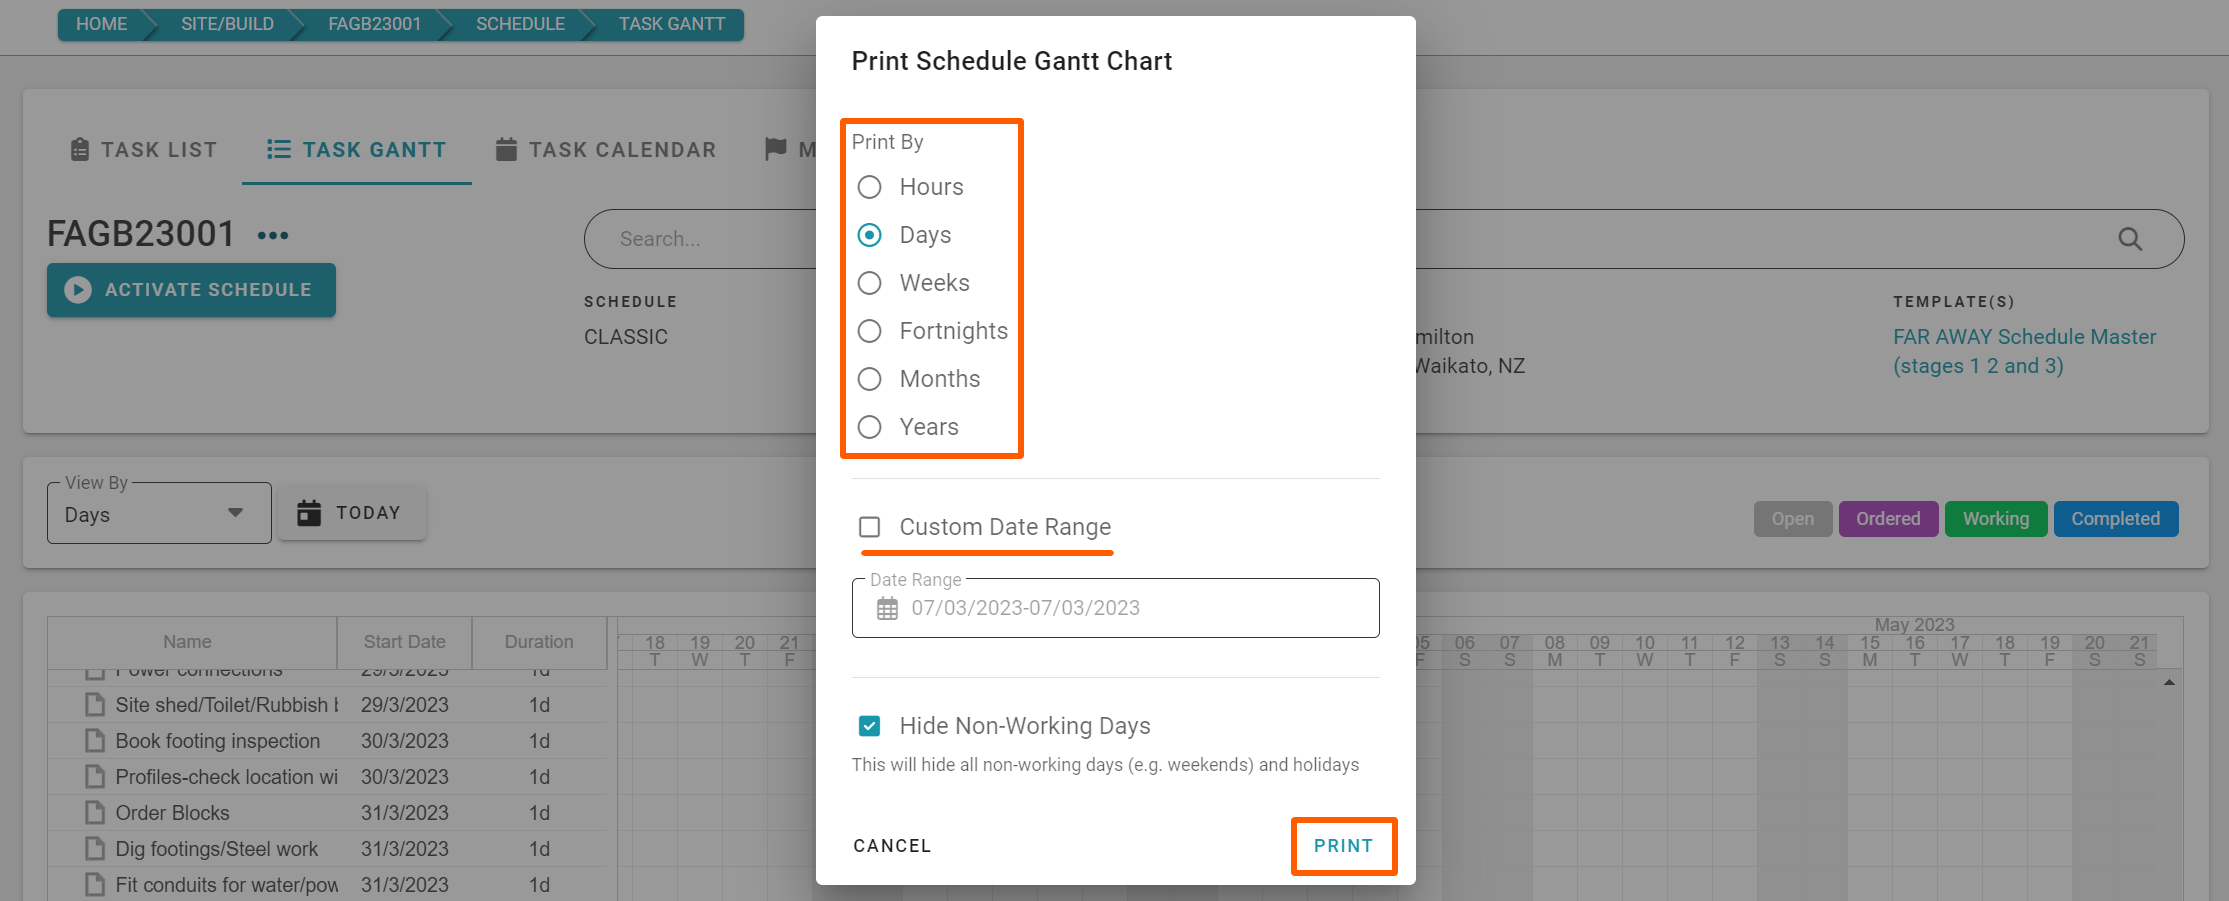
Print the Schedule - Task Gantt view
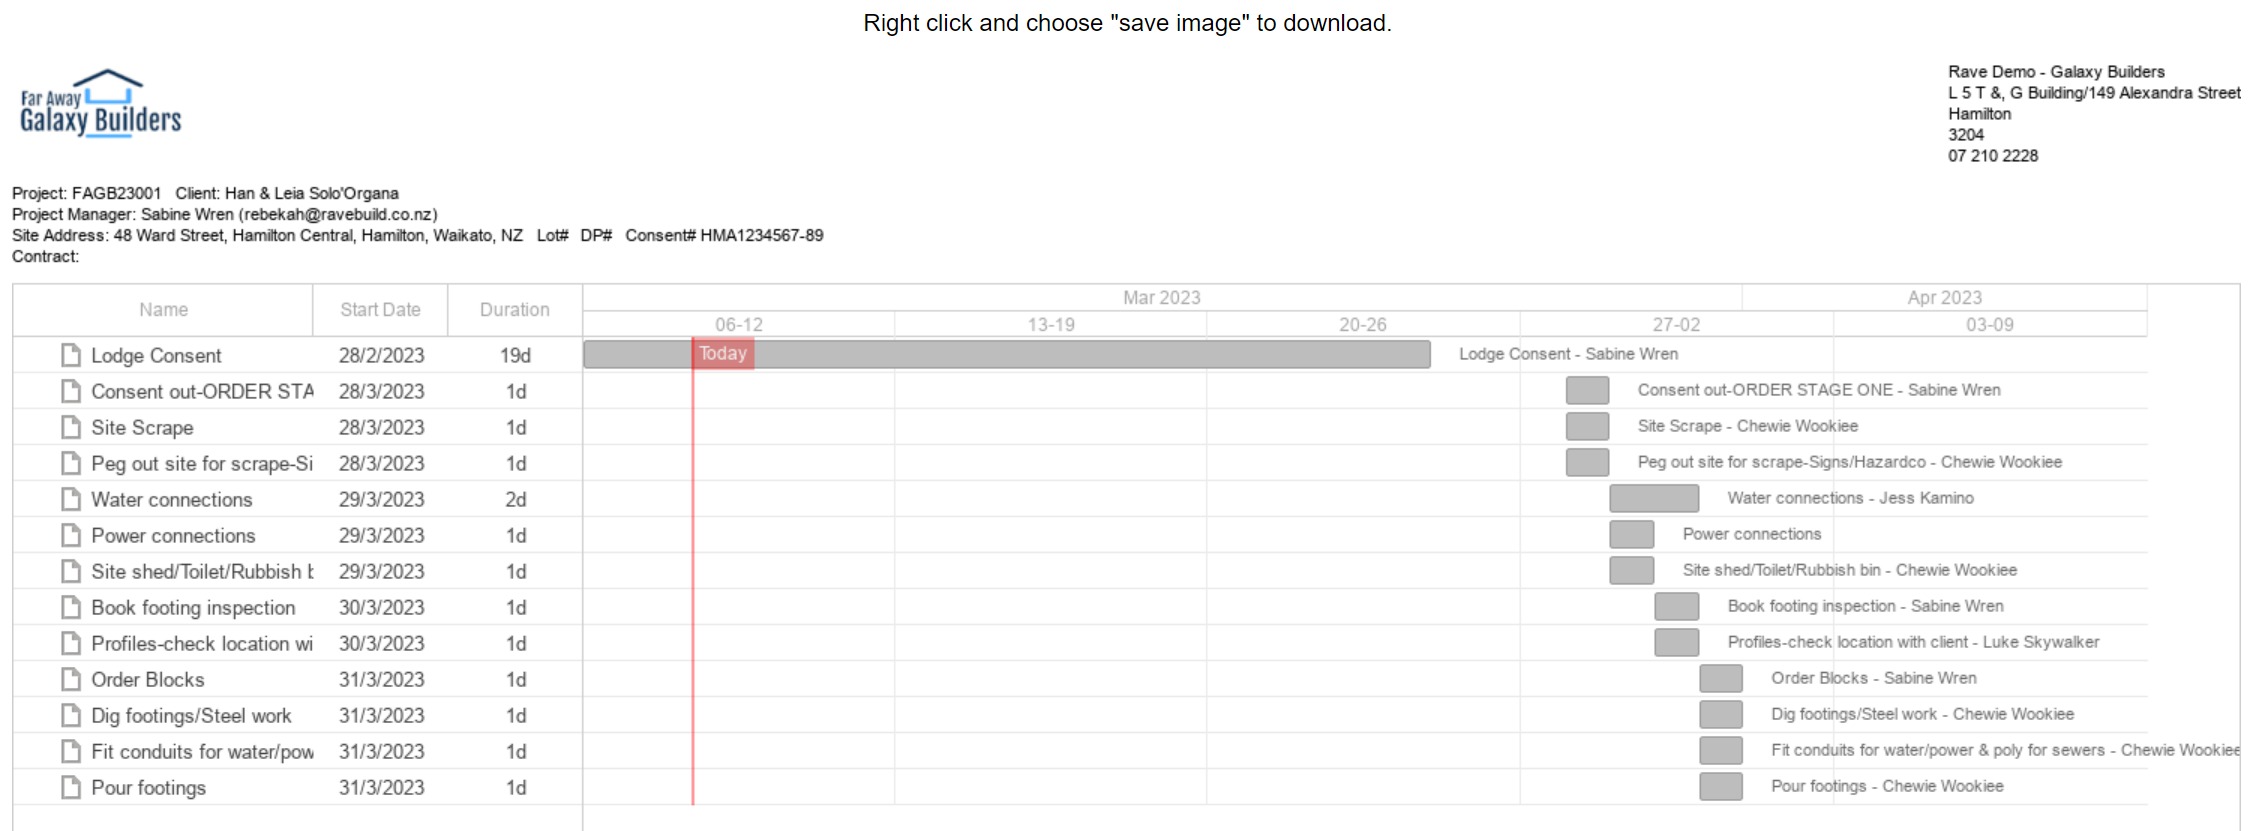
You have the ability to print a task gantt view (chart) of the schedule. This process is quite a bit different to the task list view printing - as we'll be saving the gantt chart as an image, to allow you to use the tile/mosaic/poster printing function on your printer (printer dependent) to go from A4 to A3, A2 or A1 sized print outs.
Clicking on the Print Schedule option (from the task gantt view), will cause the 'Print Schedule Gantt Chart' pop-up to appear. From here you can
- Select which Print By view (scale) you want to display i.e. days tends to be the best option
- Set the custom date range fo the gantt to display/print from
- Choose whether you want your printout to include, or hide, non-work days i.e., weekends and public holidays
- Once you've made your selections, click Print
Rave will open a new browser tab, displaying all the tasks available in that specific date range - From here, you can right-click on the chart to save the image file with a file name of choice
- Then close the browser tab
- Find and open the image file in your picture or downloads folder
- And print it
Note: If your printer has tile/mosaic/poster printing functionality you'll be able to select these options during the print preview process.
NOTE: If you require a PDF copy of your gantt chart, after step 4 above, select the 'Print to PDF' option instead of an actual printer, this will prompt you to select a file name and saving location for a PDF version of your gantt.

The Replace Assignee Action
The ‘Replace Assignee’ function allows you to reallocate all tasks assigned to one task assignee, to another - super handy if a contractor across multiple tasks in your schedule can no longer do it undo a batch of changes (mistakes) you have made to the schedule.

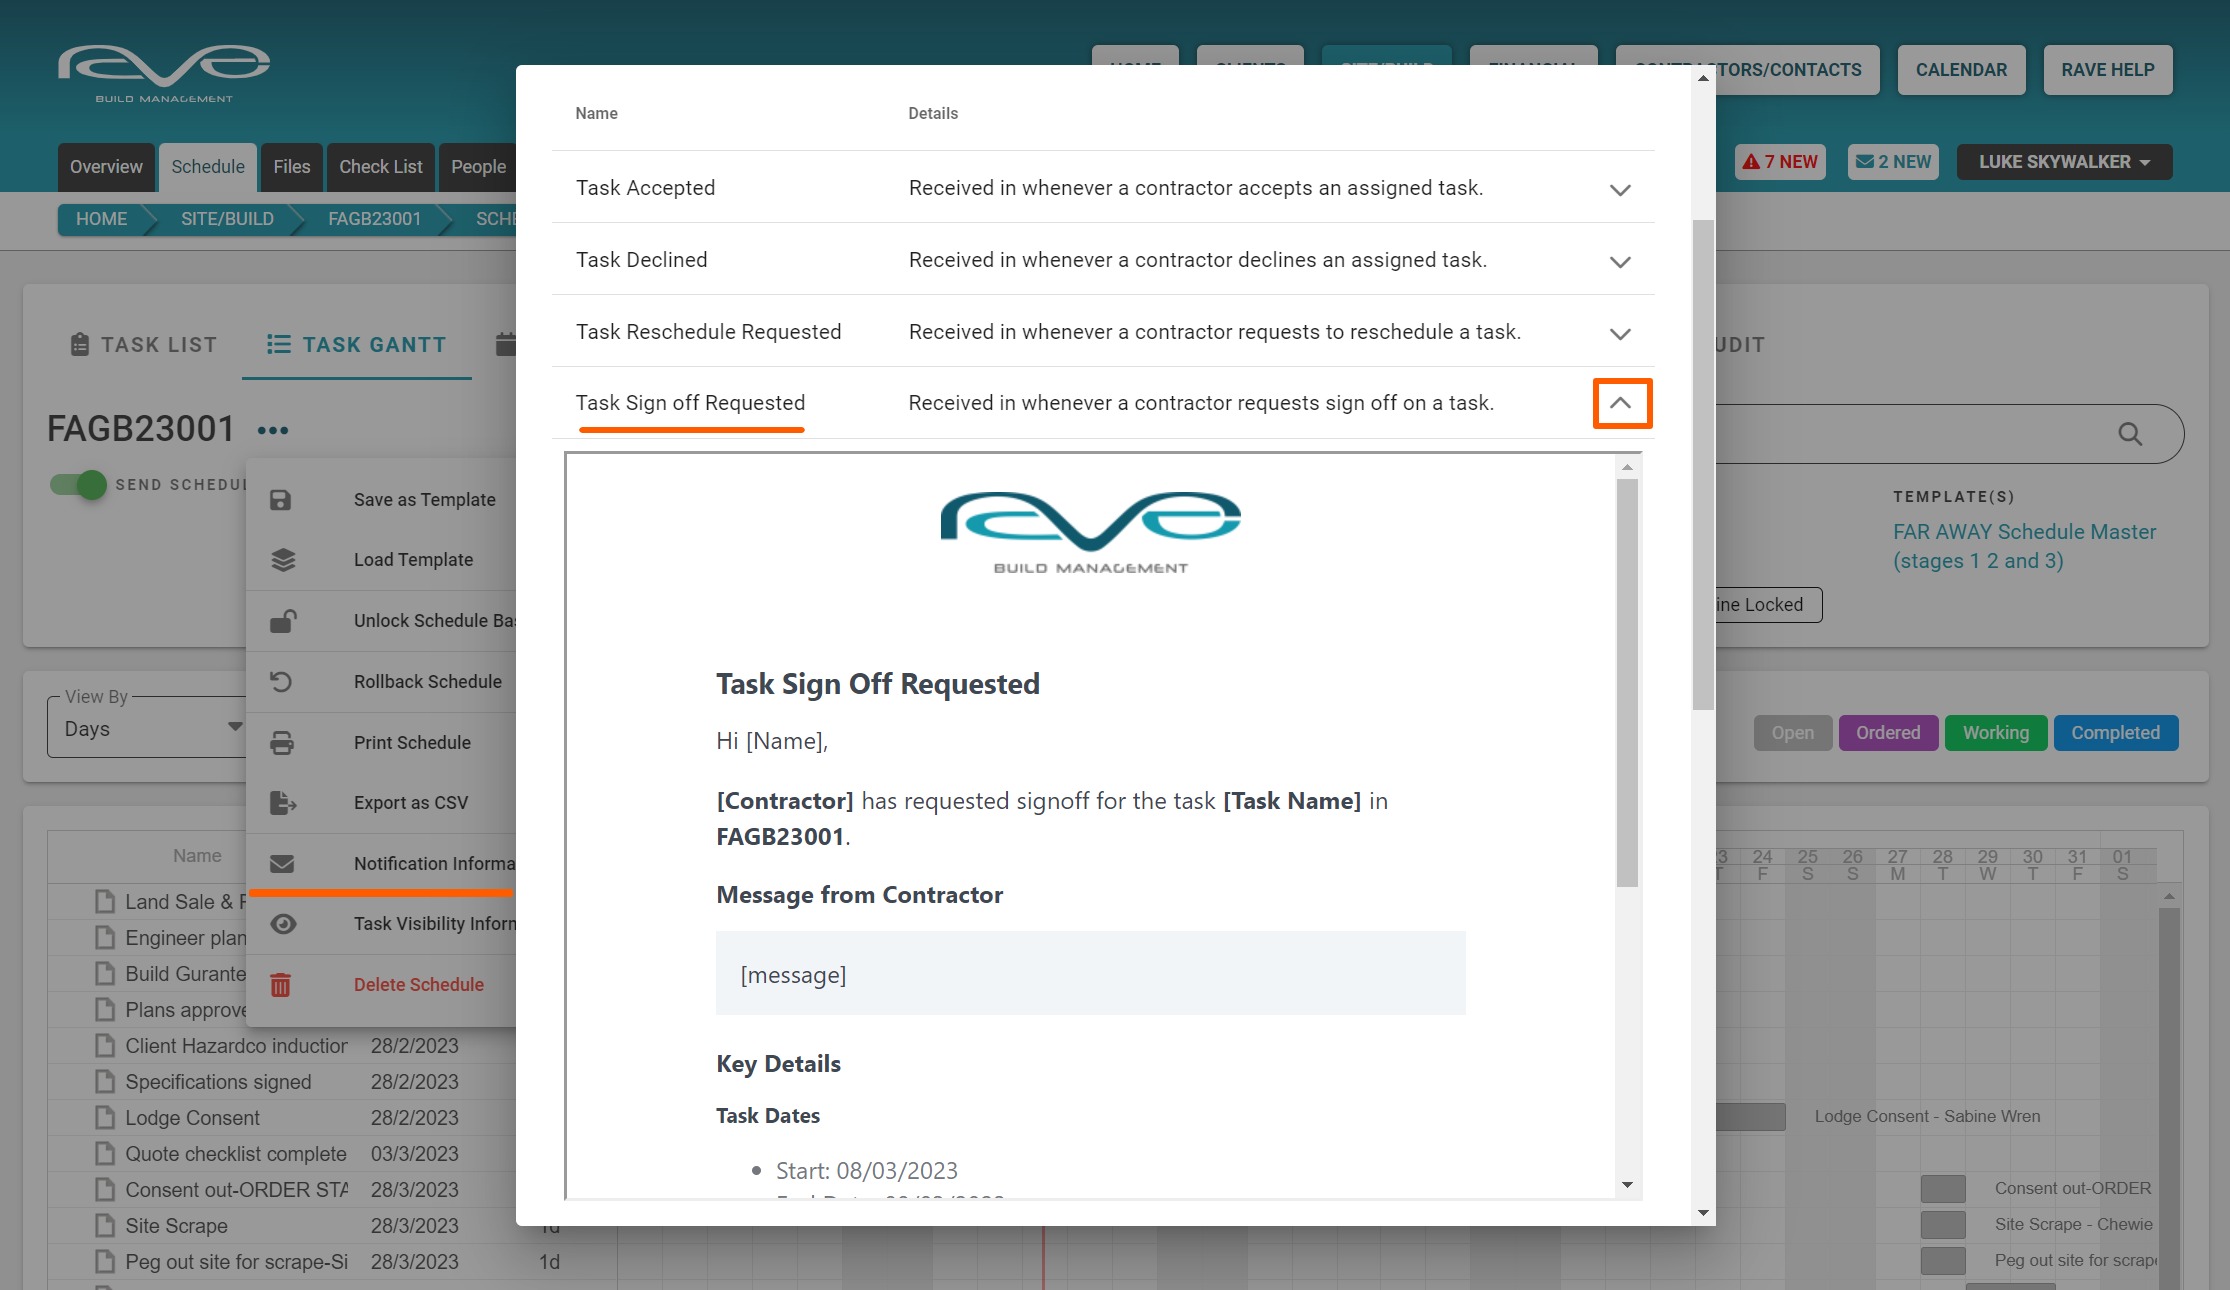
The Notification Information Action
The ‘Notification Information’ link provides previews to a range of automated incoming and outgoing notification emails from RAVE. If you want to see what any inbound or outbound notifications will look like just come to the schedule notification information and click on any one of the drop downs to see the general layout of those notifications.
Incoming Notifications
The incoming notifications are received by the project and site managers.
With 'Classic' scheduling, you have the option of being notified whenever a contractor has completed their assigned task. Clicking on the dropdown arrow to the right of the ‘Task Sign Off Requested’ option will display an example of what this notification email looks like.

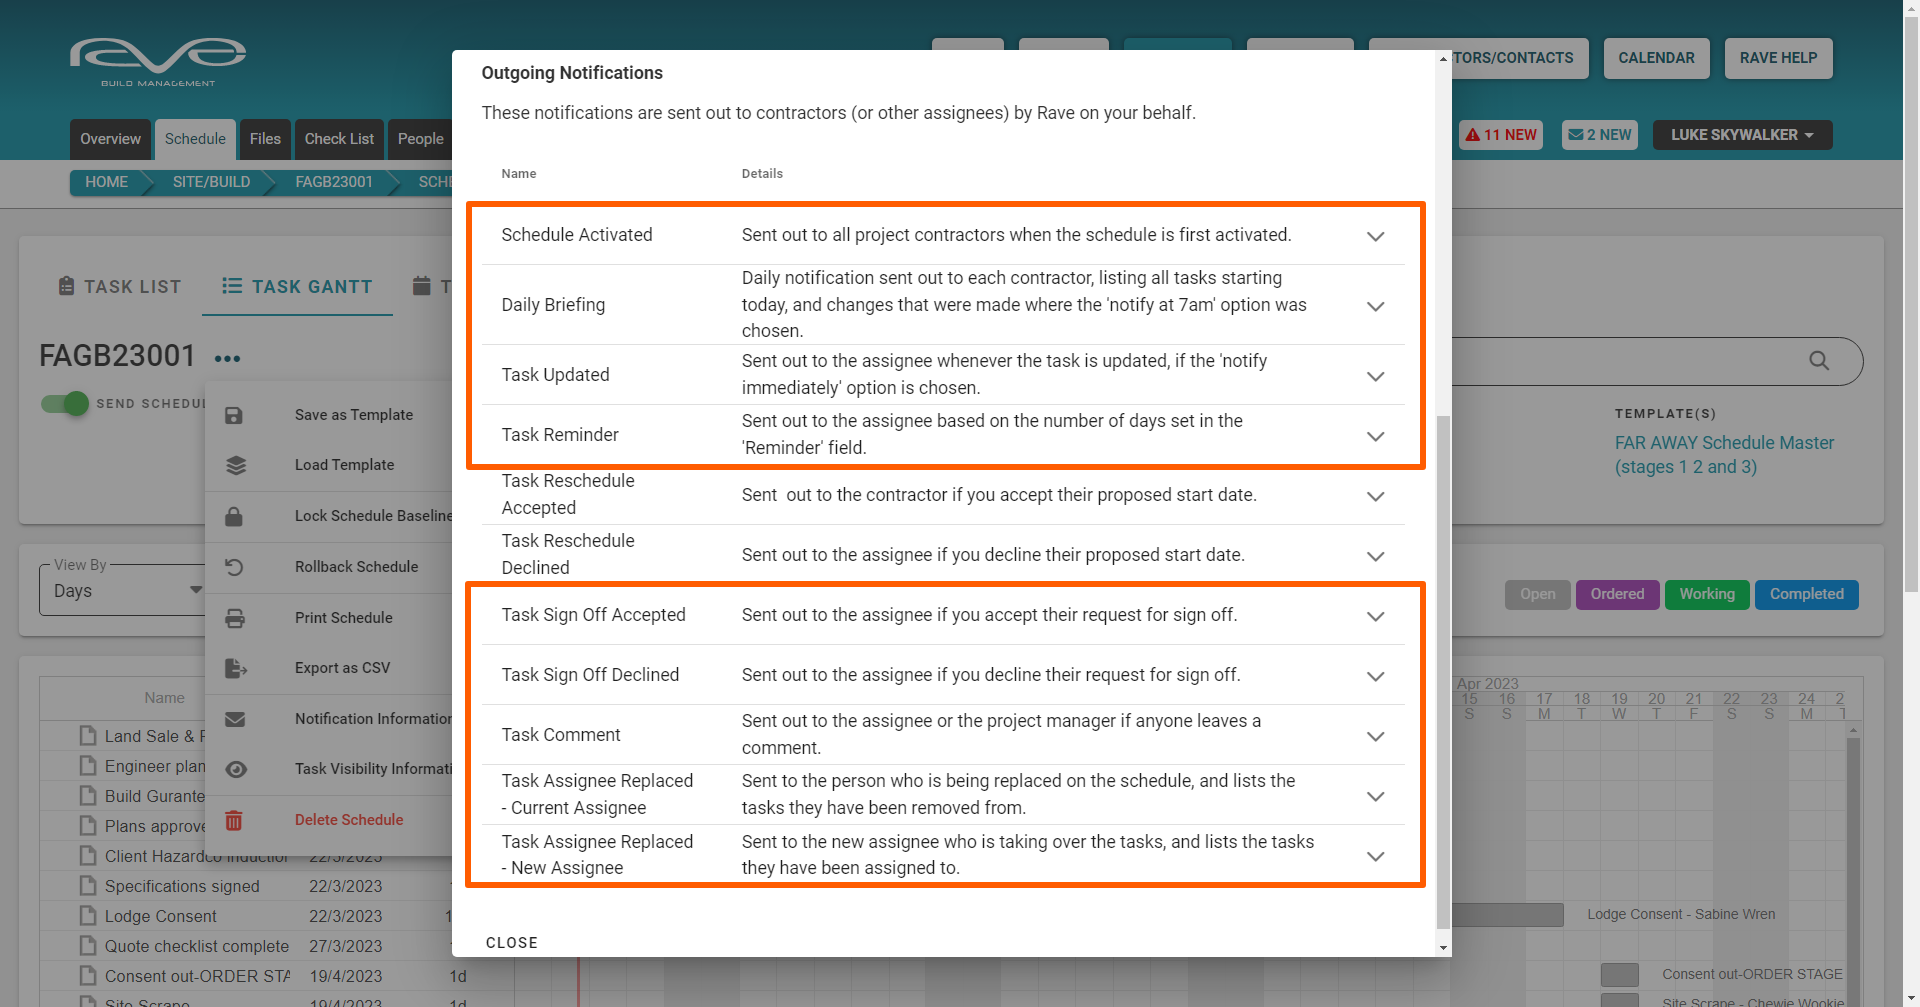
Outgoing Notifications
The outgoing notifications are sent on behalf of project and site managers - contractors and task assignees of tasks. It is quite a substantial list, clicking on the dropdown arrow to the right of each notification header will display an example of what this notification email looks like.
- The ‘Schedule Activated’ notification can be sent out to all project contractors when the schedule is first activated.
- The ‘Daily Briefing’ notification is sent out to each contractor when scheduled notifications are turned on for a job, and the 'tomorrow's 7:00am Schedule Briefing' notification option is selected. It lists all the tasks that are due to start today, and any schedule changes made the day before.
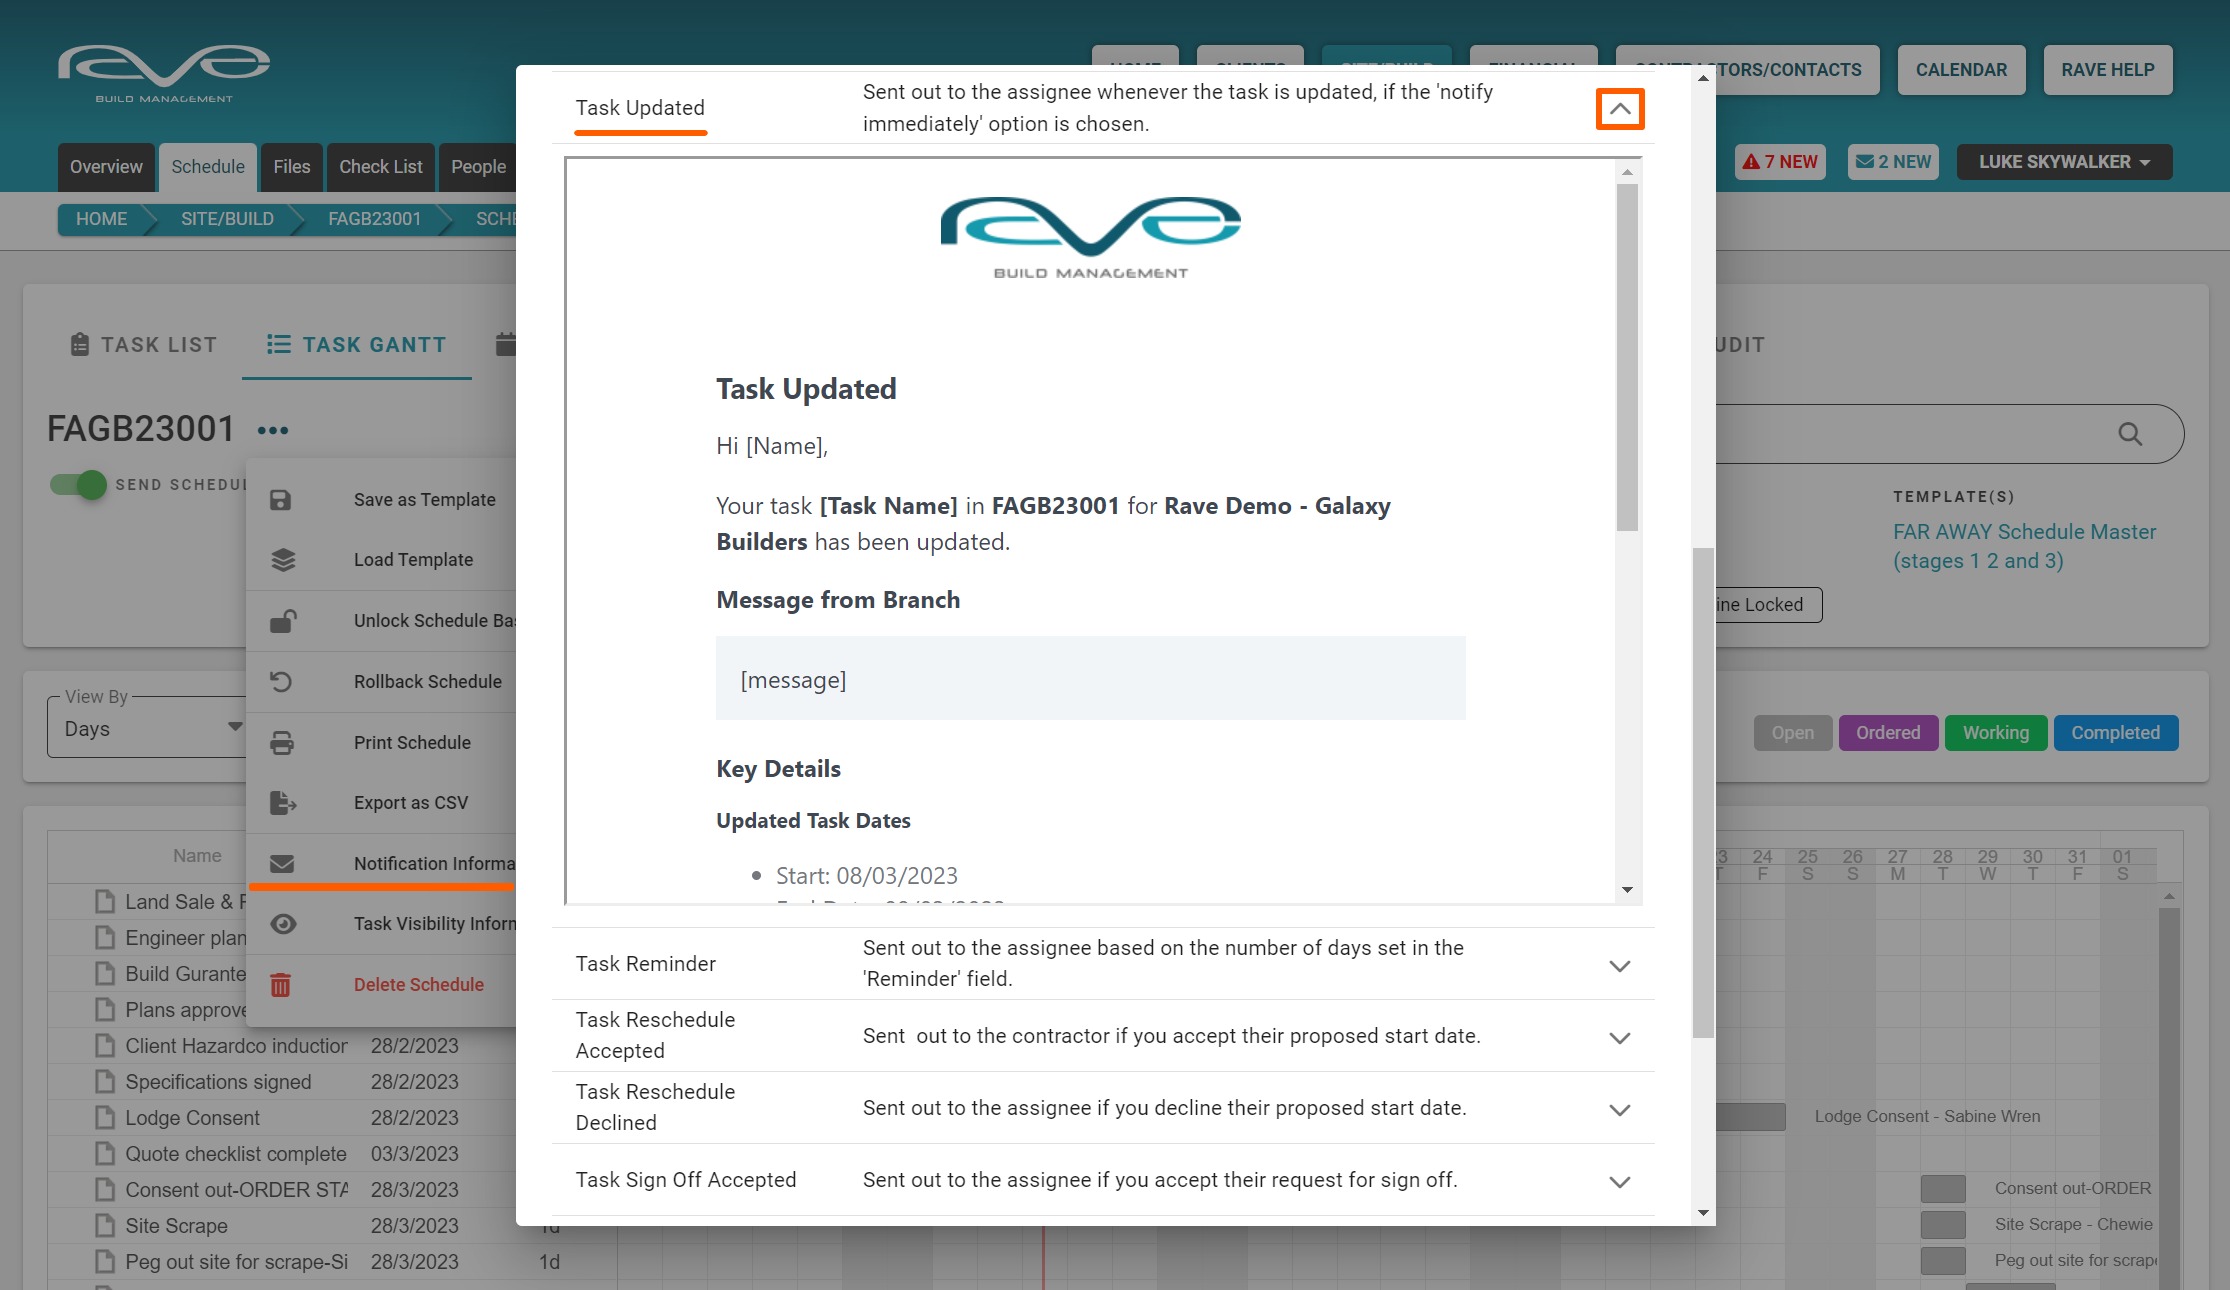
- The ‘Task Updated’ notification is sent out to the task assignees when scheduled notifications are turned on for a job, and the notify 'Immediately' option is selected.
- The ‘Task Reminder’ notification is sent out to the task assignees, when a task prompt day is loaded - and is triggered to send 'x' number of days before the task is due to start.
- The 'Task Sign Off Accepted/Declined' notification is sent out to the task assignee when you mark the task off as completed (you've accepted the task sign off), or if you have declined the task sign off, you'll have the ability to add notes i.e. what the contractor missed, or needs to do to complete the task.
- The ‘Task Comment’ notification is sent out to ALL task assignees and the project manager if anyone leaves a comment or uploads a file to a task - when the 'Notify Task Assignees' tick box is ticked. This is covered in our project communication training.
- The 'Task Assignee Replaced - Current/New Assignee' notification is sent out to the old and new task assignees when the Replace Assignee function is used - and the notification tick boxes are ticked.
NOTE: The ‘Task Reschedule’ Accepted/Declined notifications are 'Advanced' and 'Enterprise' scheduling notification options - which we cover in the 'Advanced' and 'Enterprise' schedule training.


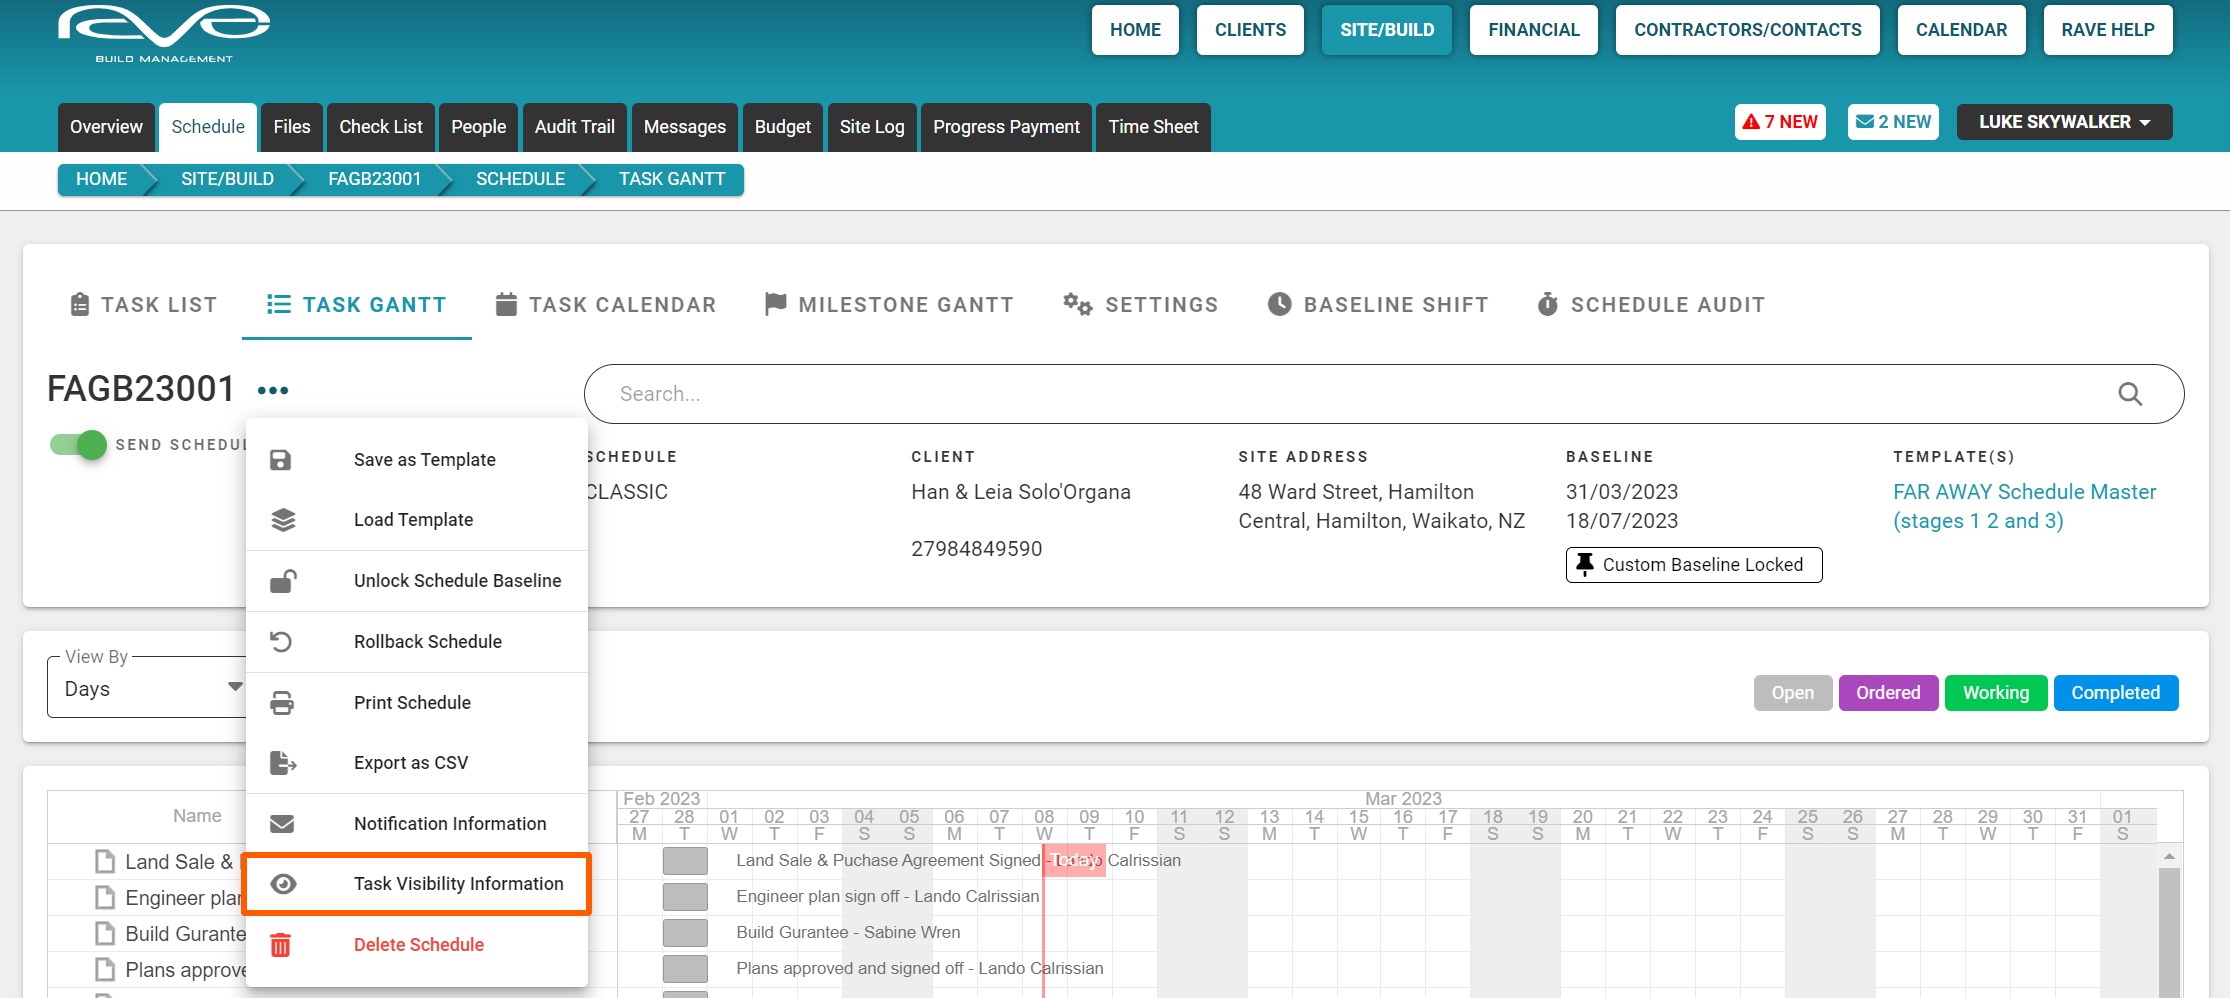
The Task Visibility Information Explanation
The ‘Task Visibility Information’ pop-up summarises when contractors (and the client if given access) can see tasks they are NOT assigned to.
- If either the project or the schedule is Inactive - NO outside users have any schedule or task visibility
- If the schedule is Active and the View Visible Tasks permissions have NOT been given - outside users will only see the tasks that are assigned to them*
- If the schedule is Active and the View Visible Tasks permissions HAVE been given - outside users will see tasks assigned to them* and all other visible tasks
NOTE: Outside users can not see hidden tasks as a general rule. However, if you assign an outside user to a hidden task, they will be able to see it when the project and schedule are Active. Hidden tasks are things like stage claim payment requests, and any admin tasks that you don't want your contractors or client to see.
Schedule Templates
Access this demo here.
New RAVE project managers will usually start their scheduling journey, by loading RAVE's Master Schedule Template, making some edits to suit their way of building, and continue to make tweaks as the job carries on. At some point, a new job will be ready to start, and the project manager will want to copy their current (updated) schedule over to the new job - this is where saving a schedule template comes in - at any point through their project and schedule management, project managers can save their current project schedule as a new schedule template.
To SAVE a schedule template from a current project:
- From the project's schedule sub-tab, click on the schedule action drop-down - the 3 meatballs to the right of the job number
- Click on the ‘Save as Template’ option
This will open the 'Save Schedule as Template' pop-up - Type in the template name* and click the Save button
This will SAVE the schedule as a new schedule template, available for you to load via the schedule action drop-down's 'Load Template' option
*RAVE HELP TIP: You can have as many schedule templates saved as you want, so it is a good idea to give your schedule template - a good descriptive name so you know what template you're getting, and also a date or version number i.e. pile foundation (2/3/23), or two-story (ver 1.2), etc.
NOTE: 'Classic' scheduling allows for one schedule template only to be loaded to a project, also the project must not have any milestones/tasks already loaded - whereas you can load multiple templates and templates over milestones/tasks with 'Advanced' and 'Entreprise' scheduling.


To DELETE an existing schedule i.e to load a new schedule template to this project:
- From the project's schedule sub-tab, click on the schedule action drop-down - the 3 meatballs to the right of the job number
- Click on the ‘Delete Schedule’ option at the bottom of the list
- And confirm the schedule deletion via the Delete Schedule pop-up
This will delete the whole schedule, and free it up to load a schedule template

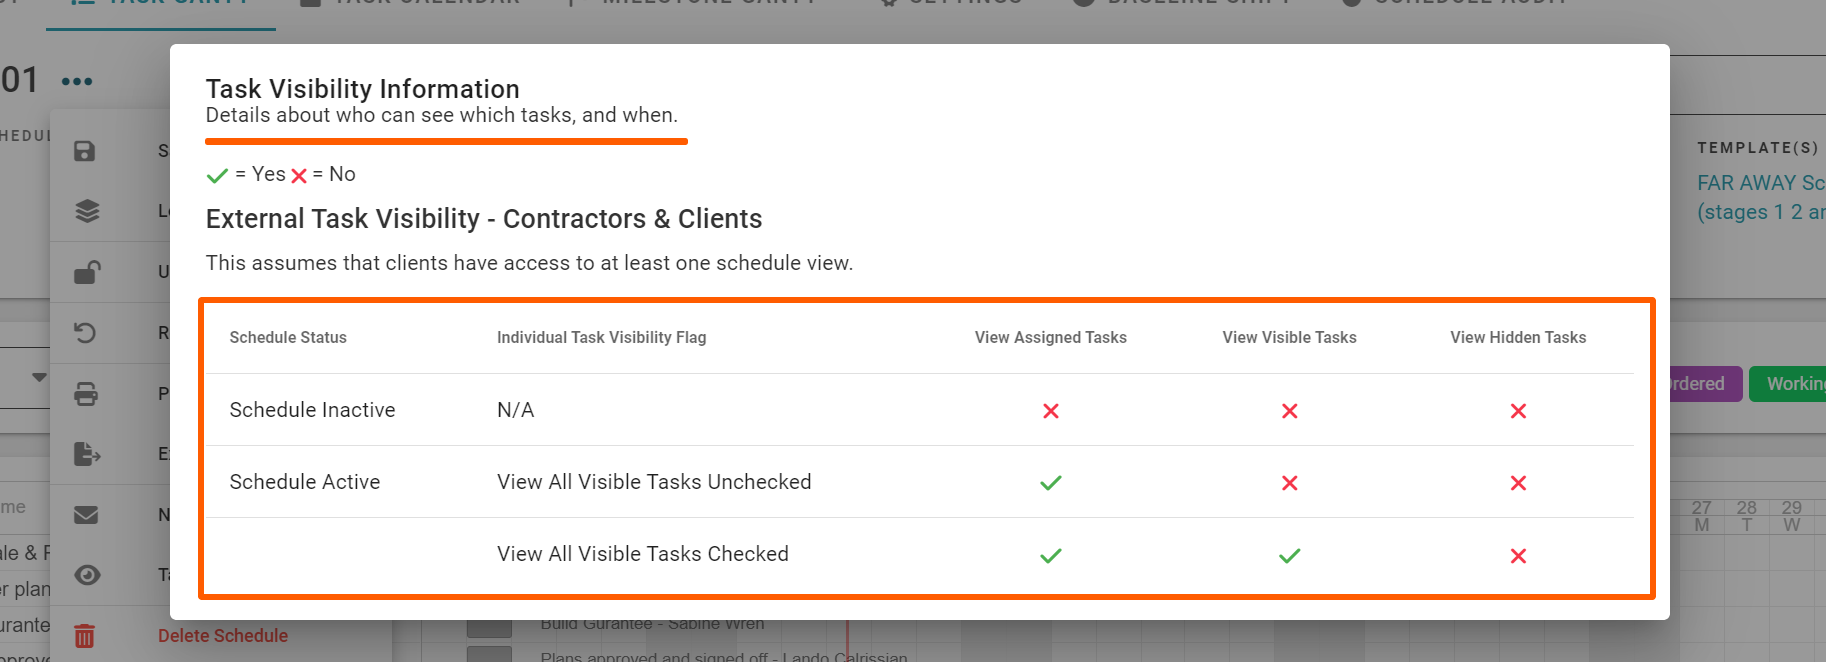
To LOAD a previously saved schedule template to a project:
- From the project's schedule sub-tab, click on the schedule action drop-down - the 3 meatballs to the right of the job number
- Click on the ‘Load Template’ option near the top of the list
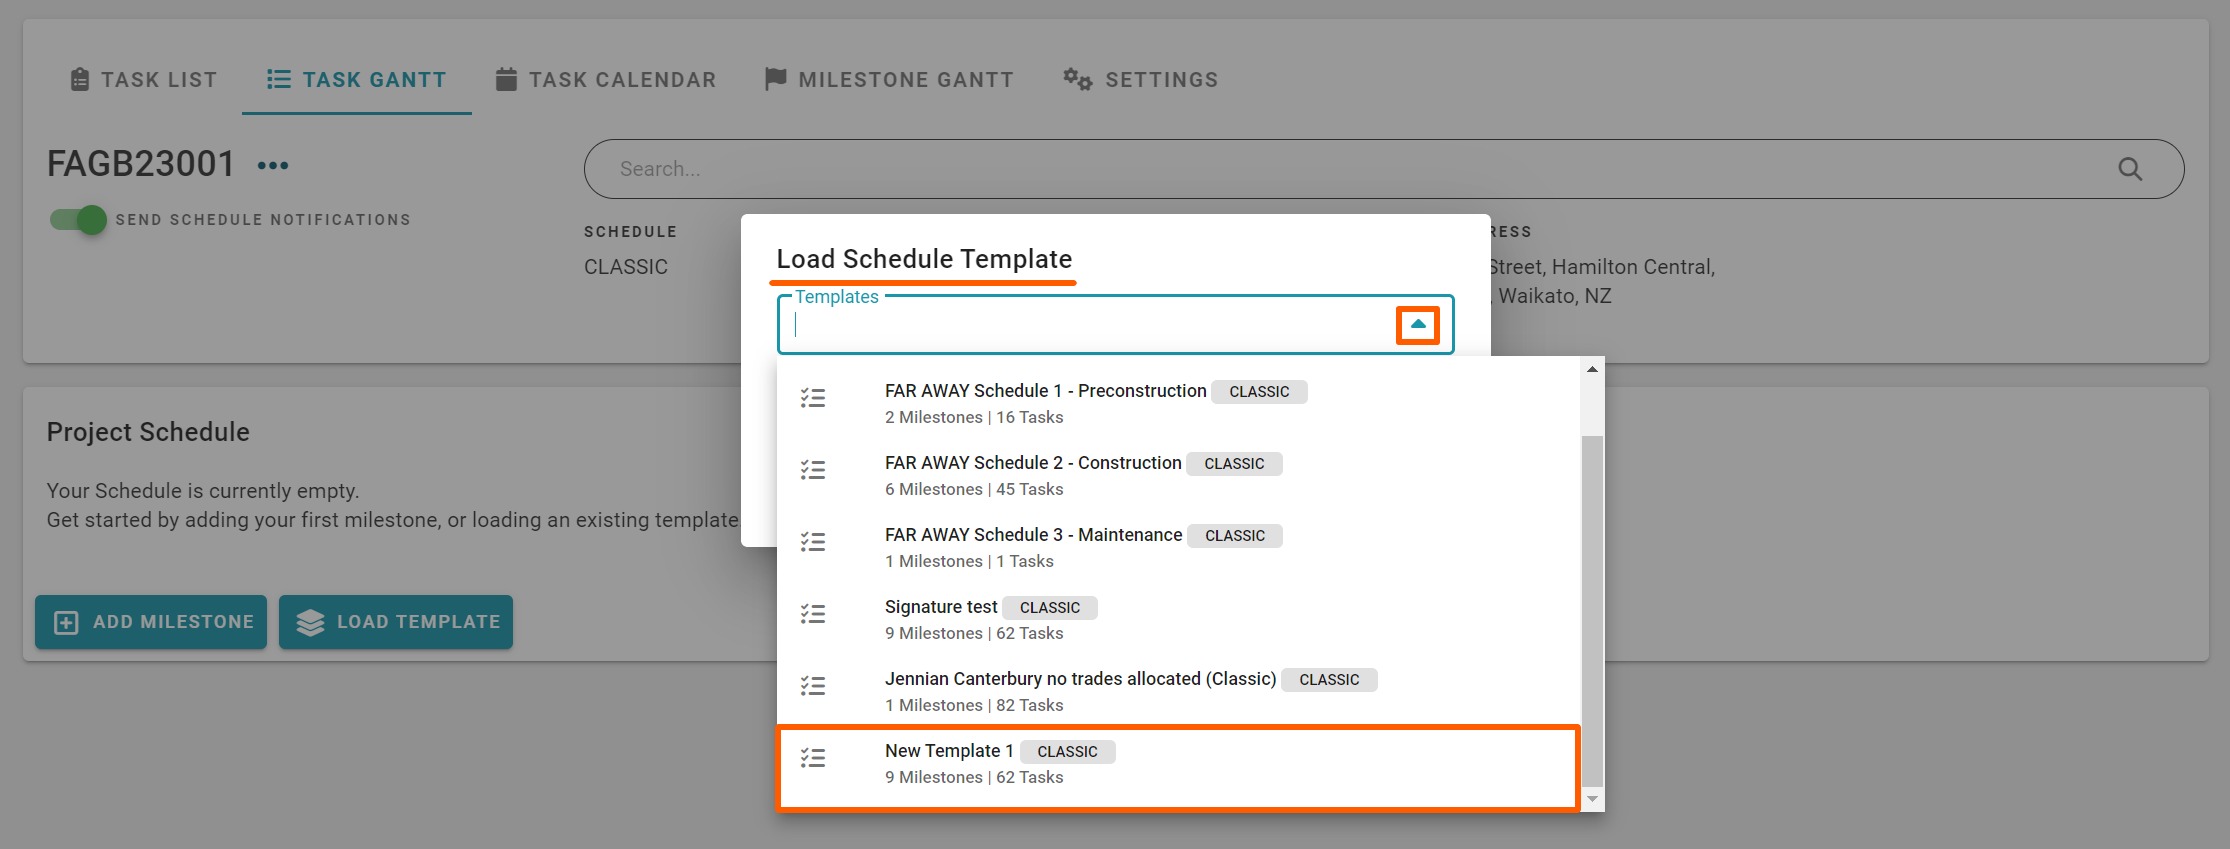
This will open the 'Load Schedule Template' pop-up - Select the template you want to load i.e. we're selecting our 'New Template 1' schedule template
- Set the start date of the first task in your schedule
- the start date will default to today's date if no selection is made
- Click 'Load Template' to confirm
Your schedule will load, with the first task set to your nominated start date, with the following tasks' start dates cascading down from there.

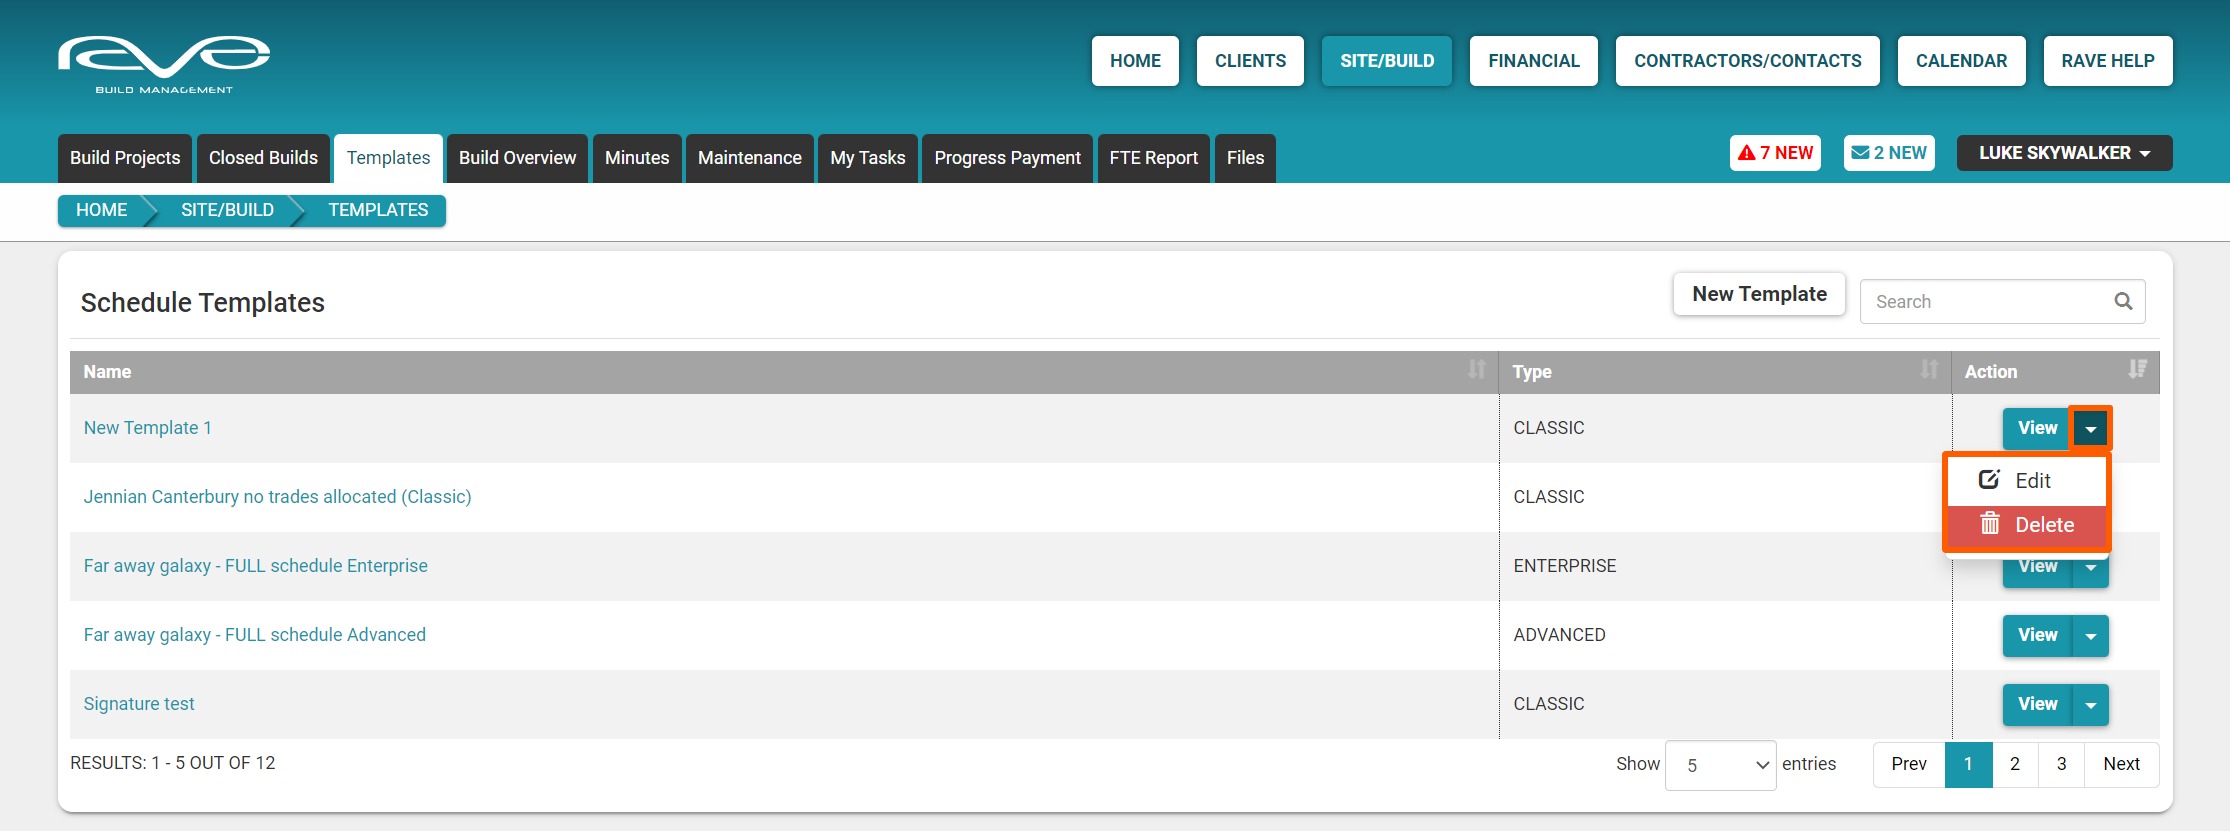
Managing Schedule Templates
You can create, load from a CSV template, edit, and manage your schedule templates via ‘Site|Build / Templates sub-tab - the ‘Schedule Templates’ are located at the top of this page.
Your previously saved schedule templates are listed here, displaying each template’s name, and the type either 'Classic', 'Advanced', or 'Enterprise'.
You can open the template to look at the schedule by clicking on the schedule name, or by clicking on the 'View' button. While the drop-down allows you to either edit or delete the schedule template.
To the bottom left of this section we have the results letting you know the number of schedule templates currently loaded, and to the bottom right we can see the number of schedule templates that are displayed for this page.

Opening/Viewing a Schedule Template
We can open the template to look at the schedule by clicking on the schedule name, or by clicking on the 'View' button - doing so will display:
- The template name and the schedule type/icon to the top left
- The radio buttons allow you to change the schedule type - if you've subscribed to Advanced or Enterprise scheduling
- The key details display the number of milestones and tasks
- The approximate schedule duration
- The source project - the project this schedule was saved from
- Who the schedule template was created by
- When it was last updated
- Then the buttons to Add a Milestone and upload a CSV template
Then we display the schedule by milestones and tasks.


Edit a Schedule Template
You have more schedule editing functionality in the project sub-tab rather than the templates section i.e. access to a Task Gantt view, the ability to link progress payments, and more control with linked tasks if you have 'Advanced' and 'Enterprise' scheduling - but, you can do some editing in the schedule templates section.
To edit the schedule via the templates sub-tab, click on the pencil icon to the right of the template name, this enables you to:
- Change the schedule template name
- If you have access to other schedule modes, you can change the template schedule mode here also
- You can add a milestone via the button to the left
- You also have the ability to upload your own schedule via a CSV schedule template
Within a milestone, you can add, edit/manage, and delete tasks - including the management of Key Tasks.
NOTE: You do not have the ability to link progress payments or manage notifications here - they are editable at the project level. This is because schedule templates are not linked to live projects with an active ‘Progress Payment’ sub-tab or live for the notification switches.


Create a Schedule Template via a CSV Upload
Watch the demo here.
You can upload your own schedule to RAVE, though the data needs to be laid out in a very specific way, and you must use our CSV Schedule Template format/layout i.e. any old schedule exported as an excel file won't upload into RAVE without some massaging first! We made it easy by including a 'Sample CSV File' link for you to use - as you'll discover in the below process.
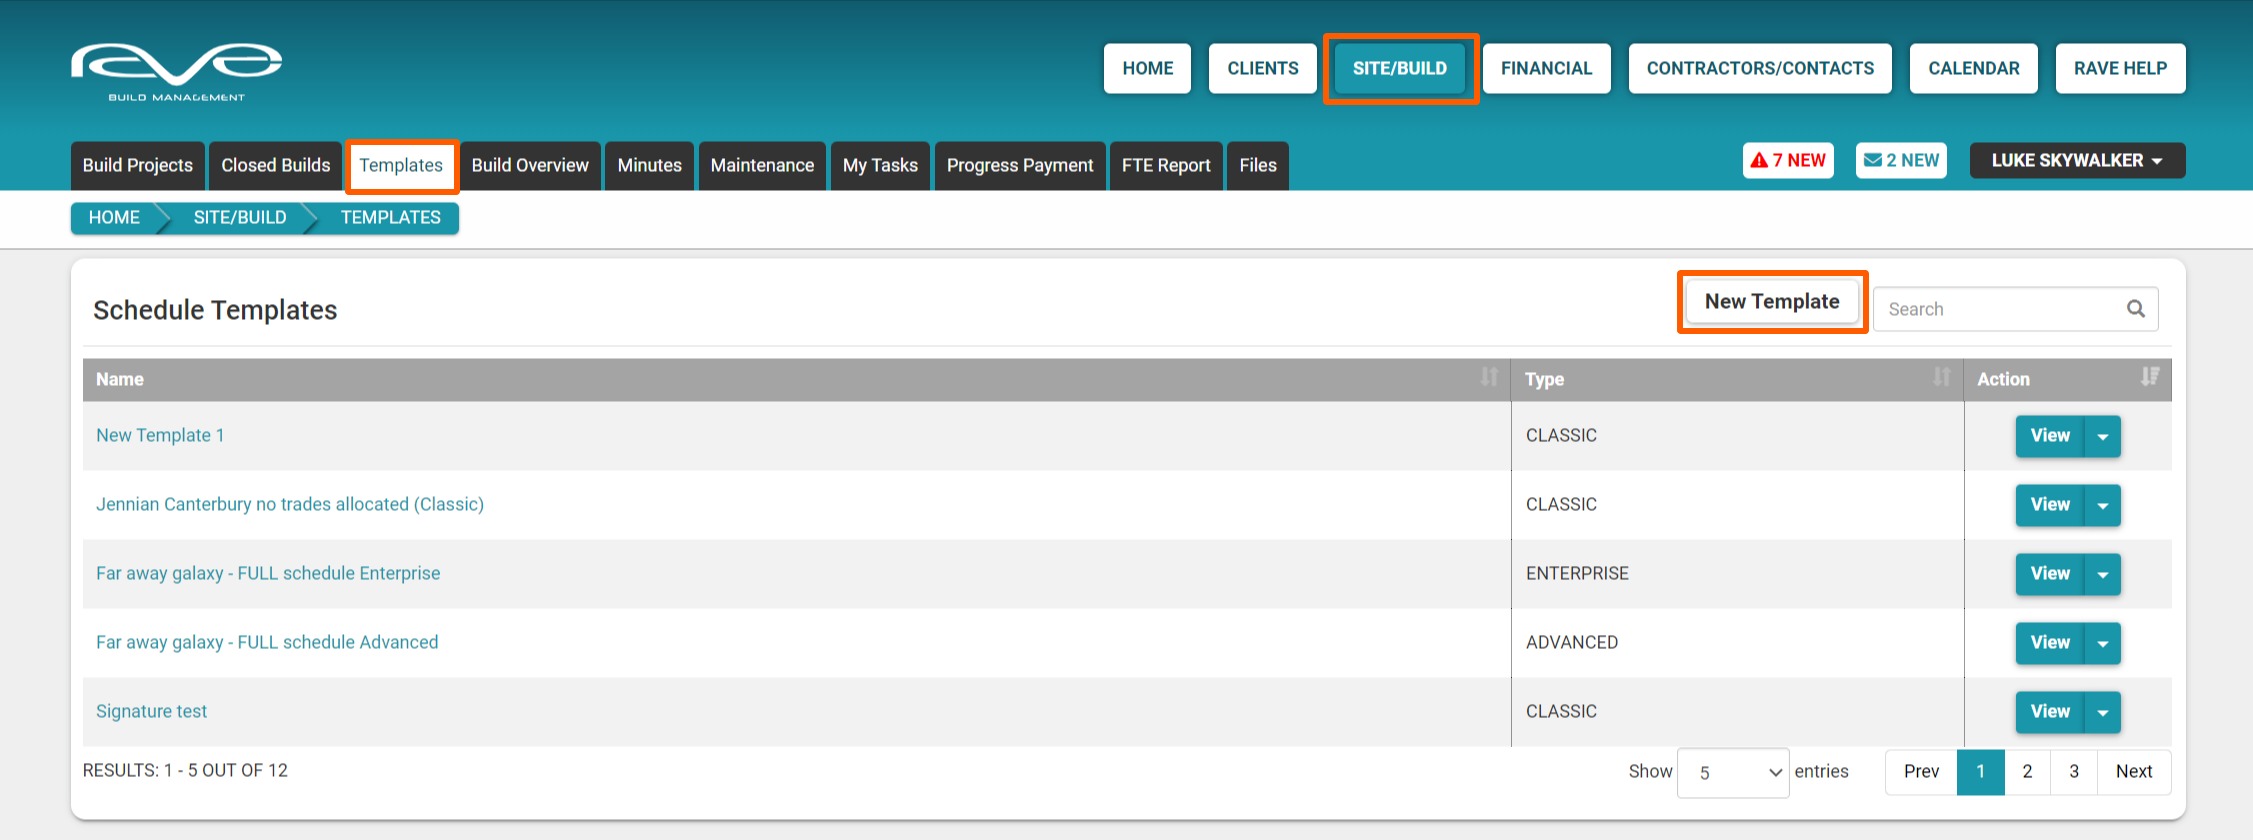
To upload your schedule to RAVE:
- We first click on the 'Site|Build' button, then the 'Templates' sub-tab
- Click on the ‘New Template’ button - to the top right of the page
- From the new template screen, we click on the 'Upload CSV Template' button
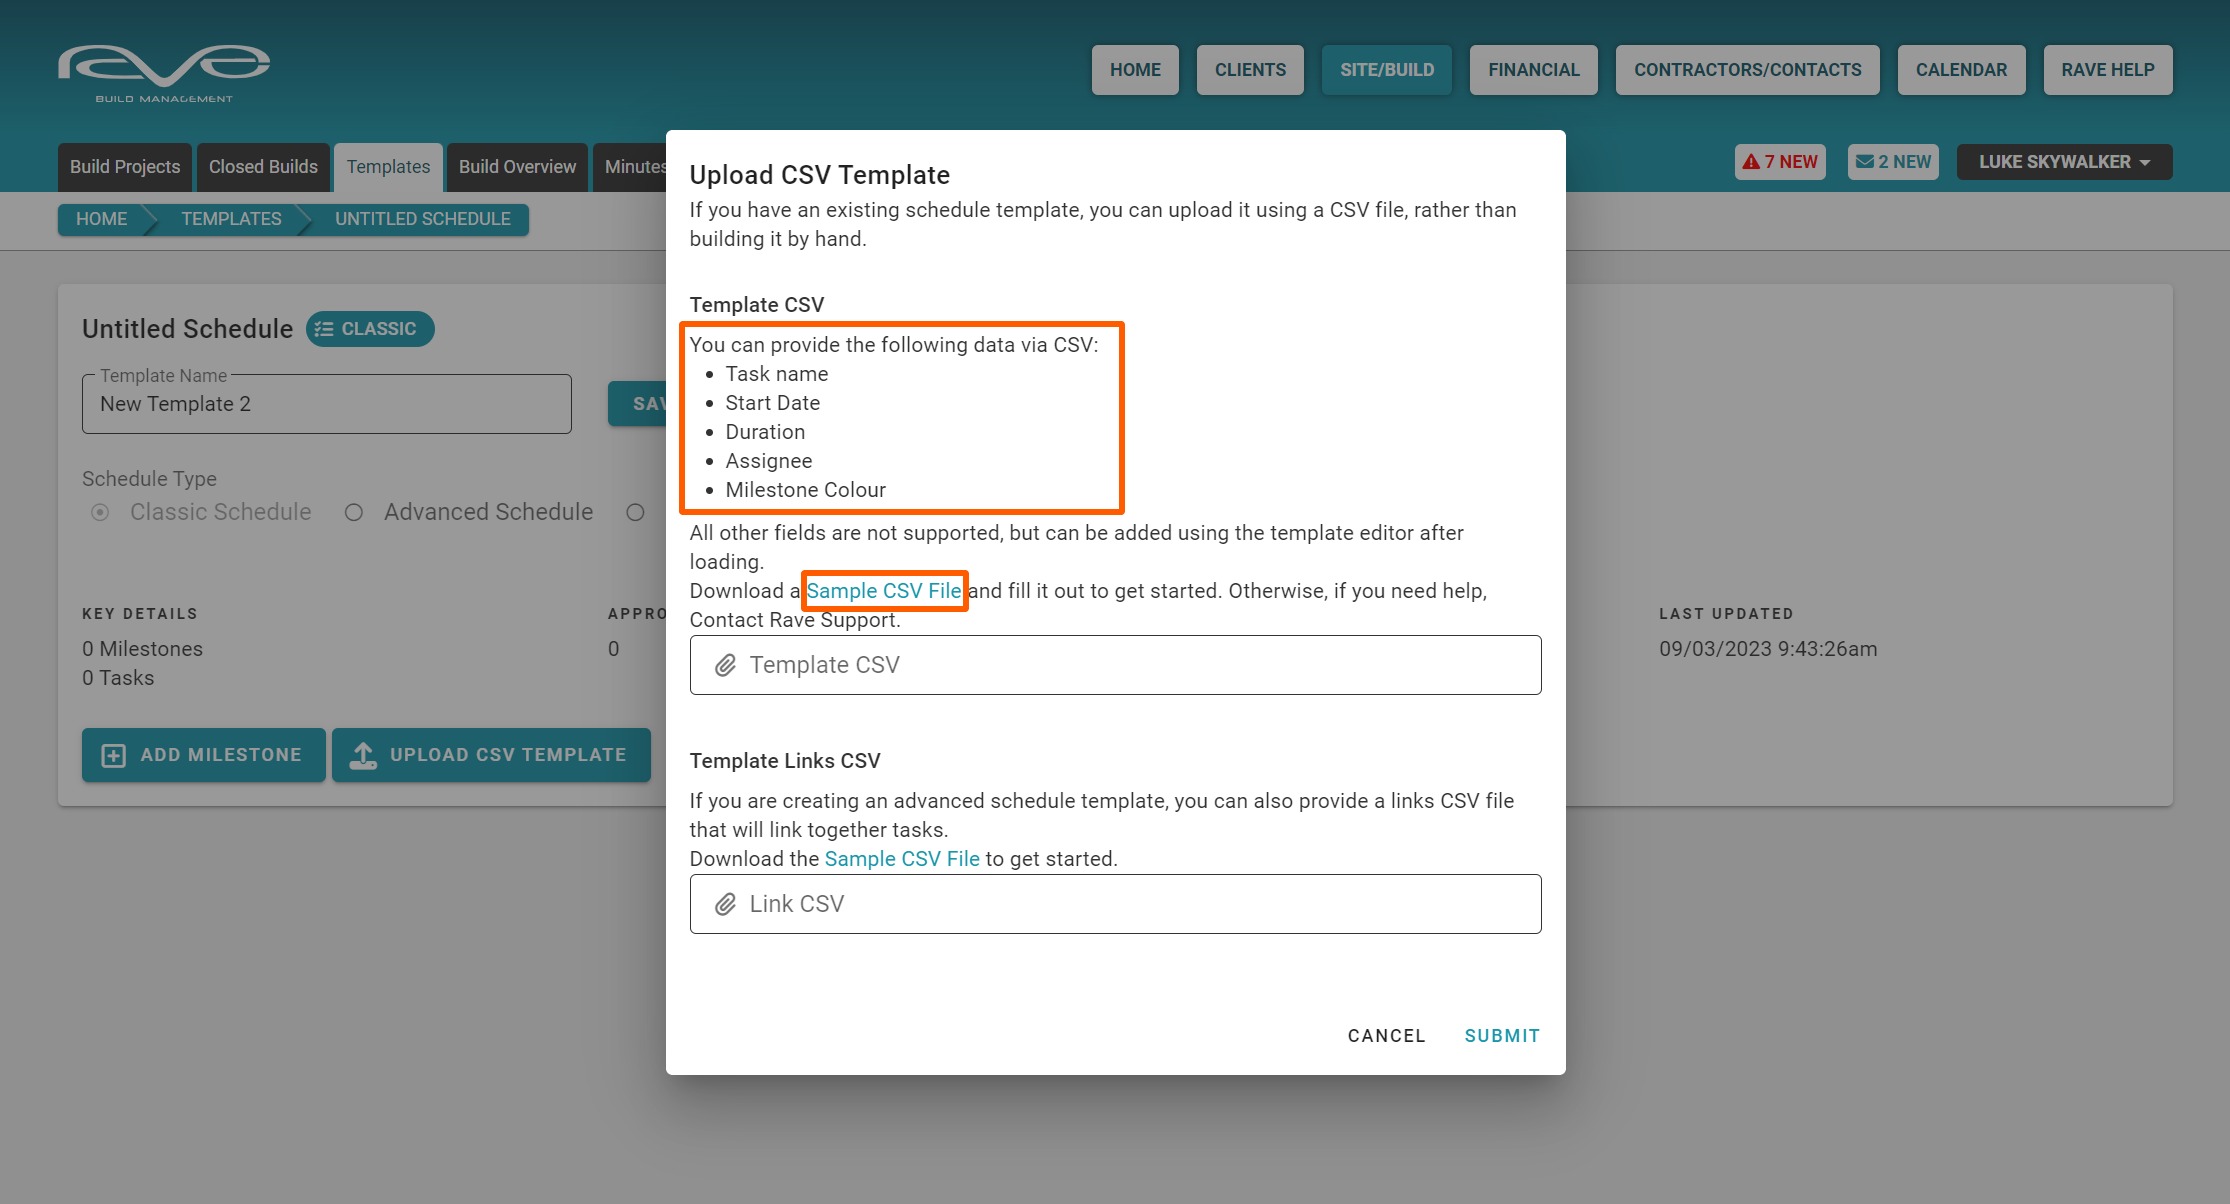
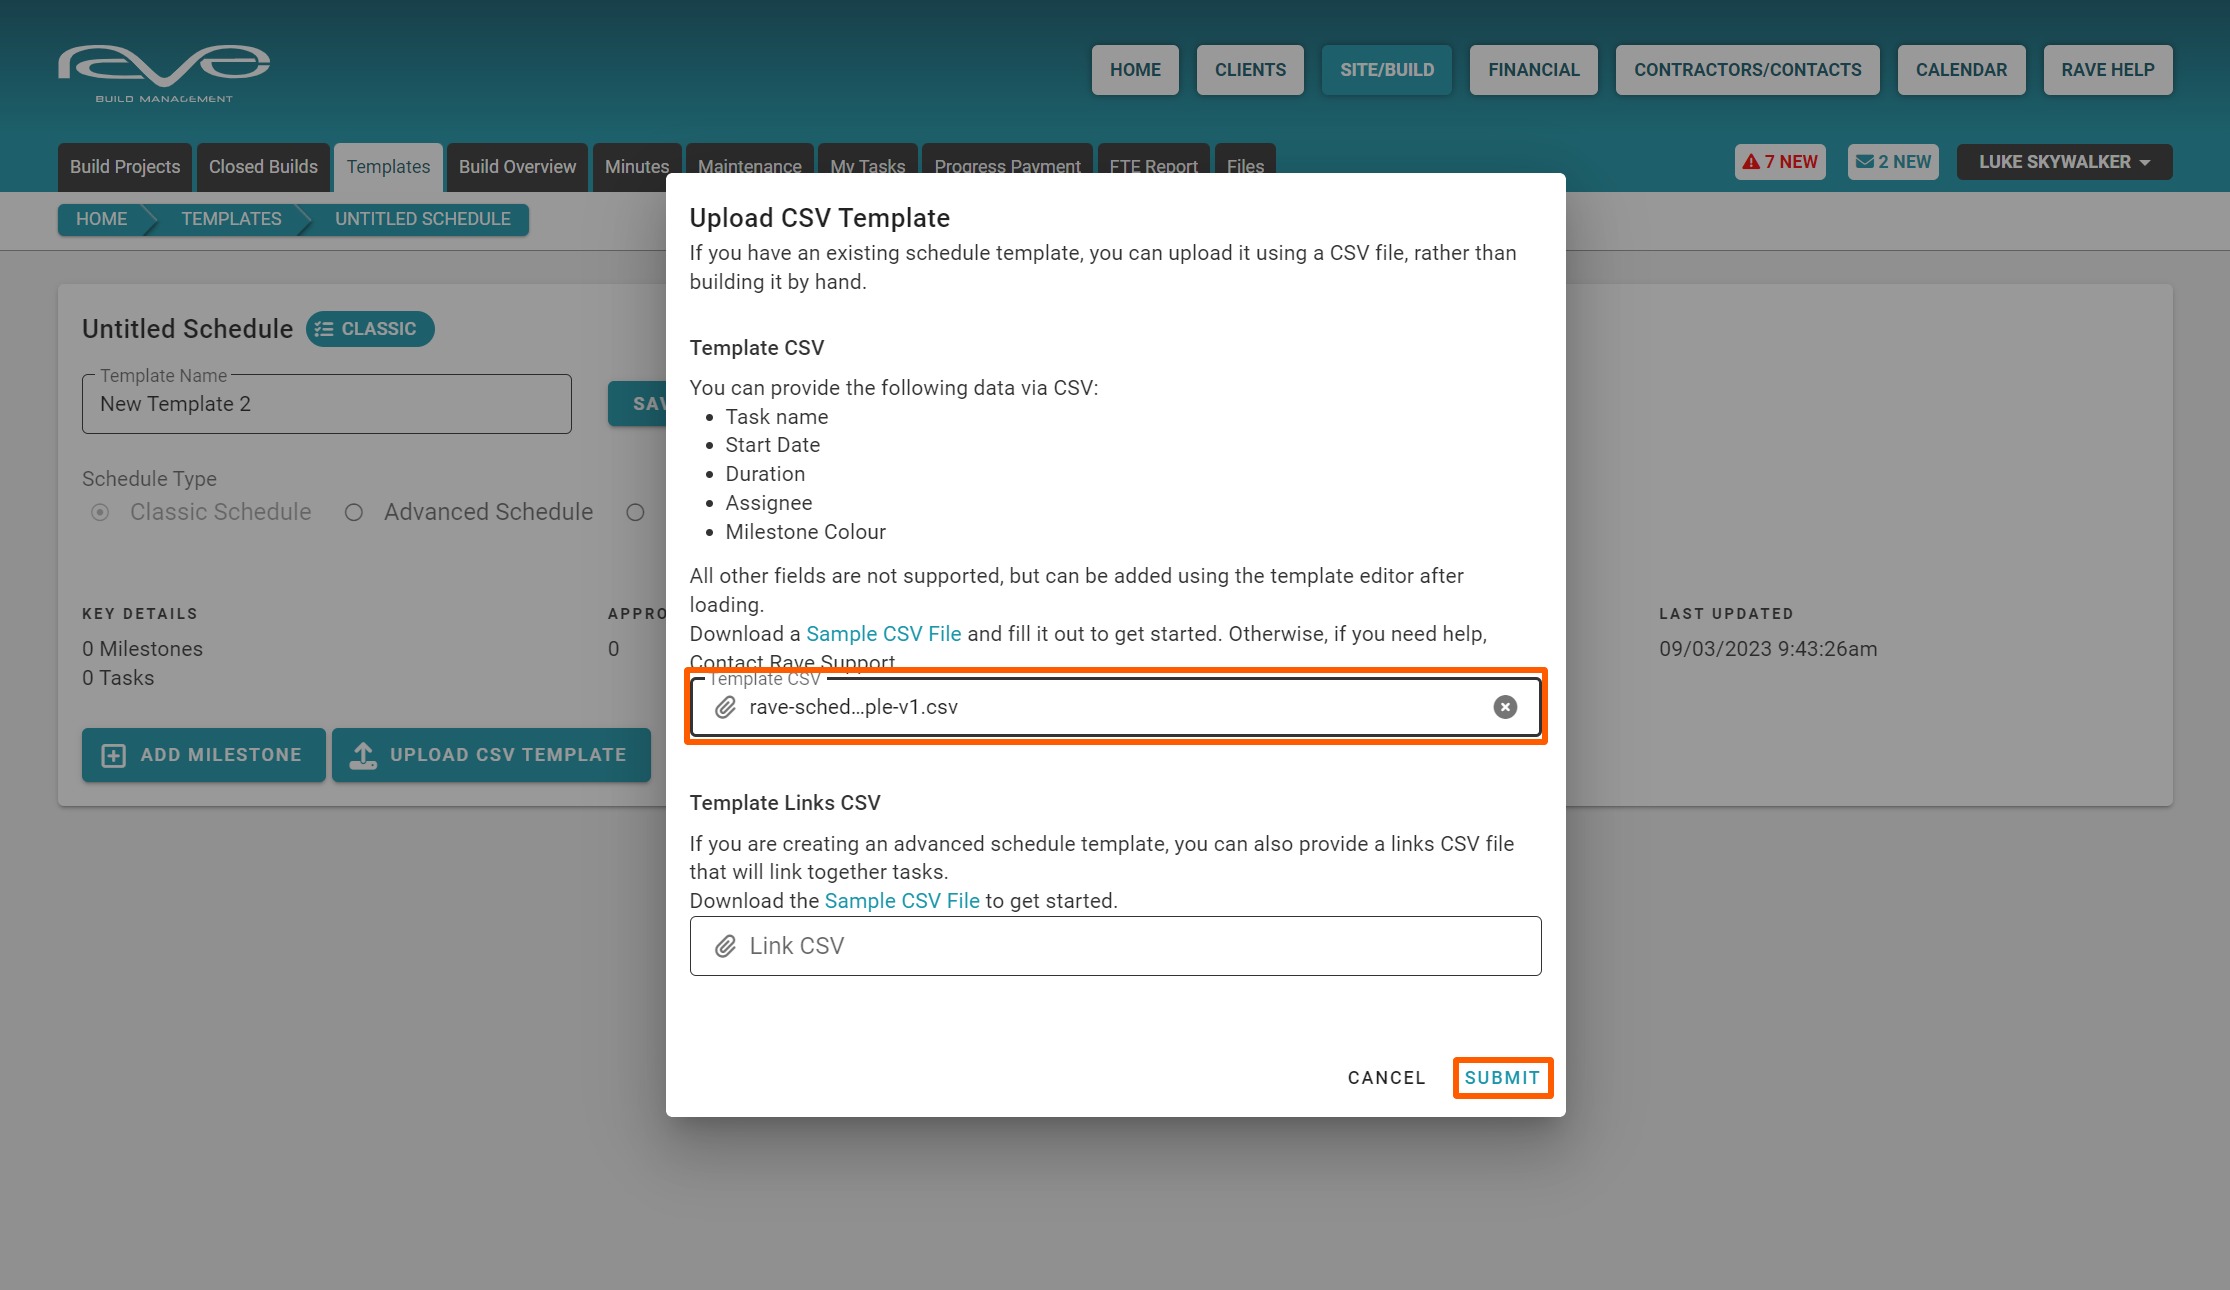
This will launch the ‘Upload CSV Template’ pop-up, detailing what scheduling data is able to be loaded via CSV, with a link to download the 'Sample_CSV_File'- Click on the link to download the 'Sample_CSV_File'
- Then open that file
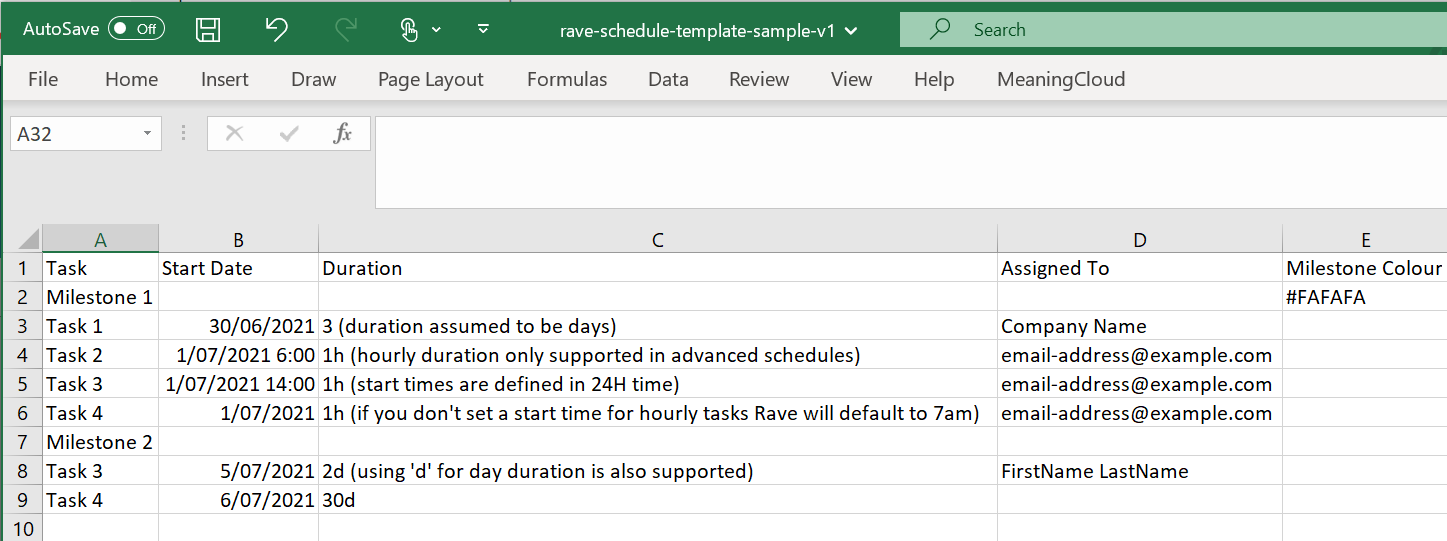
The 'Sample_CSV_File' schedule template, has a very simple and clear layout - displaying- The Task column - where our milestone names and task descriptions go
- The Start Date column - displays a number of acceptable date formatting options
- The Duration column - also displays a number of valid formatting options
Note: The reference to ‘hours’ is only applicable to those with the advanced scheduling module) - The ‘Assigned To’ column - where we can upload the primary assignee for this task
Note: The person or company needs to be in your RAVE system already - The milestone color in 'HEX' format
RAVE Help TIP: Use the 'Sample_CSV_File' as the template to copy and paste your schedule into, and resave for upload.
- Click on the ‘Upload CSV Template’ pop-up's 'Template CSV' field to find your file and select it for upload
- Then click the 'Submit' button to confirm.
- After a few moments, your schedule will load, and the process will complete

Reasons Why your 'Sample_CSV_File' Upload may Fail
If your schedule 'Sample_CSV_File' upload fails, check out the list of potential causes and solutions below:
- Firstly the file needs to be saved as a CSV (plain text comma delimited) file - an excel file will not work.
- Milestone headers must only have a milestone name (column A) and the optional milestone color field completed (column E) i.e. If you add a start date plus a duration to a milestone line, Rave will treat it as a task.
- All tasks need to be listed under a milestone header and each task must have a valid start date, and duration.
- All task assignees must already be in your system - as a staff member, a site manager, a site staff member, or as a contractor (by name, email or company name) Furthermore, the assignee's name must match the format as it appears in RAVE.
NOTE: If all these conditions are not met, your schedule upload will fail, and your RAVE session might time out.
If you have a problem with a failed upload:
- Go back to your CSV template and check that all the conditions above are met. Once you have corrected any data issues, have another go at uploading your CSV.
- If you have checked for data issues, and are still experiencing problems uploading your CSV schedule file, email us on help@ravebuild.co.nz with your CSV file attached for us to check that out for you.