Access this demo here.
We can set the default for our scheduled task change notifications via our branch-wide 'Settings' page (Site|Build/Build Overview/Settings) and then adjust at a project level via our project's schedule ‘Settings’ page.
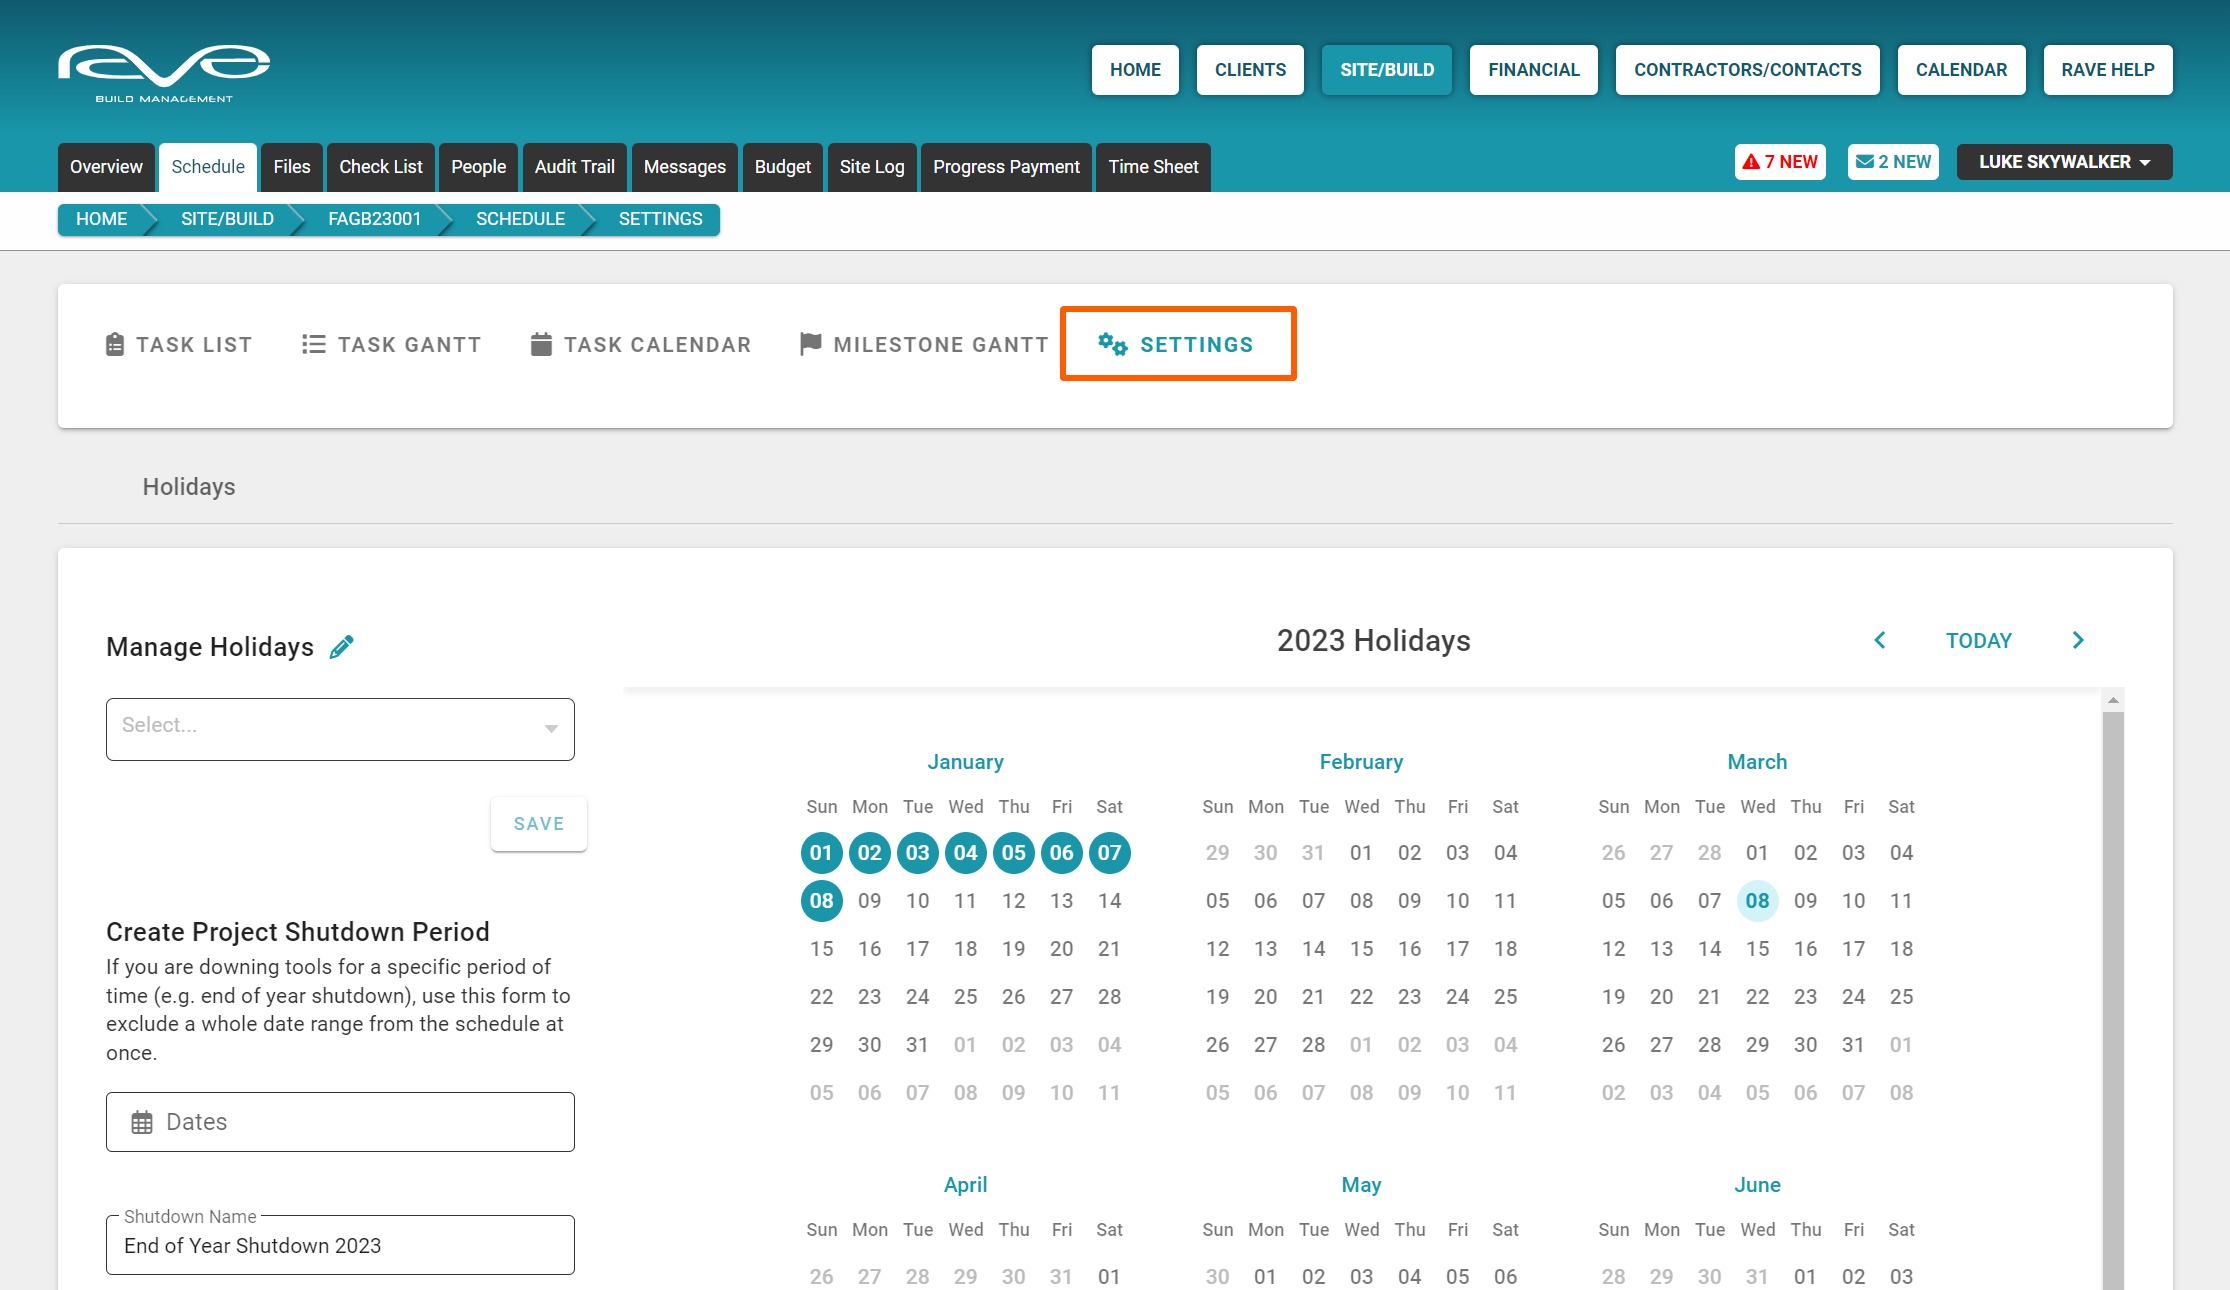
The project ‘Settings’ page is where you can adjust other schedule settings at a project level. On this page, you can:
- Manage your national and regional public holidays
- Block out your Christmas shutdown and other block out periods
- Select working days
- Manage schedule information like contractor date clashes
- And the per project setting for schedule change notifications, either the next day 7am schedule briefing, immediate, or never
- Manage your contractor task sign-off settings - and the Advanced/Enterprise scheduling task acceptance, and propose an alternative start date settings
- Add your contractor task sign-off messaging
- Manage your contractor's schedule access and visibility

- Manage your clients’ access and schedule visibility - if you've decided to give your client access to the project
Note: Client access to the project is not automatic and you do need to create and share a login with your client which we cover that in our client portal setup training tutorial.
- Manage the schedule mode between 'Classic' and the optional add-on's of 'Advanced' and 'Enterprise' scheduling

The 'ALL' Projects' Settings page-Branch owner access via Site|Build /Build Overview/ Settings
Access this demo here.
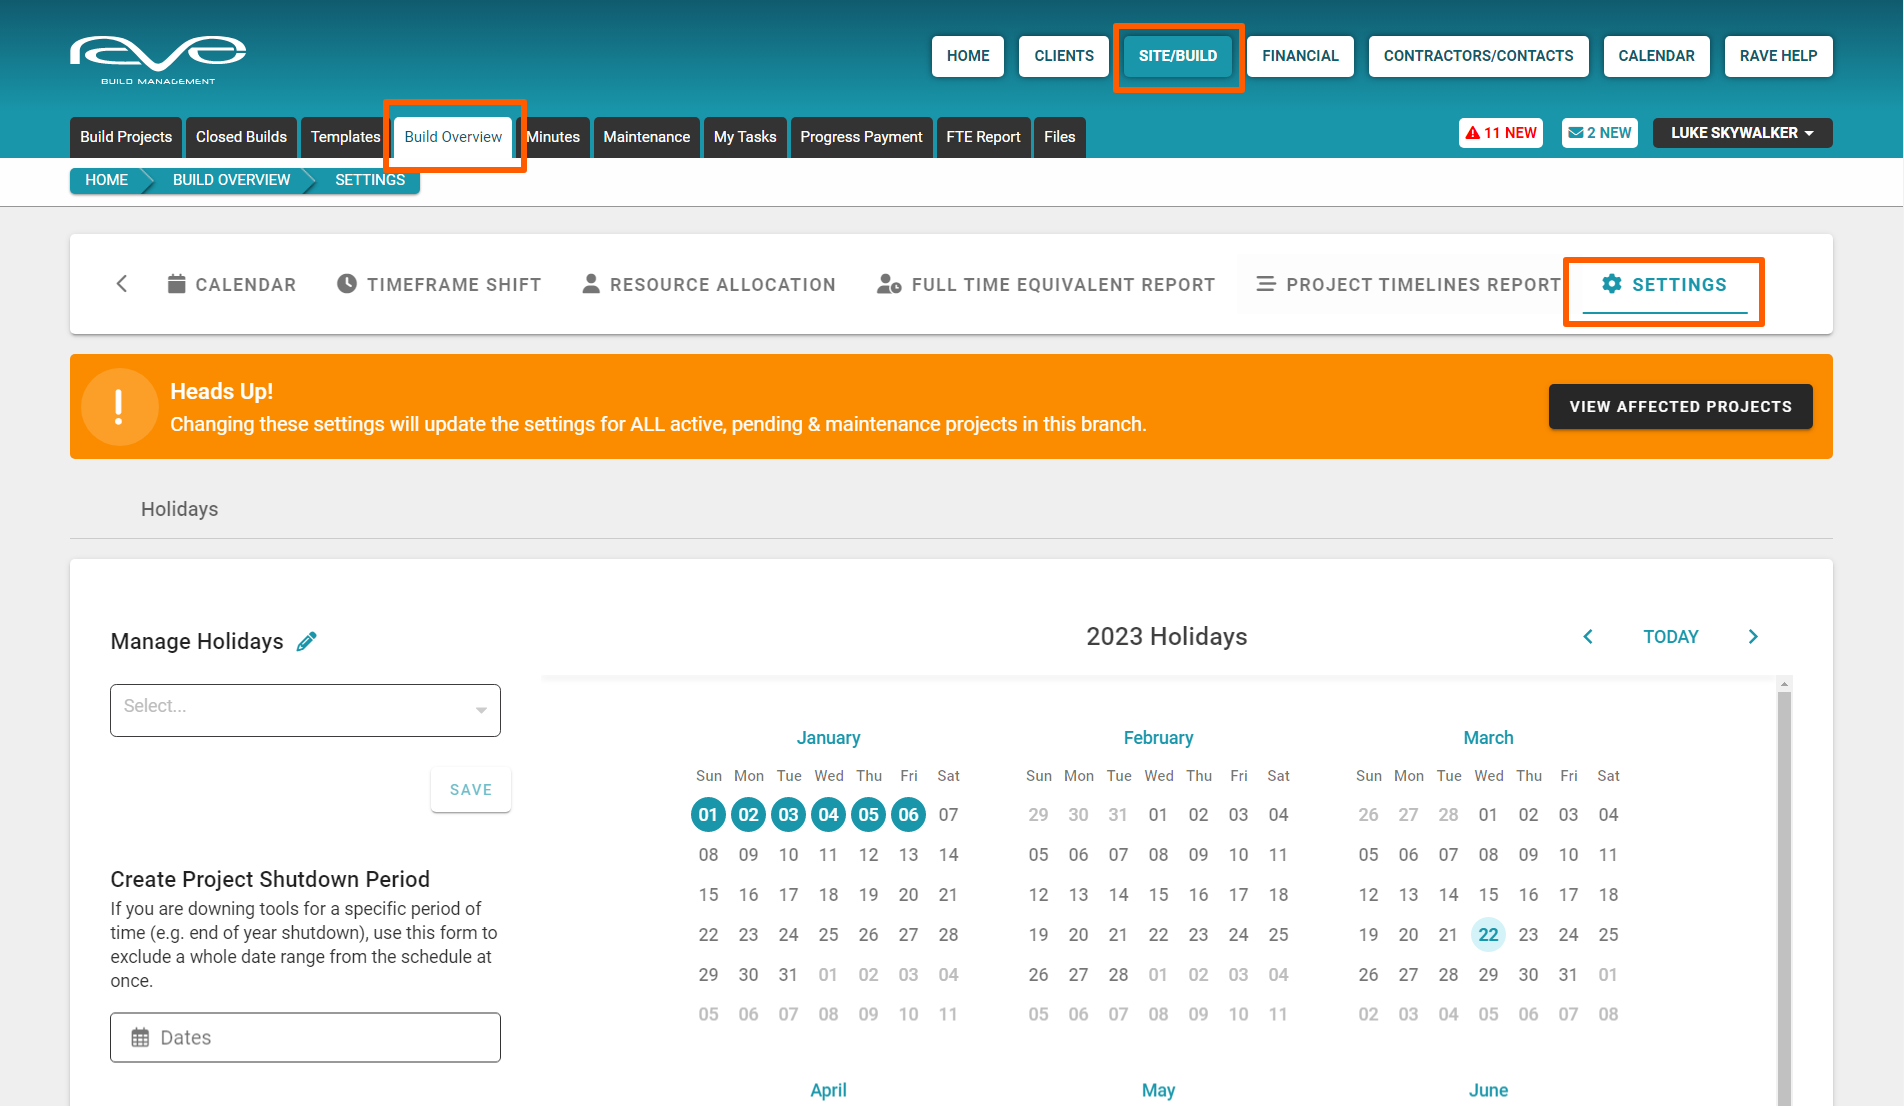
Those with branch owner settings have the ability to view, and change, your default branch-wide schedule settings. The branch-wide schedule settings page is available from the ‘Site|Build / Build Overview / Settings’ sub-tab.
As you can see, the layout for this branch-wide settings page is exactly the same as the per-project settings page, except we have this big orange alert reiterating that changes here will affect ALL of your projects.
This means we have the ability to set our schedule defaults across all projects, and then go into the per-project settings page to adjust the settings at that project level.
Managing your Schedule's Holiday Settings
Adding (managing) national public, regional holidays, and project shutdown/non-work block-out periods are pretty straightforward.
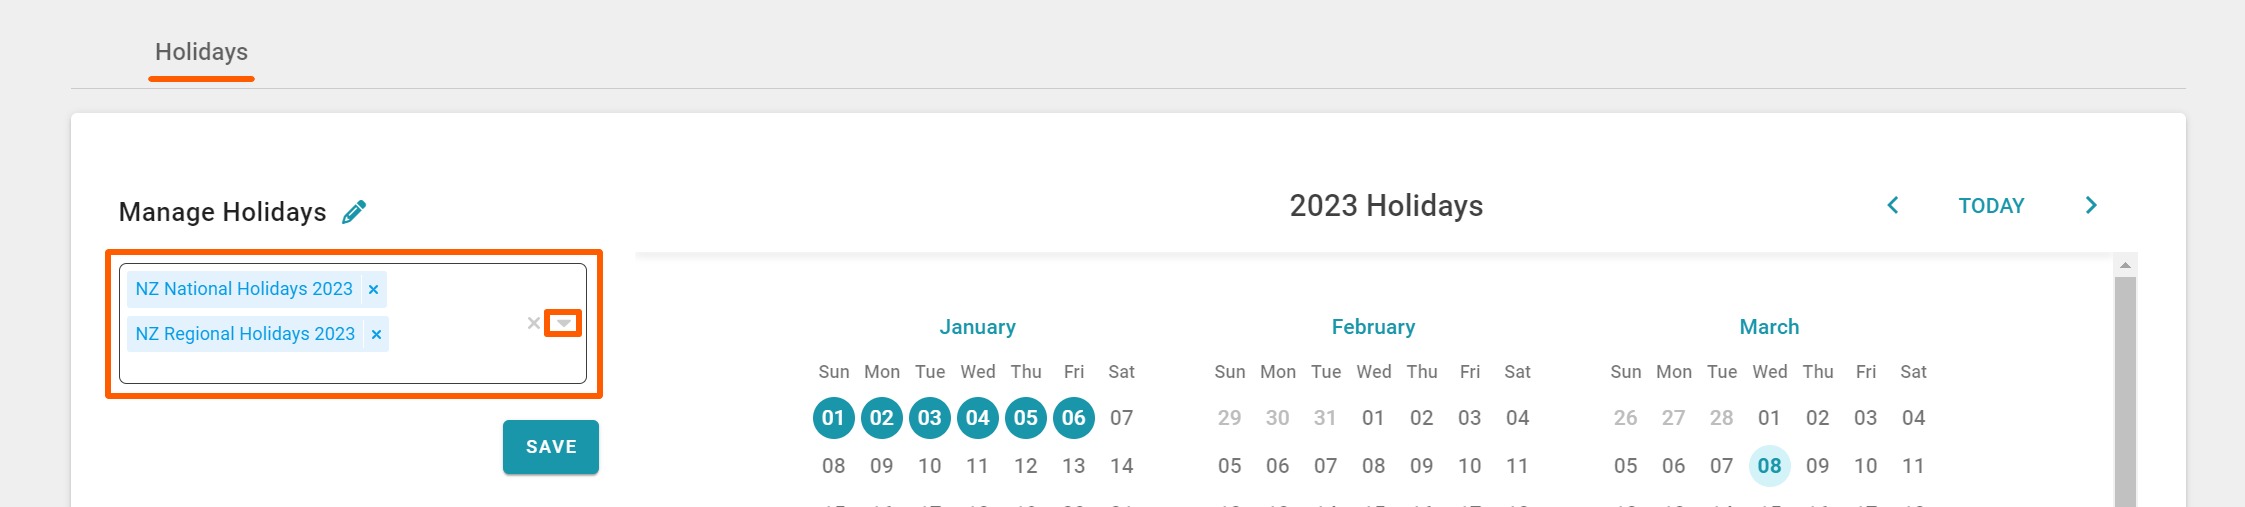
To add national public holidays we:
- Click on the manage holidays drop-down arrow to the top left of the page
- Tick all of the relevant 'NZ National Holidays' checkboxes
- And click the SAVE button to confirm
Note: You can expand the list, to select specific holidays if required, by clicking the expand arrow to the left of each description.
To add a regional holiday we:
- Click on the manage holidays drop-down arrow to the top left of the page
- Expand the required regional holidays list, by clicking the expand arrow to the left of the relevant 'NZ Regional Holidays' checkbox
- Tick all of the relevant 'NZ Regional Holidays' checkboxes
- And click the SAVE button to confirm
Note: Expanding the 'NZ Regional Holidays' listing is necessary - to ensure you do not select all of the regional holidays!
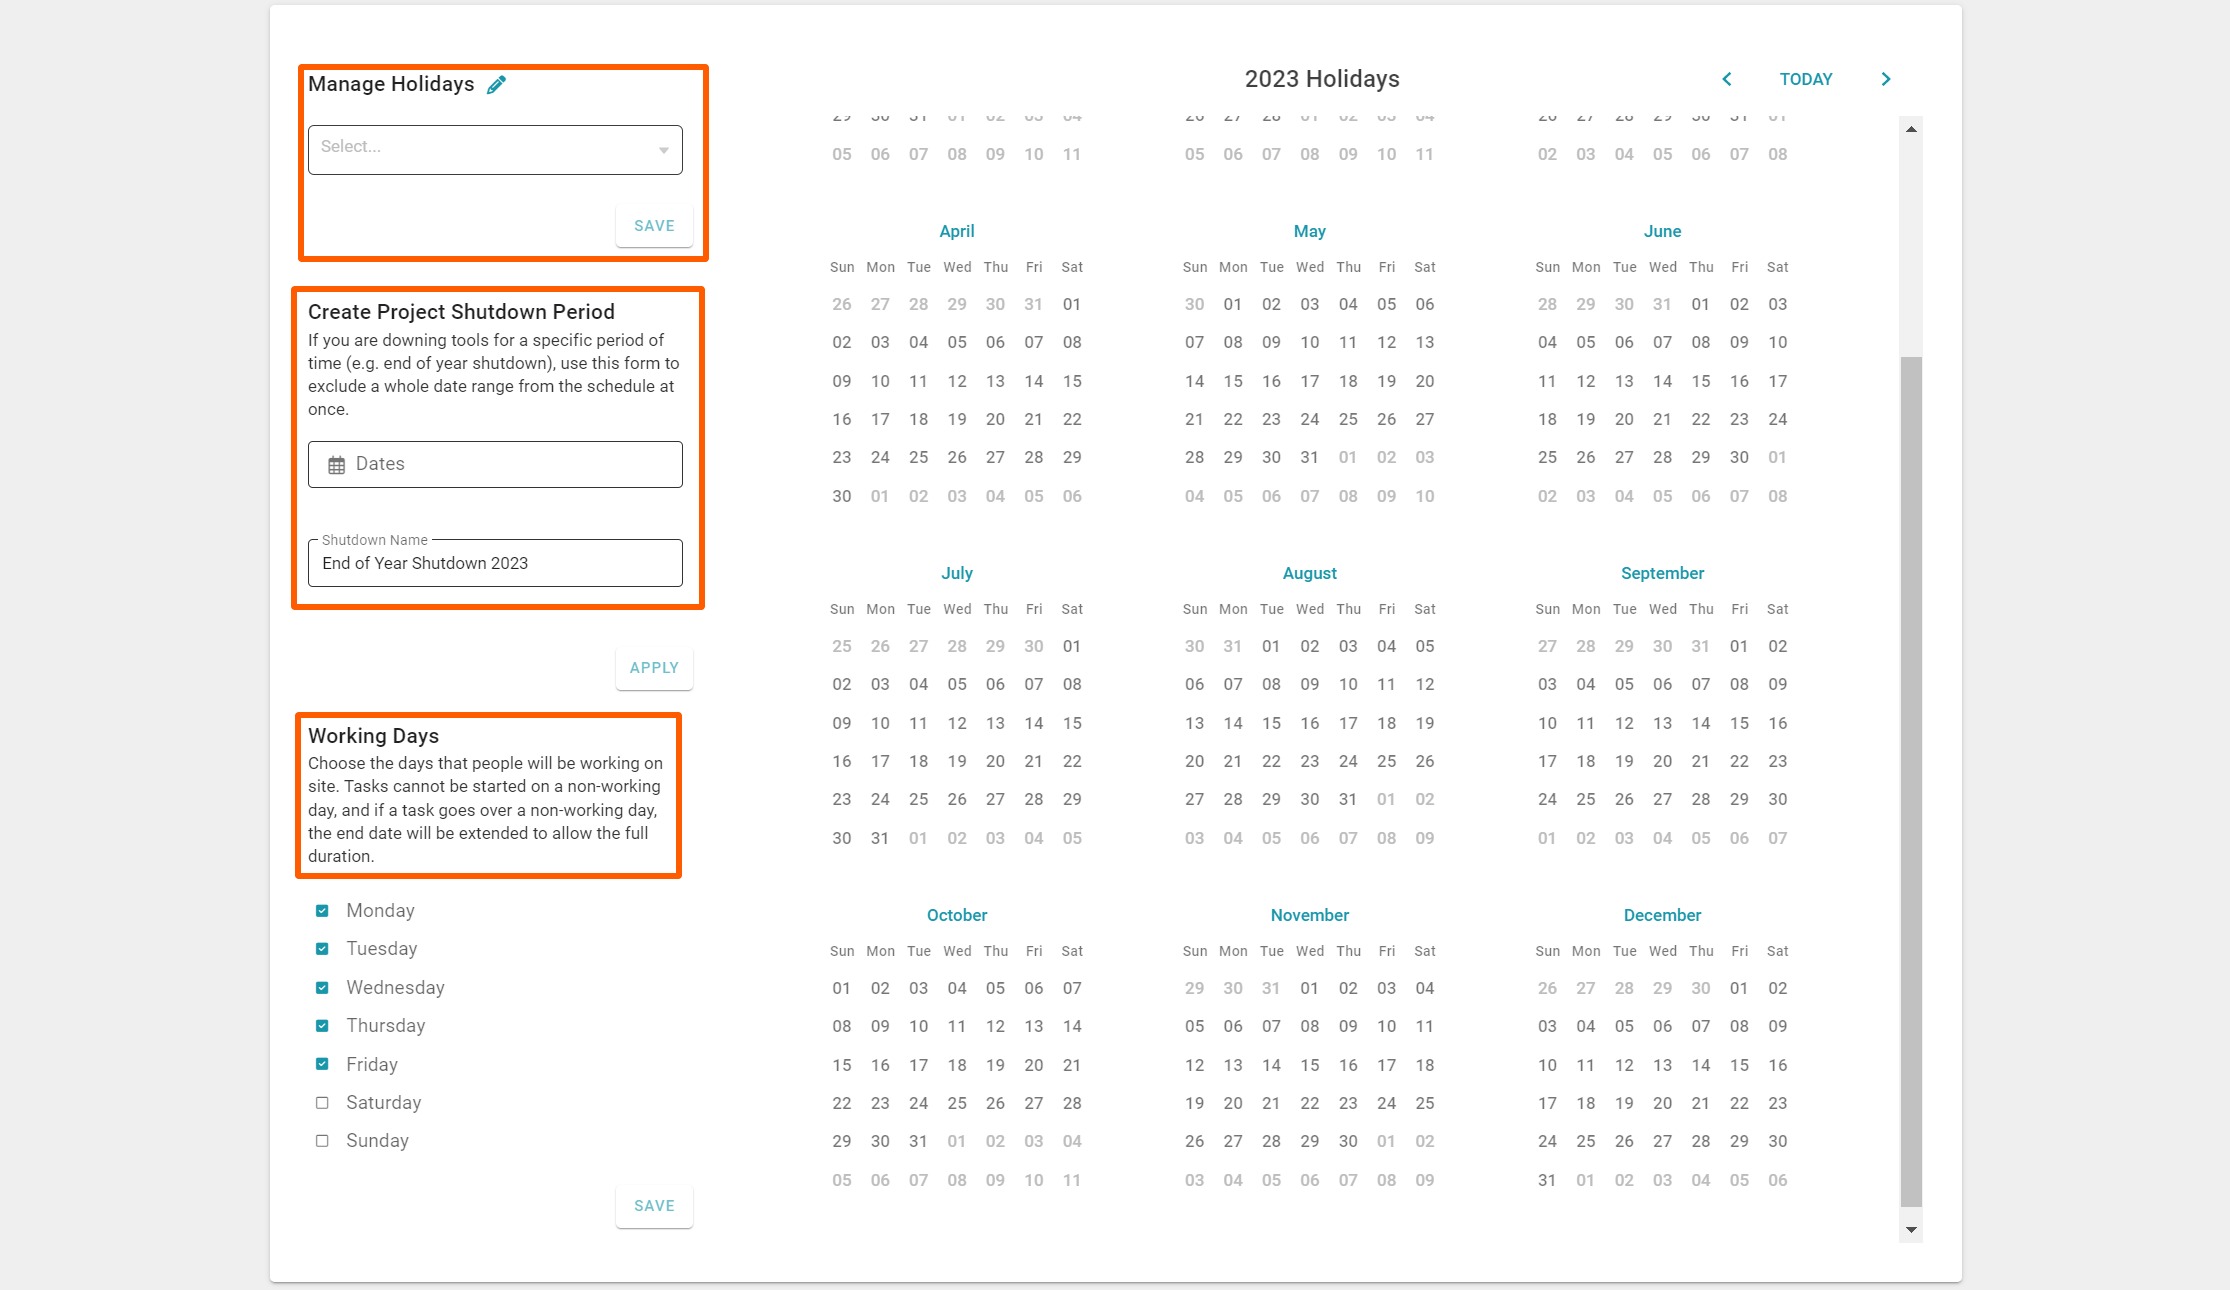
To add a project shutdown/non-work block-out period (i.e. an end of year shut down) we:
- Click on the 'Dates' field below the Create Project Shutdown Period header
- Click on the first non-work date - then move forward to select the last non-work date. This will highlight the selected date range in gold
- Click off the calendar, and type in the shutdown description i.e. End of Year Shutdown 2023
- Then click the 'Apply' button to confirm
With all of the above add holiday steps, it will take a few seconds for the calendar to update - or you may need to manually refresh the screen for it to do so.
Each holiday/non-work day will be highlighted in teal, hovering over any of these will display the description for that non-work day i.e. Anzac Day, End of Year Shutdown 2023, etc
Deleting a holiday/non-work day is also straightforward we:
- Click on the manage holidays pencil to the top left of the page
- From the Manage Holidays pop-up, tick all of the relevant holidays and non-work dates you want to delete
- And click the red 'Delete 'x' Holidays' button (to the bottom right) to confirm your changes
It may take a few seconds for the calendar to update - or you may need to manually refresh the screen for it to do so.

Managing your Schedules' Working Days Settings
Working days with 'Classic' scheduling are automatically set for Monday to Friday, with weekends being non-work days. But with 'Advanced' and 'Enterprise' scheduling, you do have the option of making Saturday and/or Sunday working days within your schedule.

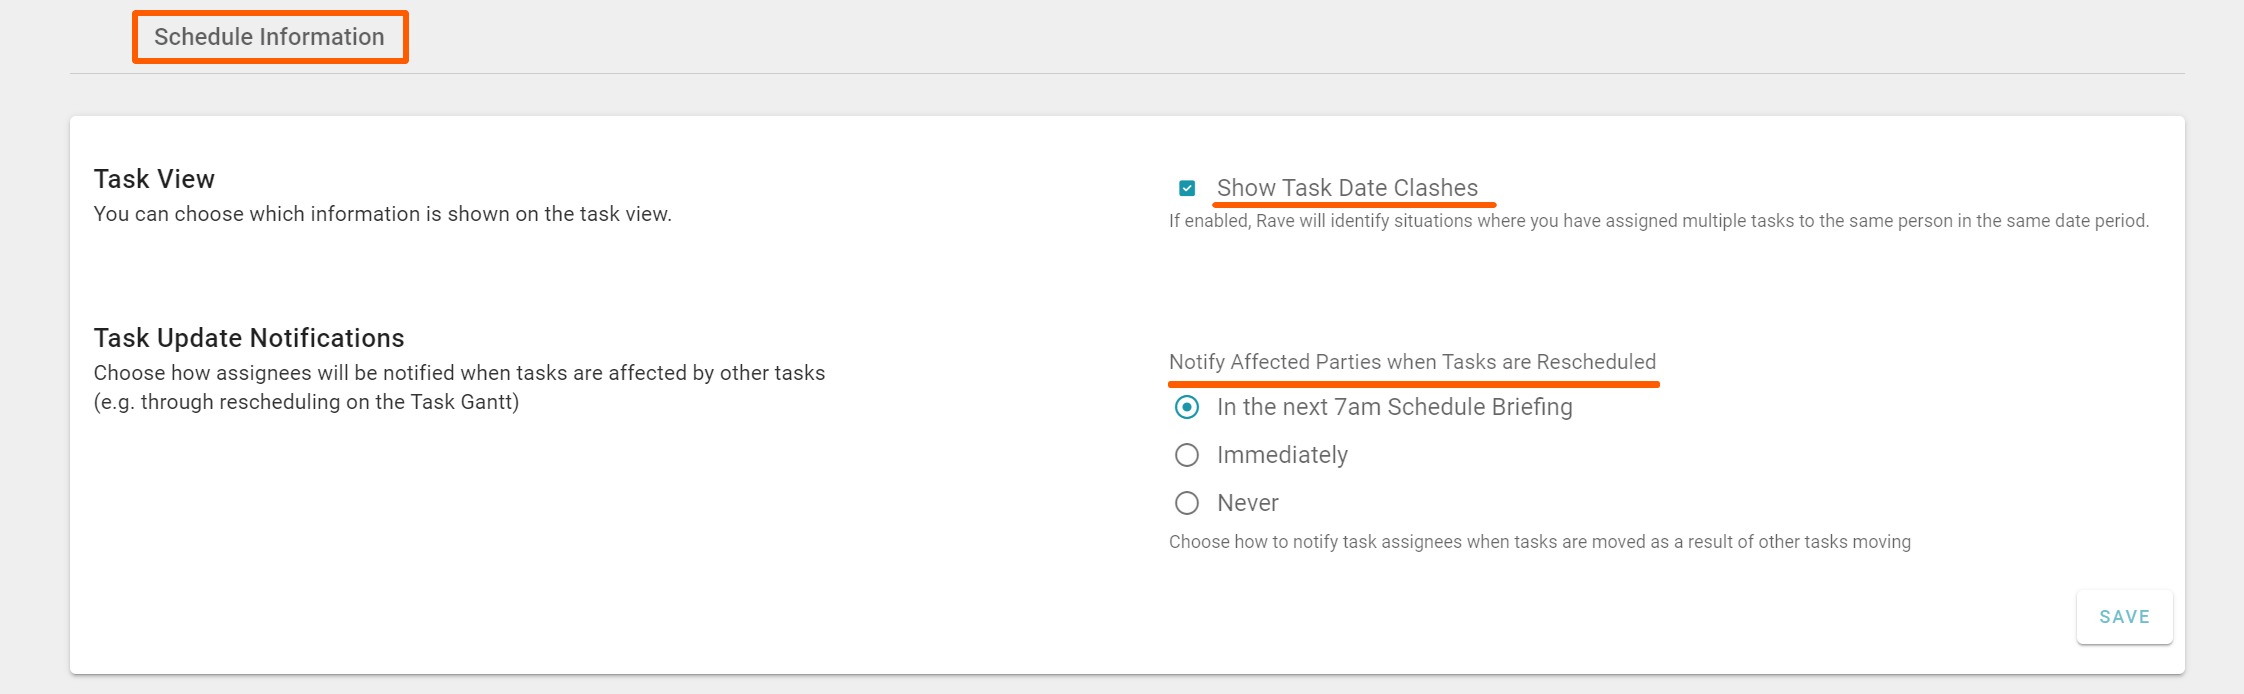
Managing your Schedule Information Settings
You have the ability to set your schedule information defaults across all projects
- The Task View's 'Show Task Date Clashes' tick box lets you know when a contractor has already been assigned to tasks on that date - alerting you that you may need to contact that trade to ensure they are available on the days that you have scheduled them for.
- The ‘Task Update Notifications’ - sets whether a scheduled task start date change notification will go out and when. These can be set to:
- In the next 7am Schedule Briefing - this should be set as your initial branch default
- Immediately - DO NOT set this as your default
- Never - no scheduled task start date change notifications will go out while this is set to never

Managing your Schedules' Contractor Settings
You have the ability to set your contractors' task completion and acceptance process
- The 'Request Sign-Off on Tasks' process, allows contractors to tell you that they have completed their assigned tasks. If this check box is not ticked, your contractors will not be able to let you know that they have completed their task, and you will not receive those notifications.
- The ‘Accept or Decline Tasks’ and ‘Propose New Start Dates’ are 'Advanced' and 'Enterprise' scheduling features, allowing your trades to confirm the days that you have booked them in for, to decline their availability to complete a task, and/or to let you know what days they are available to complete a task.
- The ‘Task Contractor Messages’ allows you to customize the messages shown to contractors when they accept or request sign-off of tasks. This can be used to remind contractors of health and safety requirements or other relevant information.
- The ‘Contractor Access’ section allows you to choose which parts of the schedule, if any you want your contractors to see. We've two switches here, the first switch allows you to control whether contractors can see other task assignees, and the second is whether you want to notify contractors when you have marked their assigned tasks off as completed.

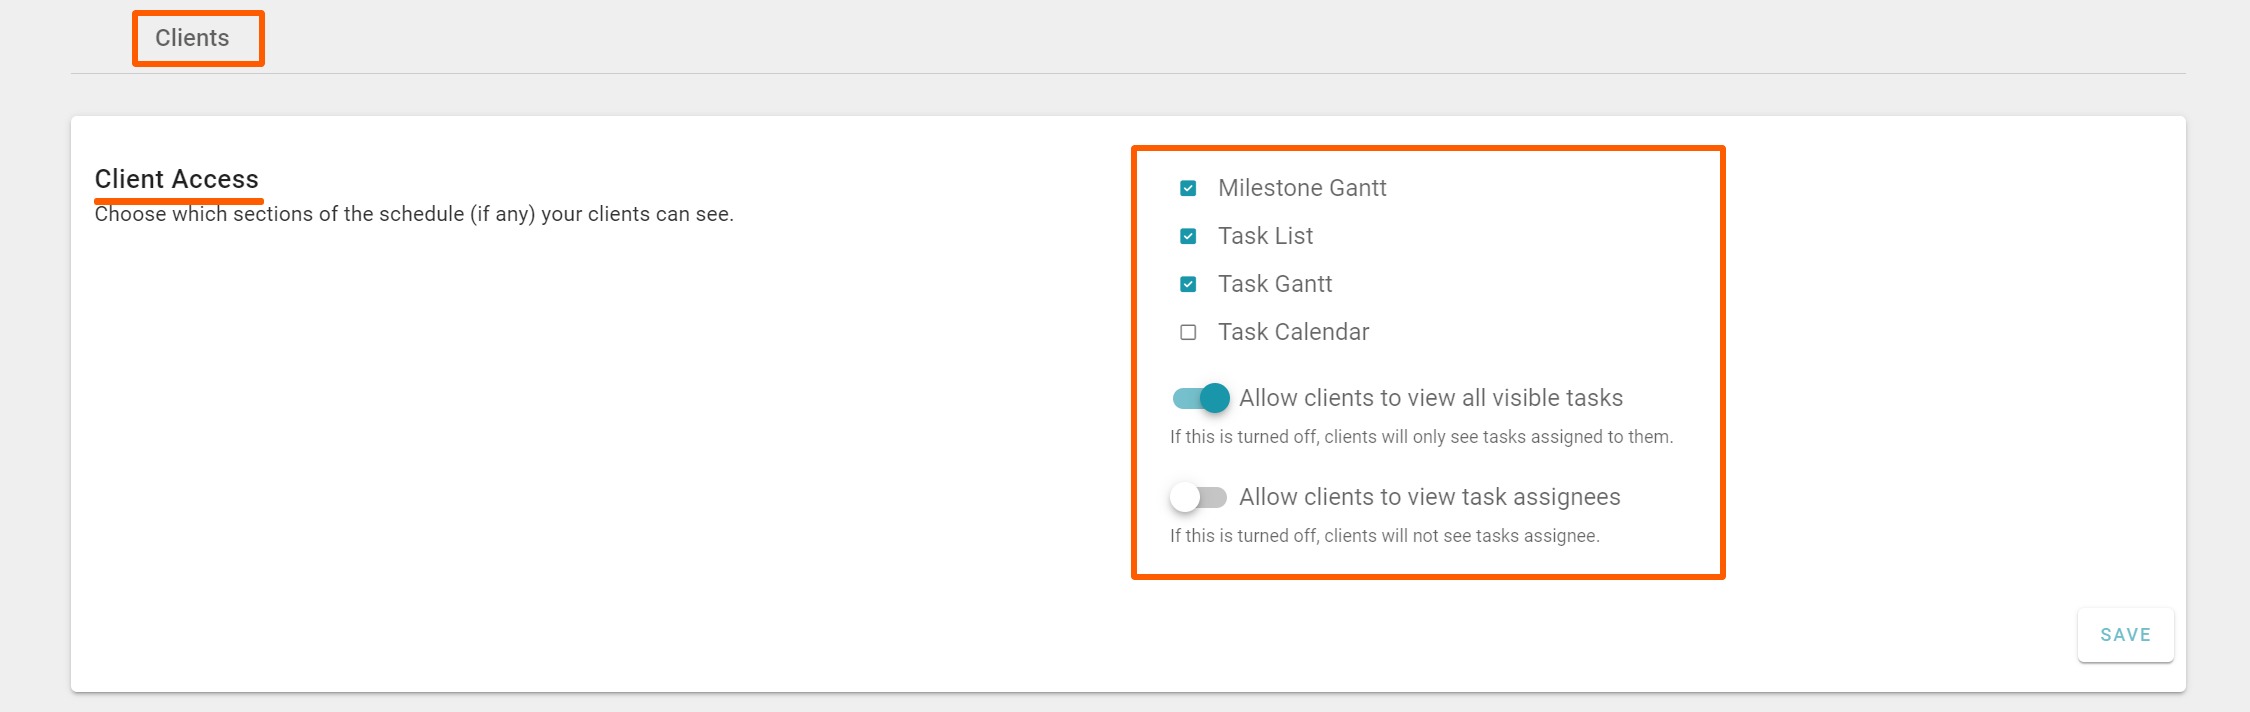
Managing your Clients' Schedule Access Settings
Client access to your projects is only possible if you have set them up with a client login - and have given it to them! For those clients that you have given project access to, you have the ability to set your clients level of schedule access:
- Firstly, you have the ability to turn on up to 4 different schedule views:
- Milestone Gantt view - the top-level milestone-only view - generally, this is the best view to give your clients to provide schedule access, with minimal detail
- Task List view
- Task Gantt view
- Task Calendar view
- The following switches only become available if you've given your client access to one of the three 'task views' above
- The 'Allow clients to view all visible tasks' switch allows your client to see other visible tasks in the schedule i.e. other tasks that they are not assigned to
- The 'Allow clients to view task assignees' switch allows your client to also see the primary task assignee i.e. the contractor assigned to the task
NOTE: Client schedule access via the Build Overview/Settings page will become the default across all of your projects. Therefore, it is generally best (safer) to NOT tick any Client schedule Access options here, and instead manage this at the per-project level.

Managing your Projects' Schedule Mode Settings
This section is only relevant if you have the optional 'Advanced' or 'Enterprise' scheduling module - which we go through in detail, in our 'Advanced' and 'Enterprise' Schedule training.
Otherwise, the default scheduling mode for our 'Classic' schedule clients is 'Classic Scheduling' - where you can move:
- This single task
- This task + all future milestone tasks
- This task + all future scheduled tasks
NOTE: RAVE's add-on Advanced Scheduling
Introduces hourly durations, and task linking (with predecessors/successors) to provide more granular control over your scheduling. The Advanced scheduling mode is primarily for maintenance companies who want task linking, and need to schedule by the hour.
NOTE: RAVE's add-on Enterprise Scheduling
Includes task linking (predecessors/successors) and the use of constraints (i.e. must start on) to provide complete control over your scheduling. The Enterprise scheduling mode is primarily for building companies who want to have greater control of their scheduling, or who have used the likes of Microsoft projects, and/or the far more expensive overseas scheduling software.
