Access this demo here.
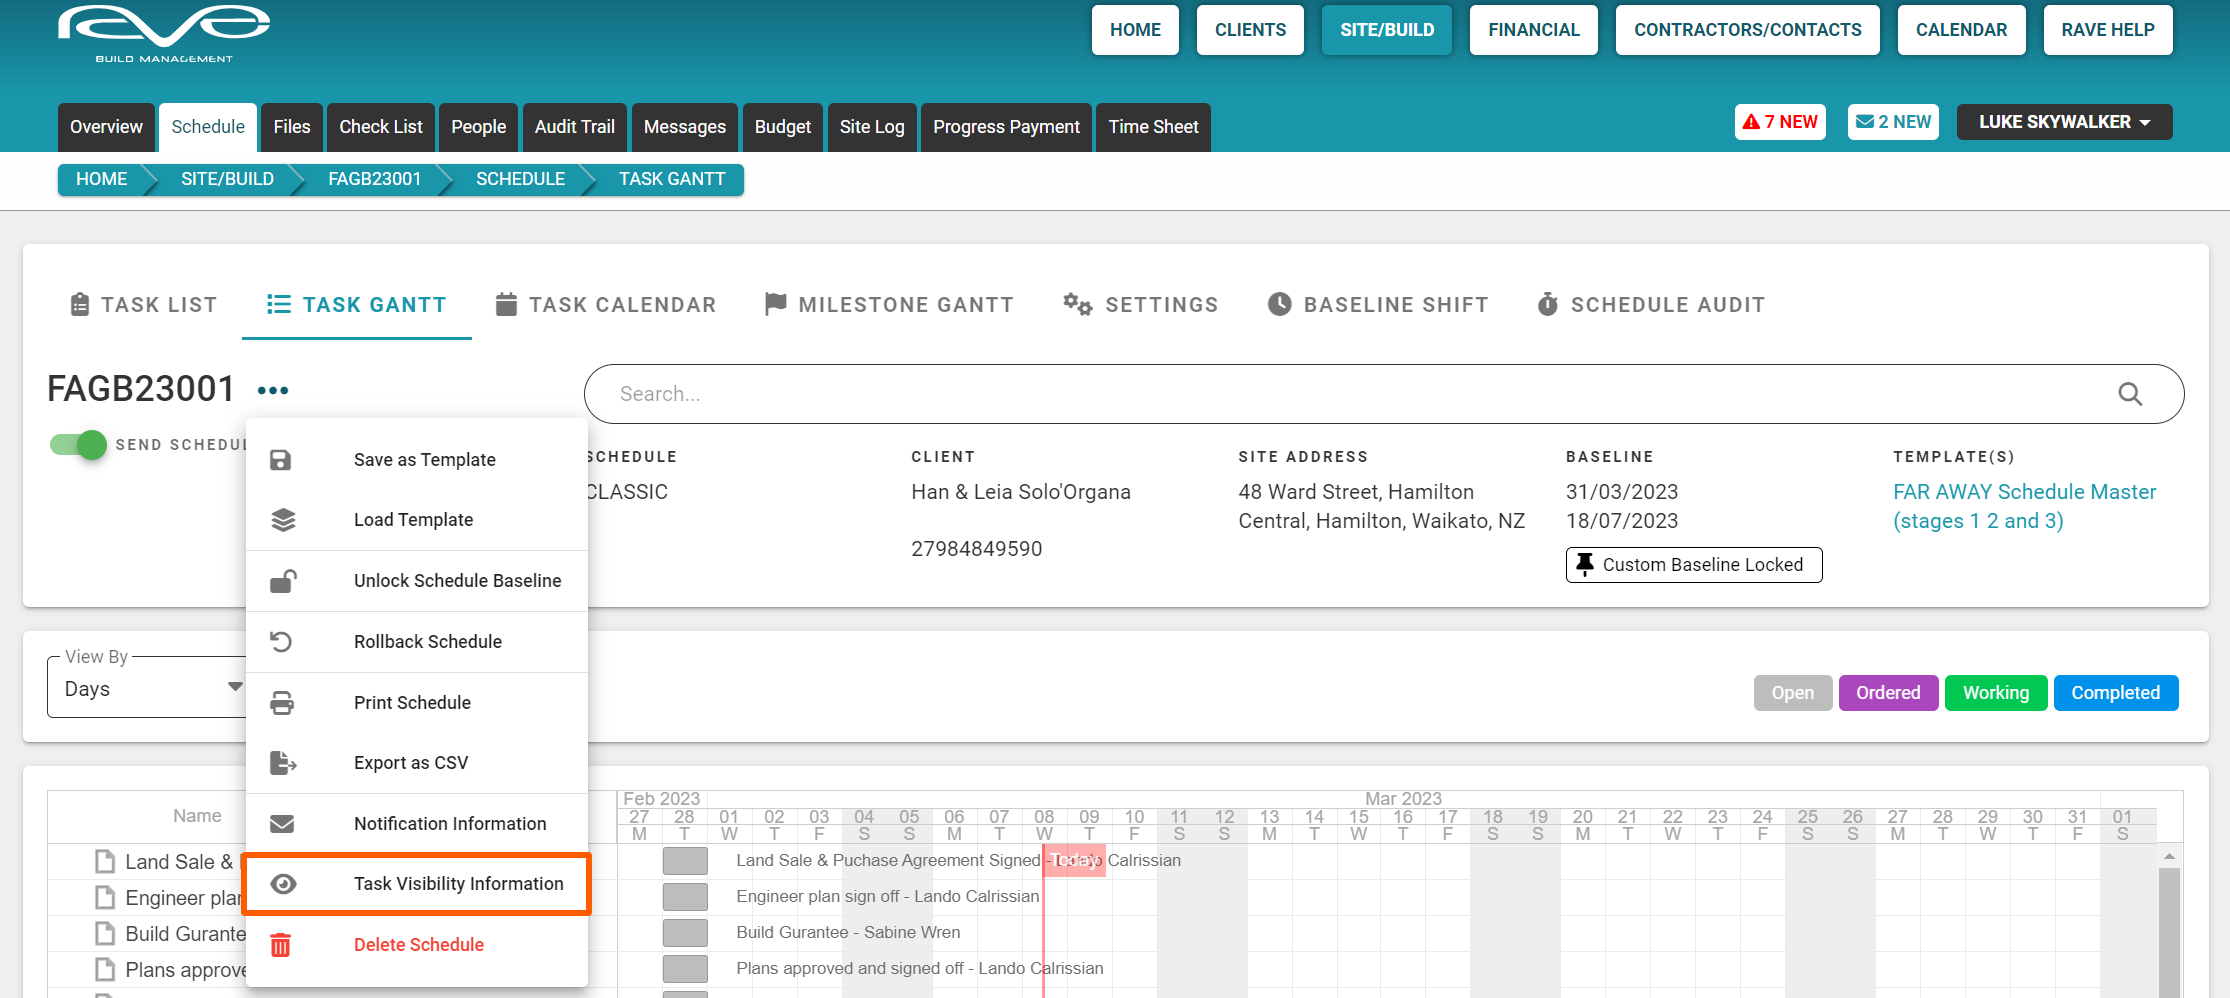
The schedule action drop-down menu (the meatballs icon to the right of the job number via the Task List view) is where we can access a number of actions to manage our schedule. We have already seen how you can 'Add a Milestone' and 'Load a schedule Template' - so let's continue down the list and review the other actions.
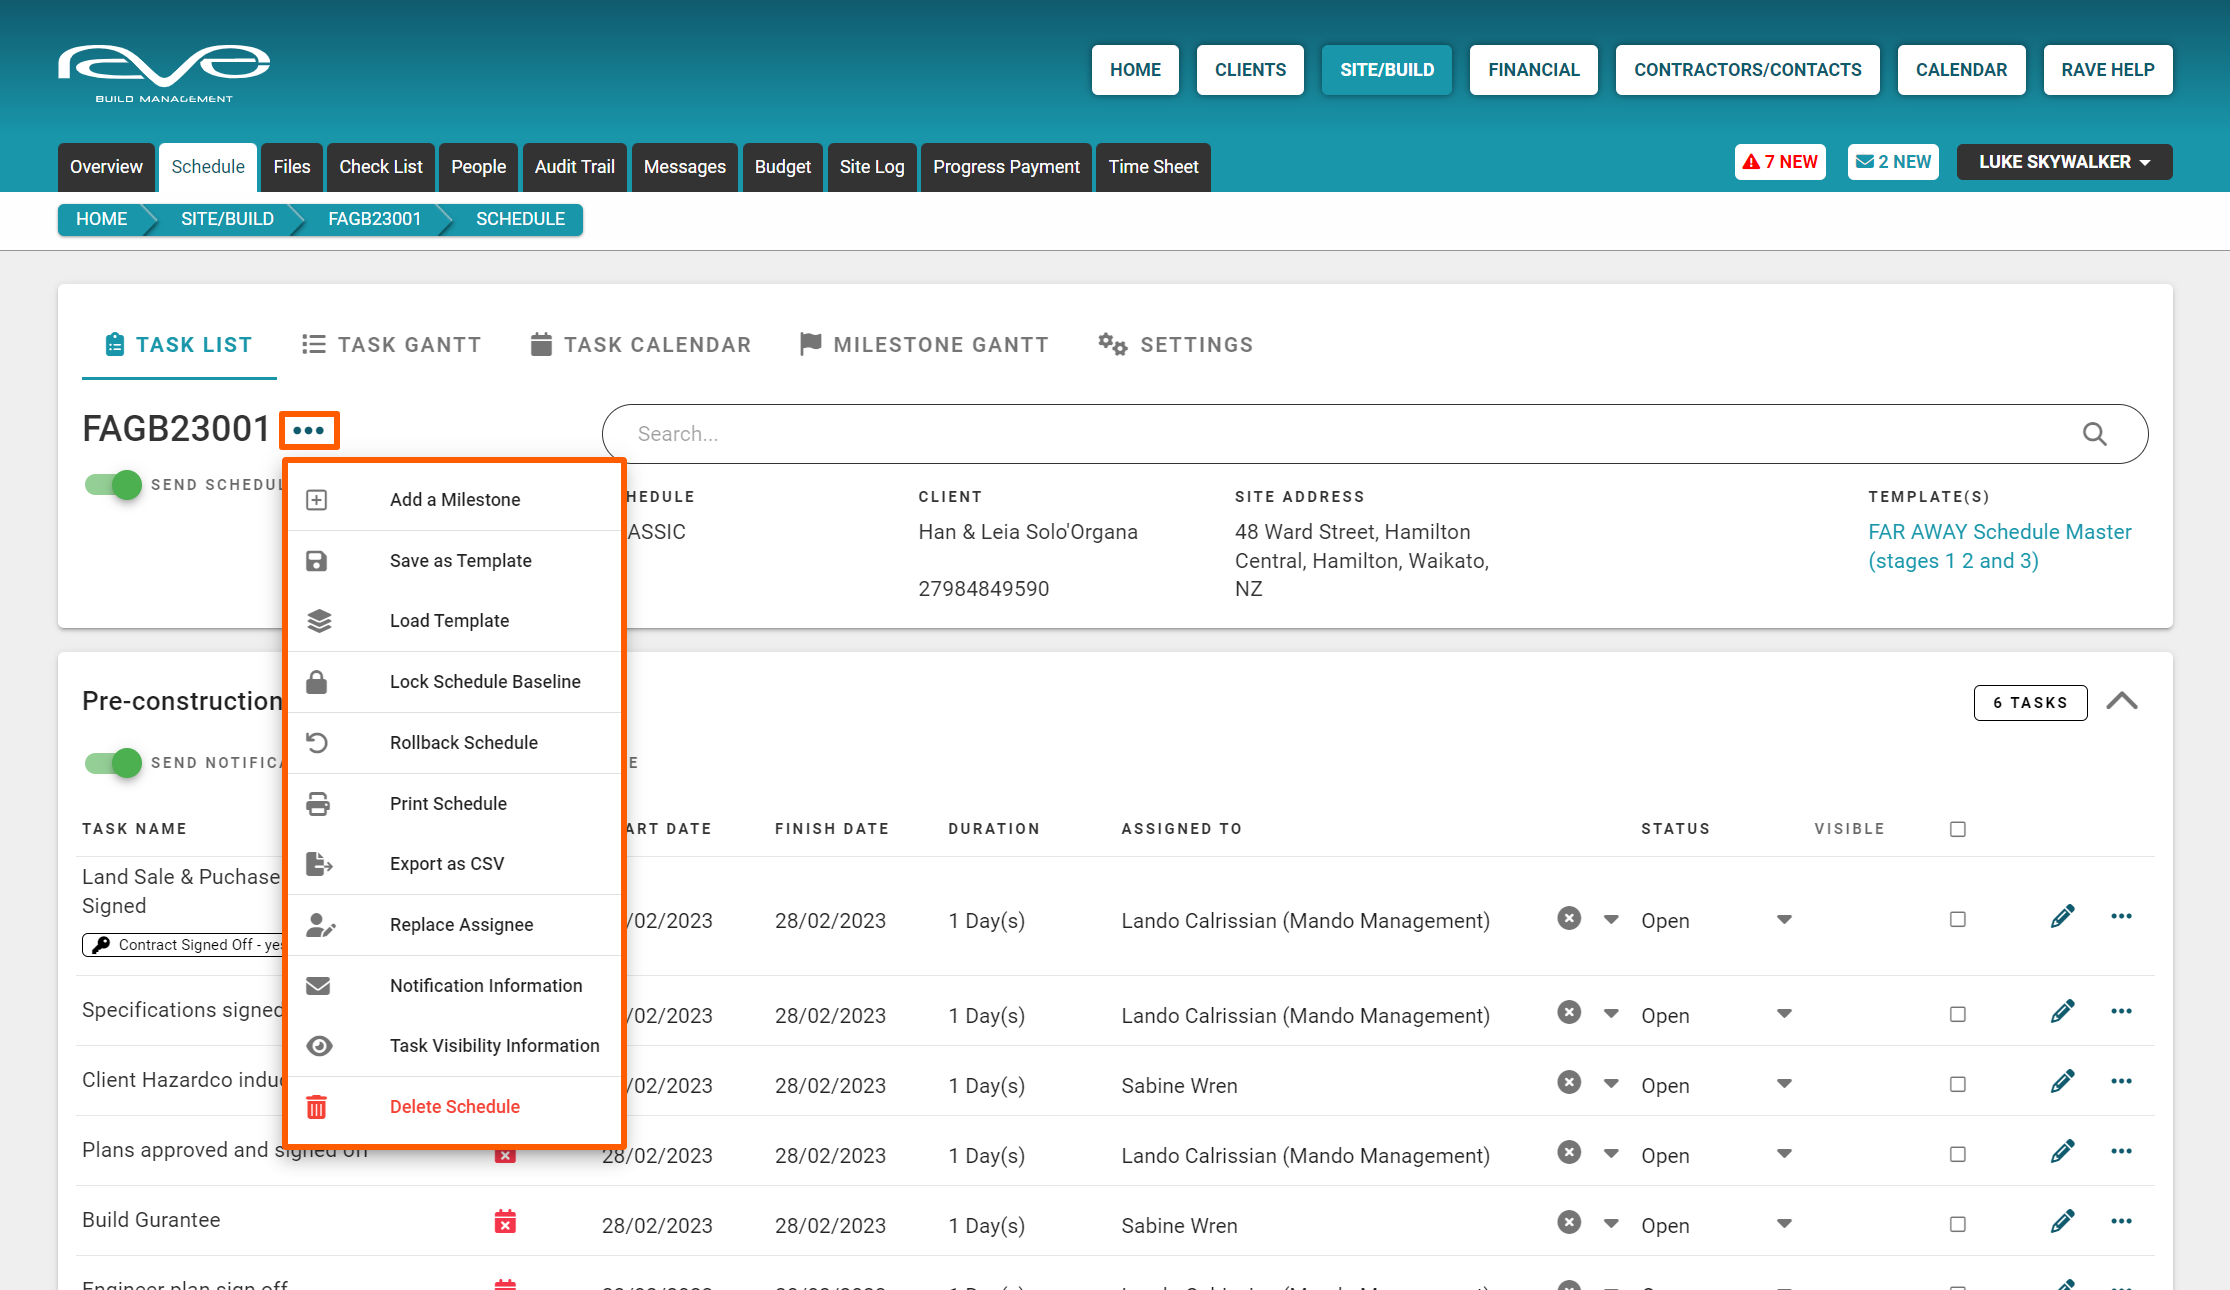
The Lock the Schedule Baseline Action
The ‘Schedule Baseline’ allows you to better track your schedule changes. Once the schedule baseline is locked, every schedule change requires a reason for the change - which can be reviewed later.
You can either set the whole schedule as a baseline, or you can select specific start and finish tasks, to track variances for a specific range of your schedule.


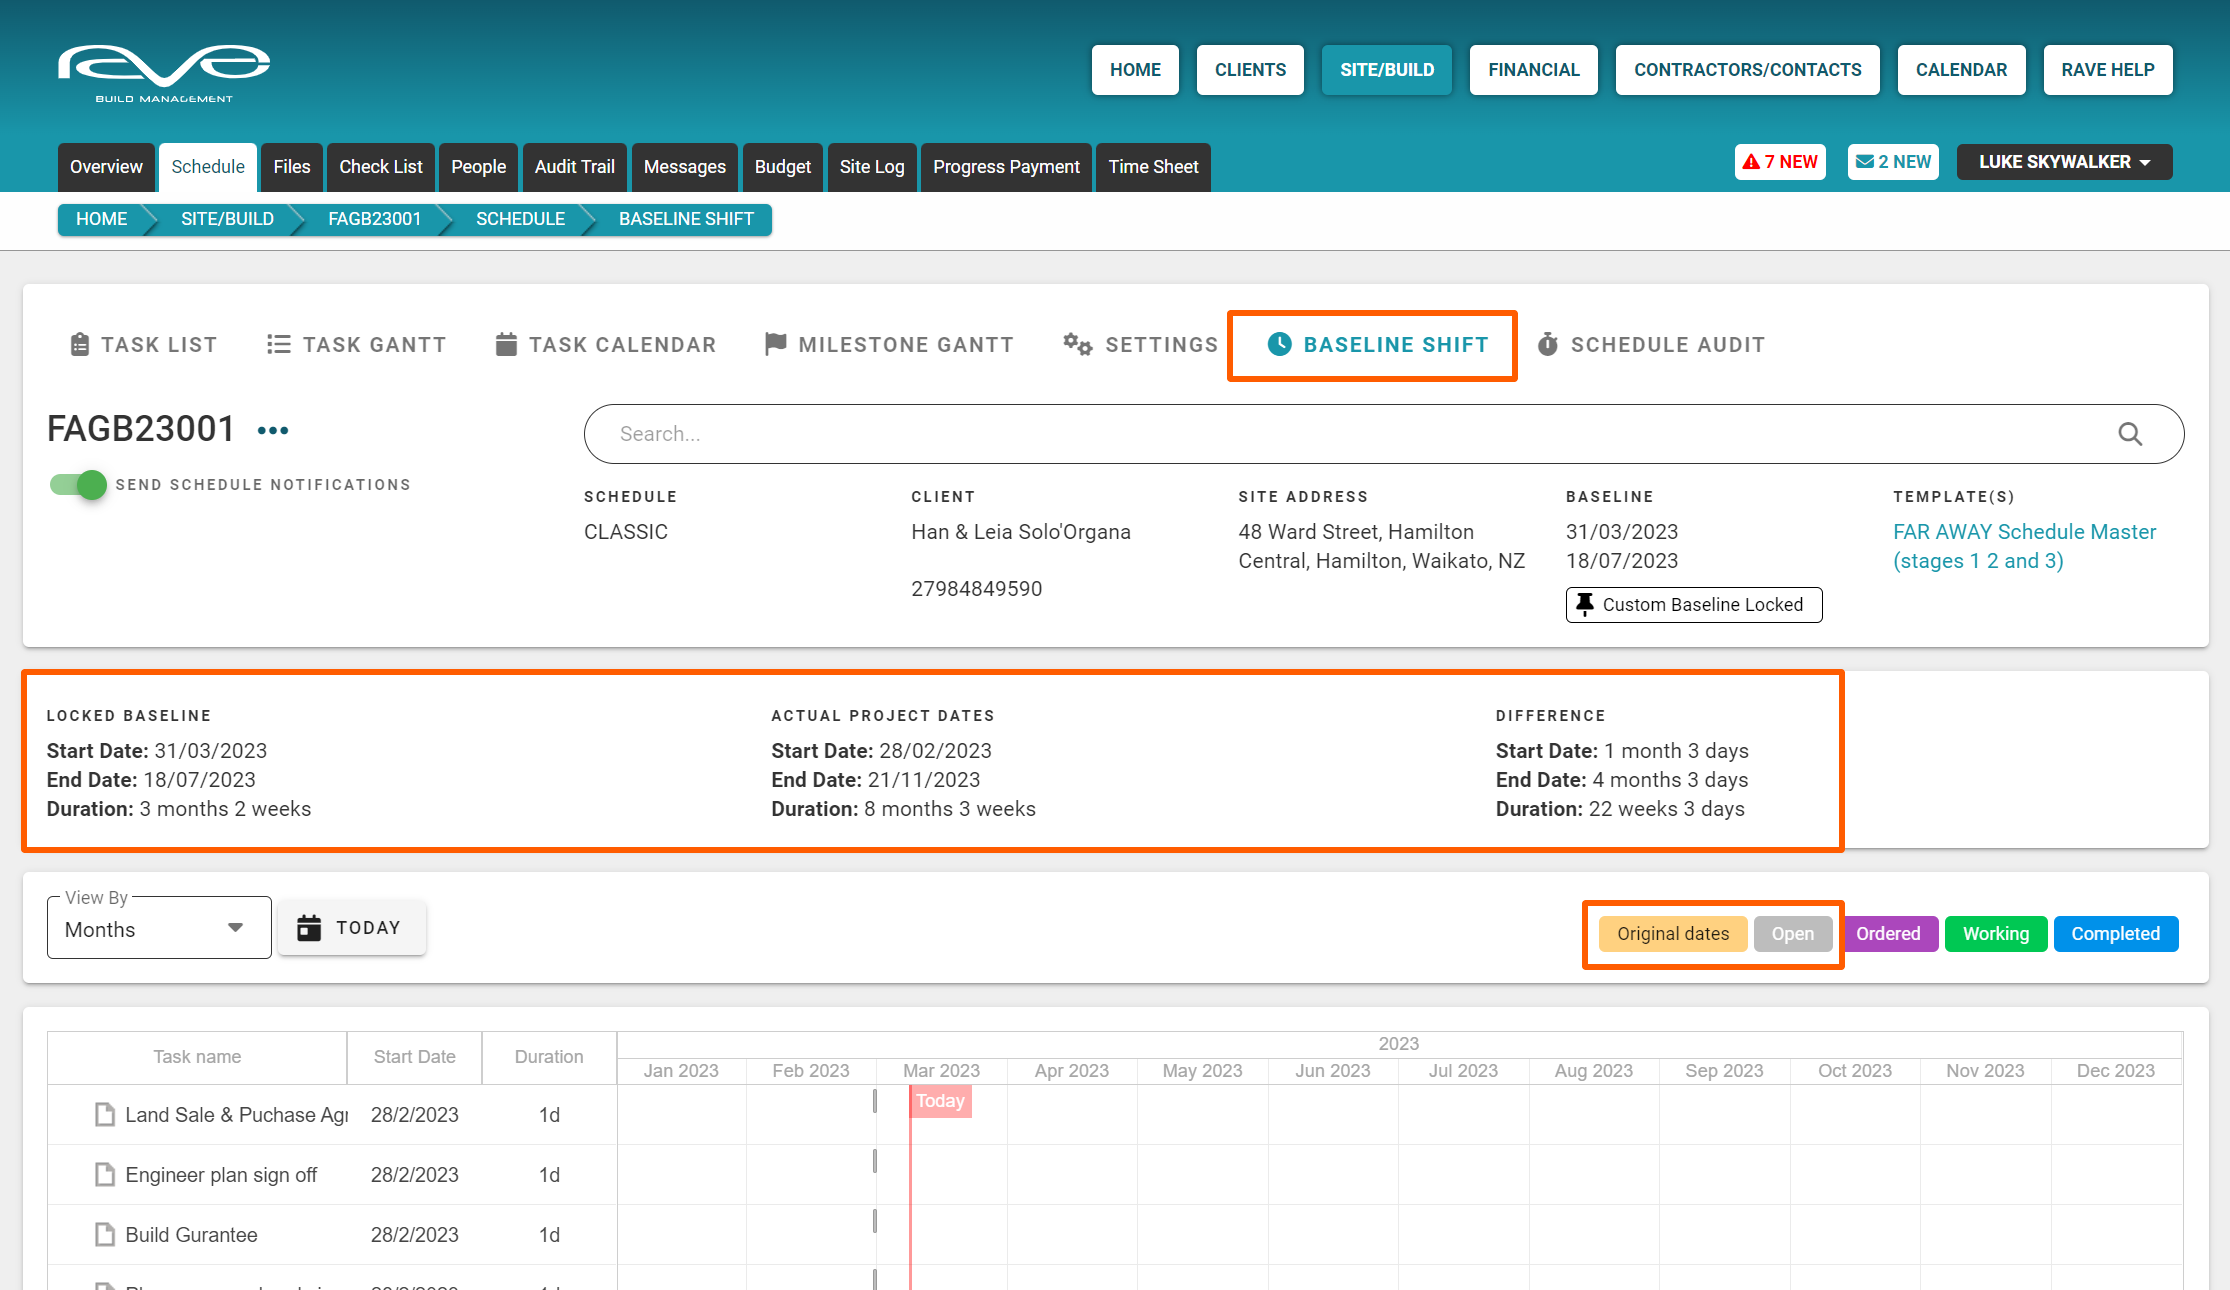
Tracking Schedule Baseline Changes
Once the schedule baseline has been set, any changes are:
- Displayed graphically via the project's ‘Baseline Shift' task gantt - comparing the original dates (yellow) vs the variance as represented by the gray, purple, green, and blue task status colours.
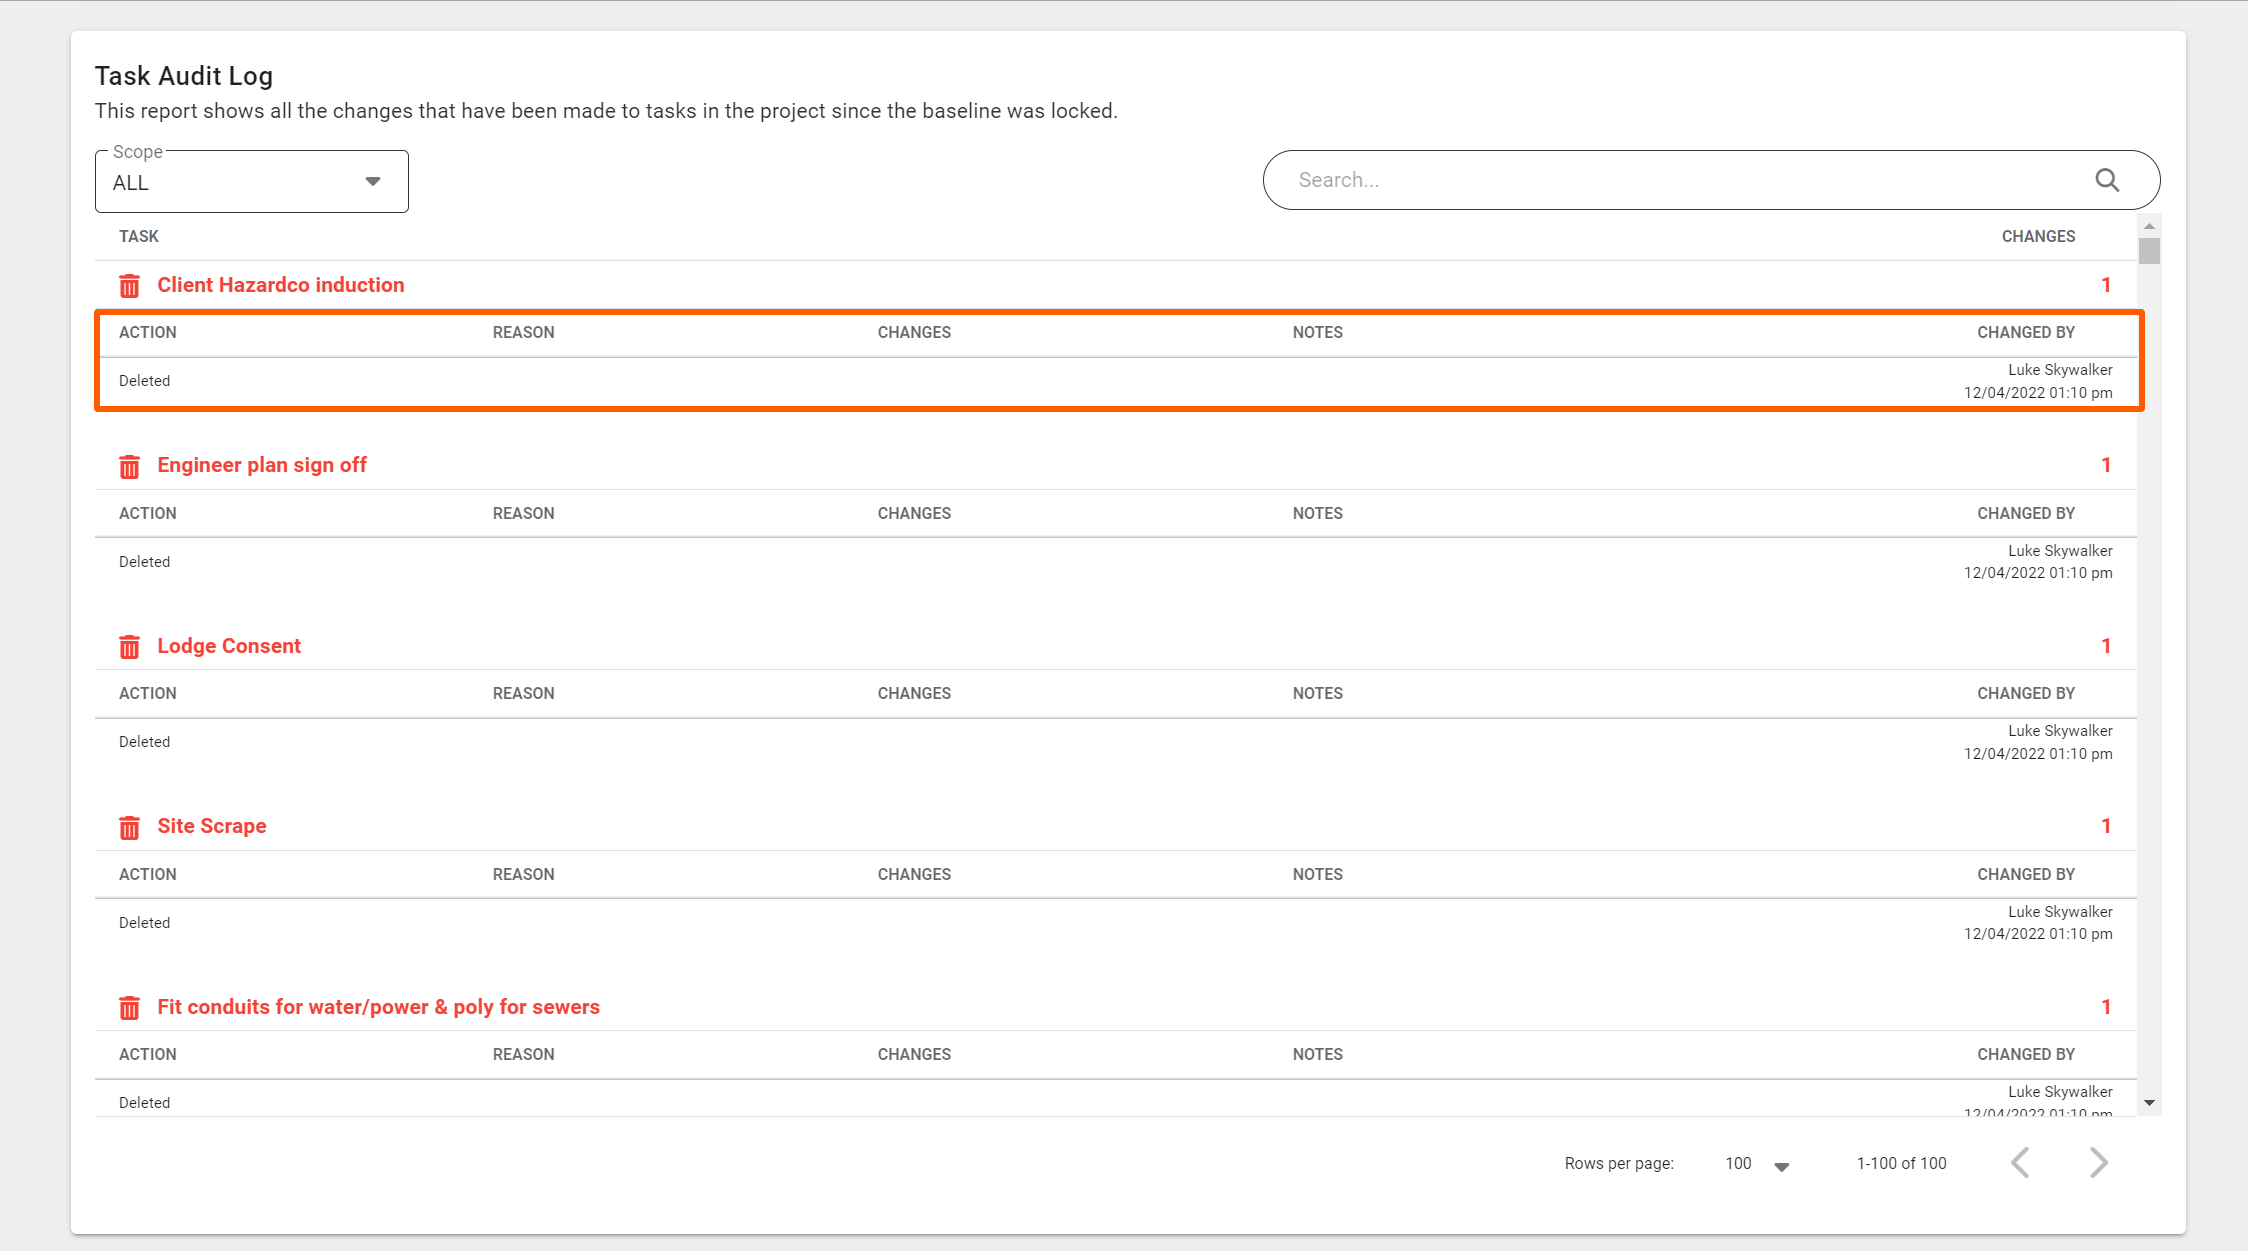
- Those with 'Advanced' and 'Enterprise' scheduling, have access to the 'Schedule Audit' report - where you can access a task's full change history, and the schedule change reason(s) also.


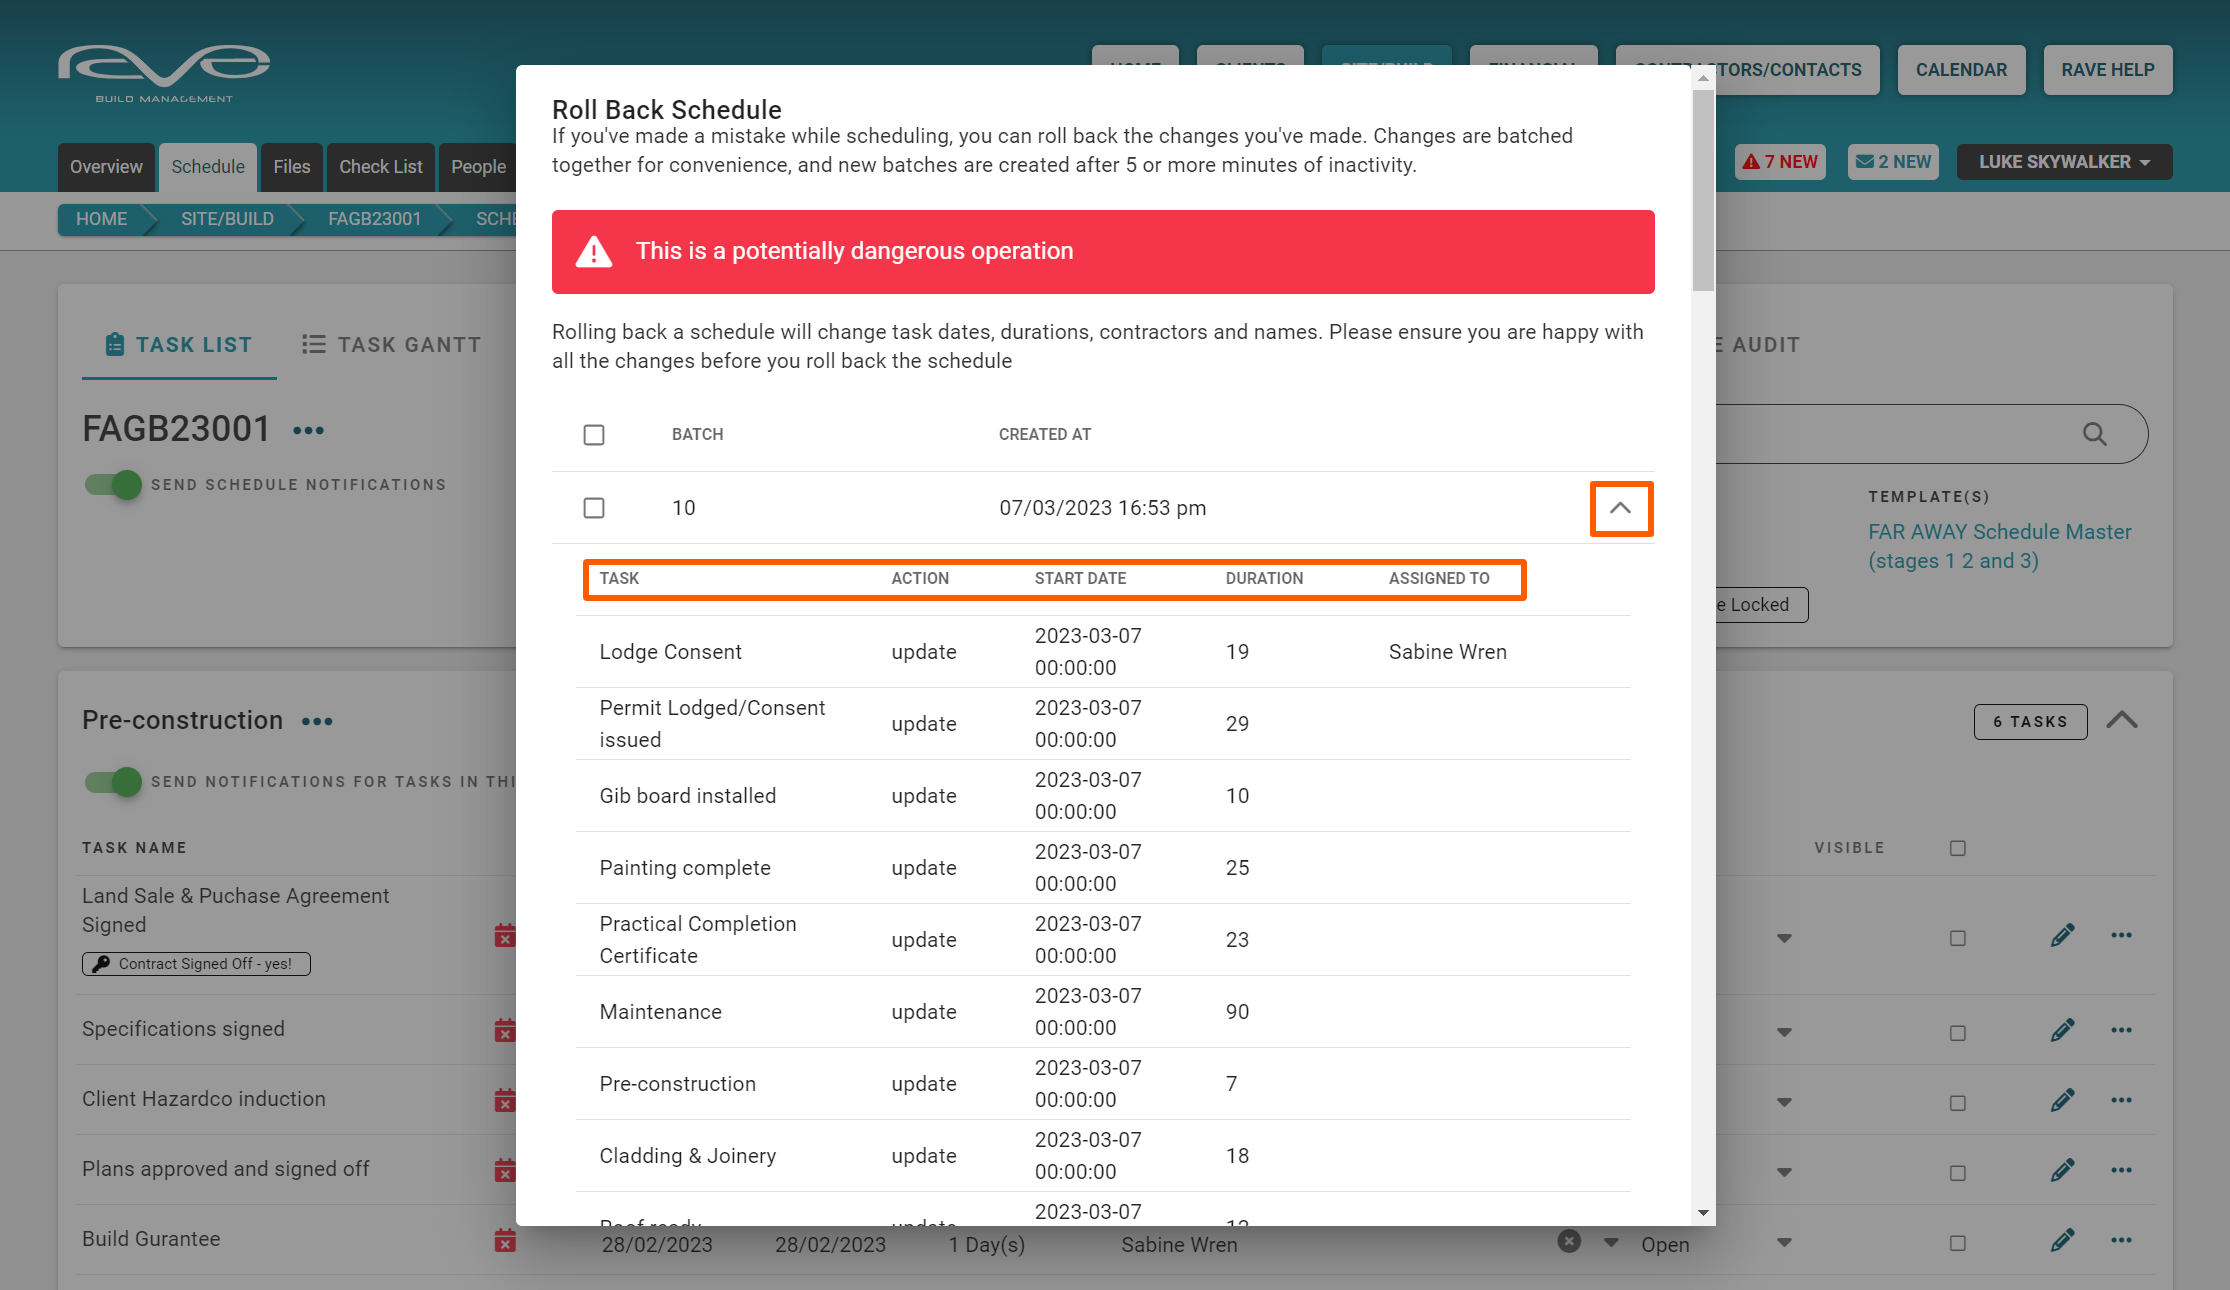
The Rollback Schedule Action
The ‘Rollback Schedule’ function allows you to undo a batch of changes (mistakes) you have made to the schedule.

Schedule changes are batched together, with new batches being created after five or more minutes of 'schedule change' inactivity.
Batches are displayed from the most recent back, listing the batch number, and the batch creation times. Clicking on a batch expand arrow, to the right of each batch, displays all the changes that would be reversed.
TIP: Depending on the amount of scheduling work you've done, a batch could involve a number of task changes, so have a look at what is to be rolled back, before you confirm a rollback change.
NOTE: Rollbacks work from the top down, if you wanted to roll back the changes in batch 8, you also need to tick to roll back batches 10 and 9.

Print the Schedule - Task List view
You have the ability to print, and customise, your task list view of the schedule. Clicking on the Print Schedule option (from the task list view), will cause the Print Schedule pop-up to appear. From here you can
- Select which milestones you want to include in your print-out
- Set the columns to appear on your print-out
- Task start date
- Task finish date
- Task duration
- The primary task assignee
- The tasks' status
- Decide whether you want to include hidden tasks or not
Once you've made your selections, click Print to print this out.


The Export as CSV (spreadsheet) Action
You also have the ability to export your schedule as a CSV file/spreadsheet. Simply clicking on the 'export as CSV' option, will instantly create a CSV version of your schedule, saved to your download section.


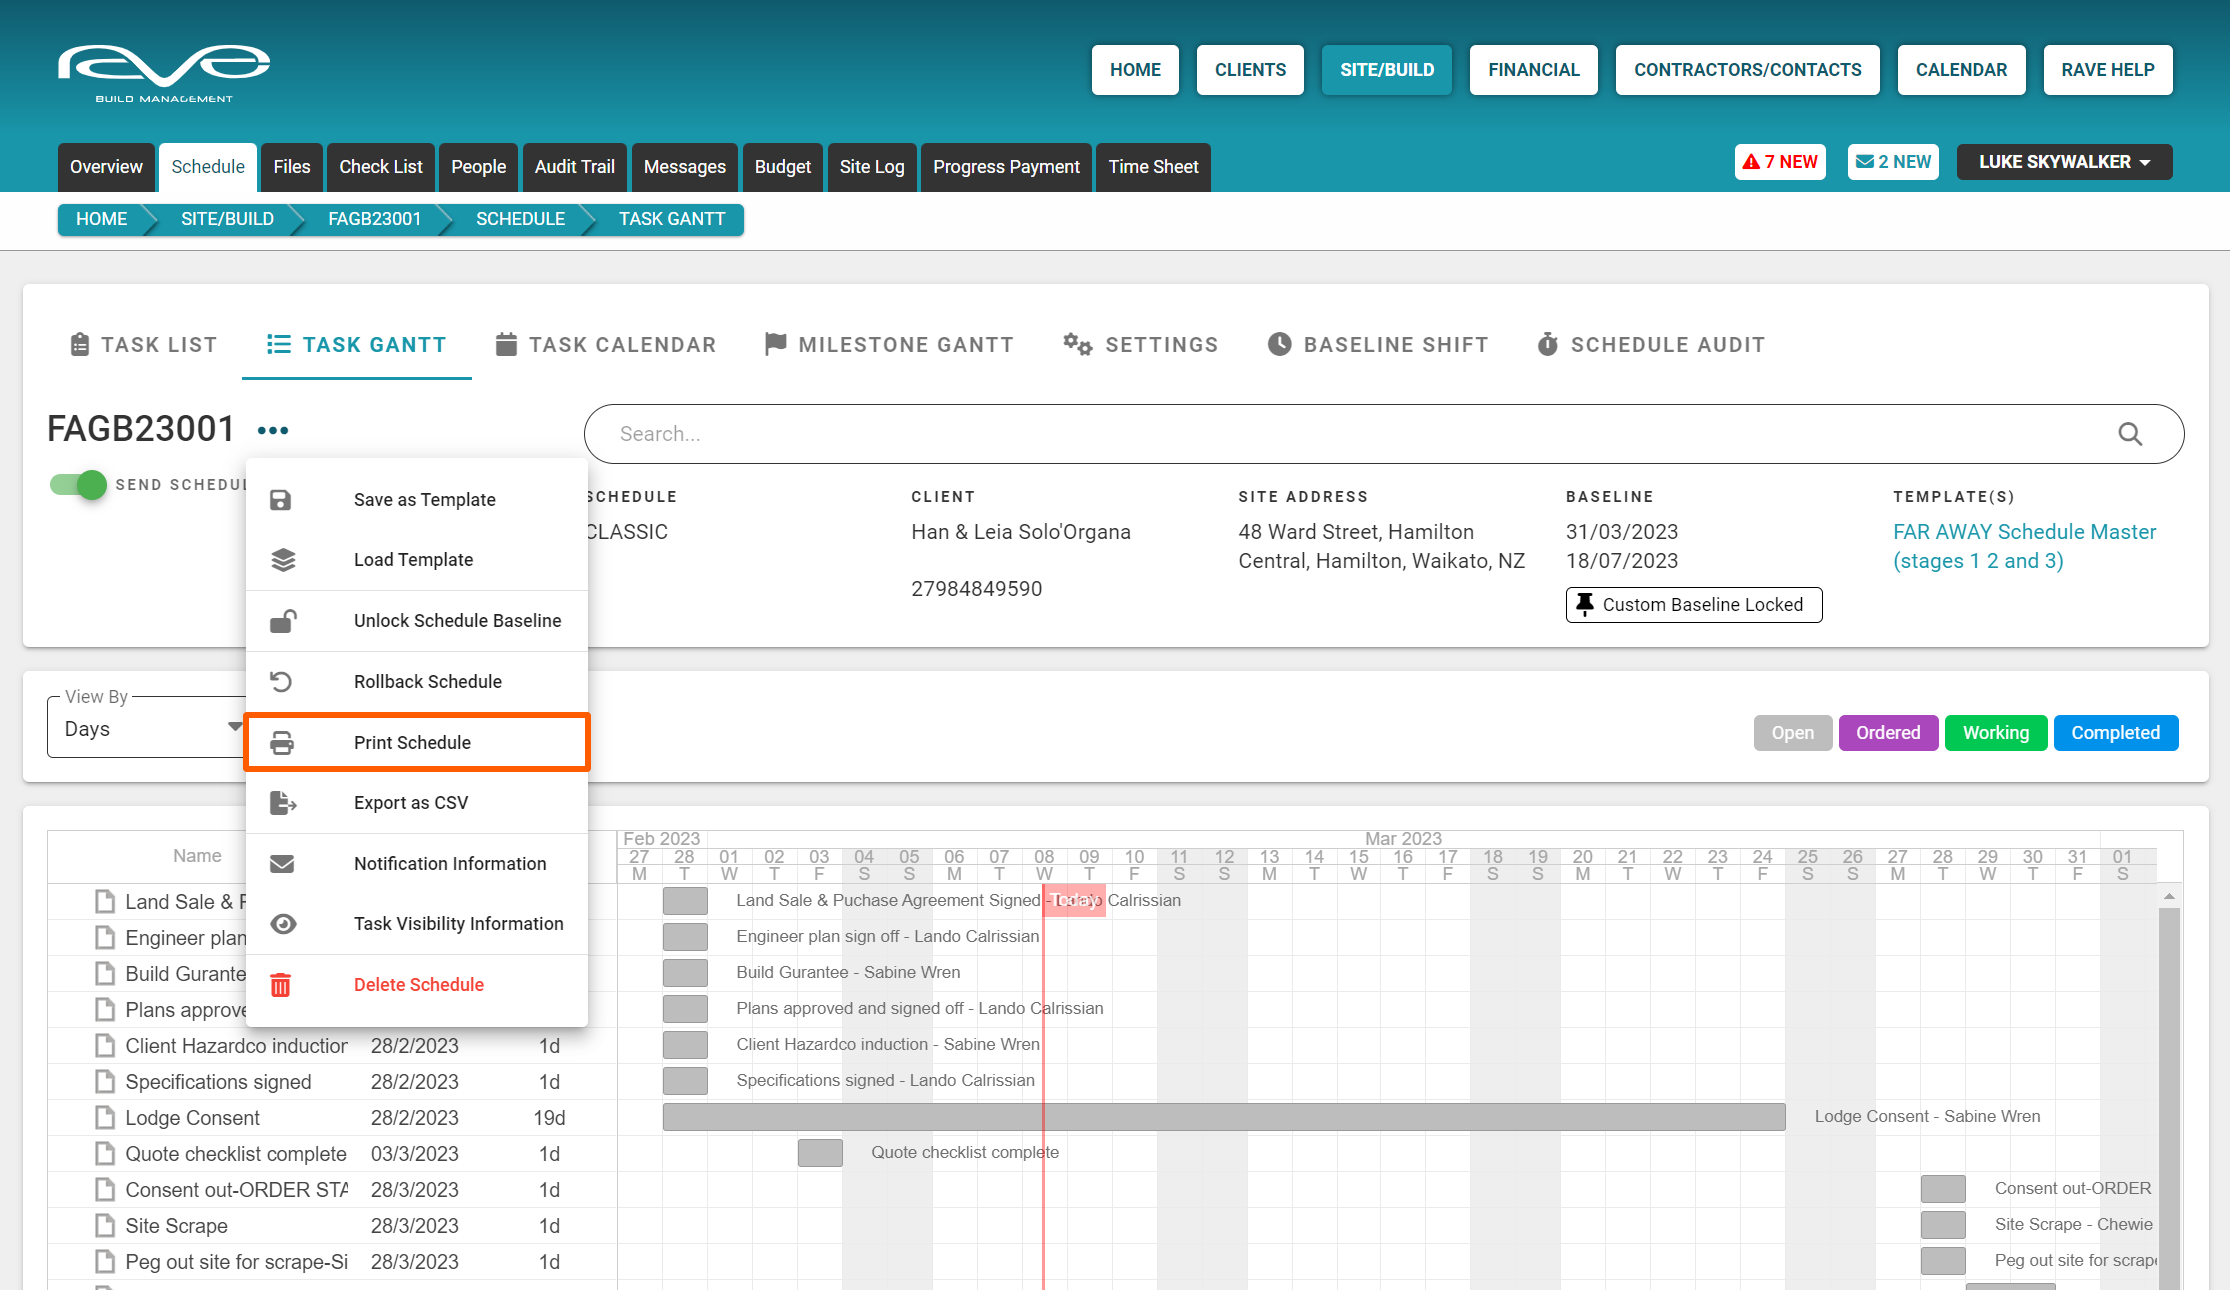
Print the Schedule - Task Gantt view
You have the ability to print a task gantt view (chart) of the schedule. This process is quite a bit different to the task list view printing - as we'll be saving the gantt chart as an image, to allow you to use the tile/mosaic/poster printing function on your printer (printer dependent) to go from A4 to A3, A2 or A1 sized print outs.
Clicking on the Print Schedule option (from the task gantt view), will cause the 'Print Schedule Gantt Chart' pop-up to appear. From here you can
- Select which Print By view (scale) you want to display i.e. days tends to be the best option
- Set the custom date range fo the gantt to display/print from
- Choose whether you want your printout to include, or hide, non-work days i.e., weekends and public holidays
- Once you've made your selections, click Print
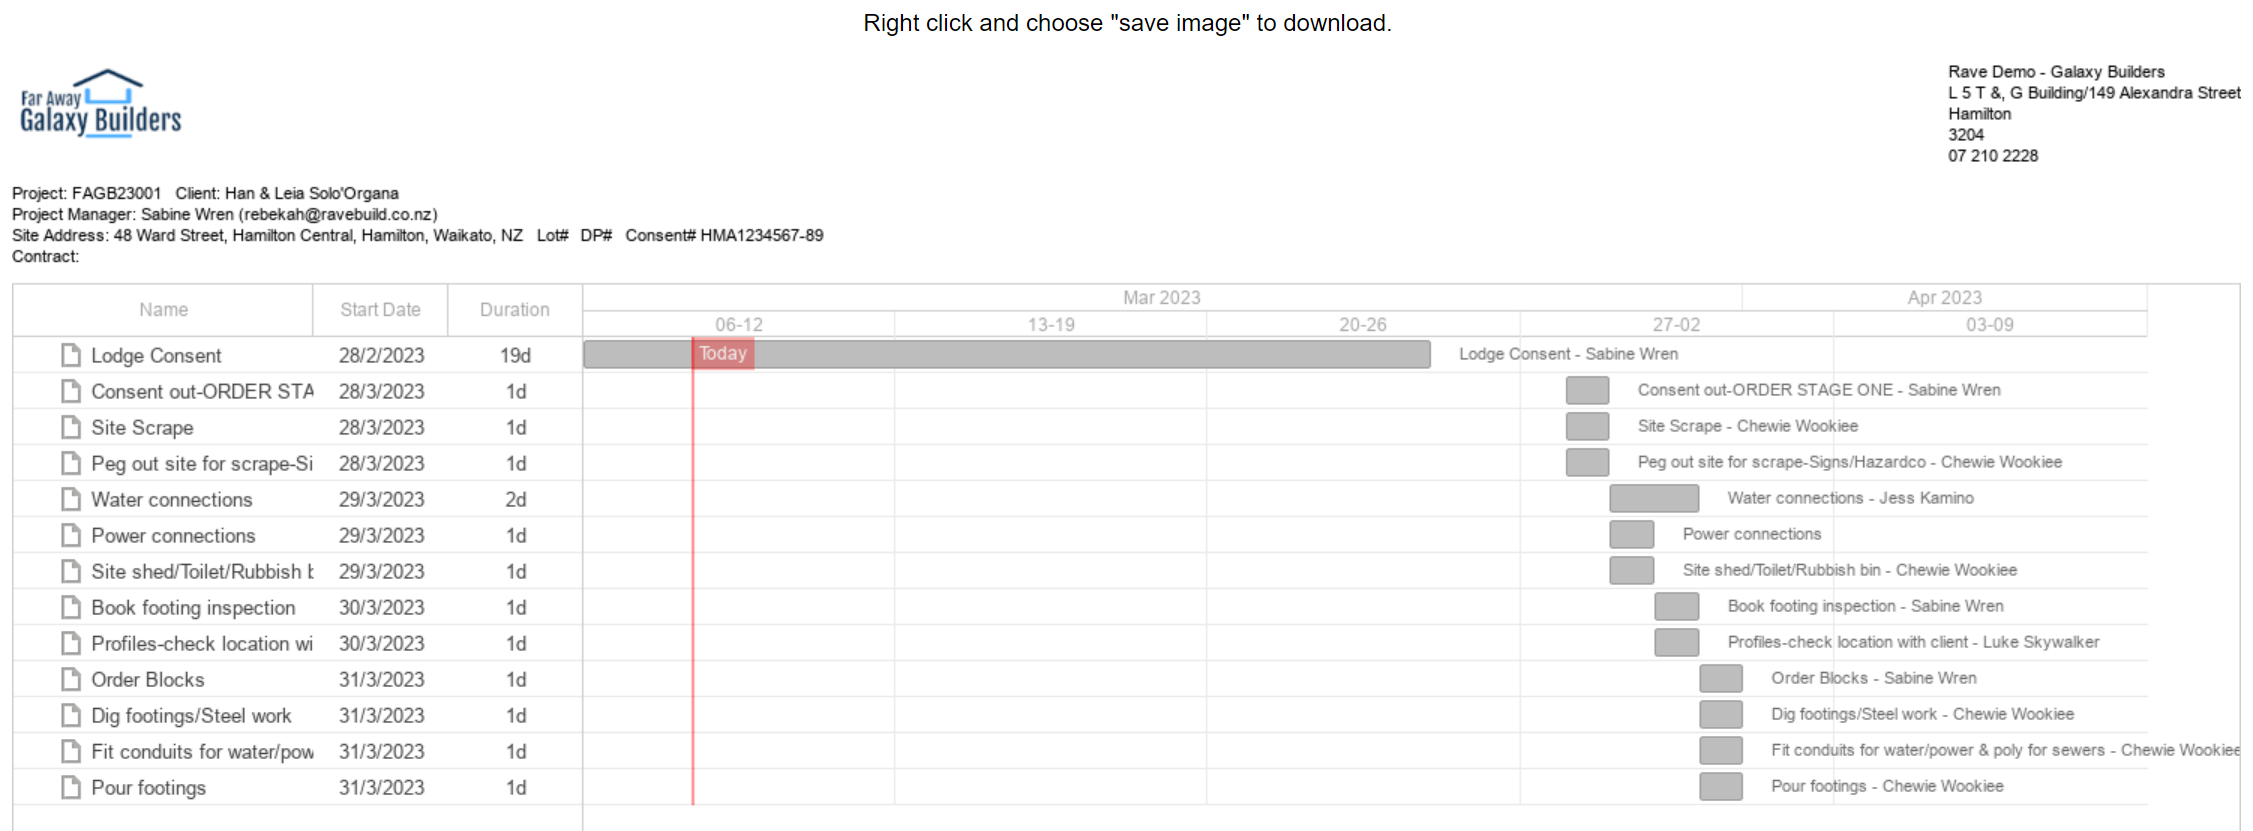
Rave will open a new browser tab, displaying all the tasks available in that specific date range - From here, you can right-click on the chart to save the image file with a file name of choice
- Then close the browser tab
- Find and open the image file in your picture or downloads folder
- And print it
Note: If your printer has tile/mosaic/poster printing functionality you'll be able to select these options during the print preview process.
NOTE: If you require a PDF copy of your gantt chart, after step 4 above, select the 'Print to PDF' option instead of an actual printer, this will prompt you to select a file name and saving location for a PDF version of your gantt.

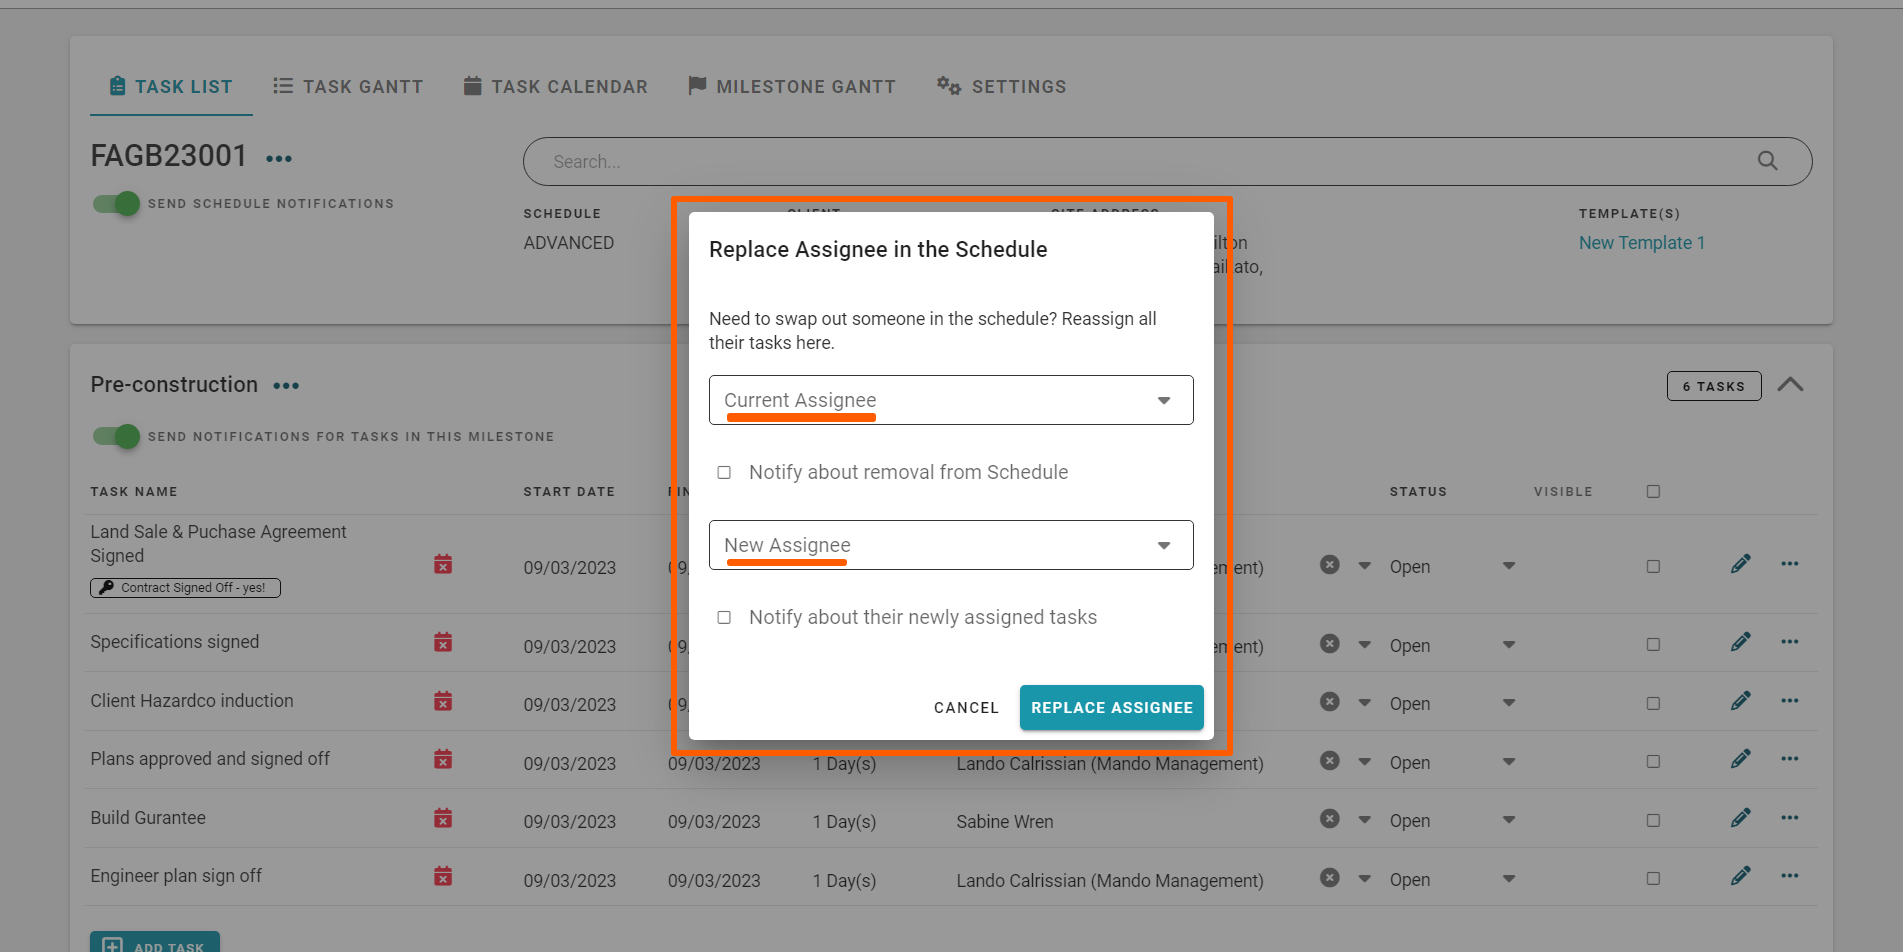
The Replace Assignee Action
The ‘Replace Assignee’ function allows you to reallocate all tasks assigned to one task assignee, to another - super handy if a contractor across multiple tasks in your schedule can no longer do it undo a batch of changes (mistakes) you have made to the schedule.
The Notification Information Action
The ‘Notification Information’ link provides previews to a range of automated incoming and outgoing notification emails from RAVE. If you want to see what any inbound or outbound notifications will look like just come to the schedule notification information and click on any one of the drop downs to see the general layout of those notifications.
Incoming Notifications
The incoming notifications are received by the project and site managers.
With 'Classic' scheduling, you have the option of being notified whenever a contractor has completed their assigned task. Clicking on the dropdown arrow to the right of the ‘Task Sign Off Requested’ option will display an example of what this notification email looks like.


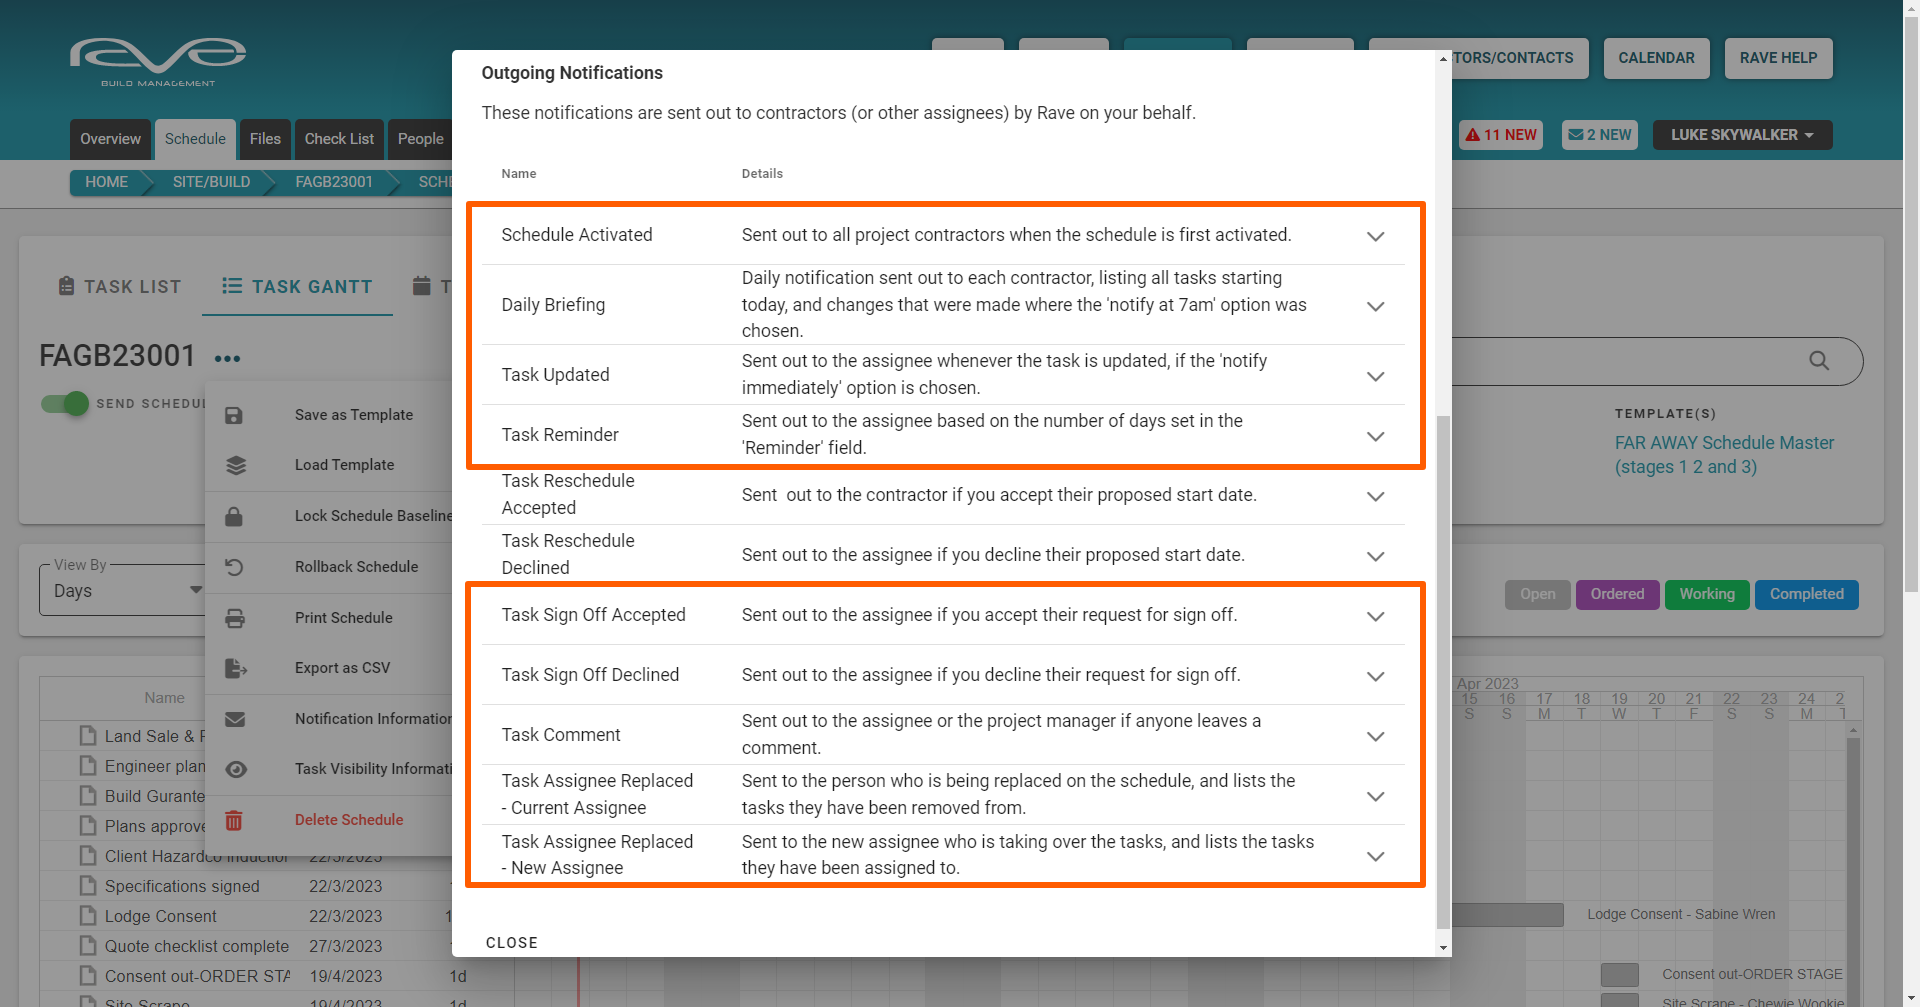
Outgoing Notifications
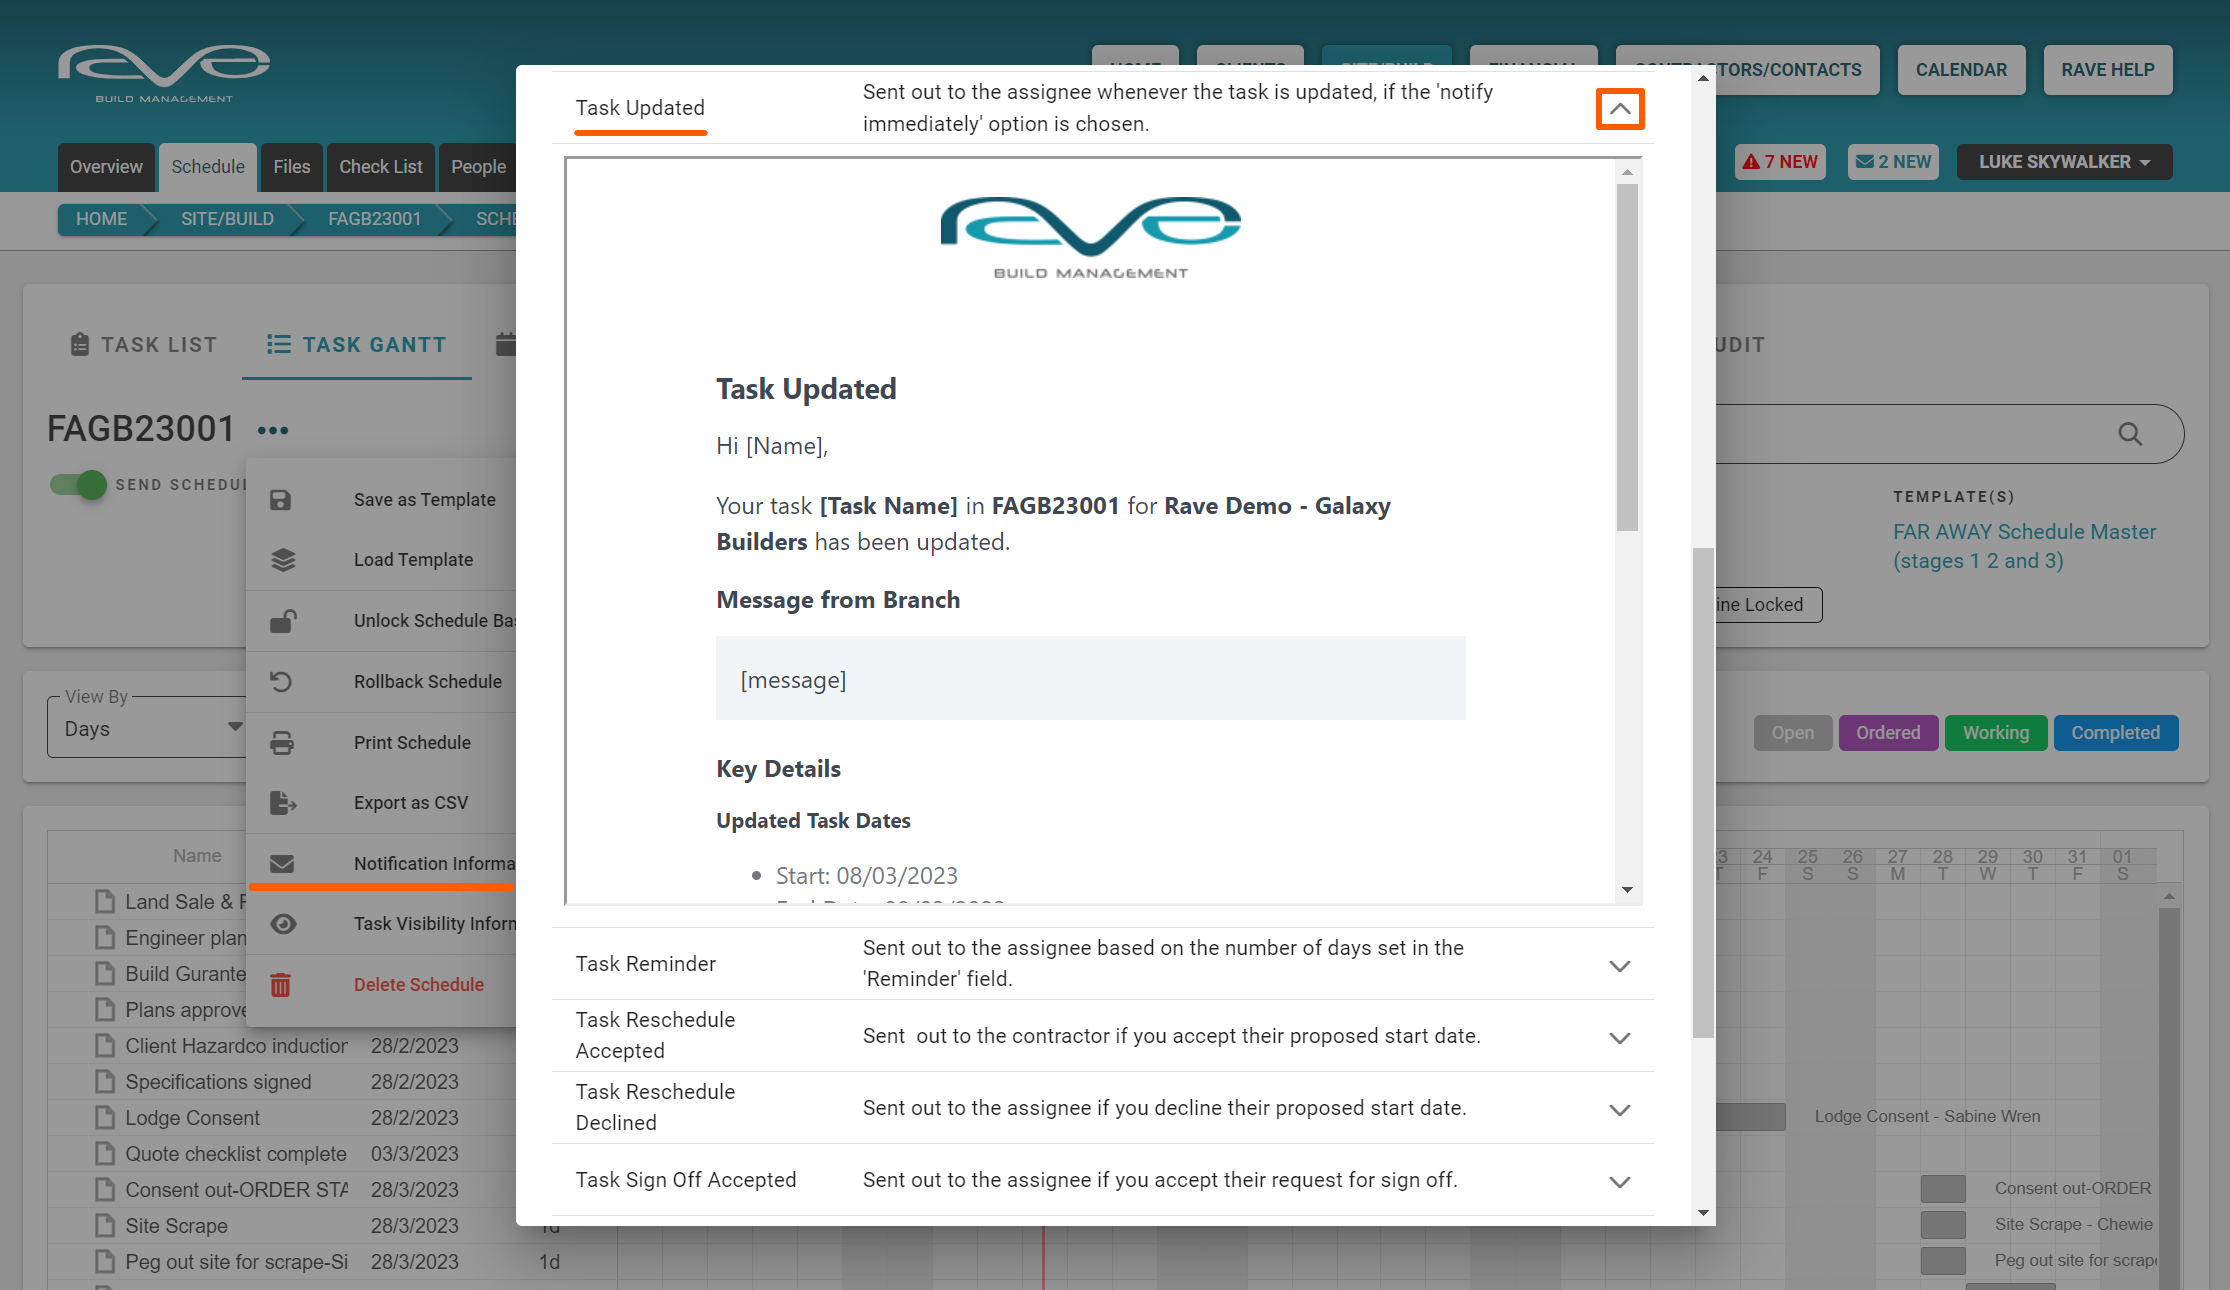
The outgoing notifications are sent on behalf of project and site managers - contractors and task assignees of tasks. It is quite a substantial list, clicking on the dropdown arrow to the right of each notification header will display an example of what this notification email looks like.
- The ‘Schedule Activated’ notification can be sent out to all project contractors when the schedule is first activated.
- The ‘Daily Briefing’ notification is sent out to each contractor when scheduled notifications are turned on for a job, and the 'tomorrow's 7:00am Schedule Briefing' notification option is selected. It lists all the tasks that are due to start today, and any schedule changes made the day before.
- The ‘Task Updated’ notification is sent out to the task assignees when scheduled notifications are turned on for a job, and the notify 'Immediately' option is selected.
- The ‘Task Reminder’ notification is sent out to the task assignees, when a 'Remin Assignee' task prompt day is loaded - and is triggered to send 'x' number of days before the task is due to start.
- The 'Task Sign Off Accepted/Declined' notification is sent out to the task assignee when you mark the task off as completed (you've accepted the task sign off), or if you have declined the task sign off, you'll have the ability to add notes i.e. what the contractor missed, or needs to do to complete the task.
- The ‘Task Comment’ notification is sent out to ALL task assignees and the project manager if anyone leaves a comment or uploads a file to a task - when the 'Notify Task Assignees' tick box is ticked. This is covered in our project communication training.
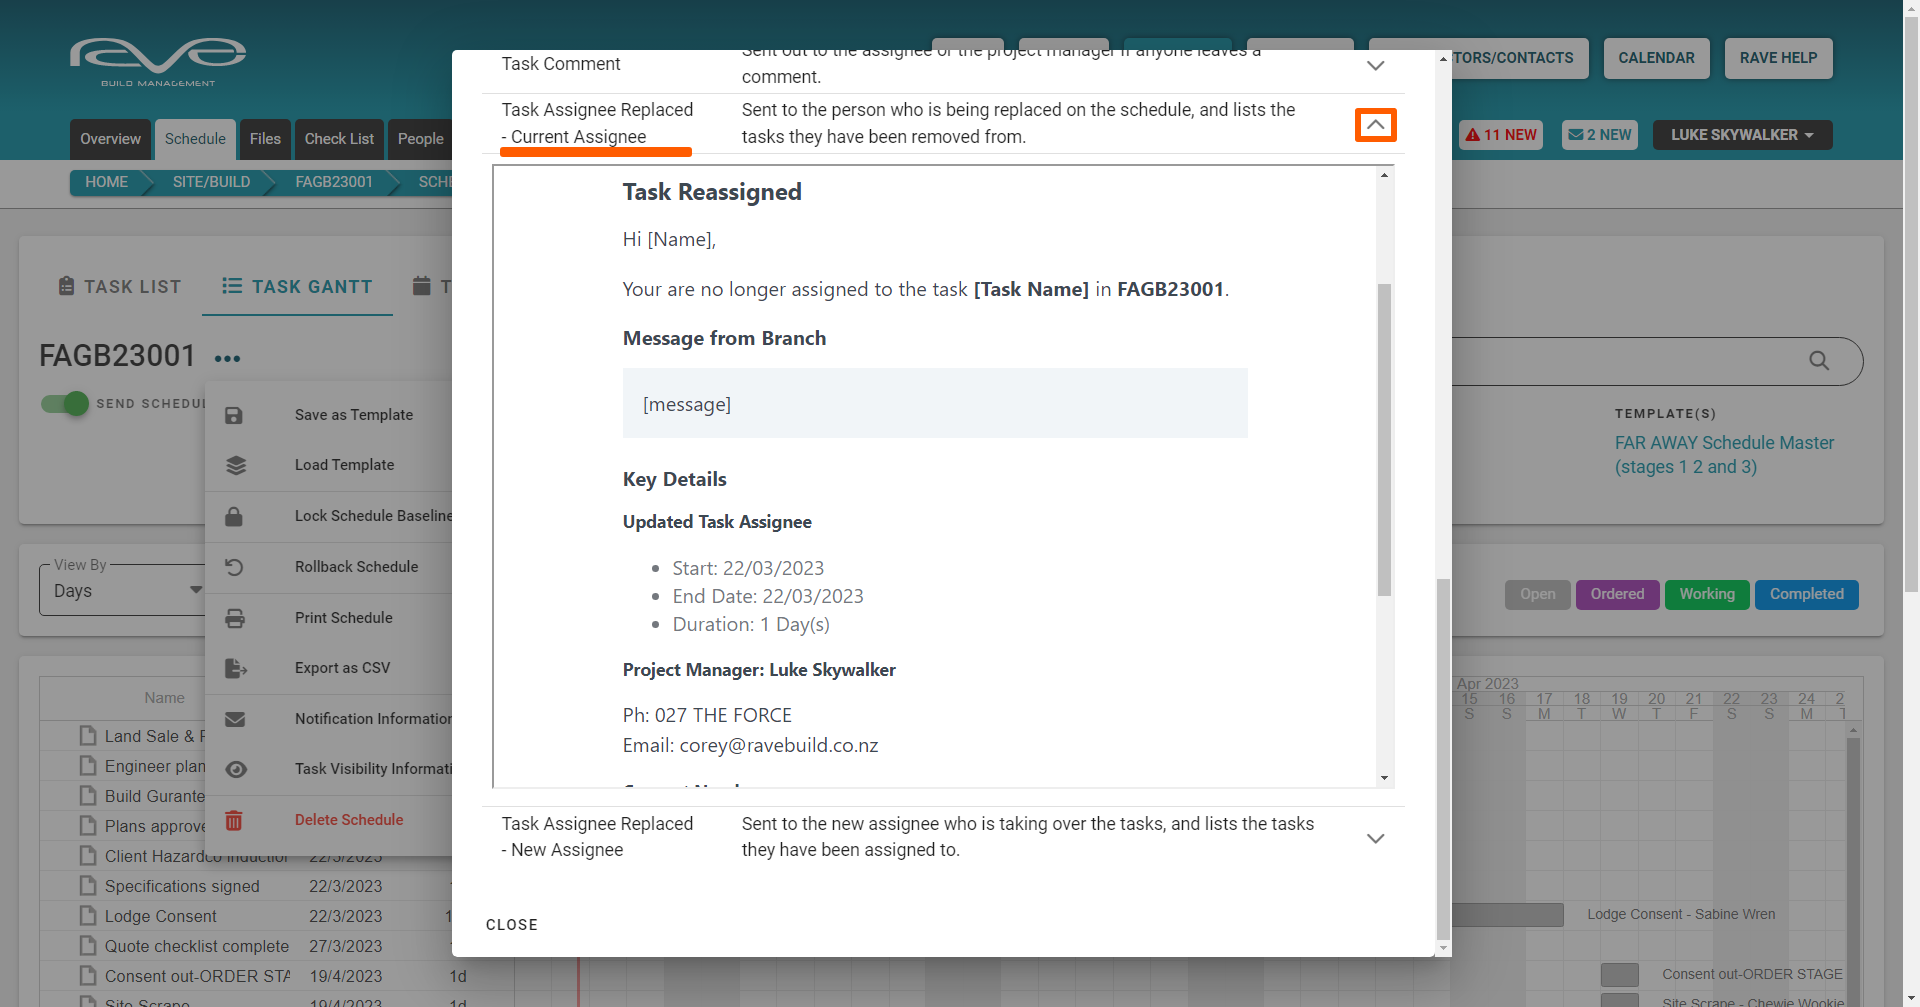
- The 'Task Assignee Replaced - Current/New Assignee' notification is sent out to the old and new task assignees when the Replace Assignee function is used - and the notification tick boxes are ticked.
NOTE: The ‘Task Reschedule’ Accepted/Declined notifications are 'Advanced' and 'Enterprise' scheduling notification options - which we cover in the 'Advanced' and 'Enterprise' schedule training.


The Task Visibility Information Explanation
The ‘Task Visibility Information’ pop-up summarises when contractors (and the client if given access) can see tasks they are NOT assigned to.
- If either the project or the schedule is Inactive - NO outside users have any schedule or task visibility
- If the schedule is Active and the View Visible Tasks permissions have NOT been given - outside users will only see the tasks that are assigned to them*
- If the schedule is Active and the View Visible Tasks permissions HAVE been given - outside users will see tasks assigned to them* and all other visible tasks
NOTE: Outside users can not see hidden tasks as a general rule. However, if you assign an outside user to a hidden task, they will be able to see it when the project and schedule are Active. Hidden tasks are things like stage claim payment requests, and any admin tasks that you don't want your contractors or client to see.