RAVE is designed to help you save time on your jobs by providing quick access to projects and documentation - helping your team, contractors, and suppliers complete their work with fewer headaches.
In this Project Admin FULL Guide to RAVE FAQ, we'll outline how RAVE can help you set up a new project, and keep all of your project information in one easy-to-find location, to save you and your team time in managing the admin end of your projects - ready for the Project Management side of RAVE!
But, if you are not already familiar with the basics of navigating around and using RAVE - we highly recommend
that ALL new business and branch staff watch this short RAVE first training tutorial from start to finish.
In this very important training, we overview all of the modules that make up the Rave Build Management System - ensuring you are aware of the key systems that are available to you, to help you get the most out of RAVE.
Then, we cover how to log into RAVE, change your password, and save RAVE as a quick link favourite. We navigate the RAVE Home Screen, before diving into RAVE's Reporting portal, and our RAVE Help Portal - showing you how to use our library of training videos, FAQs, and support ticketing system - to help you get up to speed with RAVE quickly, and at your own pace!
RAVE's Site/Build button
We access the Project Administration and Project Management side of RAVE by clicking on the Site/Build button - to the top right of RAVE. This will take us to the Build Projects sub-tab, displaying all our active Jobs and a number of other sub-tabs to look at.

The Build Projects Sub-Tab
The Build Projects sub-tab displays your open Project list, listing all the Jobs that are under construction or are soon to start construction.
The Build Projects table, displays a number of columns, from left to right we have:
- The Client name - which acts as a shortcut link to the client's profile
- The Job Number - which also acts as a shortcut link to open the job
- The Building Consent Number - if loaded
- The Deposited Plans number - if loaded
- The Project Manager's name - if allocated
- The project Site Address if loaded
- The Project Status - which includes a number of options as per the drop-down up to the left
- The Build Status - Lead, Pending, Active, and Maintenance
- And the “Show” button - which you can also use to open the job
To the bottom left of this page, we have the results reference which shows you how many jobs are being displayed, given any applied filters, out of the total number of Projects or Entries.
To the bottom right, we have the “Show X number of entries” dropdown, allowing you to set how many entries you’d like to see on each page before you have to click over to page 2, 3, etc. This will default to 10 or 15, but there are a lot of options including 'All'.
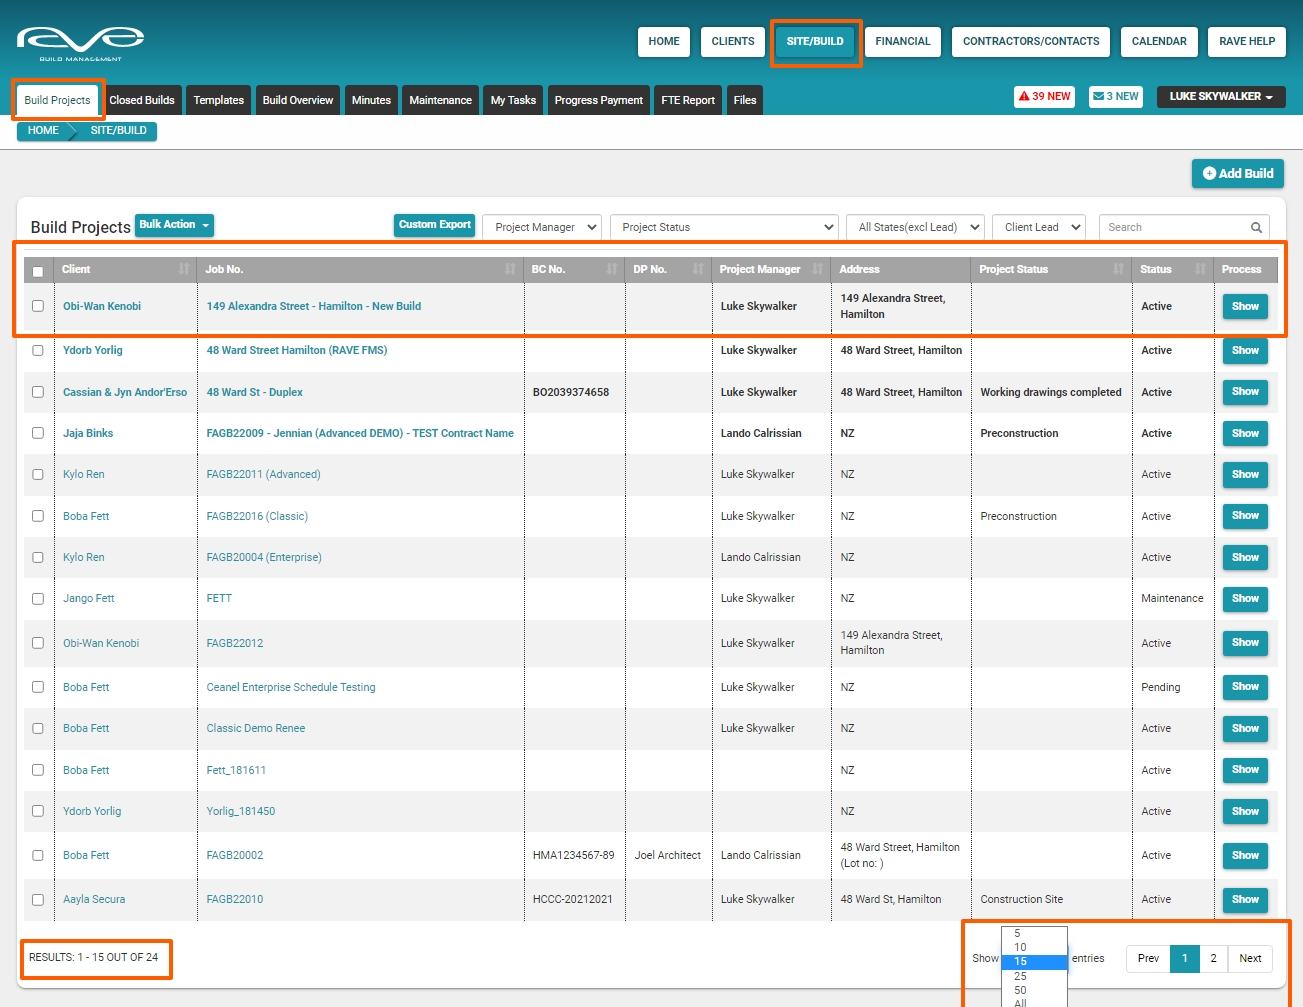
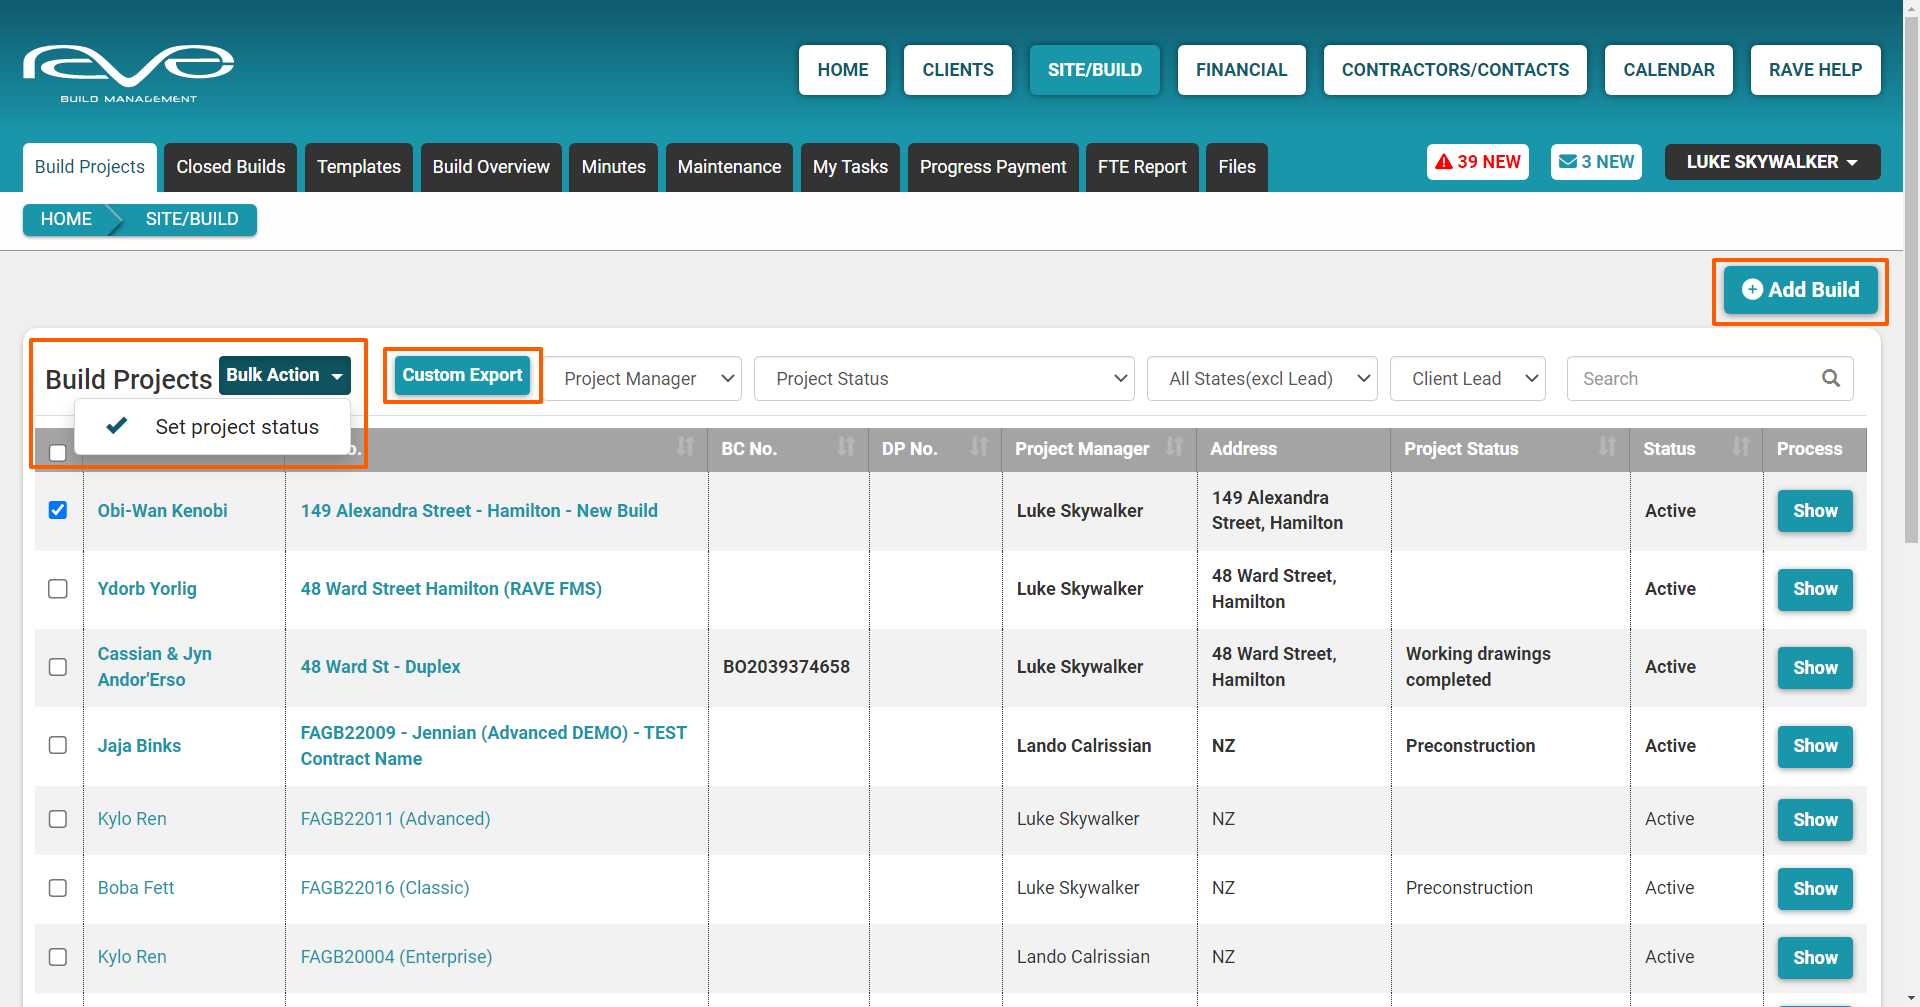
Back to the top right of the page, if you need to create a new Project for an existing Client, you can do so by clicking on the Add Build button. This will take you to a blank New Build page to fill in - with a number of required fields to ensure the build is created correctly.
Over to the top left, we have the 'Set Project Status' bulk action - where you can quickly select multiple jobs and update them to a specific Project Status.
The Custom Export button allows you to run your own Project Reports, with the ability to select your own custom fields and export that as a CSV Report. Frequently run reports can be saved as custom templates for repeated use too - check out this separate FAQ article here.

The Build Projects list Filtering Tools
The Build Projects list has a number of filtering tools - allowing you to hone in on builds with Specific Project Statuses, Build States, and Client Lead types.
The Project Status drop-down lists all of the Project Statuses along your Build's journey, and is customisable for each branch.
The Build Status filter allows you to filter your jobs by the Build Status - lead, pending, active, and maintenance. When we add a Client to the RAVE system, RAVE automatically generates that client’s first project. This may generate a lot of unnecessary 'Lead' or 'Pending' projects to your Build Project list. To prevent this, your Sales team (or project admin team) can change the Build Status on these jobs to “Lead”, which is automatically excluded via the 'All States (excl lead)' default Build Status filter.
The Build Project's search field is another great tool, it searches through all of the data in each of the columns. Especially handy if you have multiple pages of Jobs you need to go through to find the one you’re looking for.
And finally, to open up a job from the list, you can do so by clicking on the project's 'Job No' link or the 'Show” button - over to the right of the project line.

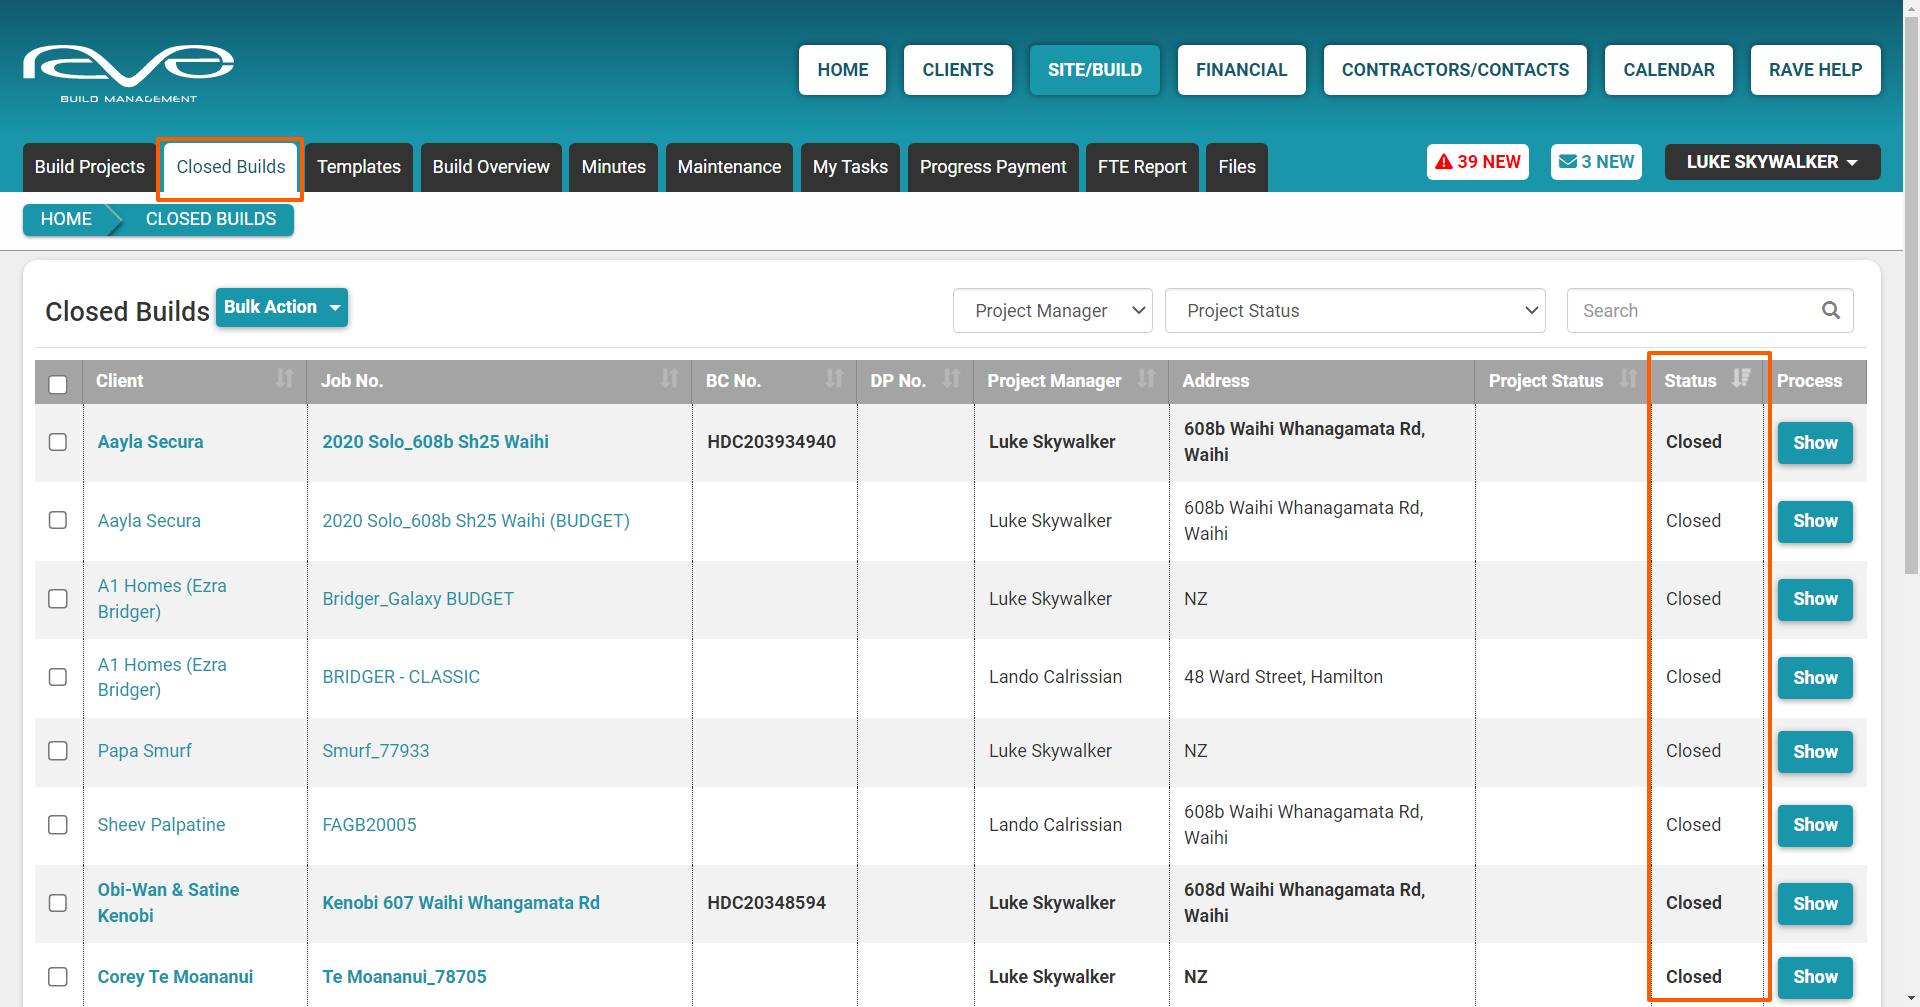
The Closed Builds list
The Closed Builds sub-tab displays all of your Closed/Completed projects and any Lost sales leads. If you can't find your client's project on your active Build Project list, chances are you find them here.
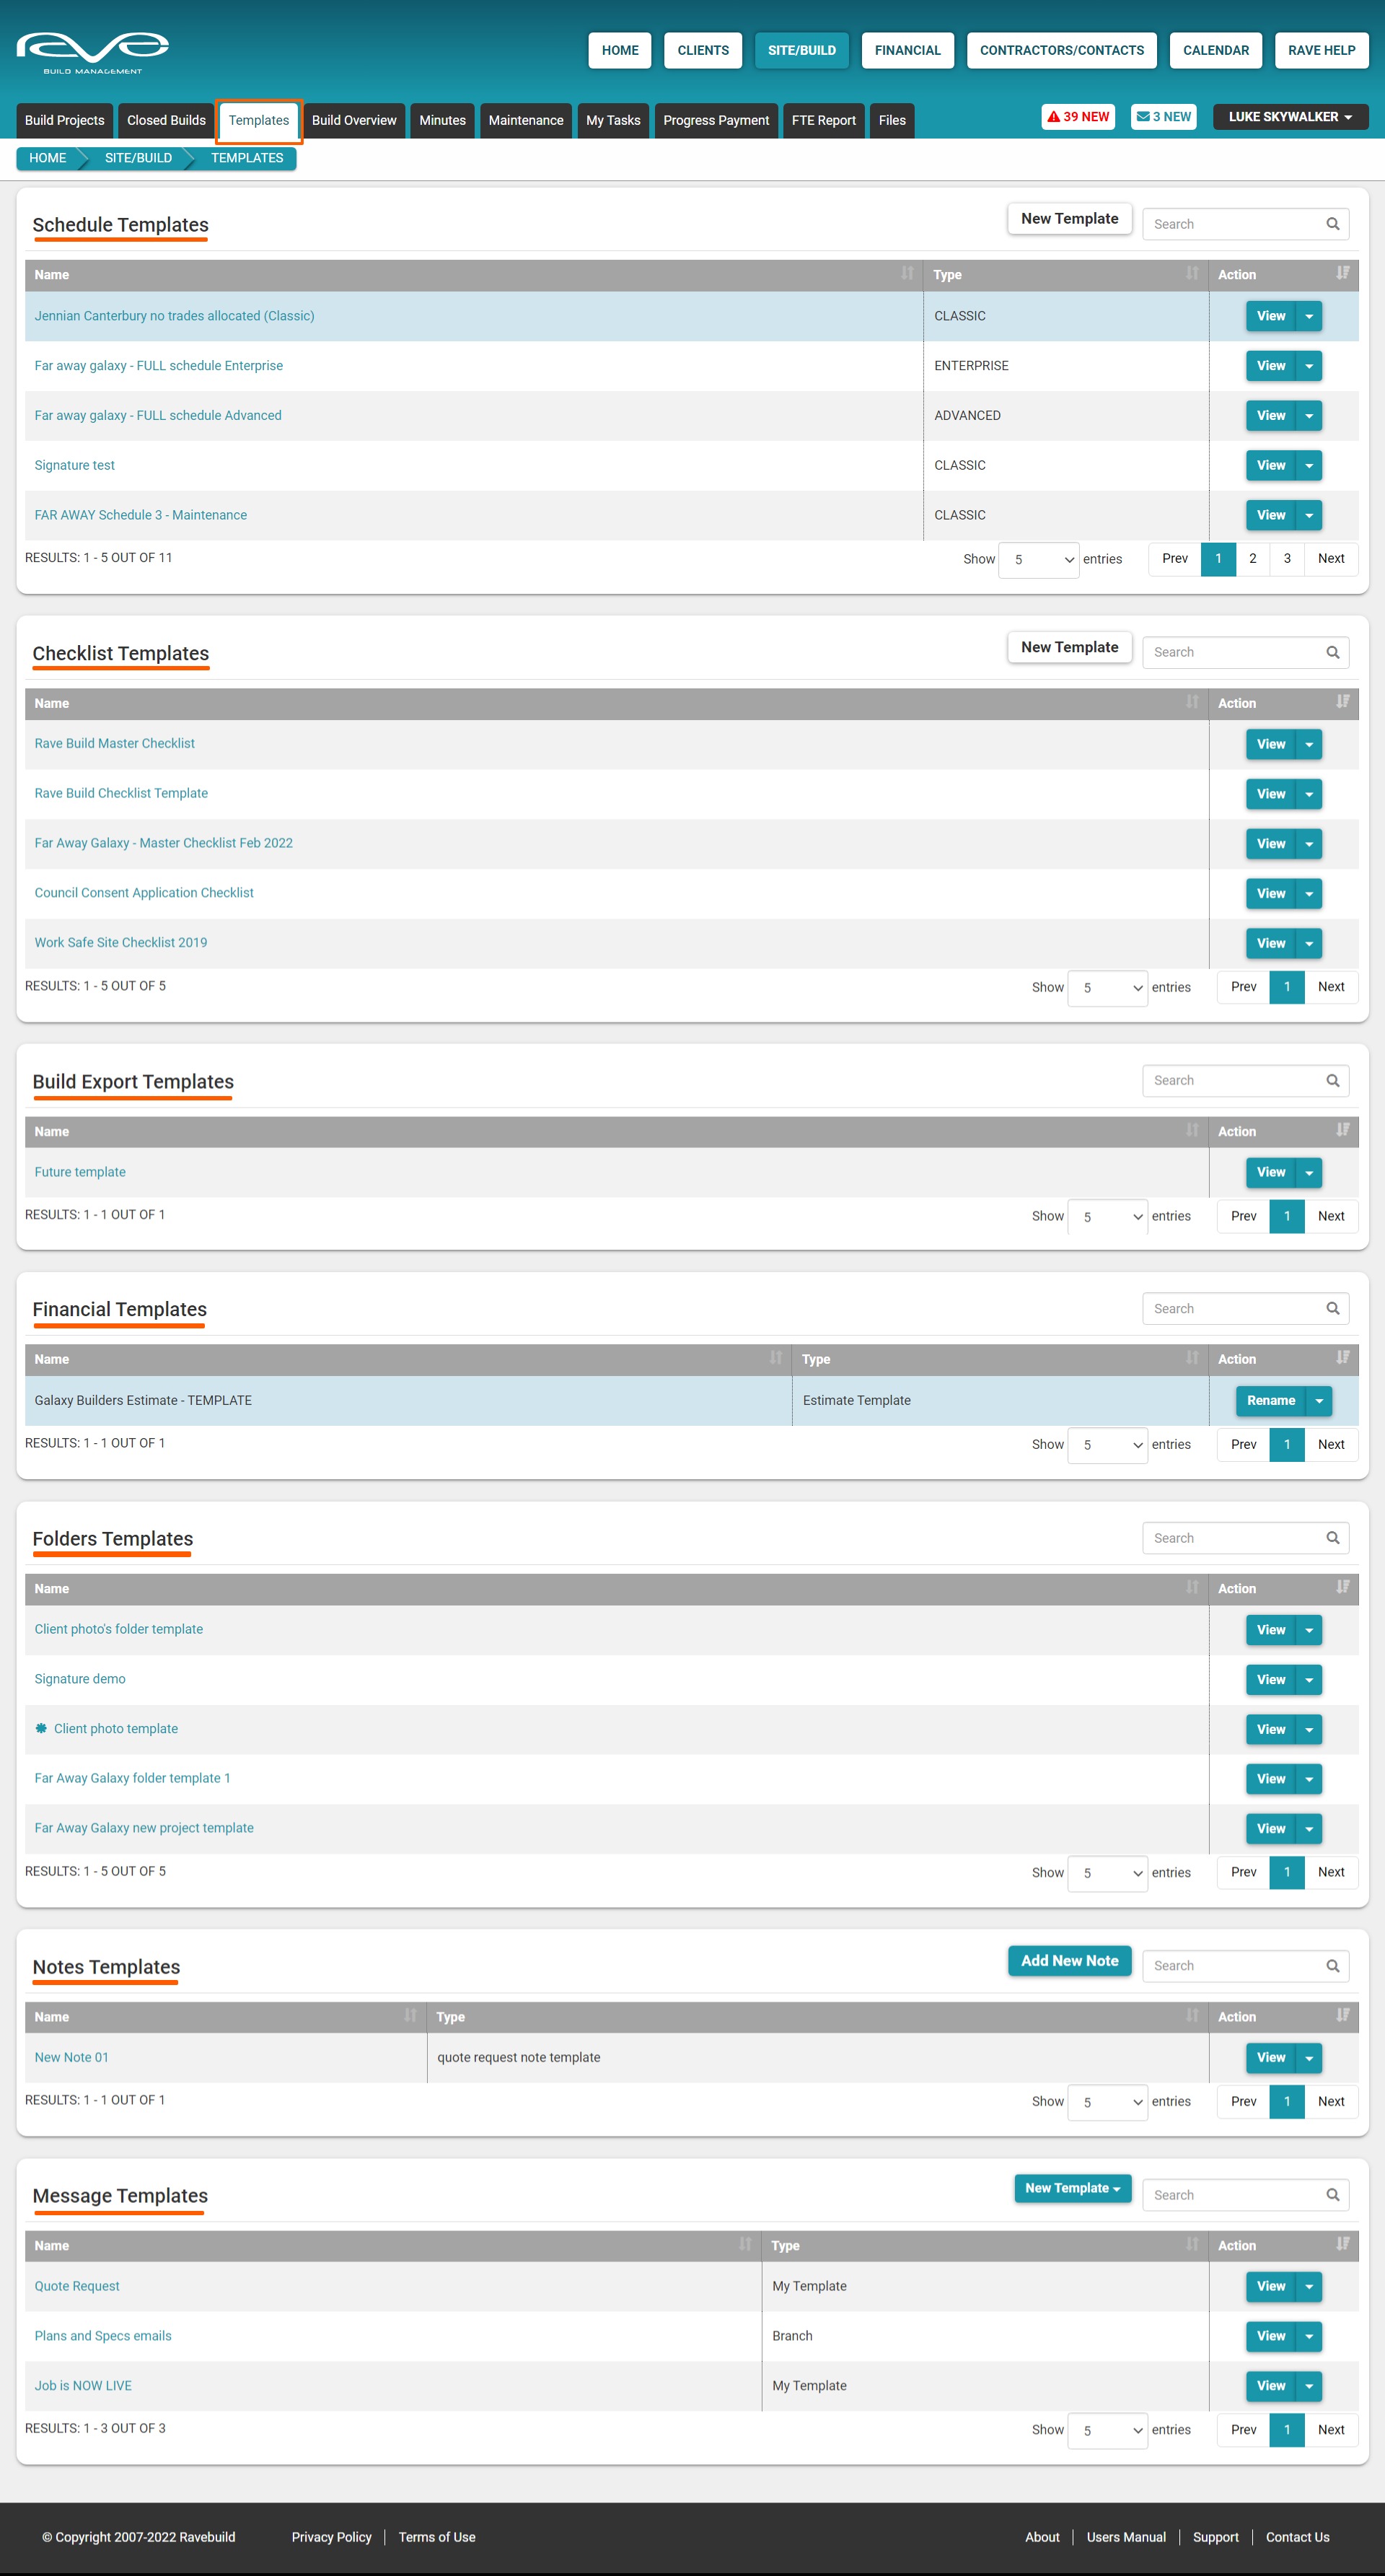
The Templates sub-tab
The Templates sub-tab lists the various Templates that have been saved within Rave. That includes your build Schedules, and also your build Checklists, Build Export templates, Financial templates, Folder templates, your Note templates for Quote Requests, and your Message templates too.
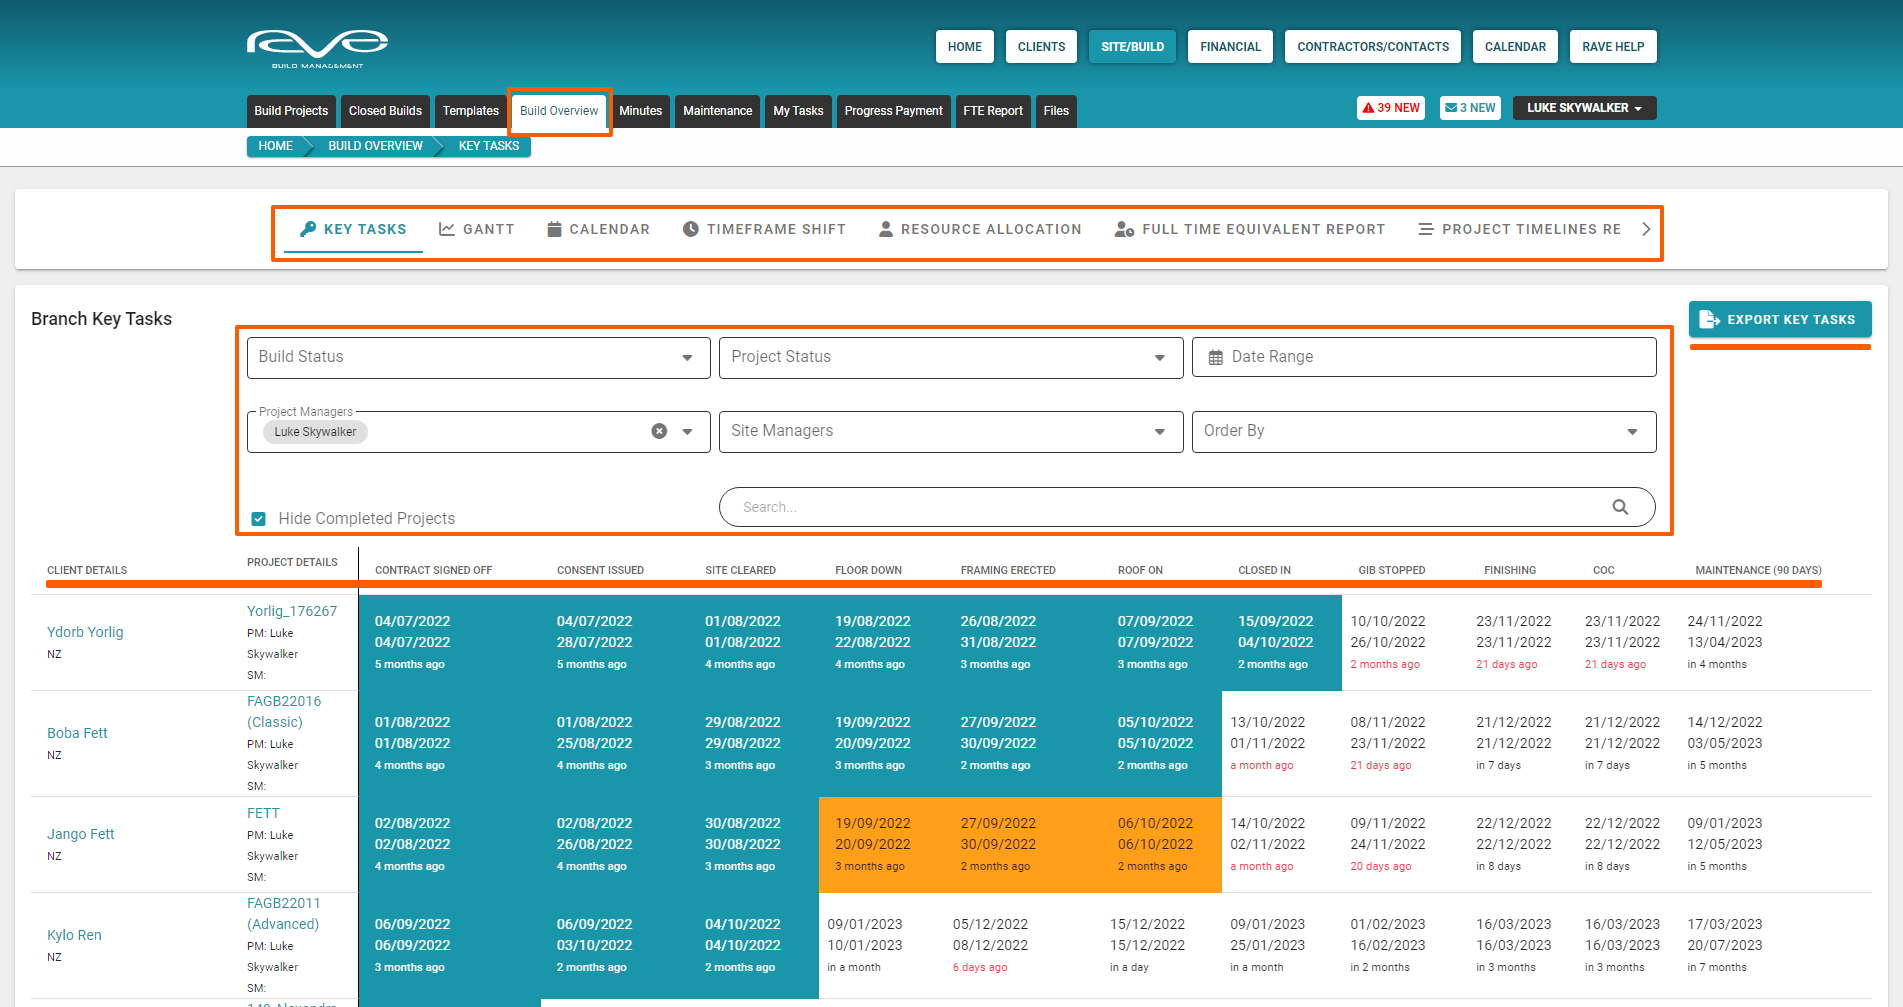
The Build Overview sub-tab (Cross Project Reporting)
The Build Overview sub-tab displays all of our different branch-wide Project, Schedule, and Staff Resources reports, it also provides access to our branch project schedule Settings page - allowing those with branch owner access to set the default settings for all projects in the branch. The Build Overview tab defaults to our Key Tasks build overview, but we have a number of great cross-project reports as shown below
- Key Task build overview - a top-level report displaying key moments of each job across all active projects
- Gantt build overview - a task-level gantt across all projects
- Calendar build overview - a task-level calendar view across all projects
- Timeframe Shift report - a top-level report displaying variance from your locked schedule baseline
- Resource Allocation + Full-Time Equivalent reports - your resource reports displaying allocated tasks either month by month or with customisable timeframes
- Project Timelines Report - a top-level report displaying all of your project's start and finish dates - allowing you to plan your next lot of work for each project manager
- Settings page - to set your branch's schedule default settings
Each Build Overview report has a number of filters, allowing you to customise the report, with print and/or export functionality also. These are awesome reports to help the business owner and project managers better manage multiple projects and to help you get the most out of these, we have created a great article that takes you through each of these handy reports, this article is available from this RAVE’s Cross Project Reporting FAQ.
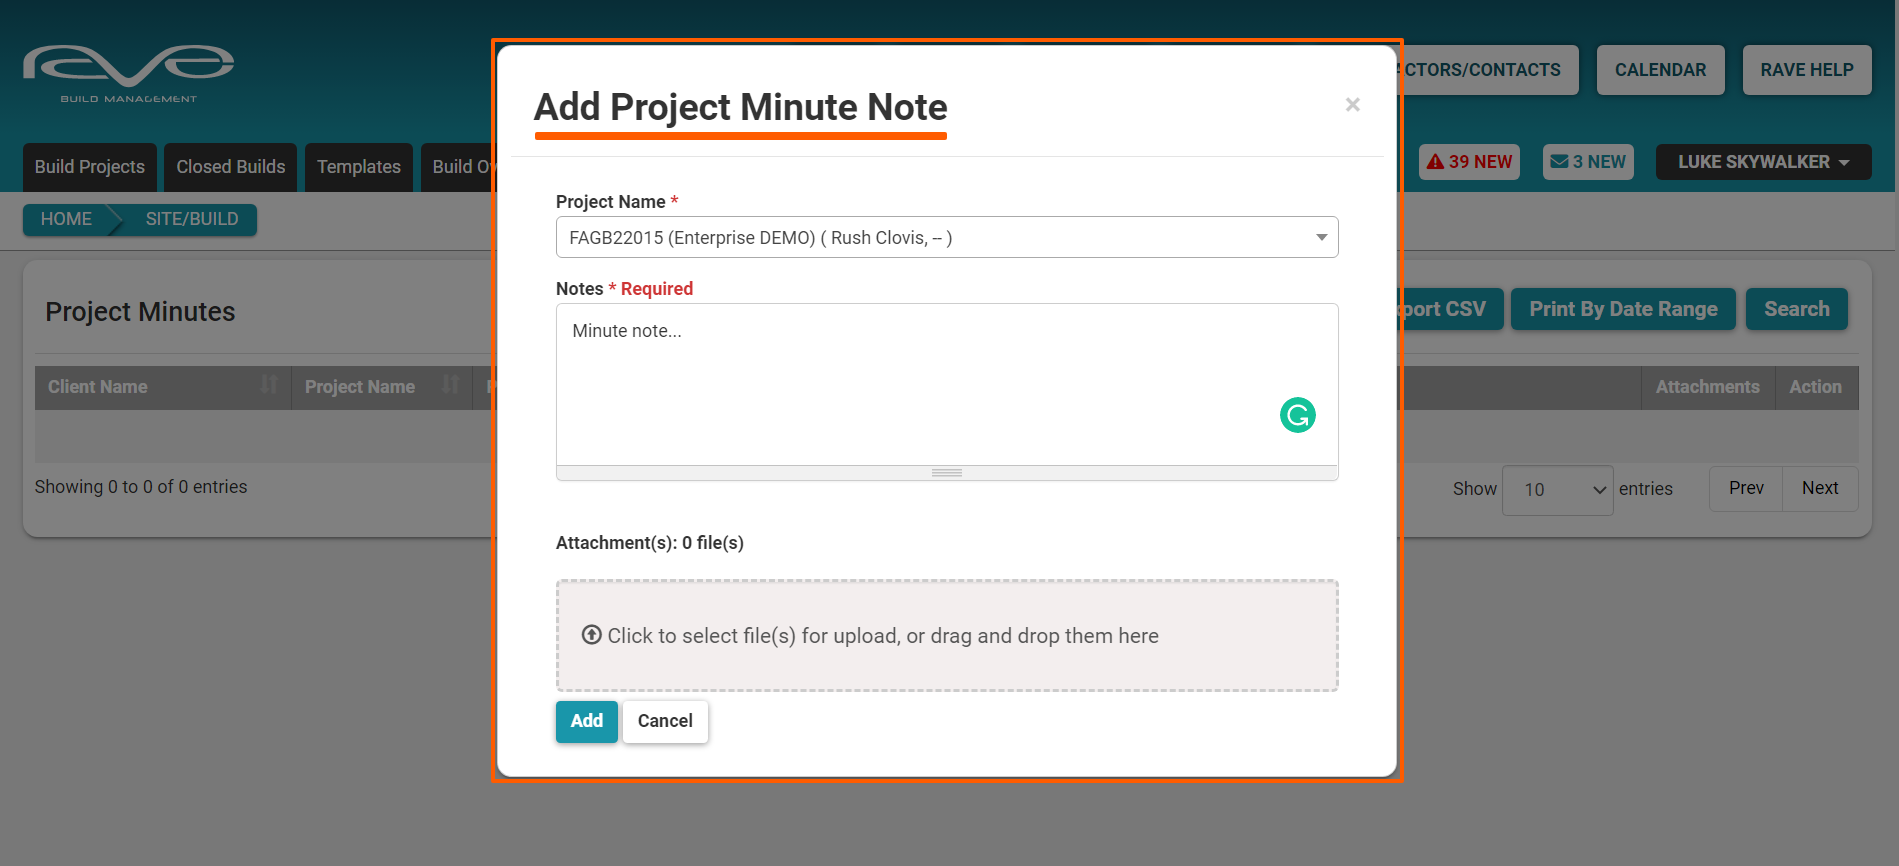
The Project Minutes sub-tab
The Project Minutes sub-tab, allows you to add Project Minutes, and track these across all of the Builds in your branch.
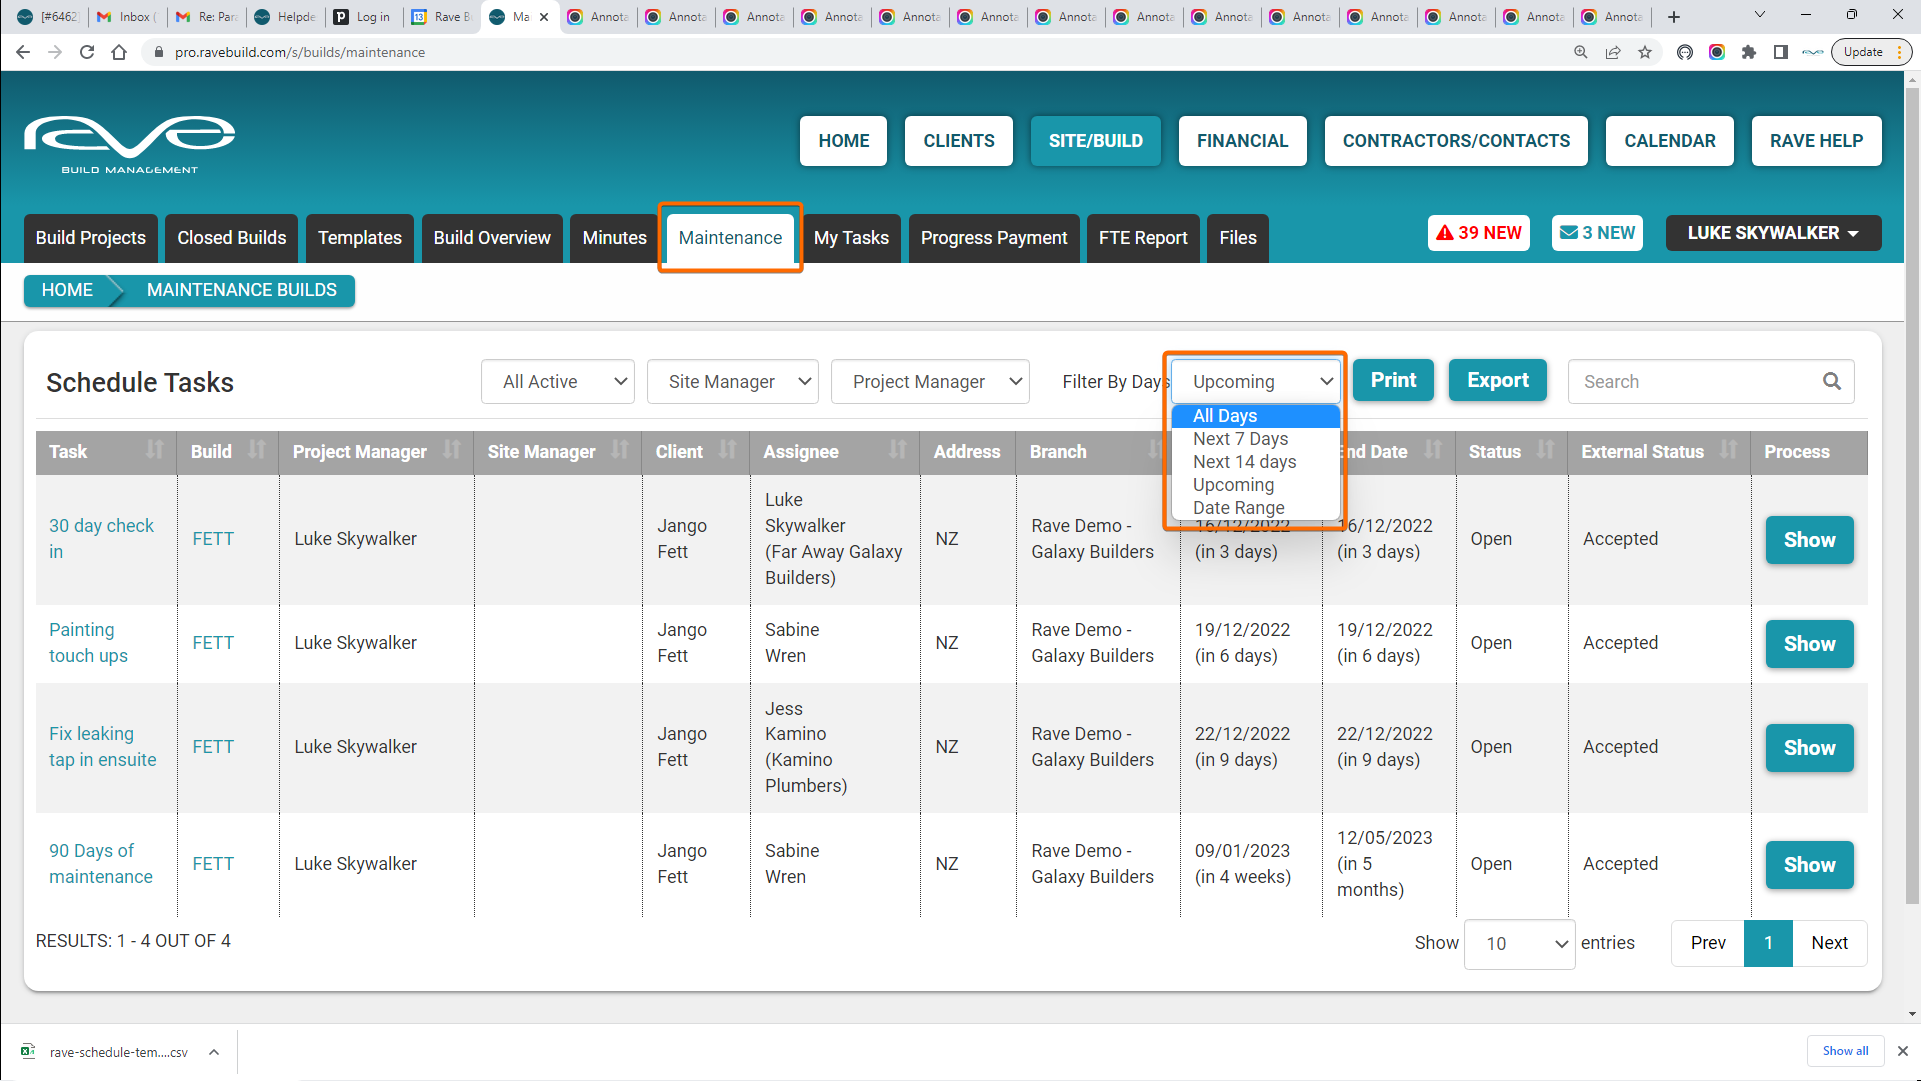
The Maintenance Reporting sub-tab
The Maintenance reporting sub-tab displays the status of all tasks that are held within a maintenance milestone in your Active Projects - it allows you to quickly review all of your branch’s tasks in your maintenance milestones.
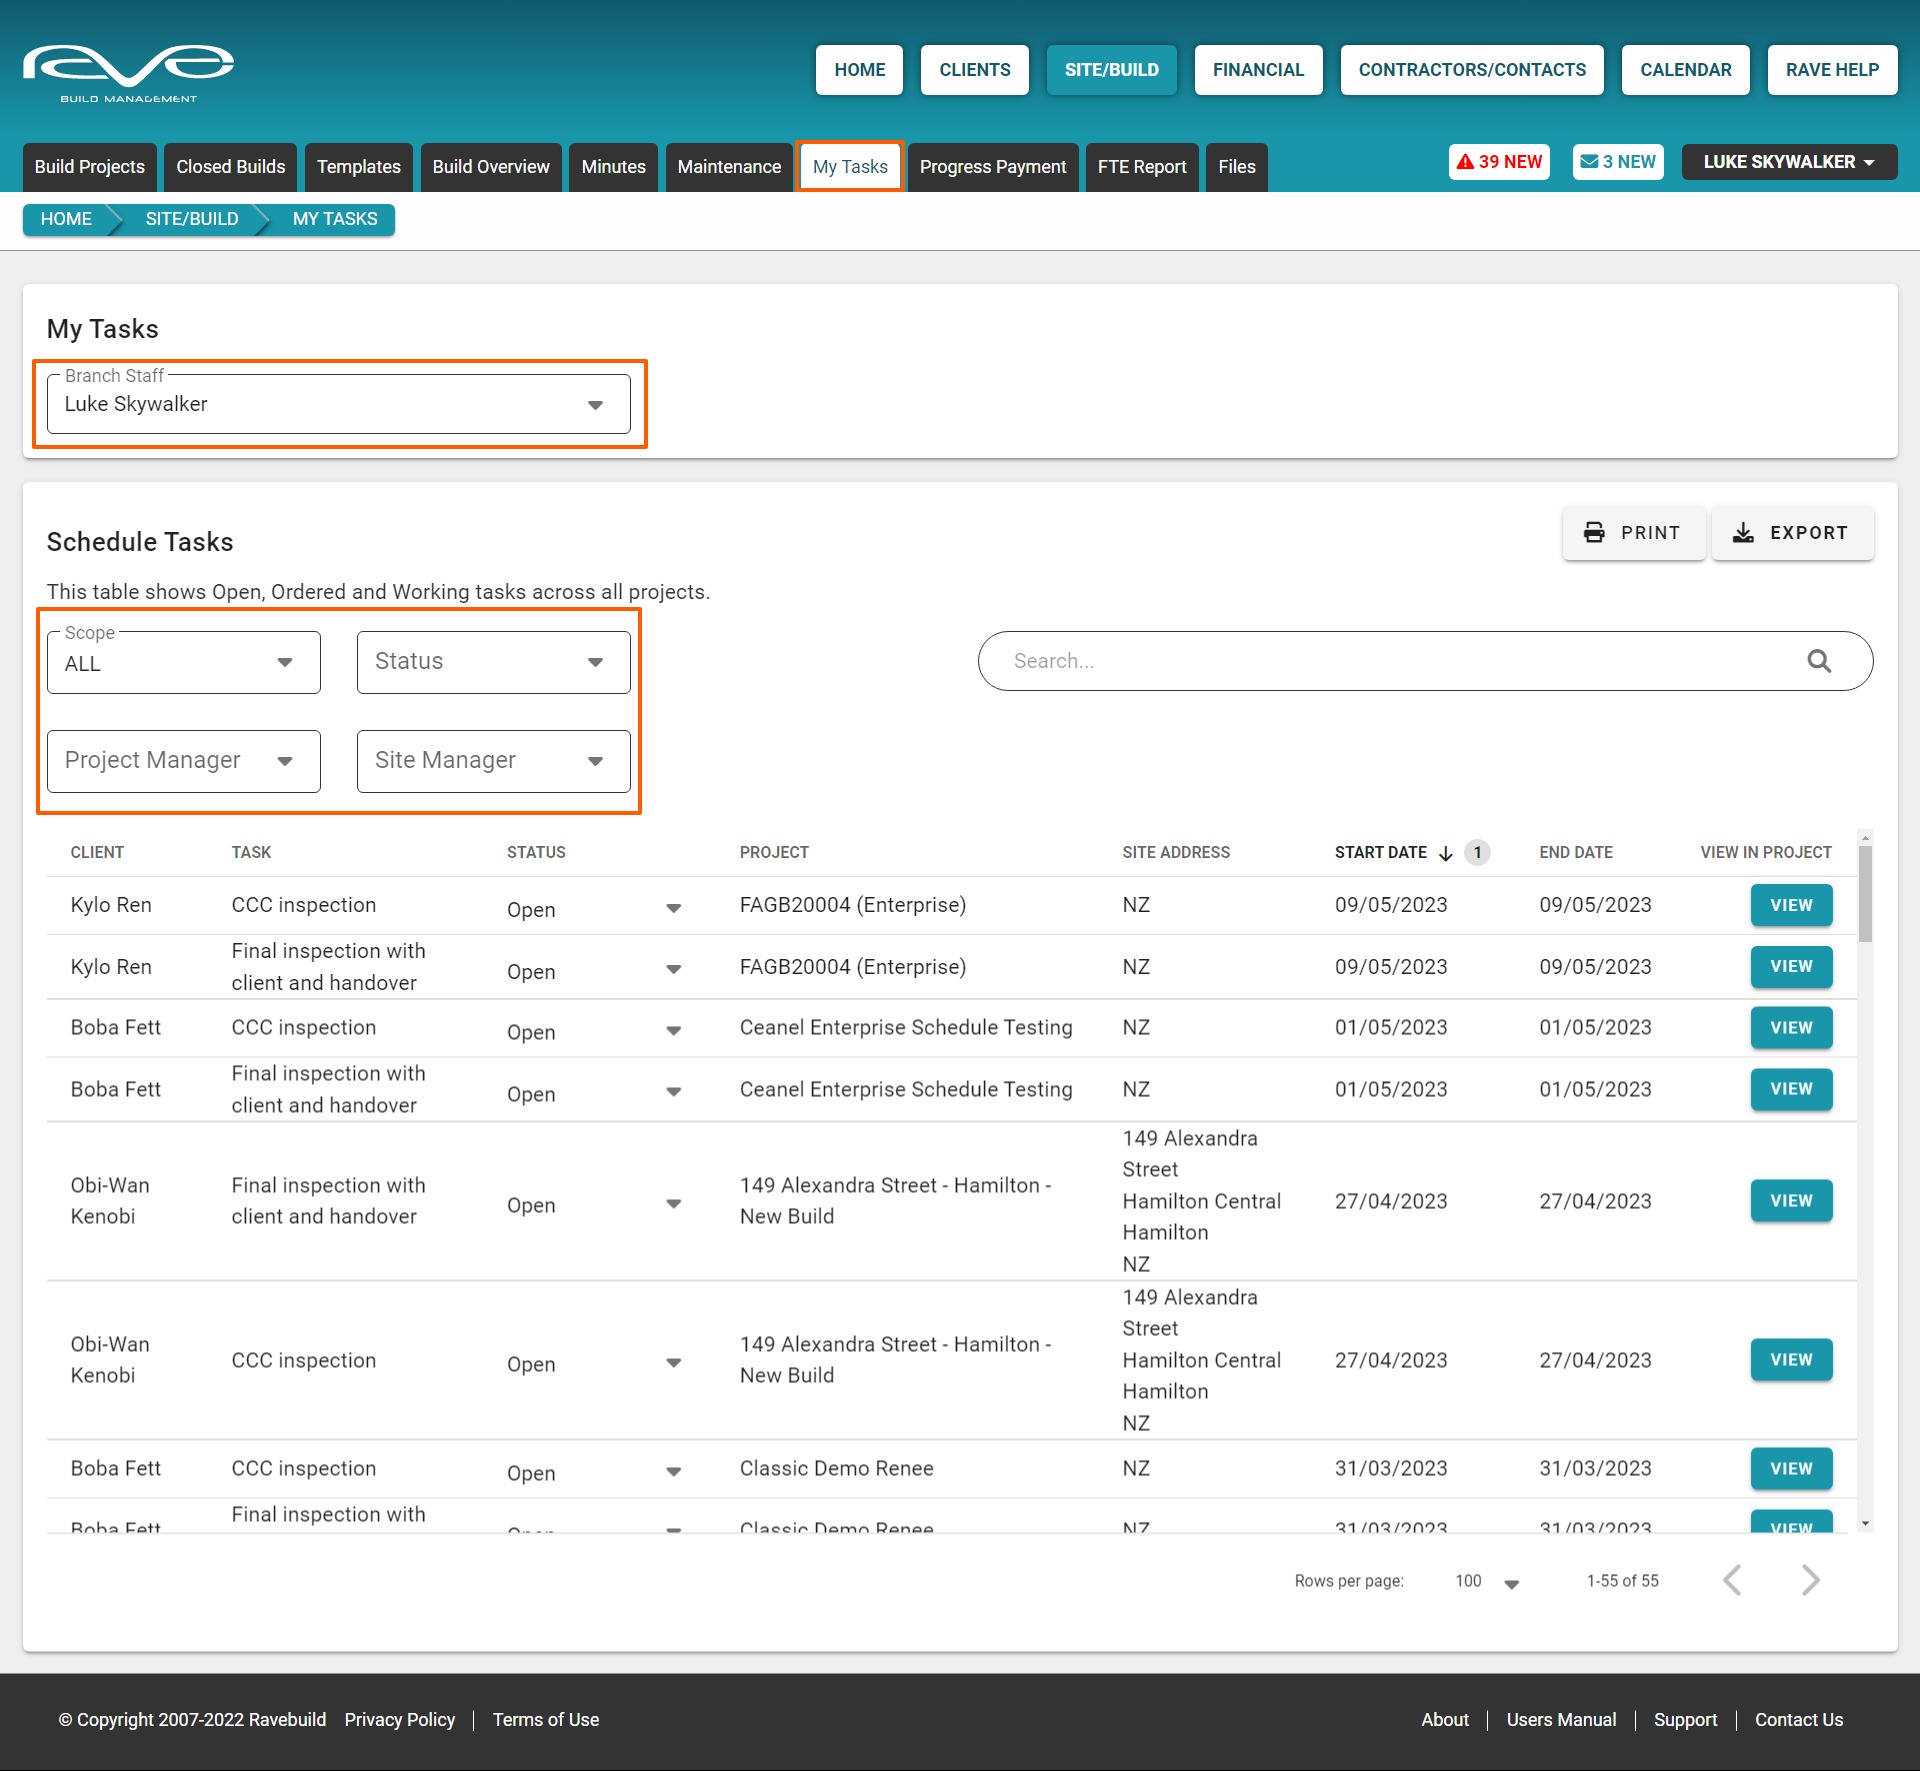
The My Tasks sub-tab
Displays all of the tasks assigned to you across all of your branch's Active (and Maintenance) project's.
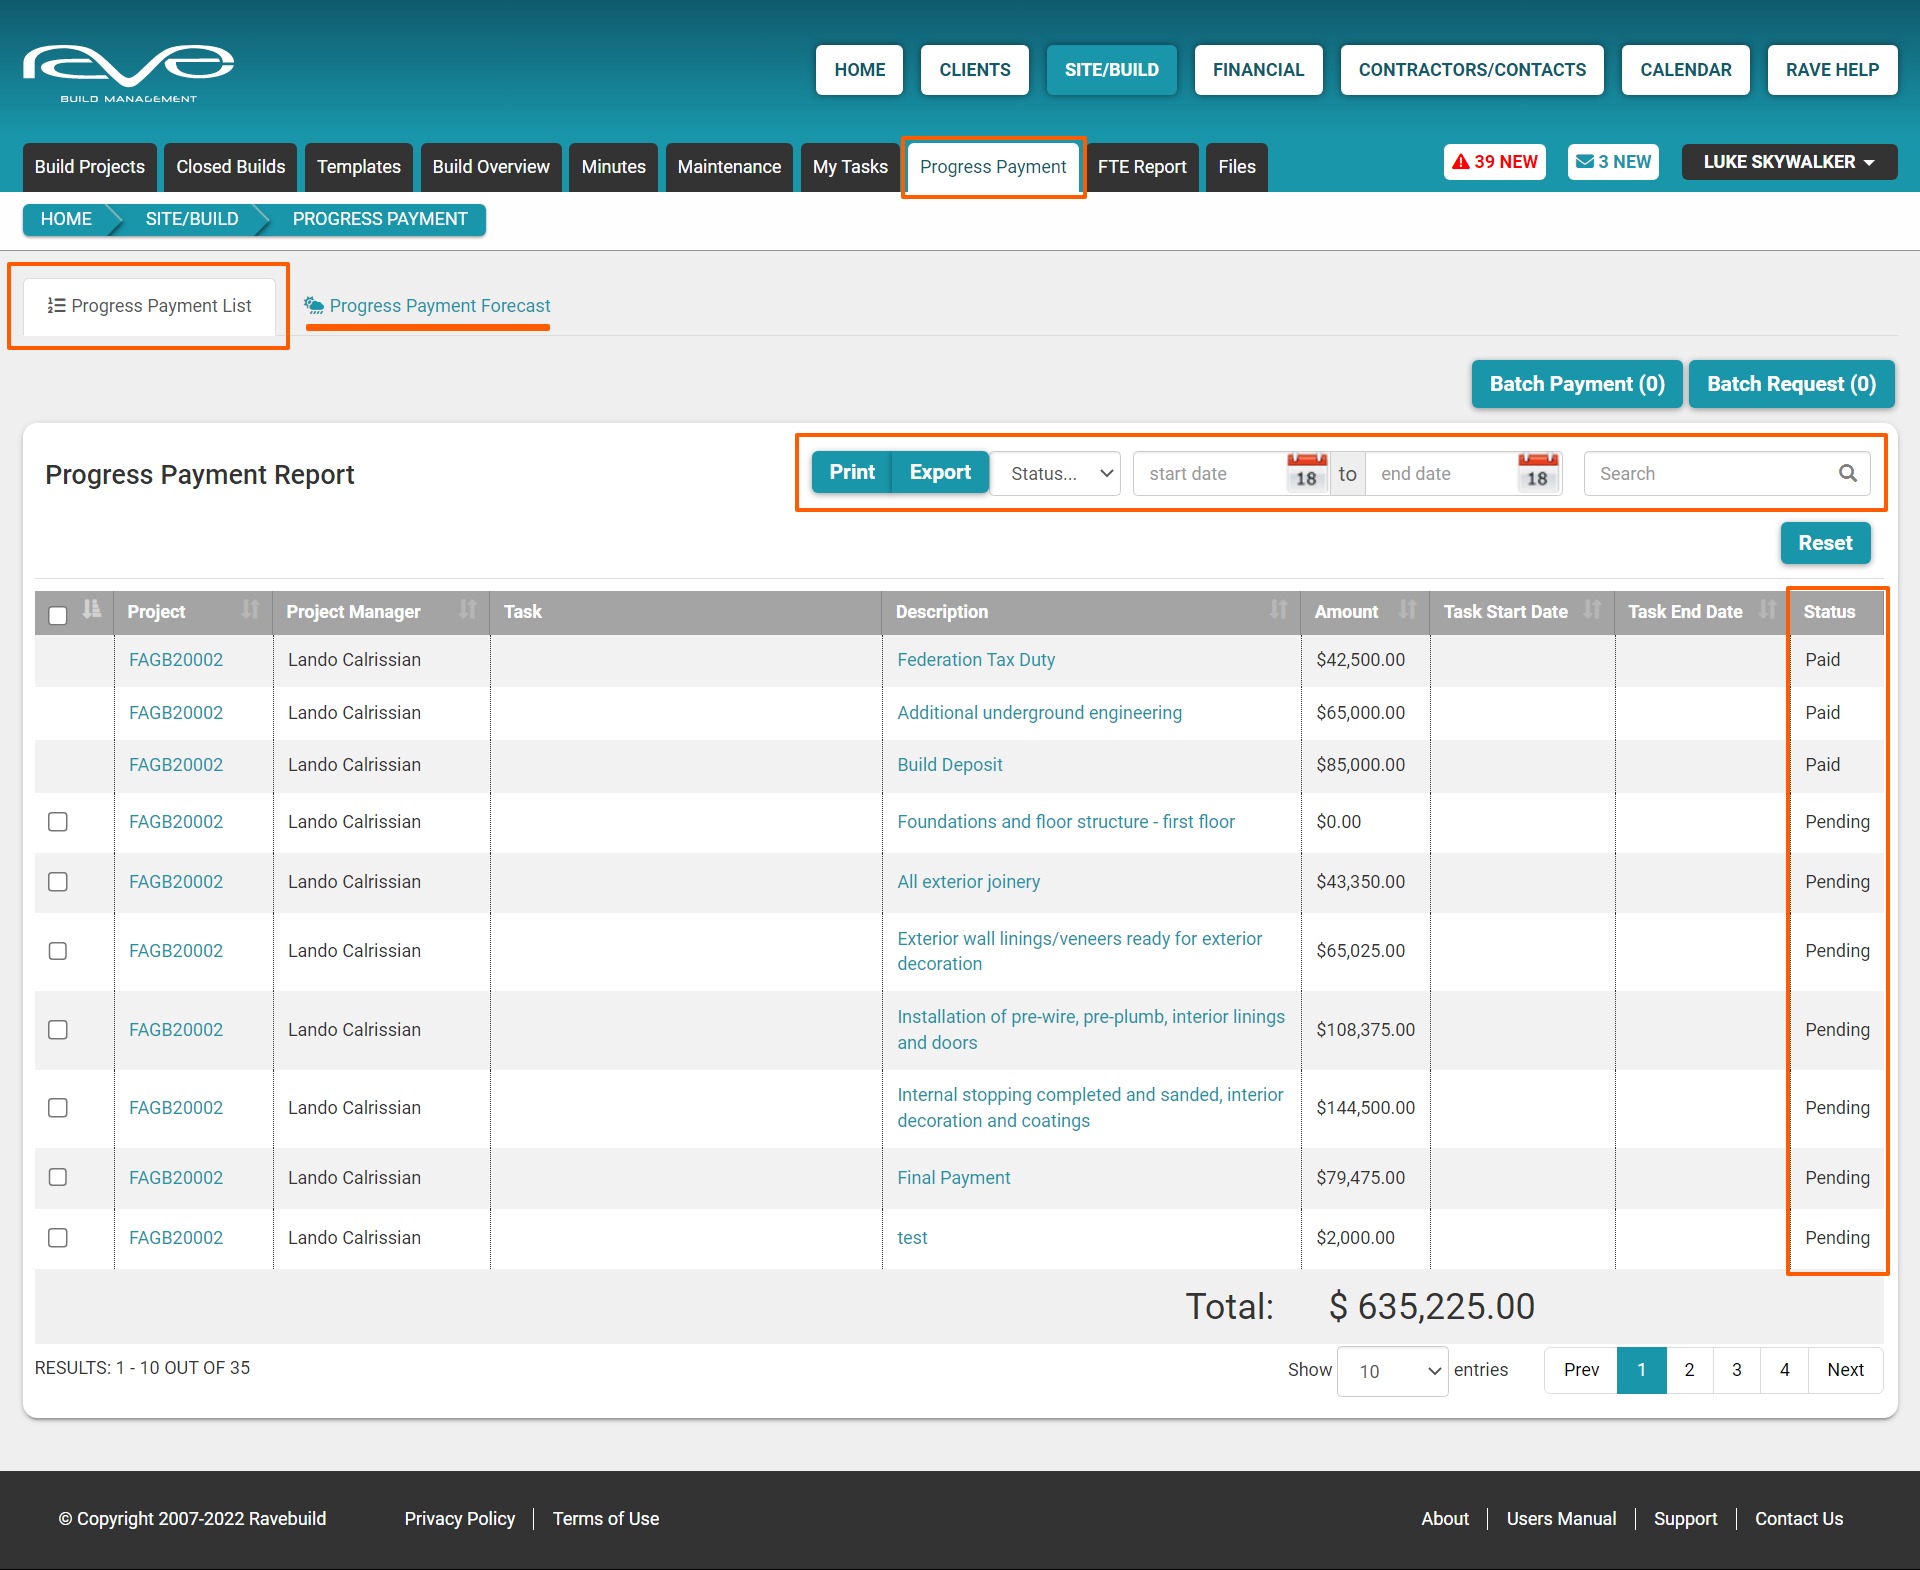
The Progress Payment report sub-tab
The Progress Payment report sub-tab is a branch-level invoice forecasting report, that summarises the status of all Progress Payment Requests linked to Scheduled Tasks in your projects. You can read more about this via our Progress Payment feature Blog here.

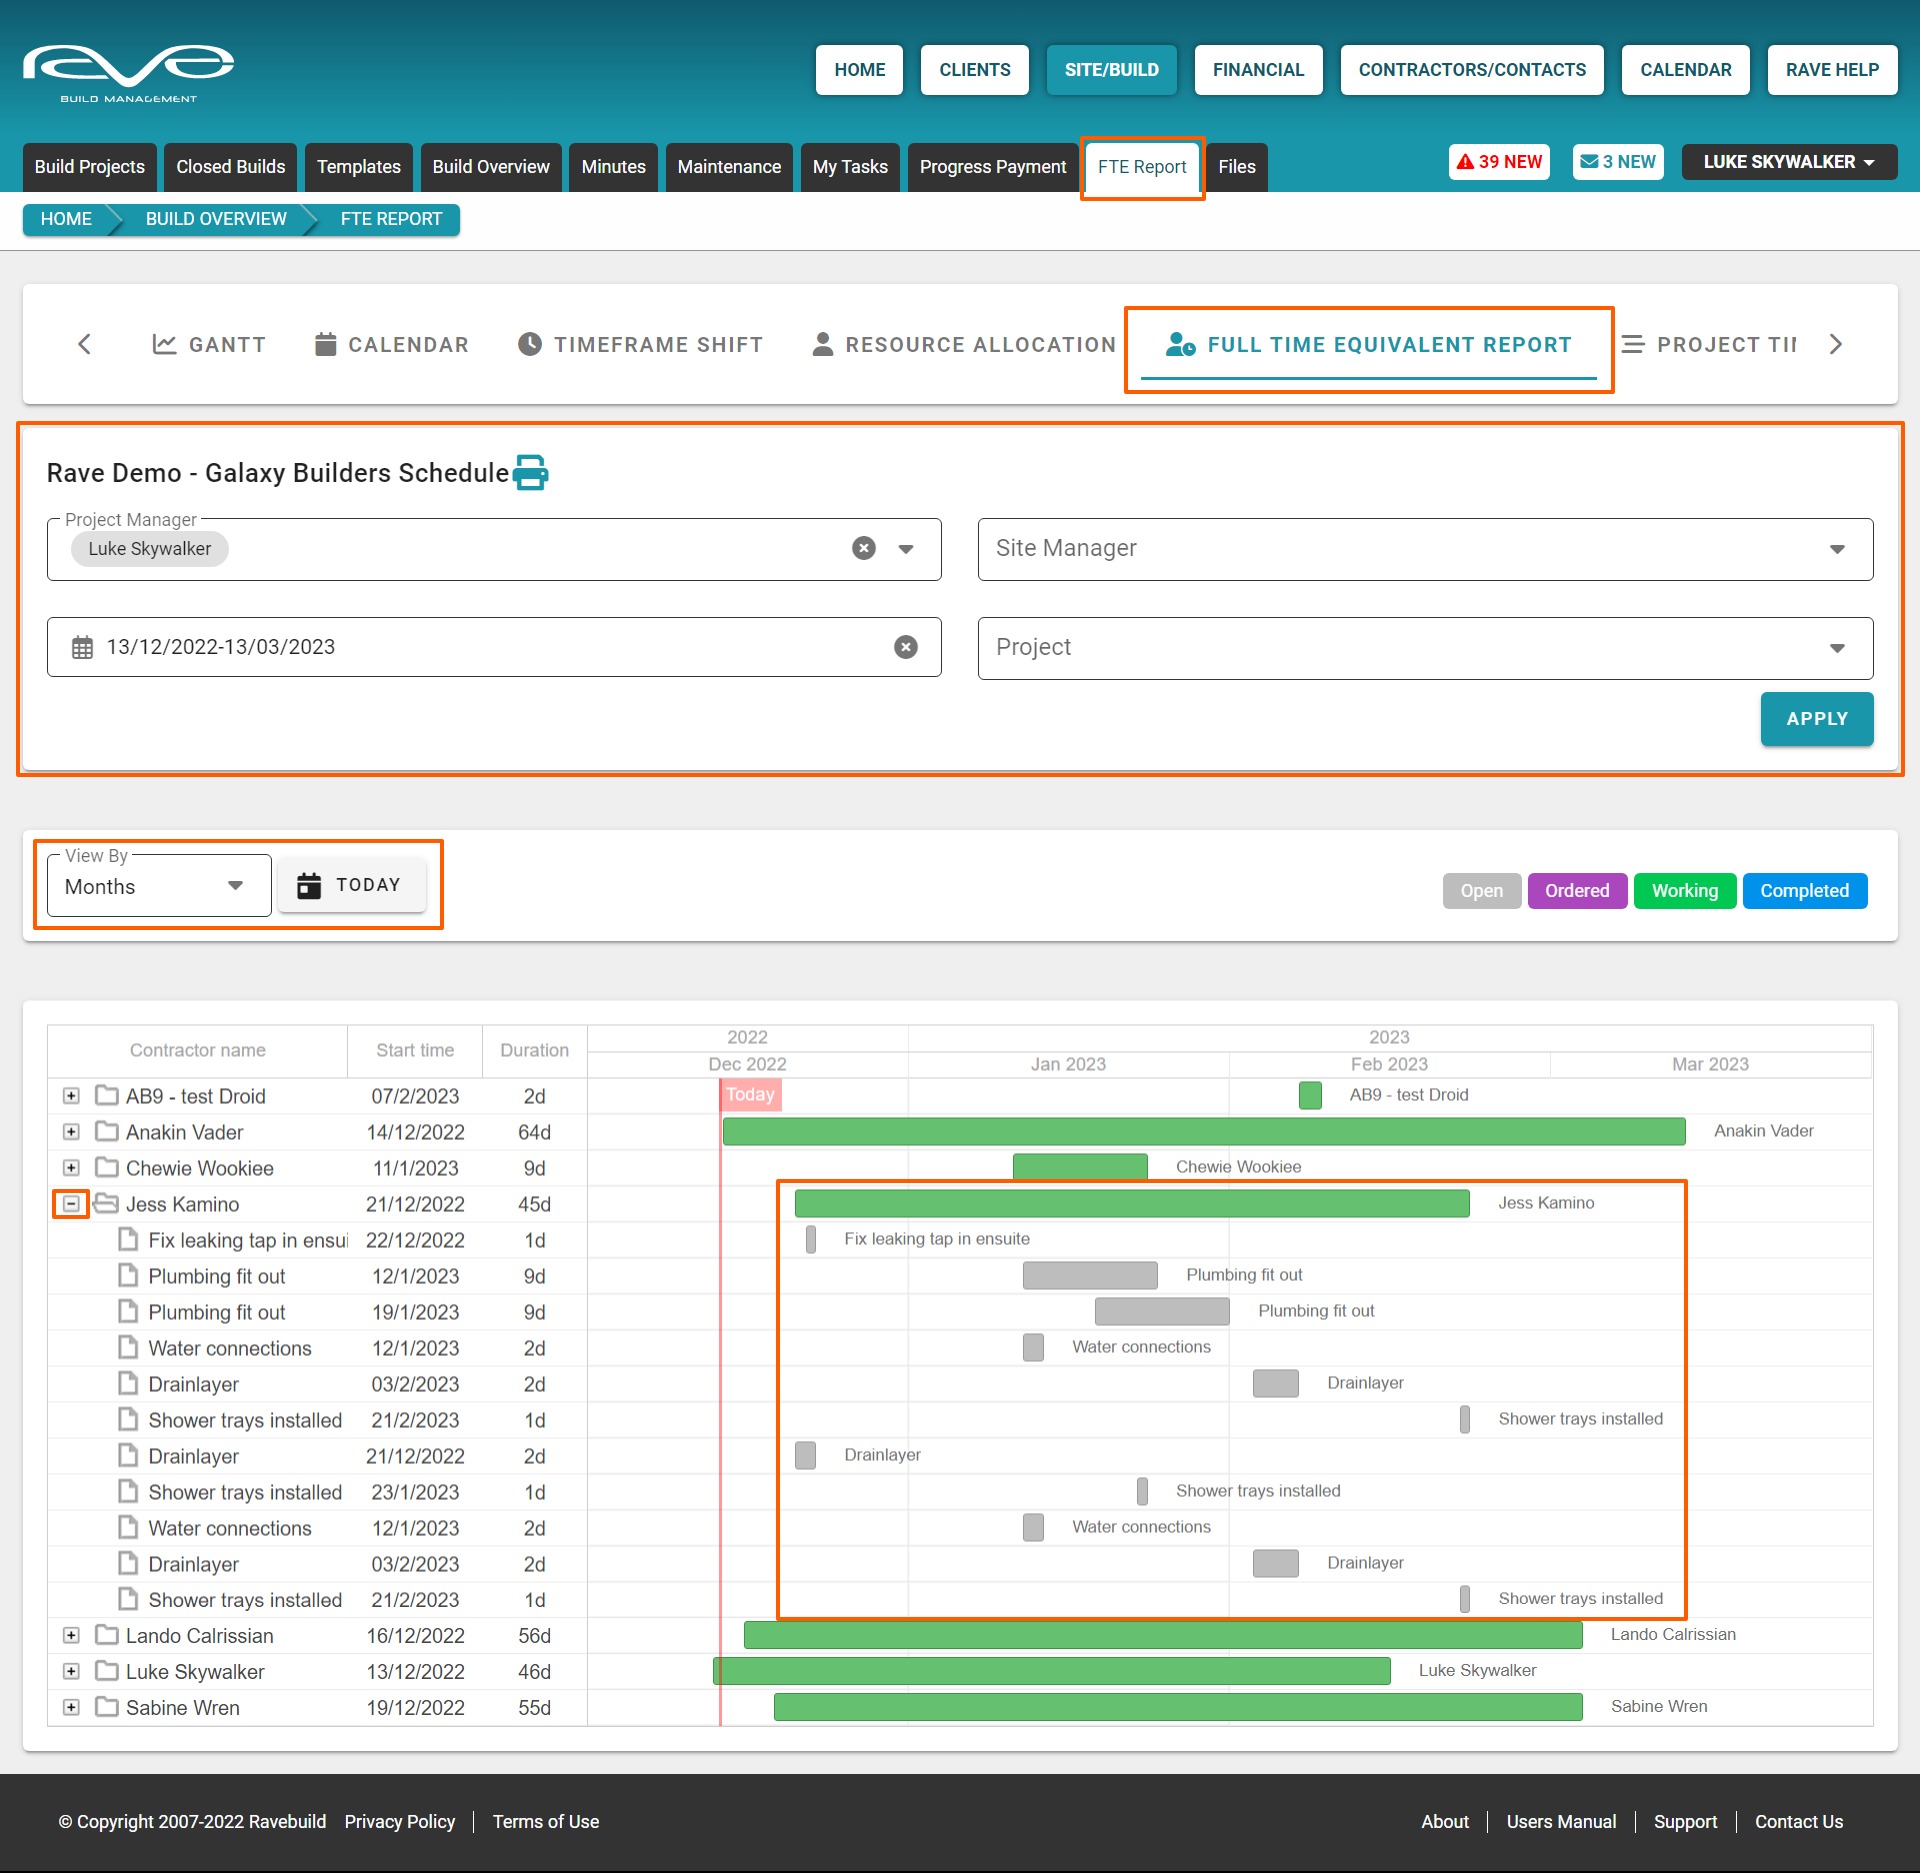
The FTE (Full Time Equivalent) Report sub-tab
The FTE Report sub-tab is a shortcut link to our Site|Build / Build Overview / FTE report - where you can track the status of any allocated tasks assigned to your project staff and contractors - with customisable filters, timeframes, task status and view by scale.
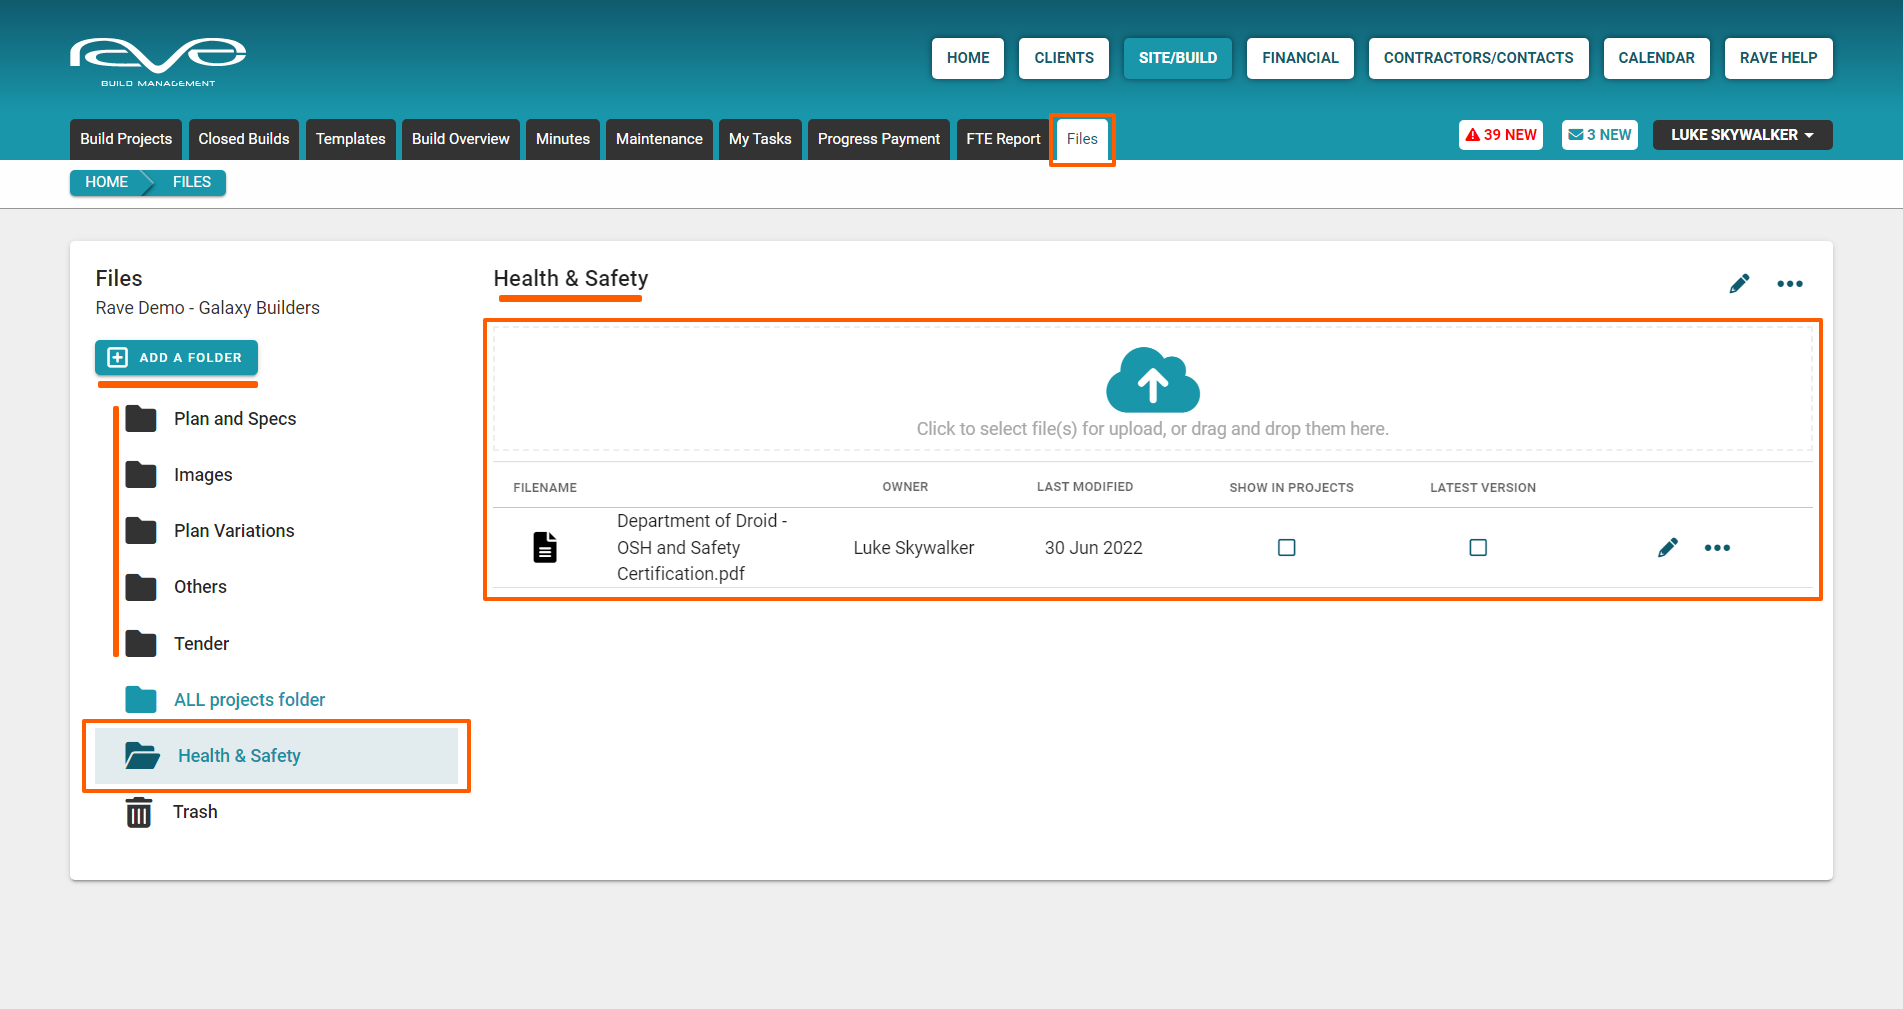
The Files sub-tab
The Files sub-tab provides a mechanism for those with branch owner permissions, to manage folders and documents that need to be made available from all projects i.e. a tender submission guide (document) to be loaded into all project’s ‘Other’ folders, a Health and Safety subfolder and Health and Safety policy documents, etc. You can read more about this via our Manage custom Folders and Files at a Branch Level blog here.
The Project Sub-Tabs
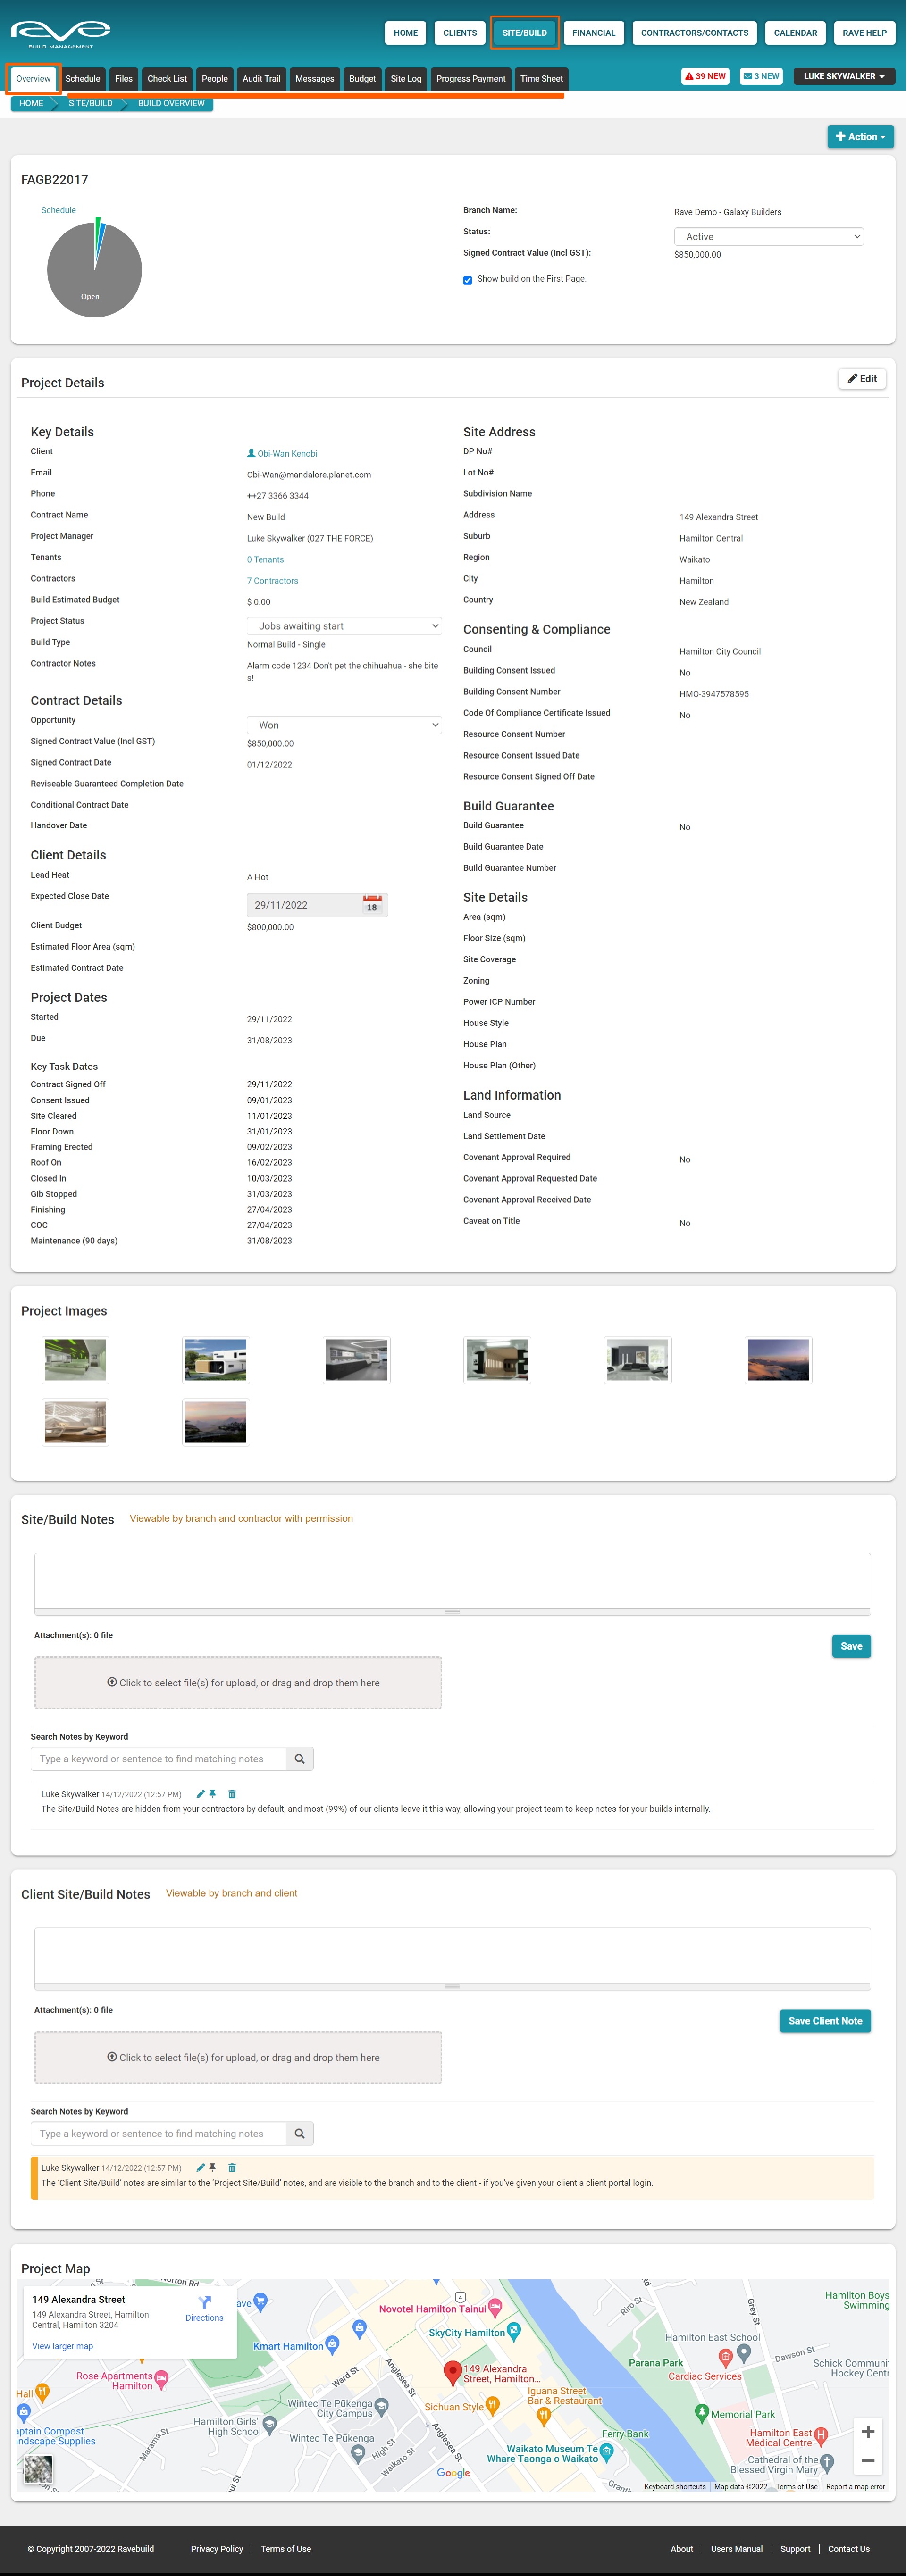
The Project's Overview sub-tab
When you open/ a job, you will gain access to the project's sub-tabs, landing on the project's ‘Overview’ sub-tab - which lists key job information for the project.
The Schedule sub-tab
The ‘Schedule’ sub-tab is where we create/load and manage our project schedule(s), assign tasks to staff and contractors, and view the schedule in various formats.
NOTE: We cover scheduling in detail via our Classic and Advanced Project Schedule trainings

The Files sub-tab
The 'Files' sub-tab is where we store all of our project images and documentation. The files can be images, pdfs, word and excel documents as well as video files. We have a number of preset folders, and you also have the ability to create your own folders at a project level too.
NOTE: We cover the files sub-tab in detail later on in this training.
The Check List sub-tab
The 'Check List' sub-tab is where you can manage your process driven to-do's and processes - that fall outside of your project schedule tasks i.e. if you have a specific way you'd like a concrete contractor to do their pour or you've got some other processes that you'd like followed, checklists are ideal for that.
NOTE: We cover the check list sub-tab in detail later on in this training.

The People sub-tab
The 'People' sub-tab is where we decide which sub-trades and site staff we want to give access to this project - unless a person's name is listed on the Peoples page, they will not have access to the project.
NOTE: We cover the people sub-tab in detail later on in this training.
The Audit Trail sub-tab
The ‘Audit Trail’ sub-tab keeps a record of all the actions that have happened within the project within RAVE. The Audit Trail is only visible to office staff (branch users) and can be very useful for checking on who did or didn't do something, and also for managing disputes. The audit trail has a super powerful, and very fast search function too - so as long as you know who did something, or what action they should have done, you can quickly search and find the reference you are looking for.
NOTE: We cover the people sub-tab in detail later on in this training.
The Messages sub-tab
The ‘Messages’ sub-tab allows you to access RAVE’s internal project messaging system - RAVE's version of project email. You are able to email others attached to the project those others being - other staff, site staff, contractors, and the client.
NOTE: We cover messaging in detail via our Project Communication training

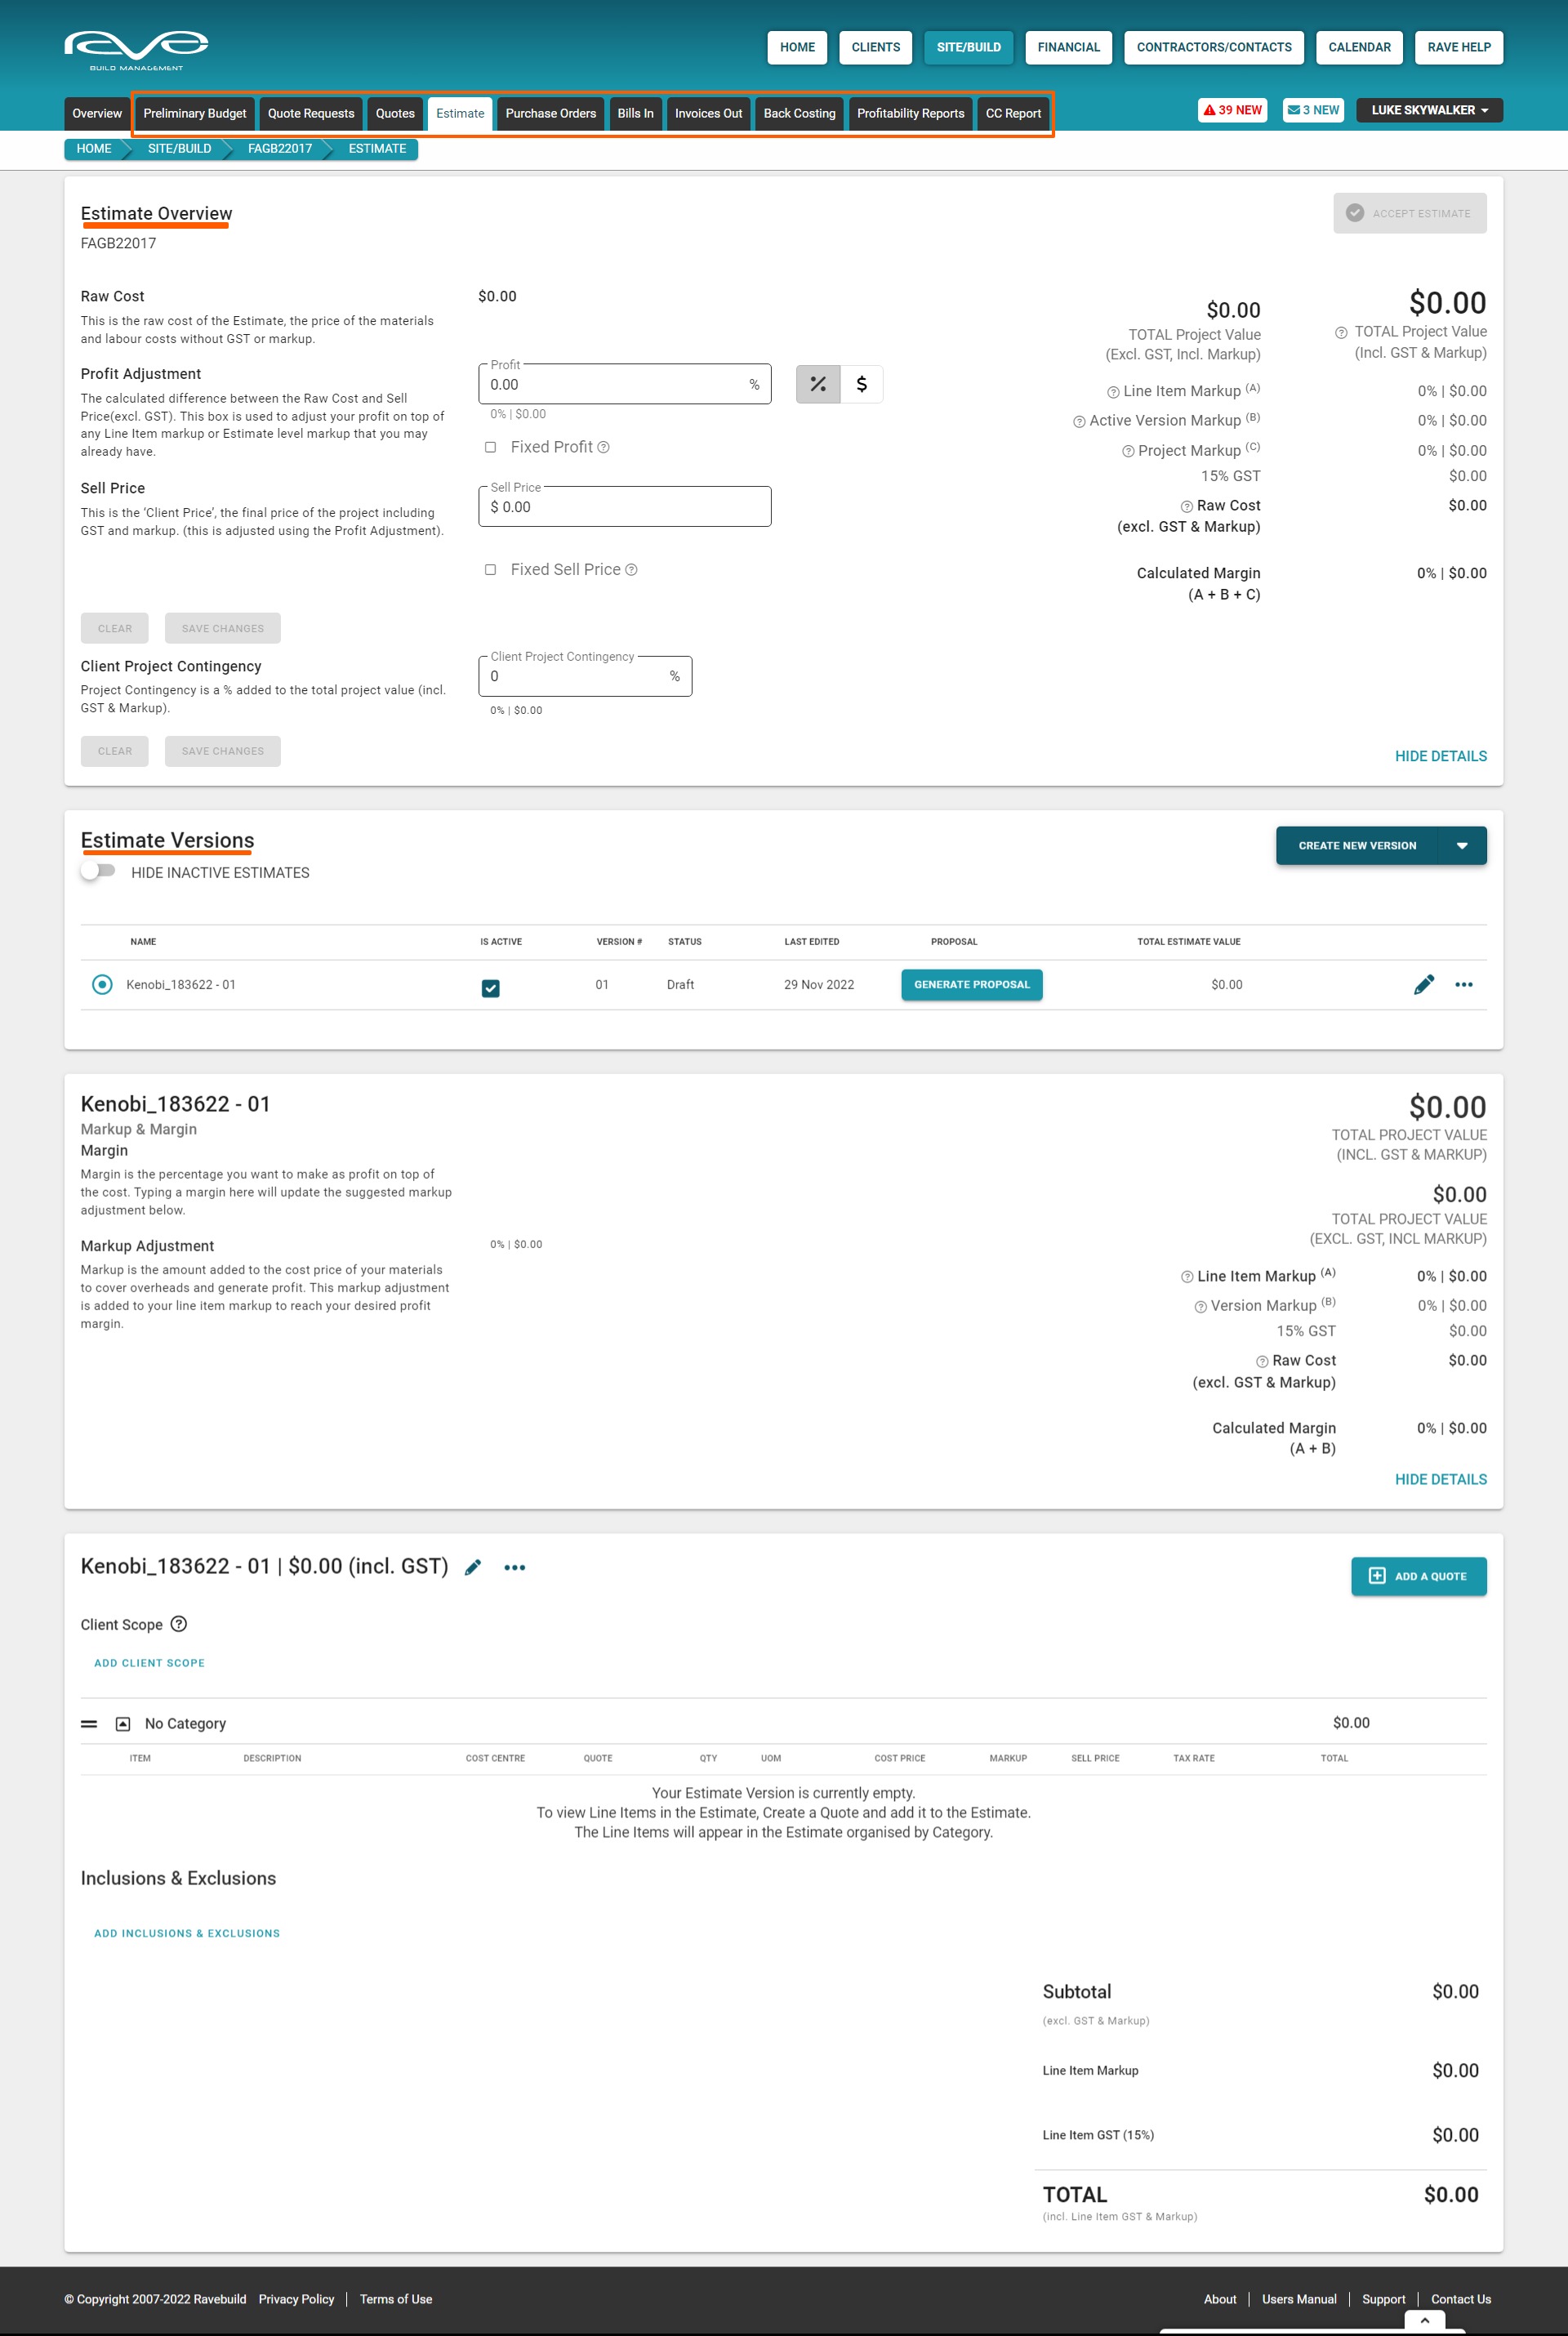
The Budget + Budget workflow sub-tabs
The ‘Budget’ sub-tab is RAVE's financial management and reporting tool, available to branches (and users) with RAVE's Financial Management System (FMS) add-on.
Clicking on the Budget sub-tab provides access to the FMS workflows:
- Preliminary Budget
- Quote Requests
- Quotes
- Estimate
- Purchase Orders
- Bills In
- Invoices Out
- Back Costing
- Profitability Reports
- Cost Centre (CC Report)
We have additional FMS reports via RAVE's ‘Financial’ button and the 'Reporting' portal via your profile dropdown.
NOTE: We cover RAVE's FMS in detail via our Financial Management System training
The Site Log sub-tab
The ‘Site Log’ sub-tab records all comments, photos and documents added to scheduled tasks. It is also used to help users track project delays.
NOTE: We cover task communication and the site log in detail via our Project Communication training

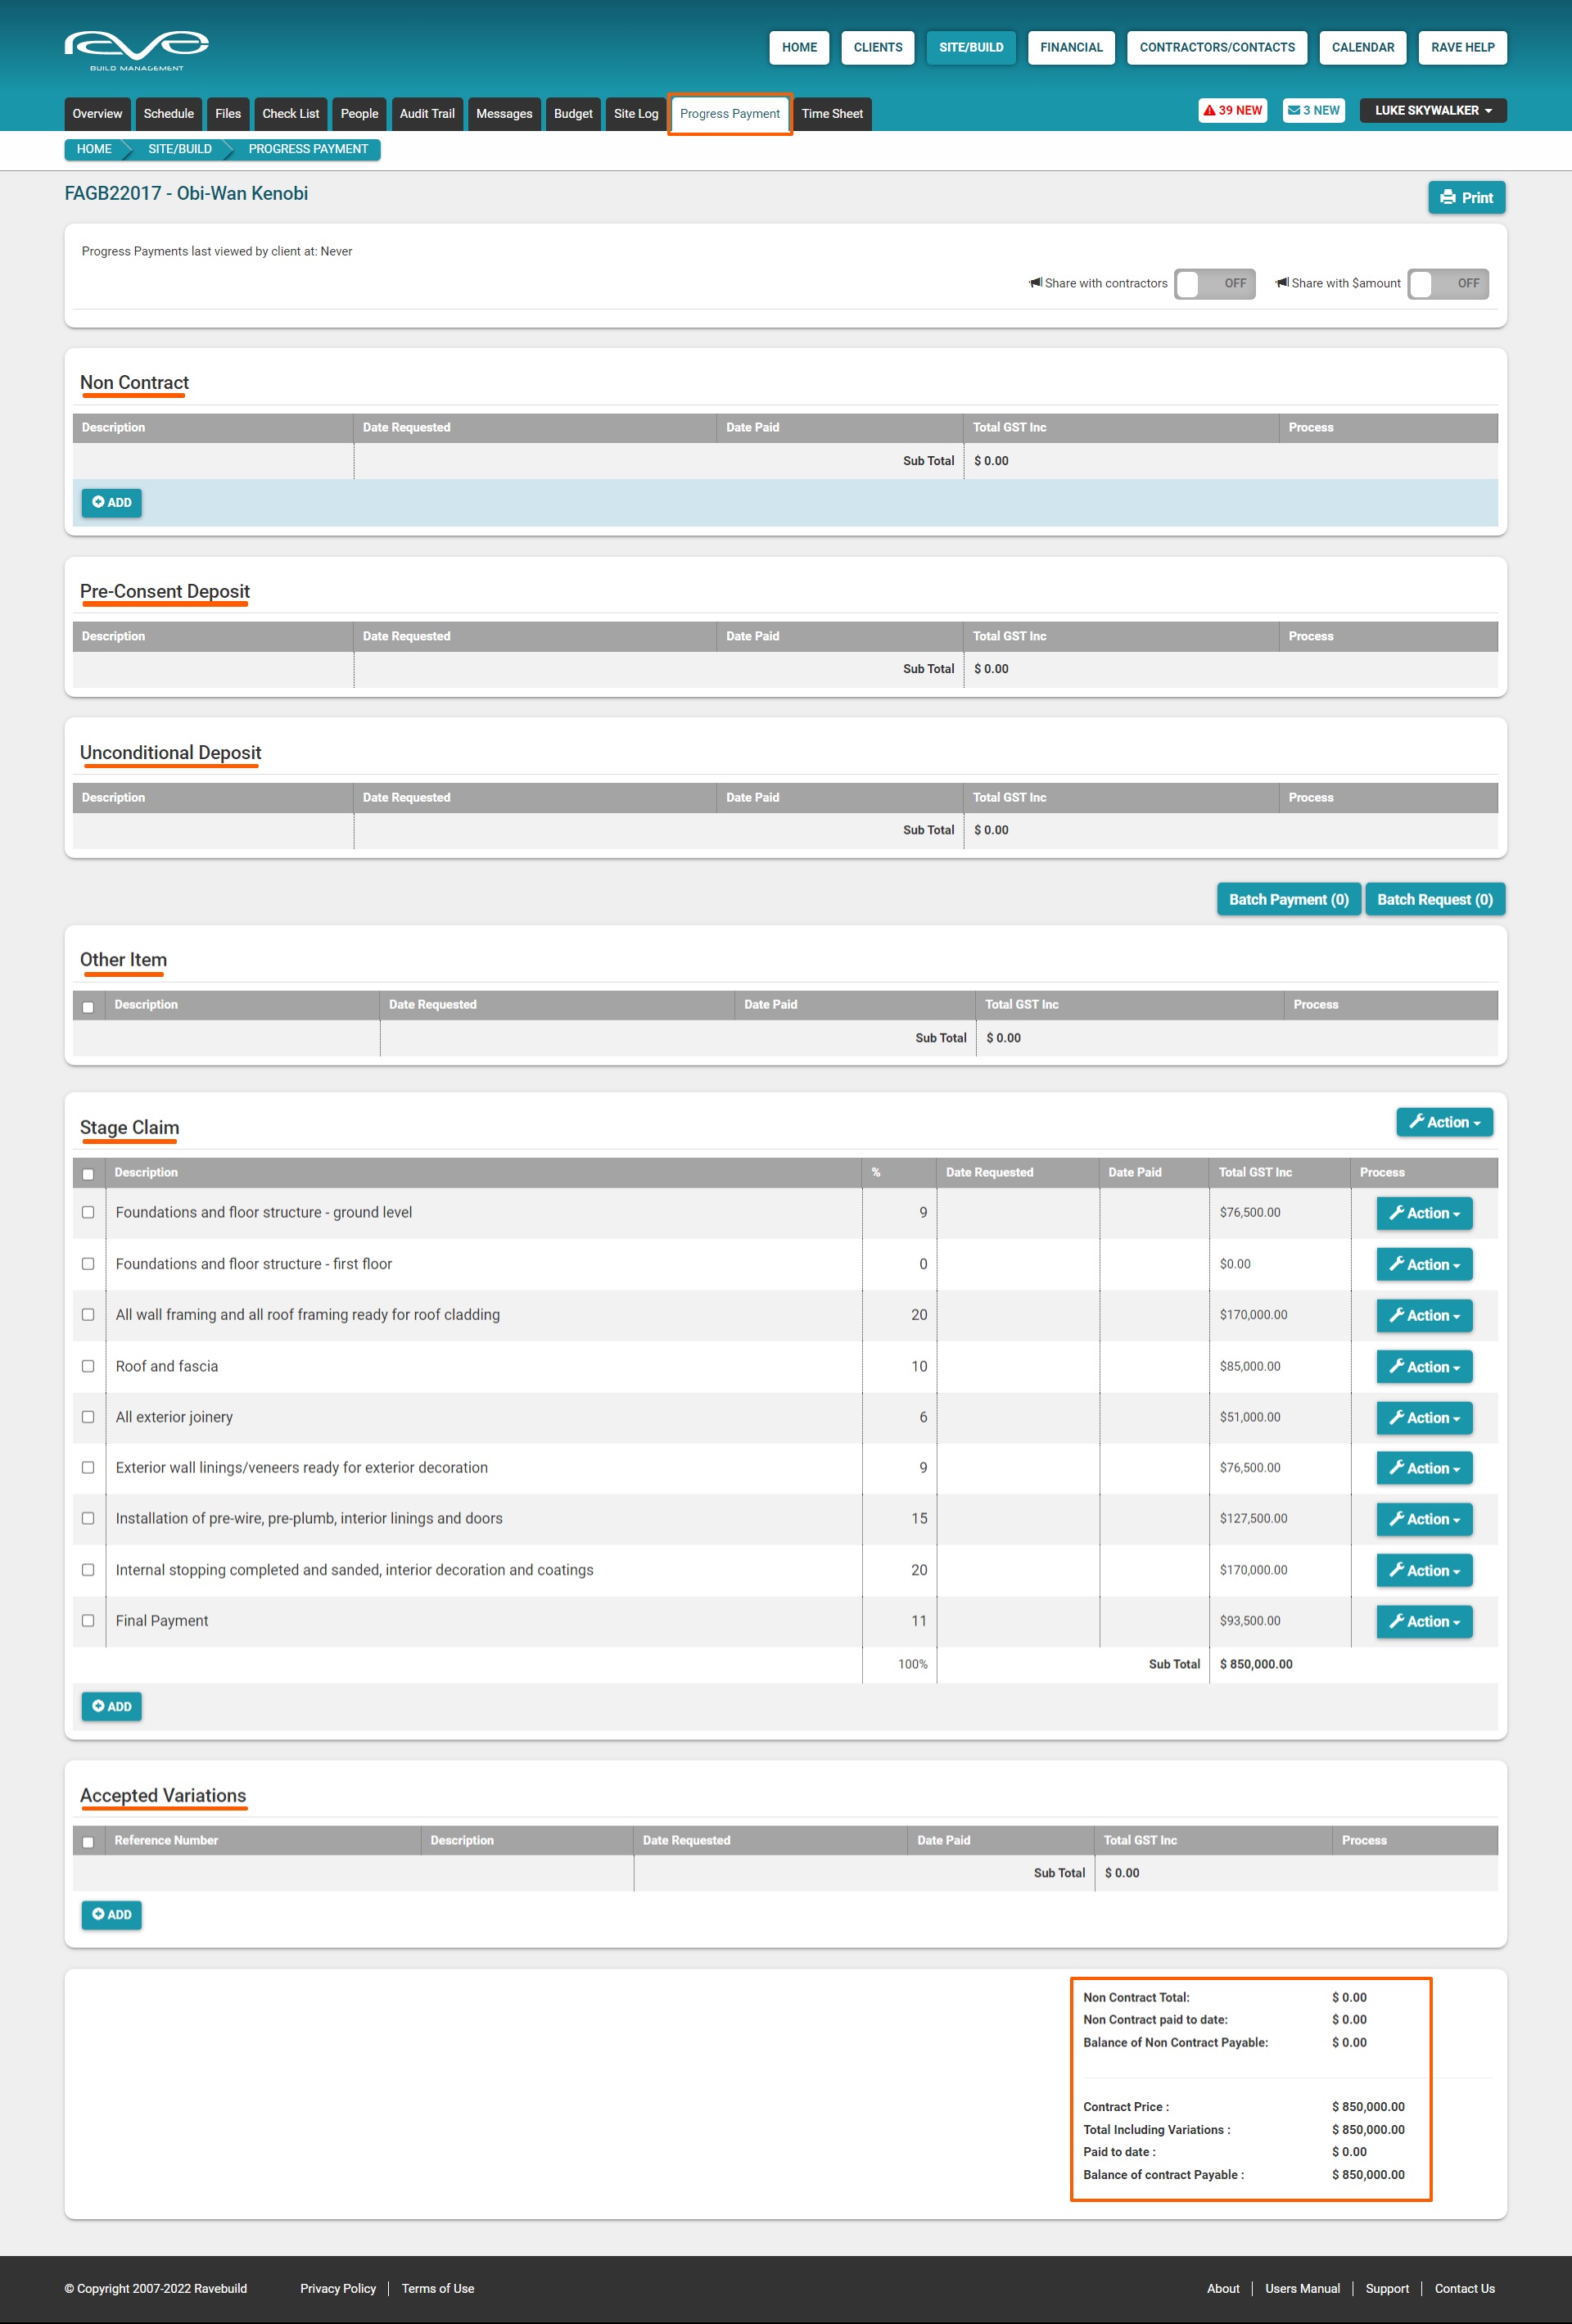
The Progress Payment sub-tab
The ‘Progress Payment’ sub-tab is where you can keep a record of all of your contract and non-contract payment requests, including your pre-sign payment requests, unconditional deposit, other items and PC sums, contract stage claim payments, and variations. Payment requests can be linked to scheduled tasks allowing accounts to more quickly request client payments.
NOTE: We cover this content in detail via our Accounts - Progress Payment training
The Timesheet sub-tab
The ‘Timesheet’ sub-tab provides a shortcut, allowing you to view and add timesheet entries for your team.
NOTE: We cover this content in detail via our Timesheet training

The Contractors/Contacts Button
Access this demo here.
A project's 'People' sub-tab is where we decide which contractors will have access to a given project - but before we can give them access here, we need to ensure we've added them to our system via the 'Contractors/Contacts' button - and that's what we're going to look at now.
TIP: If you are ever concerned about what your contractors can see in your projects, follow these steps to add yourself as a 'dummy' contractor to your branch and project, and then login in as the contractor to see what is visible to contractors.

NOTE: Contractors vs Suppliers
The term ‘Contractor’ in RAVE, is used to describe those sub-trades and suppliers who need a RAVE login to access your projects, schedules, and documents in RAVE. As opposed to 'Suppliers' who provide quote information only, these 'Suppliers' do not need to log in to RAVE to access the project details, and therefore do not need a RAVE login.

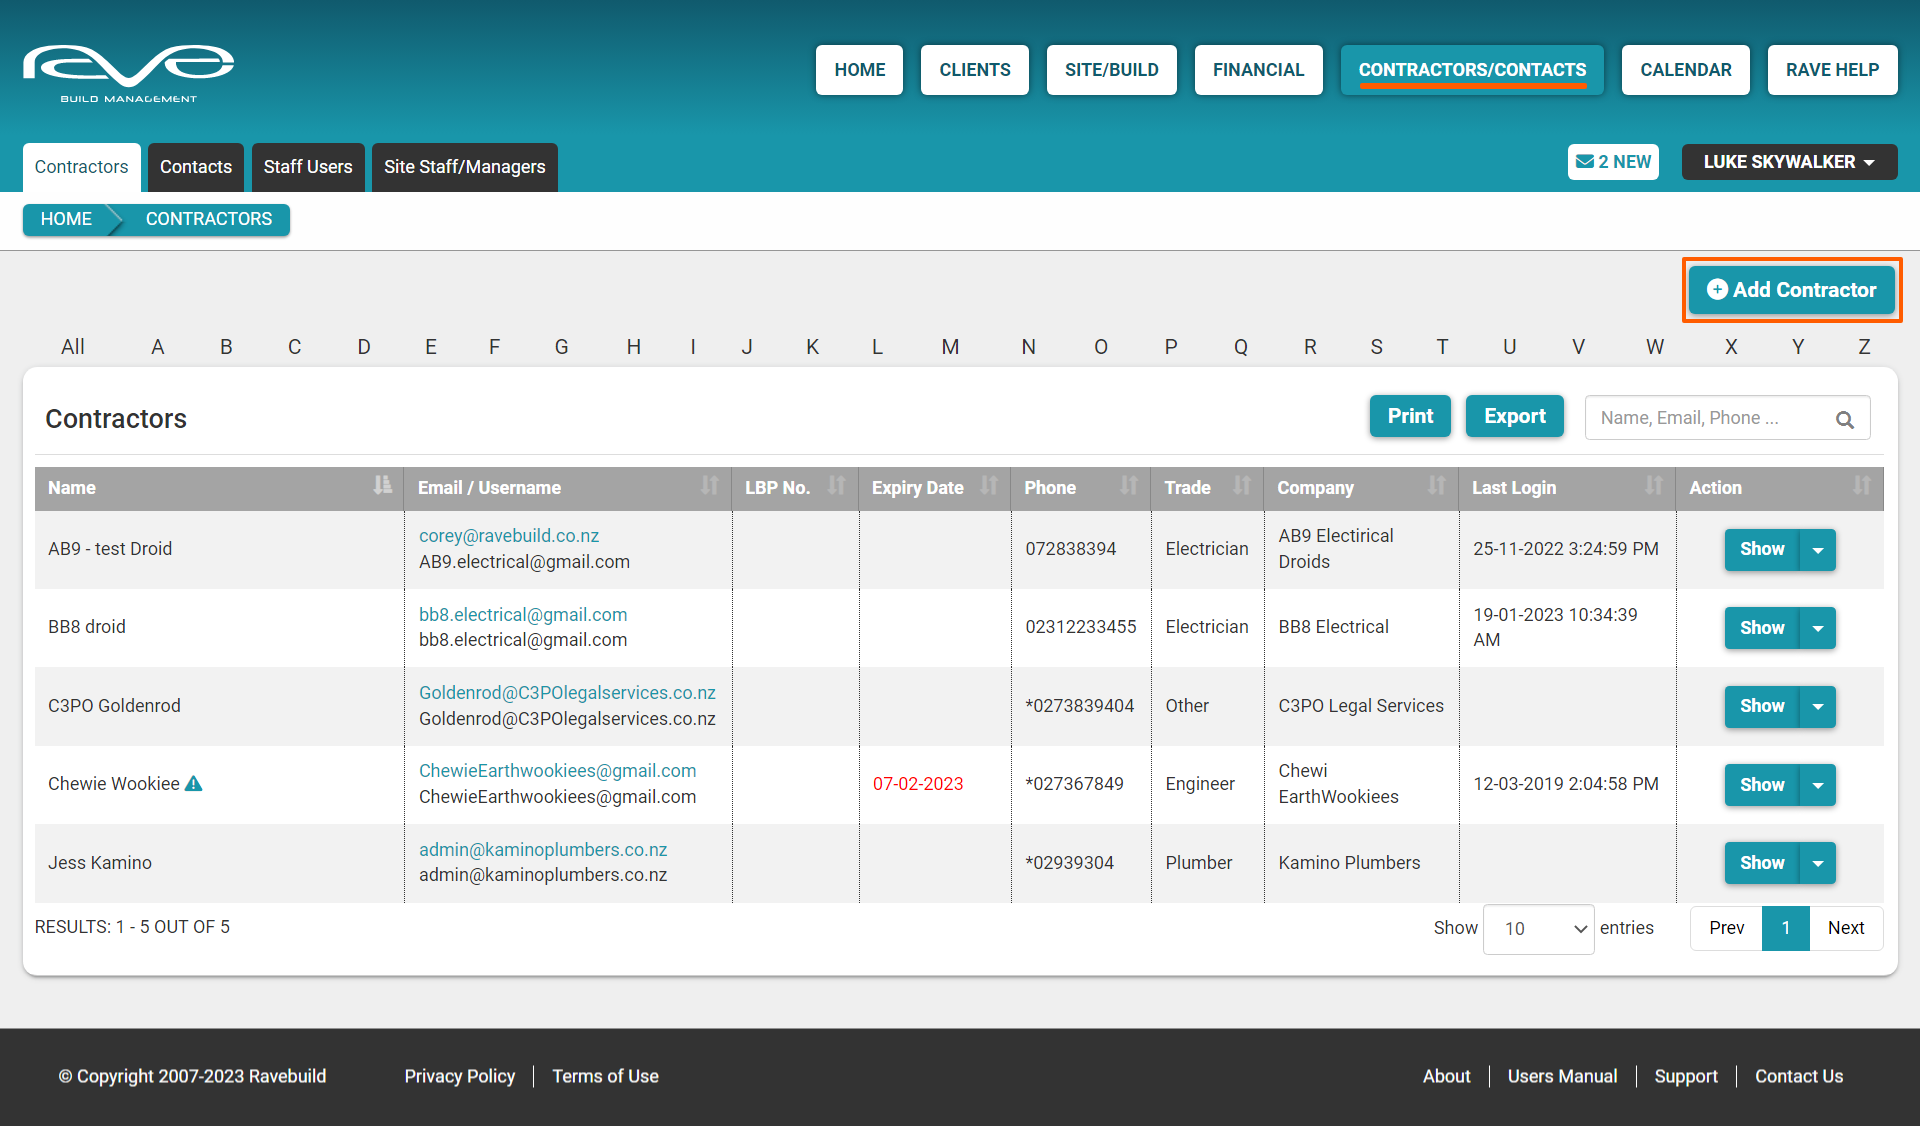
The Contractors/Contacts Page
Clicking on the 'Contractors/Contacts' button, takes us to the 'Contractors/Contacts/Staff Users/Site Staff/Magers' page - and defaults to the Contractors sub-tab.
Contractors List + Last Login explanation
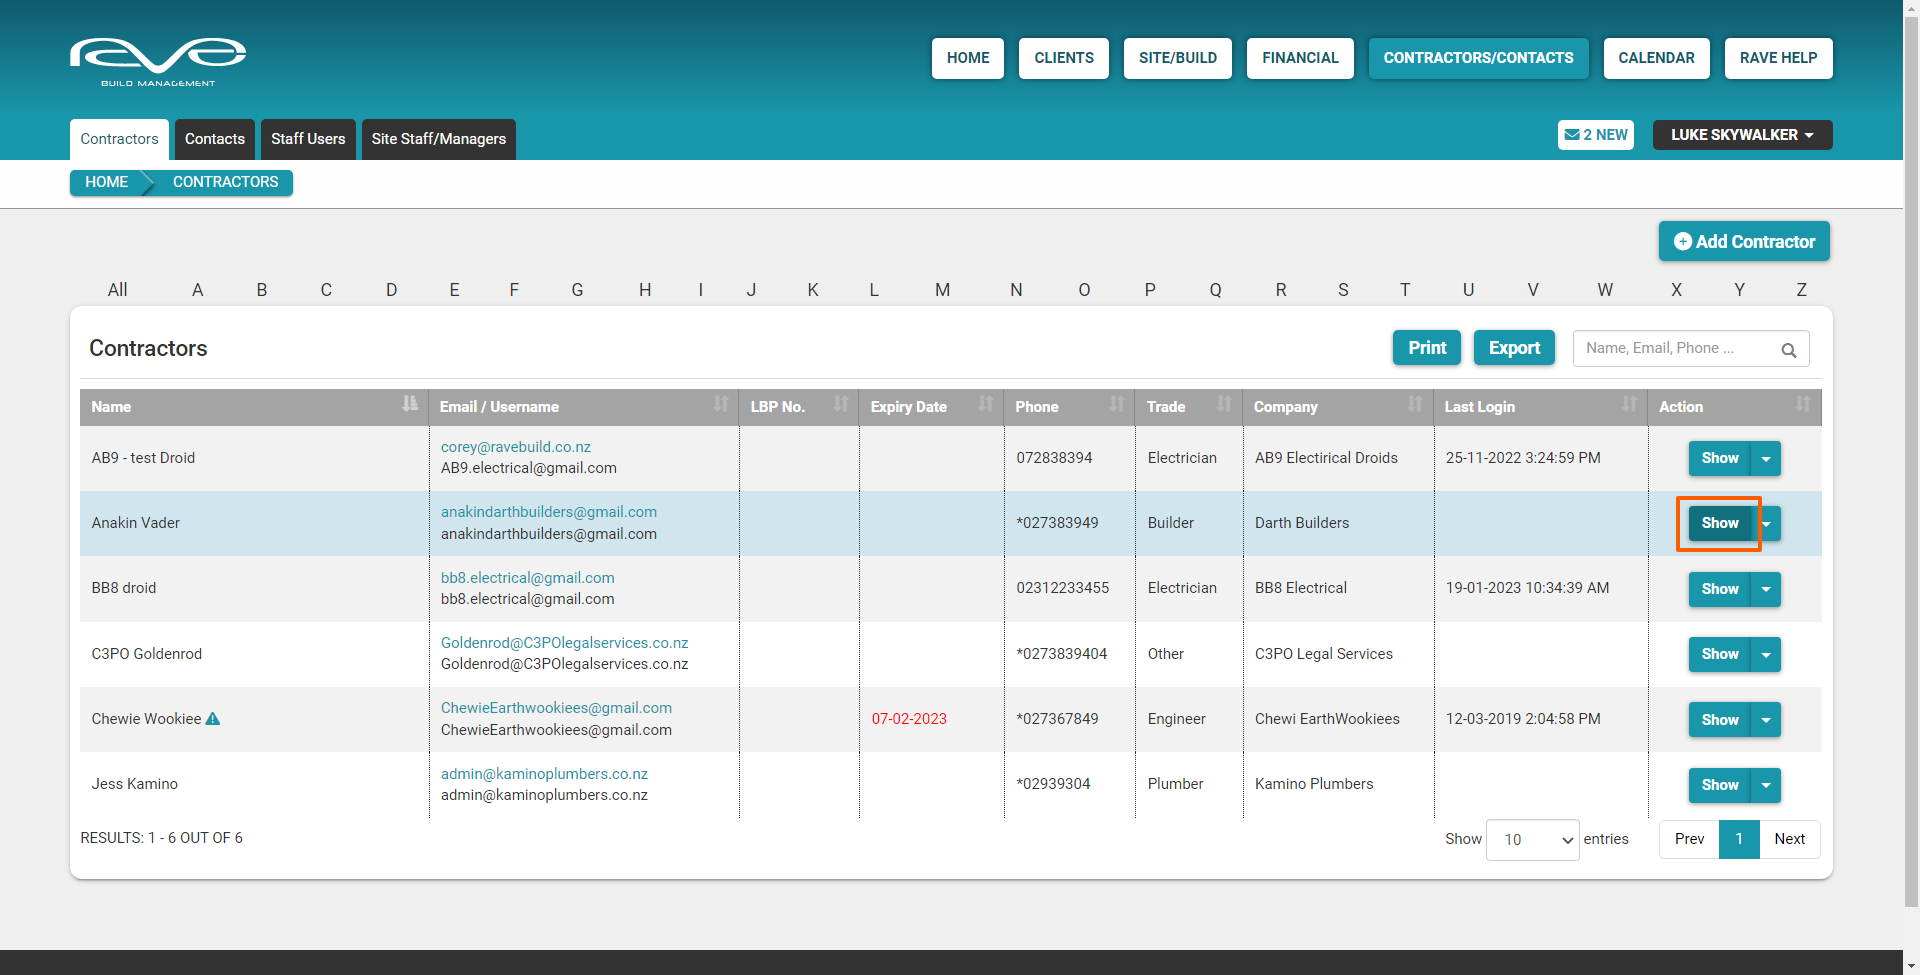
The Contractors sub-tab displays the Contractors List, with your contractors listed down the page, across the page we display their name (First and Last if loaded), their notification email (top) and their login username email (bottom), their license building practitioner number and license expiry if loaded, their primary contact number, their trade type, their company or business name, and their last login - which is handy to see when they last logged in or if they've ever logged in at all. This is an easy way to see how active your trades are within RAVE.

The show, Resend Invite, and Remove (a contractor) action buttons + explanation
To the right of each entry, we have the ‘Show’ button to open up and update a contractor's profile. Also, a dropdown menu includes a ‘Resend invite’ option, which is available until they've logged into RAVE, and ‘Remove’ which allows you to delete a contractor from your branch. The remove option is only available to those with the Branch Owner's permission.
NOTE: Removing contractors from here doesn't delete their contractor profile within RAVE, but it does instantly remove them from your branch. This will also remove them from all projects, and subsequently any project checklists, and tasks they've been given access to.

Each of these fields is searchable by the search button (to the top right of the list), and you can print and/or export your contractor list as a CSV file as required.

Contacts
The ‘Contacts’ sub-tab is primarily used by our maintenance clients, this is where you would load tenants and their contact details if you do a lot of maintenance work.

Staff Users
The ‘Staff Users’ sub-tab contains your primary branch users of RAVE, either your branch owner and management team, or your sales, admin, and project management staff.

Site Managers/Site Staff
The ‘Site Staff/Site Managers’ sub-tab is where we add users that don't need the same level of permissions as your branch users, but require a higher level of access to your jobs than your contractors and suppliers.

A great example here is if your lead contract builder is also your project manager or foreman, you can set them up as a Site Manager to have greater visibility of the schedule, with the option of giving them more control of the schedule if required.
We discuss the Site Manager vs Site Staff vs Contractor user permissions in this ‘Site Manager and Site Staff user groups’ blog.
How to Add a Contractor to Your RAVE Contractor List
Access this demo here.
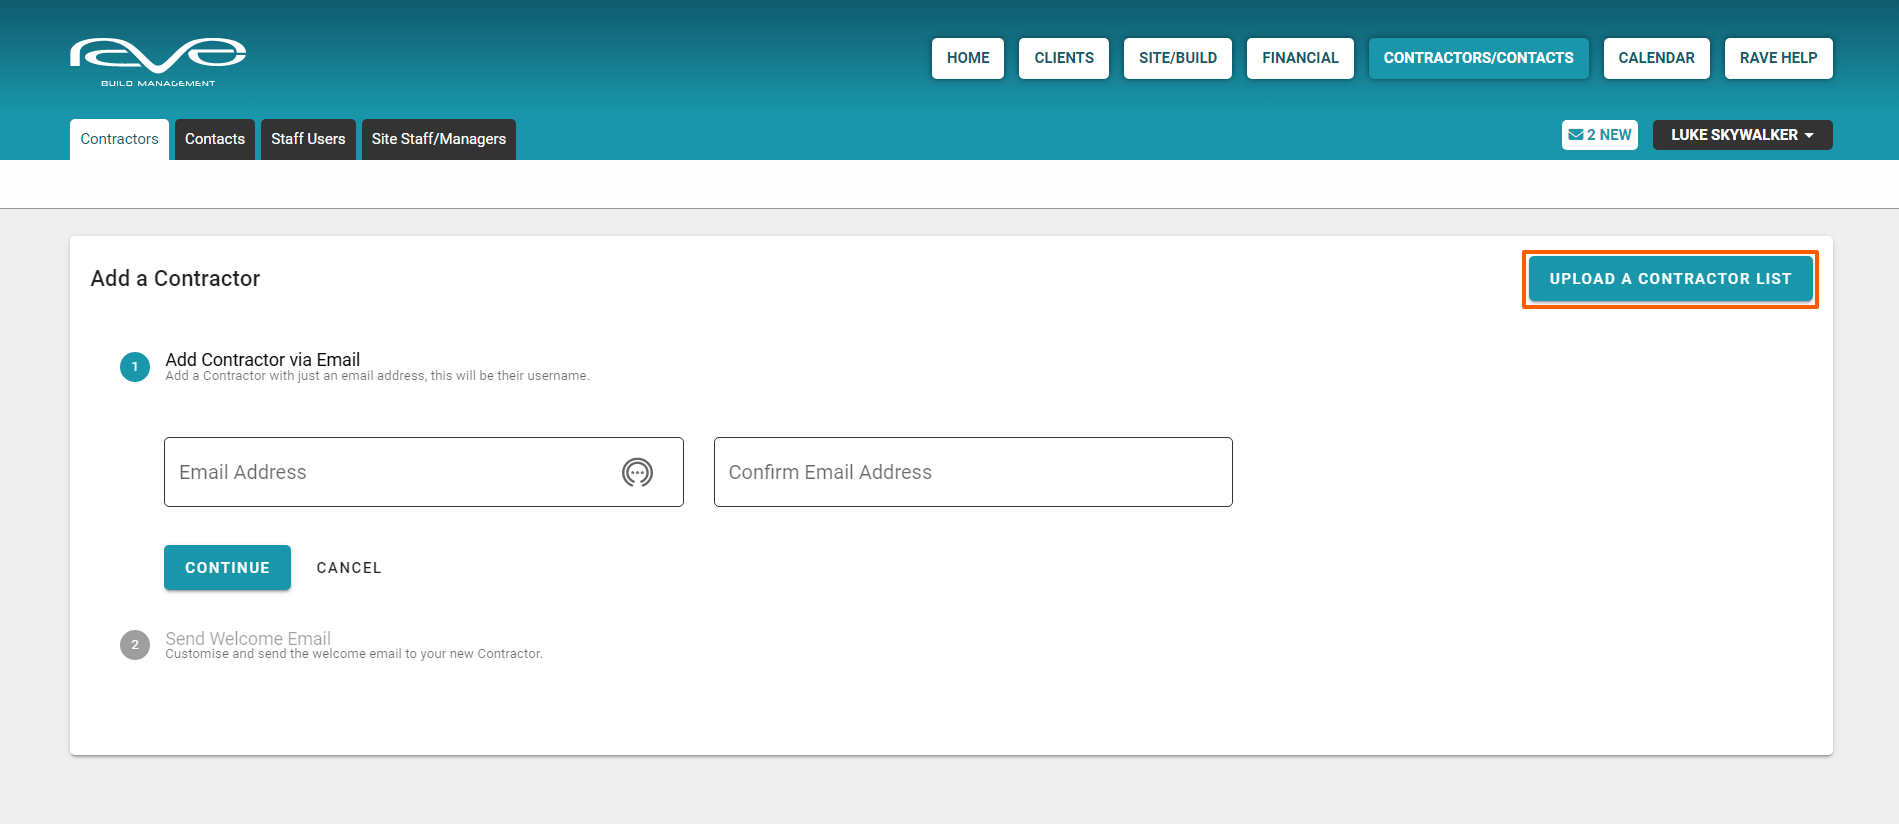
Back to the Contractors sub-tab. You can add new contractors to your RAVE system via the ‘Add Contractor’ button to the top left of the page. Here you'll see that Contractors can be added one at a time by adding and confirming an email address, or doing a bulk upload via an excel CSV document - the email only option will just populate the email leaving you or the contractor to fill in the other details, while the CSV document will populate all the fields completed.
If you'd like a demo of how to load a contractor supplier list click here.
NOTE: In both cases, RAVE will send an invitation to the contractor(s) letting them know what their login email is, allowing them to log in and check their information is correct - the email invitation/notification is automatic and can not be bypassed.


Adding a Contractor using their Email Only
To set up a new contractor with their email only:
- From the Contractors sub-tab, we click on the ‘Add Contractor’ button at the top right of the page.
- Then via the Add Contractor via Email section - we load their email address, and repeat their email address to confirm, and click ‘Continue’
- This will unlock the Send Welcome Email portion of the form
During this process, RAVE will send a welcome email to your contractor with their login username, temporary password, and instructions to help get them set up in RAVE. You can customise the welcome email Subject Line, and message copy - and save/load a contractor welcome email message template.
- Firstly, the Send Email Template dropdown menu, allows you to select a previously saved email template - that is a previously saved subject line, and message copy
- Next, the ability to overwrite the welcome email Subject line
- And finally, the ability to overwrite/customise a portion of the message copy


The Welcome Email Preview screen
Down to the bottom right of this page, we have a ‘Preview’ button. Clicking here opens a pop-up, previewing what the welcome email will look like when we eventually click the 'Send & Save' button.

As you can see at the top of this preview pop-up, we have the subject line - customised as per step 5 above.
Then your company logo (if loaded), RAVE's default invitation blurb, followed by the customisable portion of the welcome copy - as per step 6 above.
Note: Most of our clients are happy to remind their trades about the suggested upload list, and the following copy about alerts, notifications, and tender submissions. and set up instructions as per our default copy - but if any of this doesn't sit right with you, or your business, you can just go ahead and edit the text to what is right for your message.
For example, perhaps your business is not too worried about your trades maintaining a public liability insurance policy to guarantee their work. If that is the case, you can just edit the copy accordingly.

Further down, we have the getting started section instructing them to first log in by our website on their computer or phone. We give them their username (that's the email address you just loaded) and their temporary password which is valid for approx. 24 hours.
Next is the ‘Get Set Up!’ link, which takes them straight to their contractor profile in RAVE, allowing them to check that their details are correct and to complete the setup process.
Finally, there is the ‘Using RAVE Build’ section which includes two short video tutorial links, showing how to get themselves set up in RAVE, and how they can use their login to get the most out of the RAVE system. We follow that up with our contact details if they need any further assistance.
To exit the preview window, you can just click off to the side of the screen.

From here you can continue to edit the subject line, and customisable portion of the message copy - using the preview screen to double check this looks right before sending.
Once you've made all of your necessary changes, we just click on ‘Send & Save’.
The contractor email username will be loaded, and your contractor will be sent a welcome to RAVE invite email.
NOTE: RAVE will send an invitation to the contractor(s) letting them know what their login email is, allowing them to log in and check their information is correct - the email invitation/notification is automatic and can not be bypassed.

Saving + Loading a Welcome Email Template
If you've made any changes to the subject line, and/or customisable portion of the message copy - you also have the option to save these changes as a template.
To create a Welcome Email Template:
- We click on the 'Save As Template' button to the bottom right of this page - this will open a 'Save Email Template' pop-up
- Choose a Template Name i.e. Welcome + Insurance loading instructions
- And click 'Save'
This will save your customised subject line, and/or message copy - and your Welcome Email Template will be available from the Select Email Template drop-down menu when you invite your next contractor(s) to RAVE.


TIP: Add yourself as a Contractor
Another tip for those who are Branch Admin users who will be using RAVE a lot with your contractors, it might be helpful to add yourself as a contractor - to see how easy it is to get yourself set up in RAVE as a sub-trade. This also allows you to see what notifications are sent out by RAVE and gives you a chance to log into your jobs as a contractor to see your projects from the contractor's perspective. Thus, seeing their level of access to your jobs will benefit your own peace of mind.
NOTE: If you are loading yourself as a dummy contractor or supplier, the user permissions for staff versus contractors are quite different and we cannot use an existing RAVE Branch User login to add you into RAVE as a contractor. So, you would need to use a different email address, like your personal Gmail address or other email if you have one.
Adding Contractors via a CSV Contractor List
Once you've loaded your CSV contractor list, the process of completing the Welcome Email and sending this out to your contractors is the same as adding a contractor via their email.
Adding Contractors via a CSV Contractor List
For a demo of how to load a CSV Contractor List click here.
To upload a contractor List:
- From the Contractors sub-tab, we click on the ‘Add Contractor’ button at the top left of the screen
- Then click on the 'Upload a Contractor List' button to the top right of that page

- This will take you to the Upload Contractors page - with the 'Select Contractor CSV File' upload field
NOTE: RAVE requires your Contractor CSV File to be set up in a very specific way - you cannot just upload any random excel spreadsheet and expect it to be loaded into RAVE.
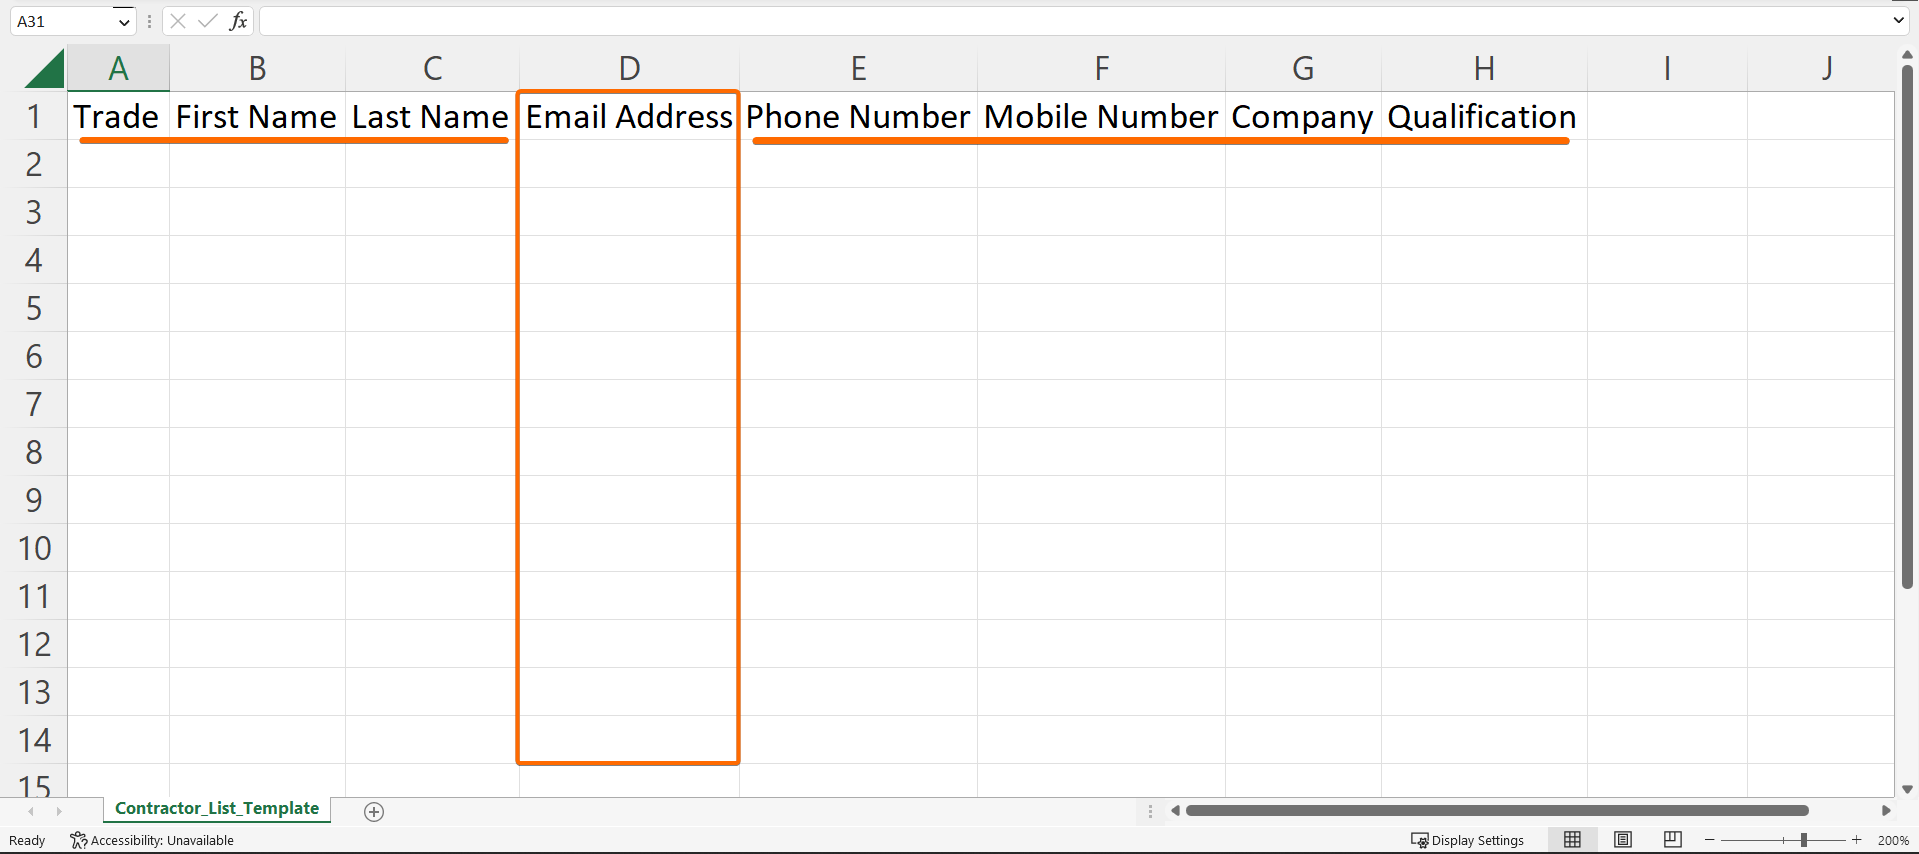
Your file needs to be saved as a 'plain' CSV file, aka a 'Comma Separated Values' file, which may display as a 'CSV (Comma delimited)' file when choosing the format to save your file.
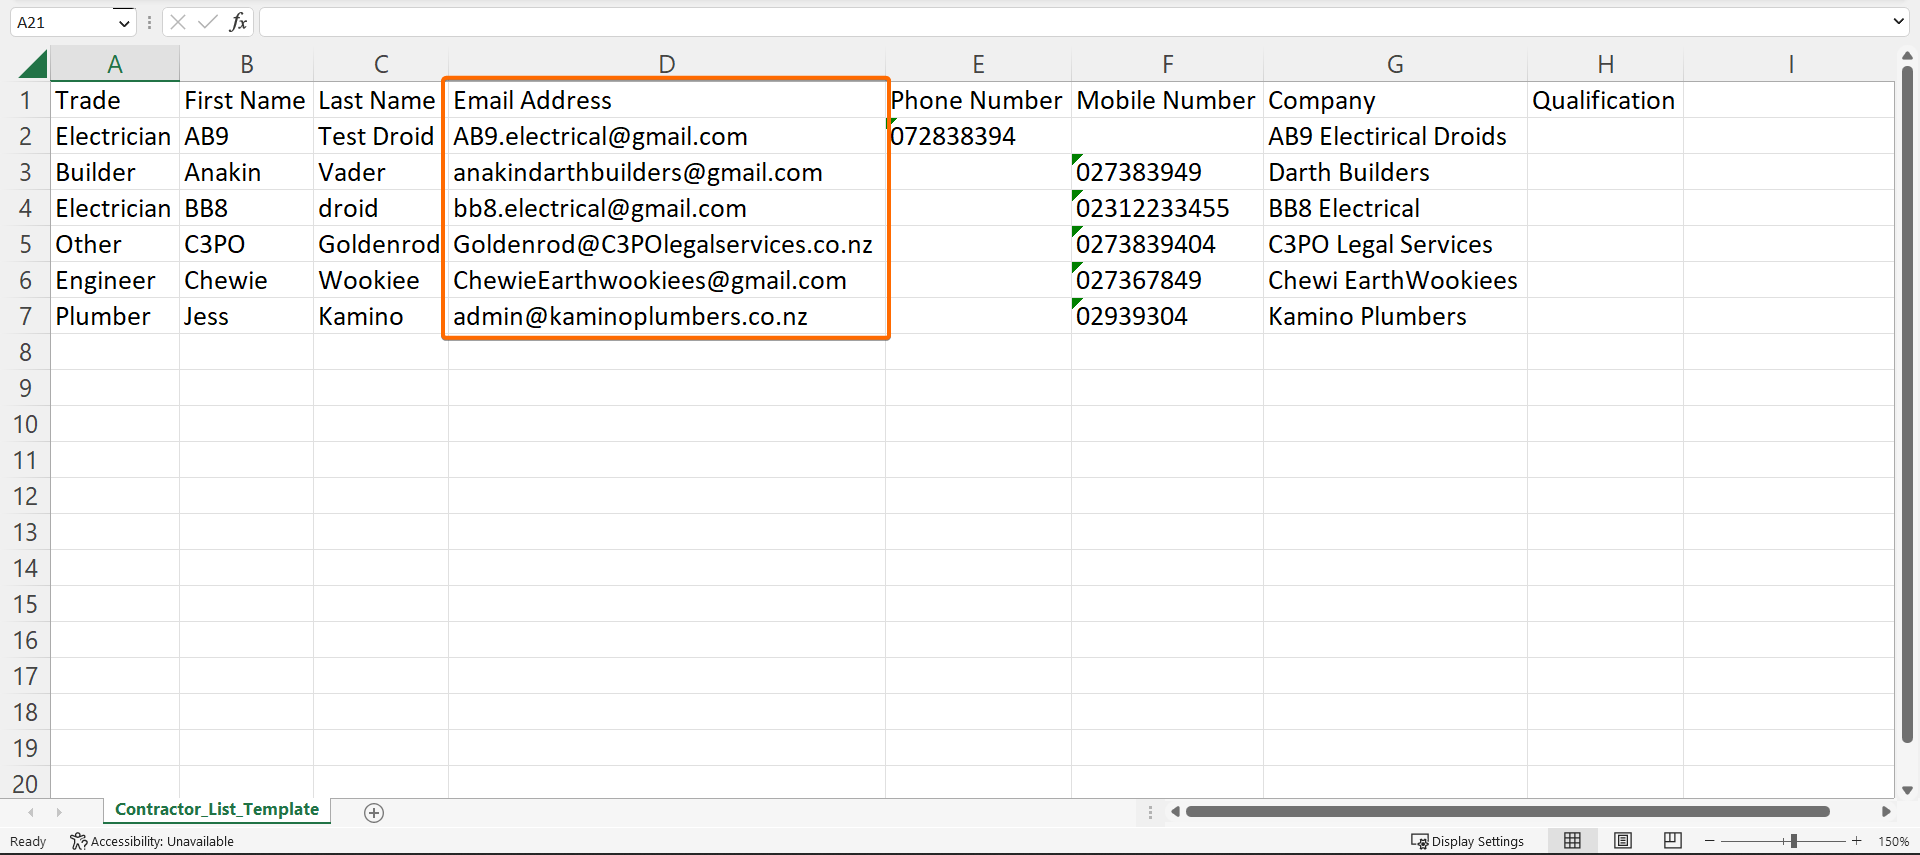
To assist you with this, we have provided a sample 'contractor_list_template.csv' file on this page also - just click on the blue link to download. Opening this file you will see that each line down the page is a separate contractor profile.
The only required field on this CSV template is the contractor's email address, but we encourage you to fill in as many fields as you can to make it easier for your trades to check that their details have been loaded correctly - also making it easier for you to find and attach contractors to your projects and schedules. The CSV columns to fill in are the contractor's:- Trade
- First and Last names - or the name of your primary contact for that business
- Email address - this needs to follow a valid email address structure
- Business or contact phone number
- Mobile number
- Business or company name
- Qualification(s) if any


- Once you have populated your Contractor List and saved this as a plain CSV file, go back to the Upload Contractors page in RAVE
- Click on the 'Select a file' field, and select your saved Contractor List CSV file
- Then click the 'Continue' button
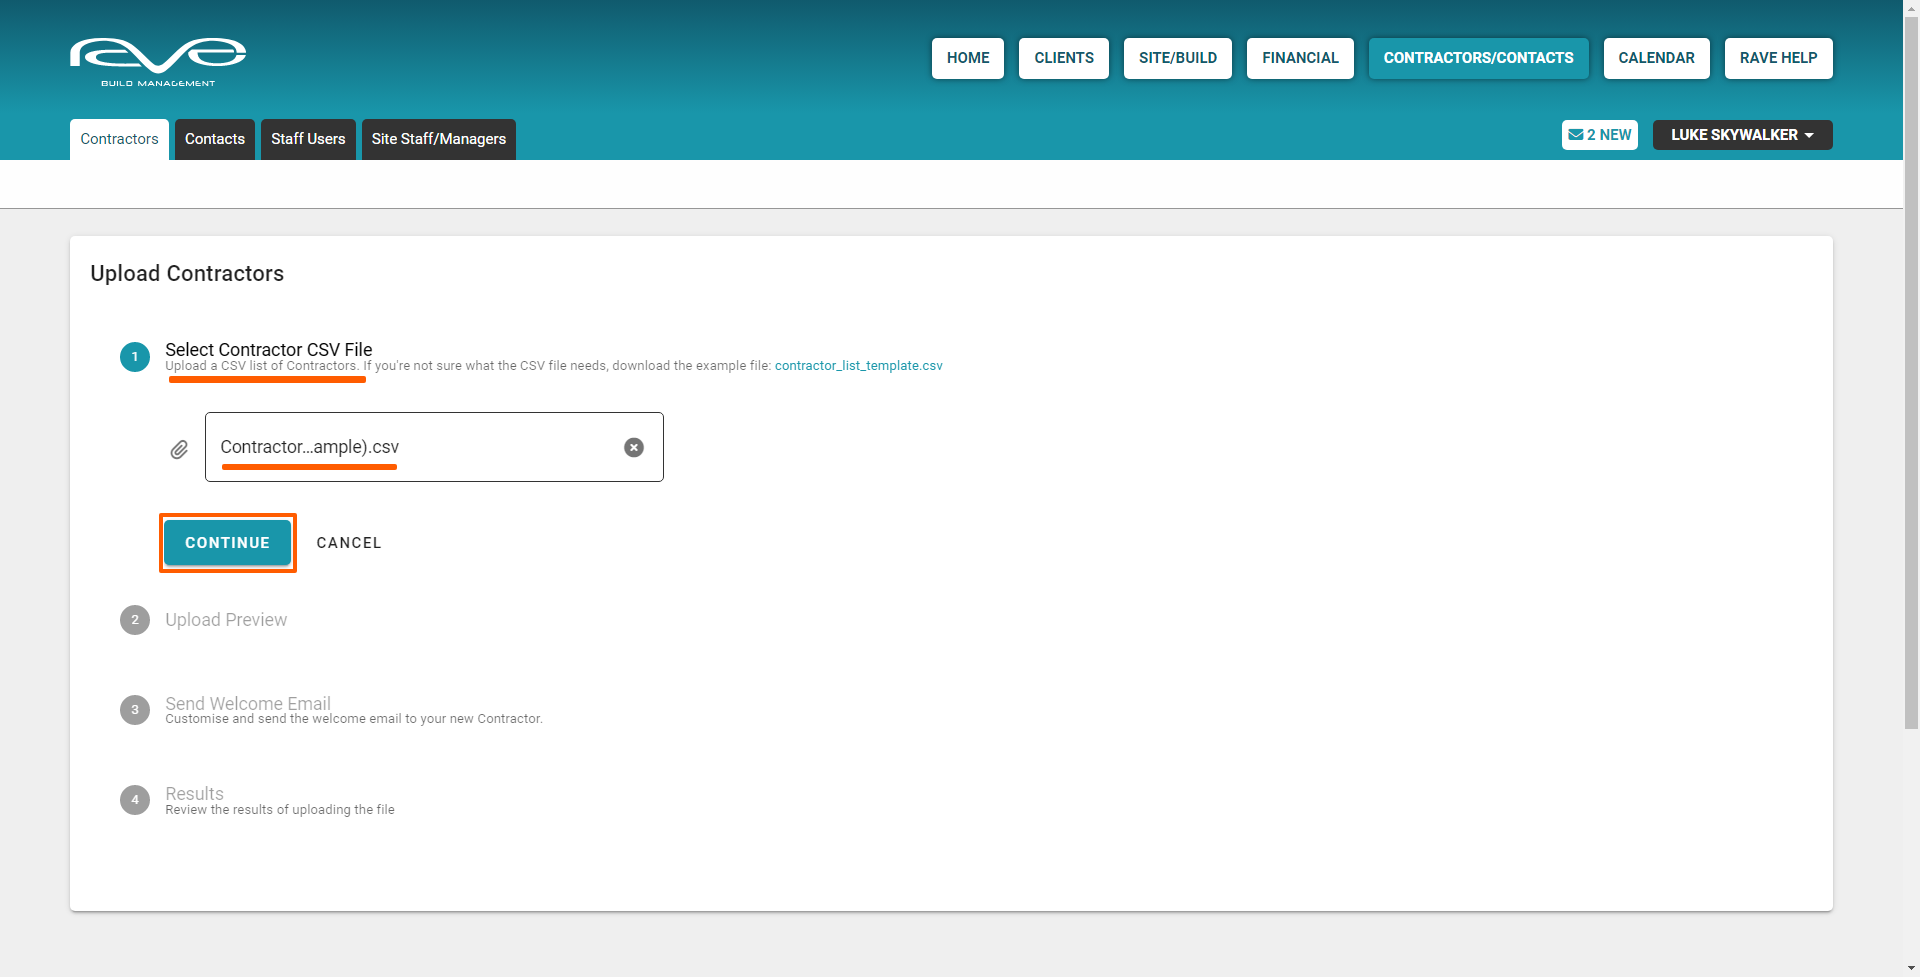
- This takes you to the Upload Preview screen, where you can check over the data to be uploaded. If the Upload Preview doesn't look right to you, go back to your CSV file, make and save any changes then click on 'Change File' to upload your updated file.
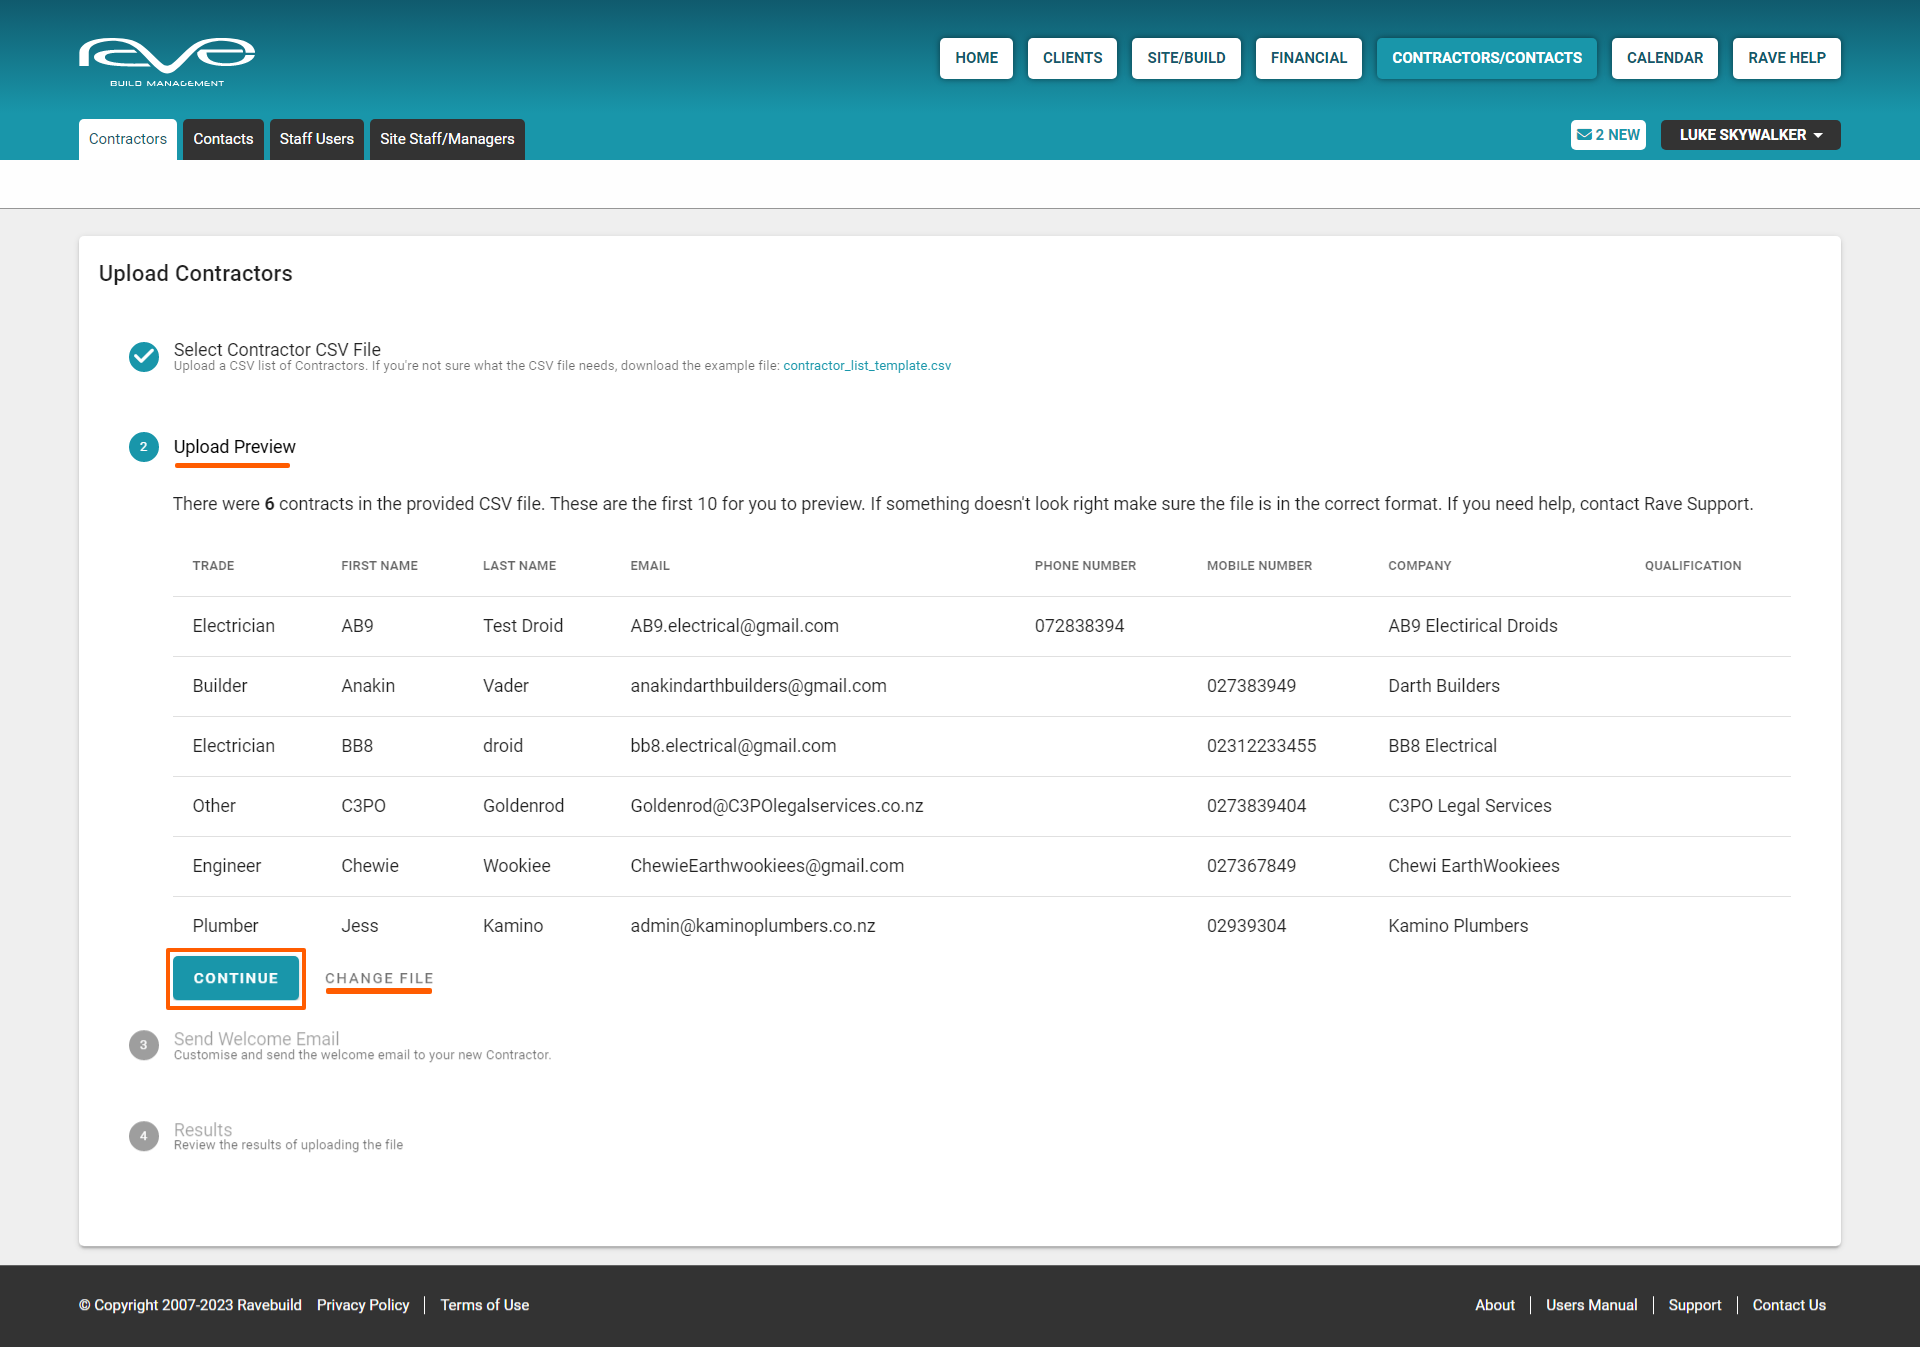
- Once you are happy with the Upload Preview display, click the 'Continue' button to move on to the 'Send Welcome Email' stage.
From this point onwards, the process is the same as the 'Adding a Contractor using their Email Only' process.
For a demo of how to load a CSV Contractor List click here.


REMEMBER: RAVE will send an invitation to the contractor(s) letting them know what their login email is, allowing them to log in and check their information is correct - the email invitation/notification is automatic and can not be bypassed.
How to Add Contractors via a CSV Contractor List Upload
Once you've loaded your CSV contractor list, we then send the Welcome Email to your contractors - the same as adding a contractor via their email.
Adding Contractors via a CSV Contractor List
For a demo of how to load a CSV Contractor List click here.
To upload a contractor List:
- From the Contractors sub-tab, we click on the ‘Add Contractor’ button at the top left of the screen

- Then click on the 'Upload a Contractor List' button to the top right of that page
- This will take you to the Upload Contractors page - with the 'Select Contractor CSV File' upload field
NOTE: RAVE requires your Contractor CSV File to be set up in a very specific way - you cannot just upload any random excel spreadsheet and expect it to be loaded into RAVE.
Your file needs to be saved as a 'plain' CSV file, aka a 'Comma Separated Values' file, which may display as a 'CSV (Comma delimited)' file when choosing the format to save your file.
To assist you with this, we have provided a sample 'contractor_list_template.csv' file on this page also - just click on the blue link to download. Opening this file you will see that each line down the page is a separate contractor profile.
The only required field on this CSV template is the contractor's email address, but we encourage you to fill in as many fields as you can to make it easier for your trades to check that their details have been loaded correctly - also making it easier for you to find and attach contractors to your projects and schedules. The CSV columns to fill in are the contractor's:- Trade
- First and Last names - or the name of your primary contact for that business
- Email address - this needs to follow a valid email address structure
- Business or contact phone number
- Mobile number
- Business or company name
- Qualification(s) if any
- Once you have populated your Contractor List and saved this as a plain CSV file, go back to the Upload Contractors page in RAVE
- Click on the 'Select a file' field, and select your saved Contractor List CSV file
- Then click the 'Continue' button

- This takes you to the Upload Preview screen, where you can check over the data to be uploaded. If the Upload Preview doesn't look right to you, go back to your CSV file, make and save any changes then click on 'Change File' to upload your updated file.

- Once you are happy with the Upload Preview display, click the 'Continue' button to move on to the 'Send Welcome Email' stage.
From this point onwards, the process is the same as the 'Adding a Contractor using their Email Only' process.
For a demo of how to load a CSV Contractor List click here.
REMEMBER: RAVE will send an invitation to the contractor(s) letting them know what their login email is, allowing them to log in and check their information is correct - the email invitation/notification is automatic and can not be bypassed.


How to Remove or Edit a Contractor's Profile in RAVE
As a contractor (if you choose to add yourself as one), you can open the invite email from RAVE and click on the ‘Get Set Up!’ to check over your contractor profile and contact details, but as a Branch User, you also have the ability to make some changes to the Contractor profile via the 'Show' button to the right of each contractor list entry.
To remove a Contractor's profile click the action drop-down next to the 'Show' button. This will give you the option to click 'Remove'.

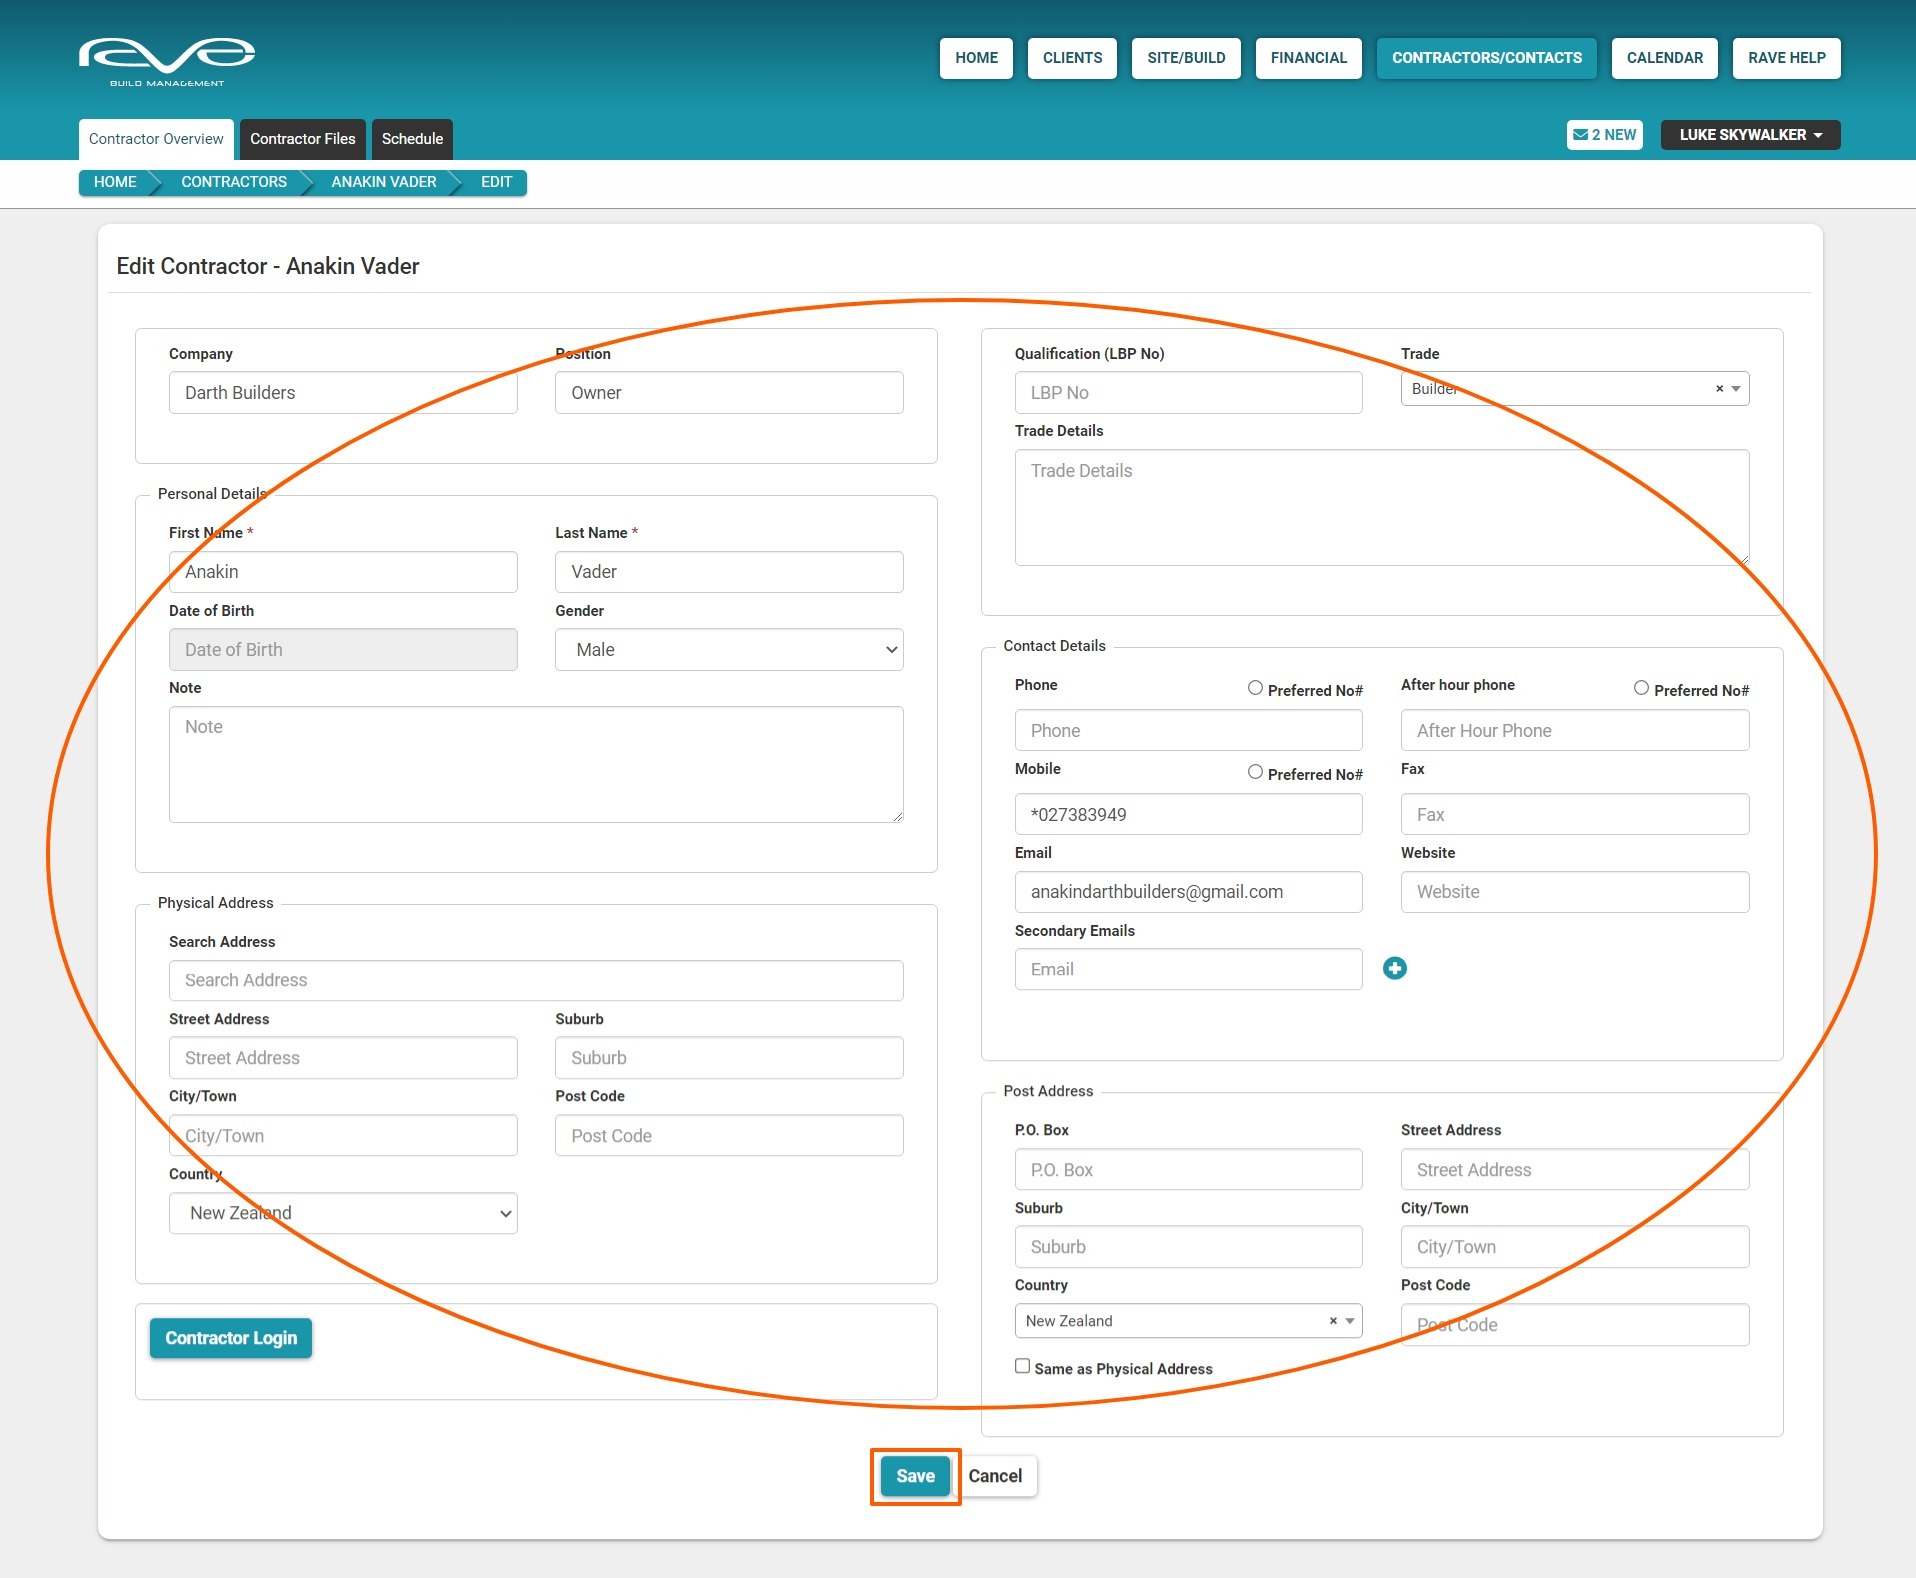
To edit a Contractor's profile details:
- From the Contractors sub-tab, we click on the ‘Show’ button of the contractor profile we are wanting to update.

- Then, from the ‘Contractor Overview’ page, click on ‘Edit’ button.
You can fill in a lot of detail on this page, but the main fields to populate (to avoid a blank contractor profile) are the company name, their first and last name, their trade, and a preferred contact number - you'll see that their email address is already pre-loaded.
- Once you've updated the necessary details, you can then scroll down and click the ‘Save’ button.


How to Upload Contractor Files in RAVE
Access this demo here.
Going back to our ‘Contractors’ list, you (and your contractors) also have the ability to upload their documentation and files i.e. insurance policies, qualifications, etc.
To Upload Contractor Files:
- From the Contractors sub-tab, we click on the ‘Show’ button of the contractor we are wanting to upload documents to.
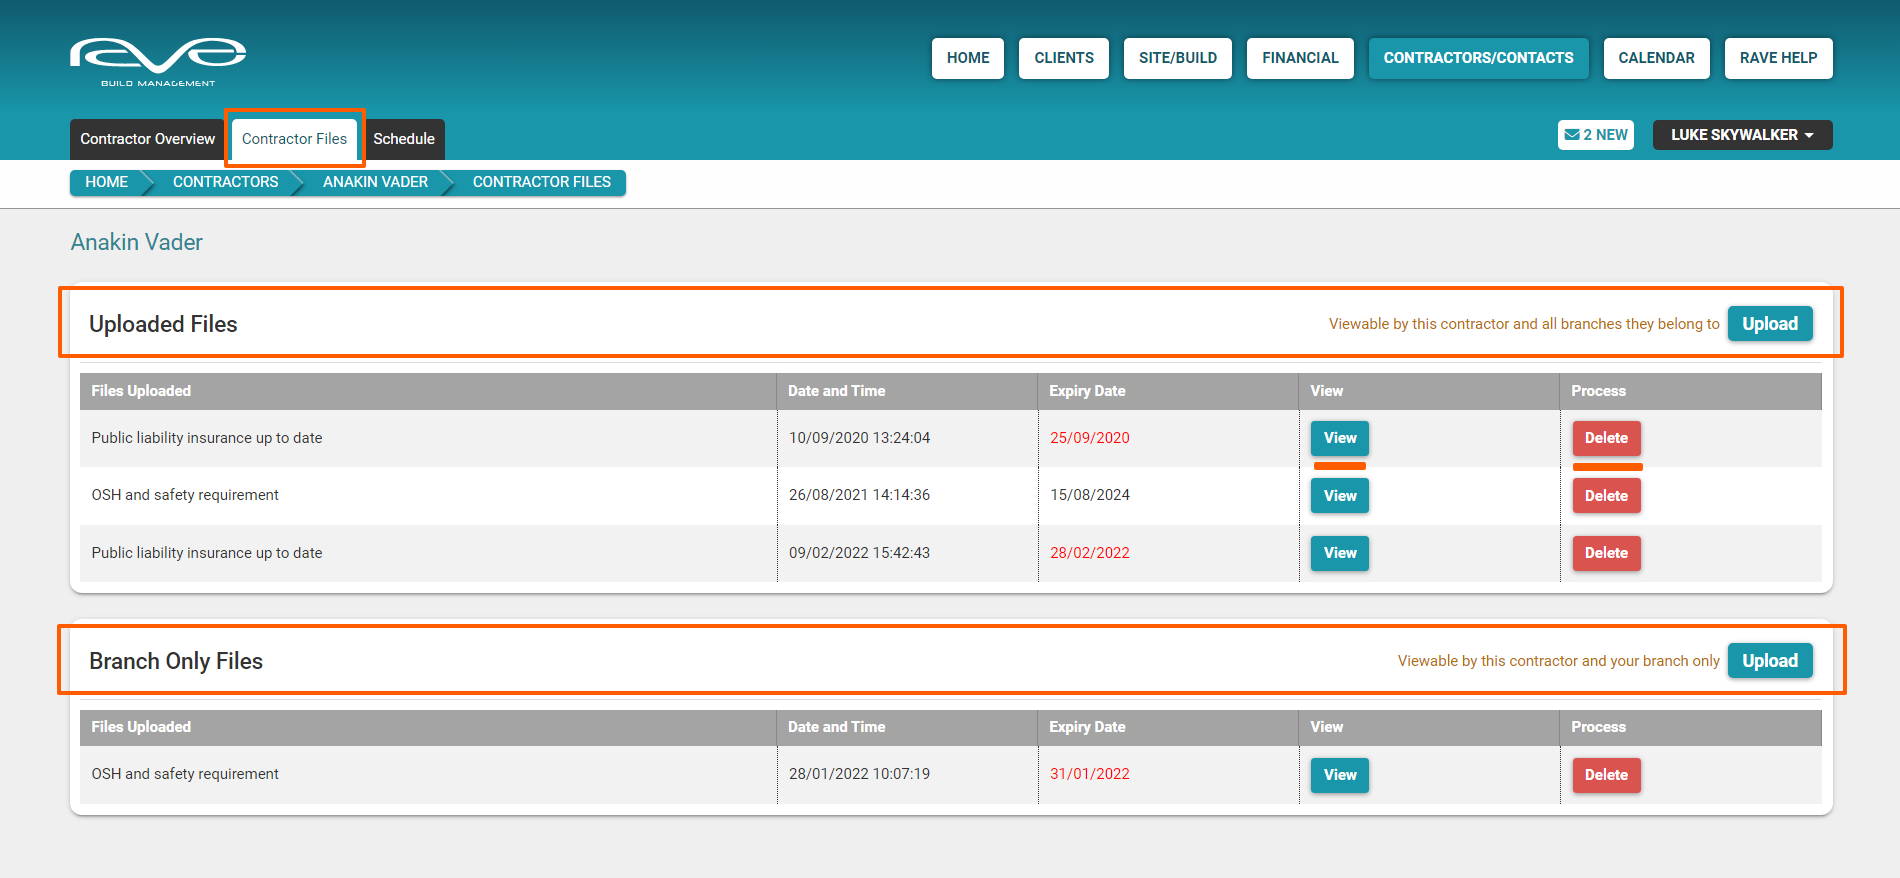
- Then, from the ‘Contractor Overview’ page, click on the ‘Contractor Files' sub-tab.
The ‘Contractor Files’ page is broken into two sections:
The first is the ‘Uploaded Files’ section which is able to be uploaded to by, and is visible to the contractor, your business, and any business that also uses this contractor within RAVE - it acts as a PUBLIC folder for that contractor.
The second section is the ‘Branch Only’ folder which is accessible by the contractor, and your business only. No other business has access to these files, so if you have any documentation that you want to upload for the contractor that you don't want any other businesses to see the 'Branch Only' folder is where you'd want to upload these files. - To add a document, you must first decide whether we should add this file to the public 'Uploaded Files' section, or your private 'Branch Only Files' section.
- Clicking on the appropriate ‘Upload’ button will open a 'File Upload' pop-up, allowing you to select from a number of Category Types:
Workplace Health and Safety policy
Public liability insurance up to date
Associations affiliated with (Master Builders, Master Electricians, etc)
Workmanship guarantee
Materials guarantee
Licensed Building Contractor Certificate
Others - Entering the document policy or expiry date
- Then clicking ‘Choose File’ to find and select the document to be uploaded
- Finally, click ‘Upload’ to add the file, or 'Cancel' to cancel and/or start the process again
This will take you back to the ‘Contractor Files’ sub-tab, where you can see the files that have been uploaded and when, and the document expiry date.
When the contractor's policy reaches this expiry date you and the contractor will be notified of this, as a prompt for them to upload their new policy documentation.
You have the ability to ‘View’ (open) the documents, reading through them to check over i.e. if their liability coverage is correct, and expiry dates line up, etc. You also have the ability to delete any outdated/unnecessary documents as required.


3 Tips for Branches to help their Contractors Access RAVE
Every once and a while a contractor may contact you because they can't log in to RAVE, they've forgotten their password, or they can't access a project, project documentation, or tasks in the schedule. We've created the below list to help you fix the most common reasons for these, starting with:
- Clarifying what their issue is
- If the contractor's RAVE invite email link has expired/doesn't work, they have deleted their invite email, they have lost their invite email, or they just haven't logged in yet - those with branch owner permissions can resend the invite via their contractor list/profile dropdown
- If they already have a RAVE login that they are currently using, different from the one you've created, and they want to use their existing RAVE login to access your jobs too - remove the contractor profile you added into RAVE, and invite them with their existing RAVE user login - this is the fastest way to fix this issue
NOTE: if the contractor is telling you they can't see your projects, or they can't see their other building company's projects - this is a big clue that you've invited a different RAVE user login to the one they are already using
- If the contractor is not receiving notifications (i.e. password resets and schedule change notifications - if turned on) check if their RAVE login email and their notification emails are different - if so, check with the contractor where notifications should go and correct the notification email by editing their contractor profile if required
- If the contractor has previously logged in - but they have forgotten their password, or if their password is no longer working - add their RAVE login email address to this link (https://pro.ravebuild.com/s/password/reset ) to send them a password reset link*, so they can set up their new password
*This assumes their notification email is correct and/or the contractor has access to the notification email address - Check if the contractor is logging in with the RIGHT email address
- Actually, ASK THEM what email address they are using to log in with and check if this is what has been set up for them i.e. some users will be auto-logging into RAVE, they have inherited a laptop, etc, and don't actually know what their login email or password is. So check what their actual RAVE login email address is, against the RAVE email login as displayed on your contractor/contacts list page*
*via the screenshot below - the bottom email is their RAVE login/email username, the top email is their notification email for password reset and schedule change email notifications - If your contractor can log in to RAVE but...
- They can't see your project - check if the project is visible to outside parties i.e. is in an active or maintenance state, and check that you have added their RAVE user profile to the project via the people's tab of the project
- they can see your project but can't access the schedule - check that you have activated the schedule
- they can't see the tasks you've assigned to them - check that you have assigned the contractor to the task as a primary or secondary contractor
- they can see their own assigned tasks, but they can't see the rest of the schedule - check that you've ticked their 'view all visible tasks' permission for this contractor in the people's tab, and also that any other tasks that should be visible to them have the task visibility tick box ticked
- they can access the project but can't see documentation - check that you have added documentation to a view by all document folder and/or their own contractor folder
- they can access the project but can't see a checklist that they should have access to - check that you have given them access to that particular checklist
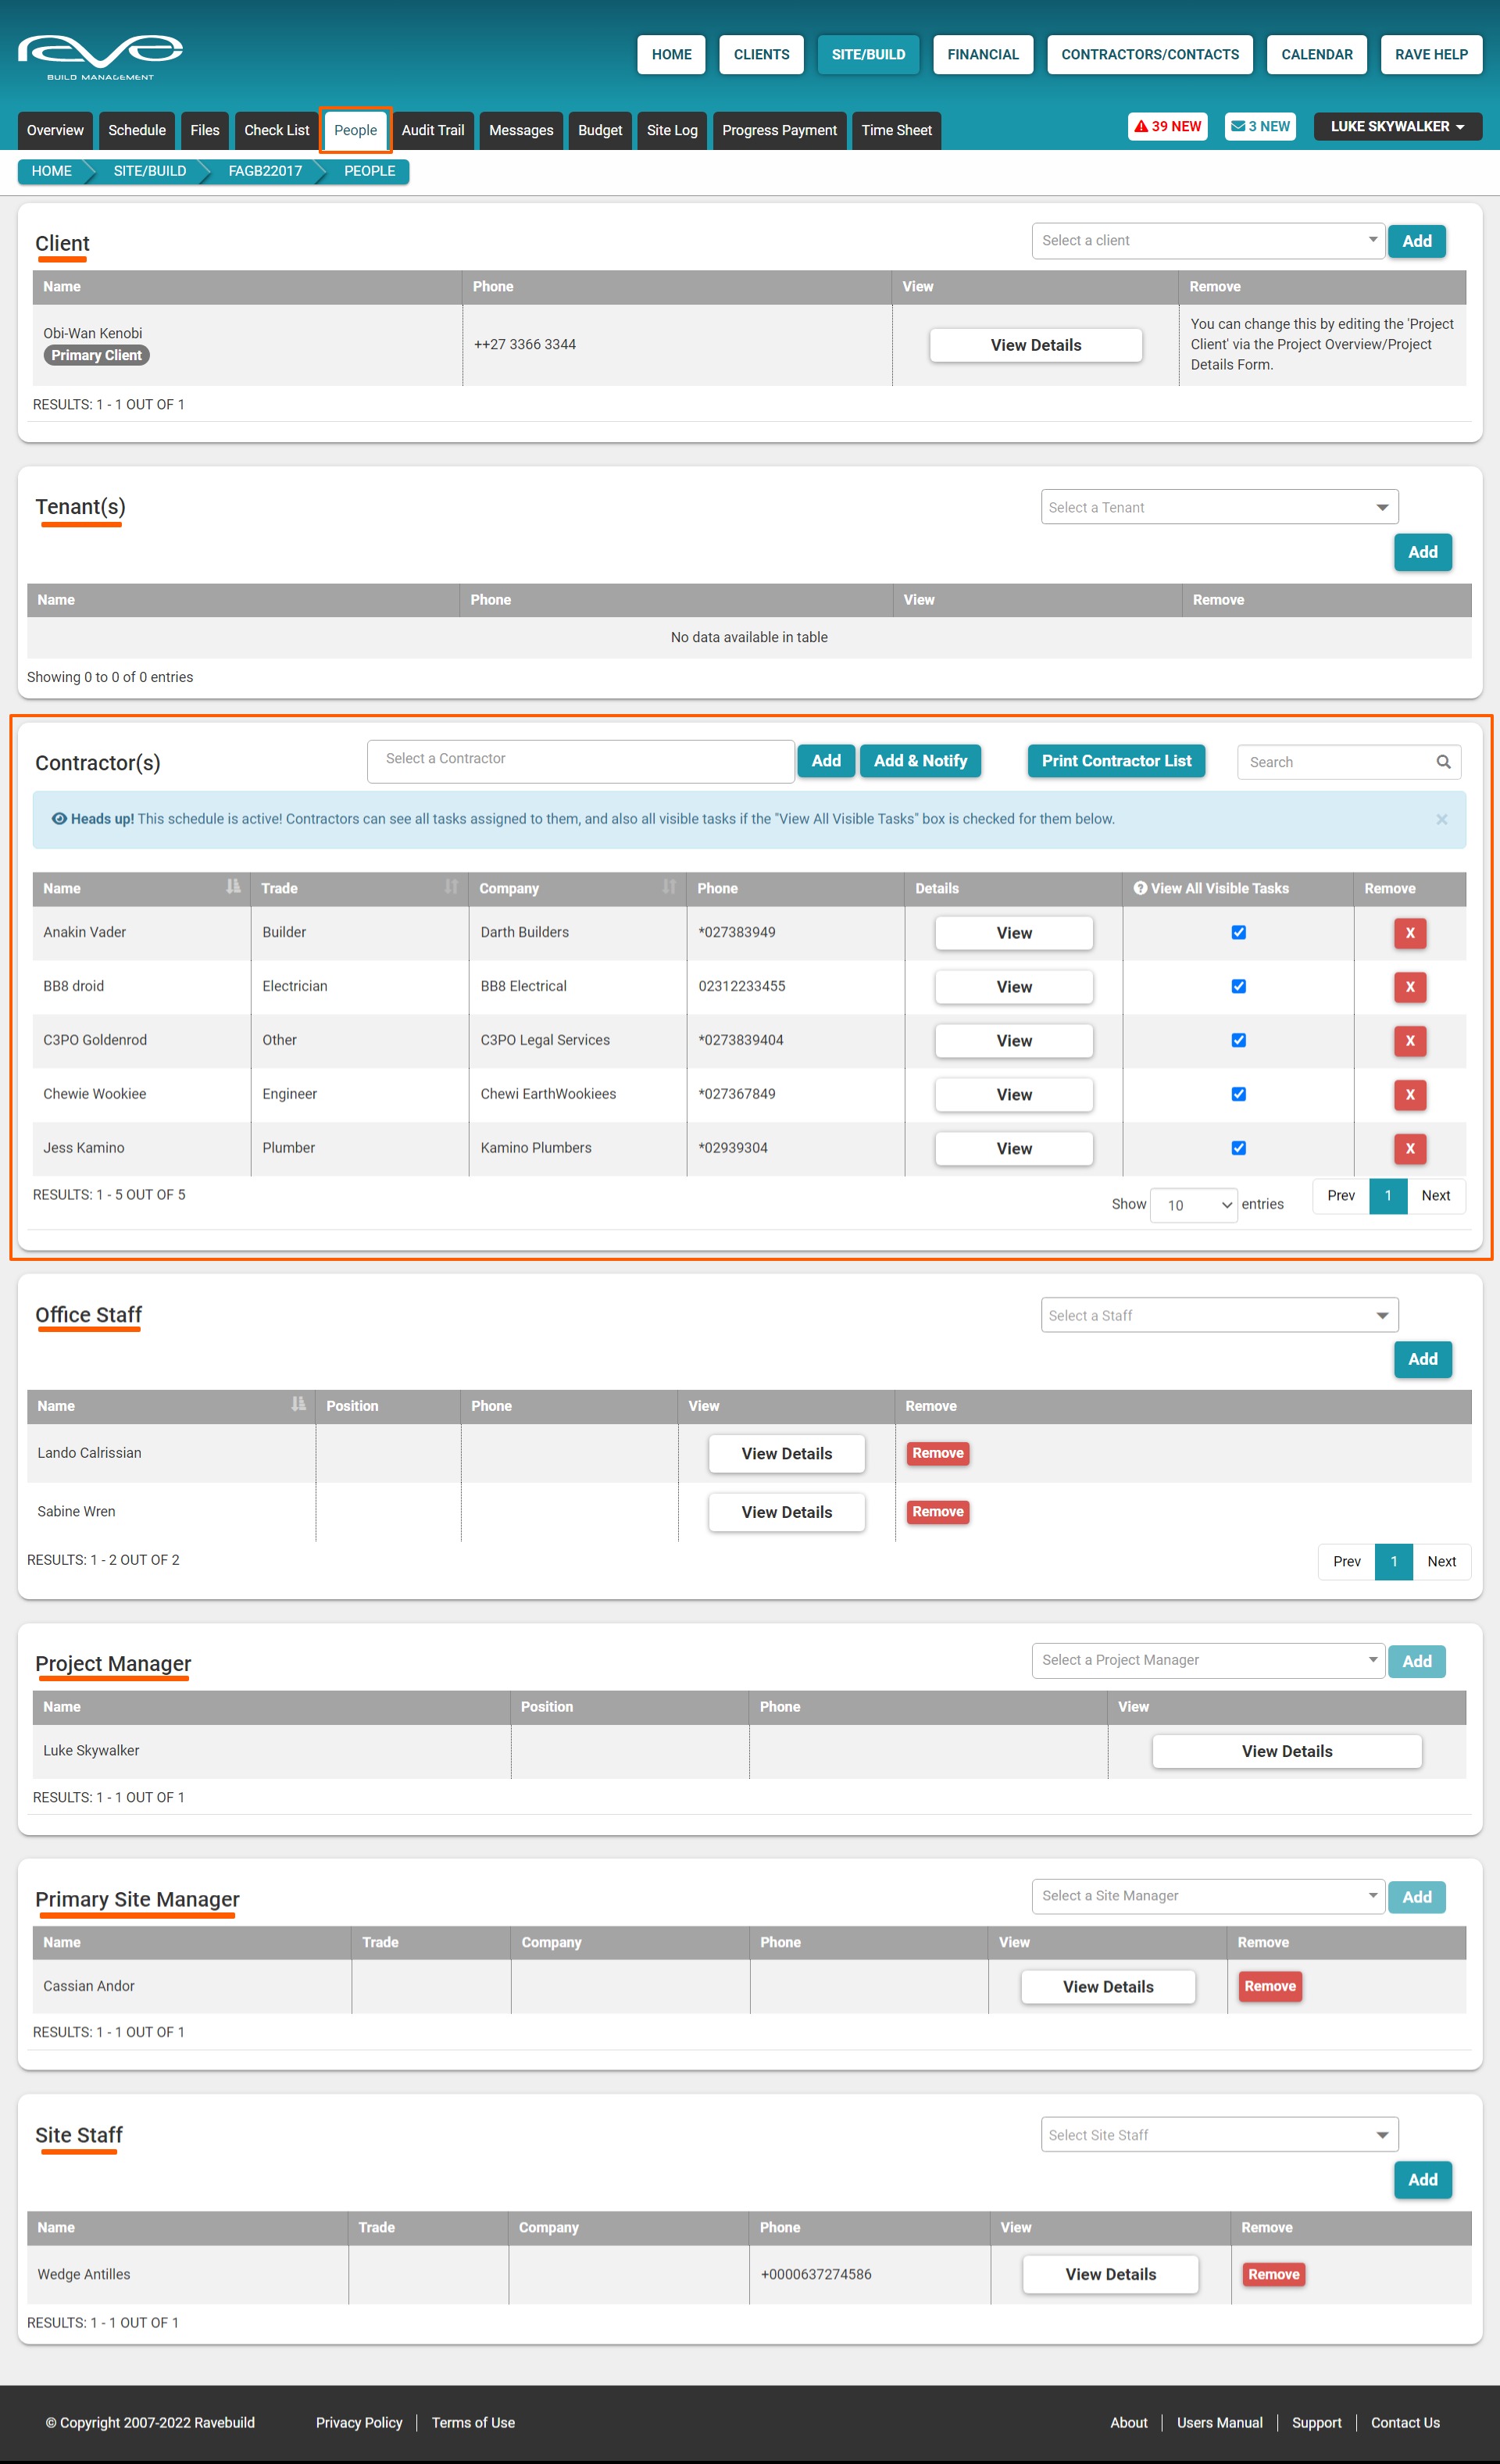
The Project's People Sub-Tab
The project's 'People' sub-tab is where you decide which contractors will have access to that project - we access this via the Site/Build button / opening your project by clicking on the job number or the 'Show' button / clicking on the People sub-tab.
NOTE: NO contractors are given access to your project automatically. You will either select and add them in manually via the 'People' sub-tab of your project or load them in as part of a schedule template. We cover project access via schedule templates in our Project Management training.
The ‘People’ sub-tab page is broken down into a number of sections - Client, Tenant(s), Contractors, Office Staff, and Site Staff - let's look at the Client section first.

The Client Section
In the ‘Client’ section, the primary client's name will be populated automatically via the client selected in the project's build overview details. The primary client is listed here, but they do not have access to the project until you provide them with a client login - which we cover in our Client Portal Setup training.

The Tenant(s) Section
The ‘Tenant(s)’ section and the 'Select a Tenant' drop-down selector are mostly used by our maintenance companies - as a way to add clients' contact details so trades can arrange access. The process to select a 'tenant' is the same as with adding contractors - which we'll look at next.

The Contractor(s) Section + Adding a Contractor demo
The ‘Contractors’ section and the 'Select a Contractor' drop-down selector is where we select the contractors that we want to give access to this particular job. Having already loaded your contractors and suppliers via the ‘Contractors/Contacts’ button, we just click on the 'Select a Contractor' drop-down, tick the names of the contractors that we want to add - or use the Select All option, and unticking those to be excluded from this job if that's going to be faster for you. You can also keyword search for a specific contractor to add, or scroll down the list and tick those that should have access.
Once you've made your selection of contractors, you have two ways to add them to your project:
- Firstly, the ‘Add’ button, will add them in to the project, but will NOT send a notification email letting them know they have access.
- Secondly, the ‘Add & Notify’ button, will add them in to the project, and WILL send a notification email letting them know they have access - this option is only available if the project is in an active state.
Tip: Generally you would use the ‘Add’ button only. If you are still setting up the job, you probably want to ensure the schedule is sorted and tasks are assigned first before communicating with your trades to let them know that they have access to the job.
We do have some other ways to communicate they've got access to the job which we'll cover in the Schedule and Communication training.

Once you have added your trades, you'll see the primary contact name, their trade type, their company name, and their preferred contact phone number. The 'View' button lets you see more of the contractor's profile details.

View All Visible Tasks explanation
By default, we tick the 'View All Visible Tasks' (to the right of each contractor's listing on the project's people sub-tab) giving all contractors access to the 'visible' or 'non-hidden' tasks within your project schedules. You can turn this off, so trades only see the tasks that have been assigned to them - but generally, we recommend leaving these ticked as it adds some positive accountability for your trades to get their tasks done in the time frame you've set for them.
i.e. BB8 (our electrical contractor) might be into surfing and although we've given him Monday and Tuesday to complete all of his prewire work, the waves might be pumping - tempting BB8 to take Monday off. But, if he can see the builders are putting up the wall lining on Wednesday, he's more likely to come in and do his mahi on the days allocated.
But again, if you do have a contractor that you only want to see their allocated tasks, you can just untick their visibility box.

The 'Remove' button explanation
The ‘Remove’ button instantly revokes that contractor's access to the project and removes them from any assigned scheduled tasks and checklists. On the contractor's side, the project immediately disappears from their Site/Build page, and any assigned tasks will disappear from their job list.
If you have made a mistake in removing them, it is easy to add them back in again via the ‘Add’ and the ‘Add & Notify’ buttons if you need to.

The Office Staff & Project Manager Sections
Although all of your office team with project access permissions can view the project schedule and details, unless a staff member's name is added to this 'Office Staff' section of the project, they will not be available to be assigned to tasks in the schedule.
The process to select an office staff member is the same as the contractor selection. That is via the 'Select a Staff' drop-down, ticking the names of the team that we want to add. Or, using the Select All option, and unticking those to be excluded from this job - if that's going to be faster for you. You can also keyword search for a specific staff member to add, or scroll down the list and tick those that should have access.
NOTE: If a project manager has already been added via the project's Build Overview, they will automatically be assigned access to the job in the people's tab - you won't need to assign them via the drop-down here. You can still change the assigned Project Manager here, or via the Build Overview.

Primary Site Manager + Site Staff Sections
At the bottom of the project's 'People' sub-tab are the ‘Primary Site Manager’ and ‘Site Staff’ sections.
Site Manager/Foreman
The site manager acts as your site foreman. By setting this role, we're letting trades coming on-site know that this is the person to see for questions or issues on this job site. The site foreman can be an office staff member, a team member with the site manager's permission, or a contractor like a lead builder or other contractor - if you are subcontracting the build and site management out.
Site Staff
‘Site Staff’ are those team members on the tools only, they need to access the project too, but not to the same extent as your Project Manager, Office Staff, or Site Manager.
The process to select a site manager or site staff member is the same as the contractor and office staff sections. That is via the 'Select a Site Manager' or 'Select Site Staff' drop-down, ticking the names of the team member(s) to select/add. You can also keyword search for a specific staff member to add, or scroll down the list and tick those that should have access.

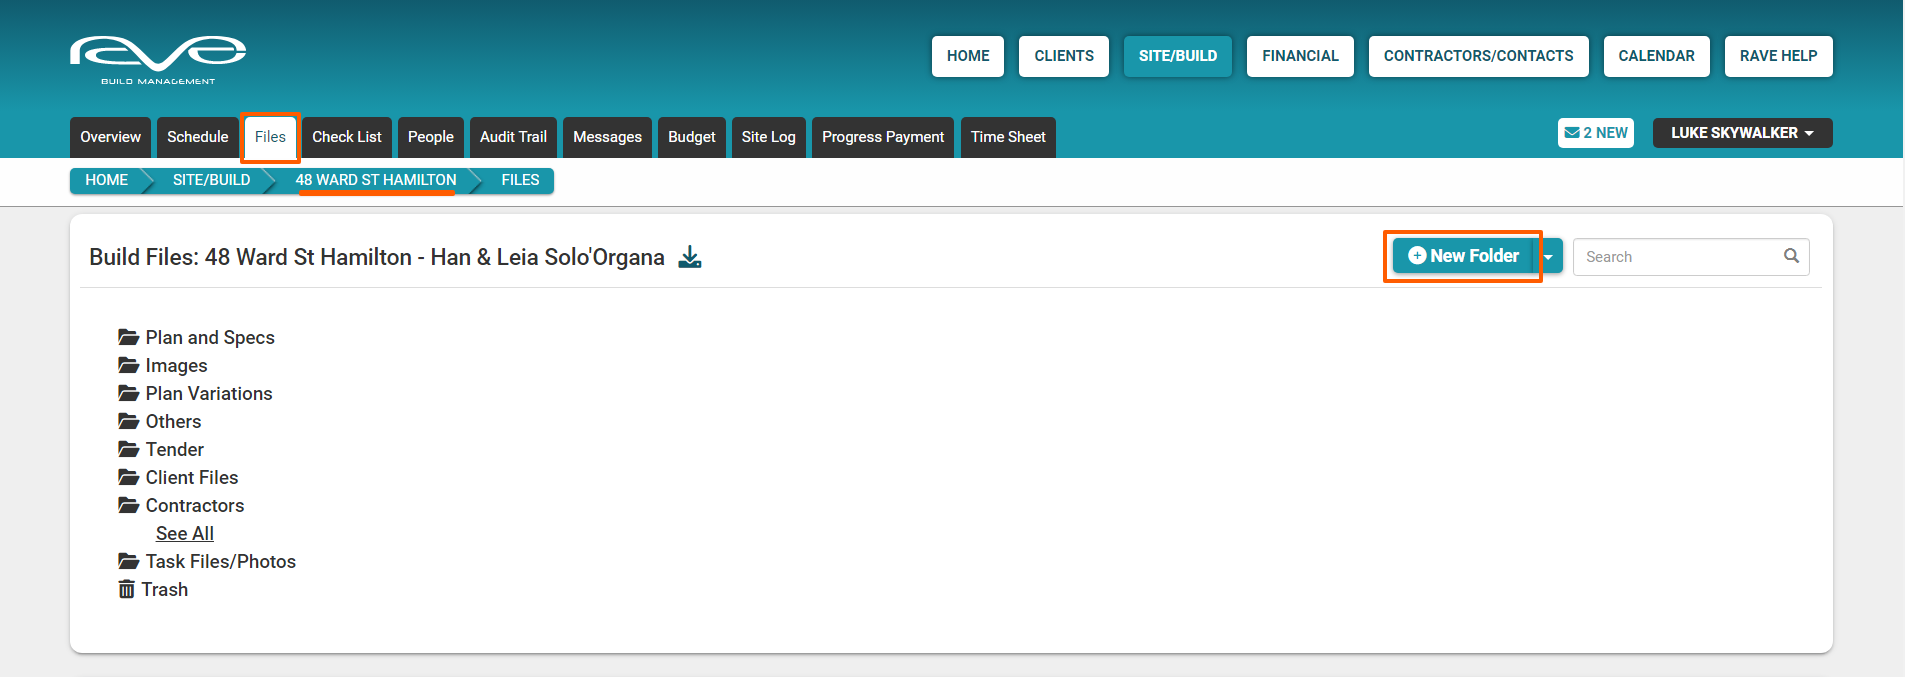
The Project's Files Sub-Tab
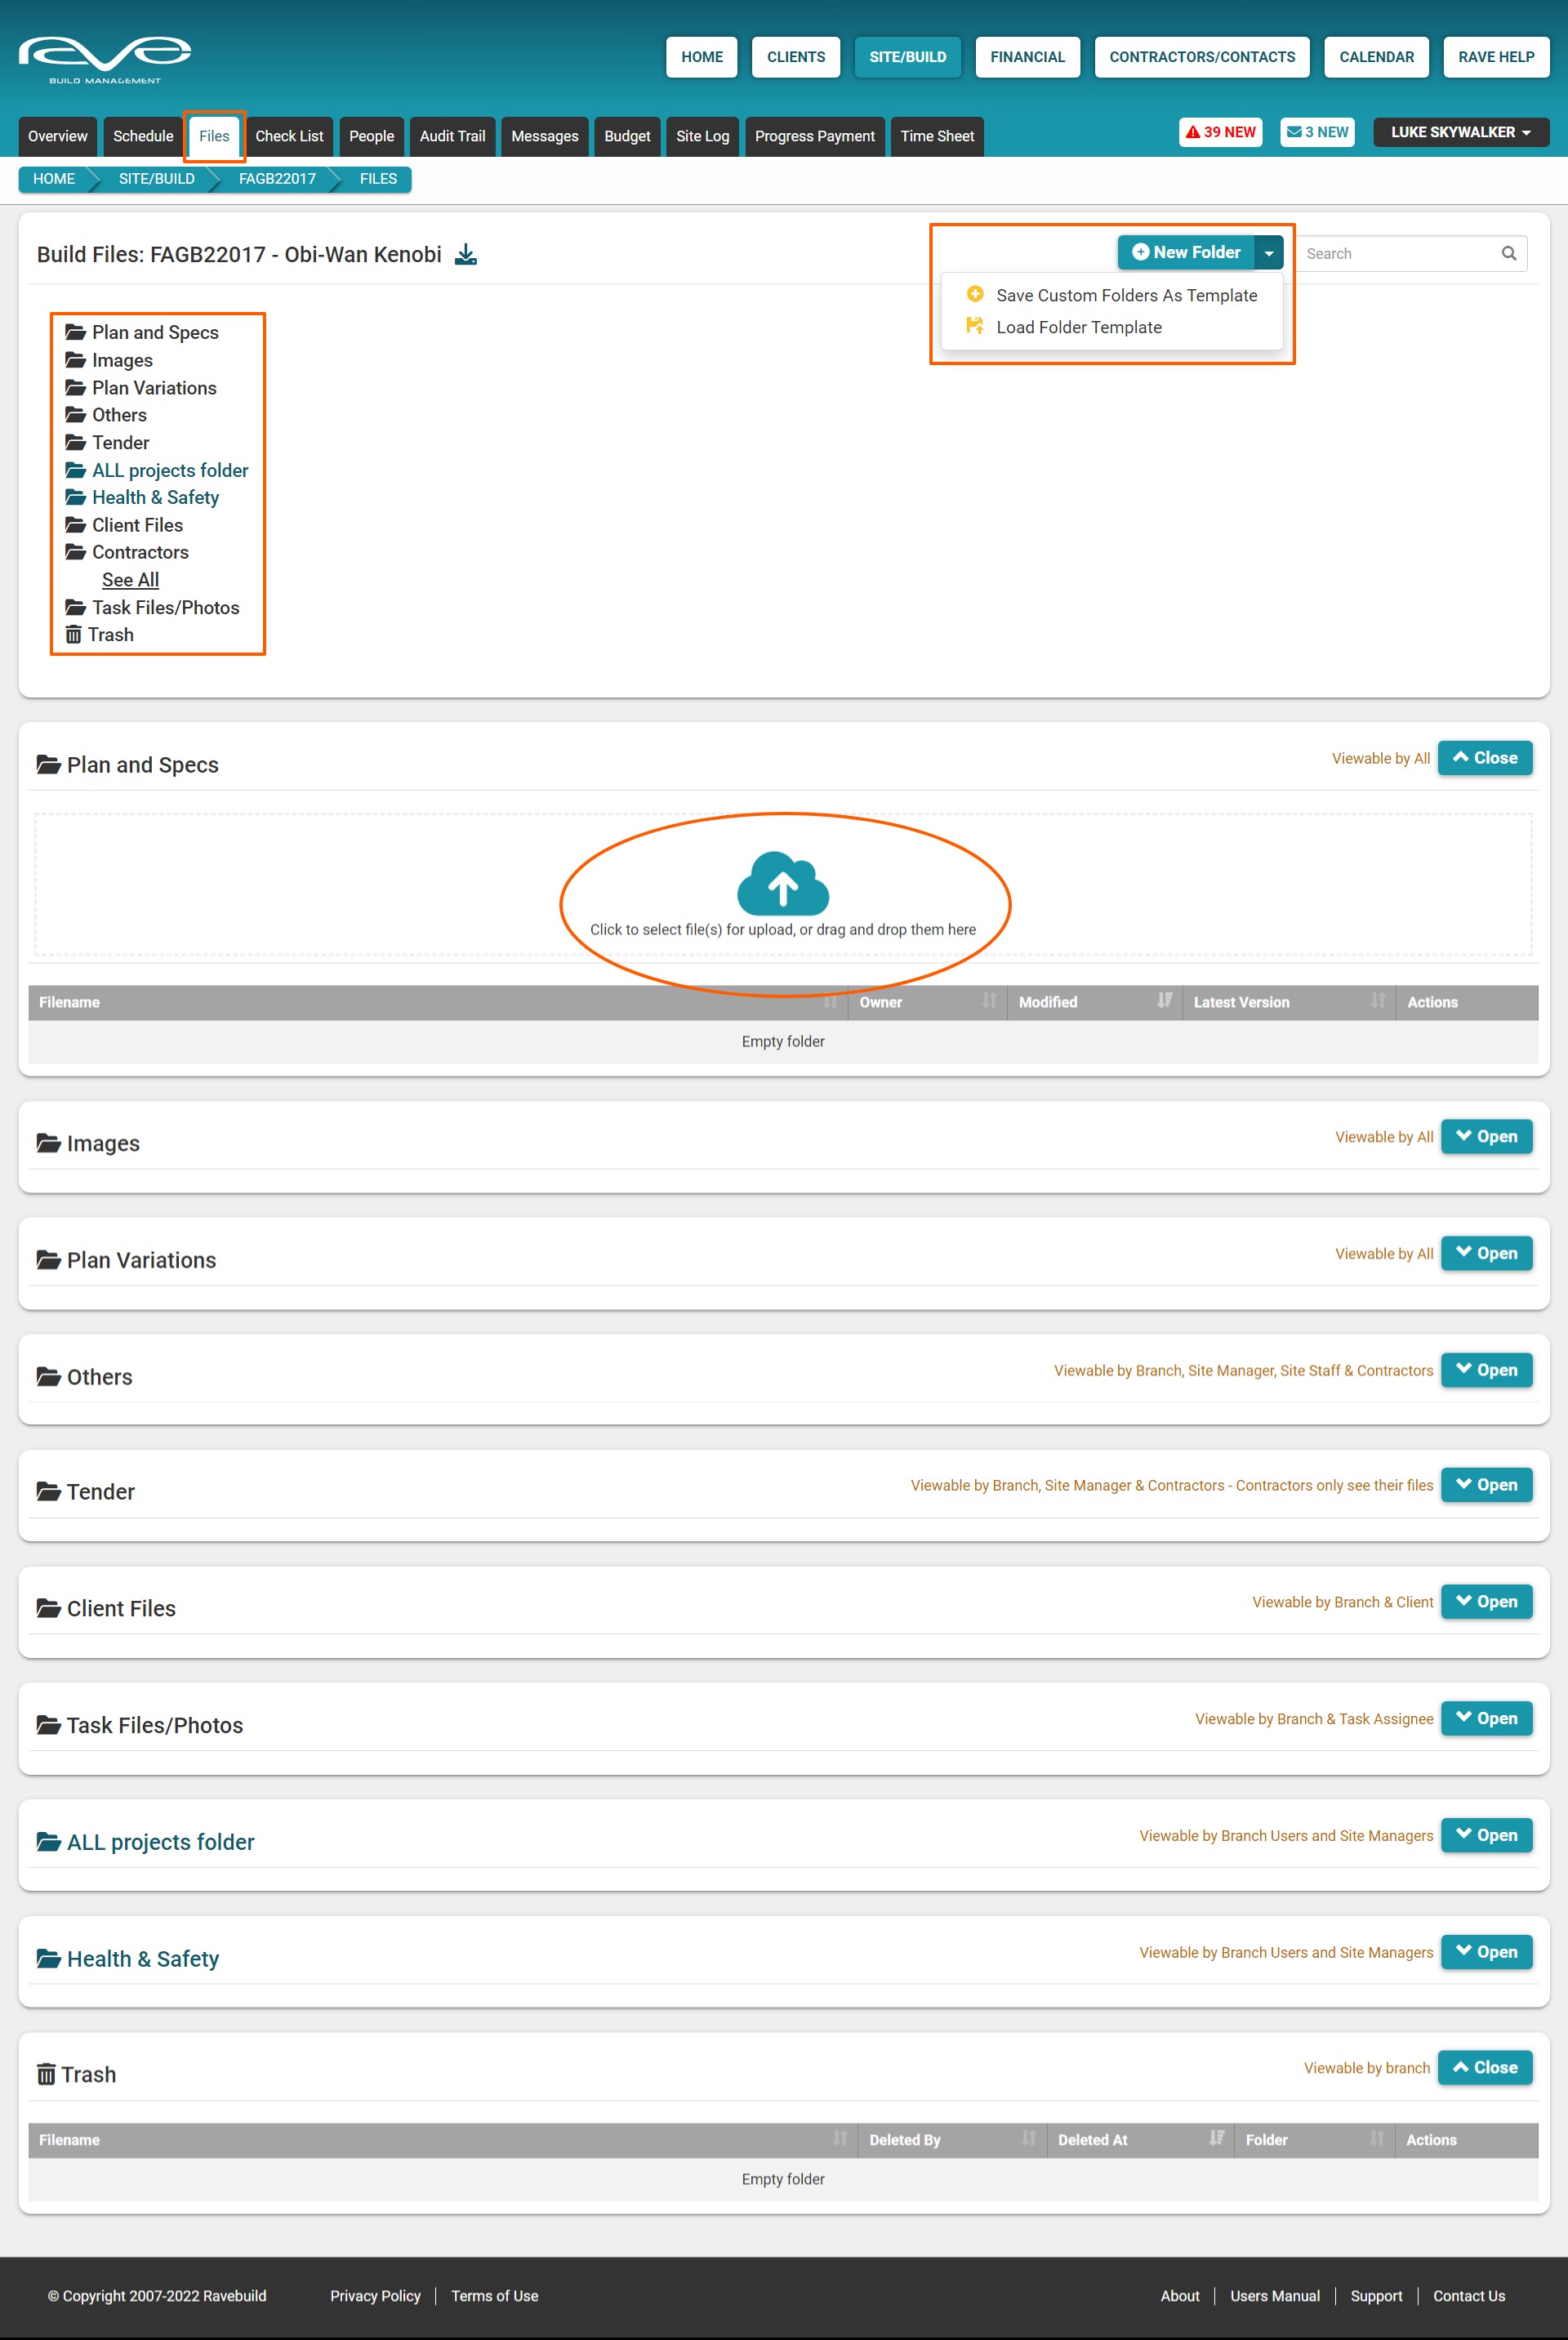
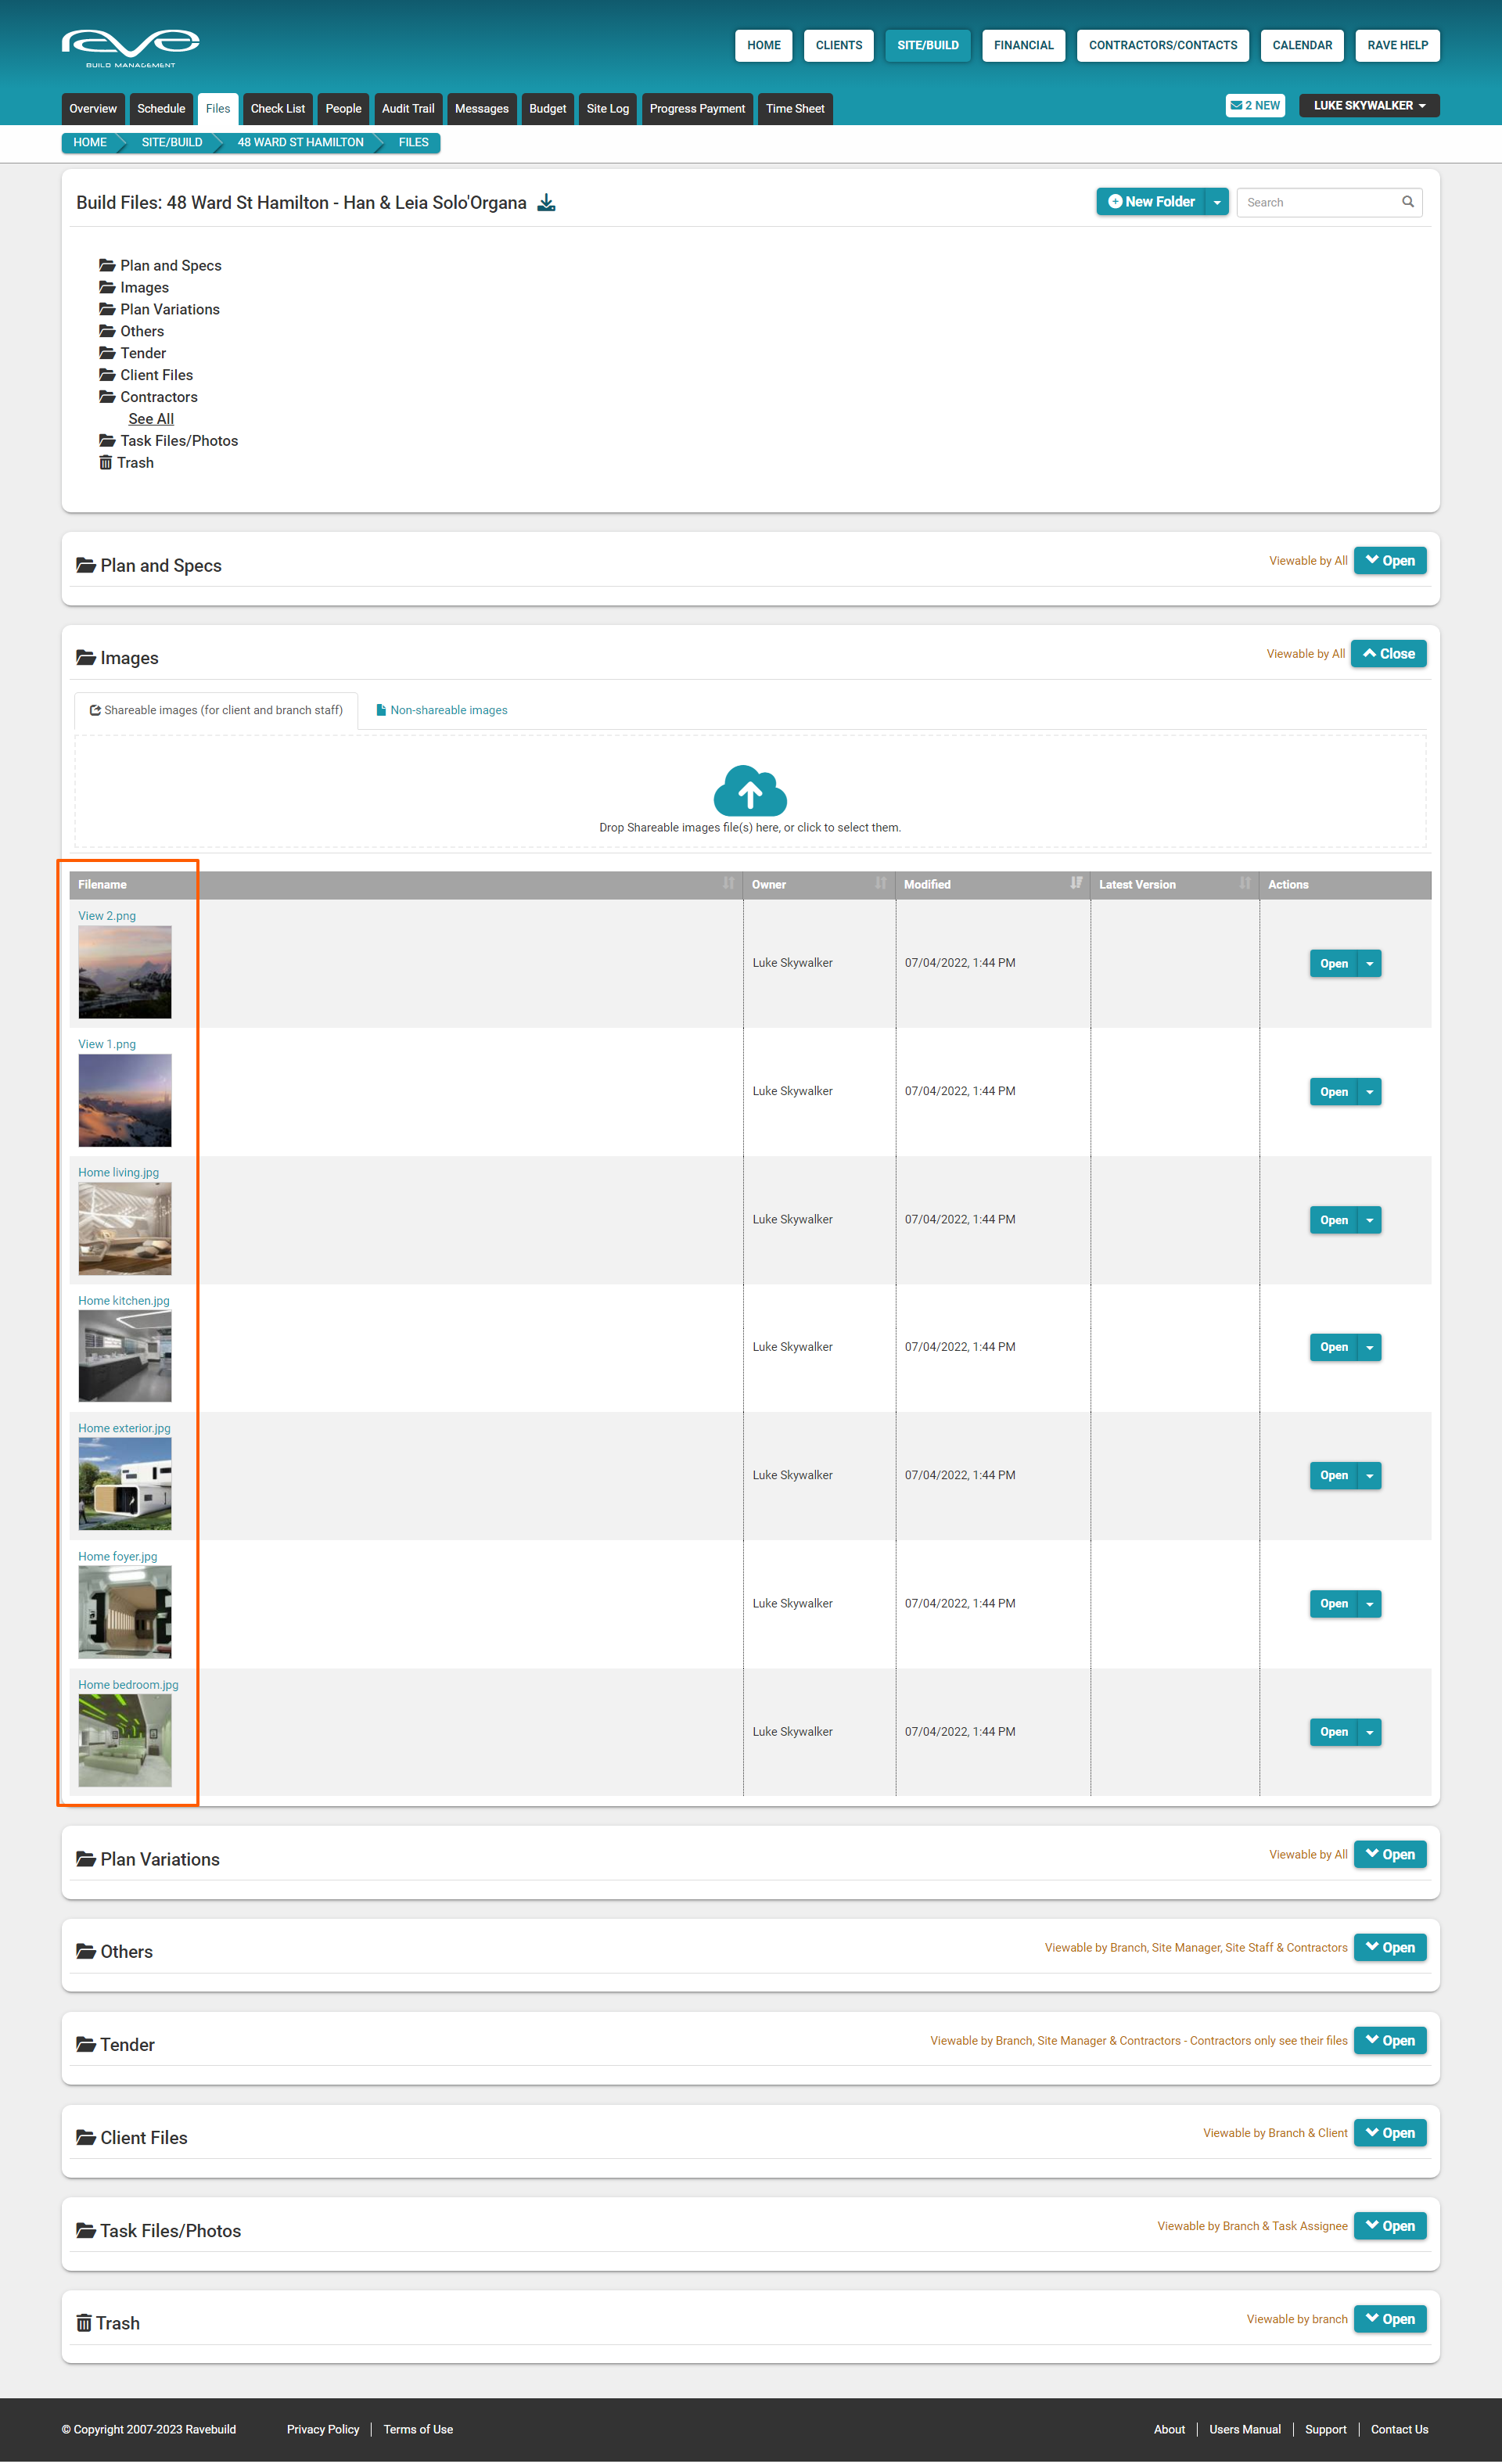
The project's 'Files' sub-tab is where you store the project's files you want your contractors and the client (with permission) to access. That is via the Site/Build button / opening your project by clicking on the job number or the 'Show' button / clicking on the Files sub-tab. The files can be pdfs, word and Excel documents, photos, and even video files.
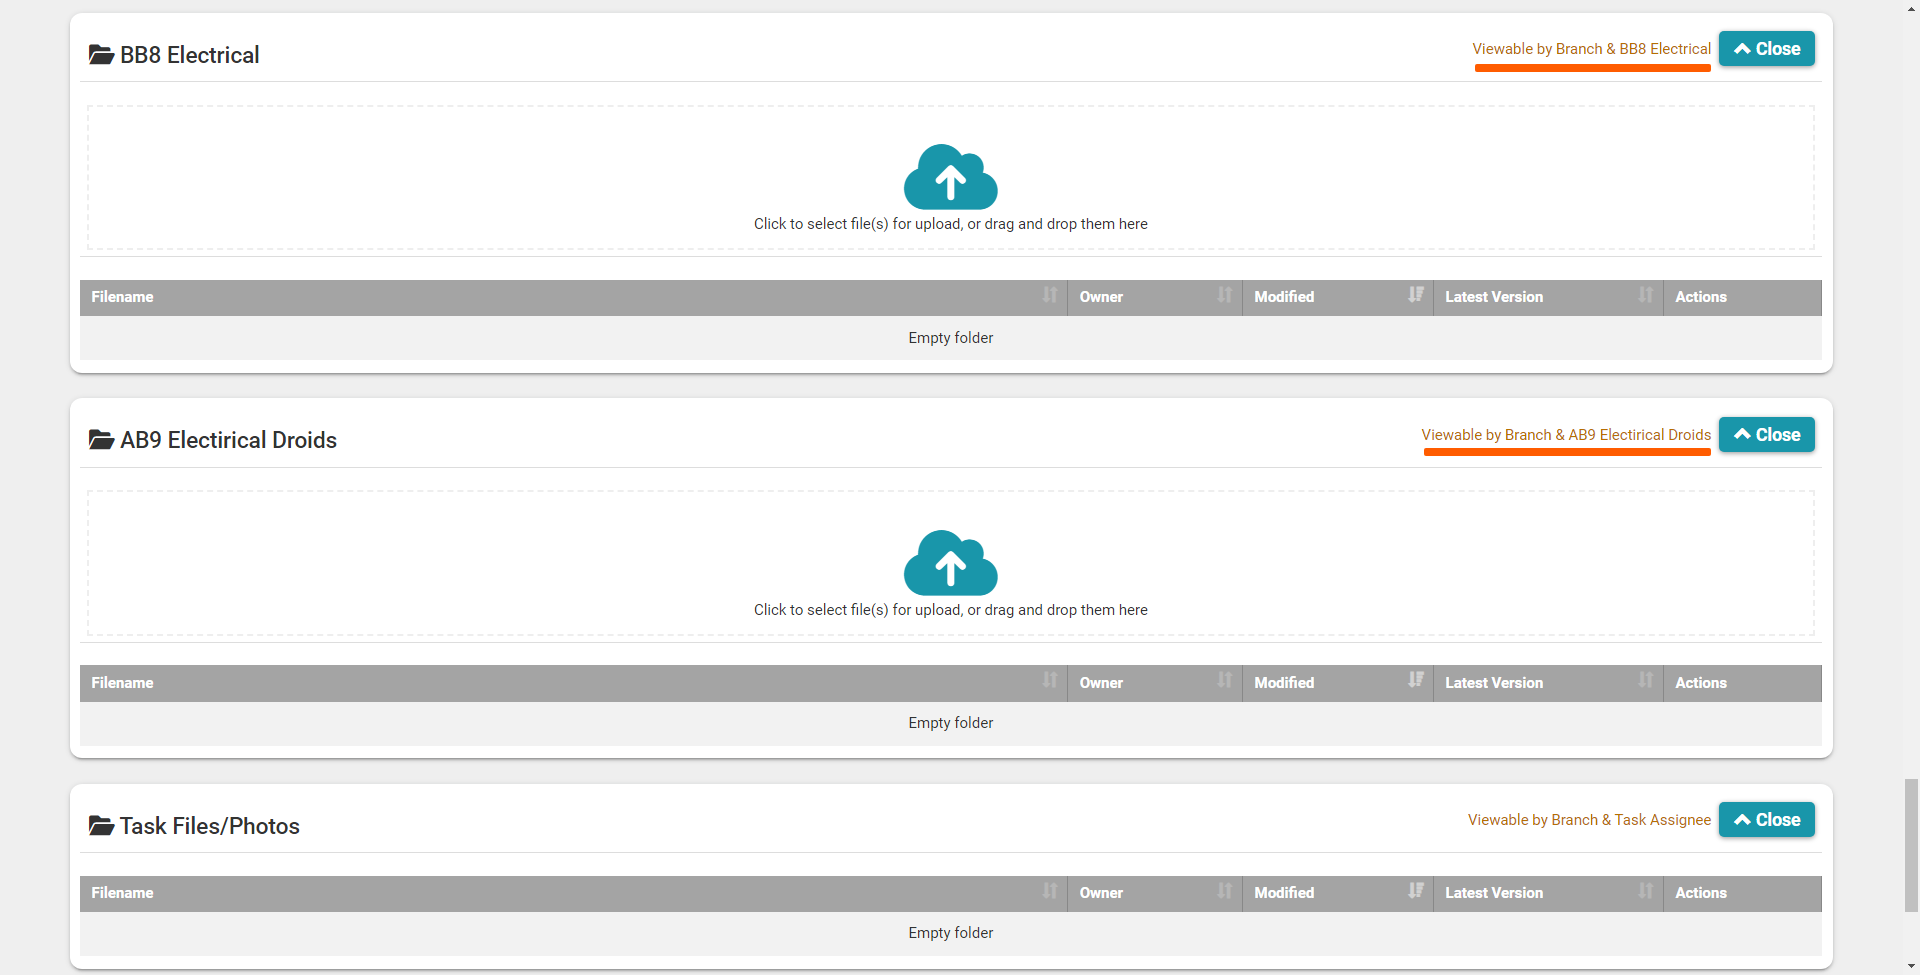
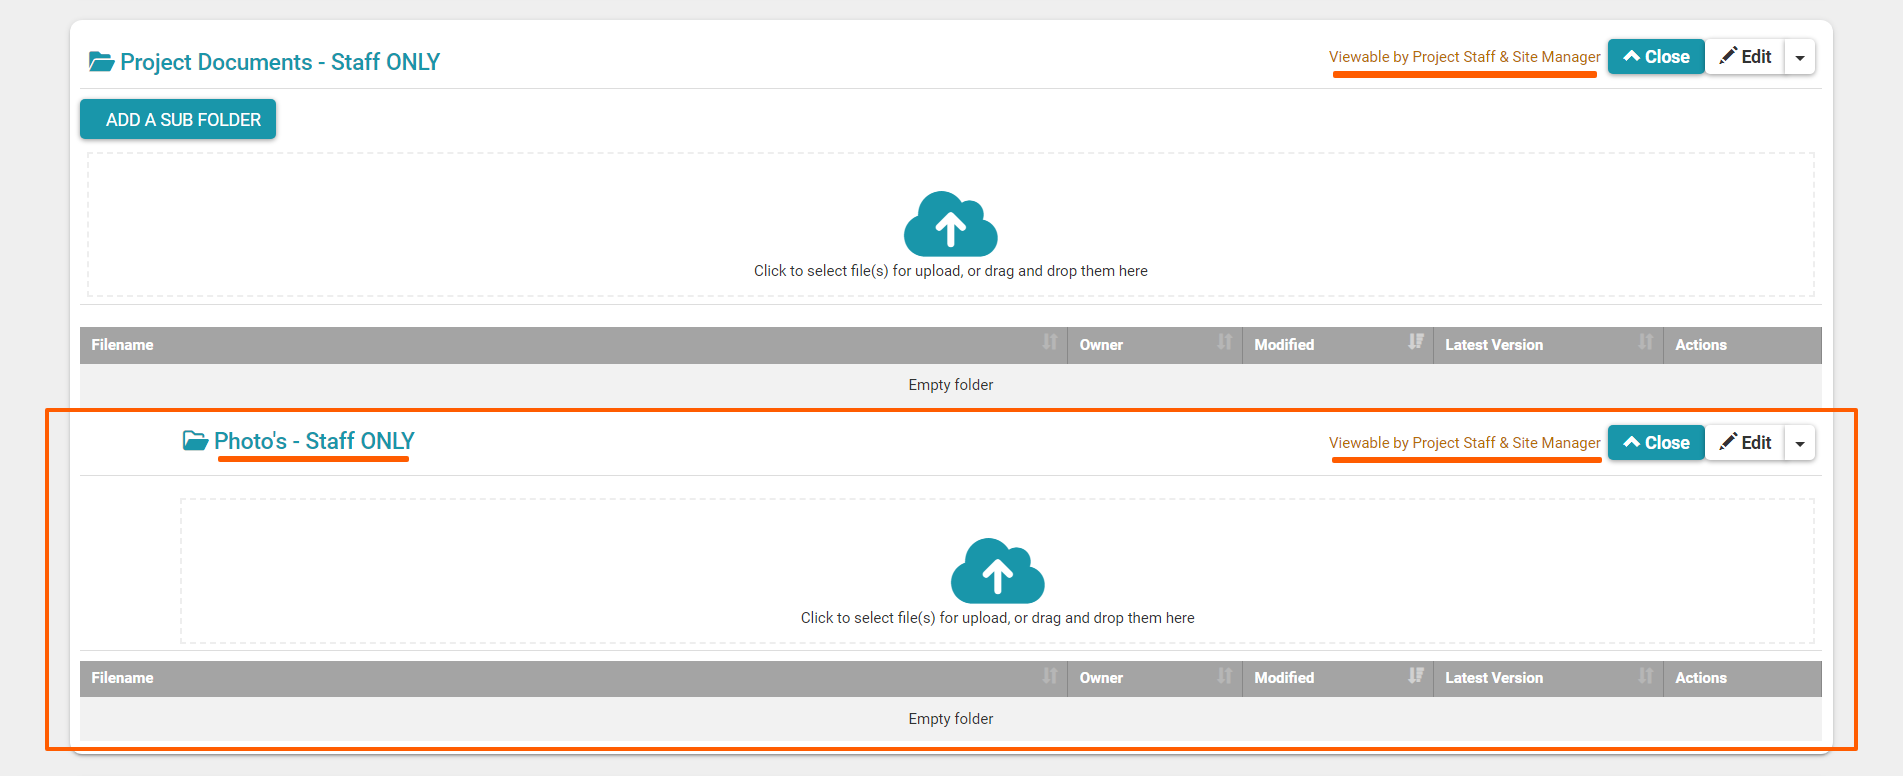
The ‘Files’ sub-tab page is broken down into a number of file folders. The dark charcoal folders are automatically loaded into each project, typically these are Plan and Specs, Images, Plan Variations, Others, Tender, Client Files, Contractors, Task Files/Photos, and Trash. You can create your own folders too these are a teal colour and we'll cover that later in this guide.
Folder viewing permissions
To the right of each File section, by the open (expand) and close (collapse) button, we have the folder's viewing permissions. As you can see, the first few folders have a 'Viewable by all' permission, this means that anyone you give access to a project (a contractor/supplier or the client) can see what has been uploaded into these folders.
Other folders have different viewing permissions - scrolling down the page and looking to the right will display the viewing permissions for each folder. i.e.
- The ‘Others’ folder is viewable only by your branch staff and contractors (not the client) but contractors can see all of the files in this section.
- The ‘Tender’ folder is viewable only by your branch staff and contractors only (not the client) - but contractors can only see their own files that they have uploaded.
- The ‘Client Files’ folder is viewable only by your branch staff and the client - contractors and suppliers cannot see what's in this folder.
- The ‘Task Files/Photos’ folder stores all the scheduled task attachments, viewable only by your branch staff and contractors of that task.

The Contractors Folder
Every contractor who has been given access to the project gets their own folder within the job also - these are displayed by clicking on the contractors ‘See All’ button - this button will display when at least one contractor has been added to the project.

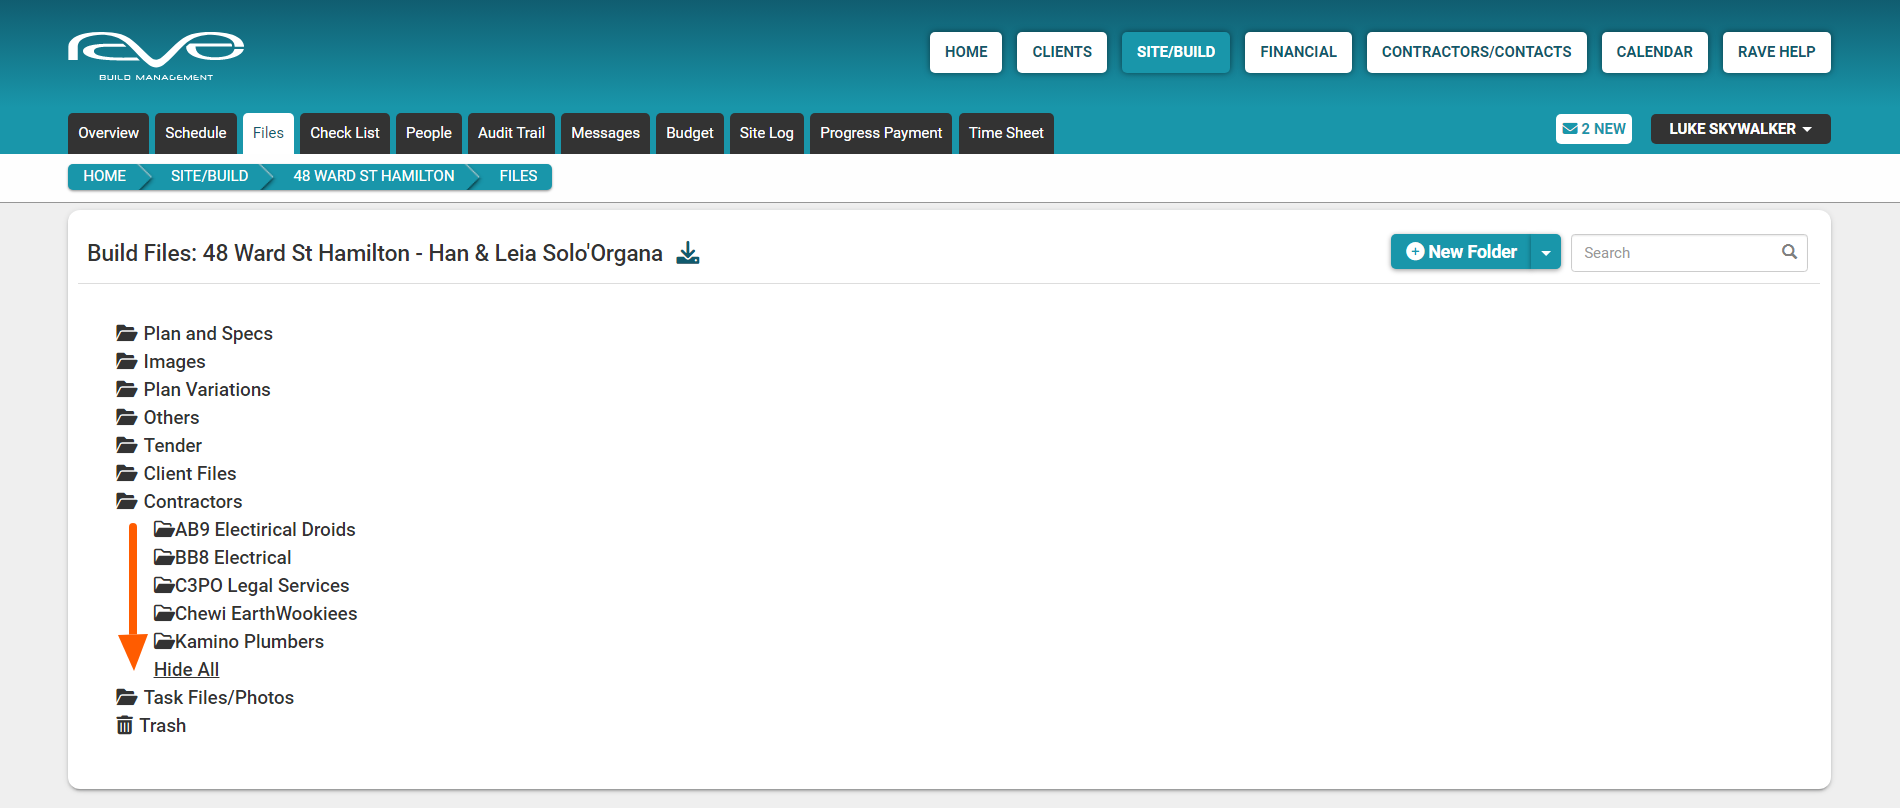
By selecting (clicking on) the BB8 Electrical contractor folder, we are taken to that folder and can see that each contractor folders are only viewable by your branch staff and that contractor's company login only. No other trades have access to another trades' contractor folder.
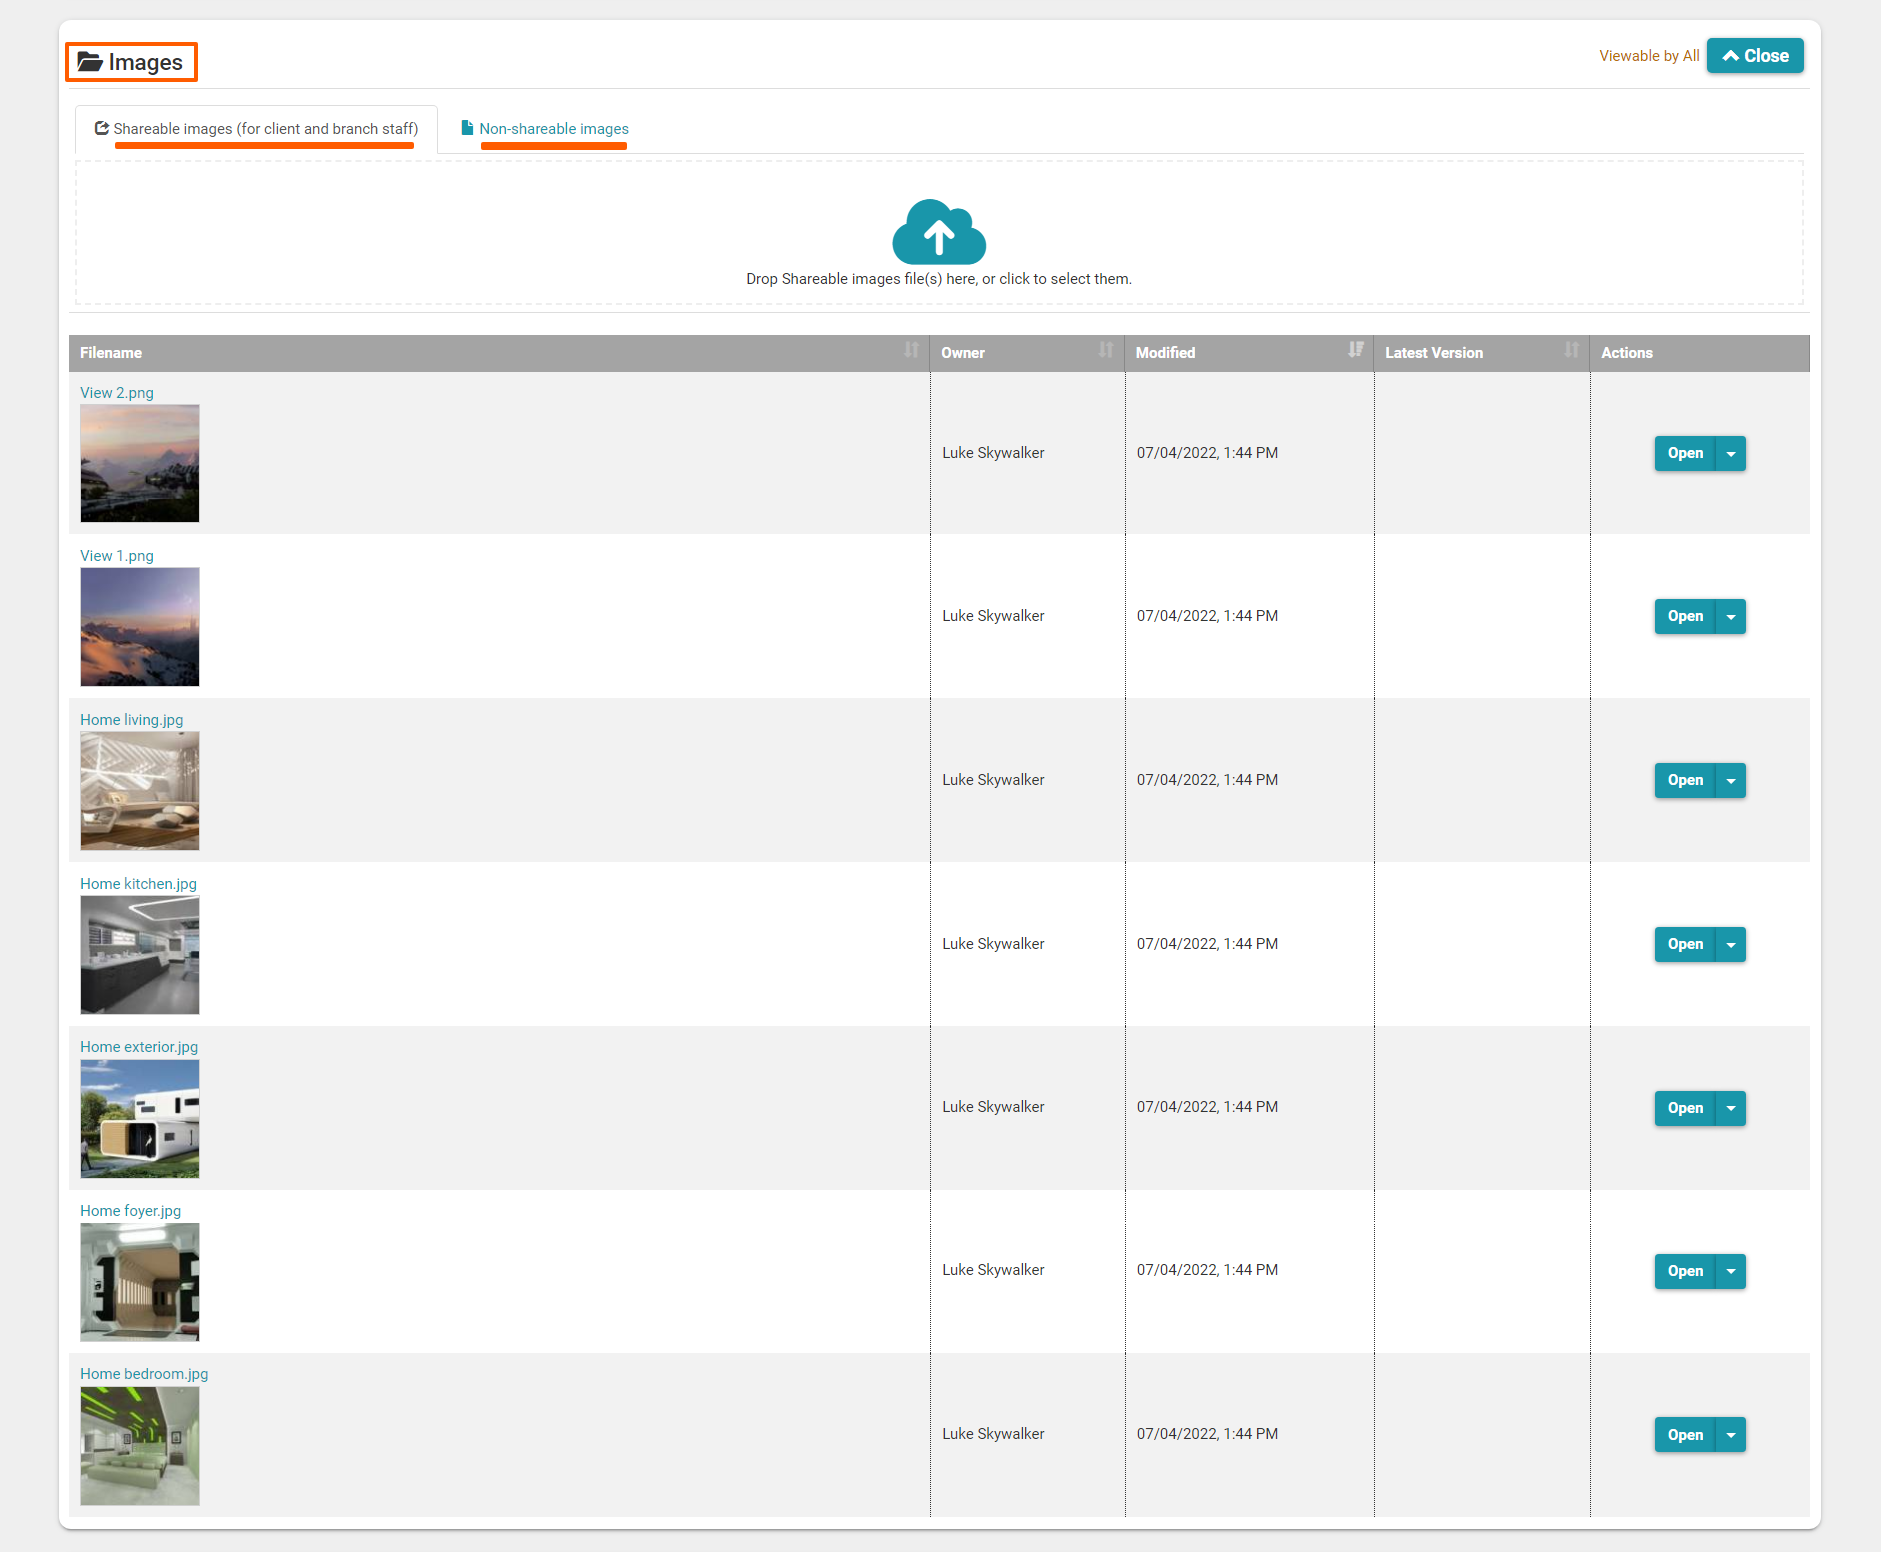
The Images folder
The ‘Images’ folder has two sub-tabs - the ‘Shareable images (for client and branch staff)’ allows you to share these photos via your Facebook account, while photos moved to the ‘Non-shareable images’ folder cannot be shared from RAVE.
Uploading + Managing Files
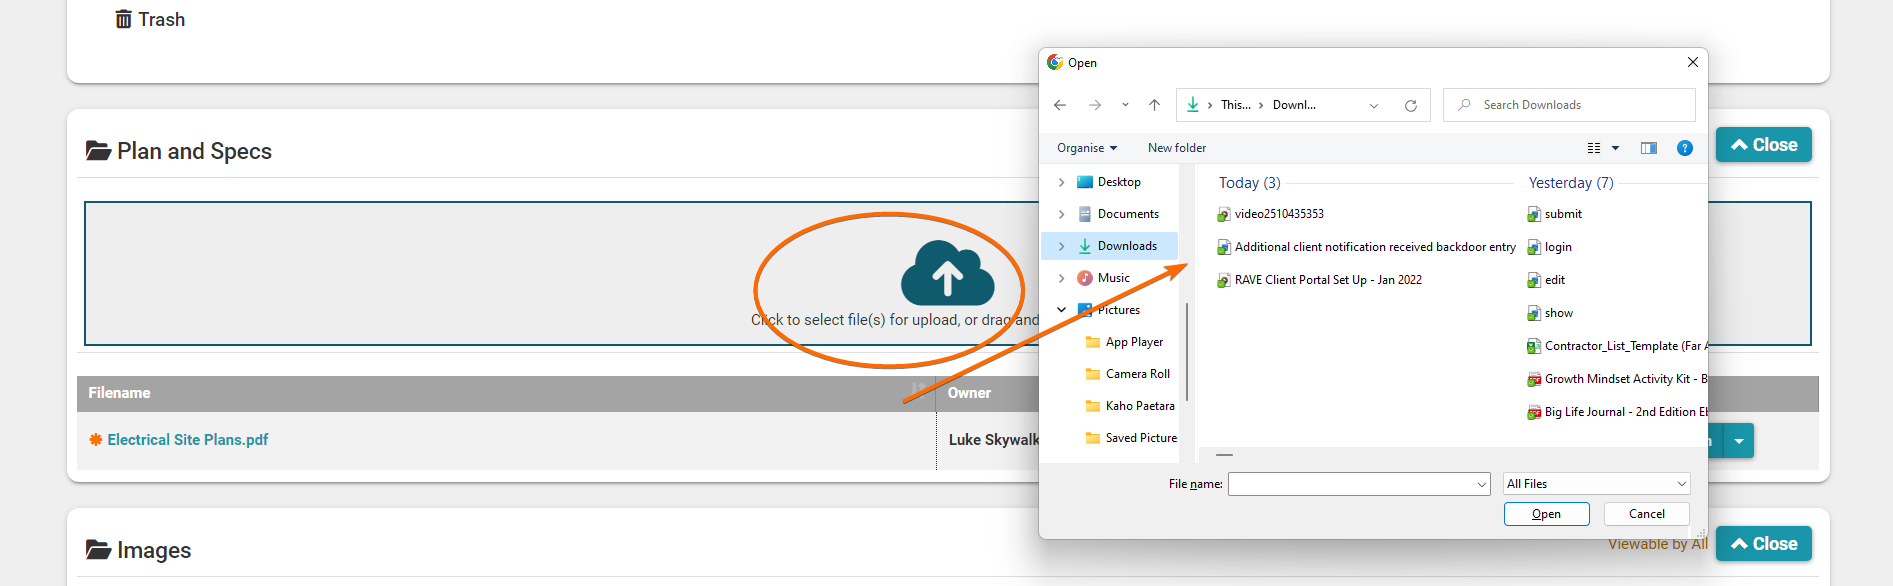
Uploading/Drag + Dropping files(s) into a Folder
We can easily upload a file(s) by dropping it into the drag-and-drop field of a File's folder. Or you can double-click on this area to open your device's file browser/images gallery to select the file(s) you want to add.
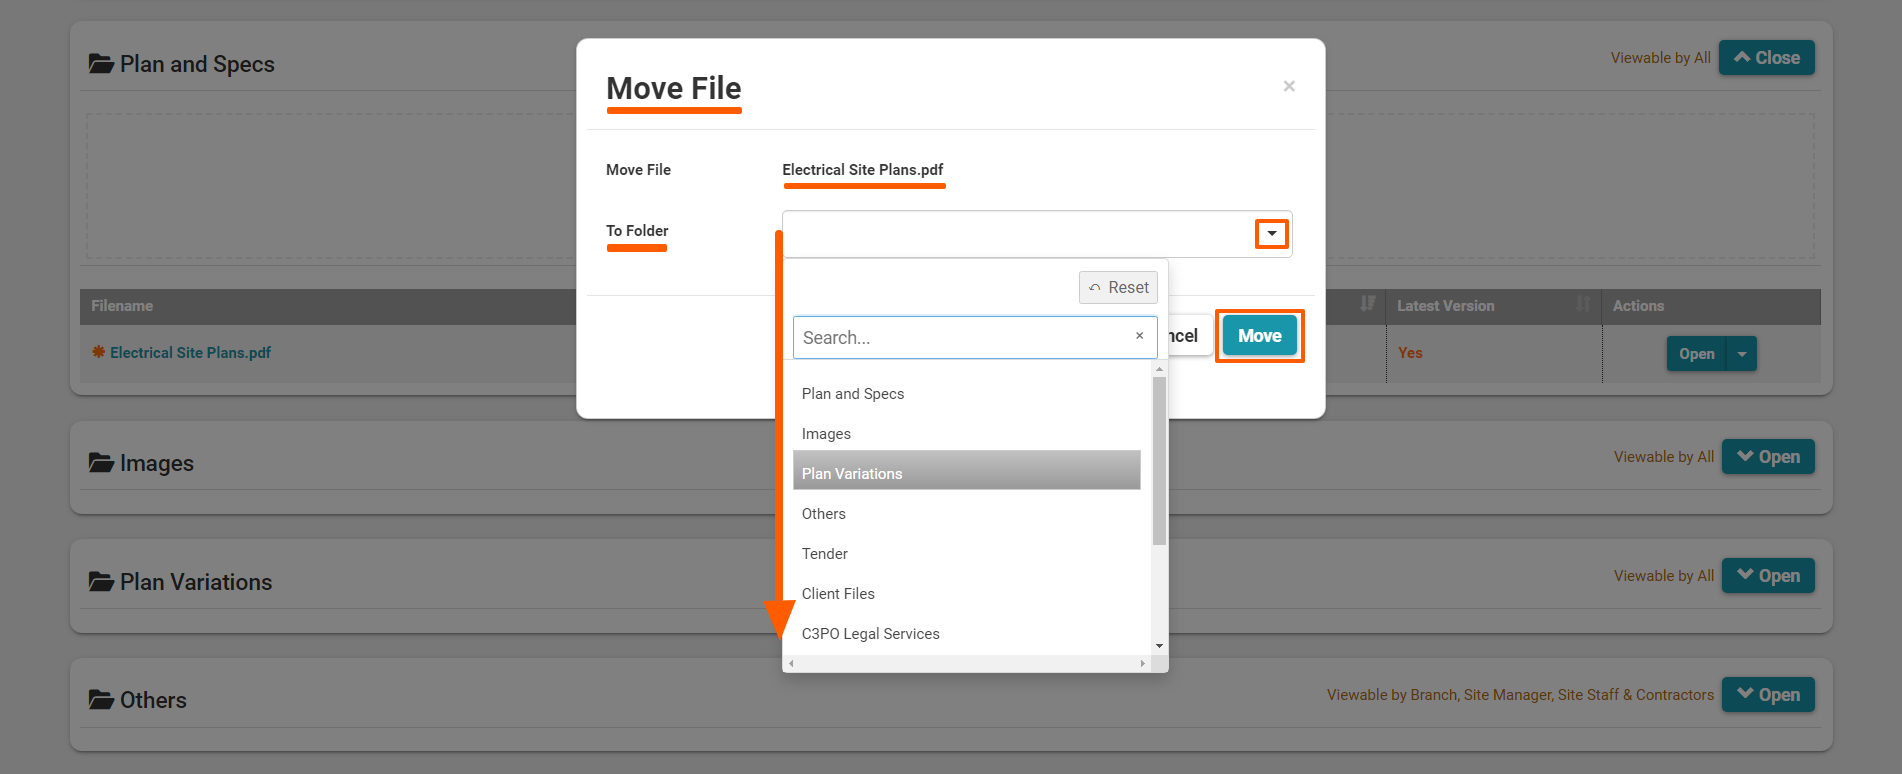
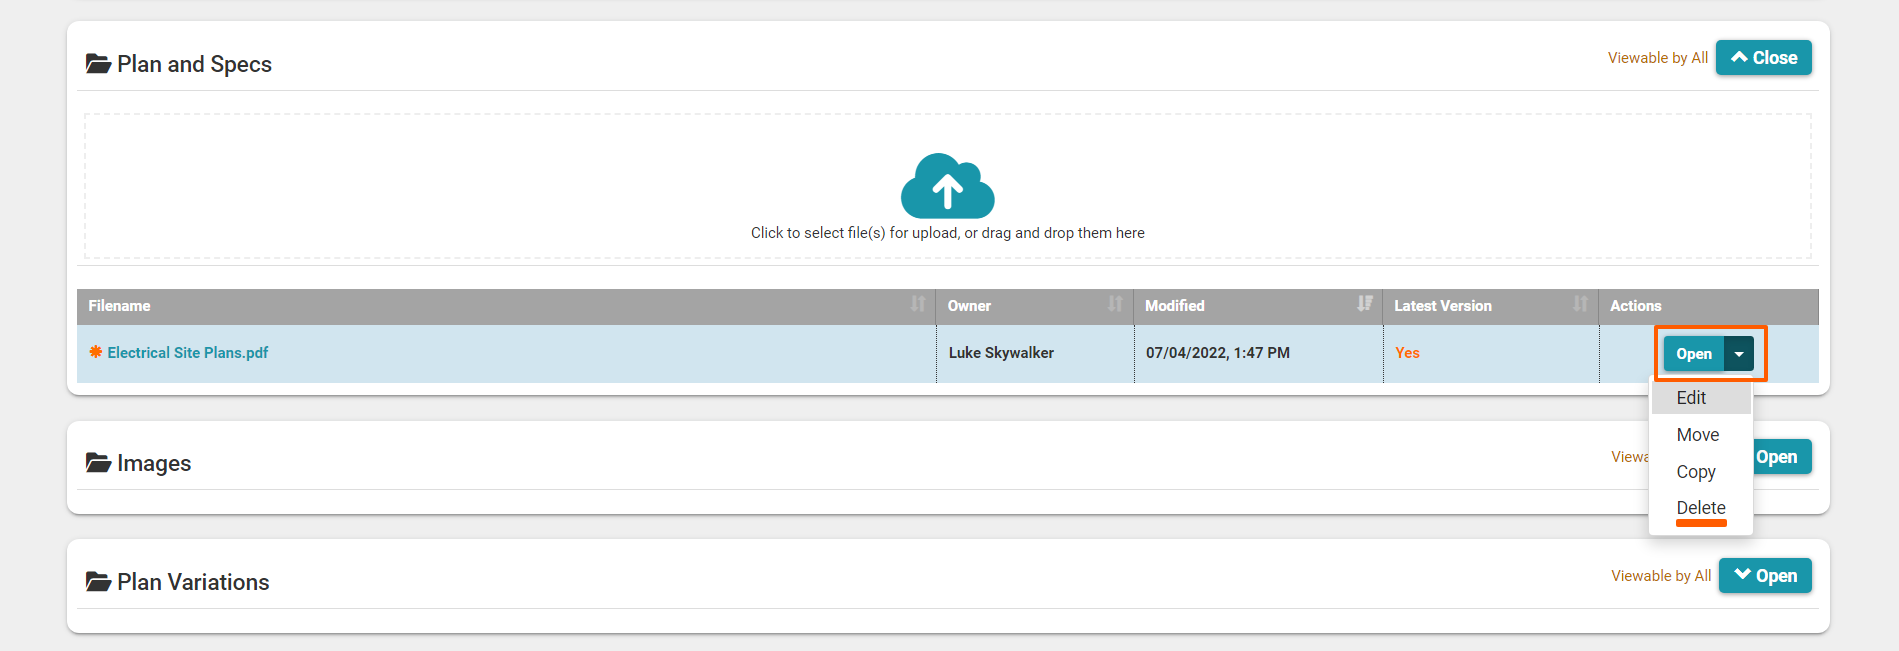
File action drop-down menu
To the right of each file is a 'Show' button, plus an action drop-down menu - the show button will open the file, and the drop-down menu allows you to Edit, Move, Copy, and Delete the file as noted below.
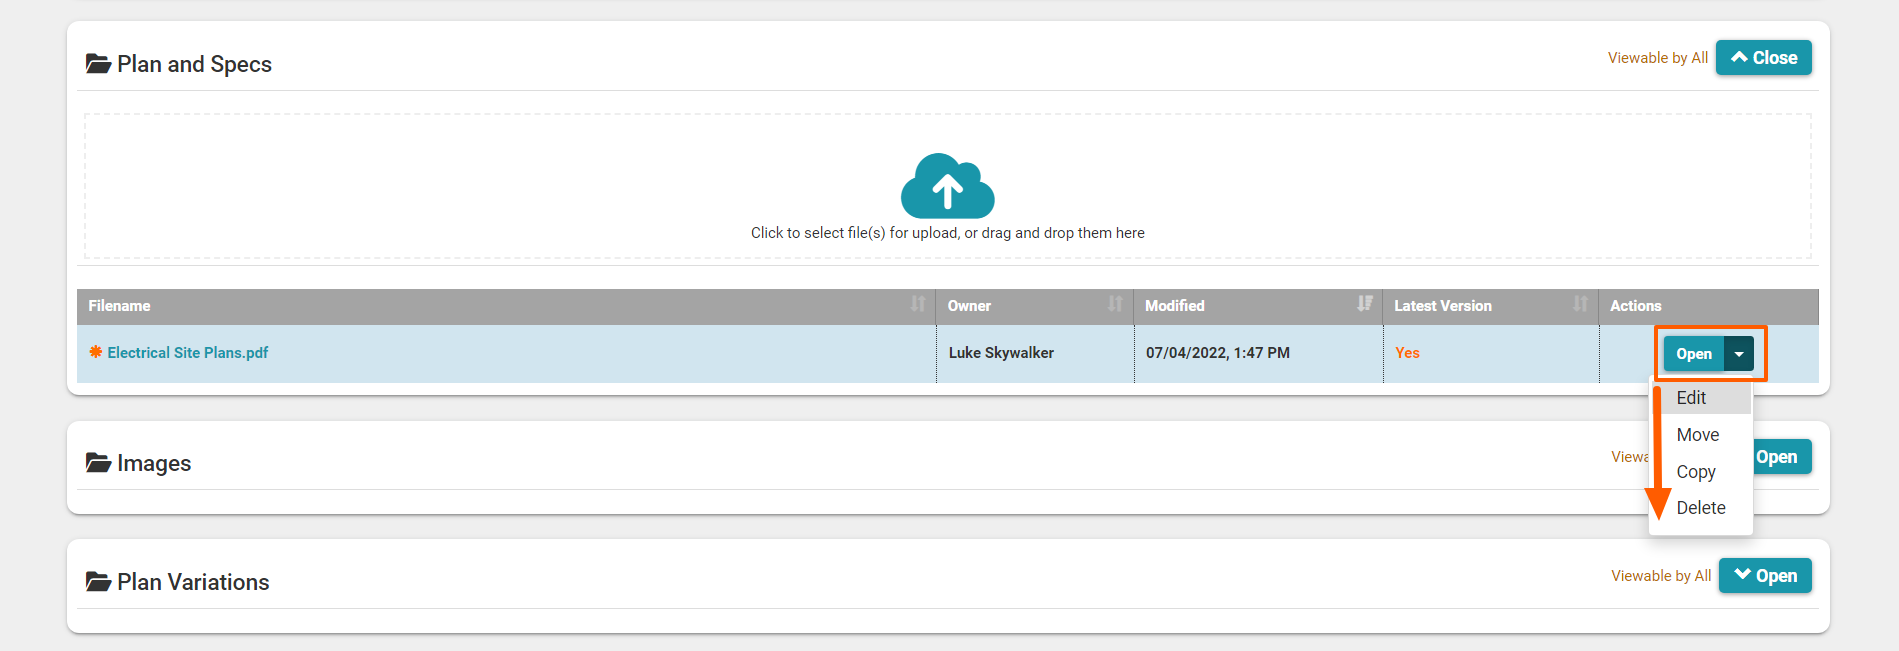
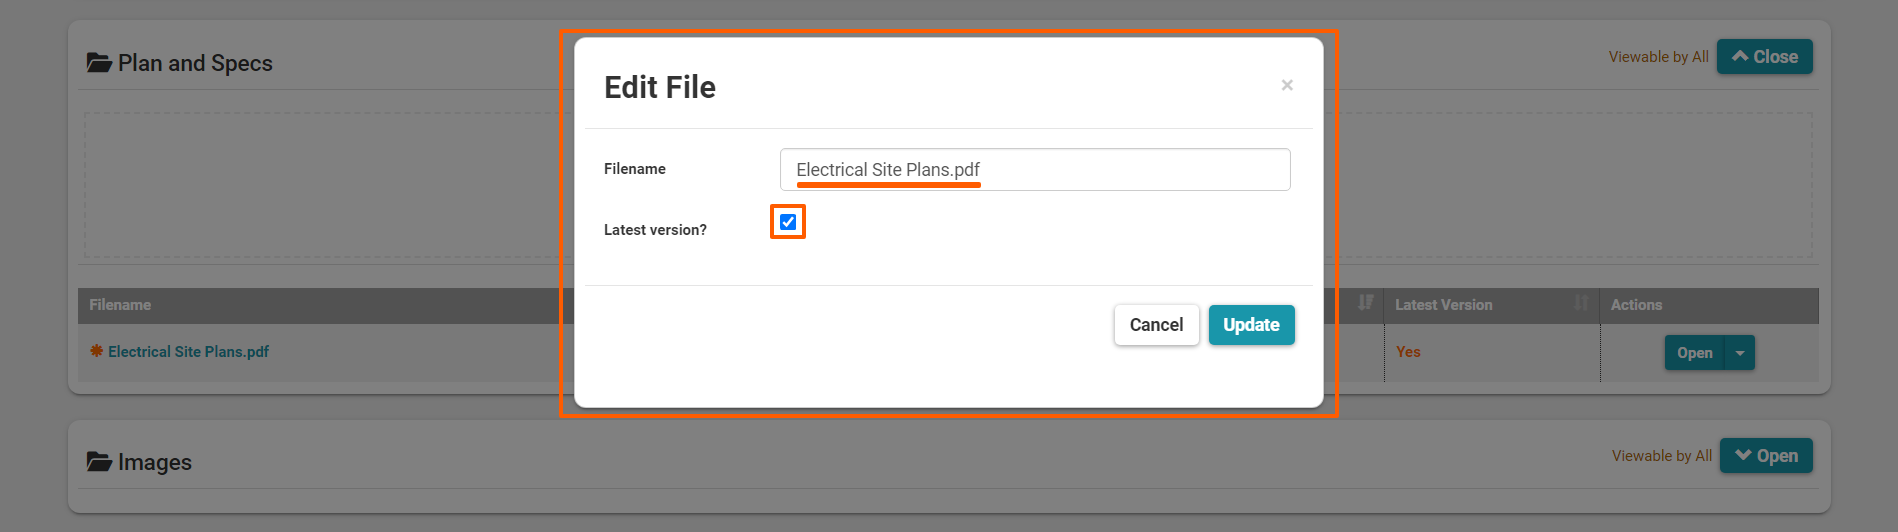
Edit a Filename + Mark as the 'Latest Version'
Once a file has been uploaded to a files folder, you can click the 'Edit' option to change the file name, mark the file as the 'Latest version', or allow the file to be shared via social media. The 'Lastest version' check box will add a 'Yes' to the Latest Version column, and add an orange asterisk to the left of the file name.

Move a file
The 'Move' selection, allows you to move a file from one folder/section to another - this is easily done, by simply clicking ‘Move', and choosing the folder that this file is to move to, before confirming via the 'Move' button.

Copy a file
As with the 'Move' selection, the 'Copy' selection, allows you to copy a file from one folder/section to another - simply clicking ‘Copy', then choosing the folder that this file is to be copied to, before confirming via the 'Copy' button.
Note: The difference between move and copy - is that move will delete the file from the original folder, will copy will leave the original file, and also copy it to the new target file.


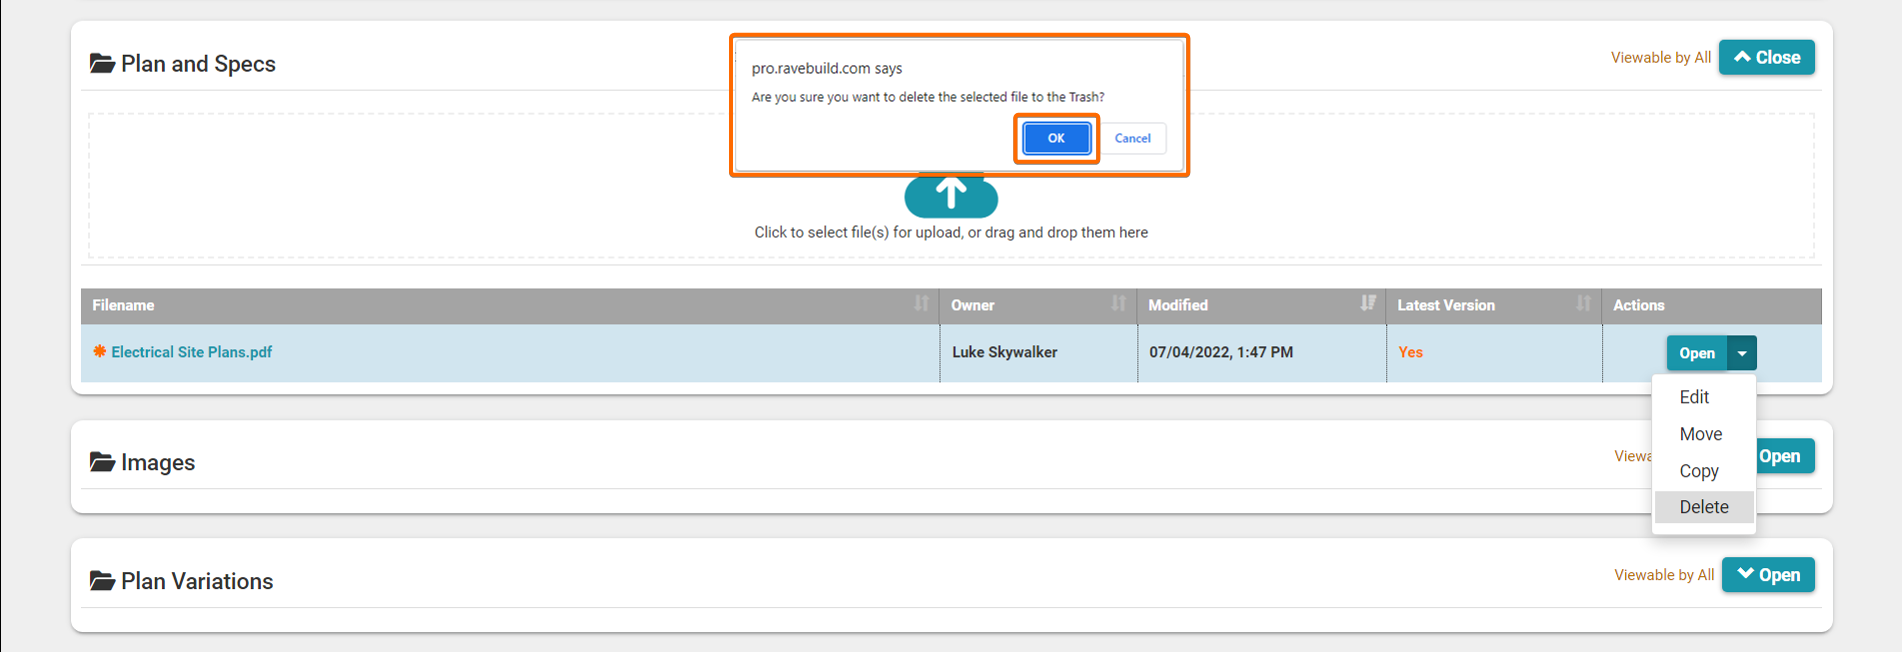
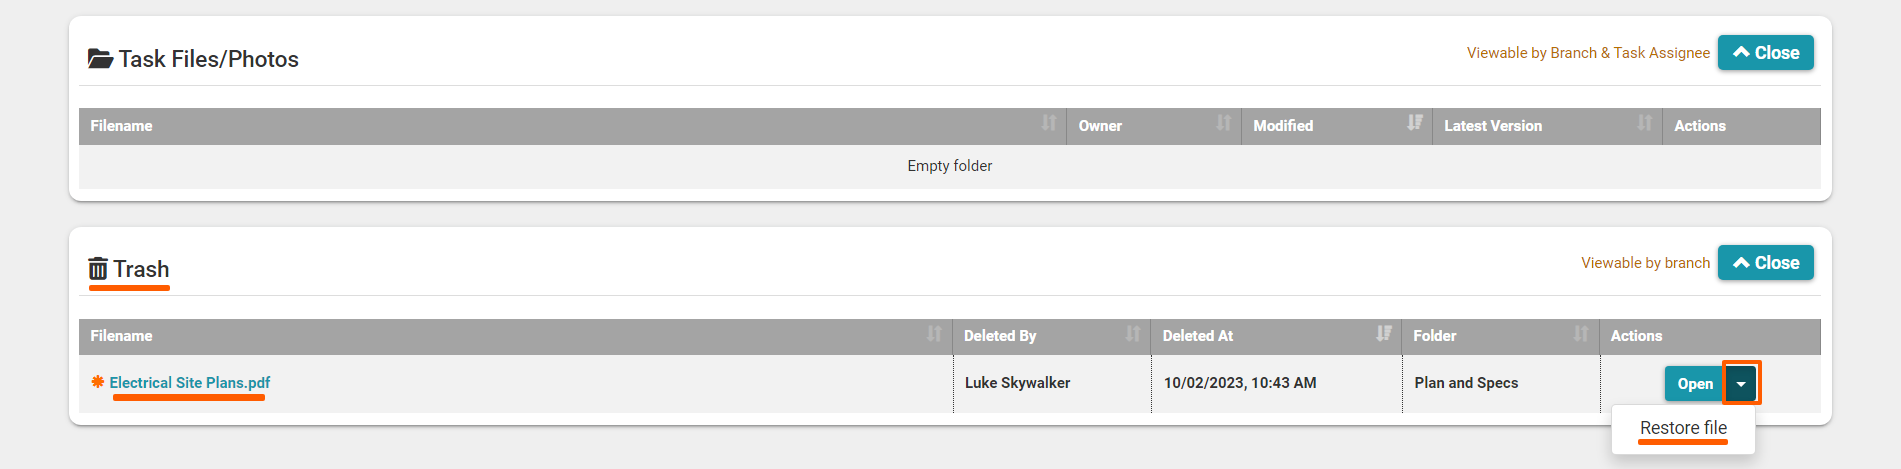
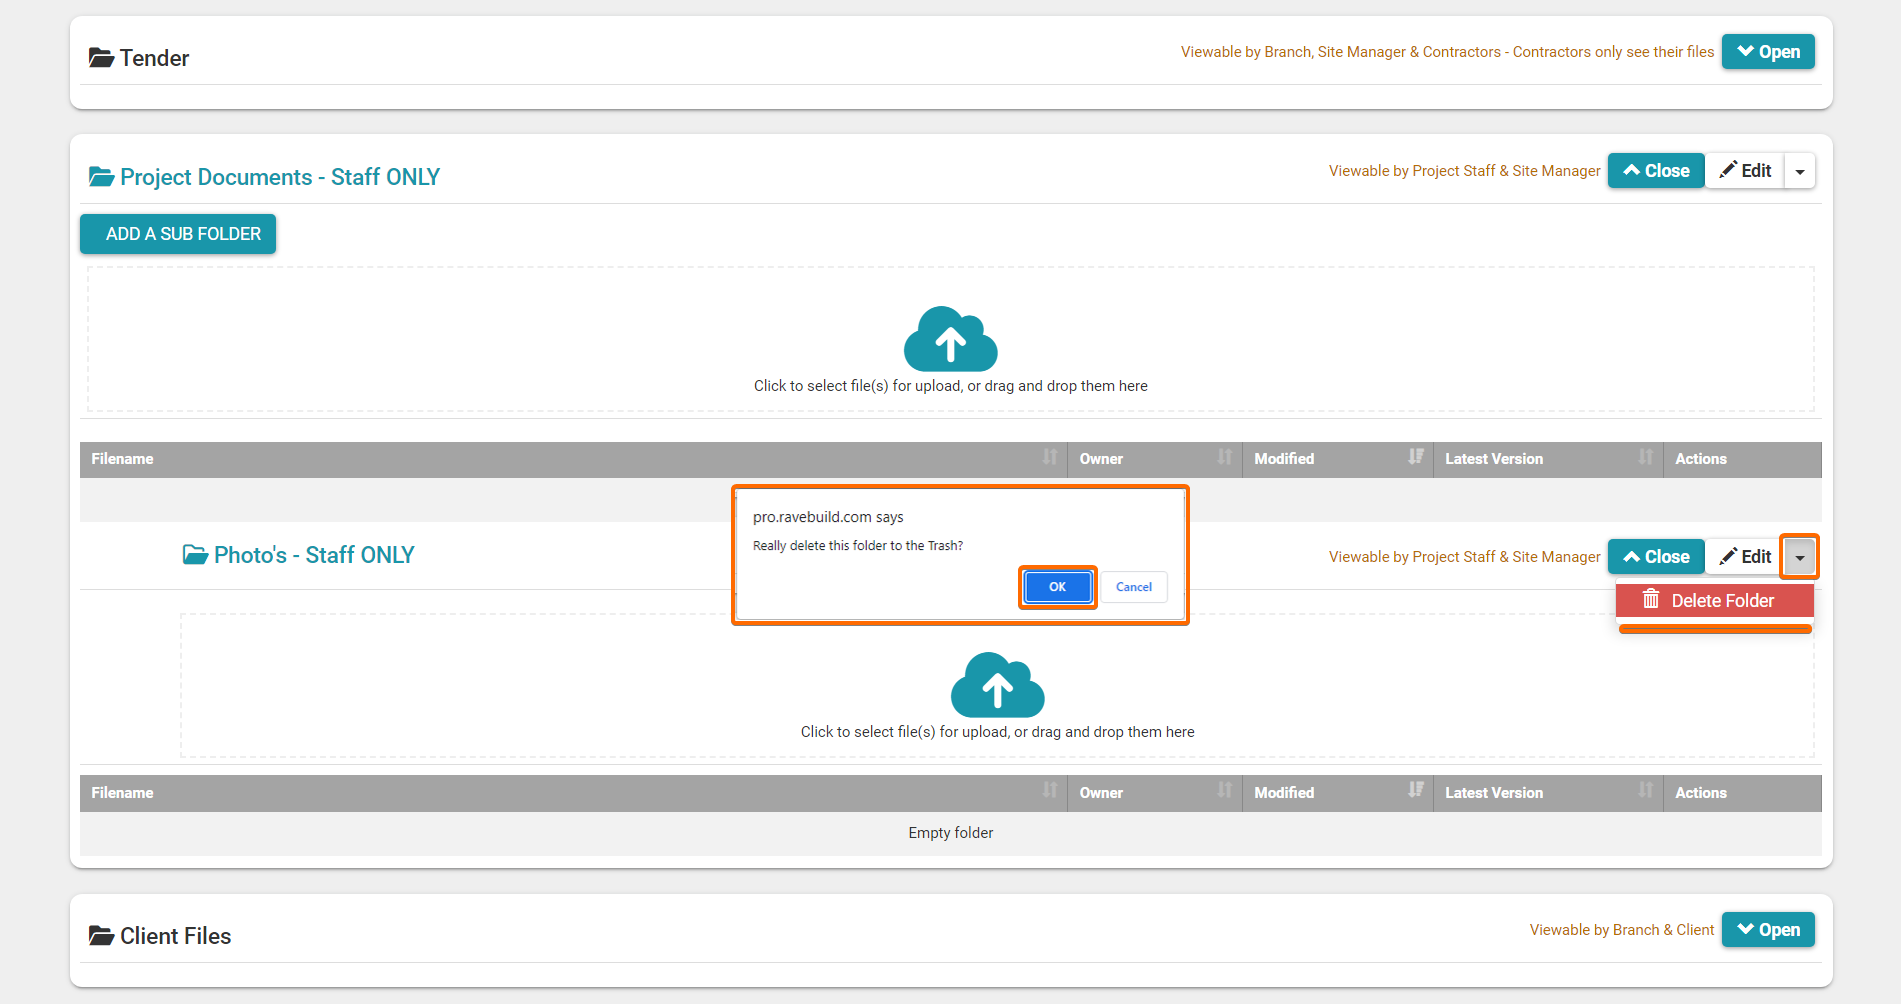
Delete + Restore a file demo + explanation
The 'Delete' selection, allows you to remove a file from its folder/section and move it to the trash. To do this, simply click ‘Delete', then confirm by clicking the 'OK' confirmation button.
Note: We very rarely delete anything in RAVE. When you 'delete' something from the Files sub-tab, it actually gets sent to the Trash folder at the bottom of the ‘Files’ page. The 'Trash' folder is only visible to staff members, who can access the project. Any 'deleted' items that are sitting in the 'Trash' folder can be restored, by moving the deleted item back from the trash folder to its original location.
To restore a file, simply click on the action drop-down menu (to the right-hand side of each file) - then click ‘Restore', and confirm by clicking the 'OK' confirmation button.
The Image Folder + Build Overview + WARNING
The project's Files ‘Images’ folder is where we store project images that we do want our contractors (and the client if you've given them access to their project) to see. A special feature of the Files / ‘Images’ folder is that all images loaded here are also available via the ‘Build Overview’ project images section.
NOTE: This is an important point to save your contractors time and data when they're viewing your projects on their mobile or tablet i.e. the project's 'Images' folder should be used to store key project images - this is not where you would upload 20 photos of the concrete pour for the client to see. Those photos should be loaded in the ‘Client Files’ folder or you can create a new folder specifically for client photos.

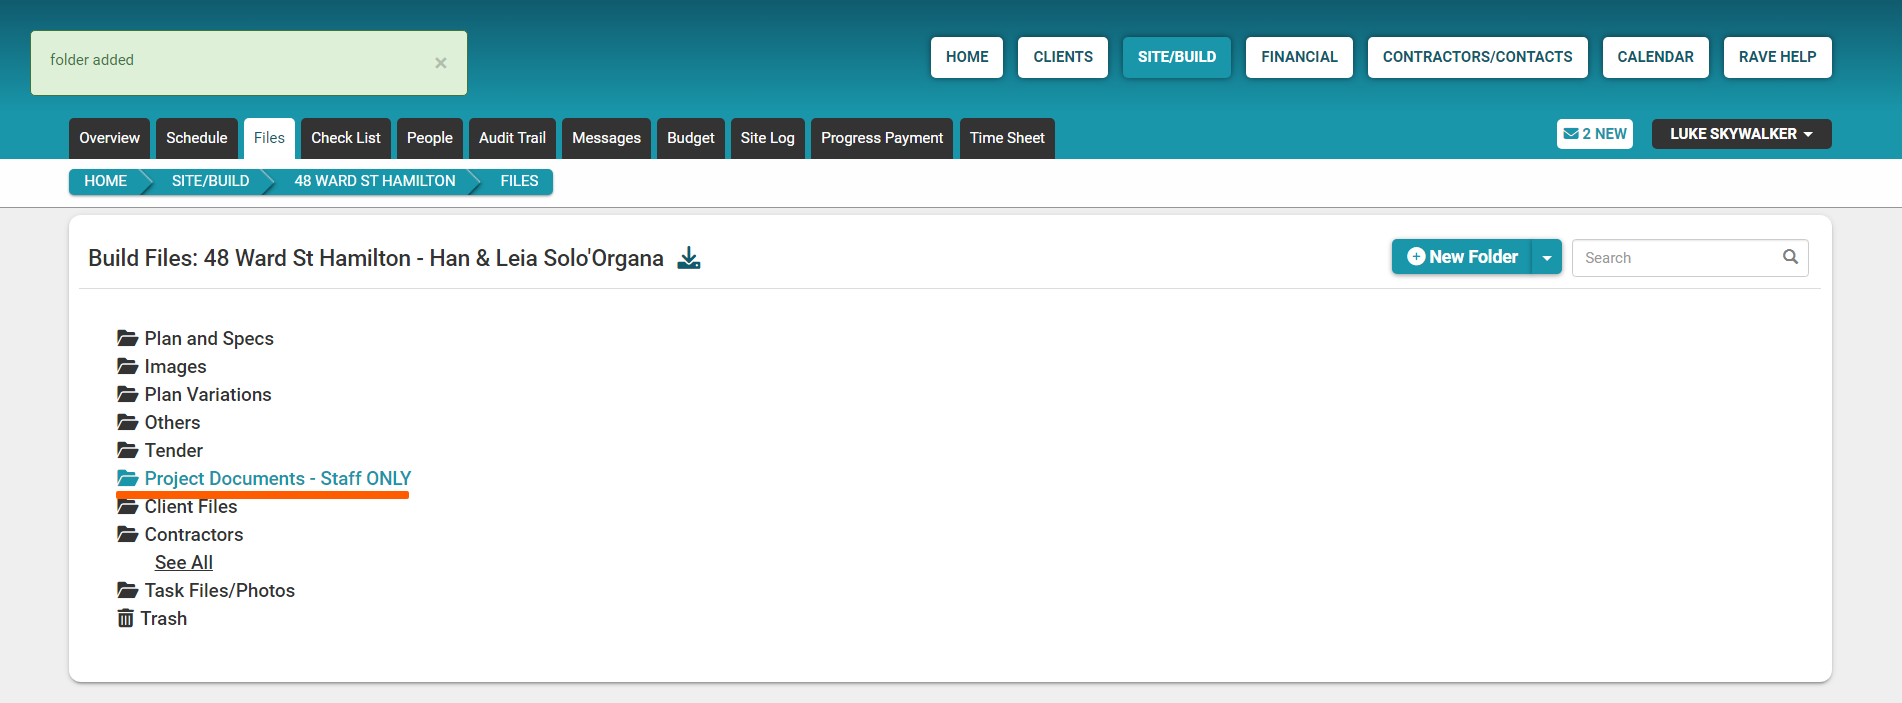
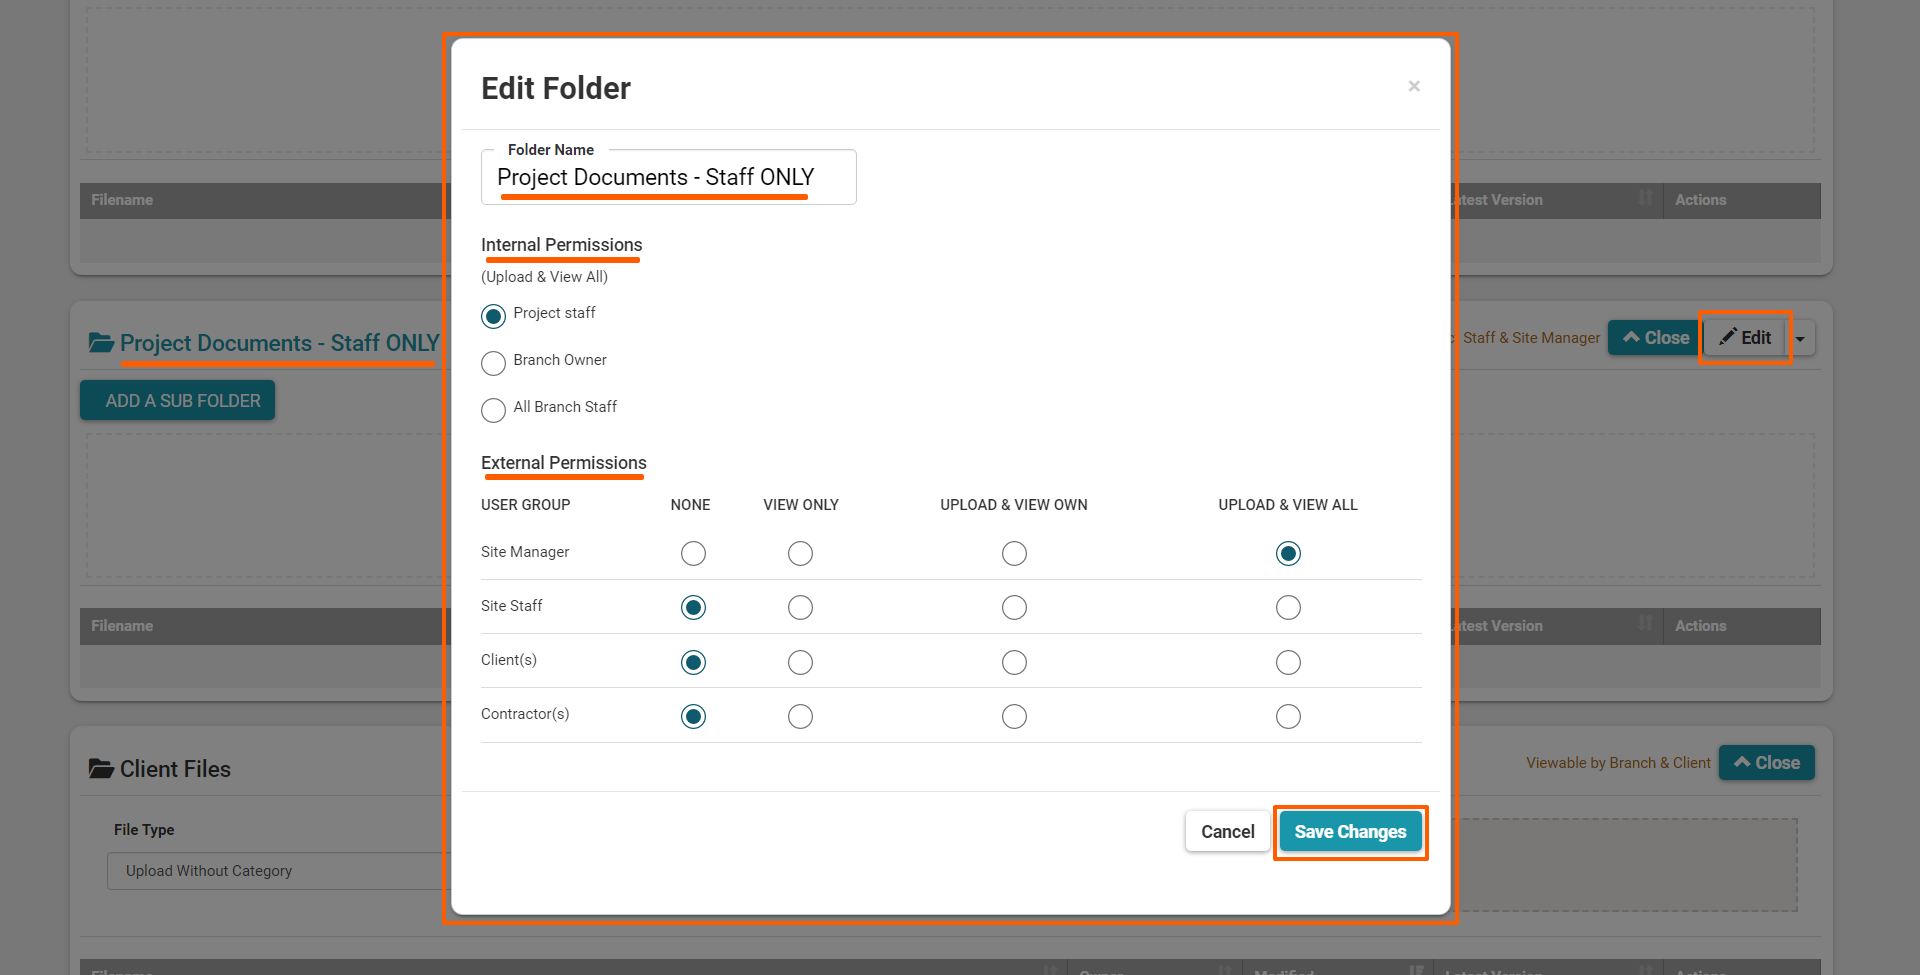
Create and Edit a new Customised Folder
RAVE allows you to create your own files folder(s) with their own permission sets, with the option of saving a folder template to load your folders automatically into any future job, or as required. These customisable folders are displayed in a teal colour vs the dark charcoal of our default/set folders.
To create a new files folder:
- From the Files sub-tab, we click on the ‘New Folder’ button at the top right of the page
- Then via the 'Add New Folder' pop-up - we give our new folder a name
- Next, we set the folder's viewing (access) and upload permissions.
We have three internal permissions:- The ‘Project Staff’ permission - only allows Office Staff, as listed on the project's ‘People's tab, to view and access this folder.
- The ‘Branch Owner’ option - only allows those with Branch Owner permissions to view and access this folder.
- The ‘All Branch Staff’ permission - allows all banch staff users (office staff and projec managers) to view and access this folder.
We have four external permissions - 'Site Manager', 'Site Staff', 'Client(s)' and 'Contractors' - None' - no visibility/no access - is the default access level for external permissions
- ‘View Only’ - in which they can access/view but cannot upload any files to this folder
- ‘Upload & View Own’ - meaning they can only view the documents they have uploaded to this folder
- ‘Upload & View All’ - where they can view all the files in this folder + upload files to this folder too
- Once you are happy with the folder name and the access/viewing permissions - click the 'Save Changes' button to confirm
- This will create your new customised/teal-coloured folder


To edit (the name or viewing/access permissions) or delete a customised folder:
Only the teal-coloured/customisable folders can be edited - that is change the folder name and viewing/access permissions.
To edit a teal-coloured/customisable folder:
- From the Files sub-tab, scroll down the page until you find your customised folder name (on the right-hand side of the page)
- Look over to the right-hand side of the page, and click the 'Edit' button to left-hand side of the page
- This will open the Edit Folder pop-up window - allowing you to update your name and view/access permission details as required.
- Once you've made all necessary changes, click the 'Save Changes' button to confirm, or 'Cancel' to cancel the update.

To delete a teal-coloured/customisable folder:
- From the Files sub-tab, scroll down the page until you find your customised folder name (on the left-hand side of the page)
- Look over to the right-hand side of the page, click the 'drop-down' option to the right of the 'Edit' button
- Click 'Delete' and confirm the deletion by clicking 'OK'

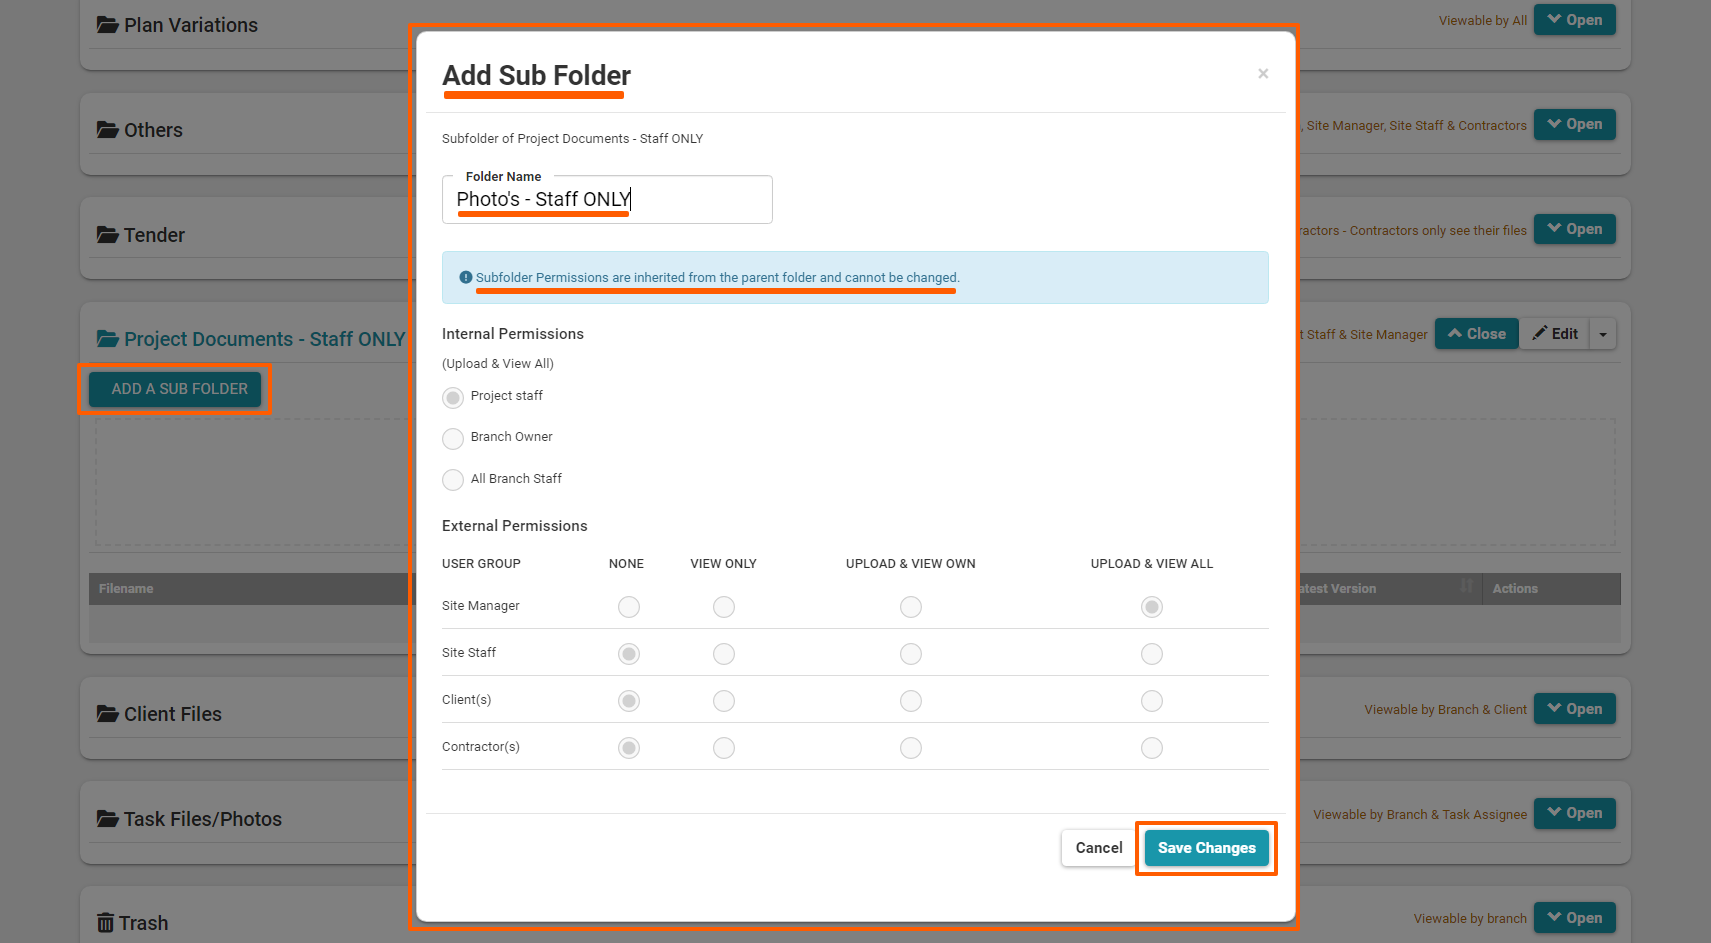
To create a sub-folder (within a customisable folder):
Access this demo here.
You also have the ability to add a subfolder(s) of any customisable folder.
To add a sub-folder:
- From the Files sub-tab, scroll down the page until you find your customised folder (on the right-hand side of the page)
- Click on the 'Add a Sub-Folder' button, found below the folder name
- This will open the 'Add a Sub-Folder' pop-up window - allowing you to give your sub-folder a name
NOTE: Unlike a customisable folder, the sub-folders viewing/access permissions mirror the parent folder permissions - these are NOT editable at a sub-folder level.
Once you've named your sub-folder, click the 'Save Changes' button to confirm, or 'Cancel' to cancel the action.

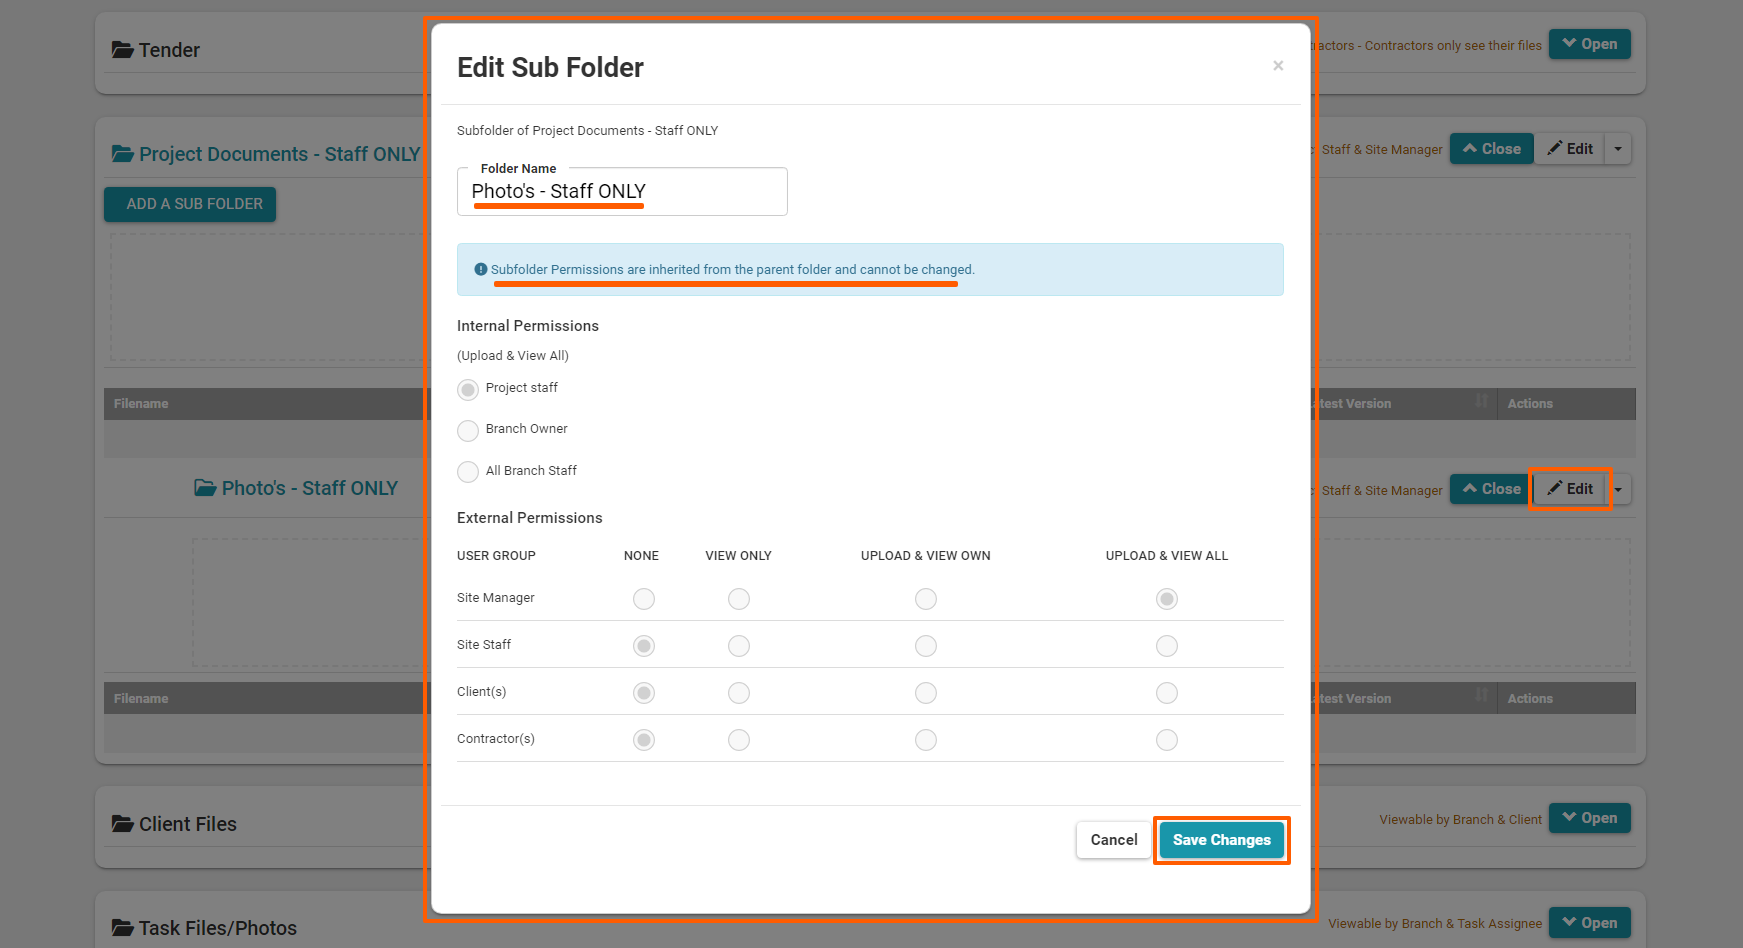
To edit a sub-folder:
- Look over to the right-hand side of the page, and click the 'Edit' button
- This will open the 'Edit Sub-Folder' pop-up window - allowing you to update your sub-folders name
Again, unlike a customisable folder, the sub-folders viewing/access permissions mirror the parent folder permissions - these are NOT editable at a sub-folder level.
To delete a sub-folder:
- Look over to the right-hand side of the sub-folder click the 'drop-down' option to the right of the 'Edit' button
- Click 'Delete' and confirm the deletion by clicking the pop-up 'OK' button

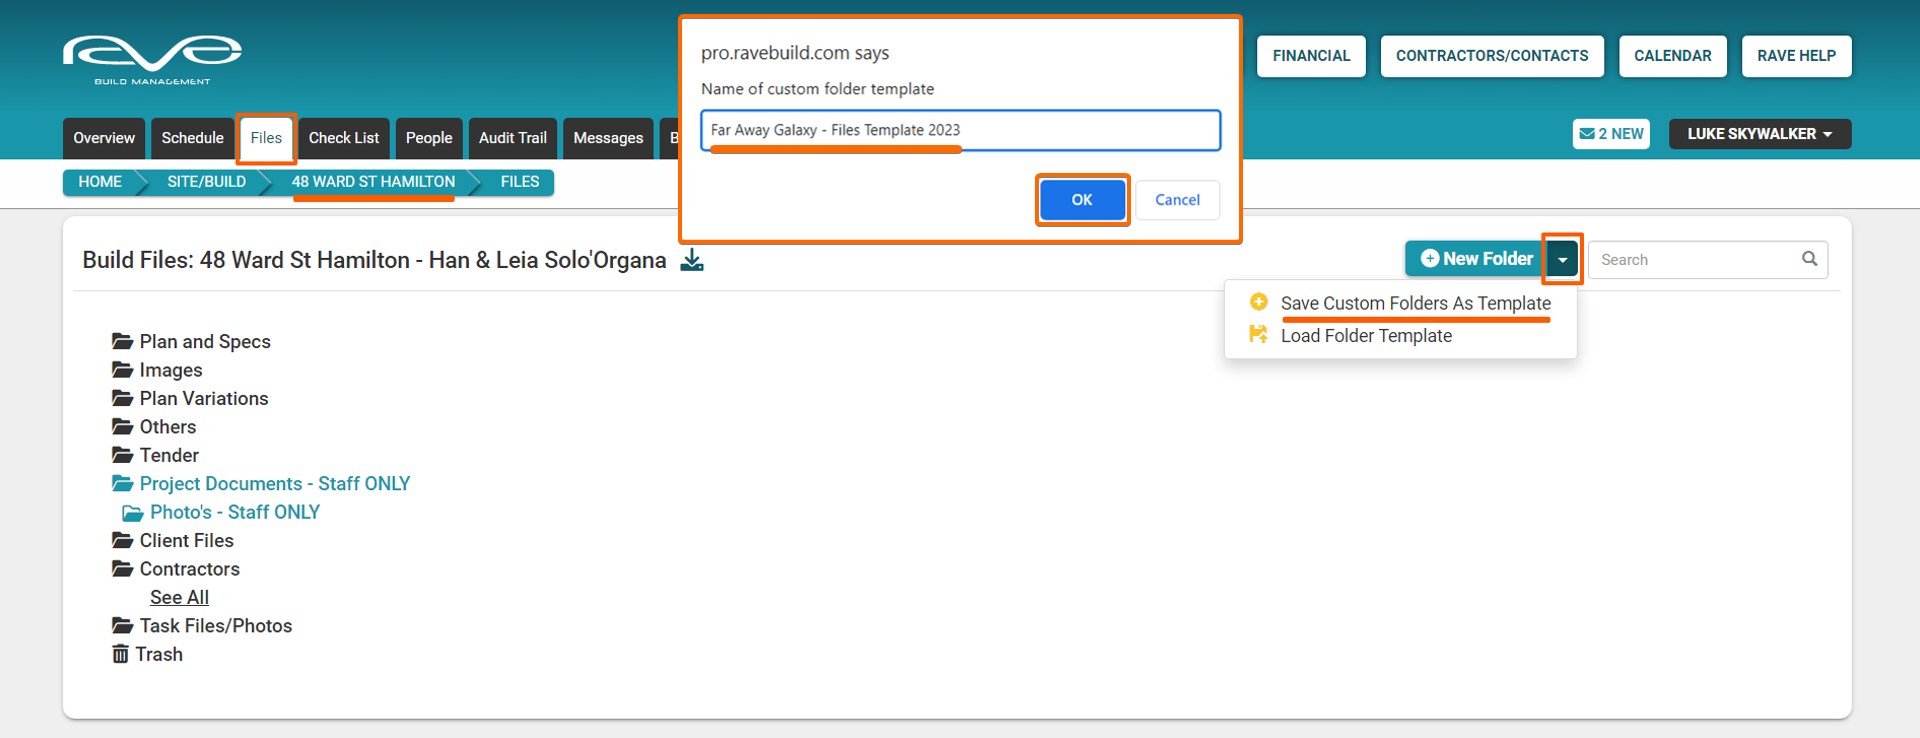
How to Create a Folder Template
Once you've created all of the customised folders in your project, you can save all of these new folders (and folder viewing/access permissions) into a folder template - allowing you to load these folders up automatically against any future jobs, or to select and load manually as required.
To create a new folder template:
From the Files sub-tab:
- Move to the top right of the page, and click on the drop-down option to the right of the ‘New Folder’ button
- Then select the 'Save Custom Folders As Template' option
- From the custom folders template pop-up - we give our new folder template a name
- And click OK

With your template saved, you can now load that template of folders and access permissions - or set it as a default template to automatically load for every new project created from that point onwards.
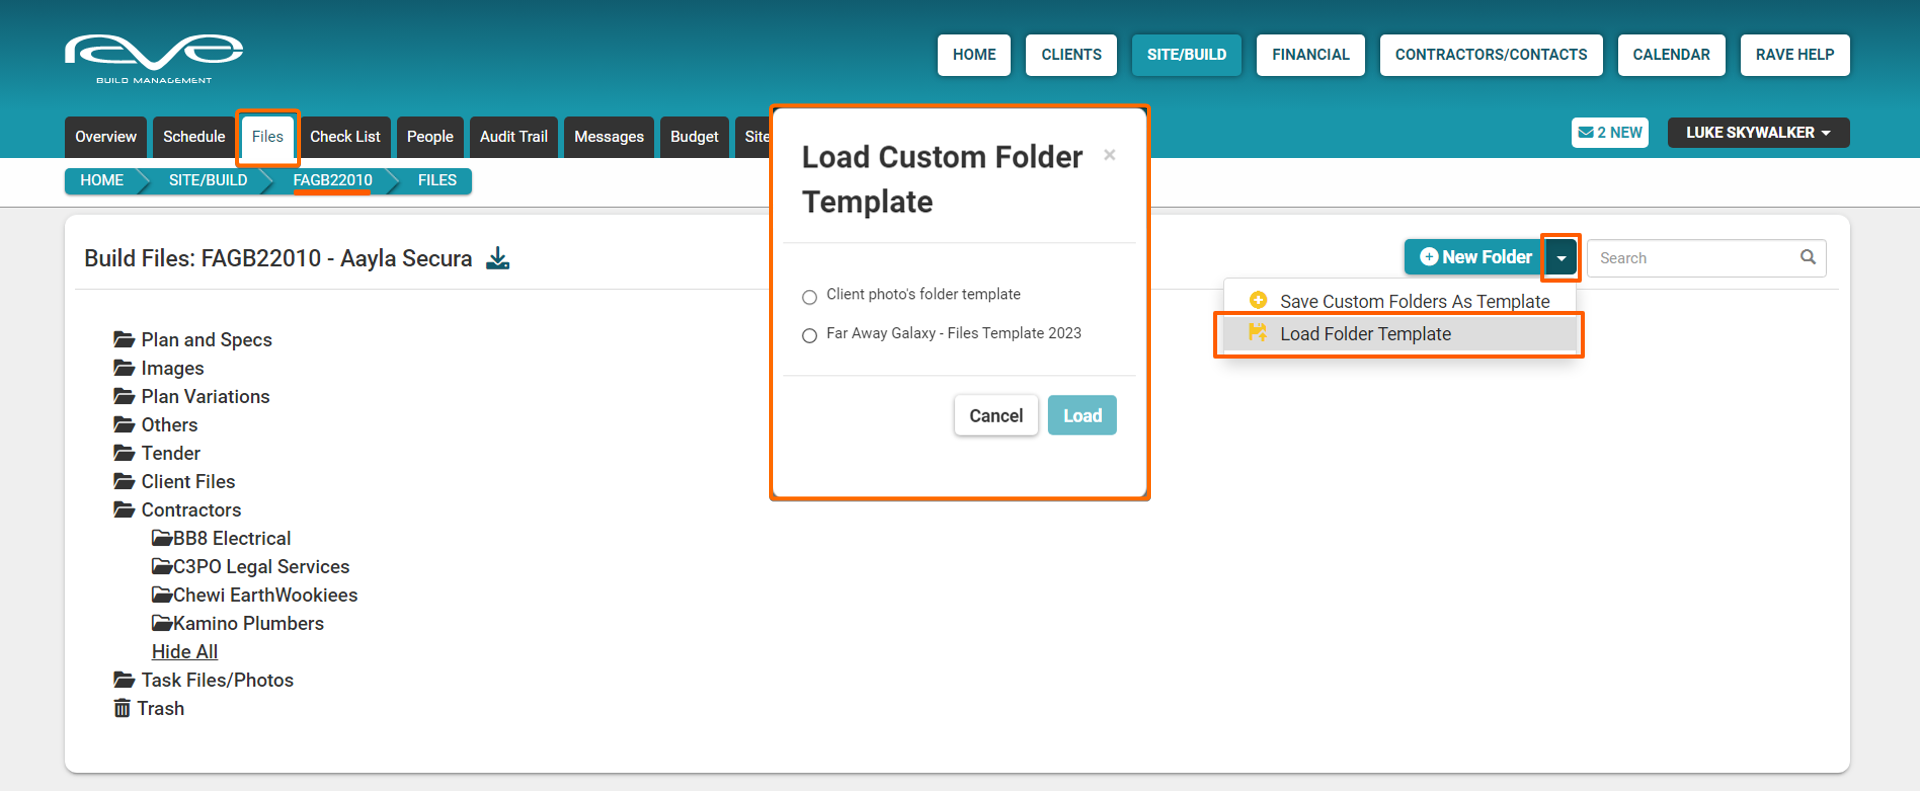
To load your folder template to another project:
From the Files sub-tab, of the target project:
- Move to the top right of the page, and click on the drop-down option to the right of the ‘New Folder’ button
- Then select the 'Load Folder Template' option
- From the 'Load Custom Folder Template' pop-up - we tick the folder template we want to load
- And click Load
This will load the folders from the folder template with the folder permissions you originally set.
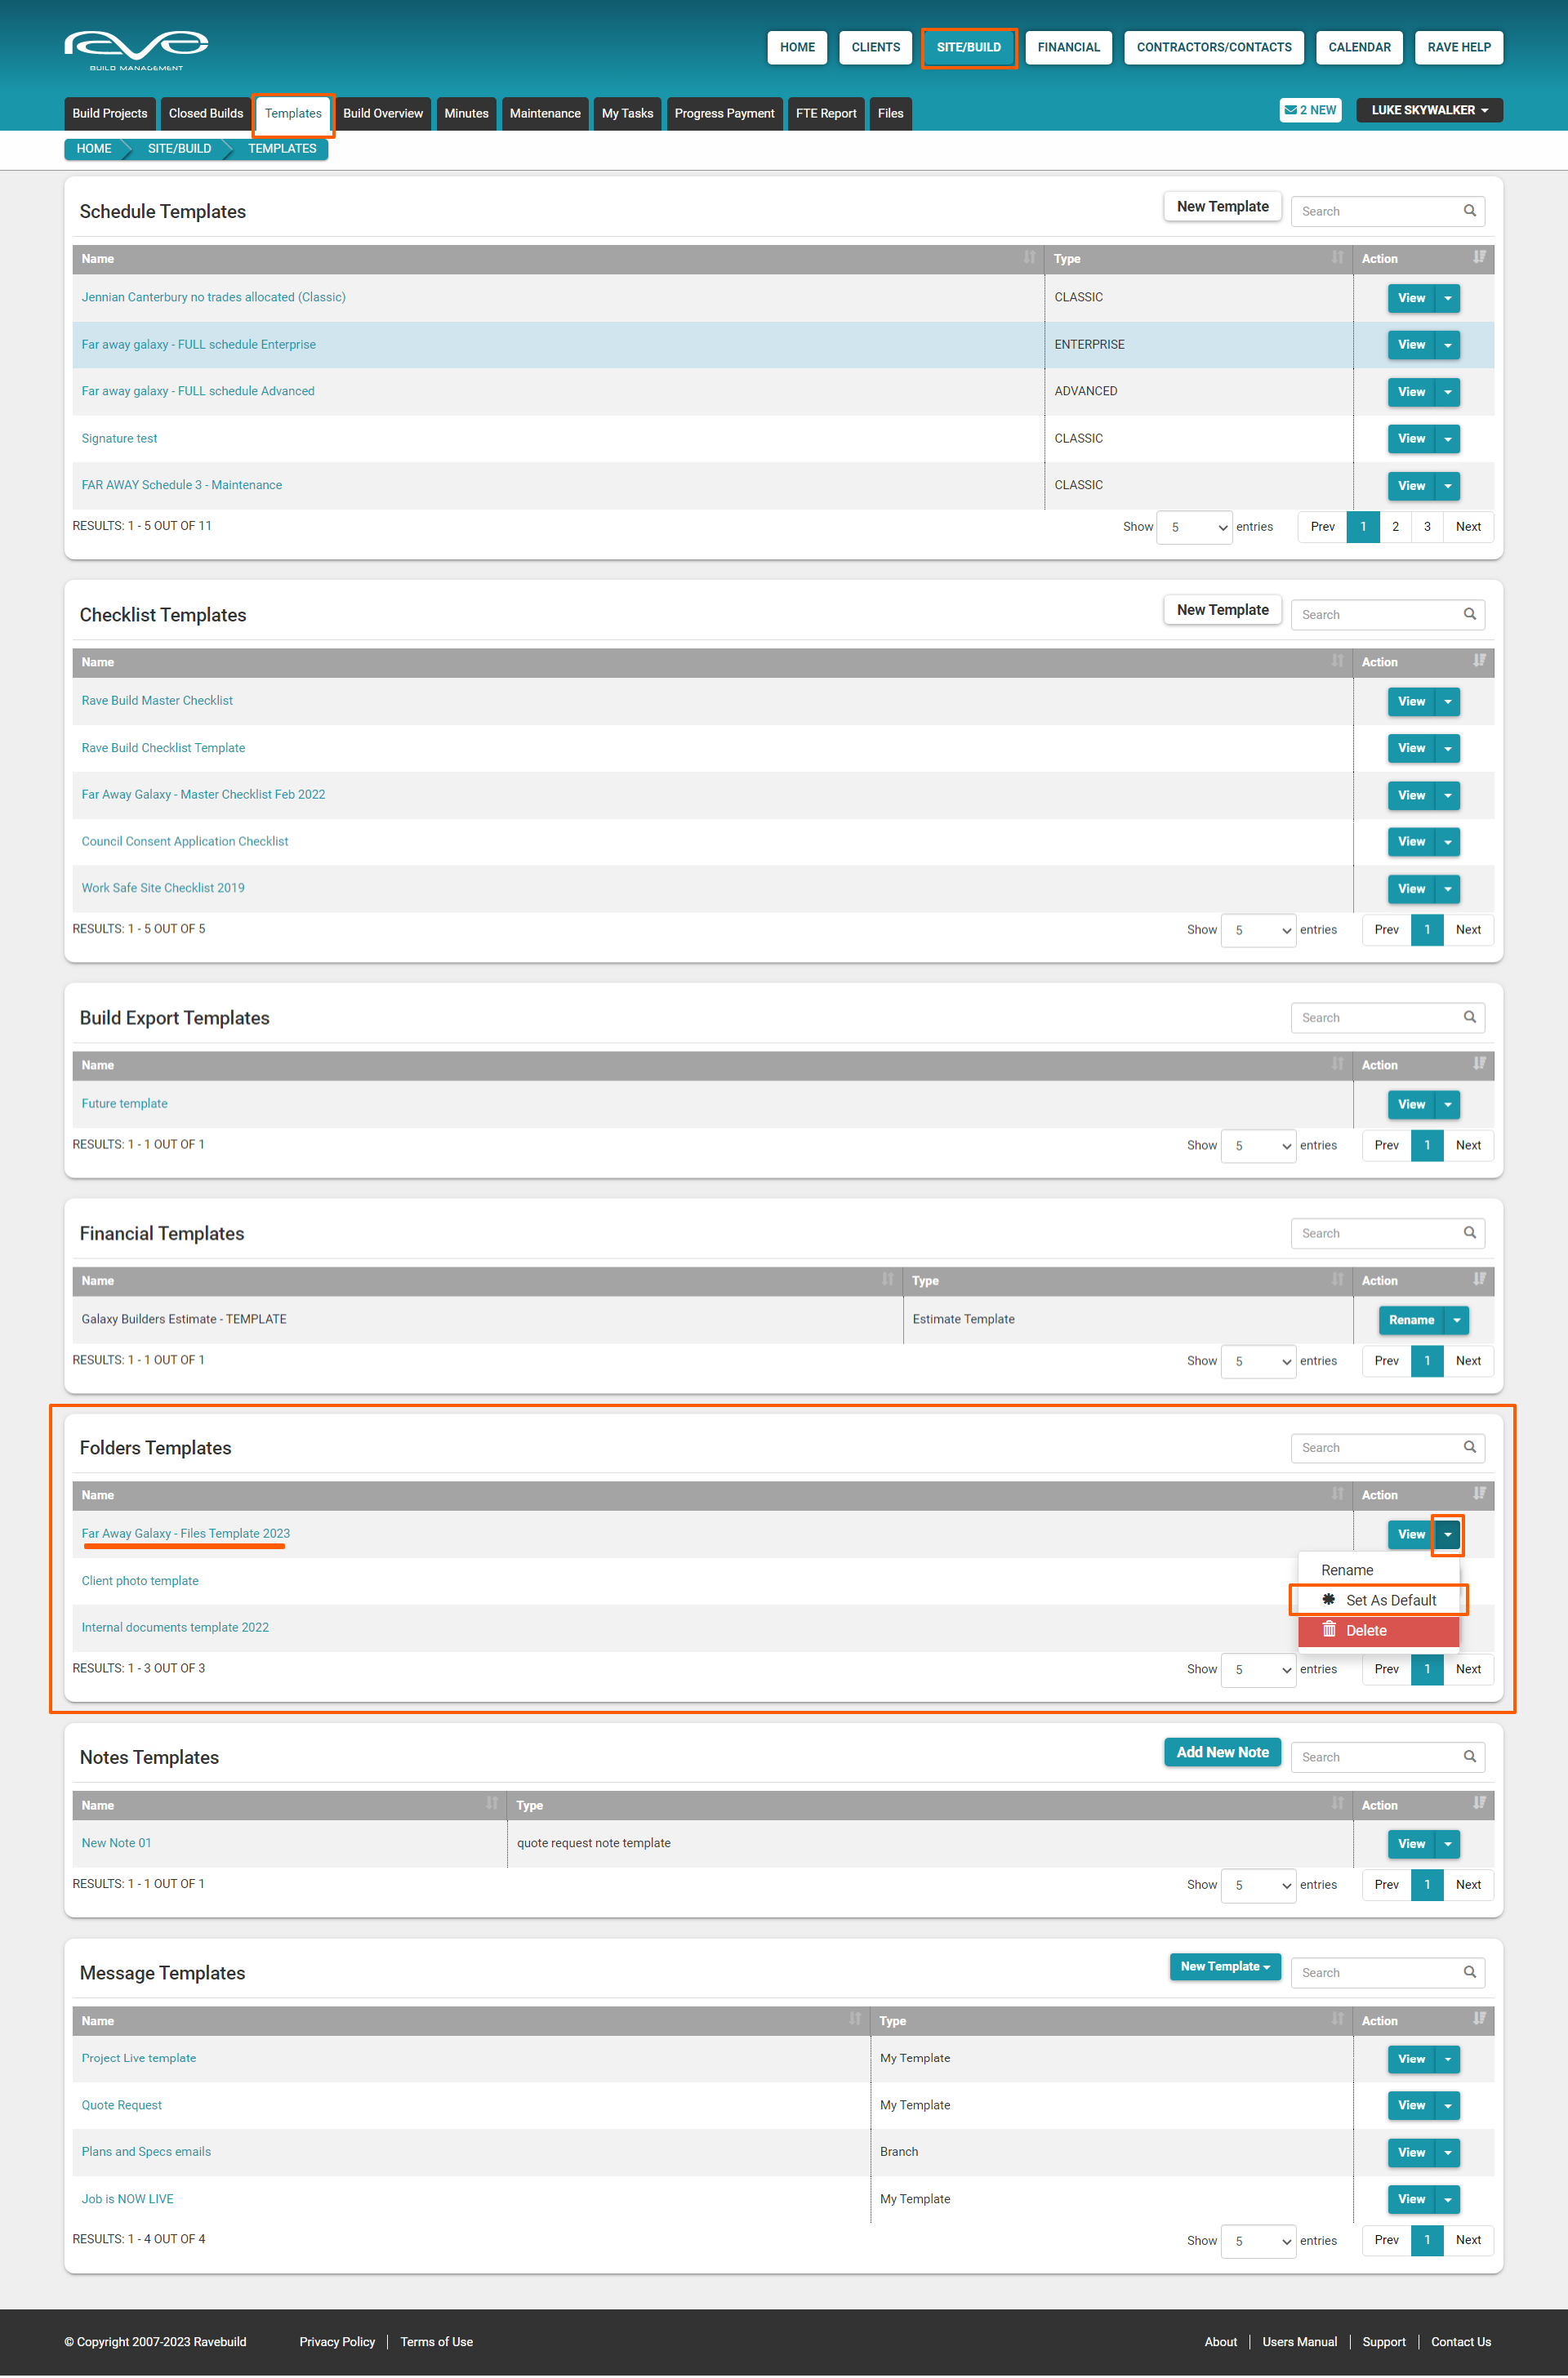
You can also set a folder template as a default to automatically load for every new project created from that point onwards.

To load your folder template to all future projects:
Click on the Site/Build button
- Then select the Templates sub-tab
- Scroll down the Templates page until you reach the 'Folders Templates' section
- Find the template name that you want to set as the default template - move over to the right-hand side of that line, and click on the Action dropdown
- Then select the 'Set As Default' option, and click OK to confirm
This will add an asterisk (*) to the left of the Template name - confirming it as your default folder template moving forward. If you are not sure what is in a folder template, click on the view button over to the right.
You can also Rename and/or Delete a folder template via the action dropdown menu if required.

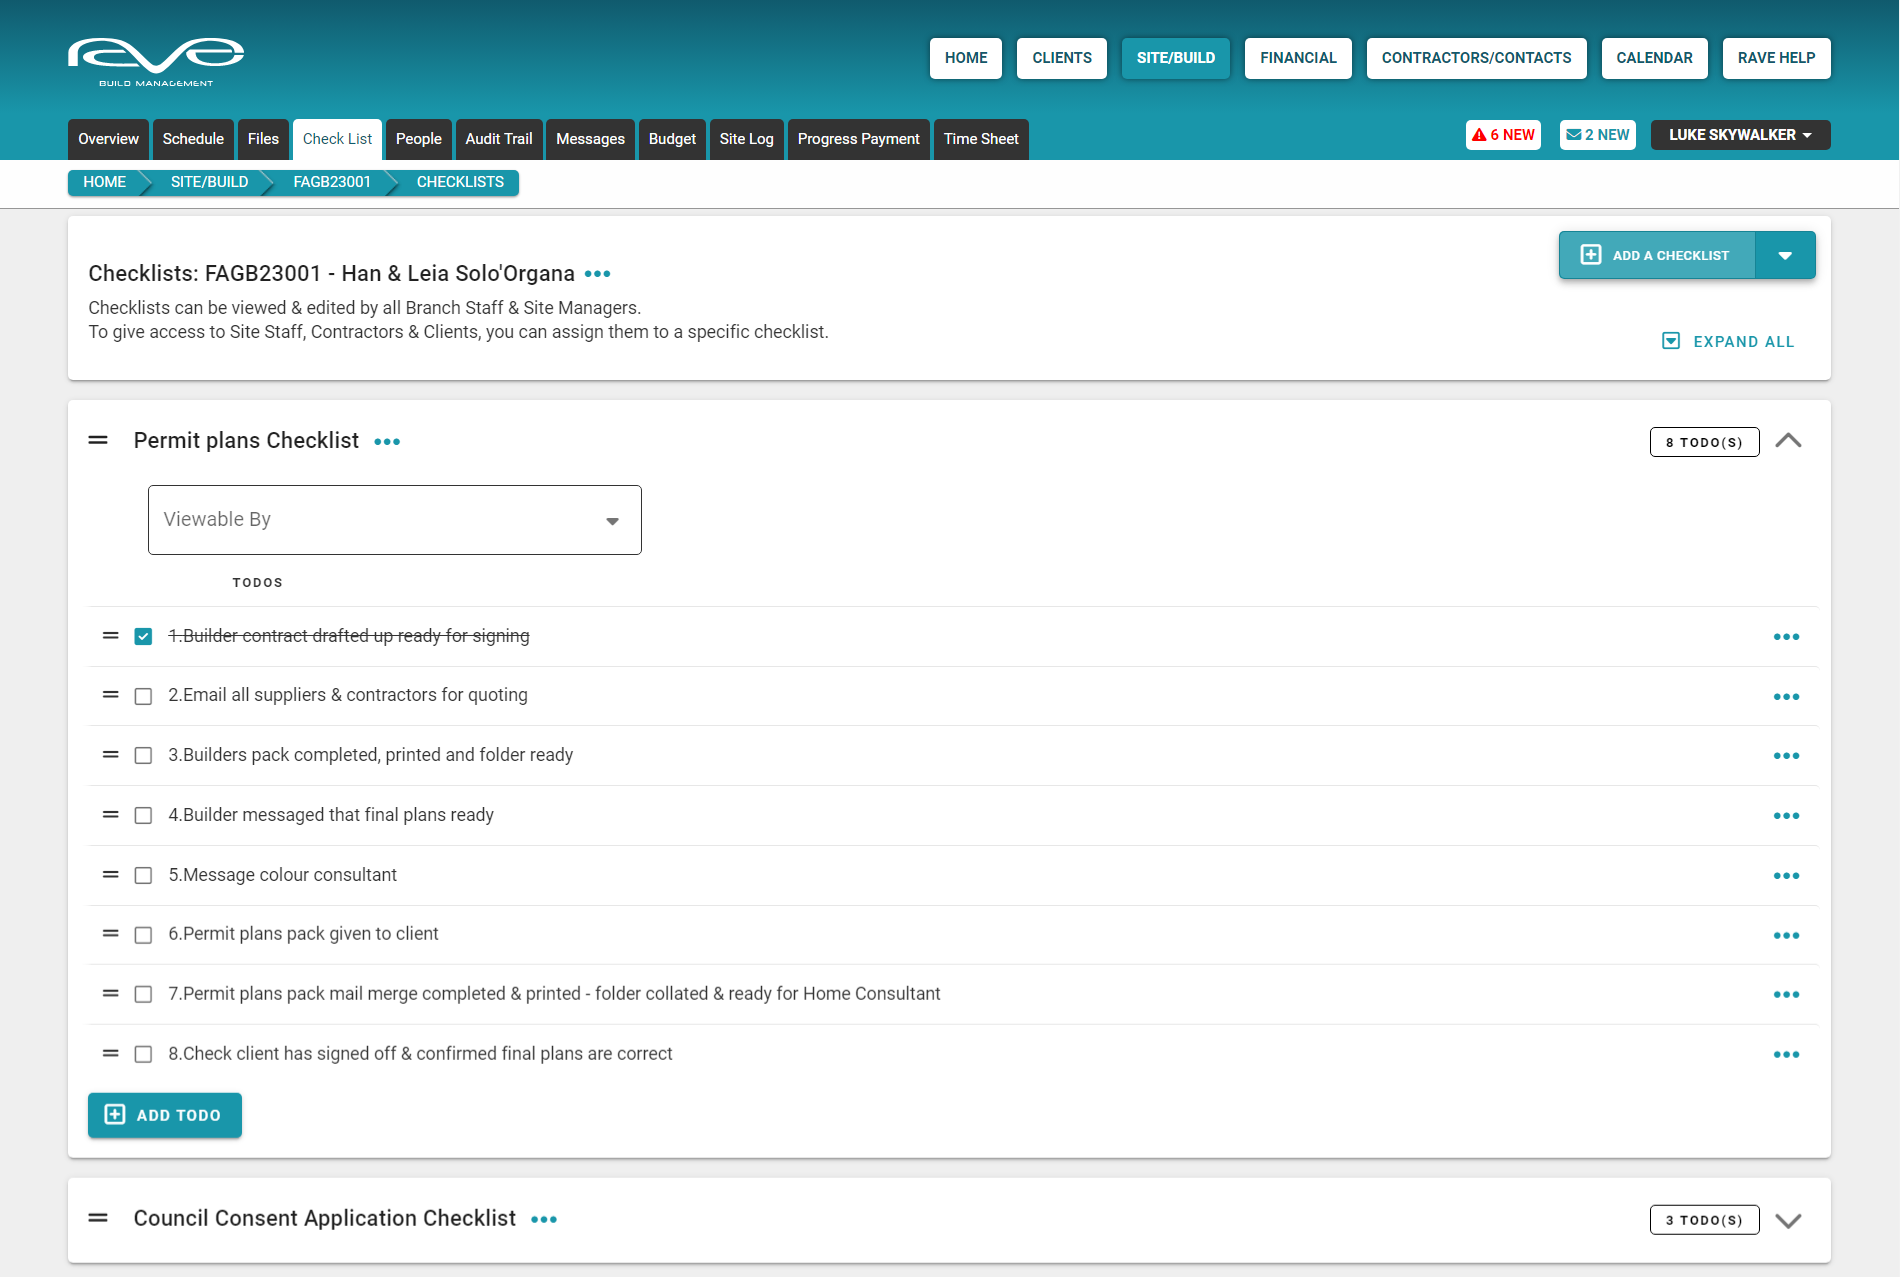
The Project's Check List Sub-Tab
Where scheduled tasks are time-sensitive activities with set start and finish days and/or times, project checklists are useful for process-driven tasks. If you have a specific way you'd like a contractor to complete a task, a site staff member to follow a specific process, or you have tasks that need to be done but are flexible regarding when they happen – checklists are ideal for that.
Adding checklists to a job
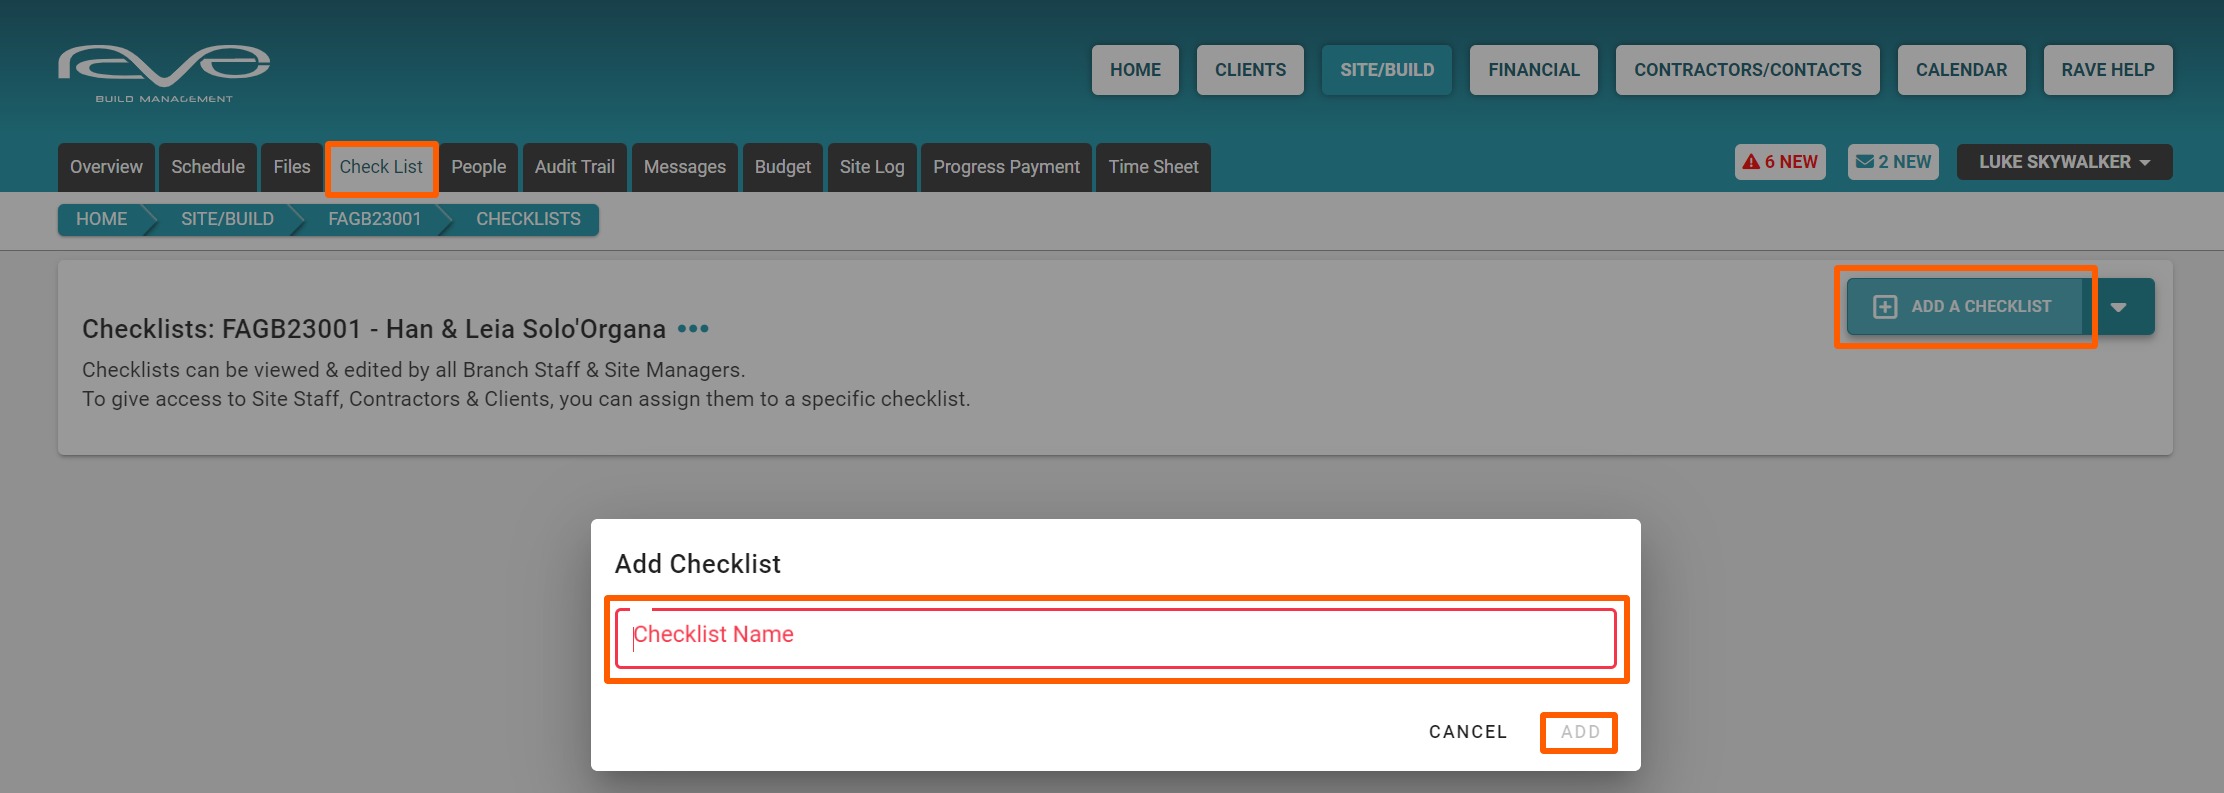
Once you have opened the job and entered the Check List sub-tab, there are two different ways of adding a new checklist to your job.
Creating a new checklist via the 'Add Checklist' action
You can build a new checklist manually by clicking on the ‘Add Checklist’ button, typing in a checklist name, and clicking ‘Add’.
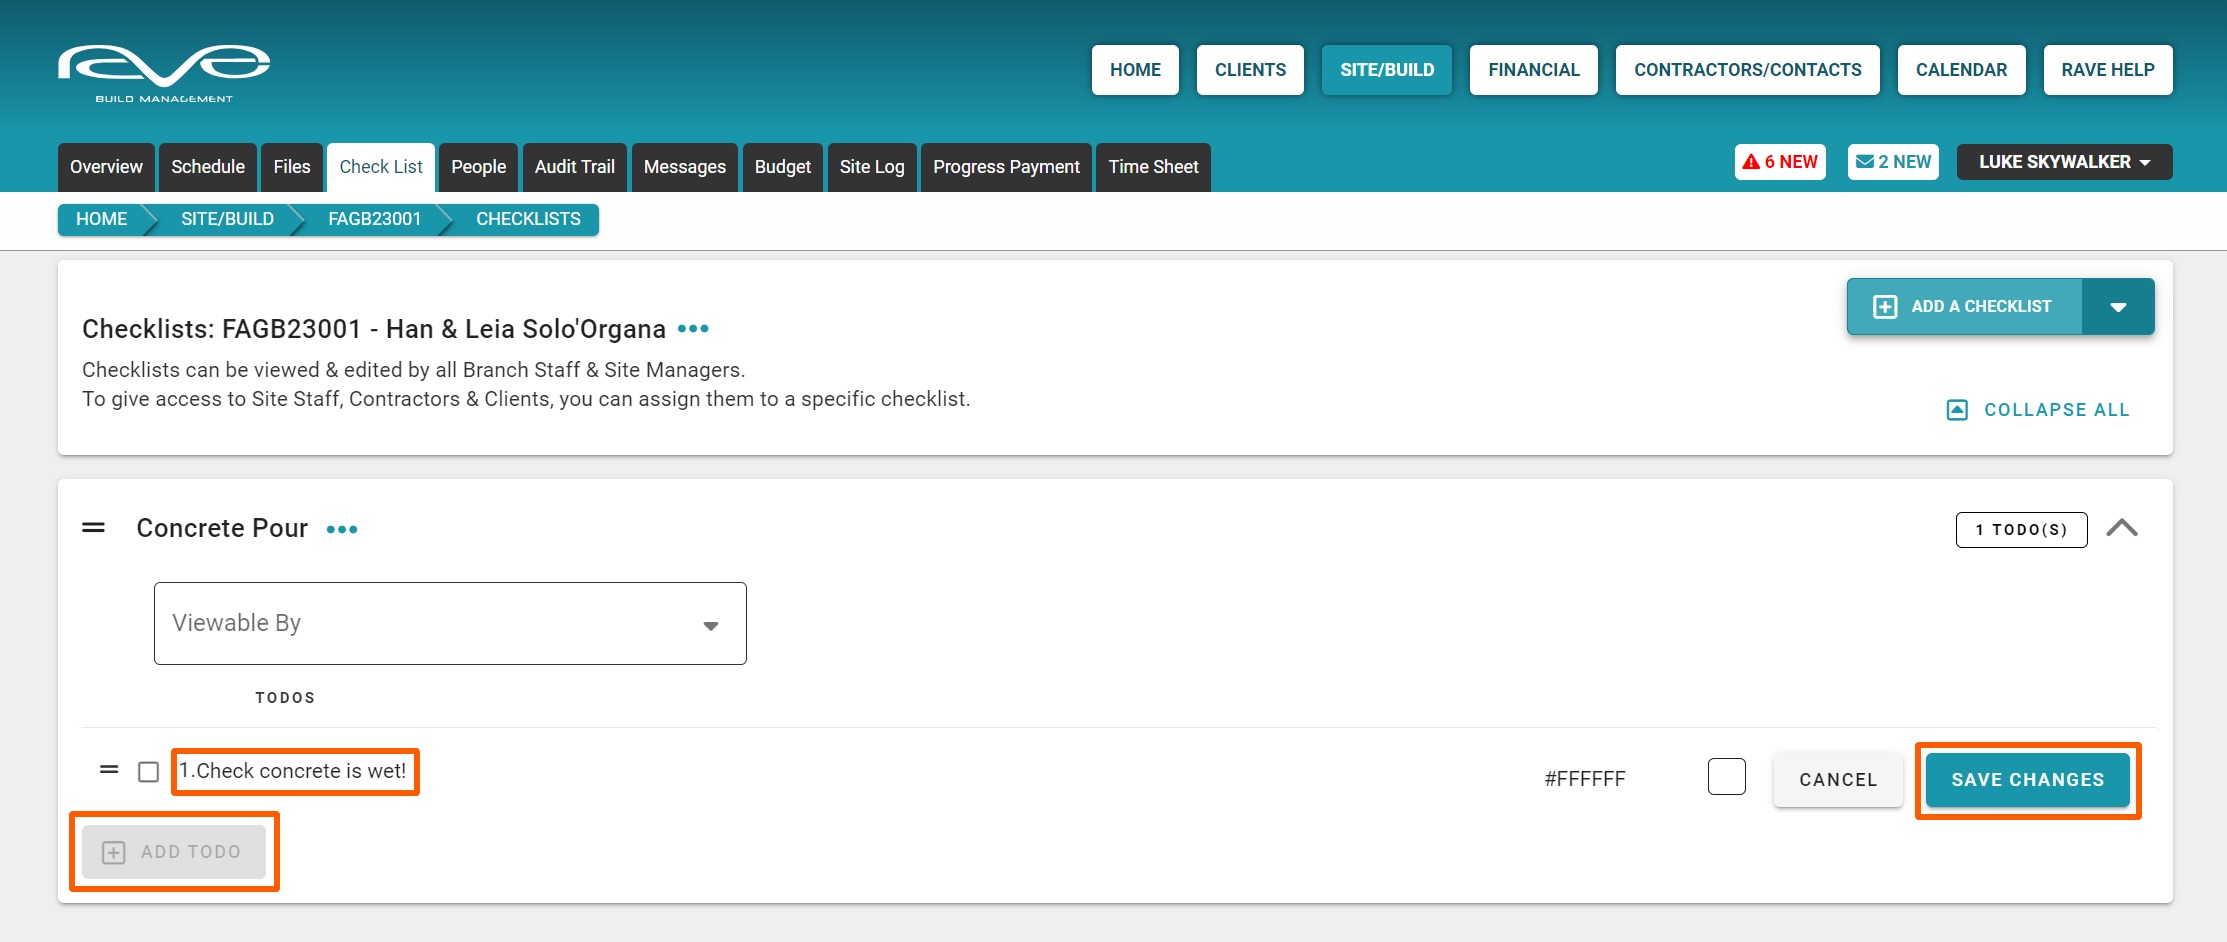
You can then add in the checklist tasks by the ‘Add ToDo’ button.
NOTE: Do not forget to click on ‘Save Changes’ on your added ToDos.
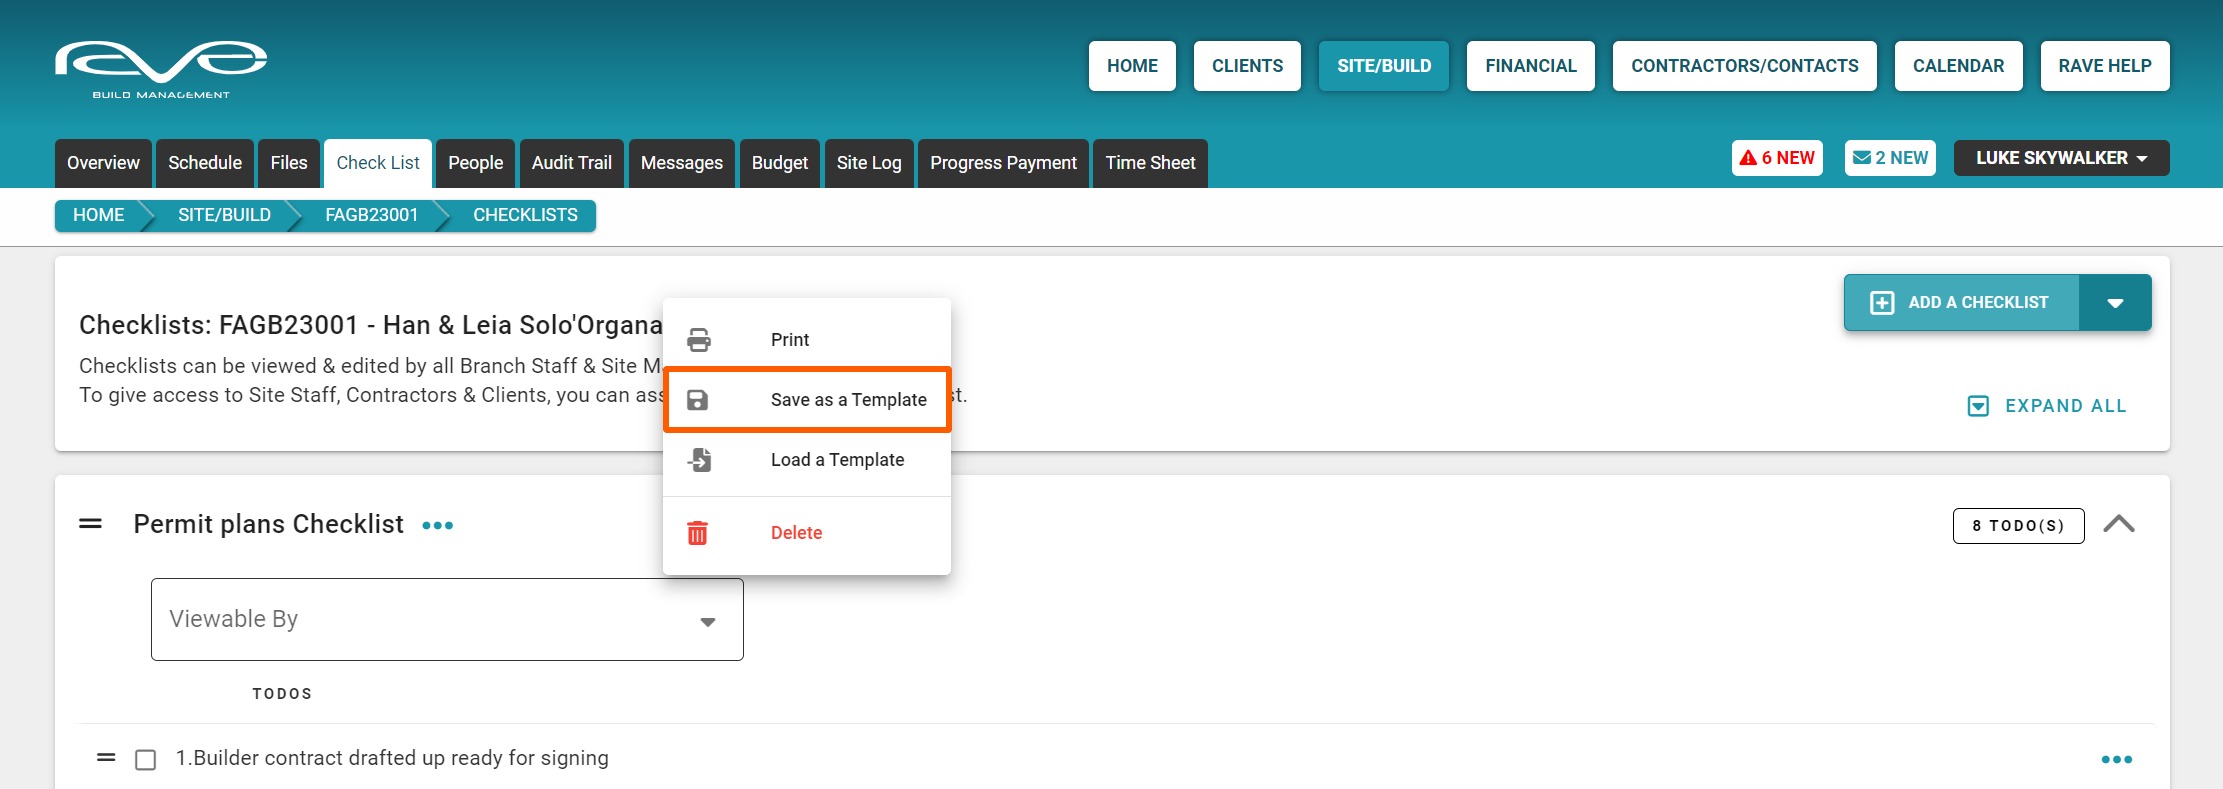
Load a new checklist using a Template
Another option is to load an existing checklist template by going to the checklist action drop-down and clicking on ‘Load a Template’. Then select the template to be loaded and click ‘Load’.
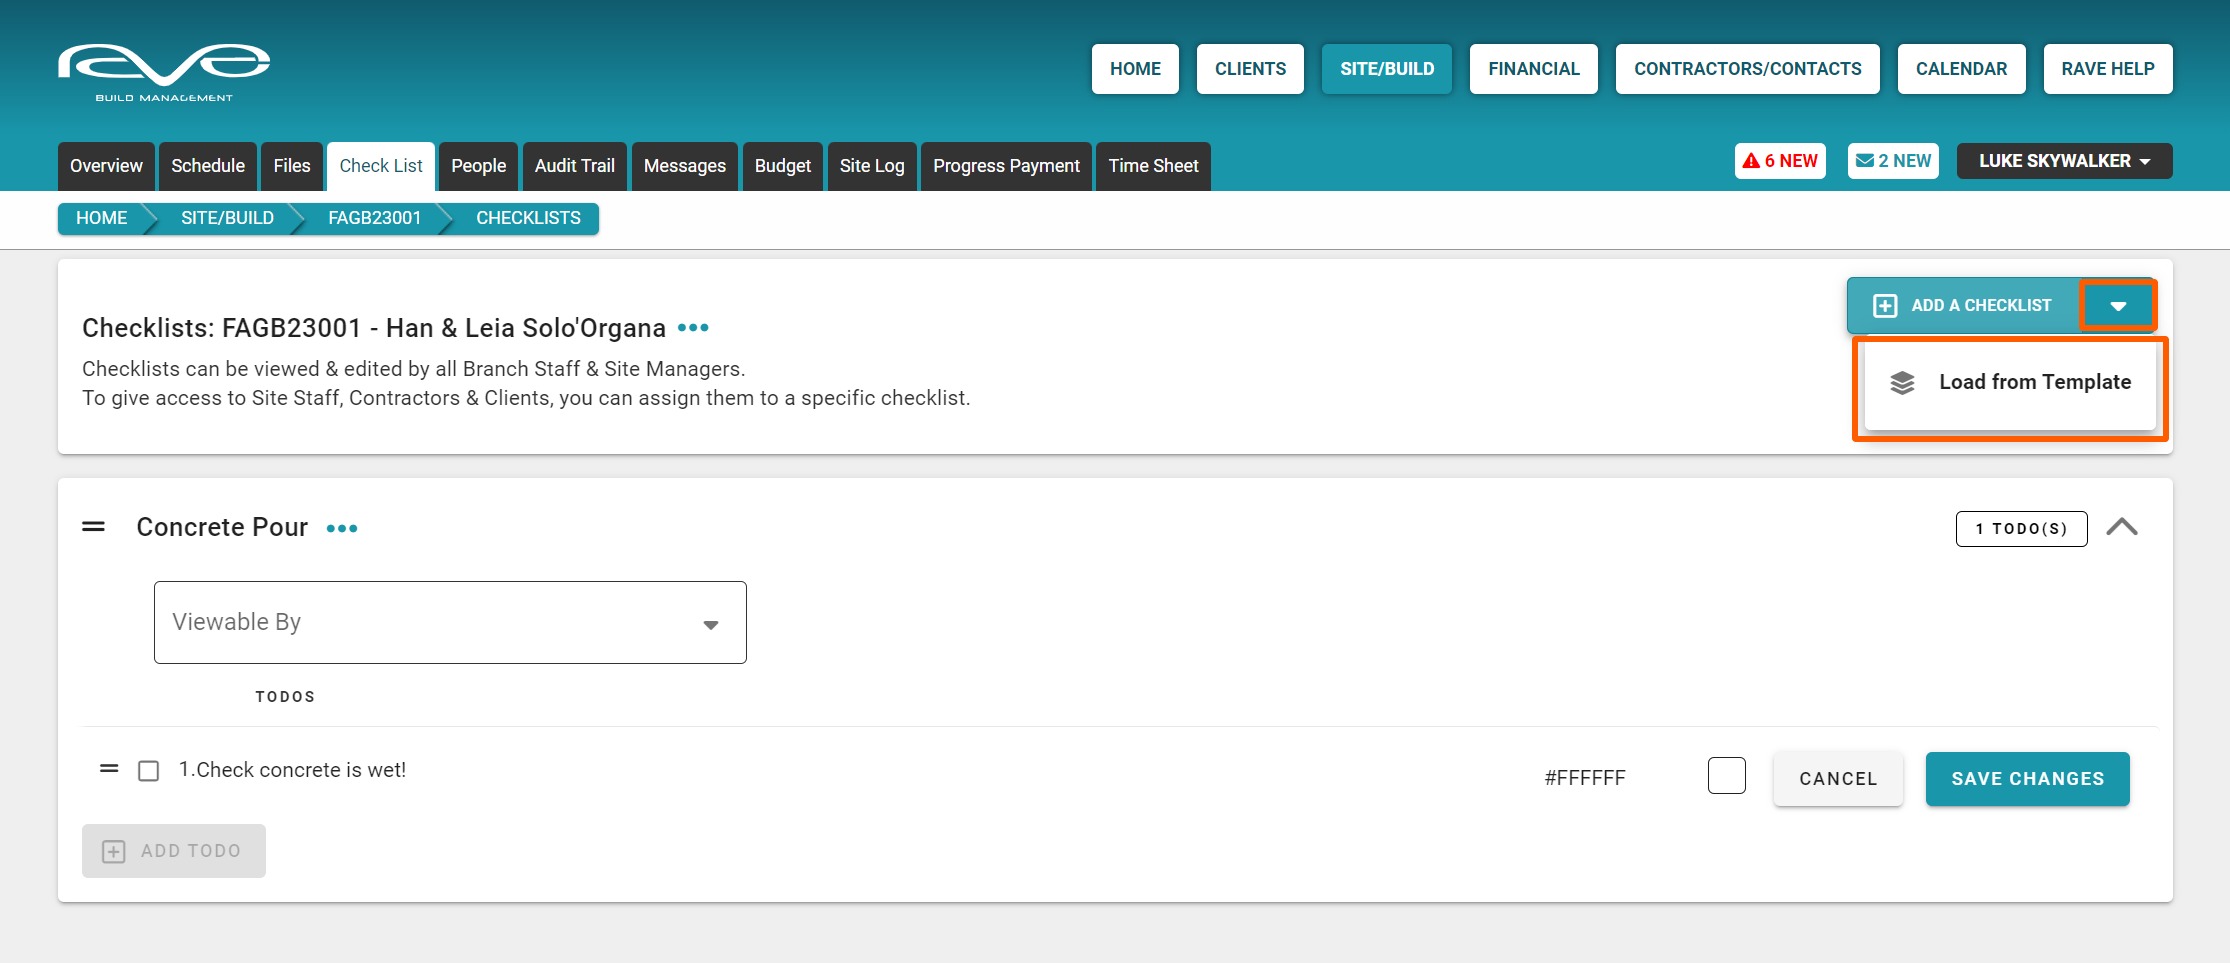

The ‘RAVE Build Master Checklist’ template is a compilation of 13 different checklists that we have created to give you a good starting point for creating your own checklist. Once you are familiar with how the checklists function you will be able to create and save your own checklists or your own master checklist template.
NOTE: Use the arrows on the right-hand side of each checklist to collapse and expand the to-dos within each individual list.
If you are thinking of using our checklist as a starting point to create your own checklist and templates, we recommend going back up to the checklist action button and printing a copy of all these checklists for you to review and make notes regarding any changes you are considering.
How to use and edit checklists
How do our checklists work and how do you edit them?
Firstly, checklists are only accessible by branch users by default. If you want to share a checklist with a site staff member, a contractor, or your client, you need to give them access to the project first by the ‘People’ tab, then they'll appear in your checklist viewable by drop down.

Once any non-branch users have been selected, you'll see their name in the ‘Viewable By’ box and a ‘Viewable By’ icon will also appear up to the top right of the checklist. Anyone with access to a checklist can then check items off, add notes and attach files too.
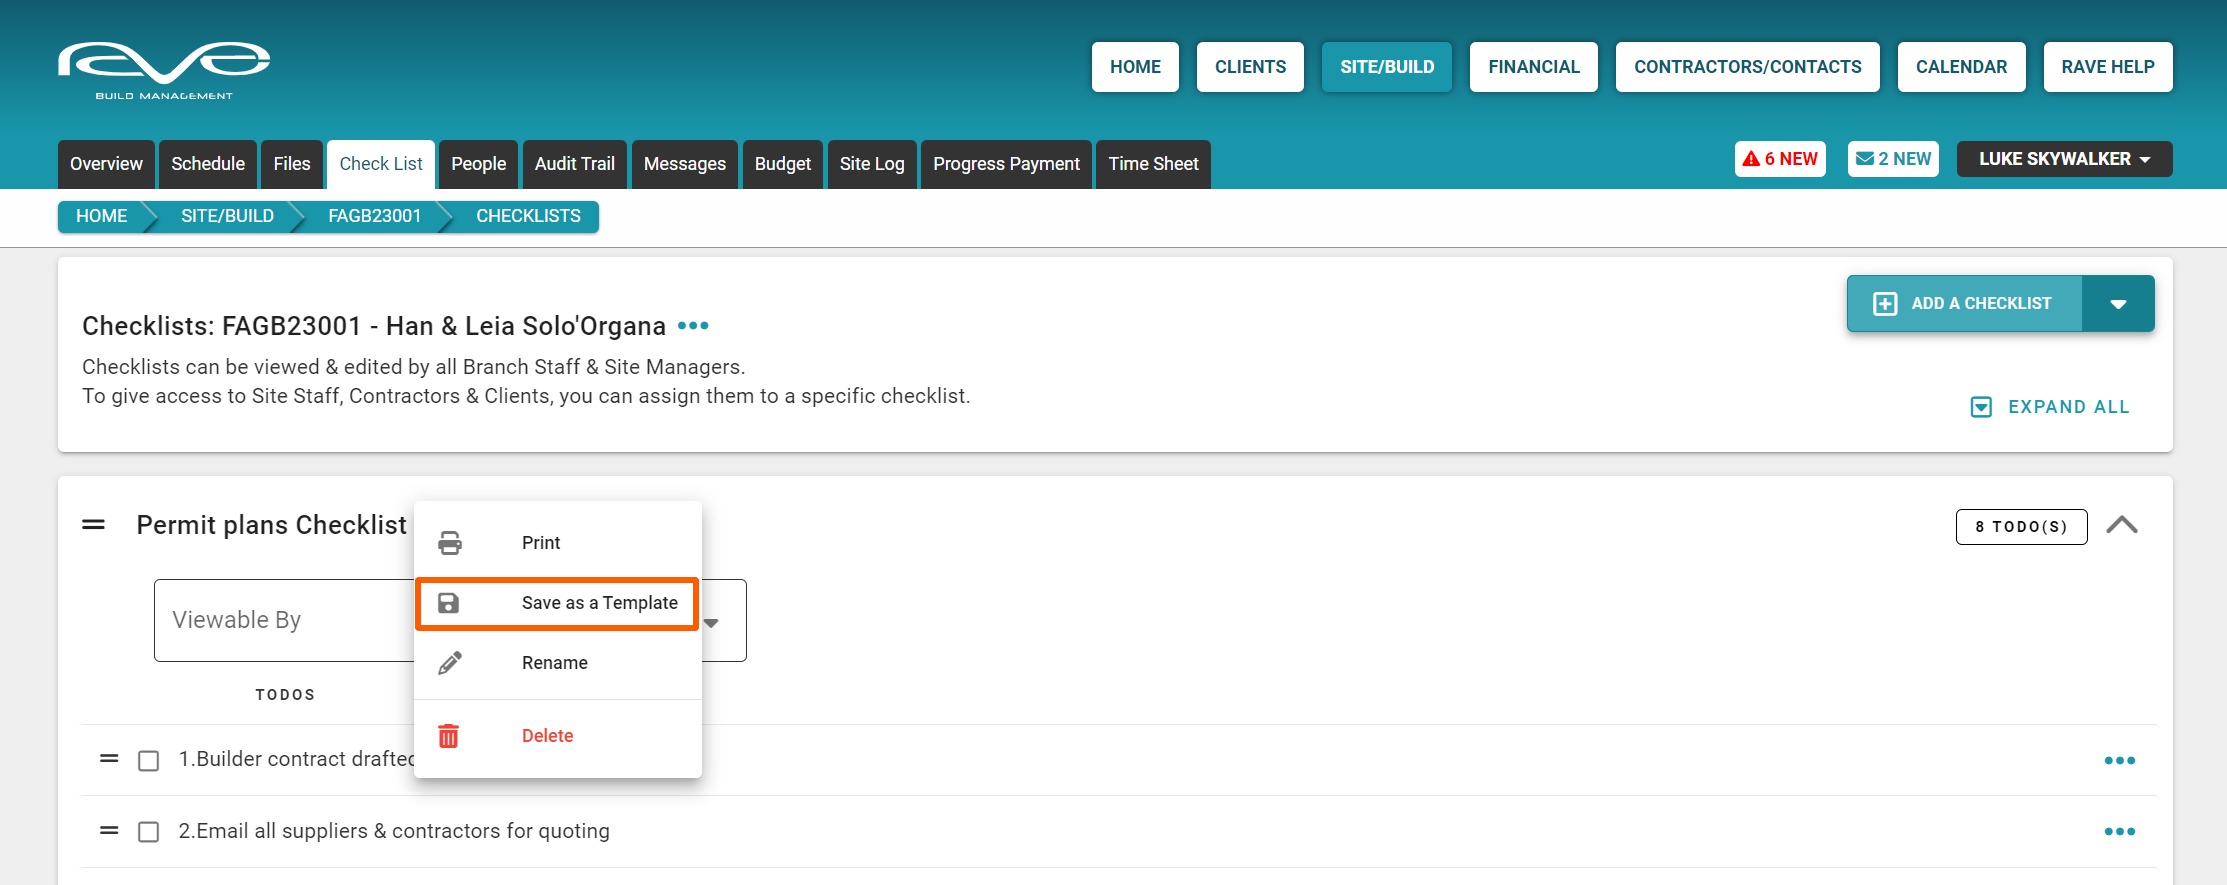
Edit an existing checklist
You can edit a checklist by clicking on the three dots next to the title. This drop-down gives you the editing options to rename or delete the checklist.
- To rearrange your checklist order, click and drag the two horizontal bars next to the checklist title until it is in the correct order.
- You can add tasks to a checklist by clicking on the ‘Add ToDo’ button and writing in your description.
- You can also select a hex colour code if required.
NOTE: Do not forget to click ‘Save Changes’ after creating a new to do.
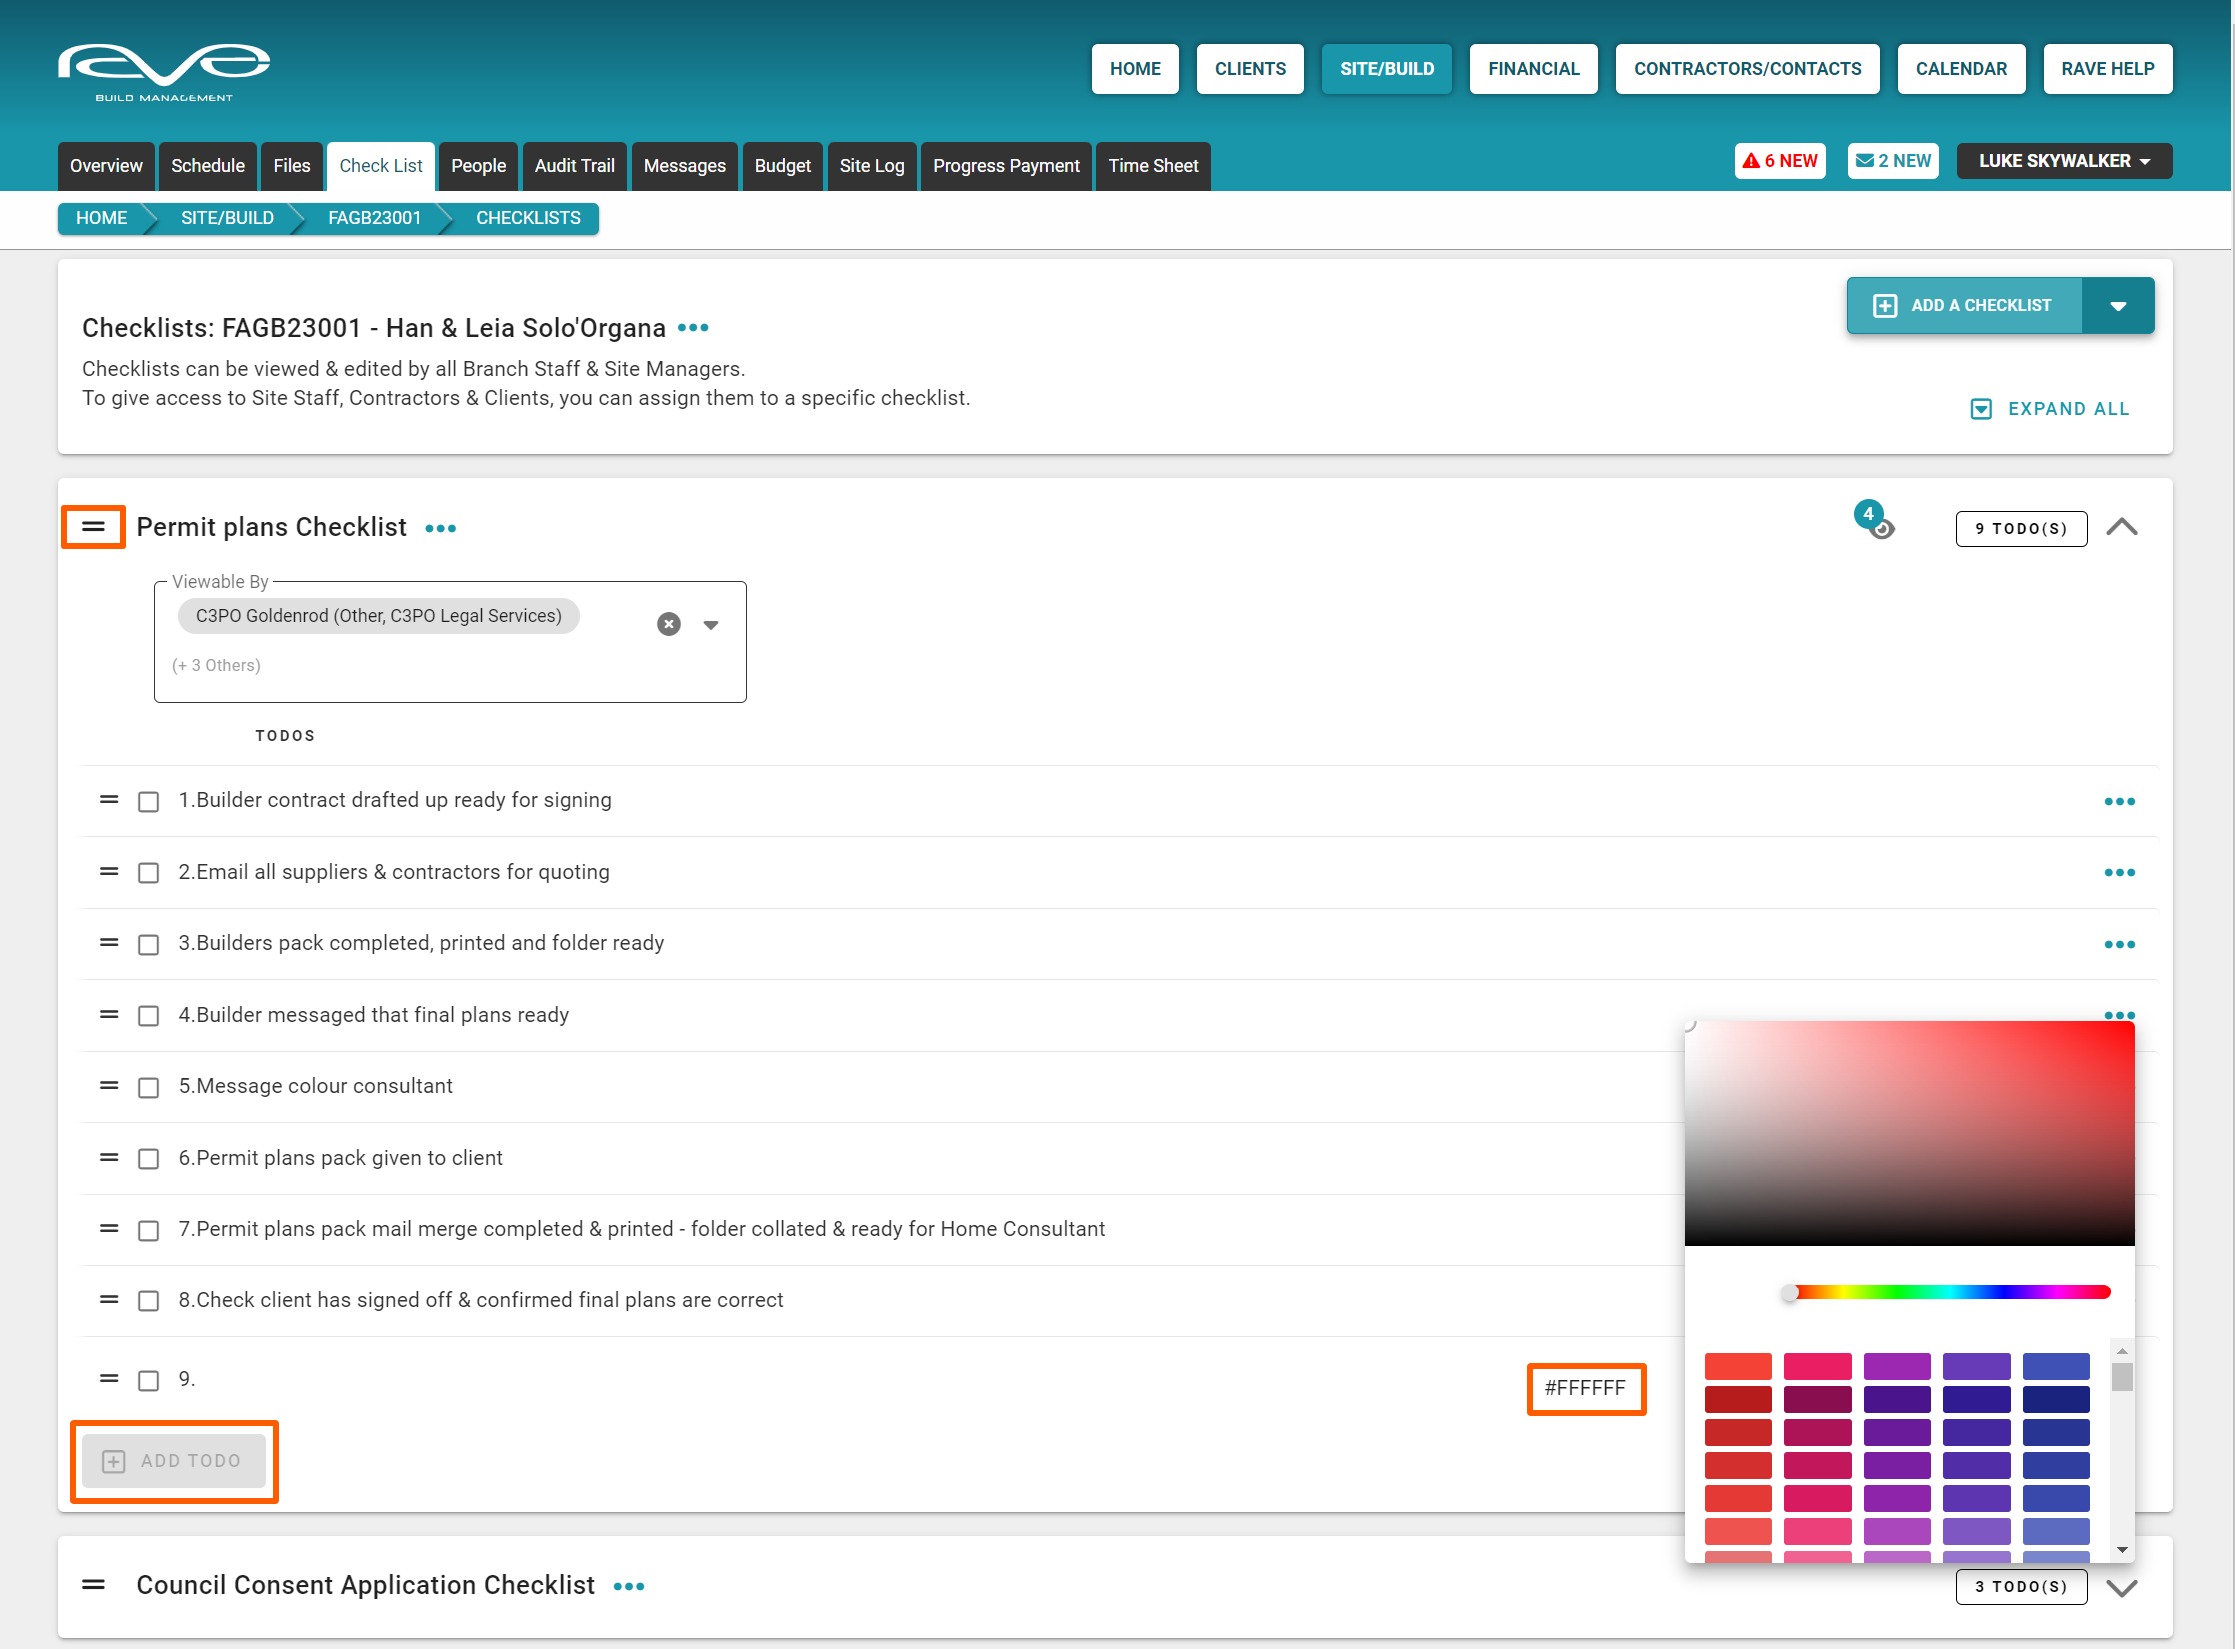
Editing a ‘ToDo’
You can edit a ‘ToDo’ description by clicking on the three dots to the far right of each ‘ToDo’. This drop-down gives you the editing options to edit the title or delete the ‘ToDo’.
To rearrange the order of to-dos, click and drag on the two horizontal bars on the left side of the title.

How to save checklists and templates
Save a single checklist
Once you've made all your changes to a checklist, you can save this as a single checklist template allowing you to select and add the specific checklist to future jobs.
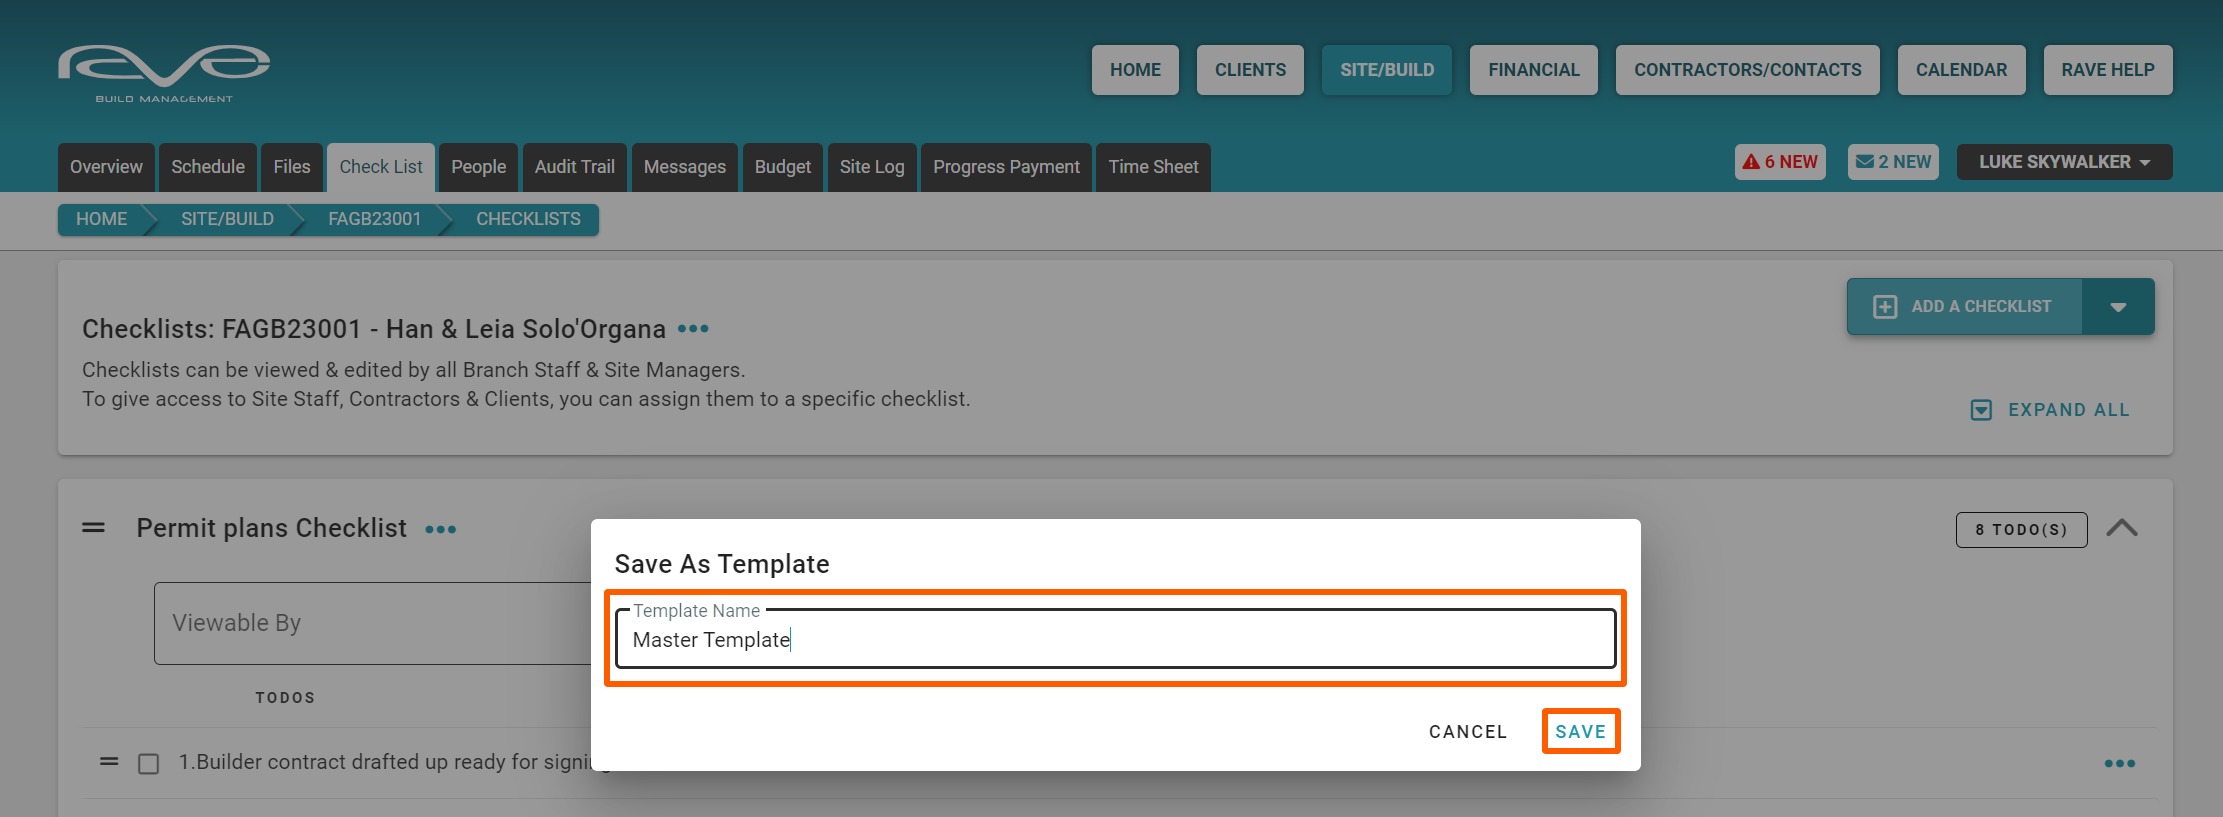
Click on the three dots next to the checklist title, click ‘Save As A Template’, give the checklist template a name, and click ‘Save’.

Save a master checklist template
Once you've made all the changes to all of your checklists, including the order of your checklist and any to-do notes, you can save all of your checklists as your own master checklist template allowing you to select and load a group of checklists to a job.
Click the three dots next to the job number and click ‘Save As A Template’, give the checklist template a name, and click ‘Save’.
Upload an existing checklist via a CSV upload
If your business already has processes in place and you'd like these uploaded to RAVE as a checklist, we have an Excel CSV template that you can complete and return to us to upload. If you'd like us to send you our CSV template and instructions, please call us on 07 210 2228 or email your request for our checklist CSV template and instructions to help at help@ravebuild.co.nz.
The Project's Audit Trail Sub-Tab
Access the full demo here.
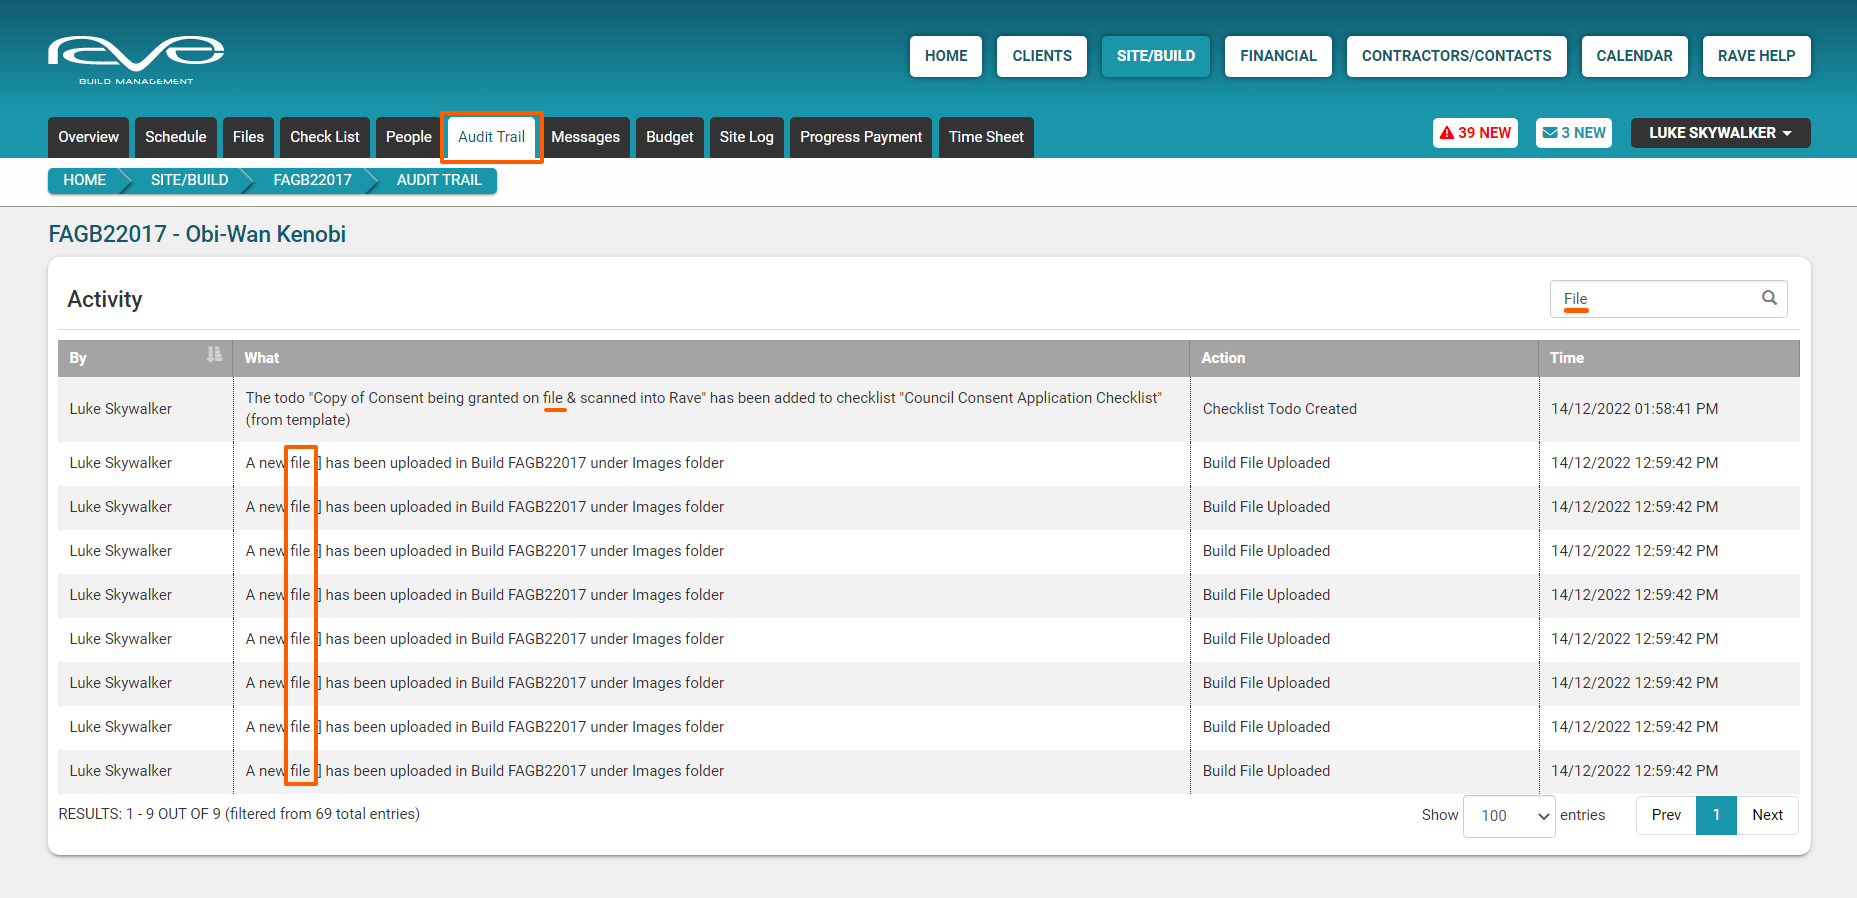
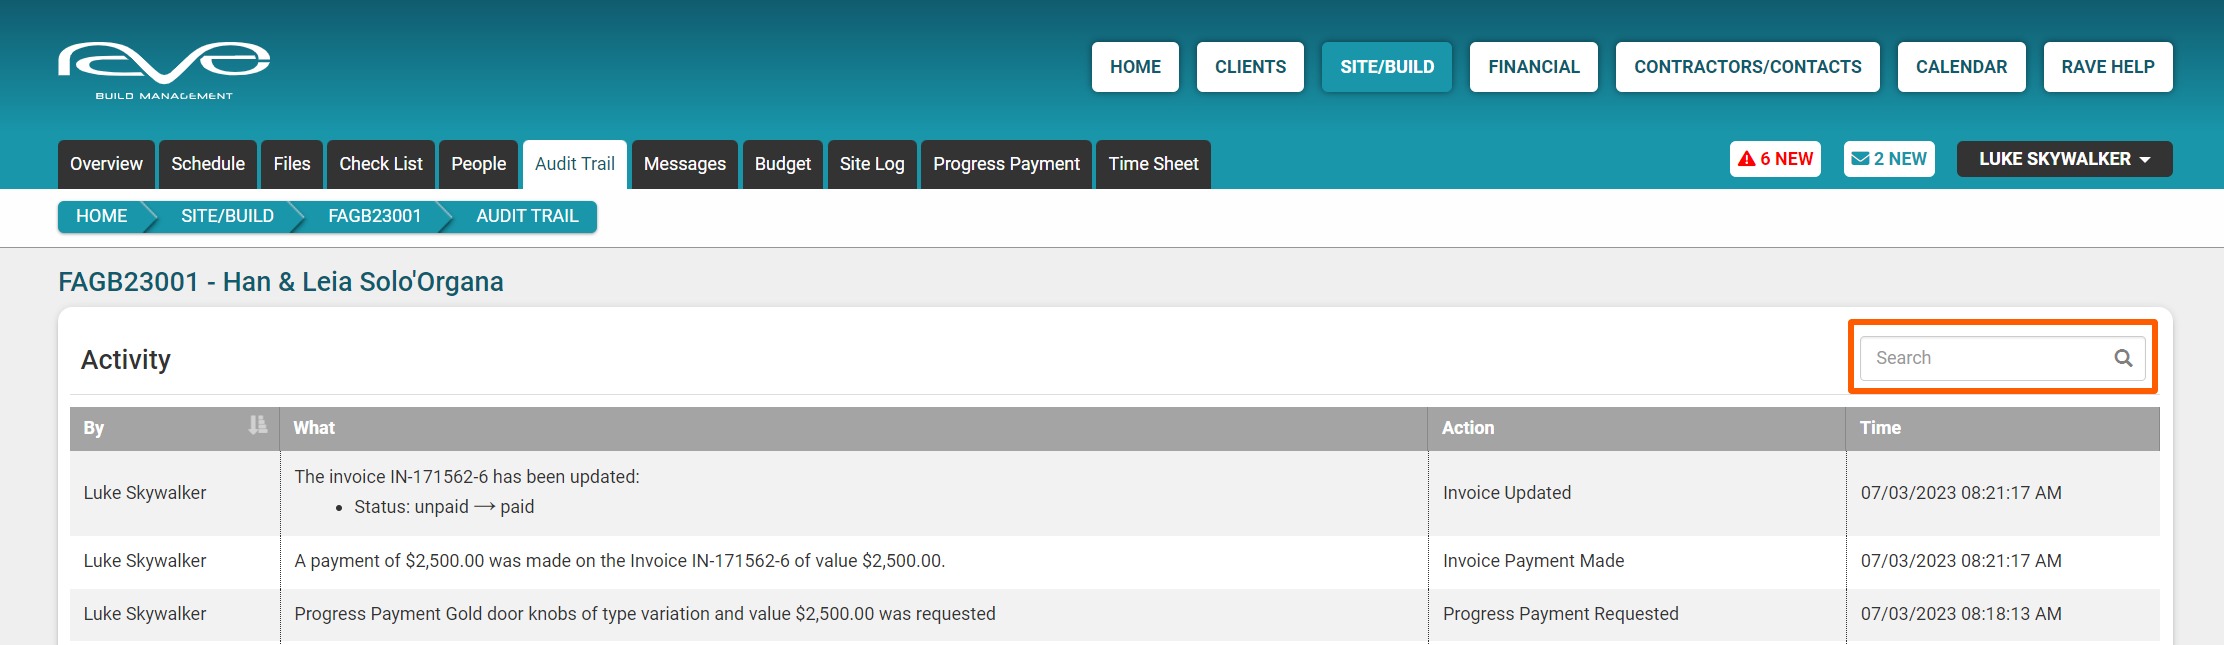
The project's ‘Audit Trail’ sub-tab keeps a record of all the actions that have happened to a project within RAVE.
The Audit Trail is only visible to branch users and can be very useful for checking on who did or didn't do something and to assist in managing disputes. As you can see below, the activity list displays who completed an action, what they did, a general action category, and the day and time the action occurred.

The Search Function
Access this demo here.
Every word and number within each entry is keyword searchable. Over the course of a project, you could easily have thousands of entries. Luckily for you, our search function is super-fast.
As soon as you start typing an entry into the Search field, the ‘Audit Trail’ will reduce to match your search as long as you have a fair idea of what you're looking for: an action task description (active), the person who might have taken an action (i.e. BB8) or a progress payment that's been made.

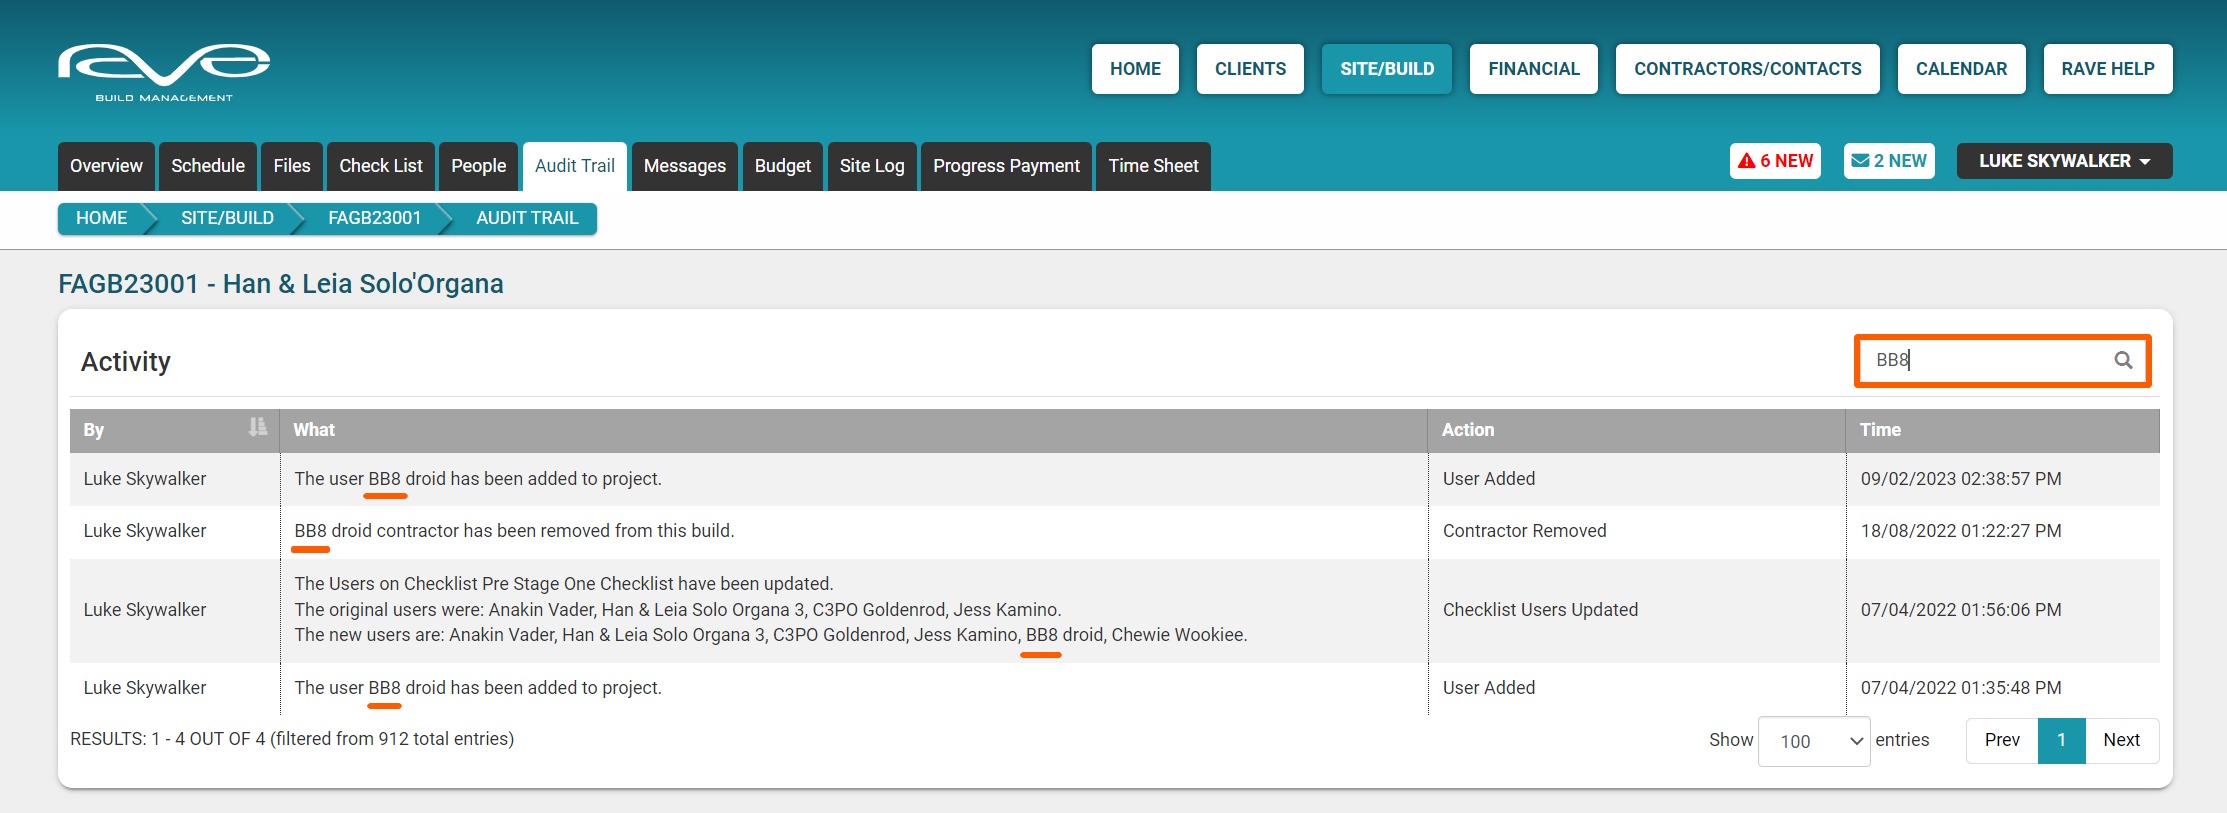
You can easily find any activity through the ‘Audit Trail’ and since it is only visible to office or branch users, this is a fantastic tool to help you identify who did or didn't do something and can be invaluable in managing both internal and external disputes.
Notes: If you need any further support you can browse through our RAVE Help portal FAQ, and blogs for our additional training resources - or reach out to us by phone 07 210 2228 and email help@ravebuild.co.nz