NOTE: The Key Tasks report has moved to the Reporting Button / Branch (or Company) / Reporting Menu
The Key Task overview (available via the Reporting Button / Branch (or Company) sub-tab / Reporting Menu) allows you to track key moments in your projects’ schedules – often relating to (but not limited to) your stage claim payment requests i.e. signing the build contract, final drawing sign off, getting the building consent, completing the floor down stage, framing up, roof on, council inspection(s) completed, etc.
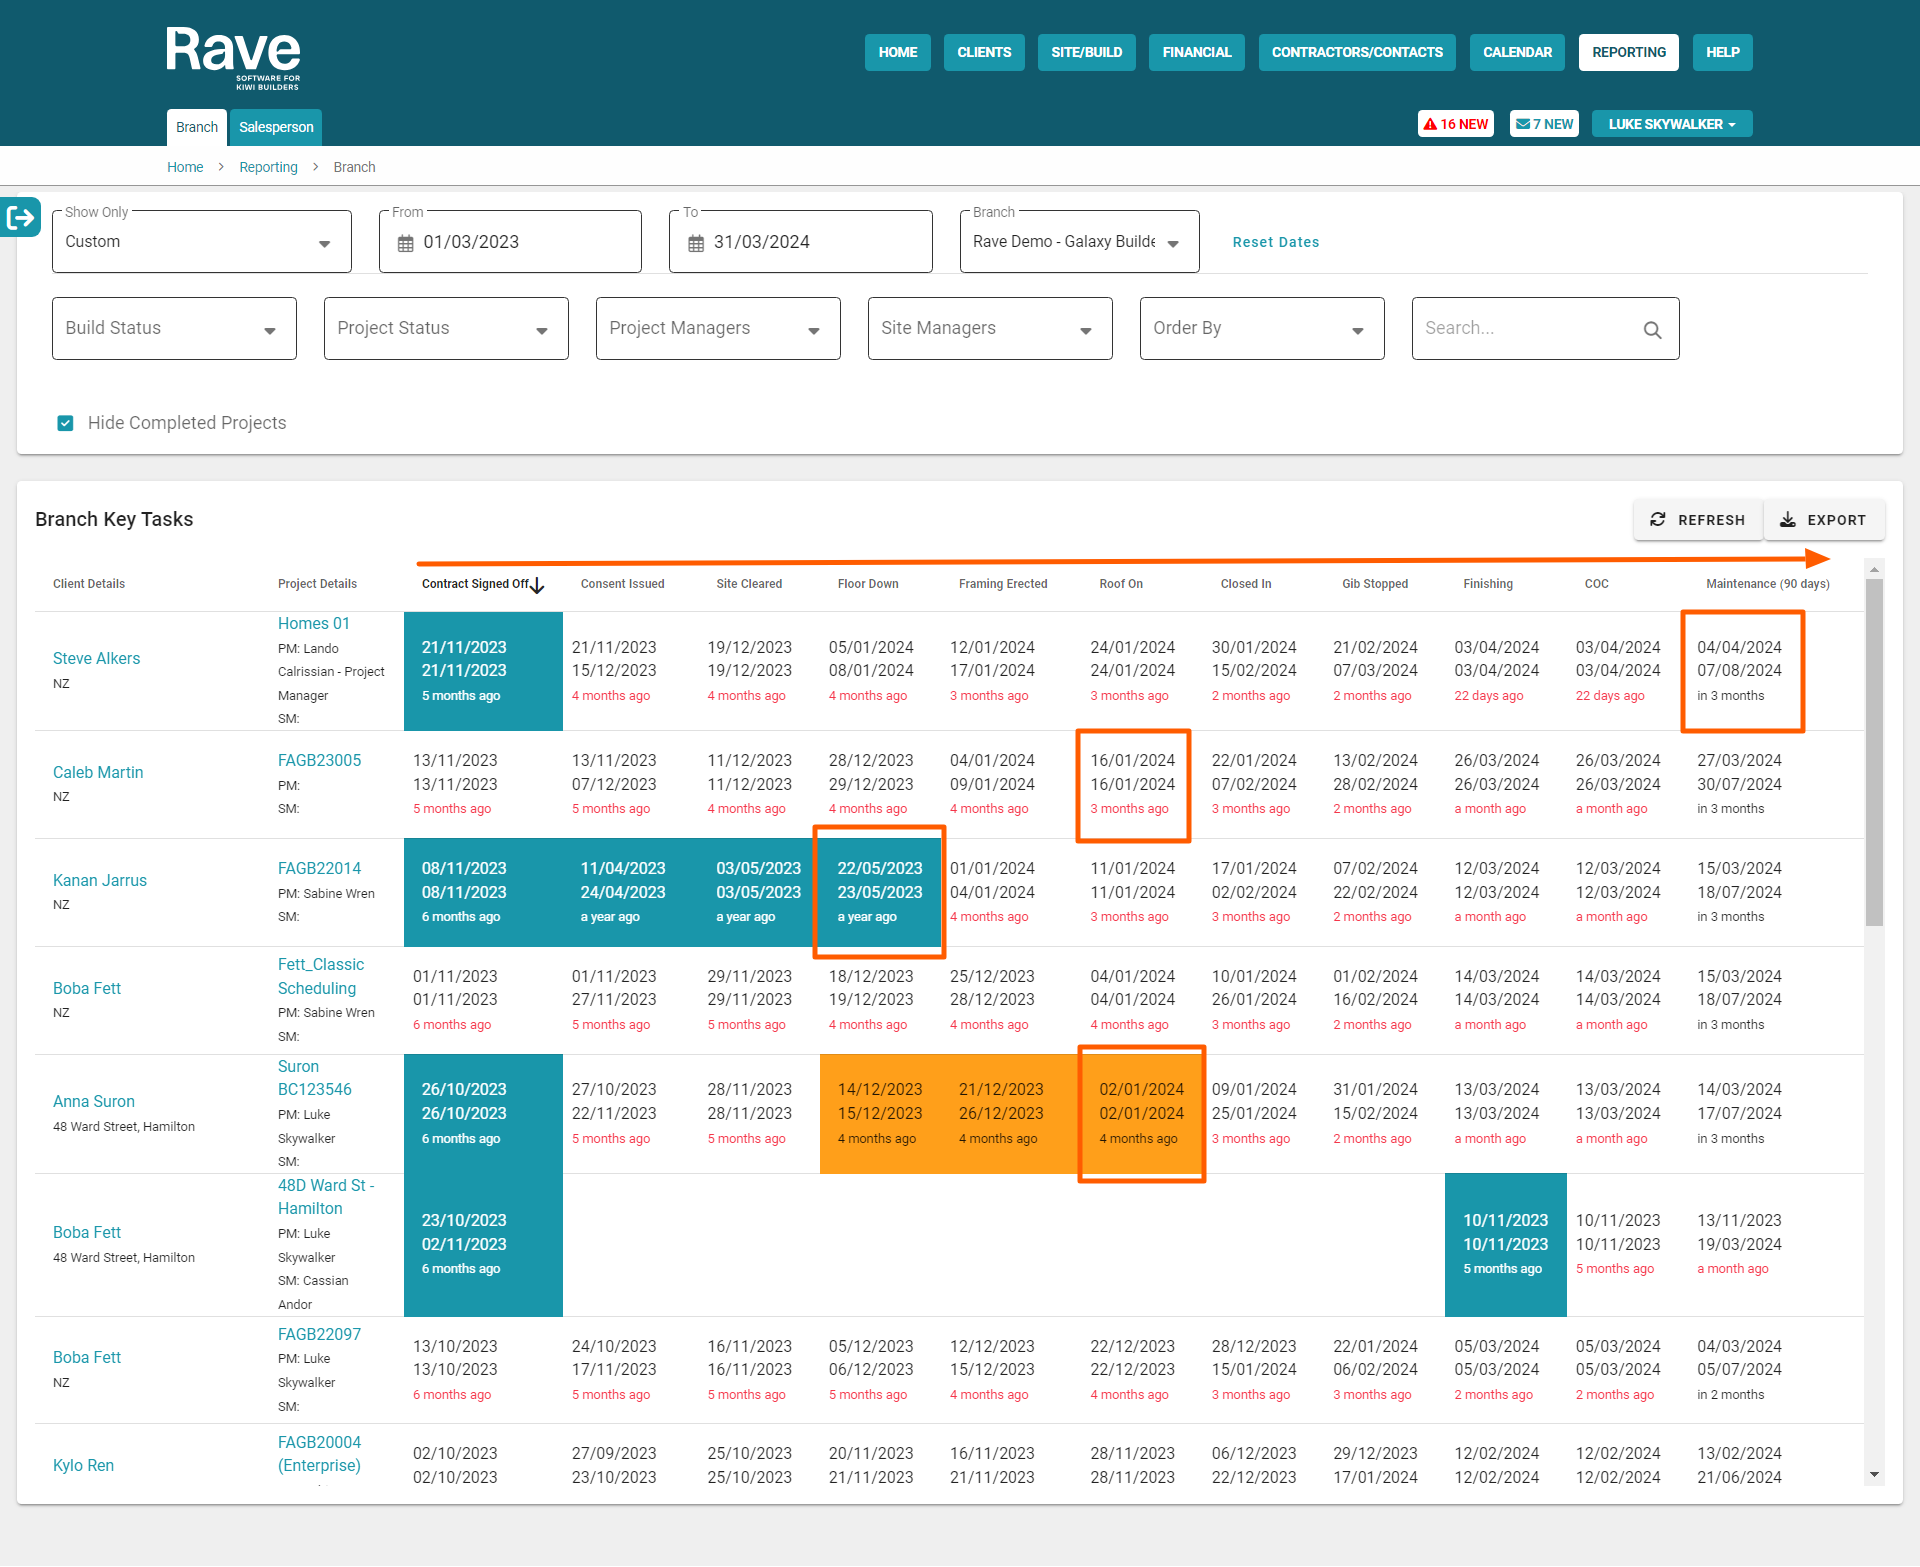
An example of a full Key Tasks build overview is included below, allowing you to see:
- Due dates for upcoming key tasks – a white background block with a black due date text
- Due dates for overdue key tasks – a white background block with a red overdue date text
- Completed key tasks – a teal background block
- Completed key tasks with a payment request requested – a golden background block
As you can see this is a great little ‘four-dimensional report’ that provides you with a clear top-level overview of project progress. But if you’re new to this report, it is likely that you’re looking at a blank overview with no data. Your active projects, with activated schedules, will appear here when at least one task in their schedule has been tagged as a key task. We have created a standard Key Task list to get you started (and we’ll show you how to customise your Key Task list a little later), so let’s look at how to assign your Key Tasks for this report.
Tagging a Schedule Task as a Key Task
You can tag a schedule task as a key task by:
- Going to the Task List view of your schedule
- Choosing a task to assign i.e. a contract being signed task
- Clicking on the pencil edit icon to the right of the task – to open the Task Details pop-up
- From here we move over to the Key Task dropdown and select the relevant Key Task tag i.e. Contract Signed Off
- Then click ‘Next’ and/or ‘Save’ to confirm
This will take you back to your Task List view, and after a few moments, you’ll see a black Key Task tag labeled ‘Contract Signed Off’ will appear. Going back to your Key Tasks build overview report (and assuming that your project is active, and your schedule is activated) you’ll see that your project has been added to the Key Tasks report and the Contract Signed Off block has been populated with task dates.
You can short-cut back to your schedule by clicking on the job number and tag your remaining Key Tasks.
Note: You can only assign one task to a Key Task tag – and you’ll notice when you assign your next Key Task, that already assigned tags are grayed out, and can not be selected again. However, if you’ve made a mistake, you can remove a Key Task tag, and then reassign it to another task.
RAVE Hack: Once you’ve tagged all of your Key Tasks in your schedule, you can save a new schedule template – this will also save your Key Tasks too, so the next time you load up this schedule template, your Key Tasks will load with their Key Task tags, and your project will auto-populate into your Key Tasks build overview report too!

Running a Key Tasks report using the Build Overview Filters
At the top of the ‘Key Tasks’ build overview page, are a number of reporting filter options – these are available for most of the Build Overview reports, and allow you to create your own customised reports – these are:
- Build Status – filter projects by the Active and/or Maintenance state
- Project Status – filter projects by their stage of construction i.e. Preconstruction, In Construction, etc.
- Date Range – allows you to view Key Tasks due in a specific date range
- Project Managers – project managers can view just their projects, a selection of project managers' projects, or ALL projects
- Site Managers – allows you to view jobs managed by specific Site Manager(s)
- Order By – changes the ordering down the page i.e. by the Schedule Start Date, Task Start Date, or Task End Date
- The Search field – allows you to filter projects by their Job Number, Contract Name, or the Client’s Name
- You also have the ability to Hide Completed Projects via the ‘Hide Completed Projects’ checkbox
Once you have applied your filters, you have the ability to export your report as a CSV file, via the Export Key Tasks button – at the top right of the page.
How to Customise your Key Task list
Those with branch owner permissions can easily update their business’s Key Task tag list in RAVE, you can access your Key Task list by:
- Clicking on your profile dropdown – your name in black to the top right of your RAVE screen
- Selecting ‘Settings’
- Then clicking on the Key Tasks sub-tab – at the top left of the Branch Settings page
This will display your Branch Key Tasks list. The order of your Key Tasks down the page is the order these will display across your Key Tasks build overview report. The Key Task Name and Description are generally the same, but it is the ‘Name’ field that dictates what is displayed on the report.

From here you have a few editing options via the Edit button, and the Actions dropdown menu to delete a Key Task tag – both are over to the far right of a Key Task. You can edit your Key Task tag list by:
- Clicking either ‘Edit’ option
- You can change the order of Key Tasks by clicking on the Order number you want to move, then editing the number, or clicking on the up and down triangles
- You can edit the Key Task ‘Name’ (and description if you want to) by clicking on the respective field, and typing in what you want to display. - You can save your Key Task tag changes by clicking on the Actions ‘Save’ button.
- And again, you can delete a Key Task tag by clicking ‘Delete’ via the Actions dropdown menu
