In this FAQ, we will learn how easy it is to use RAVE's project communication tools - to help you to achieve a massive reduction in unnecessary calls between you and your contractors.
First up is RAVE's project messaging via the 'Messages' sub-tab.
The Messages sub-tab
The ‘Messages’ sub-tab is your gateway to RAVE’s internal ‘email’ system. It is just like your normal email set-up, but it is internal to RAVE and allows you to keep all of your project-related emails in one place - the messages sub-tab of your project.
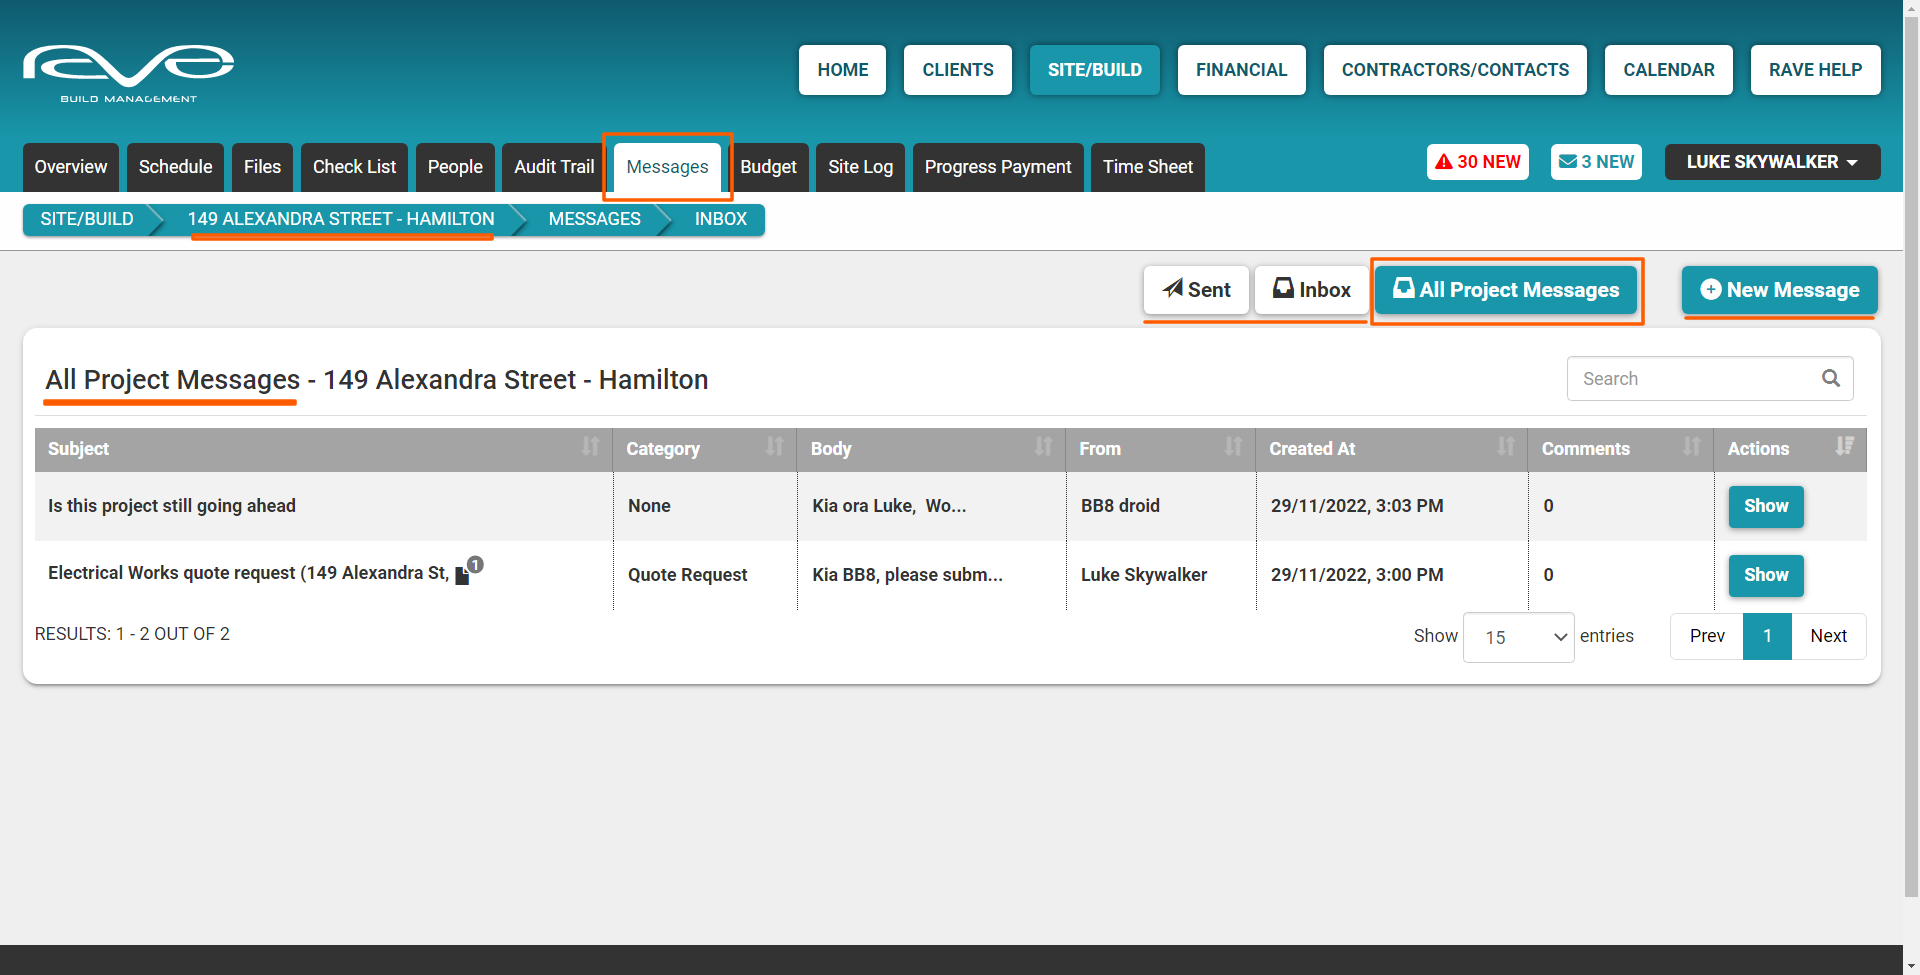
To access the messages side of a project in RAVE, we open our target project, and then click on the ‘Messages’ sub-tab.
You'll see that the 'Messages' view defaults to 'All project messages - combining both your 'Sent' and 'inbox' messages. Though you can easily click the ‘Sent’ and ‘Inbox’ buttons to view your outbound and inbound messages just like regular email - but we'll show you both as the default.
NOTE: RAVE is not currently connected to Google Business Suite or Office 365 for calendar or email but that is an upcoming update that we are working on in the New Year.
Sending a new message
To create a new message we just click on the ‘New Message’ button. And just like an email, we can select who we want to send this message to, add a subject line, write a message and add attachments, etc.
- The ‘To’ list populates from the projects ‘People’ tab
i.e. any contractors, staff, and site staff that you have not given access to your job via the project’s ‘People’ tab will not appear on your 'to' list. You can select recipients one at a time, or use the ‘Select All’ button to add all of your contractors, project/site staff, and the client – then unticking anyone you don’t want to include. - The 'Subject' line is just like a normal email subject line i.e. project delays.
- The 'Category' field allows you to set a category for your email, allowing you to filter your messages later if required.
You have the option of selecting none (no category), a number of preset categories (to track all of your messages about variations, the plans and specs change, updates, maintenance issues) or you can create your own category by selecting 'Other'.
NOTE: If you select the ‘Other’ category, you do need to type in a Category description to send your message. - Clicking on the attachments section will open up your file browser, you can then select any attachment(s) you need to add.
- And finally, you can type in your actual message, with a number of message formatting options to get your message looking just right.
- Click 'Send' to send
NOTE: You will notice that there are a number of required fields (To, Subject, Category, and Message Body). These all need to be filled in, otherwise the ‘Send’ button down to the bottom right of the page, will remain shaded out i.e. you are not able to send this message until we complete all of the required fields.

'Also send as emails' explanation
After writing your message, with all of the required fields filled in, the send button will be unlocked, and we can send the message away. At this point, you may notice that the ‘Also send as emails’ check box is ticked.
Also sending it as an email can be really helpful if your contractors are new to RAVE, and are not yet logging into RAVE daily i.e. there's the potential that they won't see the message. When this check box is ticked, RAVE sends the message not only within RAVE, but also externally as an outbound email - giving your contractors a better chance of seeing it. Although this is ticked by default, you can untick it if you do not want to also send an external email, though we generally recommend that you leave it ticked.
Again, once you have filled in all of the fields for your new message, you can just click 'Send', to send your message out to everyone in your ‘To’ list.
You’ll then be taken back to your All Project Messages page, containing both your inbound and sent messages - your sent message will be listed here.
Saving and Loading a message template
If you have a project-related email that you frequently send, you can save that as a message template, ready for you to select and load up in the future.
You can save/create a new message template by:
- Starting a new message - using the 'New Message' button and process
- You can then copy and paste your email into the message body section - also formatting it as required
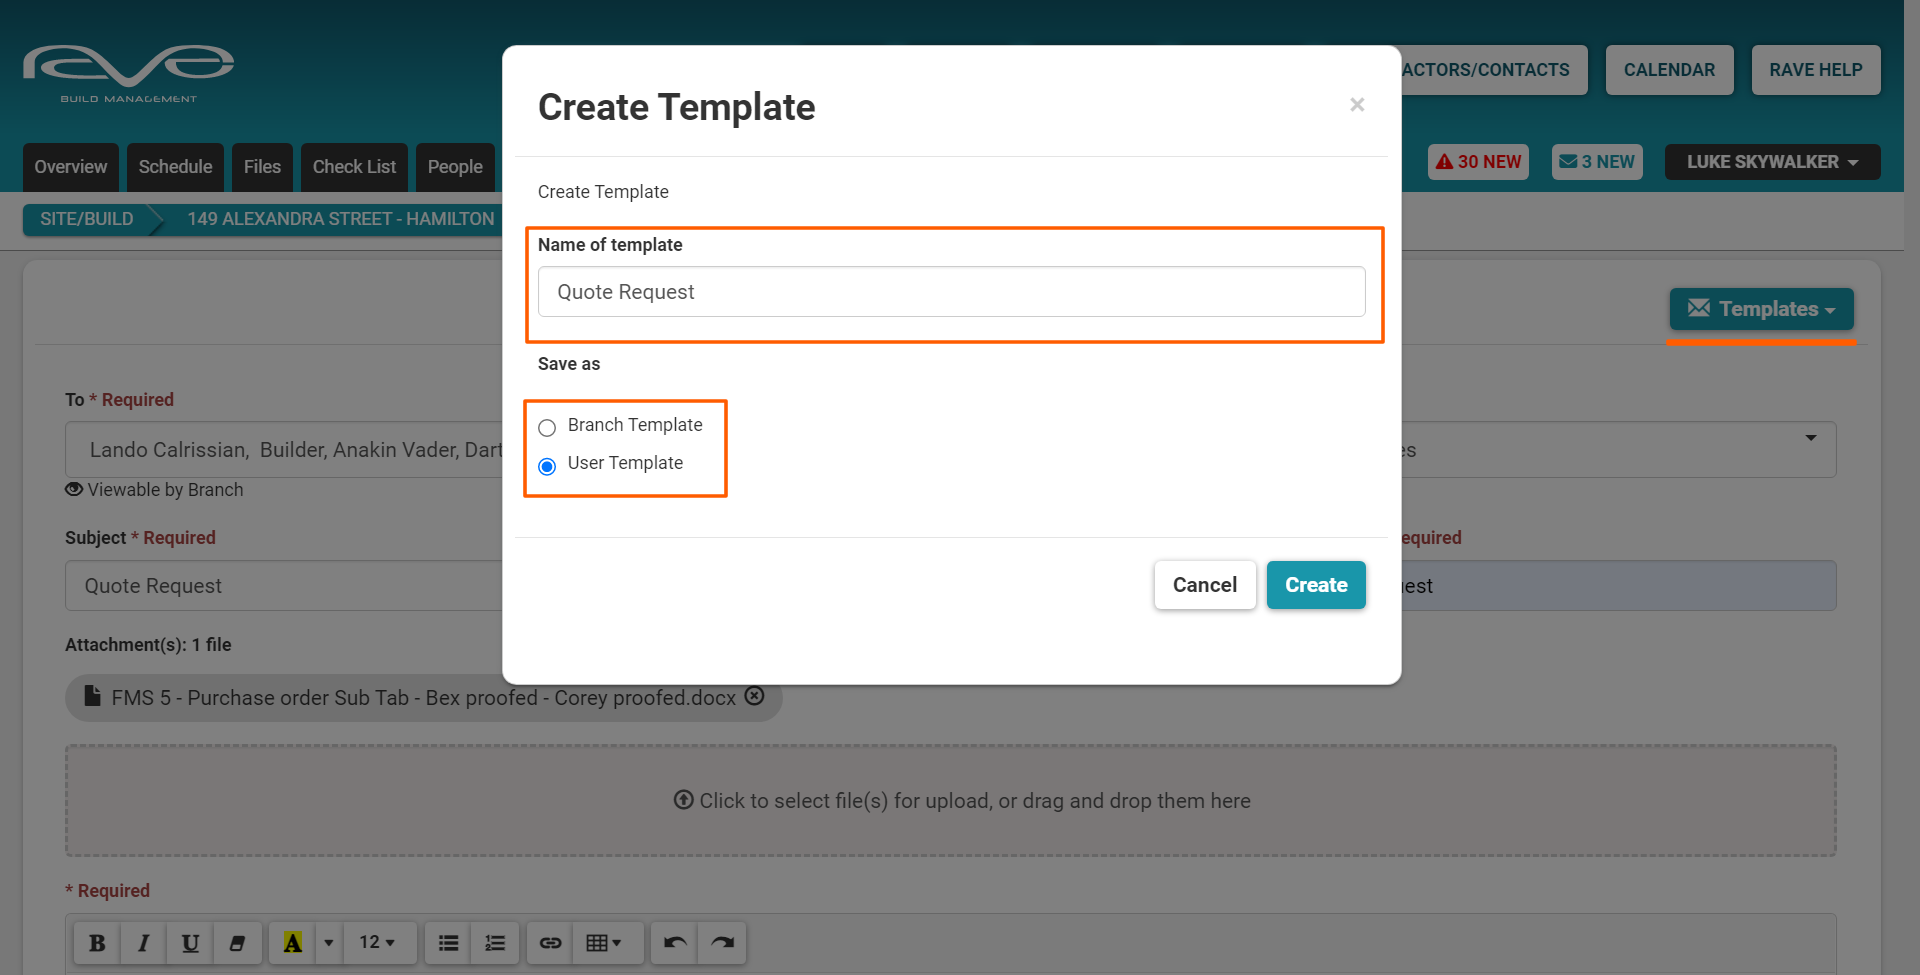
- Then, before hitting the 'Send' button, move up to the top right of your new message page, click the 'Templates' dropdown, and select ‘Save as Template’
- Give your message template a name
- Decide if this template is to be accessible to all branch users, or just yourself
- And click 'Create' to save
Your new message template has been saved for future use, you can now complete your message and send it as normal.
In a similar fashion, you load a message template by:
- Starting a new message - using the 'New Message' button
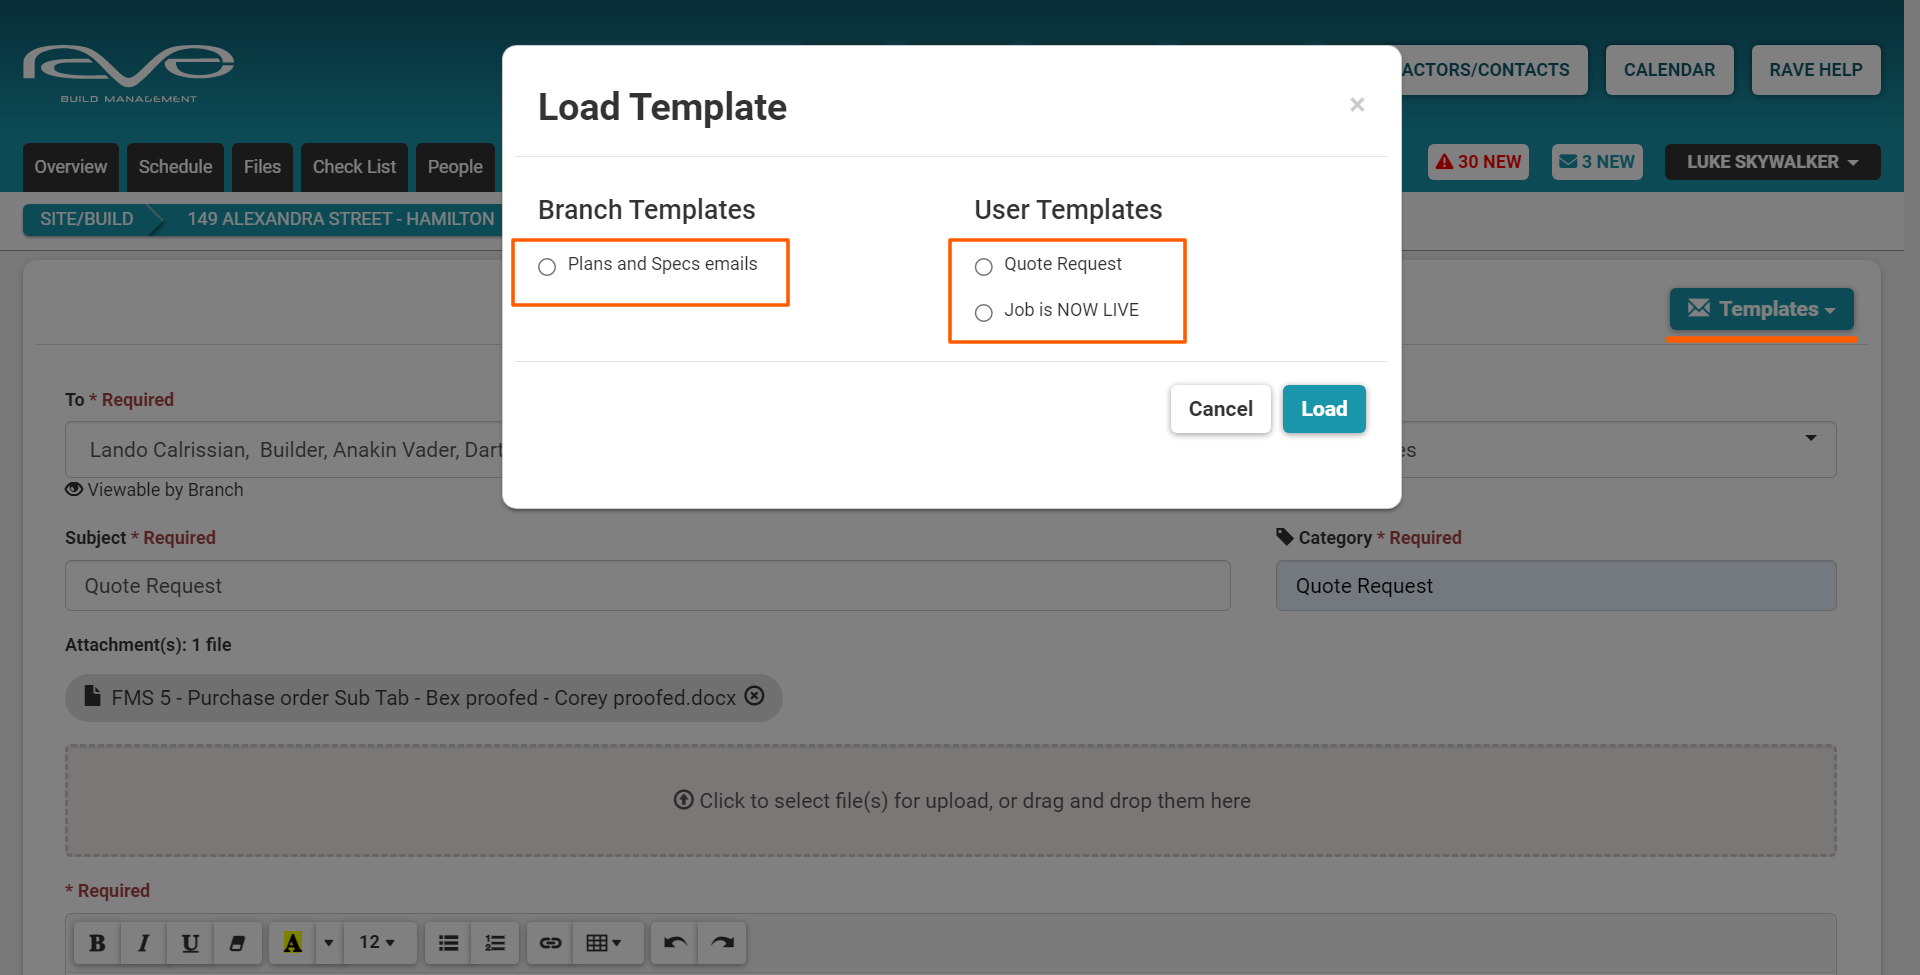
- Move up to the top right of your new message page, click the 'Templates' dropdown, and select ‘Load Template’
- Tick the message template you would like to load
- And click 'Load' to load
Your message template will be loaded - you can now edit the copy, complete all of the required fields, and send it off as normal.
Receiving a Message, a Comment, and Adding a Comment to a message
If a NEW project MESSAGE is sent to you, it will appear in your project’s 'Inbox' - also available via your 'All Project Messages' folder. To open any messages, sent or received, we just click on the ‘Show’ button over to the right of the message you want to open.
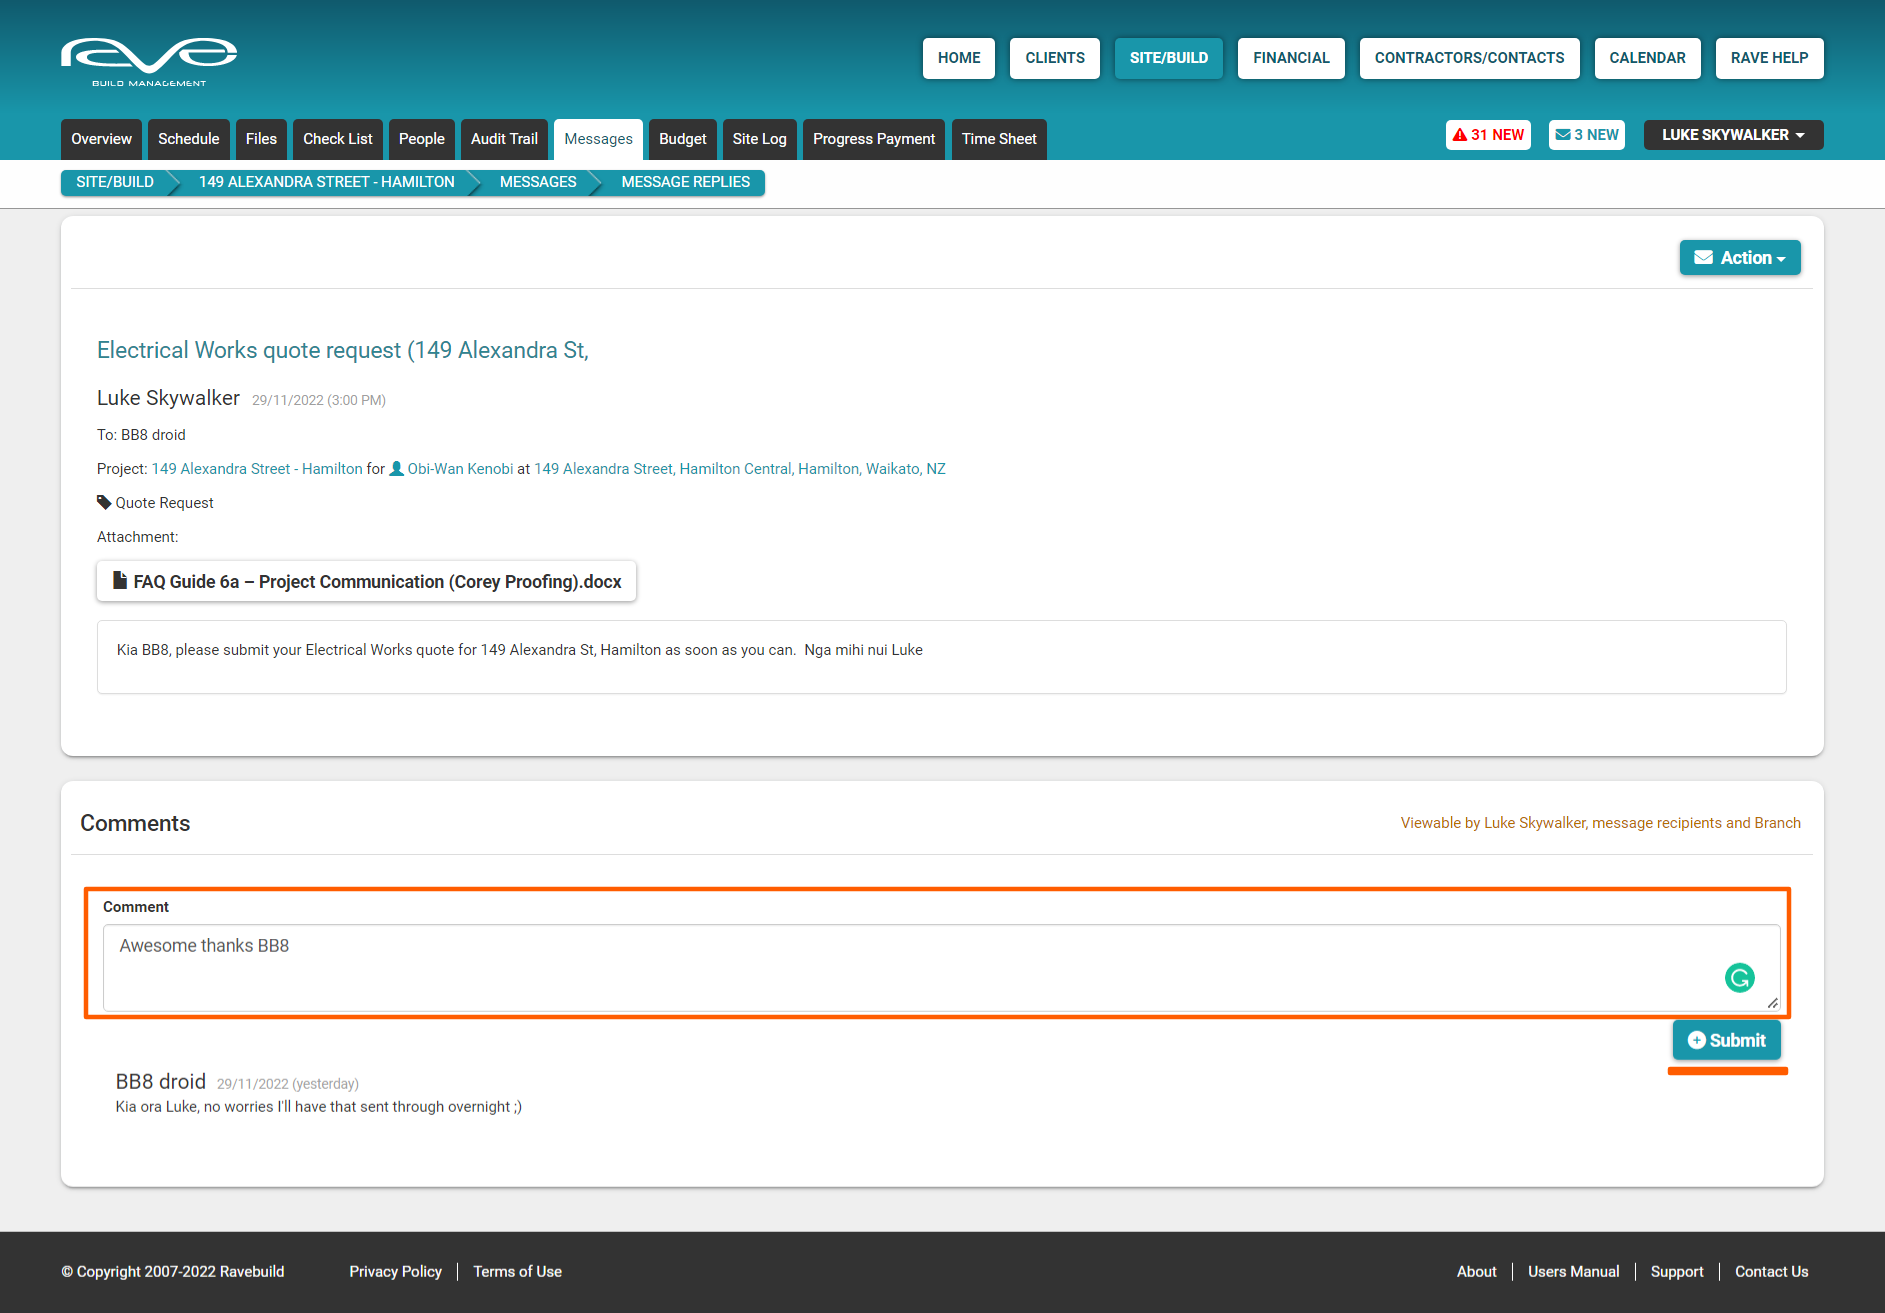
If a NEW COMMENT has been added to a project message, it will be flagged via the 'Comments' column of your 'All Project Messages' folder - also displayed in your 'Sent' and 'Inbox' pages.
To add a comment, you simply click ‘Show’ (to the right of the message you want to open), add your comment and click your message in, and click ‘Submit’ to add it.

Activating your schedule
Our next communication tool is via the Activate Schedule button, available from the ‘Schedule’ sub-tab. We cover the Activate Schedule button and process in detail via our Classic Scheduling tutorial.
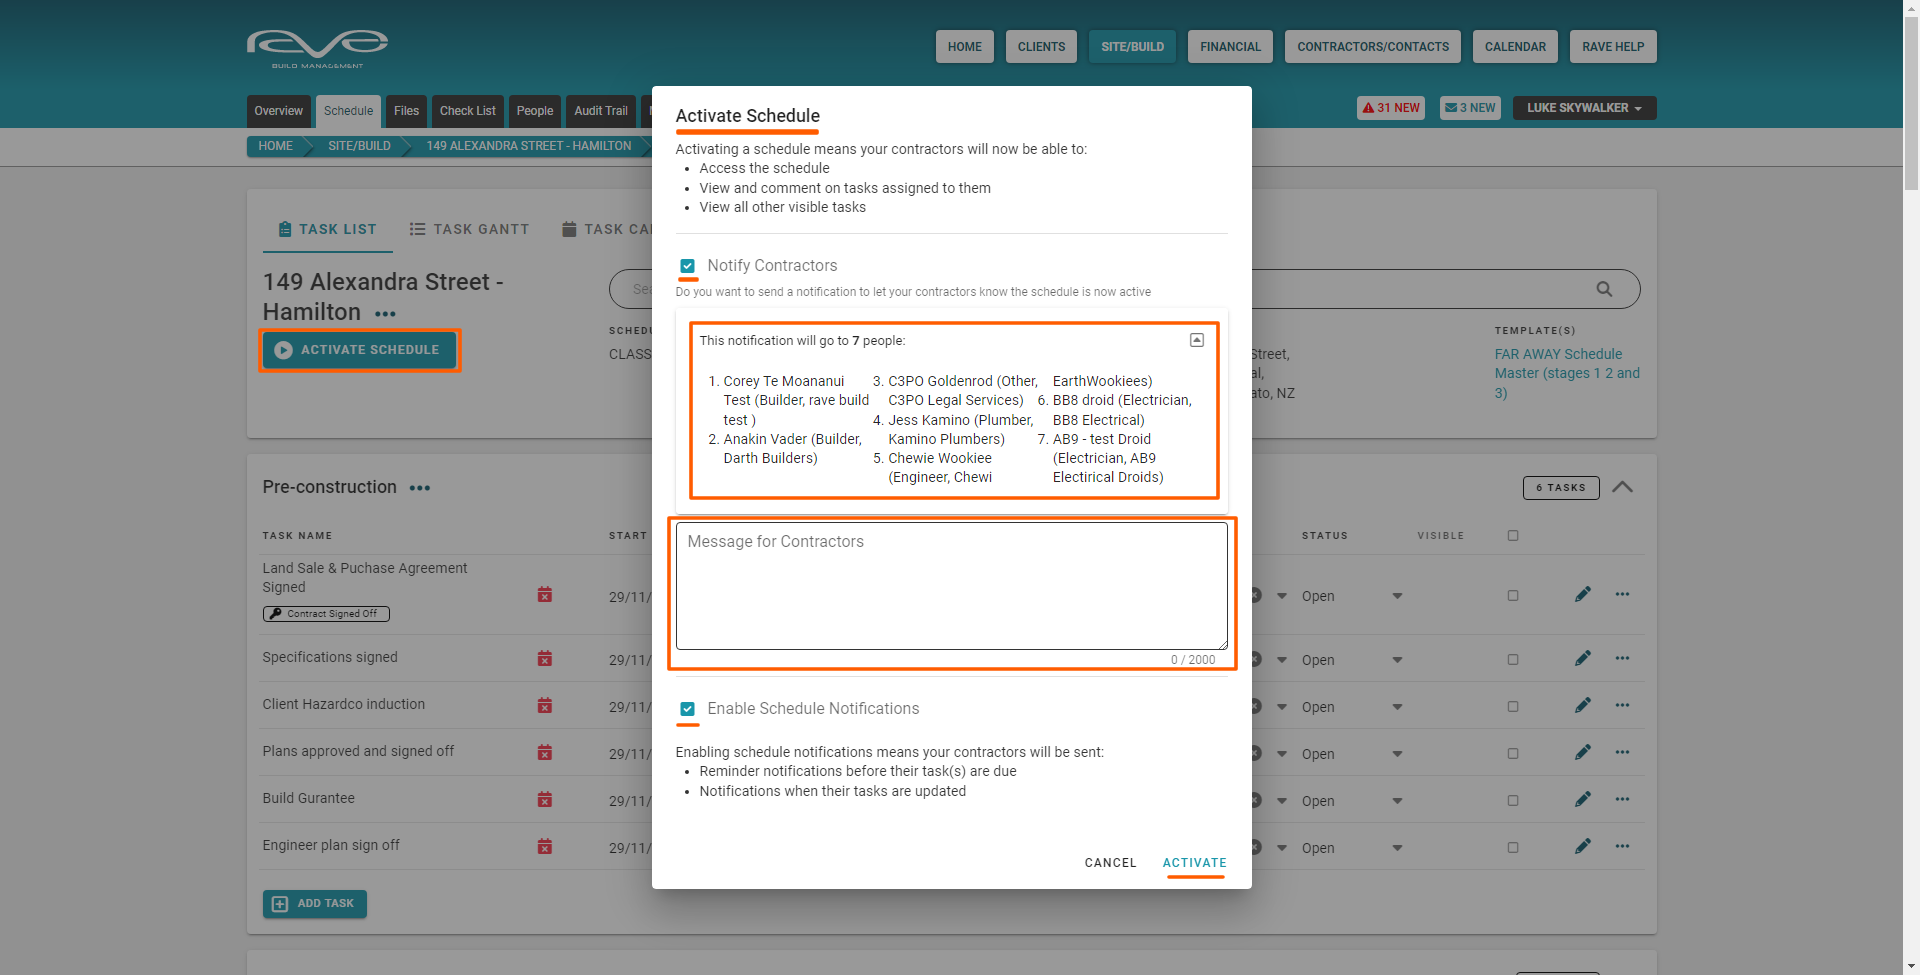
The key point here is that your schedule is kept hidden from your contractors (and the client if you've given them access) until you activate the schedule - even though the project details, files, and messages are visible to your trades via the project's Active and Maintenance build statuses.
This allows you to share your project with your trades while keeping the schedule private - until you are ready to share it i.e. you are wanting to give your trades a heads up on an upcoming job, but the schedule timelines and/or your projects primary assignees have not been finalised.
When you activate the schedule, you have the ability to check who will have access to the schedule, and to send an email out to let your contractors know that the schedule is visible. You also have the option of turning on schedule notifications here too, to let contractors know of any schedule changes that might affect their tasks.
For more details on the Activate Schedule function – please refer to our Classic Scheduling tutorial.
Schedule Task Change Notifications
We are now going to look at our Schedule Task change notifications. A key concern for new project managers getting started with RAVE, is that they don't want to bug their trades by sending too many notifications (too much noise). DON'T WORRY - RAVE has implemented a 6-point system to prevent this from happening i.e. if any one of the following 6 checks are NOT turned on, then no schedule task change notifications will be sent out.
So, let's have a look at what each of these 6 checks are:
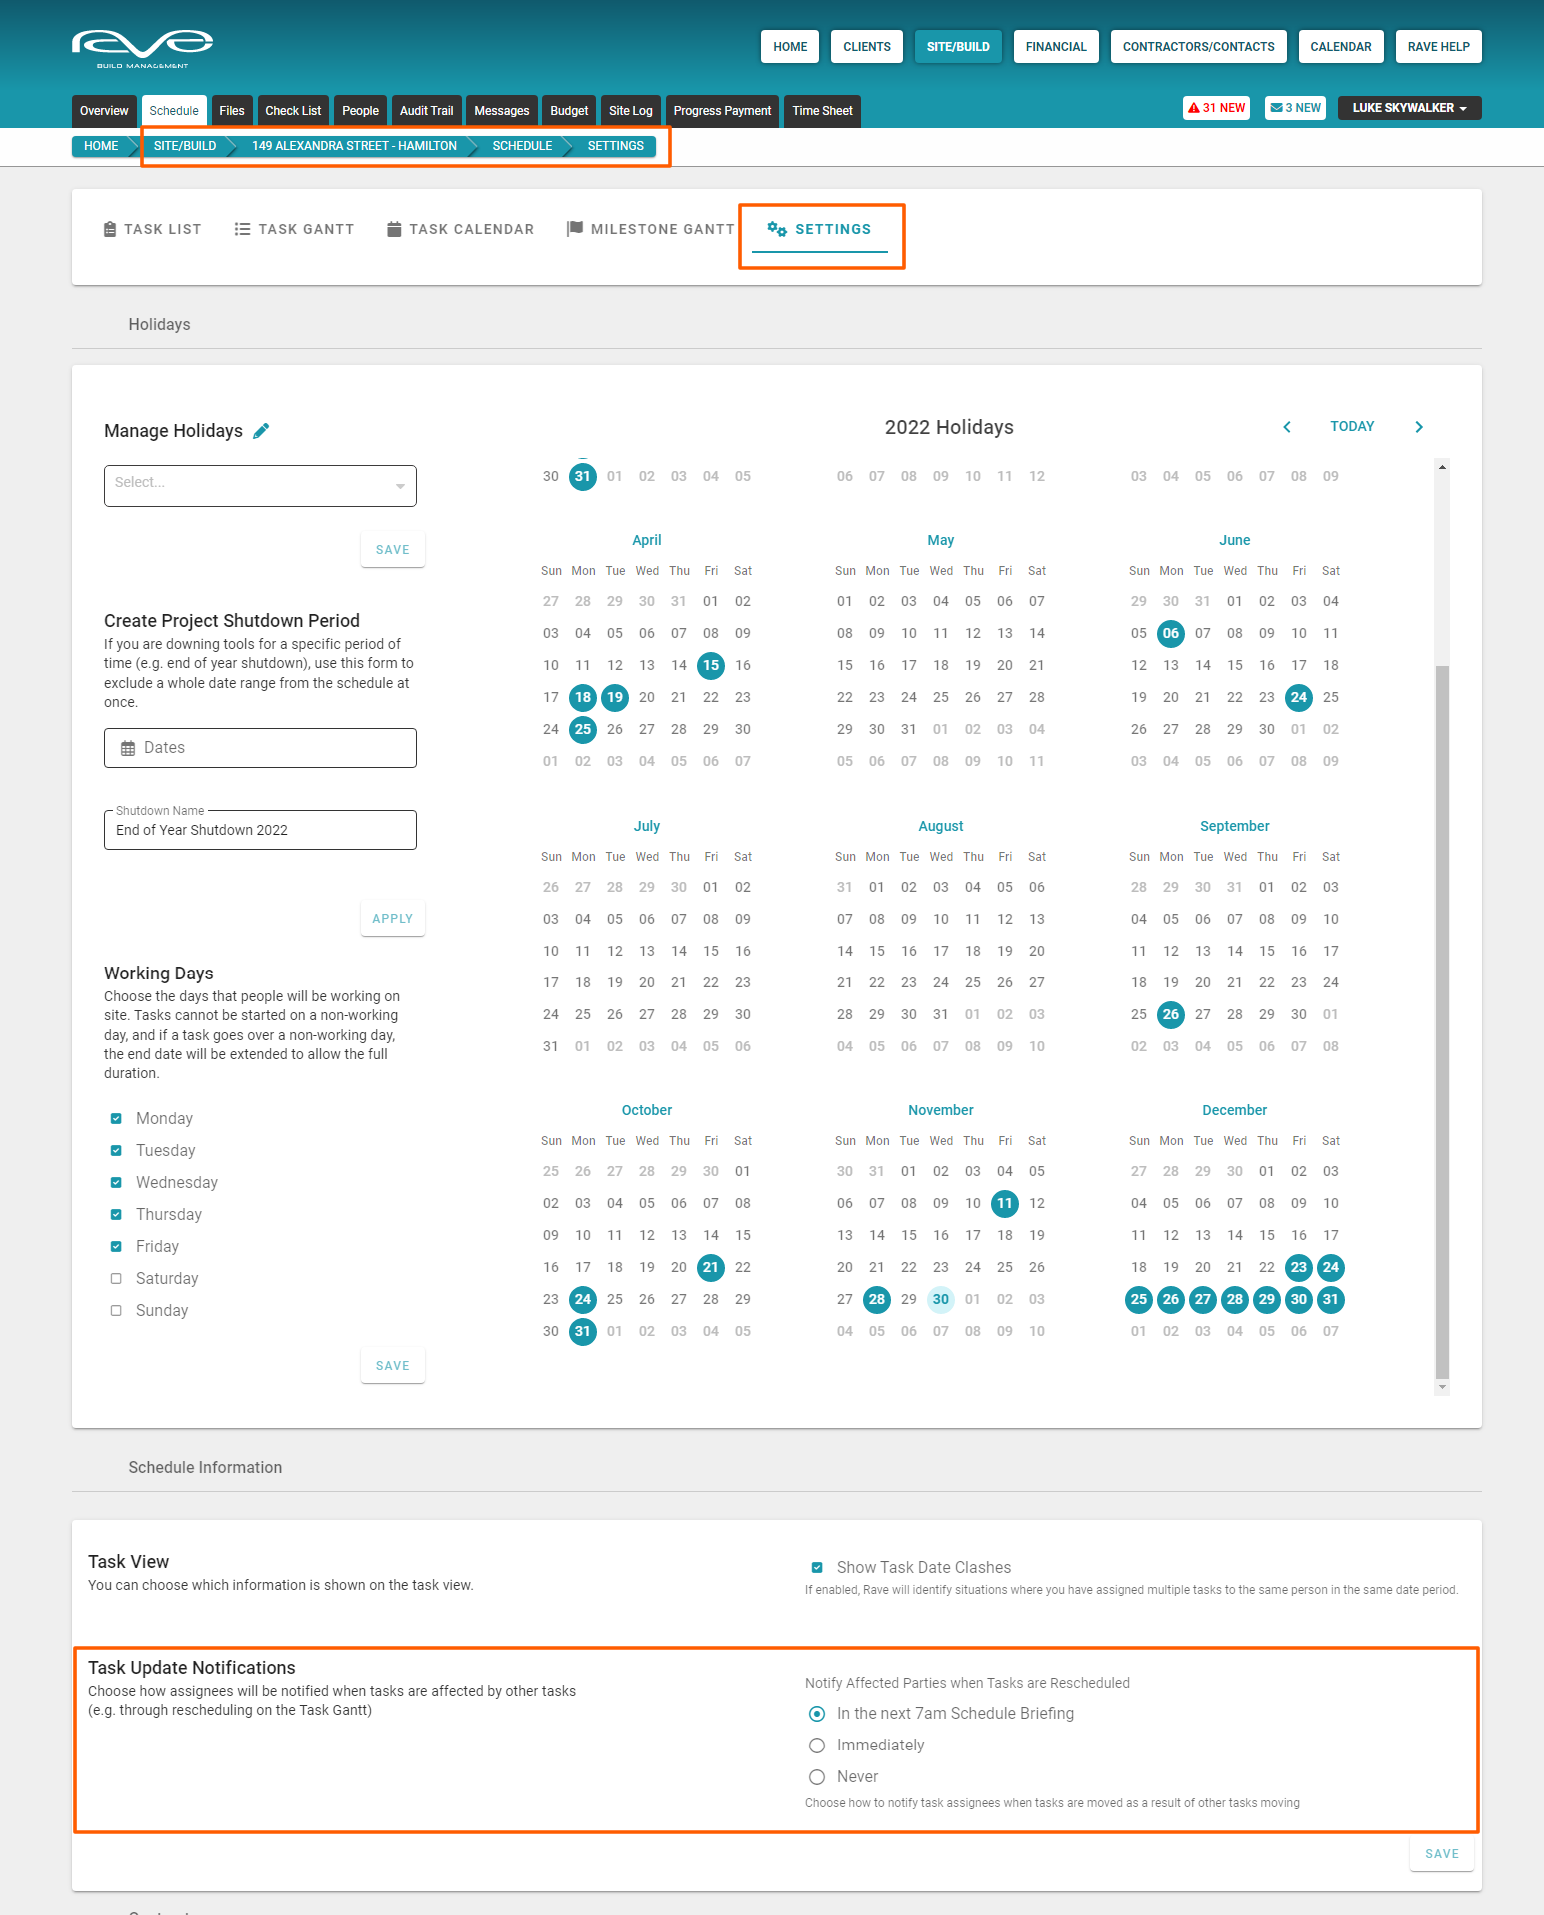
1. The ‘Task Update Notifications’ setting
The first check is the schedule’s ‘Task Update Notifications’ setting available from the project's schedule ‘Settings’ tab. This is the project's notification master switch - where we can manage if any notifications are to be sent out, and if so, the frequency of these, we have 3 options to choose from:
• ‘Never’ means that NO schedule task change notifications will go out for this project. If you never want task change notifications to go out on this project, this is the option to select.
• ‘Immediately’ means that every schedule change will send an immediate notification to affected contractors – this option is definitely NOT recommended i.e. multiple tweaks to a schedule could see 10 notifications sent out to your trades in 5 minutes. We do have an option for sending immediate notifications, if required, and will cover that a little later.
• ‘In the next 7am Schedule Briefing’ is the best option to select for when you are ready to start communicating schedule task changes. This option gives you until 11:59pm of that day, to make any schedule changes - at this point RAVE will capture the final start date for each of your contractors' tasks – and RAVE will then prepare to send one email out to that trade with all of their task updates at 7am the next morning – assuming all of the other task change notifications are checked.
NOTE: To further cut down on noise, RAVE sends one task change notification email to the contractor for all task schedule changes, across all businesses that use that contractor within RAVE.
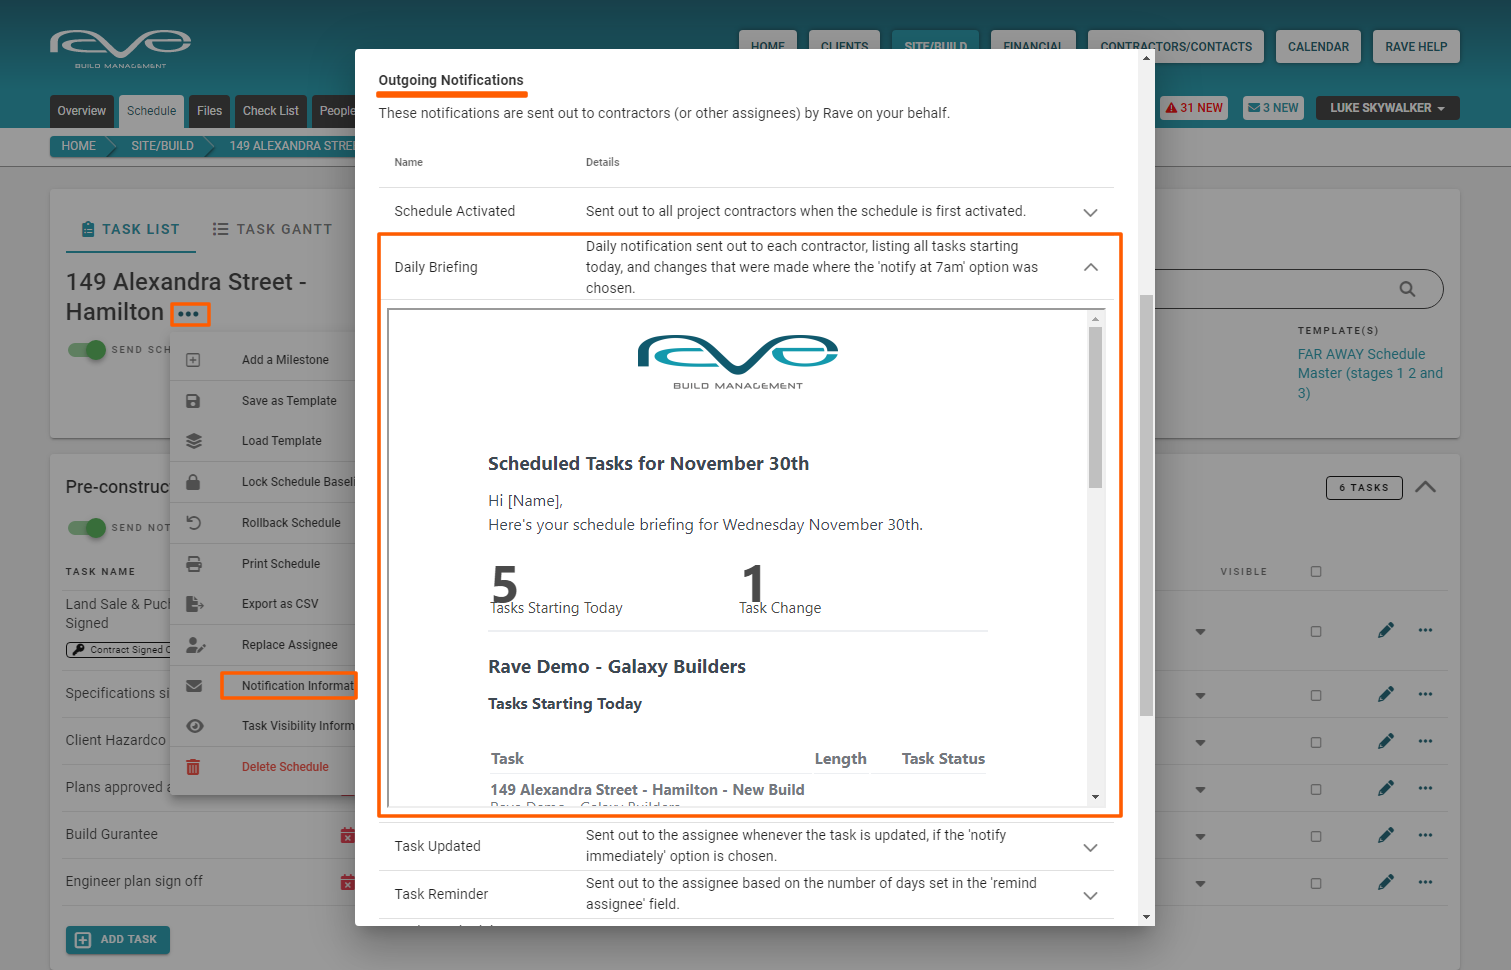
An example of what this ‘Daily Briefing’ email looks like, is available from the ‘Notification Information’ page link, via the Schedule’s action drop-down - next to the project number/name.
Notification Information - Preview Outgoing and Incoming RAVE notifications
The ‘Notification Information’ page, available via the schedule's 3 dot action dropdown (next to the job number), shows you what RAVE's inbound and outbound notifications look like - these are split into two different sections:
- ‘Incoming Notifications’ are the notifications that RAVE might send to the project manager
- ‘Outgoing Notifications’ are the notifications sent out to our trades and external parties
The ‘Daily Briefing’ notification is included in our outgoing notifications list. We can see that this notification is sent out to each contractor, listing all of their assigned tasks starting today, and changes that were made where the 'notify at 7am' option was chosen.’ By clicking on the expand arrow to the right of this line, we can see the general layout of this notification email - displaying very clearly what assigned tasks are due to start today, and if any schedule task changes were made to their tasks overnight.
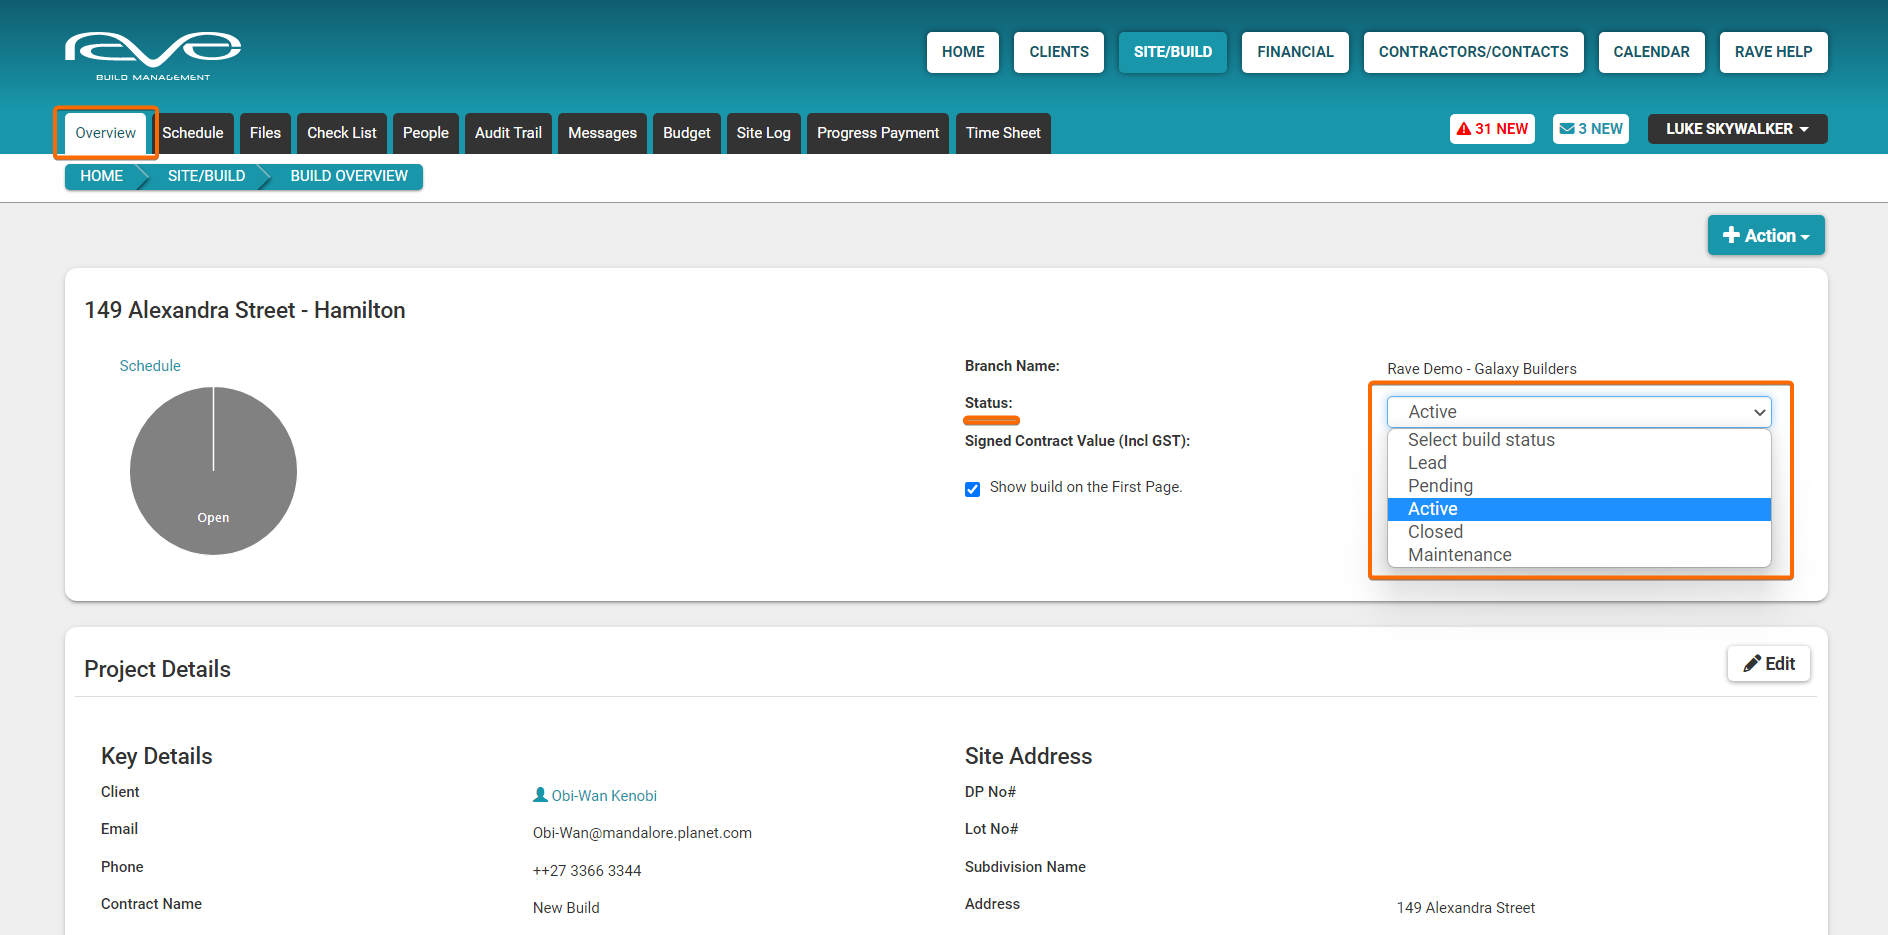
2. Is the project in an Active (or Maintenance) State?
The project needs to be in an Active (or Maintenance) state for contractors to be able to see it, this is also a requirement for sending out schedule notifications too. We can check the current build status by viewing the project's ‘Overview’ page - looking at the build status over to the right of the page.
NOTE: Contractors do not have visibility, or any access to a project while it is in a Lead, Pending or Closed state – and again, notifications will only go out if the job is in an ‘Active’ or a ‘Maintenance’ state.
3. Has the Schedule been Activated?
The third check is that the schedule needs to be activated - that is, made visible to your contractors. As with the build status, if the schedule is not visible, there is no point in notifying them about any schedule changes. We can check this while the job is in an Active (or Maintenance state), by going back to the ‘Schedule’ page, and seeing if the ‘Activate Schedule’ button is still visible.
NOTE: If the ‘Activate Schedule’ button is still visible, the schedule has not been activated - the schedule will be hidden from contractors, and no schedule task change notifications will go out. Once the schedule has been activated, this button will be replaced by the ‘Send Schedule Notifications’ master switch.

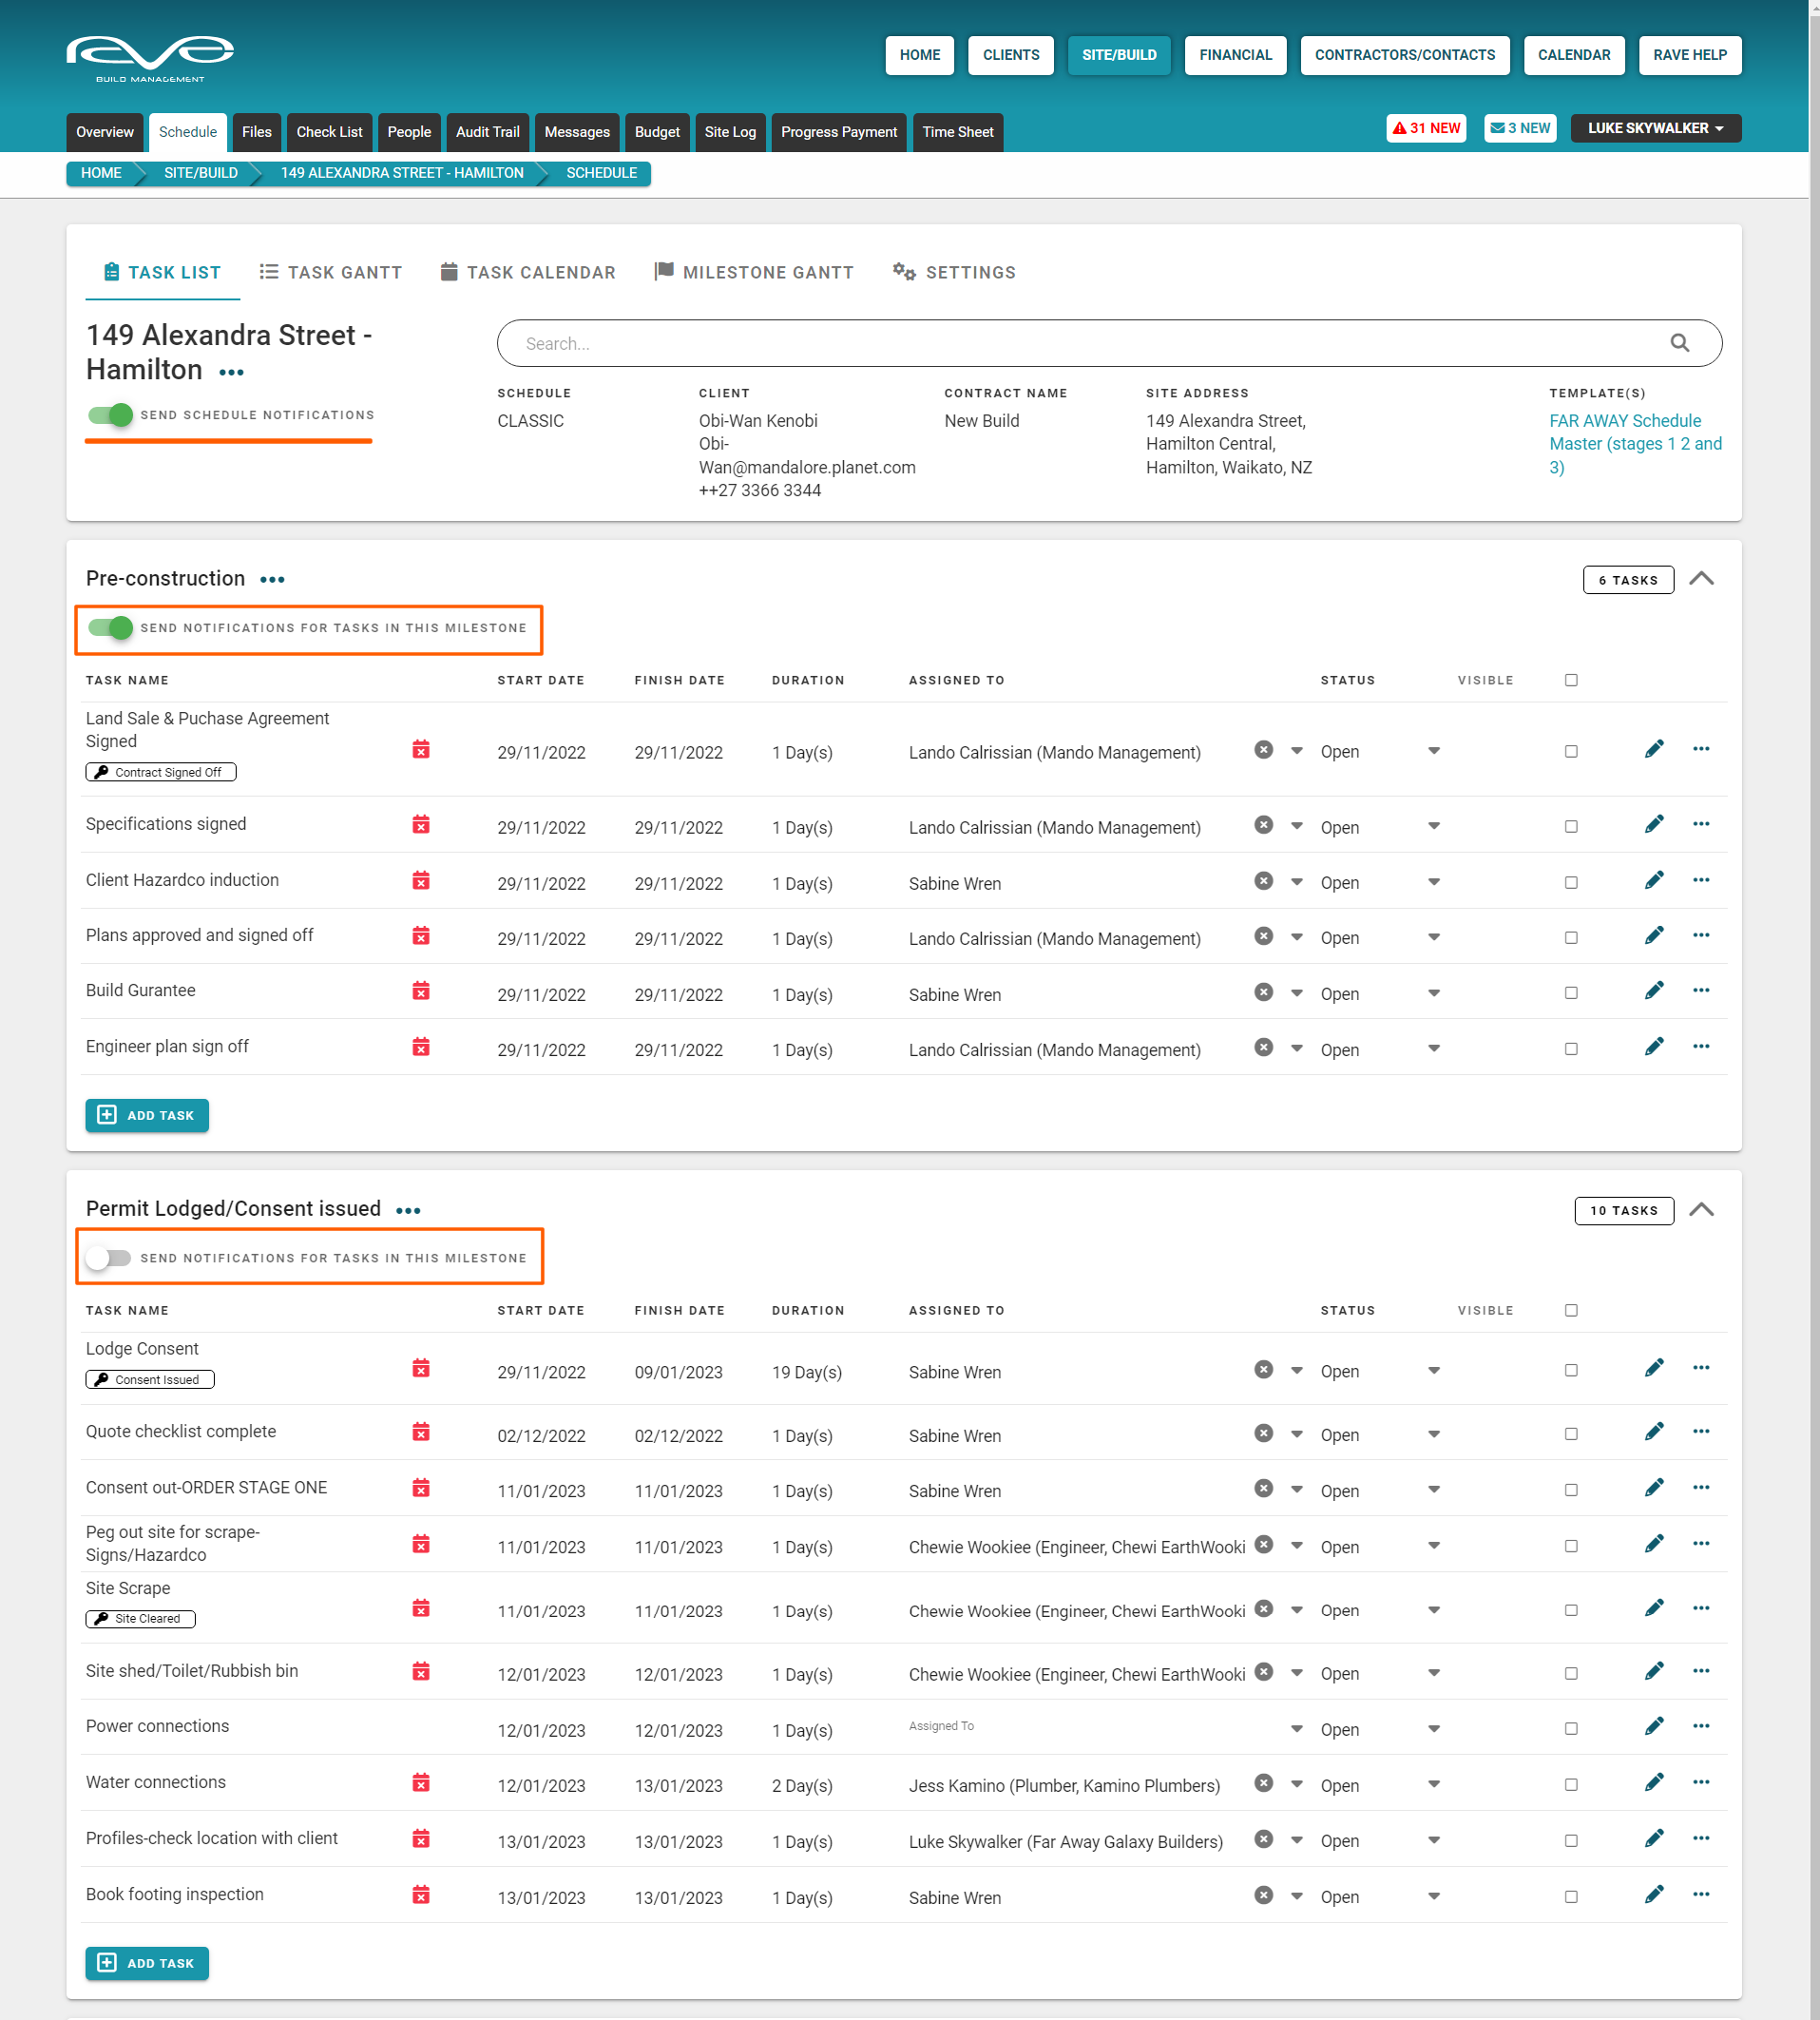
4. Is the ‘Send Schedule Notifications’ master switch turned on?
The fourth check is that the master ‘Send Schedule Notification’ switch, replacing the 'Activate Schedule' button (below the job number, up to the top left of the schedule page) must be turned on i.e. green – and not gray.
If this master switch is turned off (gray), it will turn off all of the ‘Send Schedule Notification for Tasks in the Milestone’ switches, for all milestones across the whole project - and again, no schedule task change notifications will be sent out.
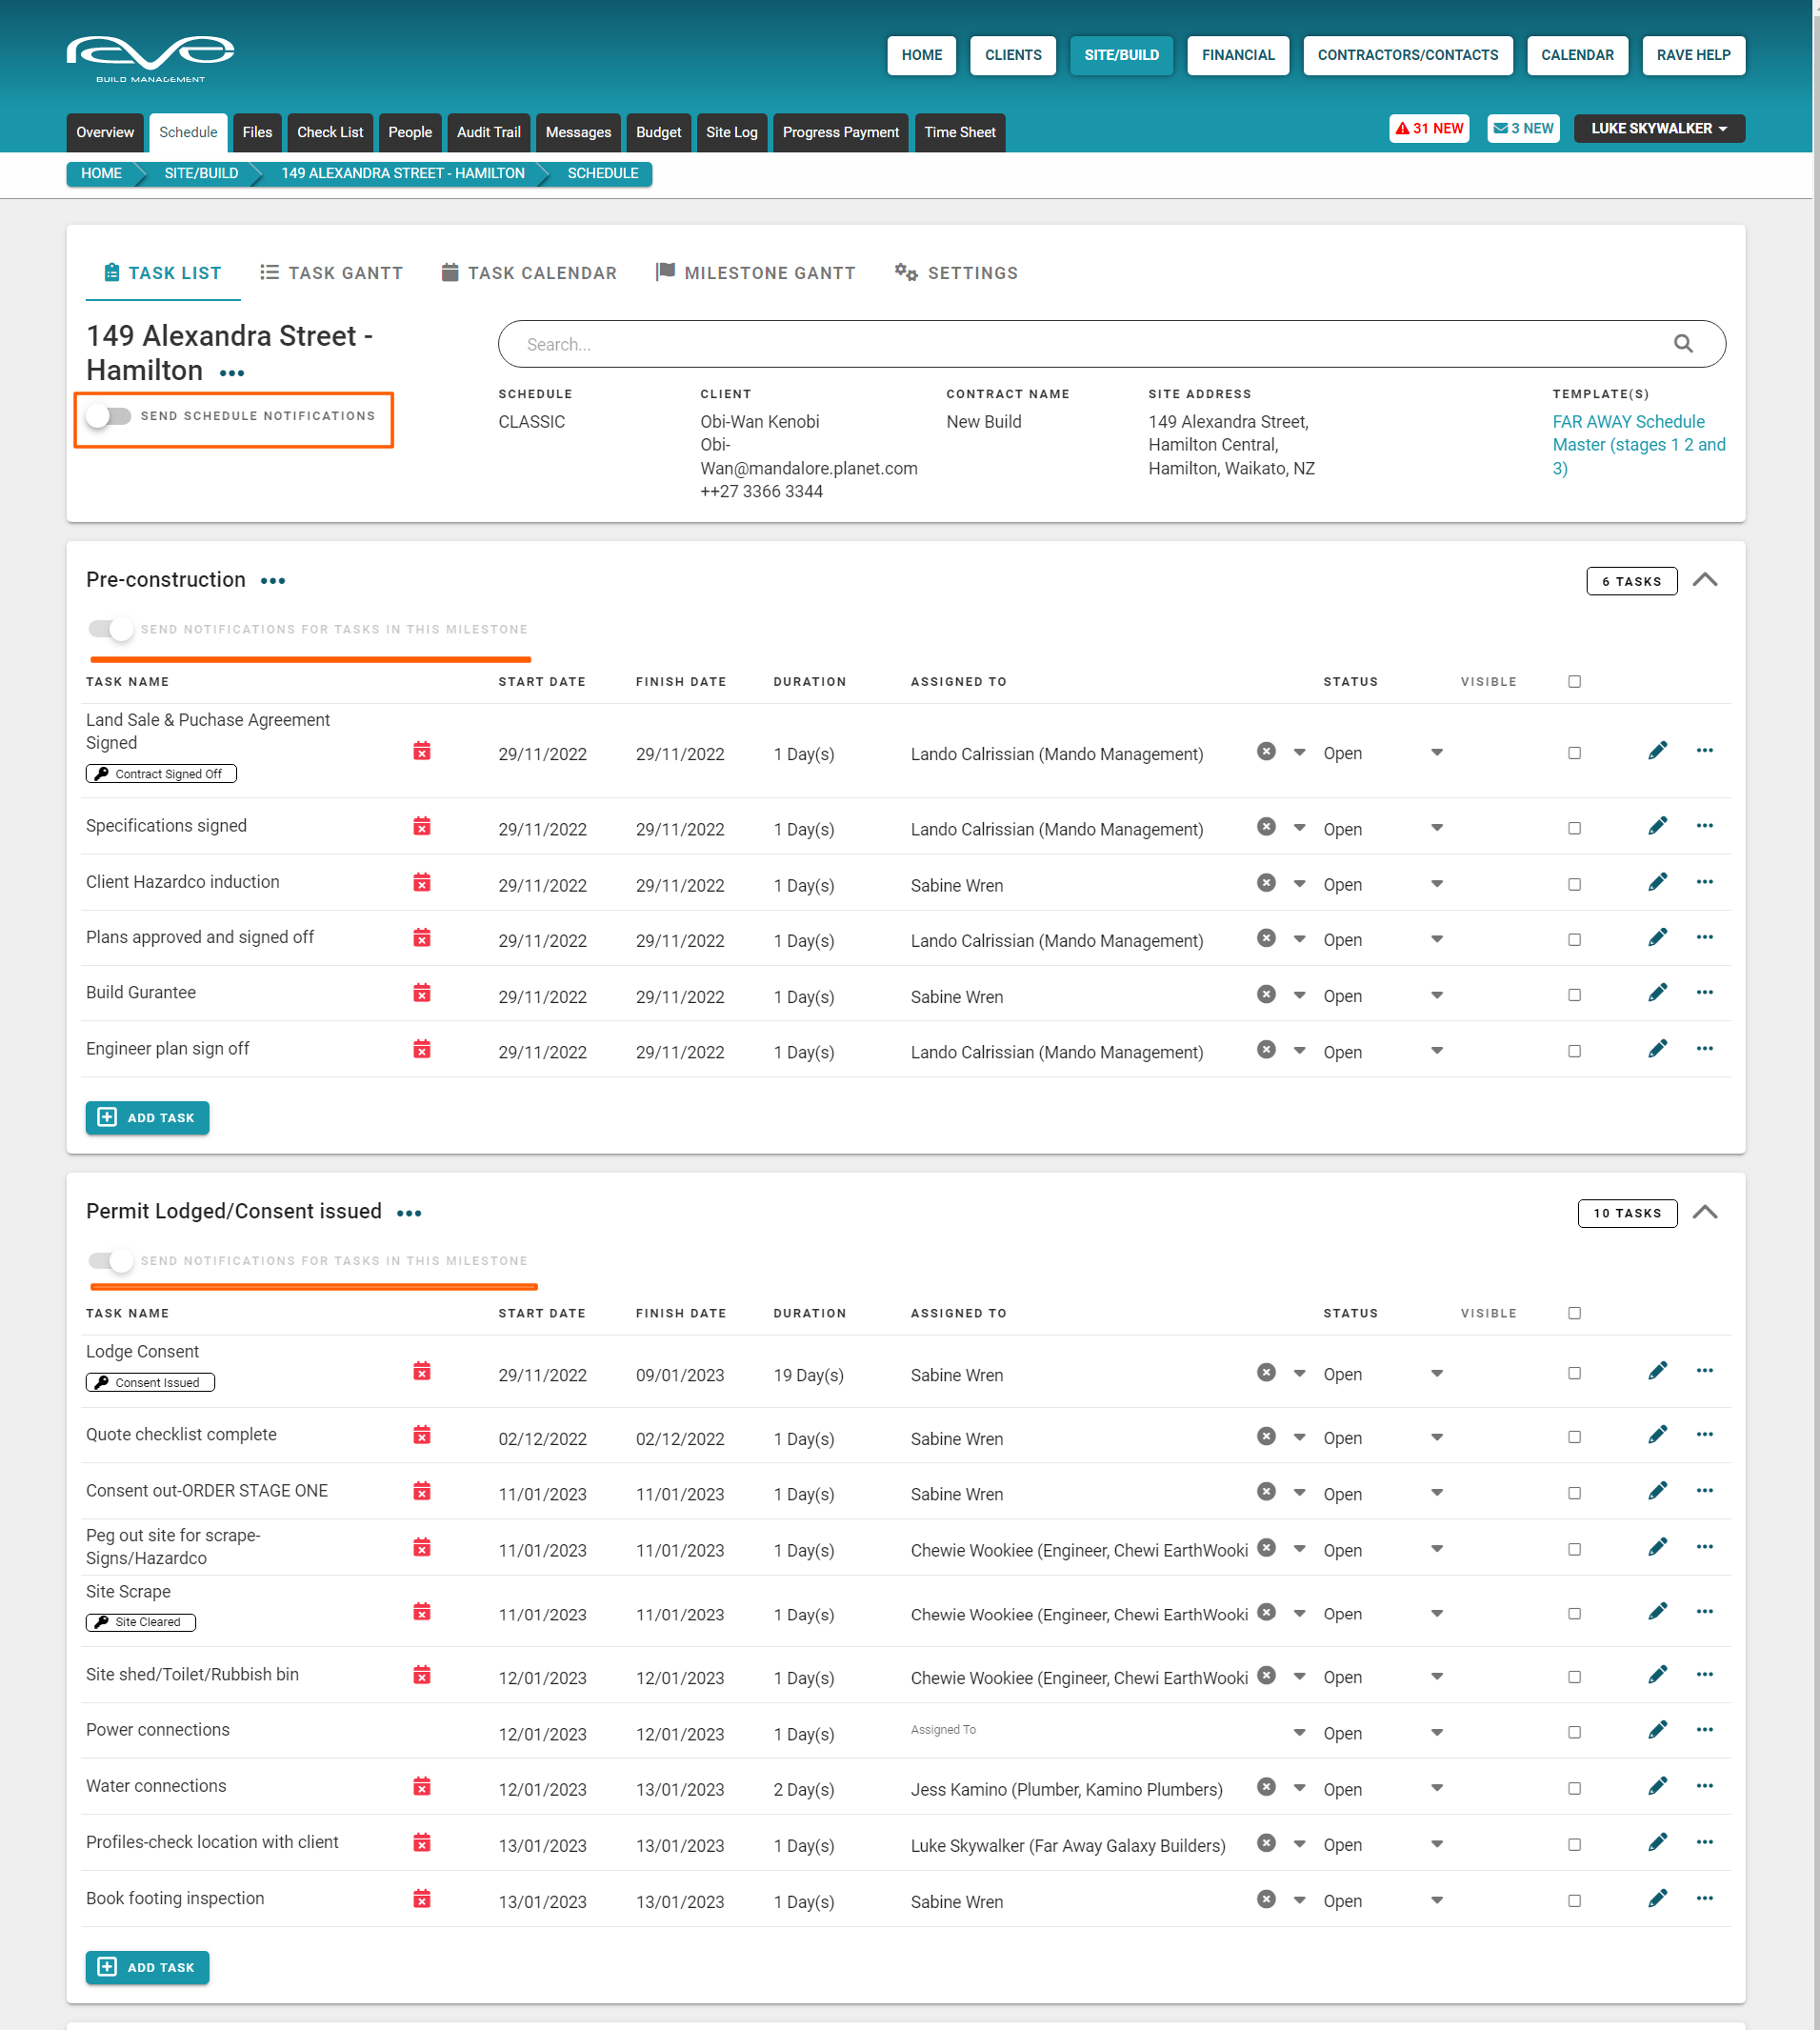
5. Is the task's 'Send Schedule Notification for Tasks in the Milestone' switch turned on?
The next check is that the task’s milestone Send Schedule Notification switch must be turned on. If this task’s milestone switch is not turned on, NO schedule notifications will go out.
NOTE: Even though notifications may not be sent, tasks are still updated in real-time in RAVE, so as long as the job is in an active/maintenance state, and the schedule is activated, contractors will have access to up-to-date start dates for their tasks – regardless of whether they are receiving notifications or not.
Tip: This is quite a handy feature for larger projects with multiple milestones i.e. you may not want your cleaner whose task is still 4 months away, to receive notifications every time you adjust your schedule and their task start date has changed - you can prevent this by turning on notifications for your current milestone, and maybe the next Milestone, so notifications are only going out for the tasks that are due in the next few weeks.
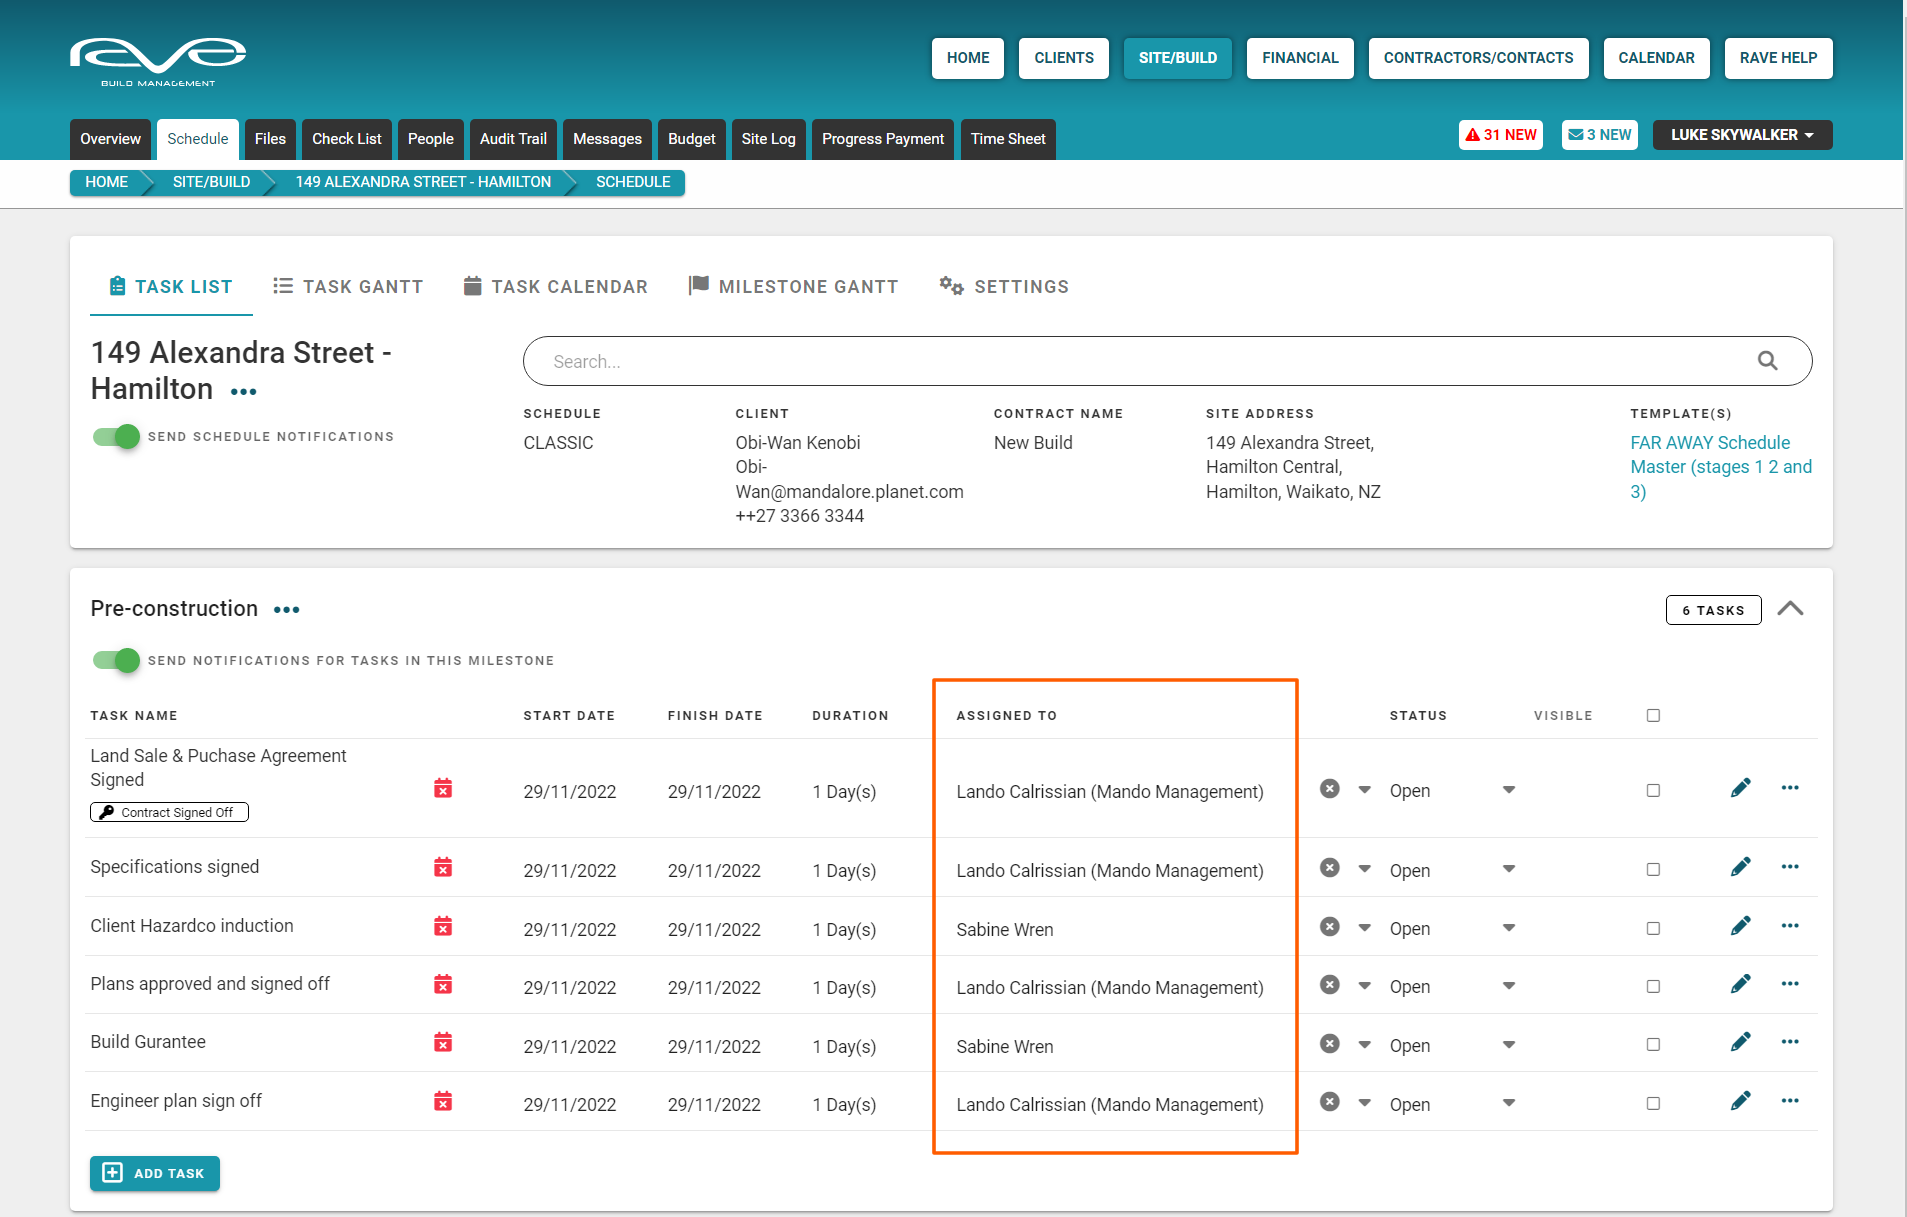
6. Is the Task Assigned to anyone?
The sixth and final check is that the task needs to be assigned to someone i.e. the task must be assigned to someone (a contractor, site staff, staff member, or even the client) for a task change notification to be sent out to them.
So in summary, before any schedule task change notifications are sent out, ALL of the following checks must be in place:
- The ‘Task Update Notifications’ project setting must be turned on
- The project must be in an Active (or Maintenance) State
- The Schedule must be Activated
- The ‘Send Schedule Notifications’ master switch must be turned on
- The task's 'Send Schedule Notification for Tasks in the Milestone' switch must be turned on
- And finally, the task must be assigned to anyone
If any one of these 6 checks are NOT turned on, then no schedule task change notifications will be sent out.
Send an Immediate Schedule Task Change Notification (Classic Scheduling mode)
Your default schedule task change notification setting is likely set to 7am the next day, so if notifications and all the checks above are turned on, any contractors' tasks that have had a start date change, will be notified of this change at 7am the next day. But, in the case of an important and/or urgent schedule task change - you have the option of sending an immediate notification via the Task Details pop-up.
To send an immediate Schedule Task Change Notification:
- From the Task List view, access the Task Details pop-up by clicking on the Task List task pencil
- or from the Task Gantt (task description, or duration block) - This will open up the Task Details pop-up, where you can change the start date as required
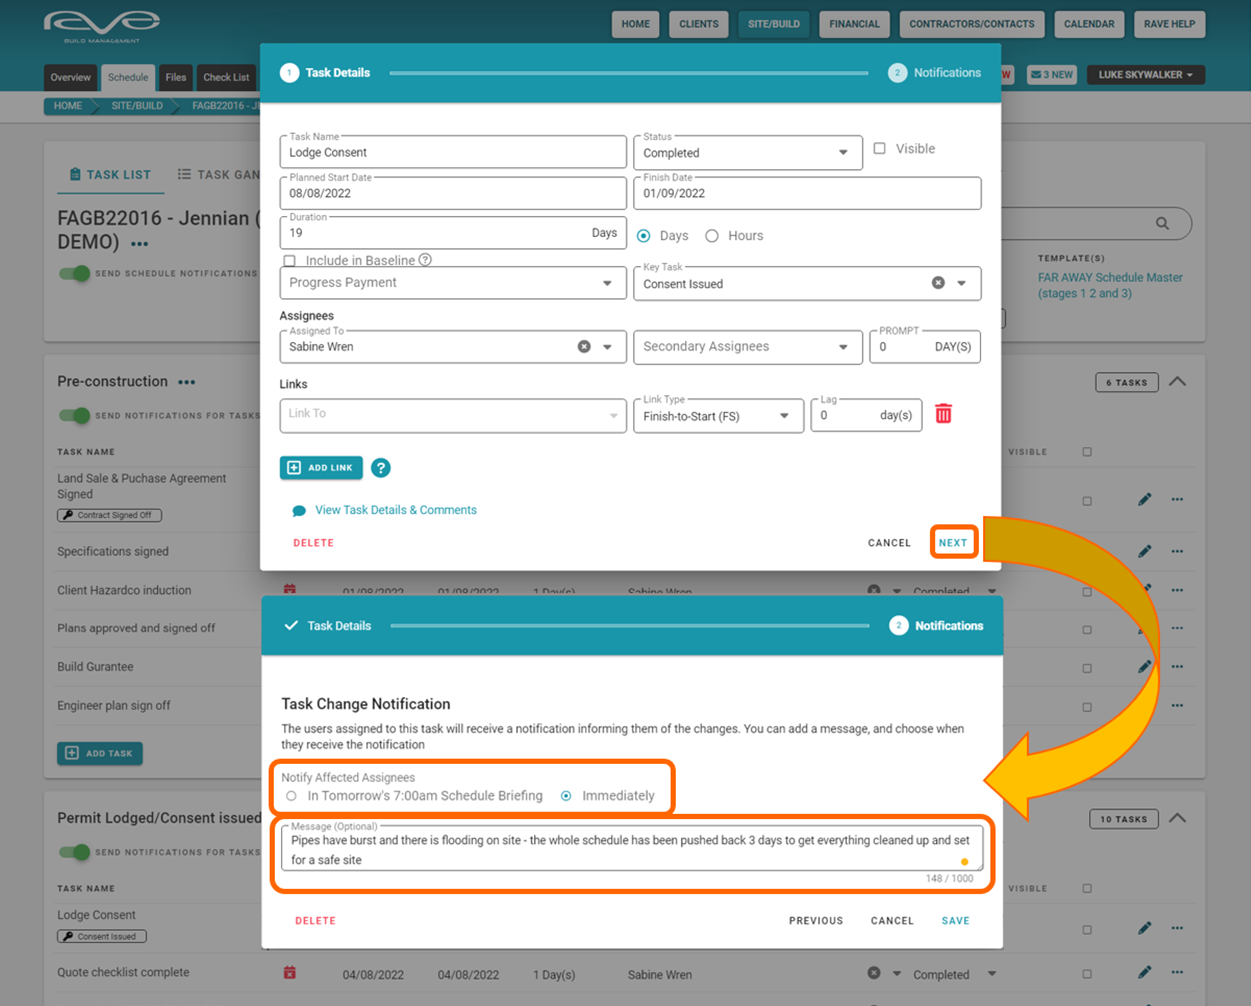
- Then, press the ‘Next’ button (to the bottom right of the pop-up) which will display the 'Task Change Notification' page - with the default of 7 a.m.
- From here just click on the Notify Affected Assignees 'Immediately' option
- You can also add a message/explanation to go along with your notification
- Then click ‘Save’ to push that immediate task change notification out.
Task Communication via the ‘View Task Details & Comments’ tool
The ‘View Task Details & Comments’ tool, allows you to have 2-way communication directly with your task assignees. You can discuss delays, and updates and share photos and documentation. Ideal for when you can't get through to a contractor on the phone, this tool provides the option of immediate notifications to the task assignee(s), and keeps a record of your communications on this task, including any attached photos, documents, and other files - via the project’s Site Log.
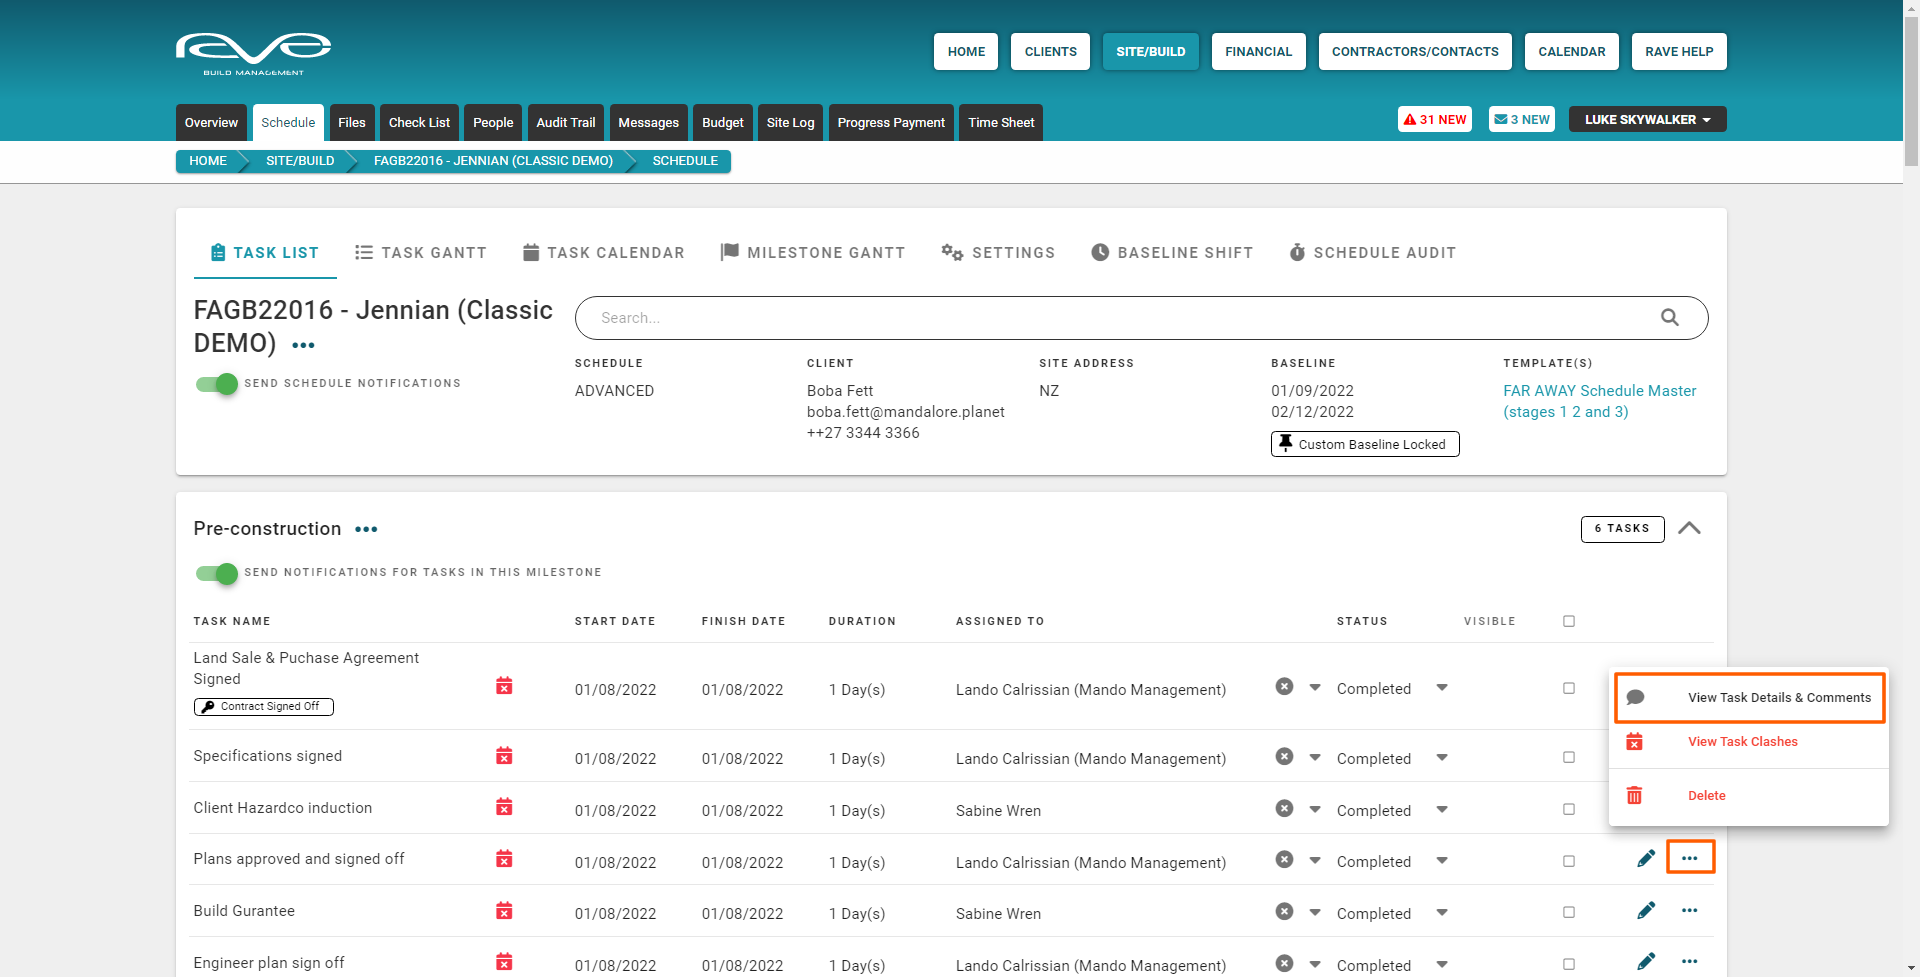
- From a project's Task List view, we access the ‘View Task Details & Comments’ pop-up by clicking on the Task List 3 dot action dropdown to the right of the task, and selecting View Task Details & Comments
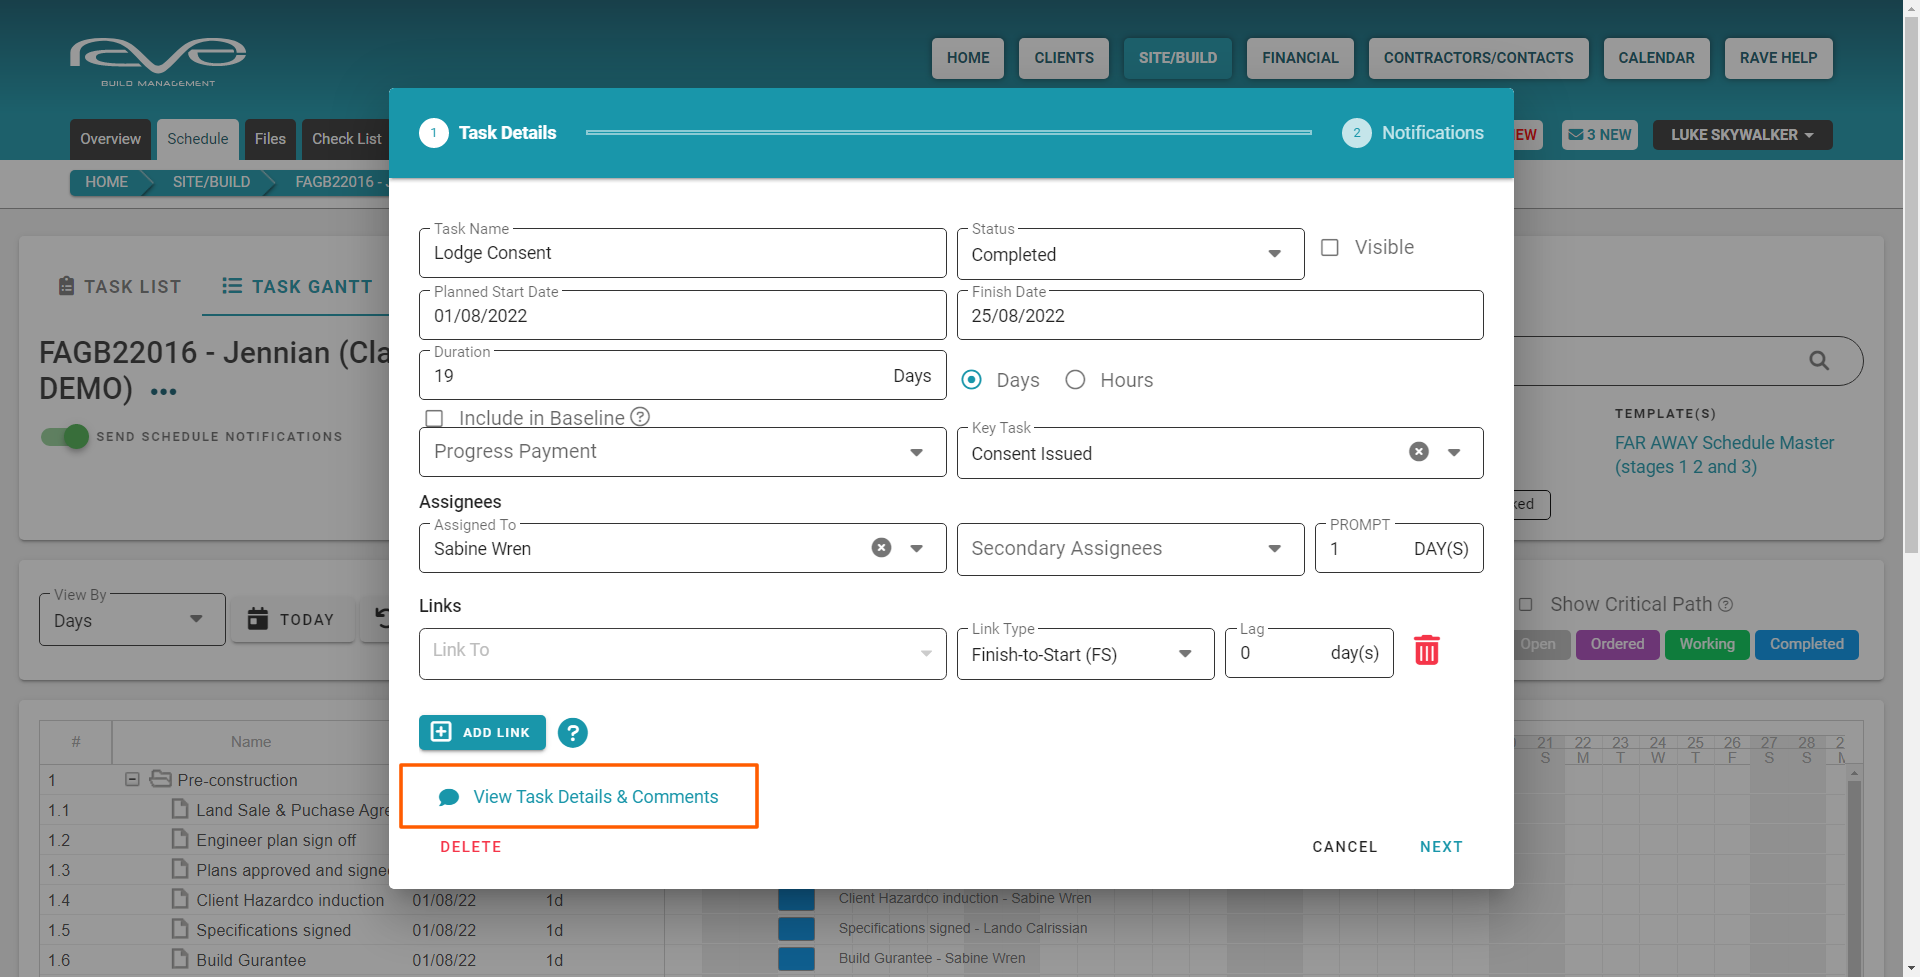
- or from the Task Gantt view via the Task Details pop-up, and selecting ‘View Task Details & Comments’ - Once the Task Details & Comments screen has opened, you can
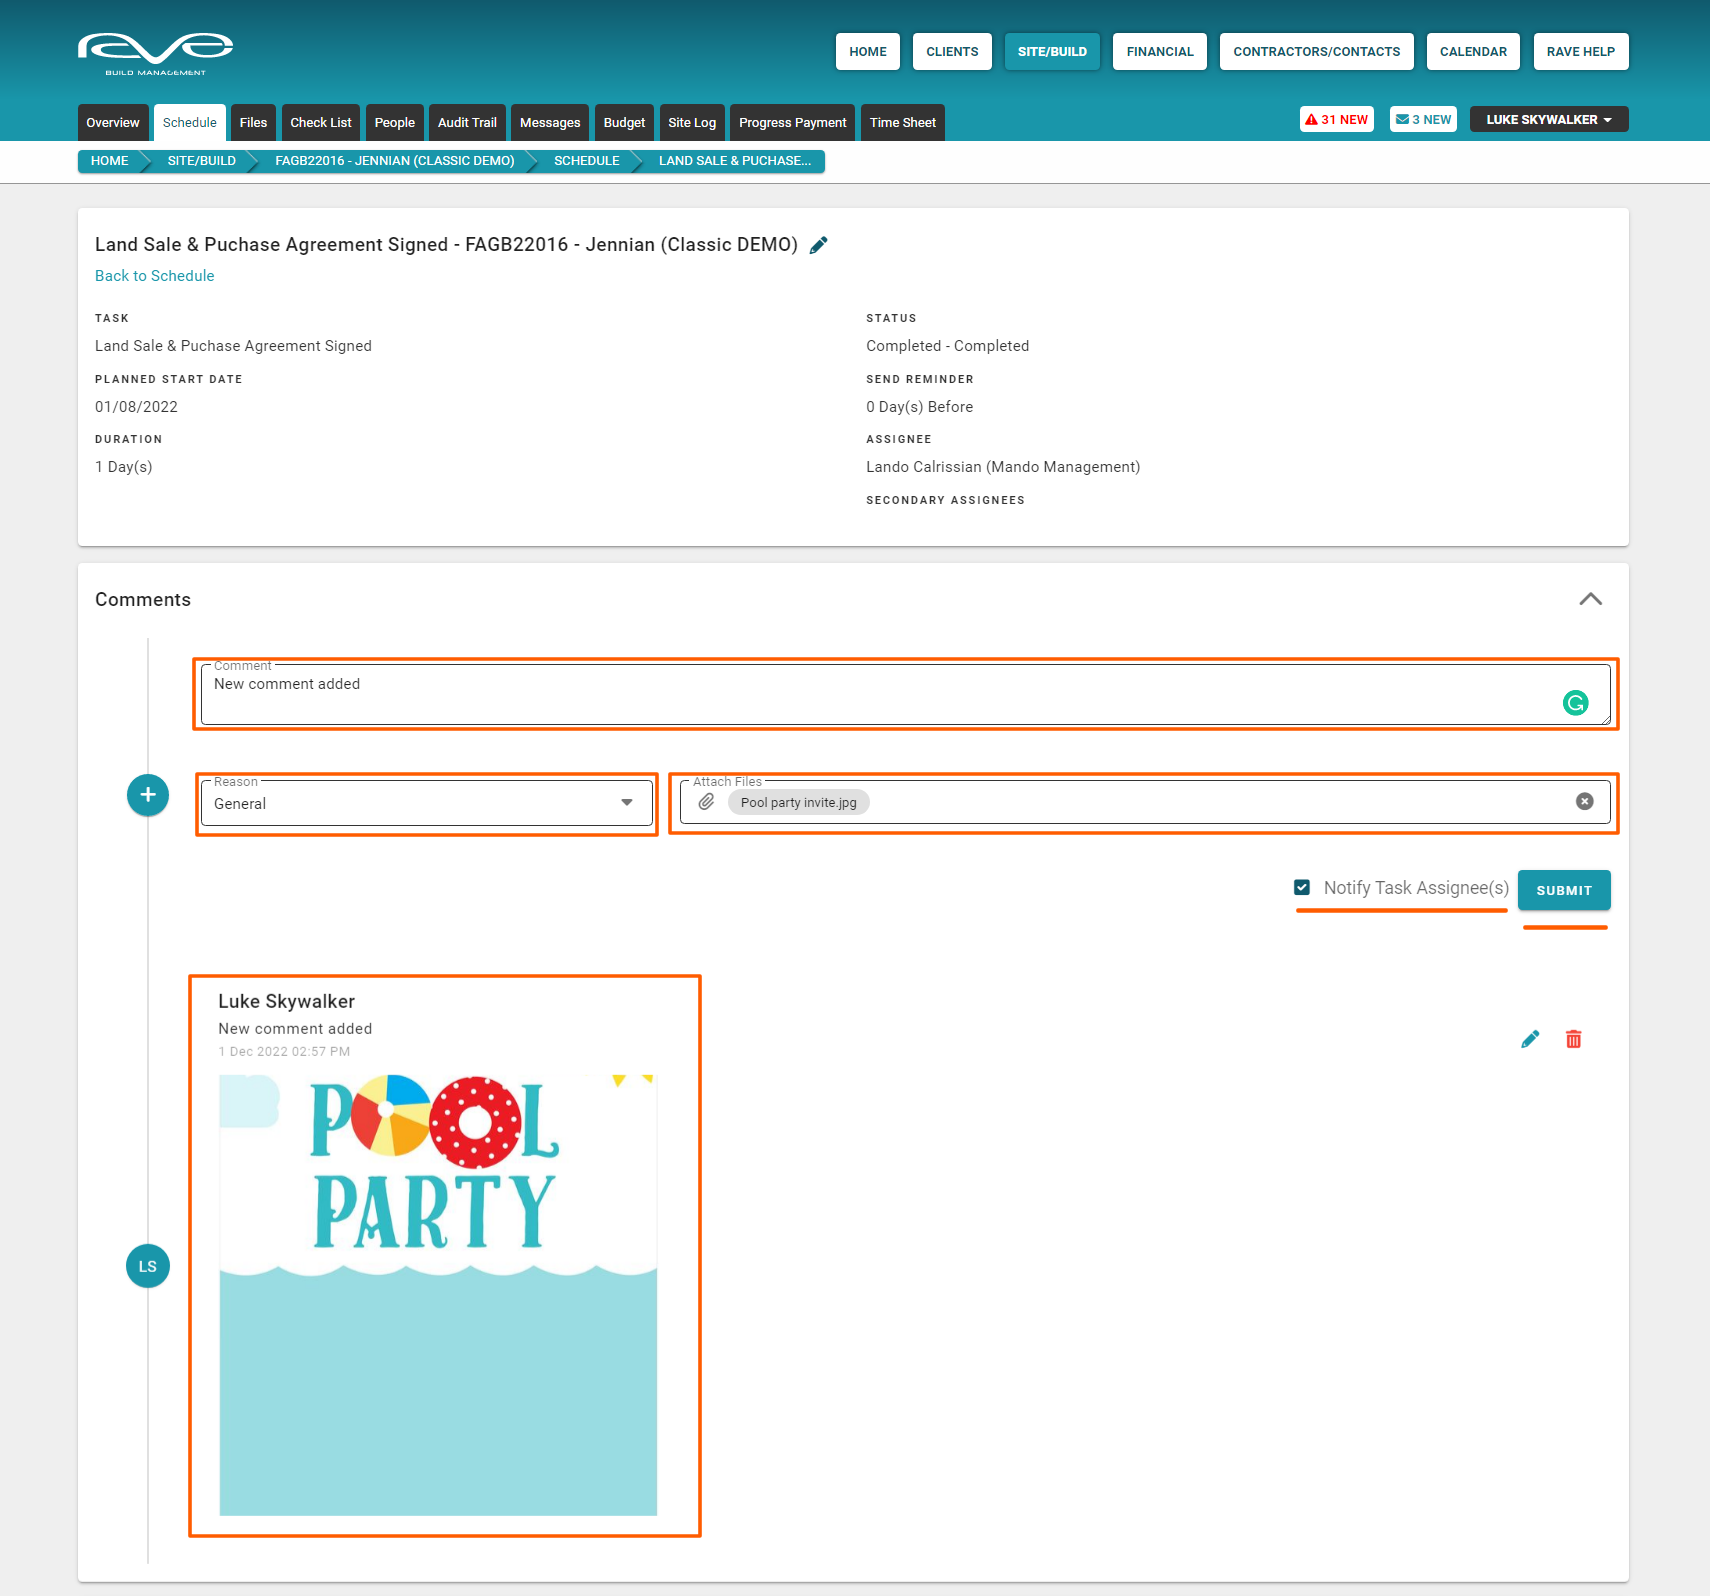
- Add your comment to the Comments section
- Select an appropriate delay reason, if applicable from the Reason dropdown, or leave it as a General comment
- Click in the Attach Files section to attach files i.e. photos, documents, other files and video etc..
- Decide if you want to ‘Notify Task Assignees’ (which is ticked by default) if so, they will receive an immediate alert via RAVE, otherwise no alert will be sent - but the comment will still be visible to all task assignees. - Then click 'Submit' to send
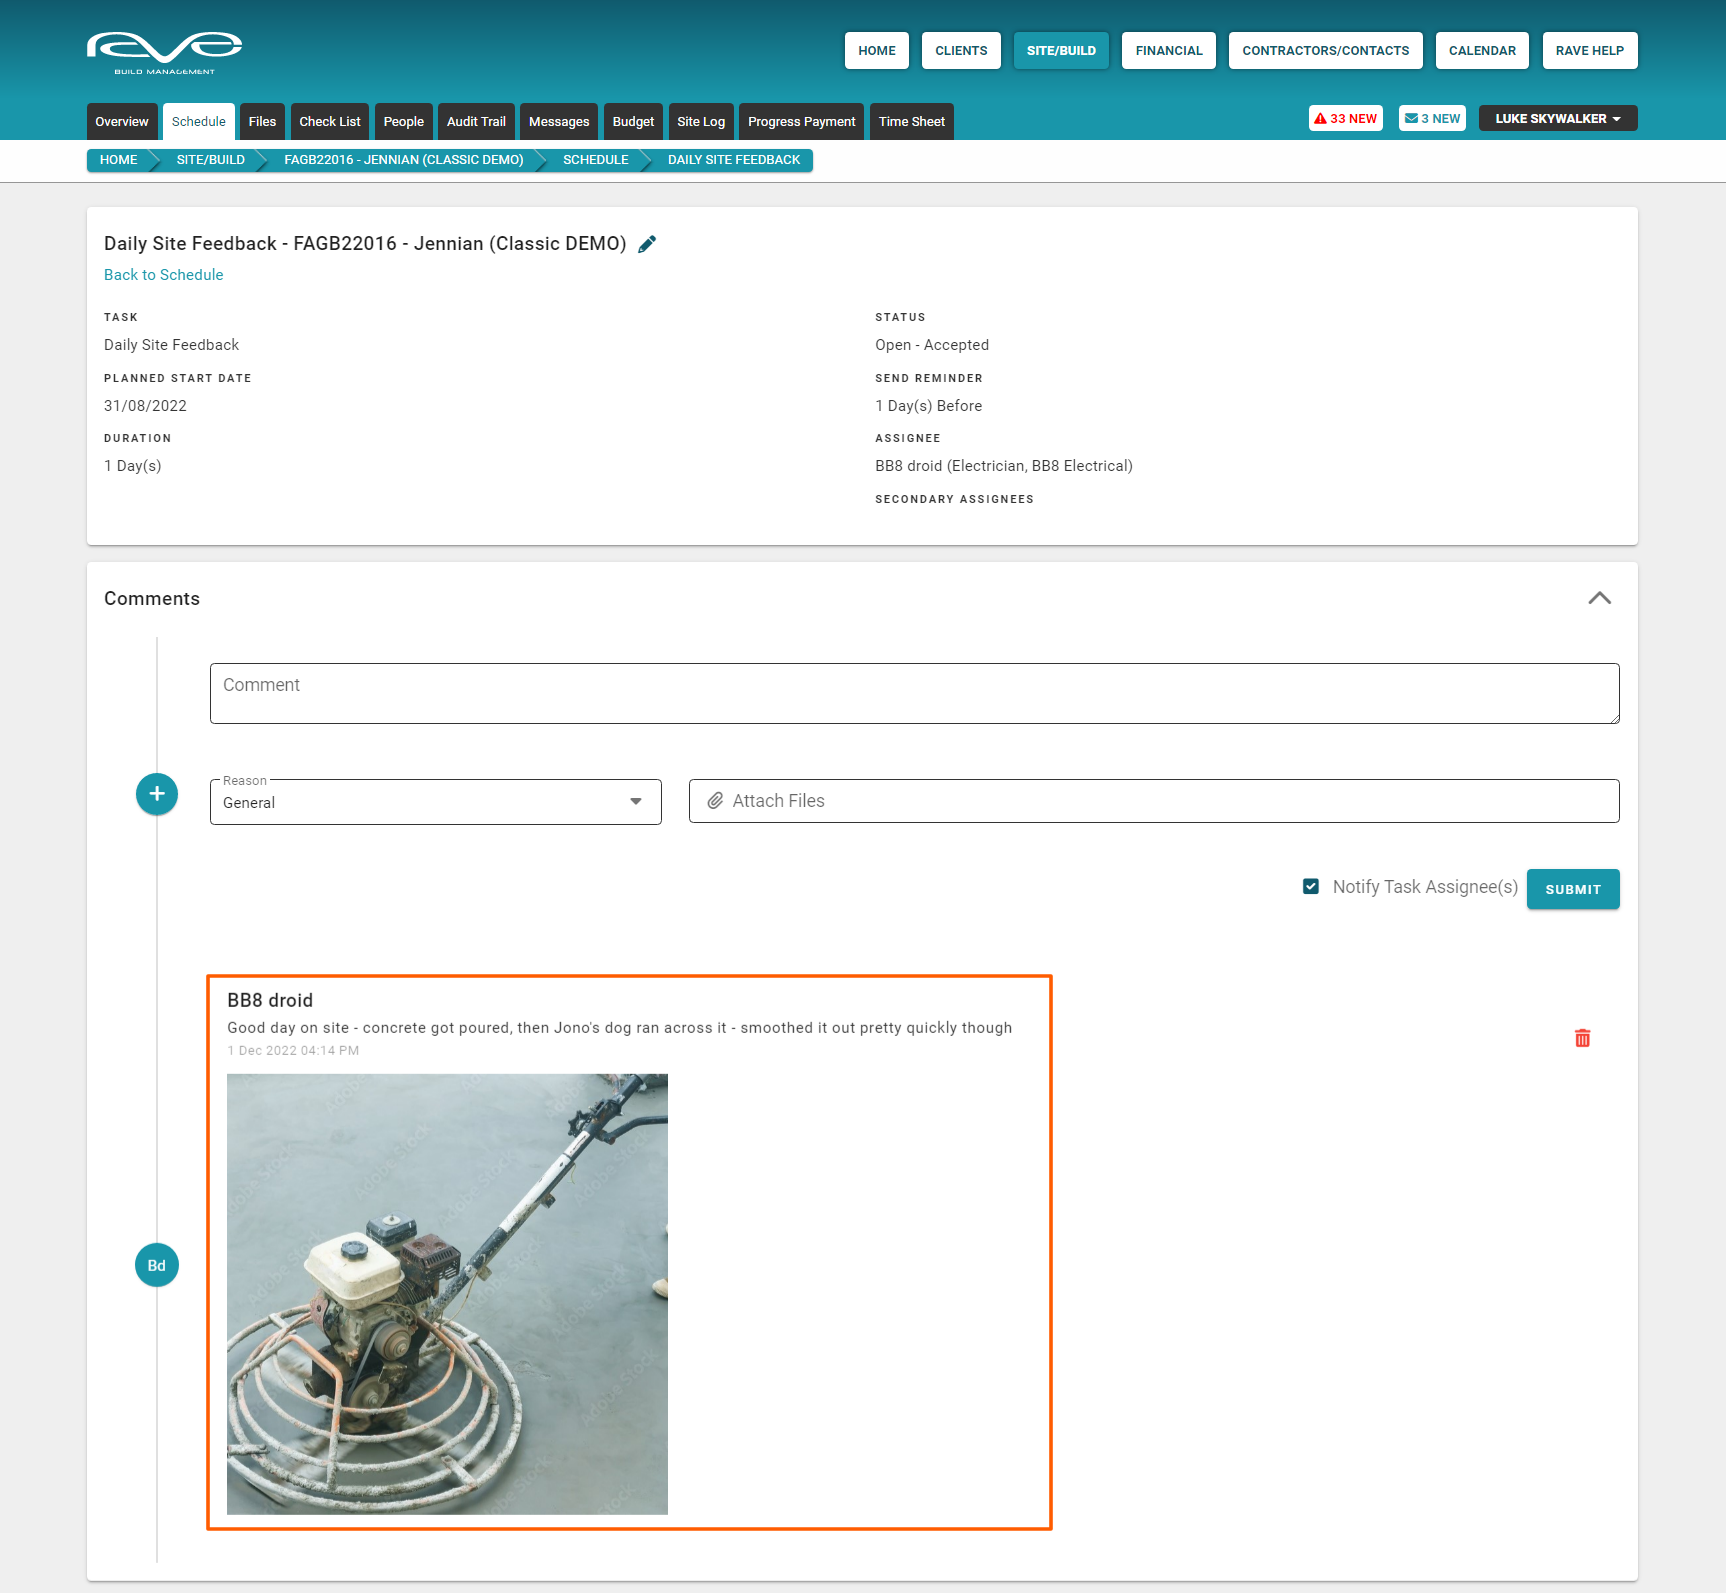
Once submitted, the comment will be saved in the comment history – as per the screenshot below. You then have the ability to edit or delete the comment by clicking on the edit pencil or trashcan icons to the right of the entry.
If the ‘Notify Task Assignees’ check box was ticked, the contractor would receive an immediate alert from RAVE that there is a new comment added to their assigned task – they also have the opportunity to comment (send a response back to the project manager and all other task assignees) also with the option of adding any photo’s or documentation too.
Site Log – a record of all Task Comments
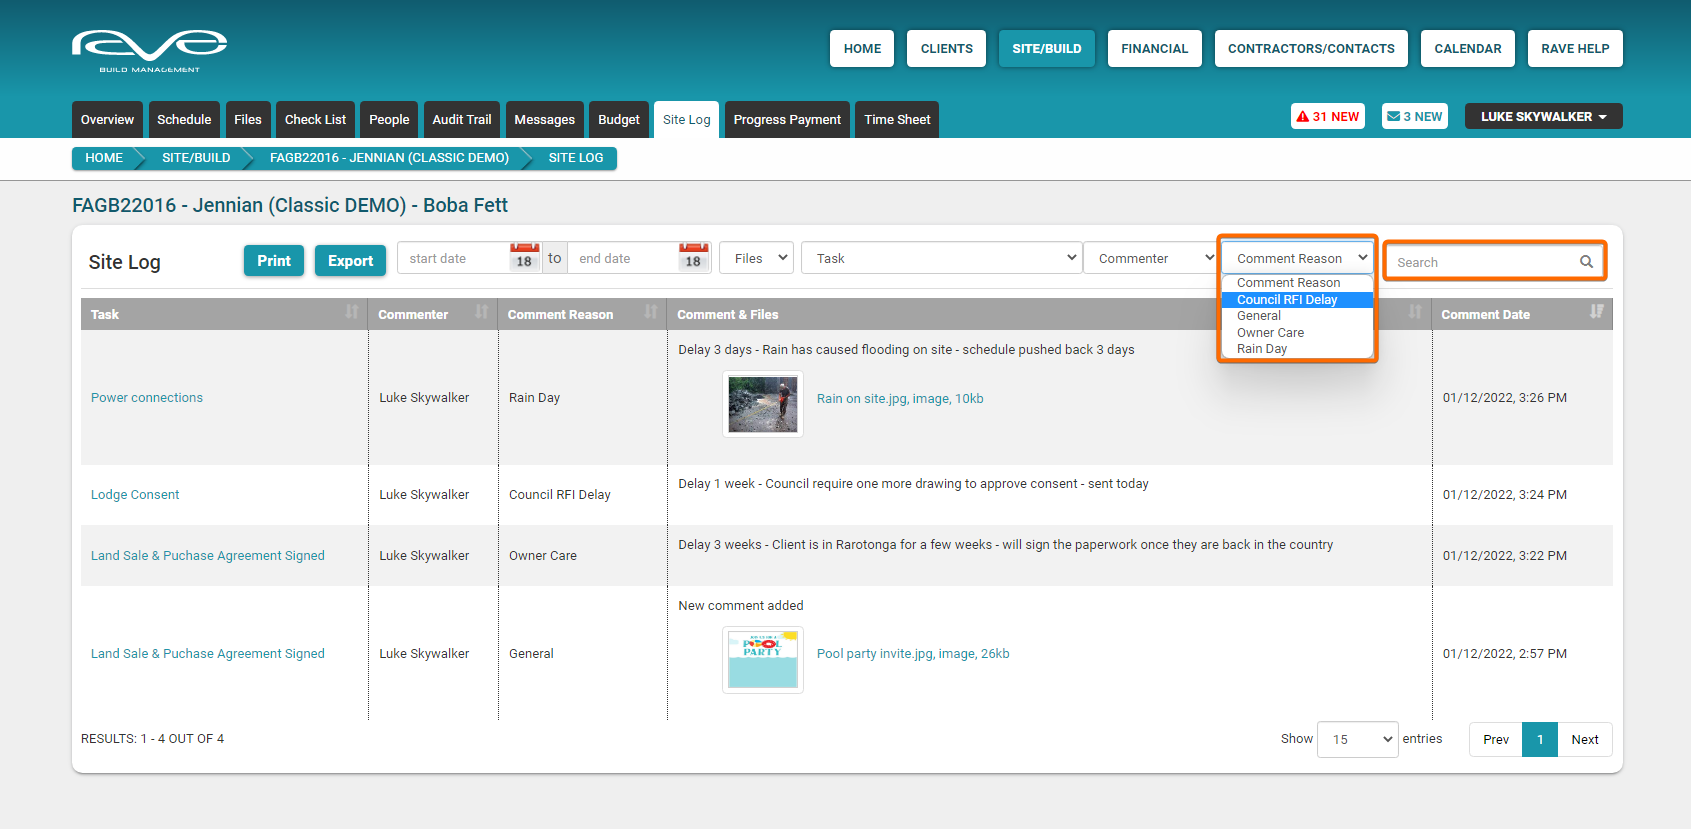
All task comments are also recorded in the project’s ‘Site Log’ sub-tab – allowing you to quickly scan all of the comments, photos and documents added to tasks in your project. Plus some handy filtering tools, and a search field, to quickly find delays across your jobt. As per the screenshot below – the table displaying these includes:
- The Task description – a clickable link back to the task in the schedule
- The Commentor – who made the comment
- Comment Reason – either General, or one of the delay reasons
- Comment & Files – the actual comment record, and any attachments
- Comment Date – allowing you to search by a date range
- The Comment Reason filter – allows you to identify specific delay types
- And the Search field – allows you to search by key words
Tip: Create a Daily Site log and keep up-to-date - when you're NOT on site
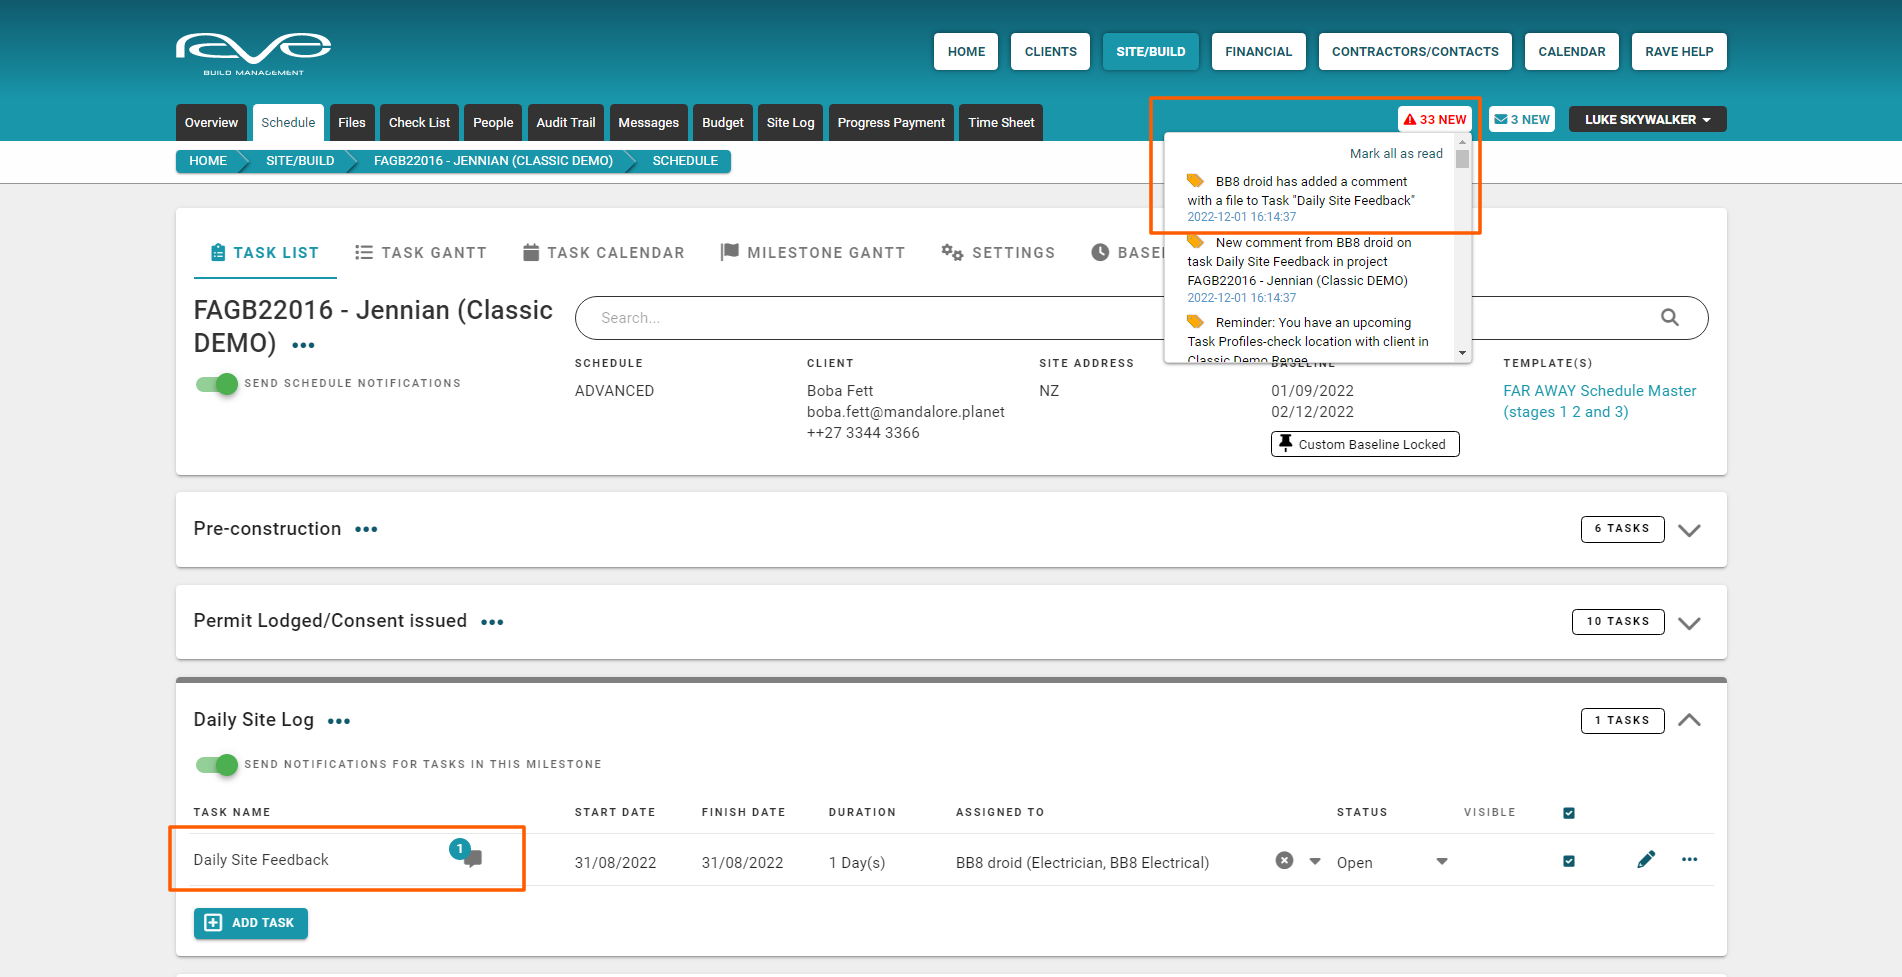
A ‘Daily Site Log’ task + the ‘View Task Details & Comments’ tool is a great way for your site manager, foreman, or lead contractor to keep you informed on how your project is going - on the days when you are not on site.
To create a ‘Daily Site Log’ task:
- Firstly create a new ‘Daily Site Log’ milestone via the ‘Add Milestone’ option of the schedule's 3 dot action dropdown (next to the job number)
- Add a task named ‘Daily Site Feedback’ and assign it to your site manager, foreman, or lead contractor
- Click 'Save' to create the task
And that’s it! You can now catch up with your site manager, show them the ‘daily site log’ task you’ve assigned to them in your schedule, and let them know that you’d like them to add a comment (and photo(s) if appropriate) via our free to download RAVEBUILD app, at the end of each day to let you know what has happened on site.
Any comments other task assignees add are alerted to the project manager and other task assignees immediately. Your site foreman will also receive an immediate alert whenever you reply back them.