RAVE’s Site/Build button allows you to view all of the projects you have been given access to by your building companies, and access all of their job details, and files etc.
This contractor and supplier training takes you through the various sections of RAVE's Site/Build screevia RAVE's desktop portal - RAVE's FREE to download RAVEBUILD app`has similar functionality, but with a slightly different layout optimised for smaller smartphone screens.
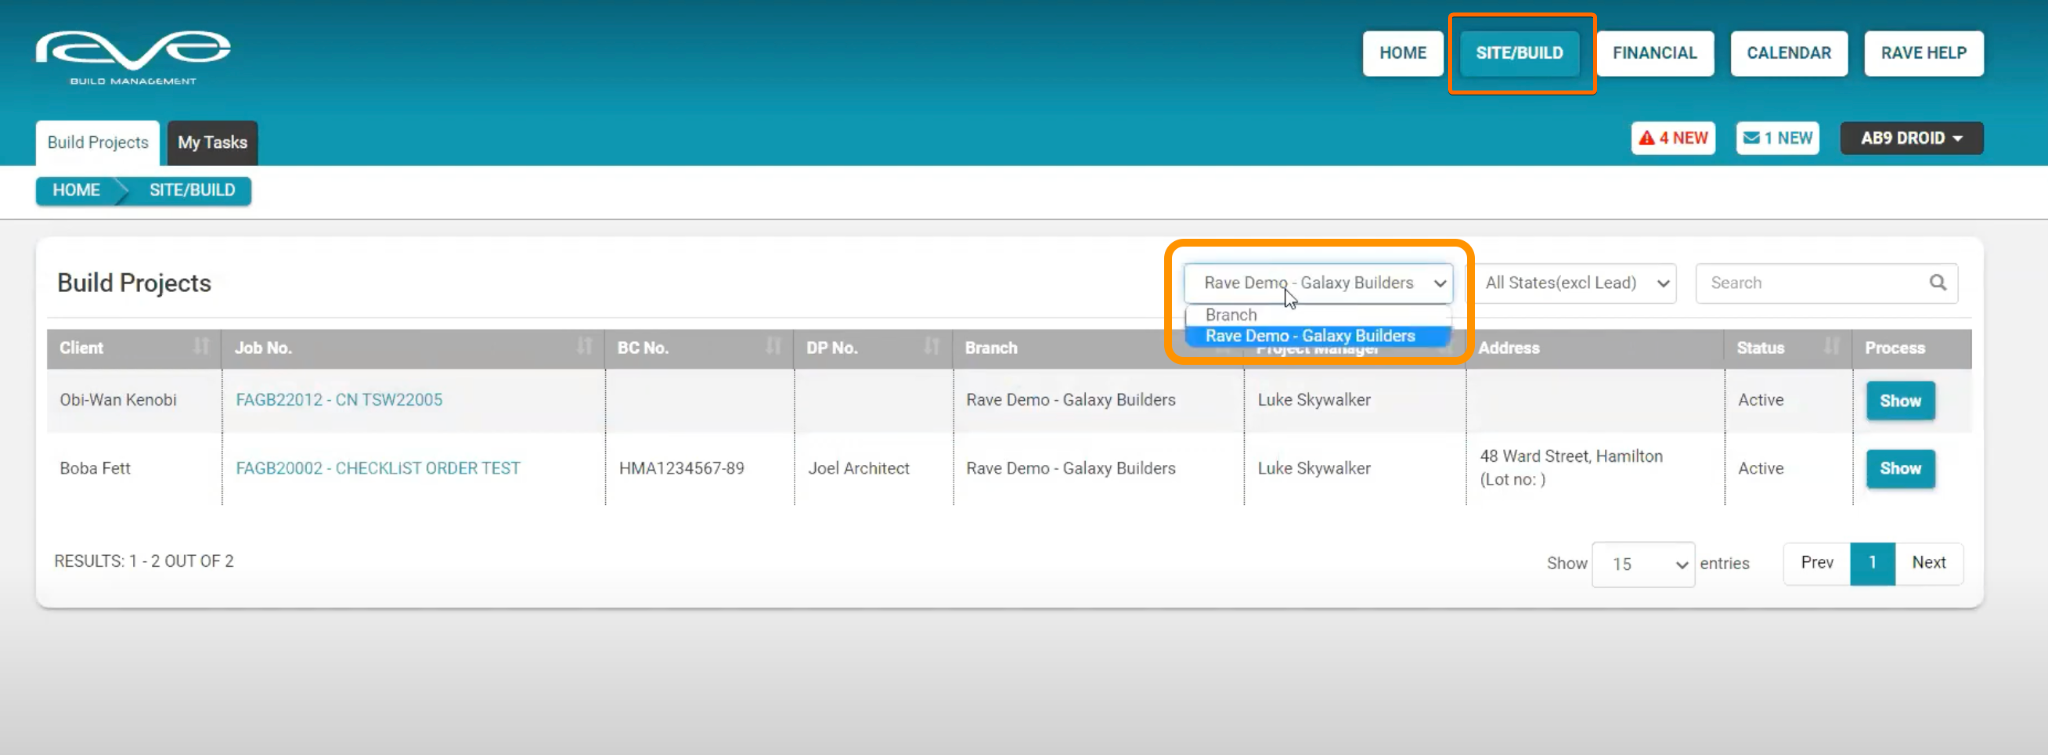
Filter by Branch
If you have a very large list of projects from multiple building companies, you can filter these via the Branch drop down filter.
Filter by Task Status
You can also filter your projects via their project status.
- An active state means that the project is underway, or the branch is wanting to communicate information with you.
- The maintenance state means that the keys have been handed over to your building companies client.
- The lead and pending states generally means that the job is still in the early stages of negotiation, or is not yet ready to be shared - and access to the project at this point is generally for quoting purposes.

Job details
You can open up a specific project by clicking on the job number link, or clicking on ‘Show’ to the right of the project.

This takes you to the Build Overview of the project, providing access to various project sub-tabs.

The Project's Build Overview sub-tab
The overview sub-tab provides you with the project’s basic job information. This includes the building company's name, project job status, project manager details, contractor notes, site address, building consent details, and more.

To the top left, you can see the project schedule as a pie chart, as the job moves through to completion, a little blue wedge will open up and slowly expand to show real-time progress through to completion.

Scrolling down, you can see the project images which displays any uploaded site photos. The project map is also displayed based on the site address details loaded.

The Project's Schedule sub tab
Once the schedule is live, you will have access to view your assigned task, and may also have access to the full schedule of tasks. There are two schedule views - the Task List view displays the schedule tasks in a task list format, while the Task Gantt view displays tasks in the graphical/gantt display format.


Requesting Task Sign Off
Based on your project manager's preferences, you may be able to let your project manager know that you have completed an assigned task, via the Task List view of the schedule. This is done by clicking on the ‘Request Sign Off’ button, to the left of your assigned task. You can also add a short message if required, and send this off by clicking the ‘Confirm’ button.
Once sent, the project manager will receive an immediate alert on their end, that you’ve finished the job, and it is now awaiting their sign-off. The ‘Request sign off’ button will be replaced by an ‘Awaiting Sign Off’ icon.


Project Manager Task Sign-off
Once the project manager is satisfied that the task has been completed to their standard, they will sign off your task, by marking the task as complete. They also have an opportunity to add a comment to the task. Once done, you as the task assignee will receive an immediate alert to let you know that the task has been signed off. The ‘Awaiting Sign Off’ flag will be replaced by a ‘Task Completed’ icon.

Communicating with the Project Manager in real-time
You have the ability to communicate with a project’s project manager in real time via any of your assigned tasks in the construction schedule.
For instance, you've come to do the electrical prewire, but there's a whole lot of leaky pipes on site, and you can’t safely do any electrical work in that state. So, you can inform the project manager of the issue and any potential delays via the task messaging.
To send a new message, you first open up the task by clicking on the ‘Task Description’ (to the left of the page) or the ‘i Details’ link (to the right of the page). From here you can add a comment, and attach a file (image, document, video file etc) if you wish - clicking ‘Submit’ to send it through. Once sent, the project manager will receive an immediate alert on their end, that they’ve a new comment or photo against a task.
Likewise, the project manager may respond back to your comment, and/or adds their own comment, or file to the task, you’ll receive an immediate alert notification on your end. Clicking on this alert will take you back to the Task’s Comments section of that task for review.


The Files sub tab
The project files and documentation that your building company has loaded for you are available in the project’s ‘Files’ sub-tab. There are a number of folders that you have access to, a few of which you can upload your own files and documentation to.
The Plans and Specs folder generally contains the project’s plans and other key project documentation.
NOTE: The latest version of any file may be highlighted by an asterix to the left of the file name, and a ‘Yes’ under the latest version column to the right.
 The
The
The Images folder contains important site images loaded by the building company. These also copy over to the Build Overview Project Images section, nestled between the project details and project’s map section of that page.

The Plan Variations folder generally contains variations to the plans – if not already loaded in the Plans and Specs folder as a ‘latest version’ document.
The Other folder generally contains any other useful documentation as loaded by the building company.

Submitting Quotes via the Tender Folder
You can submit quotes via the Tender folder. Any documents that you load here are only viewable by your business, the building company's staff, and the site manager.
You add documents here, by clicking on the cloud icon. This will open up your device's file browser, allowing you to select the relevant file(s) to load.
You also have your own Company folder that you can load files and documents into - be it a quote, photos, sign-off certificate(s), or any other types of documentation you need to add.

The Task Files/Photos folder contains all of the files and photos that have been added against any of your assigned tasks in the project’s schedule.

The Messages sub-tab
If you have been sent any messages through RAVE then you will receive these via the mail icon, next to your dropdown profile. Any task alerts will be displayed next to the mail icon.

Clicking on the mail icon will display any new messages. Clicking on a specific message alert will take you to that message, in that project’s messages sub-tab.

Filtering your messages
Clicking on the project’s messages sub-tab, will default to displaying ALL Messages received for this project. You can filter the messages by clicking on the dropdown filter:
- All Messages will display both sent and received messages
- Sent will display all of the messages you’ve sent for this project
- Received will display all of the messages you’ve received for this project

Sending a new message
To send a new message, click on the ‘New Message’ button

The next screen let’s you compose your message, and acts very much like sending a normal email – you can:
- Choose your recipient’s, the project manager or office staff, via the ‘To:’ drop down
- Add a subject line and any attachments i.e. Tender submission
- Add your message copy in to the body section and format it
- Add a Category if required – though this is generally left as ‘None’
Once all of the required fields are completed, you can decide if you want RAVE to send this to your recipients as an external email as well, and then click send.
NOTE: All of these are required fields, meaning that these need to be completed otherwise the message can not be sent i.e. the ‘Send’ button will be grayed out until all fields are completed. and the And once completed, click ‘Send’.


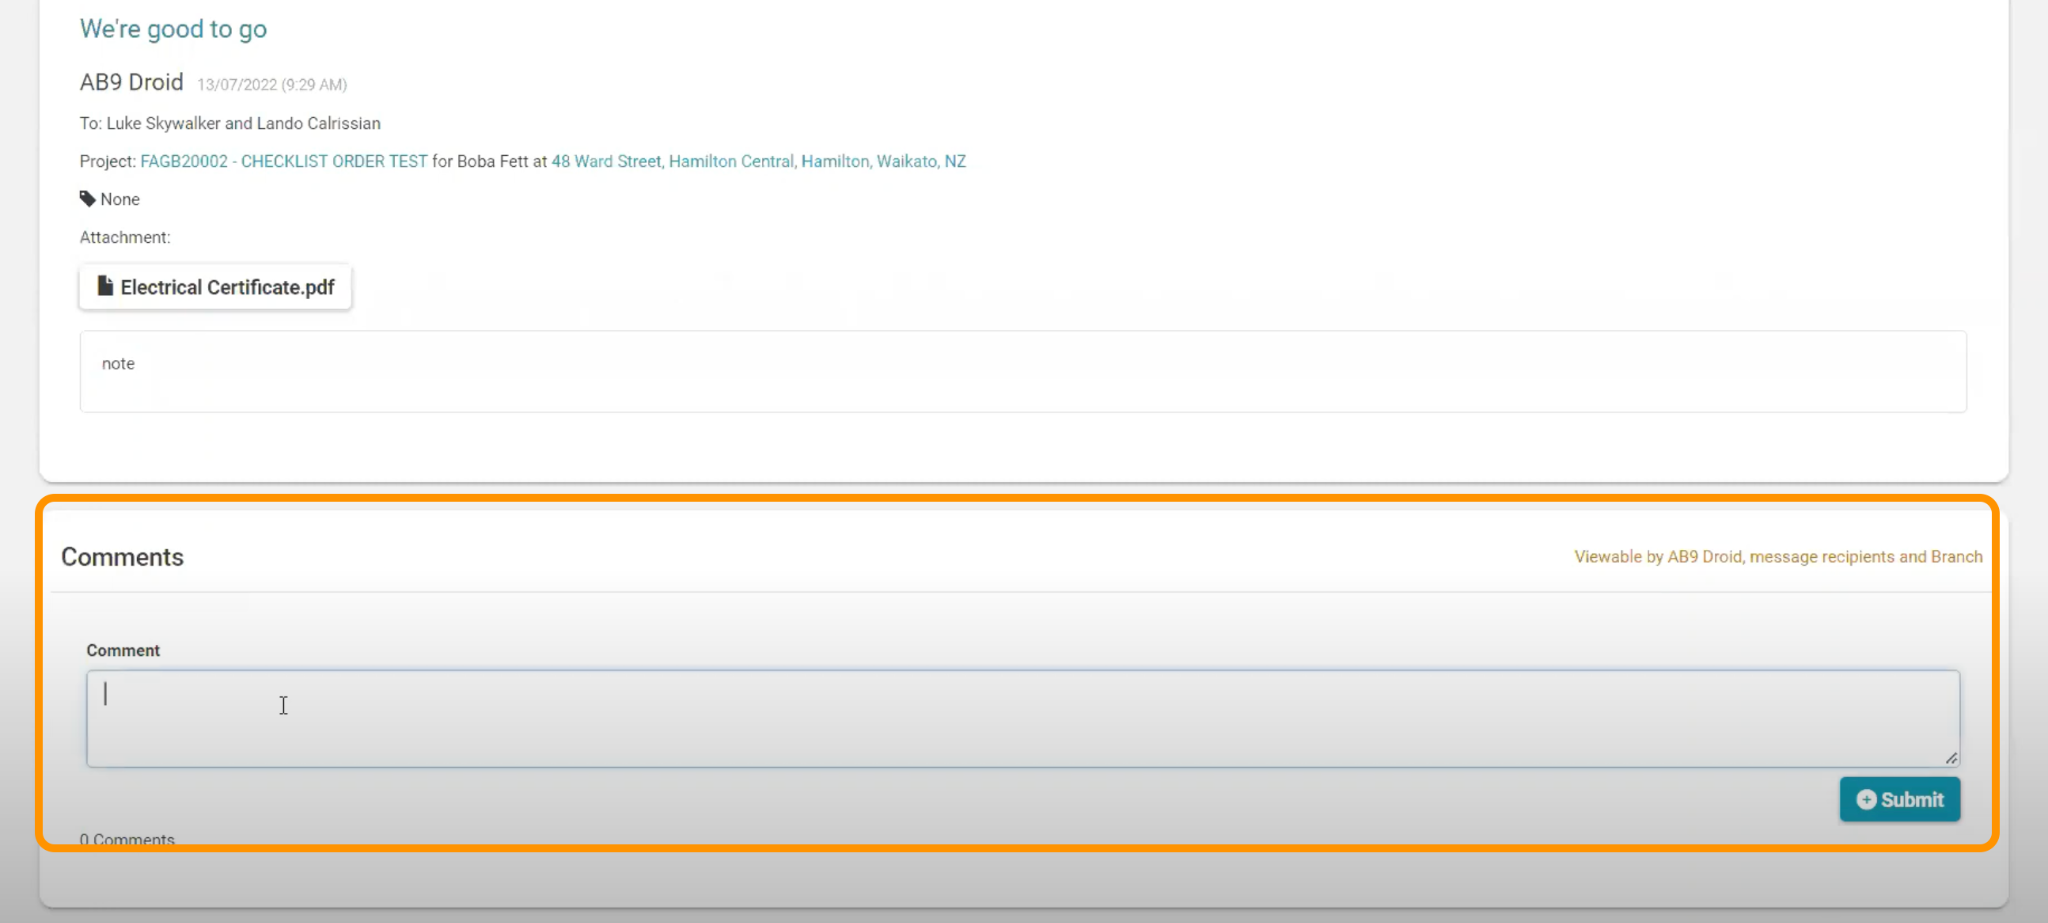
Replying to a received Message
You can respond to received messages by opening the received message, adding your reply in the ‘Comments’, before clicking ‘Submit’ to send.
The Site|Build / My Tasks sub-tab
The Site|Build / My Tasks sub-tab gives you the ability to display your assigned tasks across ALL of your build projects either via a Task List or Task Gantt view.
My Tasks – Task List View
By default the Site|Build / My Tasks sub-tab will open to the Task List view, listing all Schedule Tasks not yet completed in a start date order i.e. in order of the latest start date first, then working backward down the page.
This Schedule Tasks list displays, for each assigned task, the:
- Task description
- Status – Request Sign off / Awaiting sign off
- Branch – being the building company
- Project (job number)
- Site address
- The task’s Start and End dates
To the right is a view button, which opens the task, to access the task comments and any files loaded. This page also has some handy filters:
- The Scope filter allows you select all tasks, upcoming tasks only, upcoming tasks in the next 7 or 14 days. RAVE also allows you to create your own date range.
- The Branch filter allows you to view assigned tasks from a selected number of branches.
You also have the ability to search for a specific task via the Search field. And the ability to Print or Export (as a CSV file) your list as required.

My Tasks – Task Gantt View
The My Tasks – Task Gantt view, shows you assigned tasks in a graphical gantt display. By default the Task Gantt view shows future tasks from today’s date onwards, though you can use the calendar filter to select a specific date range. Other available filters include
- Task Status – Open, Ordered, Working
- Task External Status – Accepted, Assigned, Awaiting Sign Off, Completed and Rejected
- Branches – again allowing you filter assigned tasks from a selected number of branches
The View By dropdown, gives you the ability to zoom the task gantt scale in and out.
The Today button repositions the gantt to display today’s date (if it’s within the selected date range)
The Task Status is colour coded – as per the top right of the screen
- Open (grey) meaning the task hasn't started yet
- Ordered (purple) meaning we are awaiting materials to arrive before the task can start
- Working (green) meaning that the task has started but is not yet complete
- Completed (blue) meaning that the task has been completed to the project managers satisfaction
If there are a number of tasks displayed and/or the date range is wide enough – you have the ability to scroll the gantt chart sideways, and up and down.
The gantt chart is able to be printed via the print icon - this is to the top left of the page, following the Schedule Task Gantt header.

Printing the Task Gantt view
You have the ability to print your My Task Gantt Chart on to a single page (A4, A3, A2 etc) or across multiple pages – though this is heavily printer dependent i.e. the ability to print to one page, or multiple pages as a tile/mosaic/poster print option (x pages wide by y pages high).
Steps to print your My Tasks Task Gantt
- Click on the printer icon to the top left of the page
- On the Print Schedule Gantt Chart pop-up
- Select the view by timeframe (hours, days, weeks, fortnight, months, years)
- Set the date range of the gantt chart to be printed - by clicking on the date range (defaults to today) and click the start date and click again for the end date
- Decide whether you want to include non-work days in the print out (weekends and non work block out periods)
- Click print
- This will create a webpage of the task gantt view, now right click to ‘Save image as…’
- Give the .png image a file name i.e. My Task Gant and save this png file
- Open up the saved PNG file, and click on your print icon
From here you will be able to print to whatever paper size, and scale you want i.e. fit to a page or your own scale option. If your printer supports ’tile’ / ‘mosaic’ / ‘poster’ printing, you can blow the Gantt chart up over 2 or more pages, allowing you print an enlarged version of your gantt timelines.
NOTE: If you require a PDF copy of your gantt chart, after step 5 above, select the 'Print to PDF' option instead of an actual printer, this will prompt you to select a file name and saving location for a PDF version of your gantt chart.
