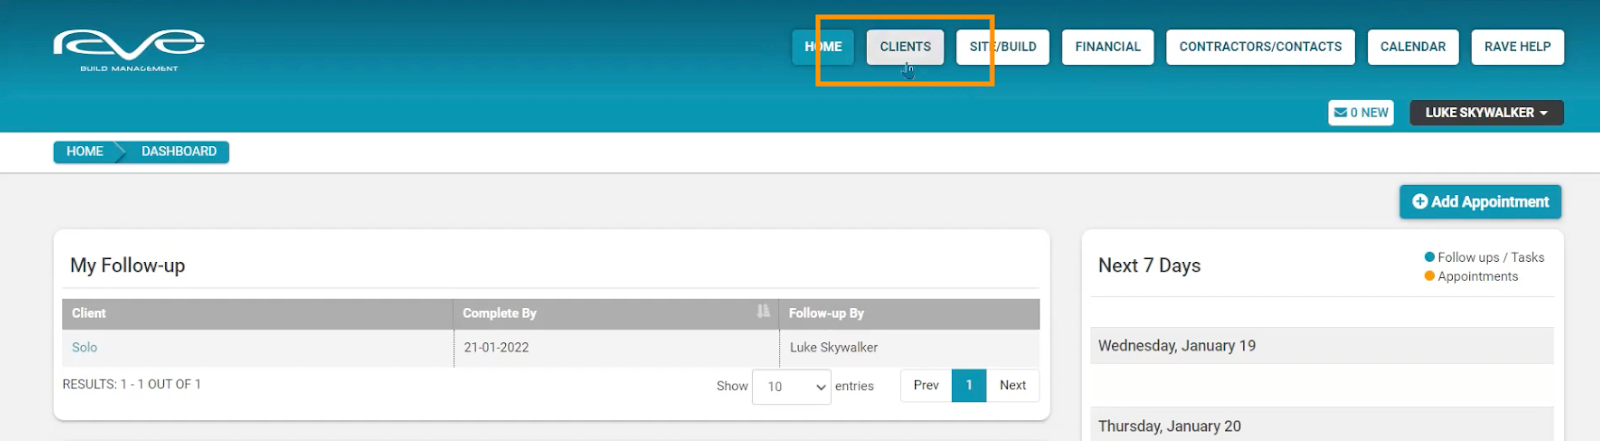
The Clients button is where we add new clients, find their client information, and manage our sales leads through to completion. The Clients button is found at the top of the Homepage as shown by the rectangle below.
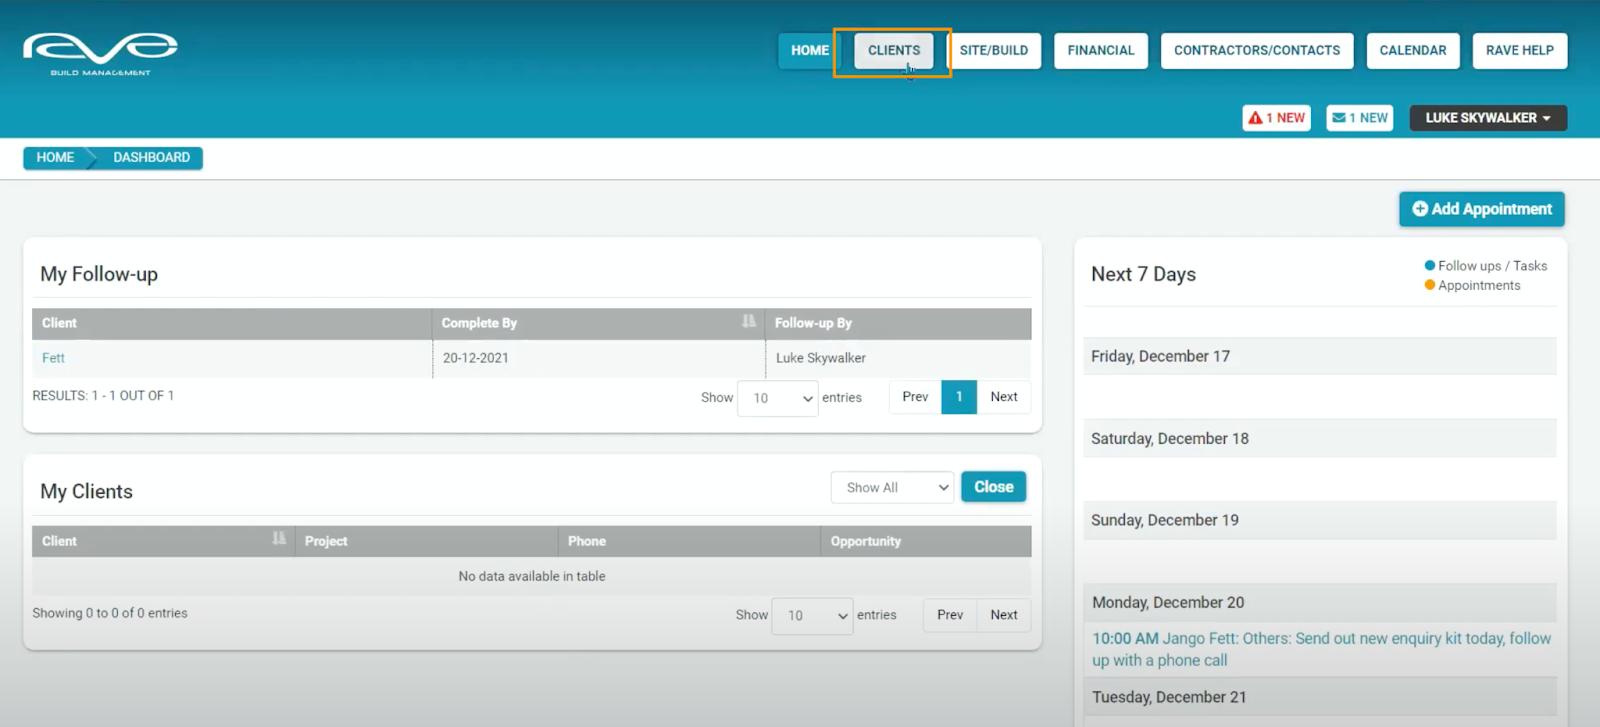
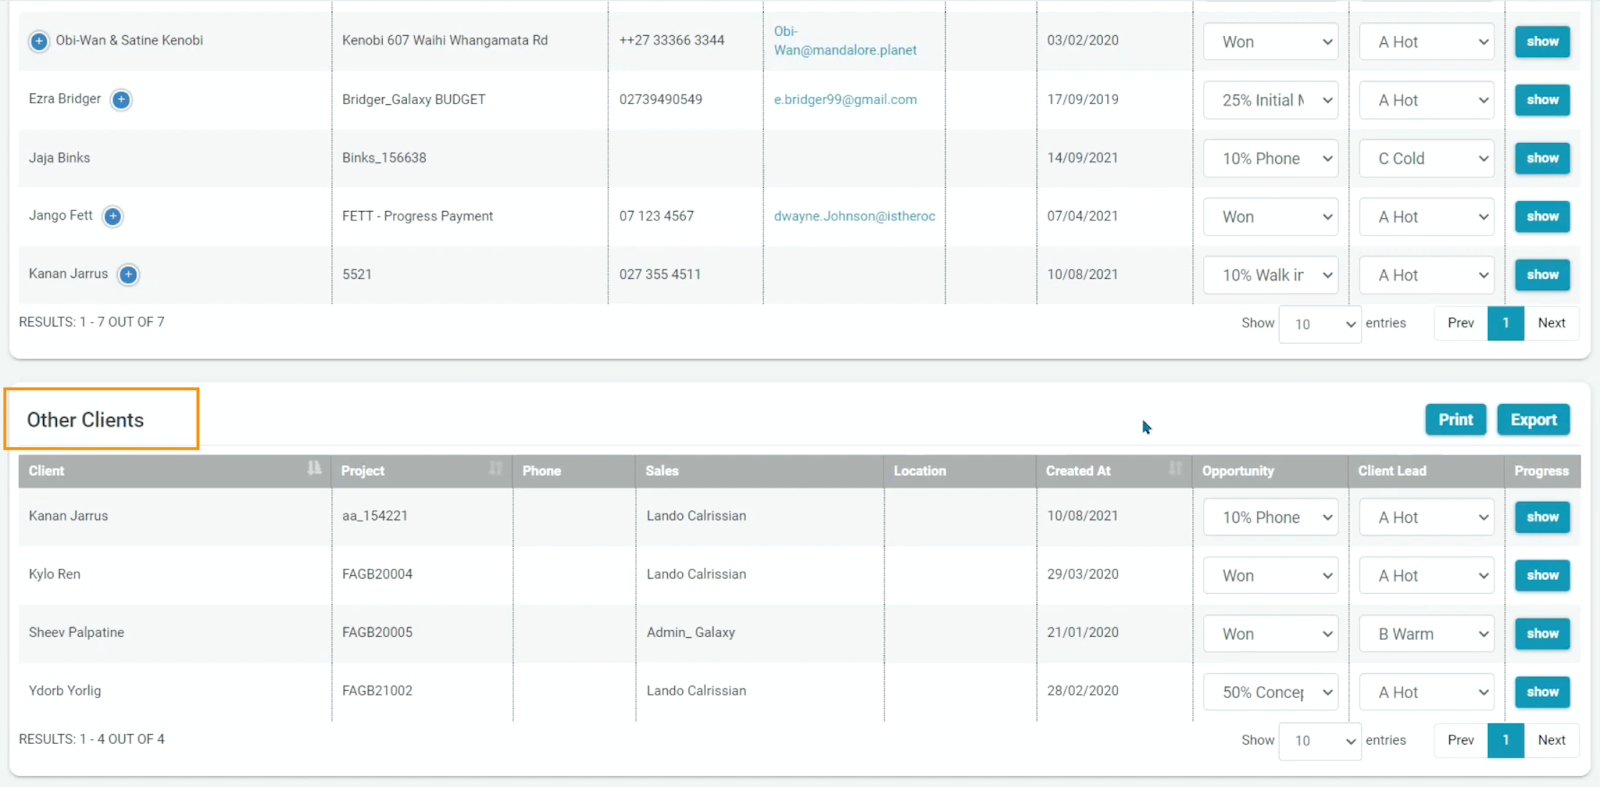
Once we click on the Clients button, we arrive at the active Clients list page, where we can easily find and access all of our active clients. We display two Client lists, My Clients and Other Clients - any Clients assigned to me as the salesperson will appear in the My Clients list at the top of the page.

If you've got more than 10 entries, they'll be on the next pages which you can access by clicking “next”, or you can select how many entries you want to view.
All the other active Clients in the branch (assigned to another salesperson) are available in the Other Clients list, which can be found with a simple scroll down to the list at the bottom of the page.
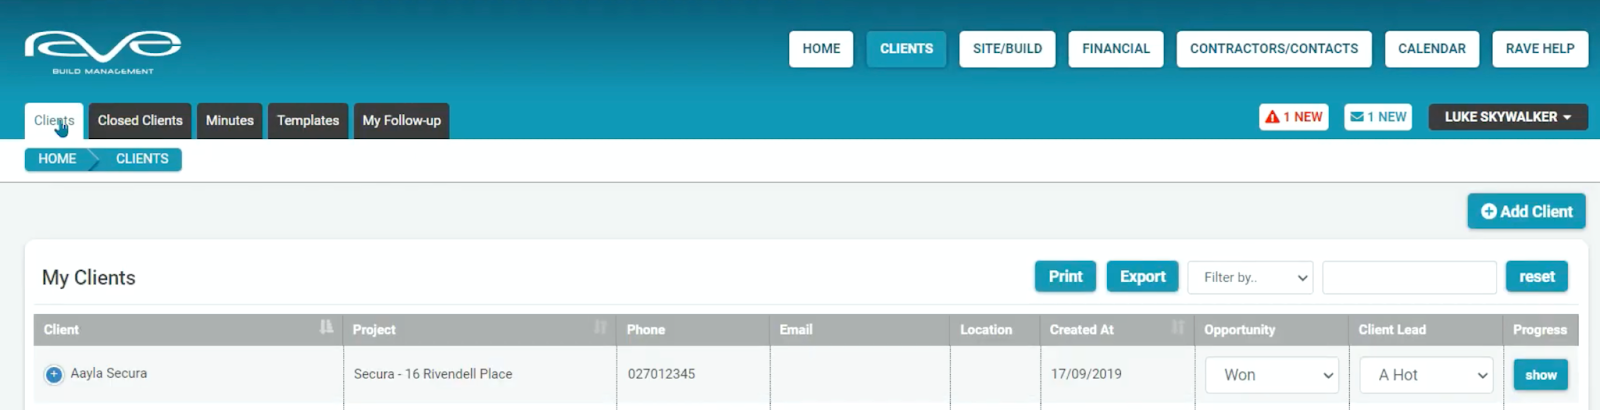
As a salesperson, you'll always have access to all of the active clients in your database, but to find any clients who have completed their builds with you, or have been marked as lost, you need to go to the Closed Client list.

Explanation of the Client list table
Access this demo here.
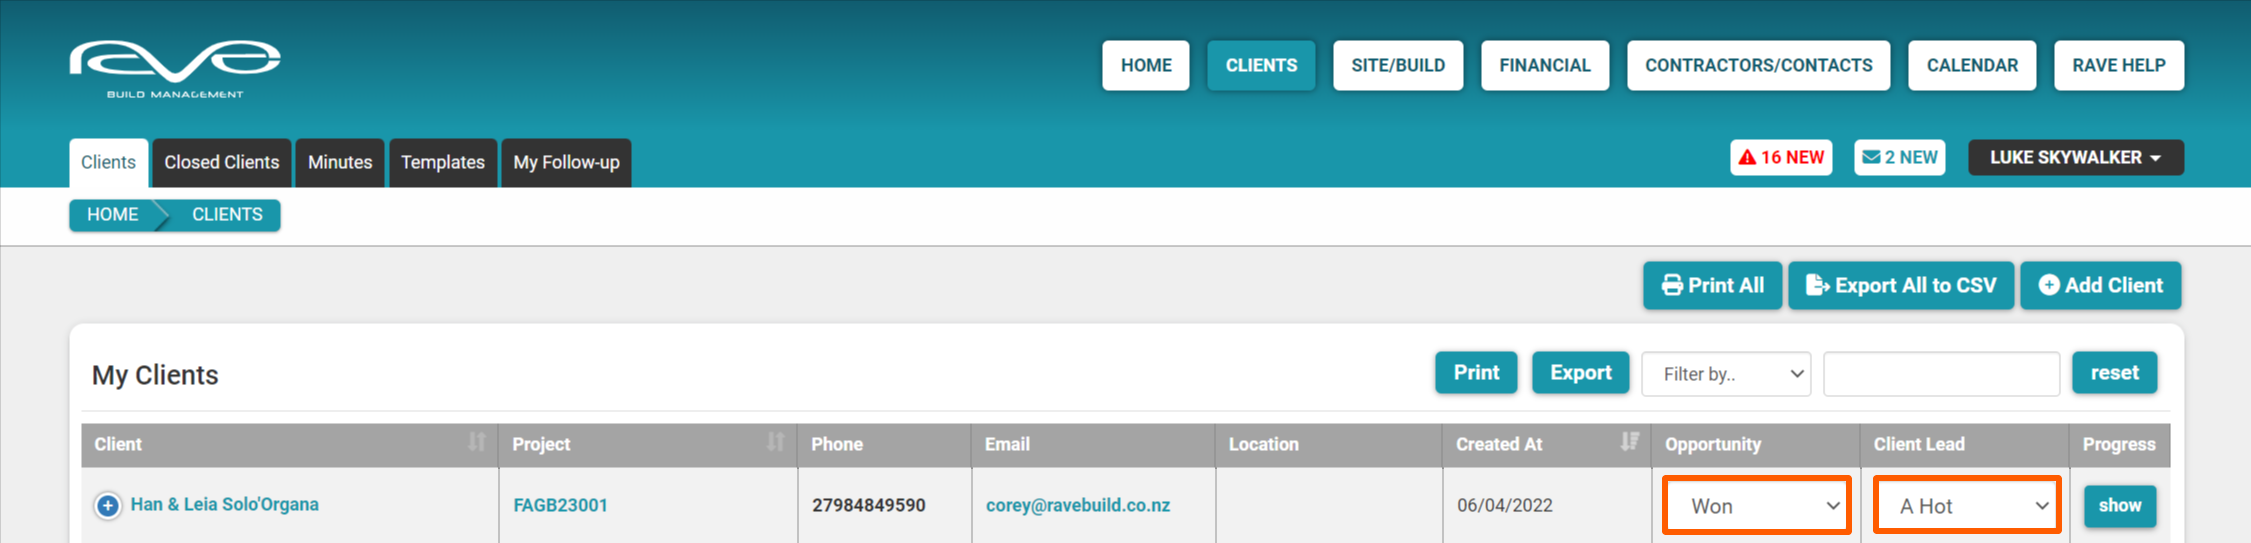
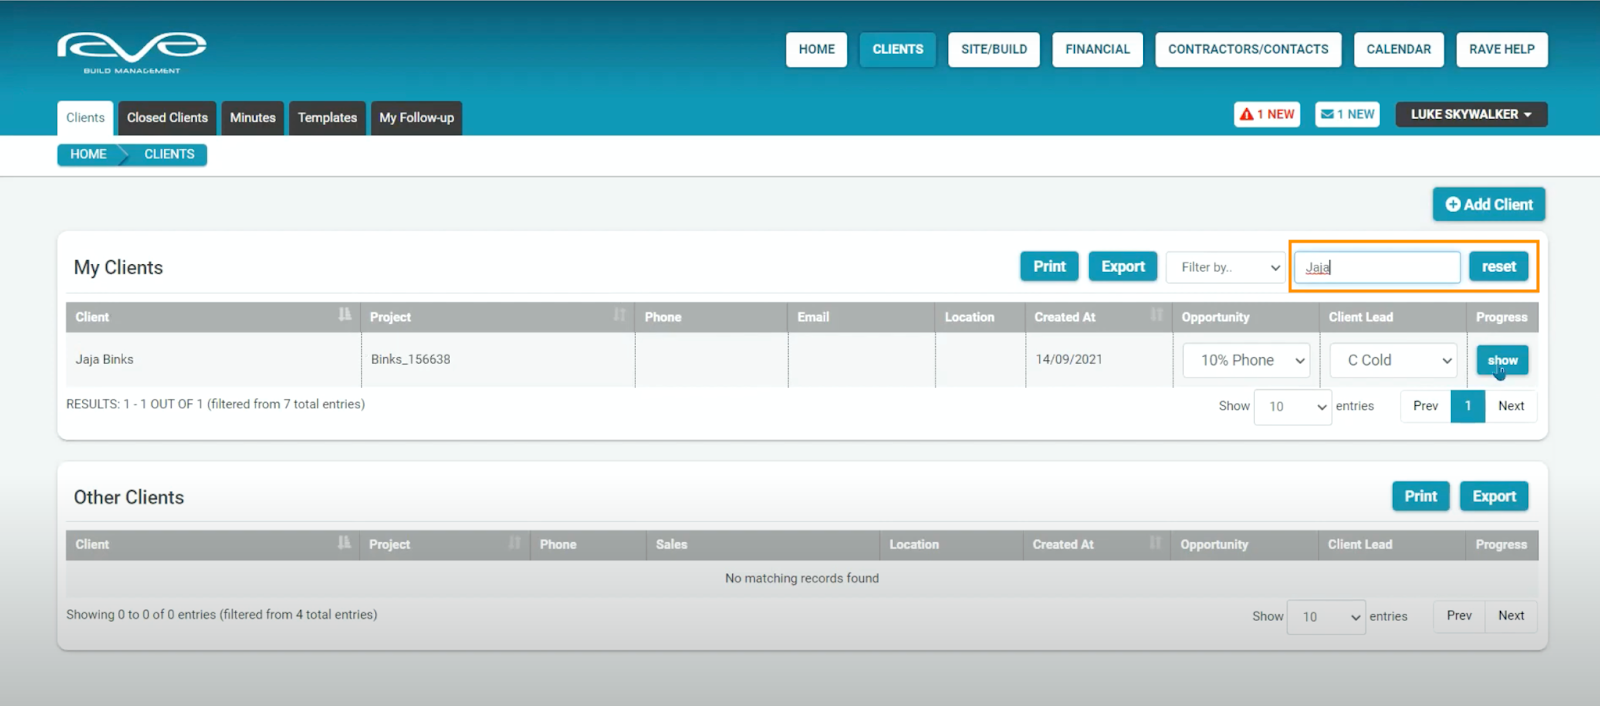
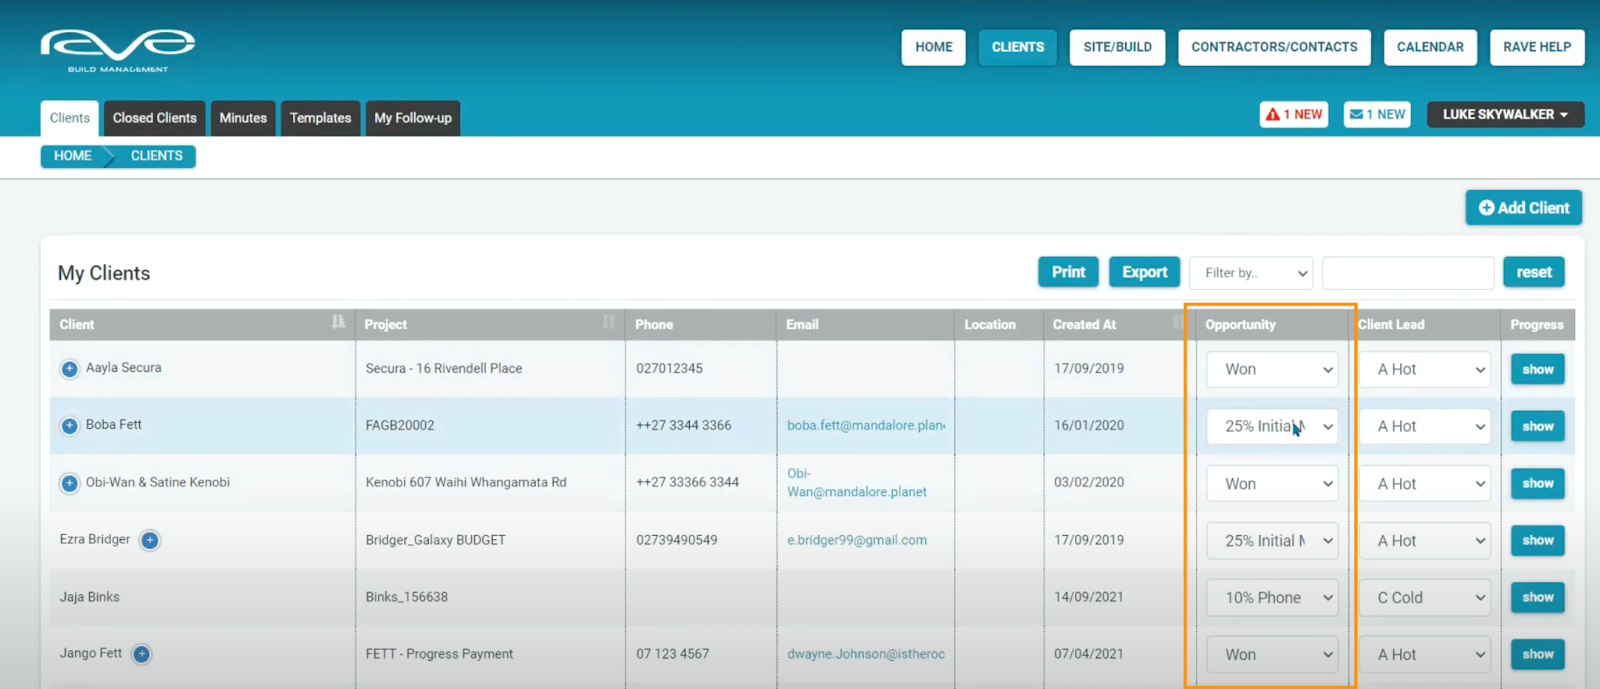
You'll see we have a lot of information here. We list the client's name, their project, main phone number, email, location, and (if added when their Client Profile was created) the Sales Opportunity which simply is a record of how far through the sales process you are with them, whether the Client Lead is Hot, Warm, or Cold, and the ability to open (show) the Client profile.
Over by the Client name, we have two “+” buttons, one before and one after their name.
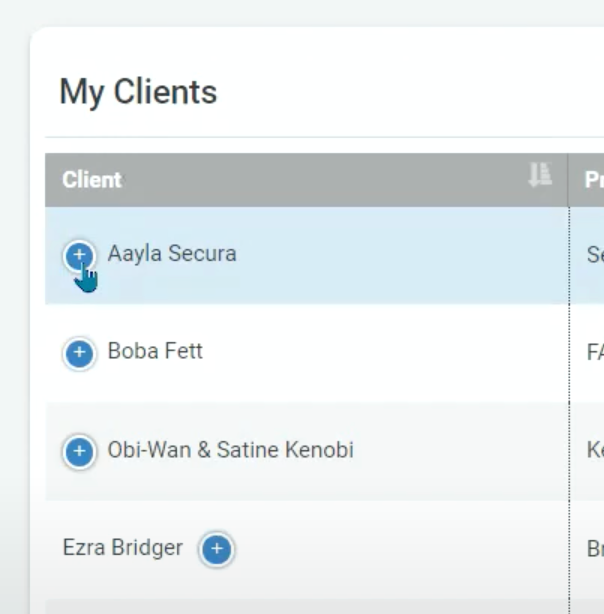
The plus button before the client name lets you know that we have another Contact loaded against that client profile. The button after the client name, lets you know we have more than one Project attached to that Client profile.
You are able to edit the client's opportunity and client lead using the drop-down menus under those headings.
Printing, Exporting, and Filtering the Client list
To the top right of the Client list, press the Print button, this gives us the ability to print our Client report.
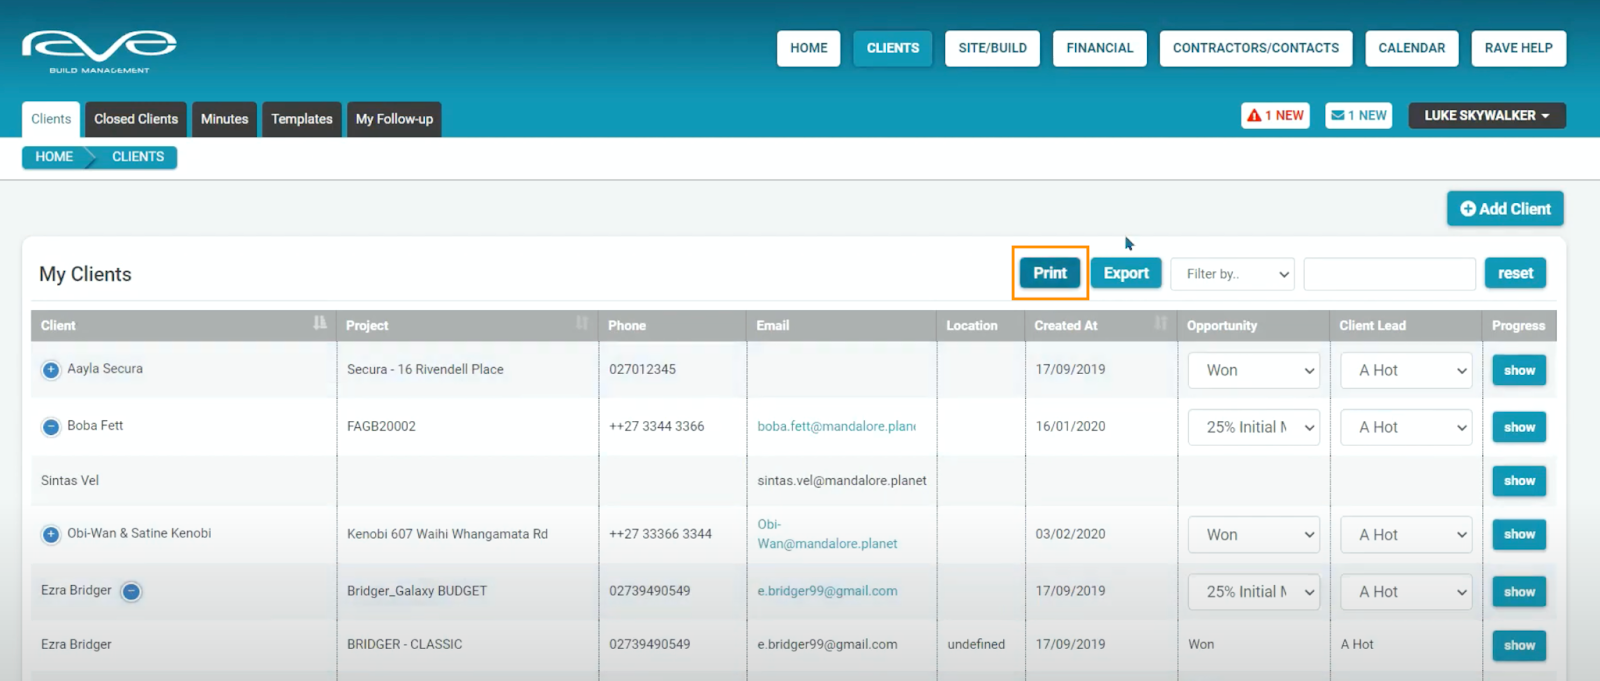
There’s also the ability to export the client report, by pressing ‘Export’ right next to the Print button.
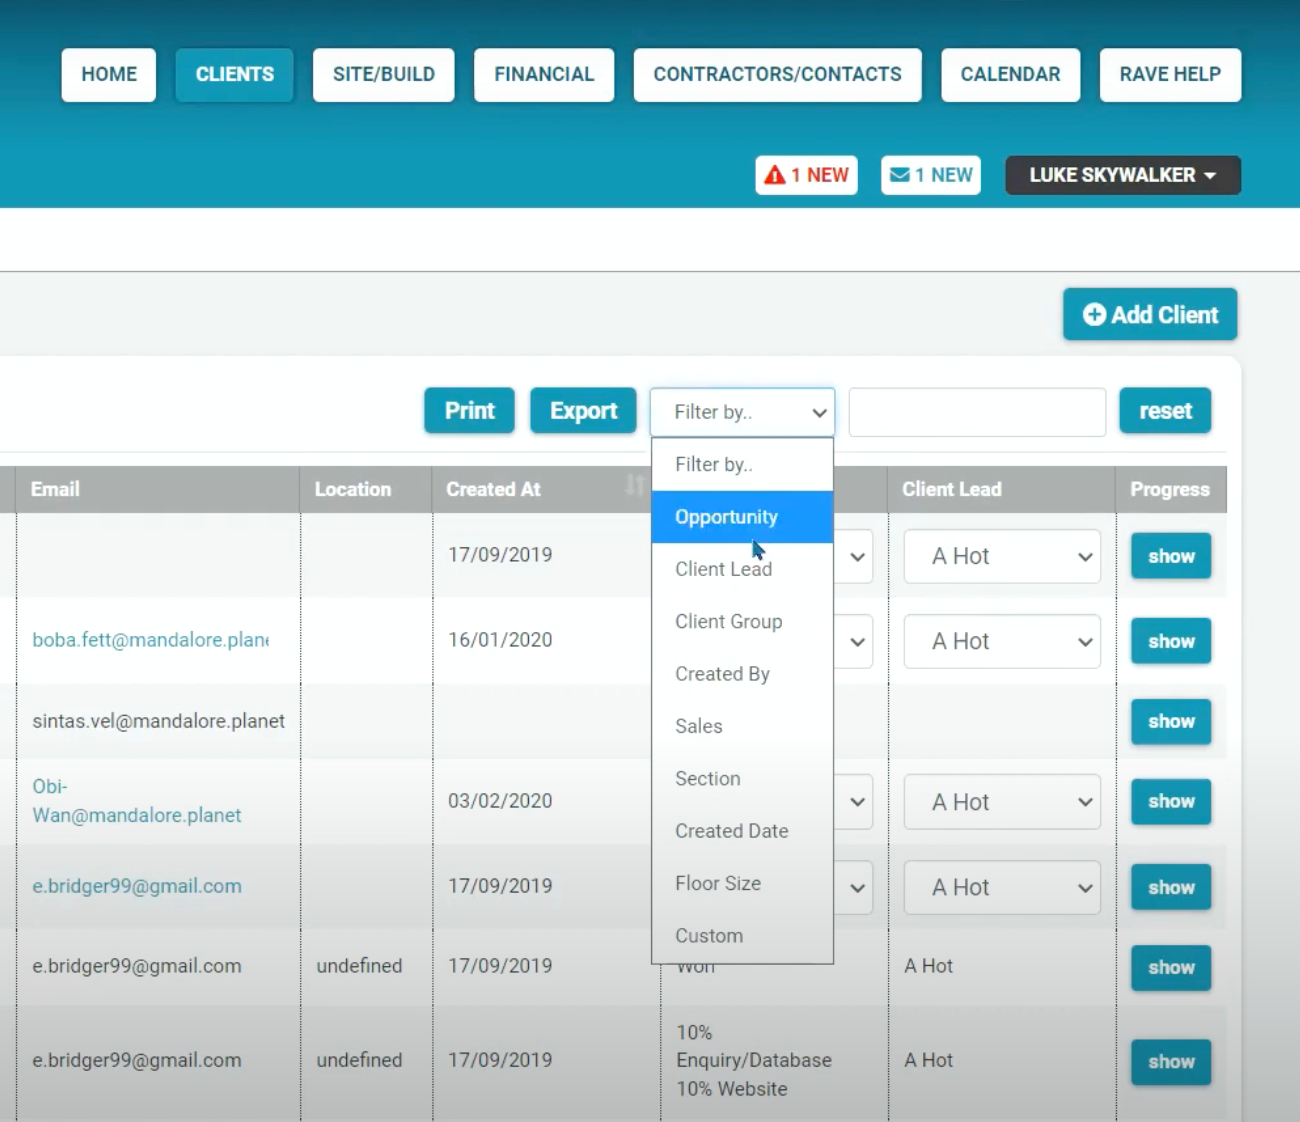
And finally, the ability to filter the Client list, the filter option includes:
- Opportunity - the stage you are at with a particular client (e.g. you might be interested in seeing all customers with 10% Opportunity which might mean you've made contact with them once, or 50% which might mean they've paid the deposit).
- Client lead - how close you are to close a sale with them (A Hot, B Warm, or C Cold )
- Client group - the role of the client (e.g. architect, property manager, landlord, etc).
- Created by - the individual who created the client profile
- Sales - who the Sales Person is
- Section - the section location (if loaded)
- Created date - the date when the client was added to the RAVE system
- Floor size - the floor size of the client’s build
You can also filter the client list by Client, Project, or Created At in alphabetical/date order by clicking the arrow symbol next to the relevant section name.

To remove any filters click the 'Reset' button on the right.

Creating a Custom Client List Report
You can also Print or Export your own custom client list reports. This is started by setting the Custom criteria via the sales opportunity, the Salesperson, and selecting the different fields to report on.

Once you’ve selected your custom criteria, head to the bottom and select “Export as CSV”.
If you'd like to create your own Sales Report template based on these criteria, then just add a name down the bottom, and click "Save as template.
Searching for a client
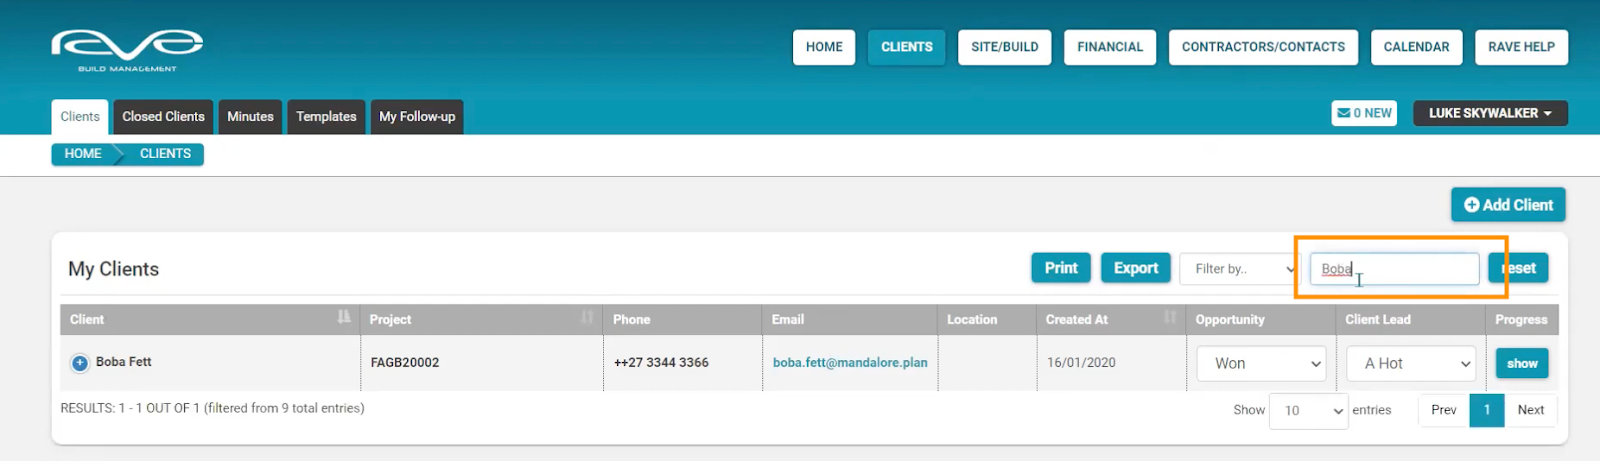
We provide you with a great search function - search fields can be found on the Clients page (below the +Add Client button. Typing a client's name in this field will search through all active Clients in the database, and display any matches to your search criteria.
Adding a client
Adding a new Client is pretty straightforward. If you click on the “Add Client’ button as shown below, you’ll be taken to the ‘New Client’ page where you can add one client at a time or a client list via the ‘Upload Client List’ button.

Essentially, we're just filling in as many fields as we can, ensuring that the required fields are completed. If you don't have all the information to hand, no worries, just complete the details that you do have as we can always come back later by editing an existing client profile.
NOTE: If the Client is already in the system, Rave will let you know that we have a match, and rather than adding them again, you can just click on the Client name and go to their existing profile. Allowing you to add your notes, follow-up, or an additional project. Refreshing the screen will reset the page and we're ready to load a new client.


The Client Opportunity/Client Lead/Estimated Budget/Expected close date explanation
When adding Client details you’ll notice the Client Opportunity/Client Lead/Estimated Budget/Expected close date section - these fields feed into your Sales Person sales reports, and your branch's Branch sales reports - so they are important for you to complete them all.
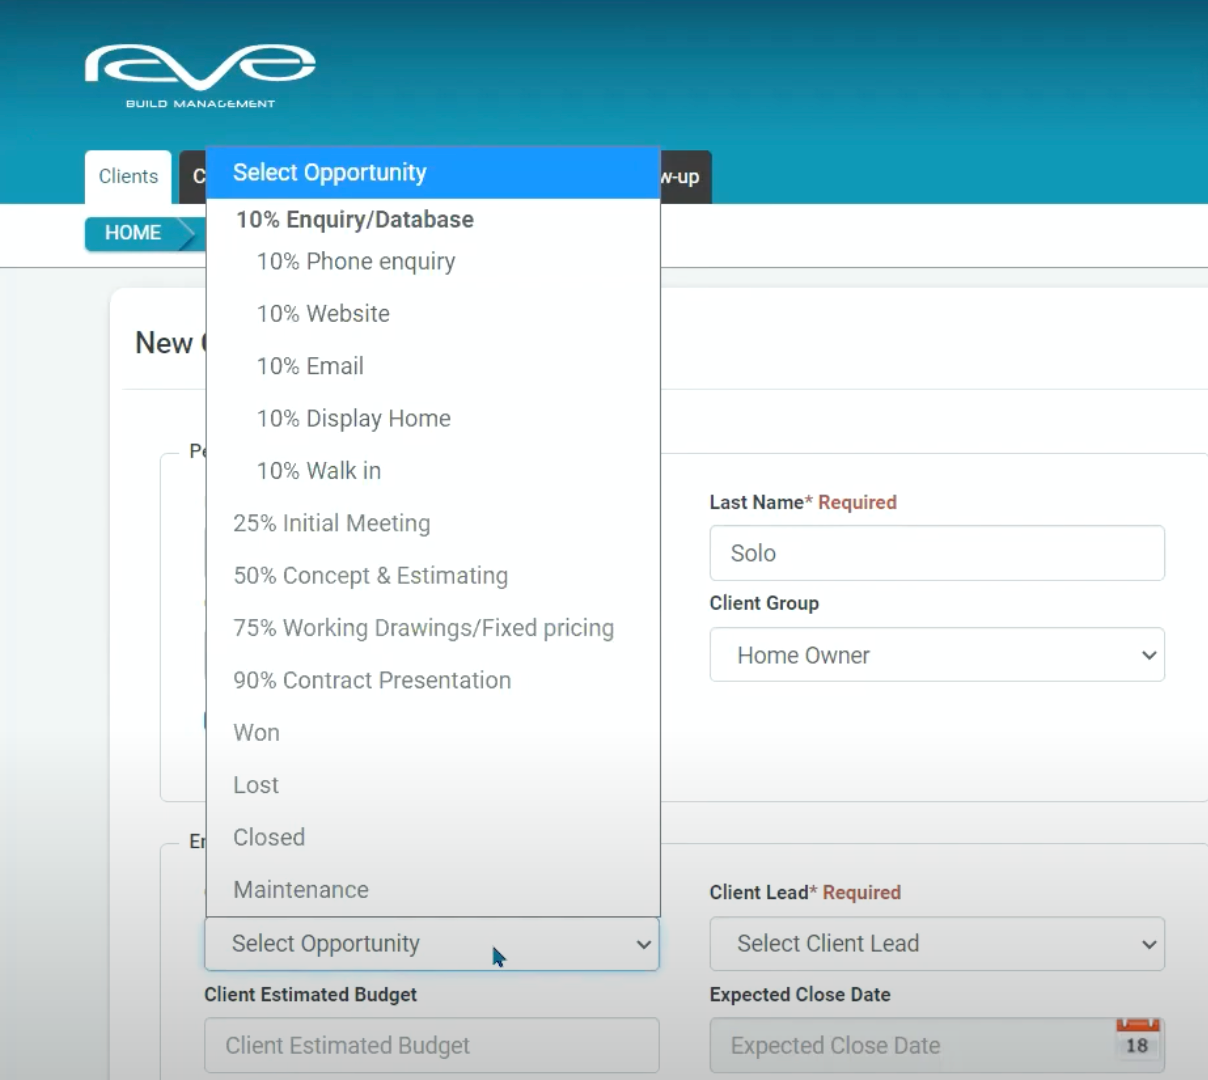
The “Opportunity” dropdown is basically a reflection of your company's sales process - showing you “where the Client is at”. You must select a 10% opportunity (how the client made contact with you) and save the new client details before you can move the client opportunity to any of the other areas. So select the most appropriate 10% opportunity and then move on to the Client Lead dropdown.
The Client Lead, allows you to mark the lead as Hot, Warm, or Cold. This is a helpful way to mark how close the client is to being locked in as a confirmed job. However you and your branch classify Hot, Warm, or Cold is up to you and your branch - a general rule of thumb for residential home builders is, that a Hot lead is someone who has their land and finance sorted (and maybe looking to confirm their builder sooner rather than later), a Warm lead may have one or the other, and a Cold lead is someone just making an inquiry but might not even have any land sorted.
As long as the opportunity is beyond the initial inquiry stage (i.e. from an initial meeting onwards), a Hot Lead will be displayed on the Home Page’s My Hot Leads table.
The Client's Estimated Budget is next, based on the type of build they’re wanting to do (number of bedrooms and bathrooms etc), you should have a fair idea of their general budget even if they’ve not told you their price range yet. And if you are not sure, you can always enter this value down the track too.
The Expected close date is the date the salesperson is hoping to ‘close the deal’ - it is the expected contract signing date, not the build completion date. Again this information feeds into the Hot Leads, Sales Pipeline, and Sale Forecast reporting.
The Build Status will default to pending which relates to a project that has been WON, but is not yet underway - if the contract hasn’t yet been signed, you should adjust the Build Status to Lead.
Over on the right, we can select our salesperson for the particular client too, plus identifying them as a person or a company.

From here we can either select “Save” (to create their client profile and automatically create the client's project in RAVE), click “Next” to access the enquiry specification page, or we can select “Show More” to the bottom right - to add additional client profile information.
Clicking “Show more” when adding a Client, allows you the chance to add additional client profile information.
The most relevant feature here is to “Add Another Contact Person”, via the link found down at the bottom left of the page, which will instantly pop up additional contact fields for you to fill in as required.
Quick tip: If you’re dealing with a couple and want to add both names to the profile, just head back up to the top and add the second name into the name field! Generally, the first appearing name is the “main contact” with their contact details listed at the top, the second name can be added as the additional contact down the bottom. You can also use the “Add another contact” section for any other relevant individuals to the Client profile.

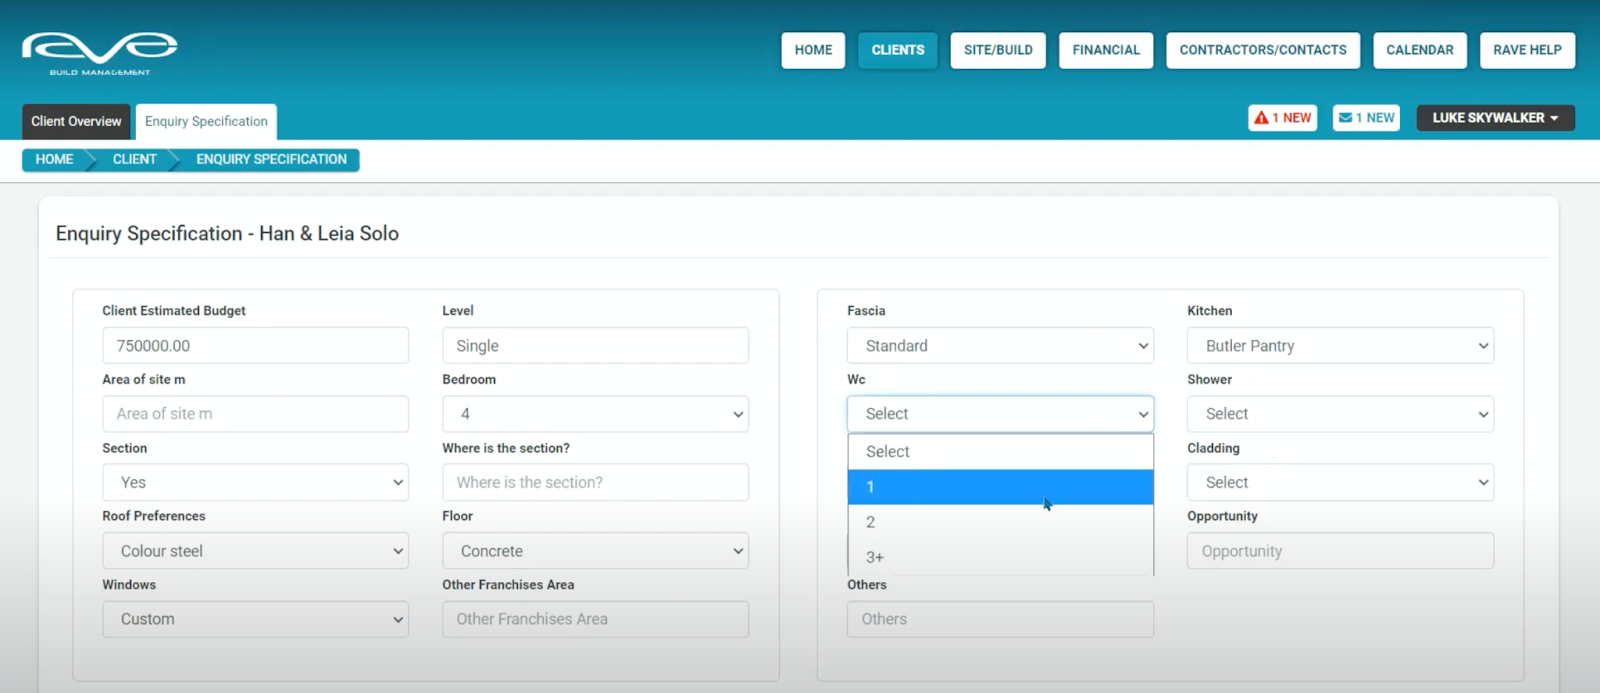
The Enquiry Specification page + Source of Lead
The Enquiry Specification page allows for some small customisation depending on your company's need ( additional drop-down selections or changes to category headers etc) this is where you can fill in as much info as you can based on your conversation with the client.
A key field here is our source of lead, which feeds back into the Sales reporting to let you know which marketing activities are working best for the business. If there’s a source of lead that isn’t available in the dropdown, be sure to let us know and we can add it in, but in the meantime, you can select “Other” and then note the source of lead manually.
Saving the Client Profile to generate the Client's first Project

Once you've finished adding in your new client profile details, clicking Save at the bottom of the client setup page finalises the creation of this new Client Profile, which also automatically generates the client’s first Build with its own Build number.
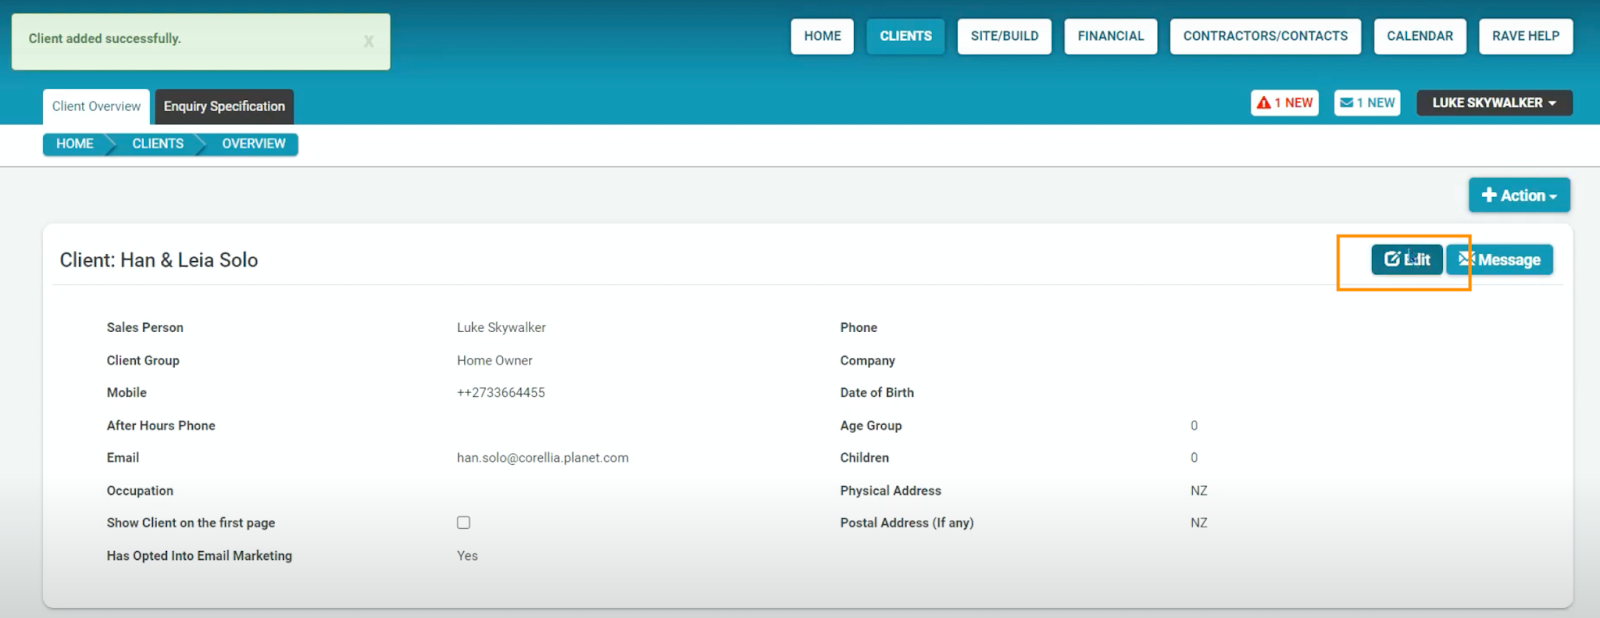
Editing the Client Profile
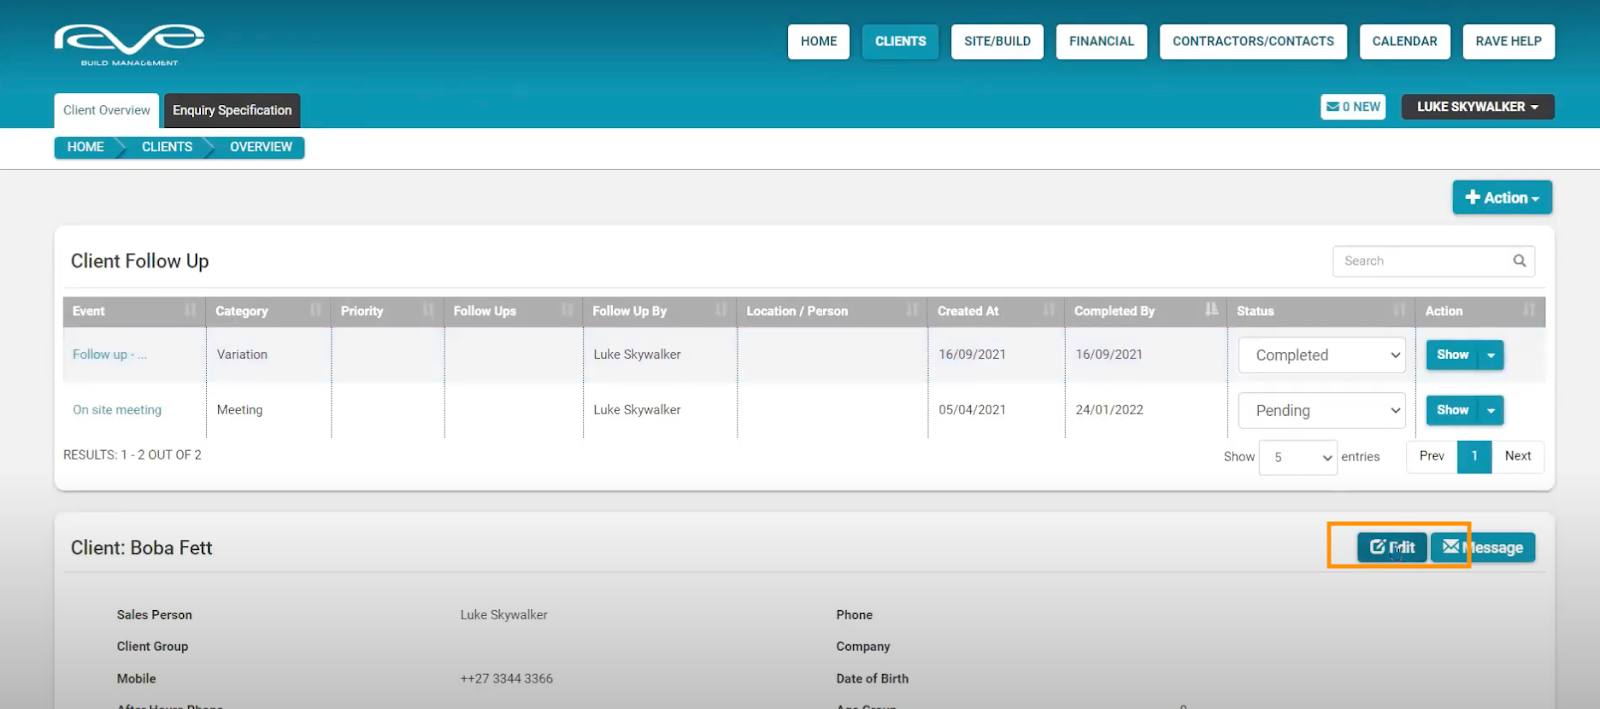
If you ever need to edit or add details to a Client profile, just click on the “Edit” button at the top right of the Client Profile/Client Overview.
Show Client on the first-page tick box
In the Client overview, we can select the “Show Client on the first page” tick box, which will do two things.
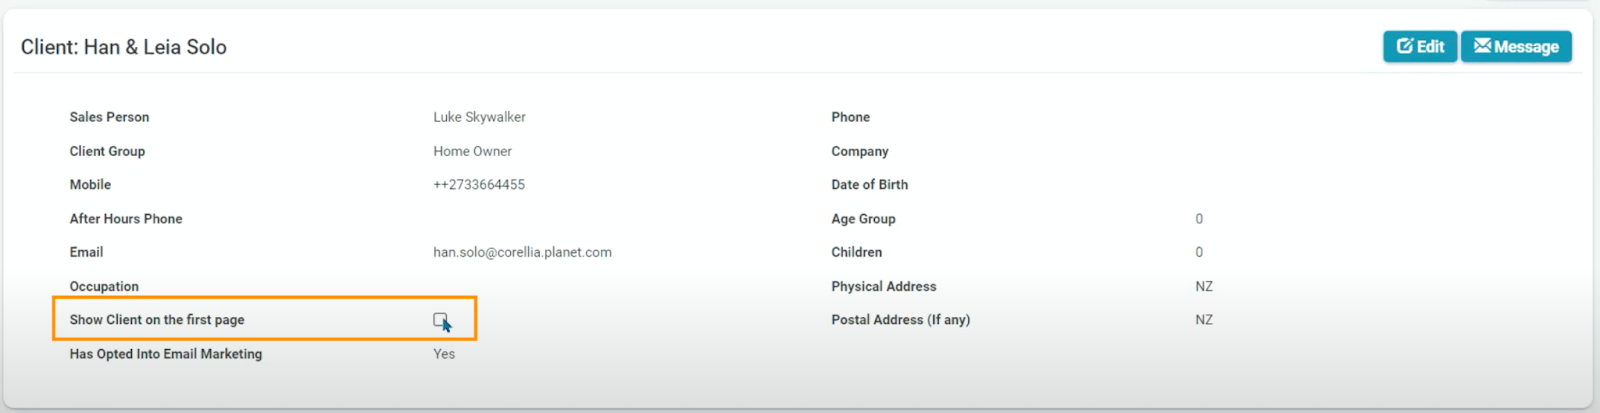
Firstly, it will add the Client to the home page under the My Client List, with handy links to the Client Profile, the Project, their main contact number, and an idea of where they’re at in regard to their Sales Opportunity.
And, if we go to the Client list, you’ll see that this Client has been prioritised to the very top of the Client list (or to the top grouping if other clients have also been prioritised) and is also highlighted in bold lettering.

RAVE Client List upload tutorial
In this quick demo, we show you how to upload a Client list into RAVE.
Firstly, we need to ensure we're on the Client Management side of Rave, by clicking on the “Clients” quick-access button.

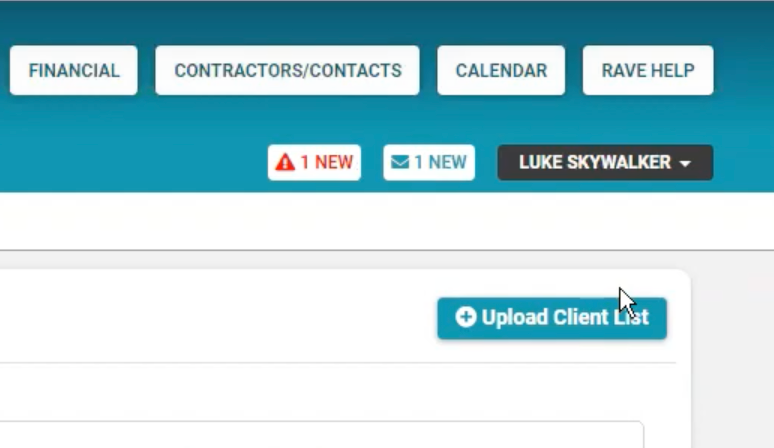
Once there, we move to the right of the screen and click on “Add Client”.

Then, instead of just adding a single new Client, we click on the “Upload Client List” button.
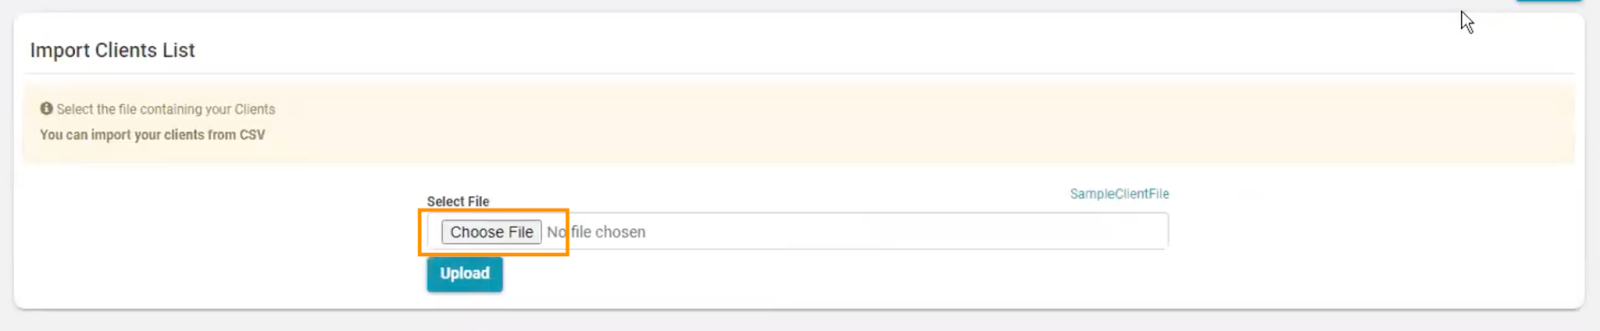
You’ll then find yourself on the Client Import List page.

Explanation of the Sample Client CSV File
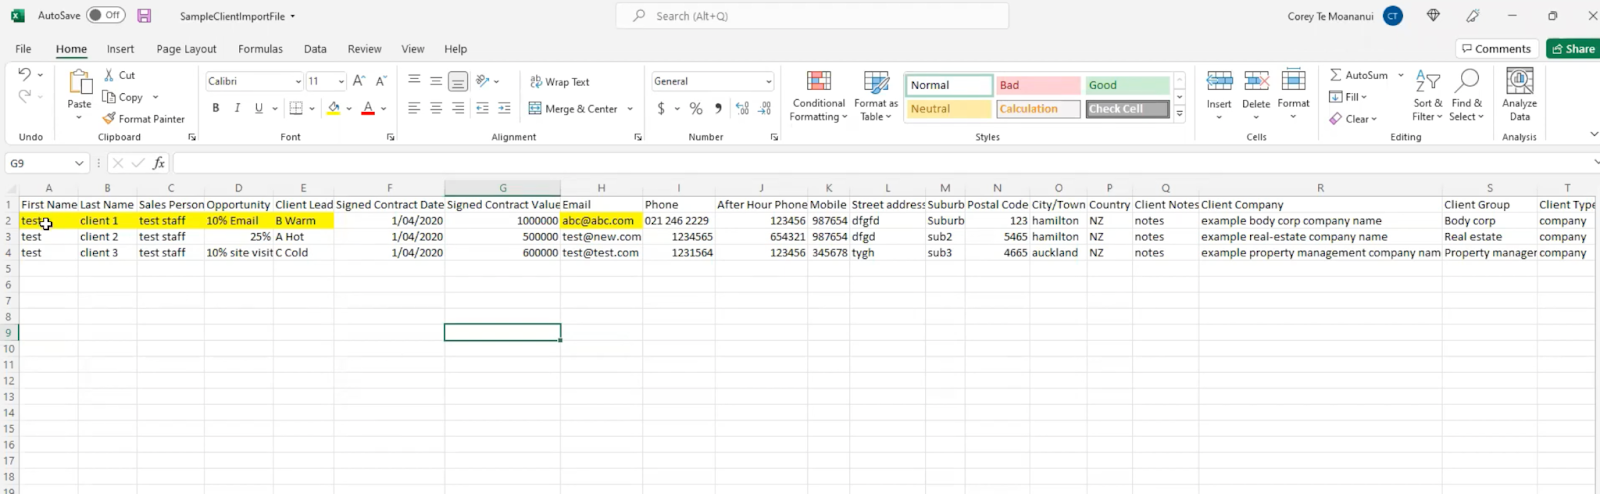
Rave requires an importing Client list to be set up in a very specific way, and it needs to be saved as a Comma Delimited or Plain CSV file. We have provided a Sample Client CSV file for you, to the right of the screen, click on “SampleClientFile” as below, to download and use as a template to complete.

Once you’ve downloaded this file, open it up, and you’ll see the file below. Each row (line) is for a separate Client Profile. You’ll see there are a few required fields here, and some of these fields need to match what is already listed in your Rave system. That is the Sales Person's first and last name, the Sales Opportunity, and the Hot/Warm/Cold lead status needs to match the selections in your Rave system. The email needs to be valid and follow a valid email structure, and you should always have a first and last name loaded against each entry.
Check out the video demo from 1:30-2:13 to see an example of copying + pasting your own Client list into this CSV. There are also some examples of correcting fields to match your Rave system.
The more fields completed on the Sample Client CSV File the better. The non-required fields are automatically loaded to the corresponding fields in Rave, and unless the data is in a field in the CSV template it will not be loaded into Rave.
Once all loaded correctly, save the updated CSV file, go back to your Client list in Rave, click “Add Client”, then “Upload Client List”, then “Choose File” (select your saved CSV), then click “Upload.
From here we just match the fields in Rave with the corresponding fields in your CSV. When using our CSV template, this step is super easy. Hit save once you’re done, and let Rave do its thing! Once completed, you’ll be notified how many leads have been loaded into the system, feel free to check that they’ve loaded in ok, and that’s it!
NOTE: If you have followed these steps, and are still experiencing problems with your Client list upload - email us at help@ravebuild.co.nz with your CSV file attached, for us to check that out for you.

The Action Button
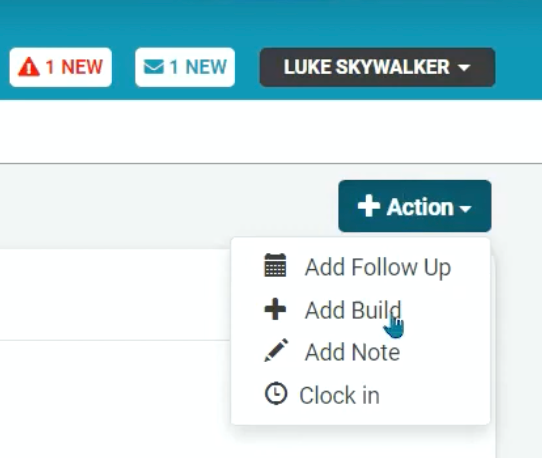
Once a Client’s profile is created, there are a few key actions you can take. We’ve identified these in the Action dropdown via the Client Overview screen.
Add Notes - to build rapport and/or add value to the build
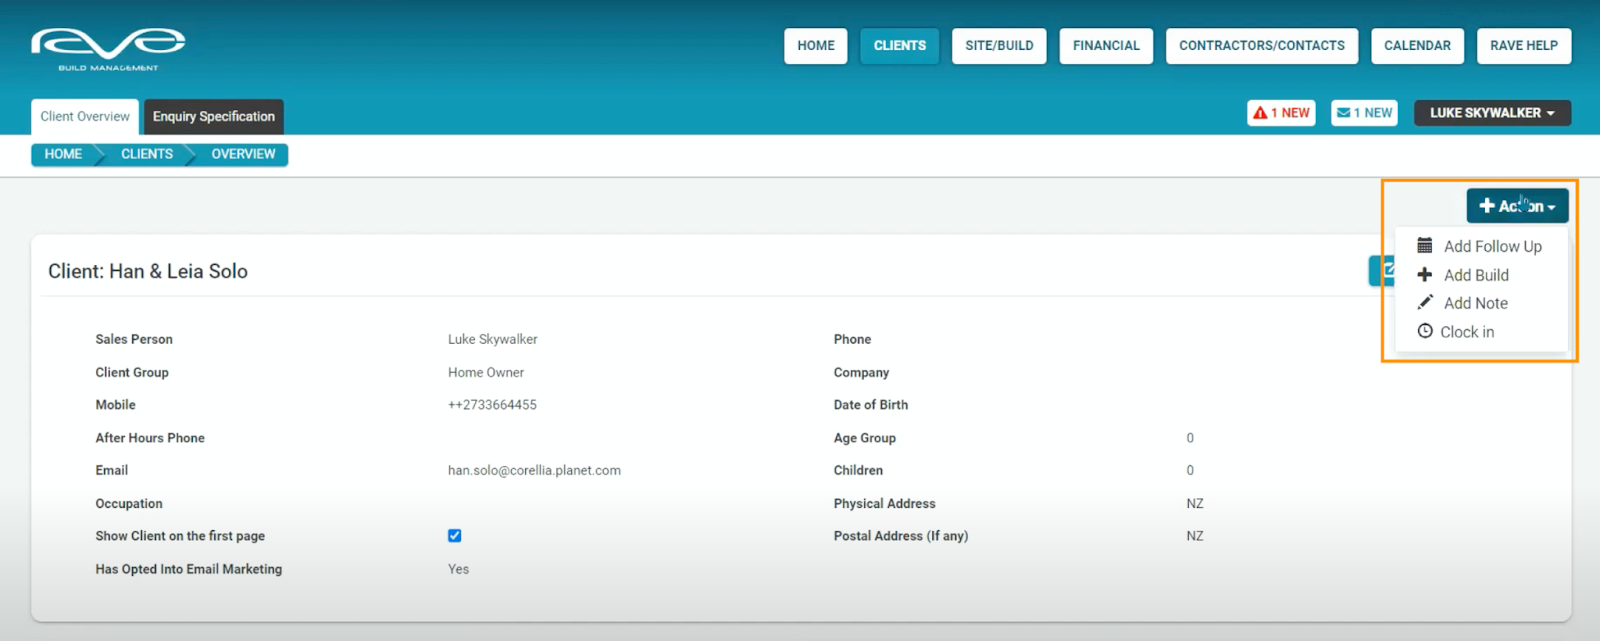
Clicking on the Add Note option will take you down to the Client Profile Notes portion of the Client Overview page.

In general, there are two types of notes that we like to reference, one type is the notes that would help you build rapport with your Client, and the other is notes that are going to help you add value to the project. But you can add whatever notes you need to, these are only visible to those with branch logins.
On the rapport side of things, your Clients might drop little facts and snippets about themselves and their situation, these little points and notes may really help in winning the Client over i.e. when you’re going to a site visit with your client, you can jump on your phone, tablet or laptop, review your key client notes, and set yourself up for a really great meeting.
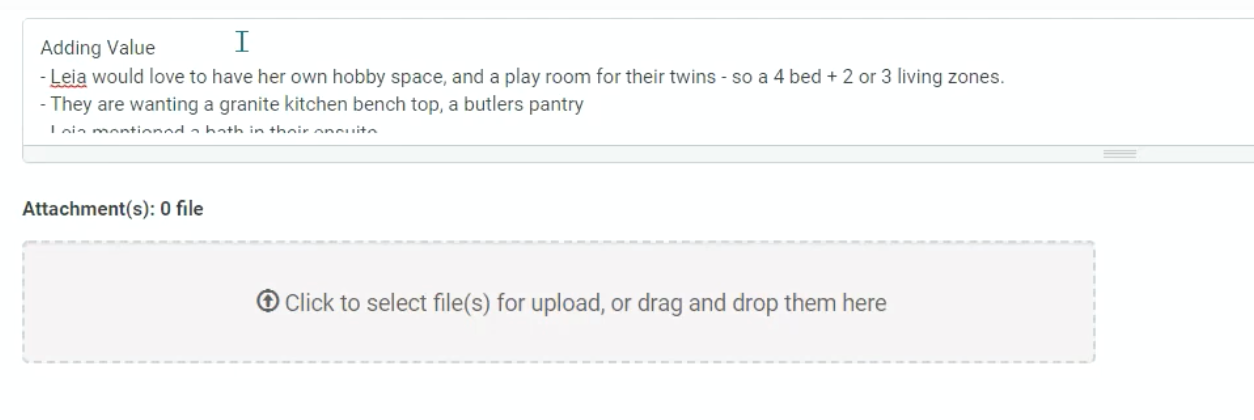
Each note entry will automatically record who added the note, plus the day/time that they added them. You drag and drop or upload a variety of files - images, PDF, video files etc. They’ll be sorted by order of most recently added, you can also edit, delete, or pin a certain note to the top of your notes if you’d like.


The kind of notes that we’d call “Value Adding”, are things that may result in an upsell to a more expensive build. These notes are crucial in delivering the perfect build for your Clients too. Check out our example set of notes here.
Final tips on notes:
Your notes can be written as we’ve already shown you, and/or they could be copied + pasted from an email or other reference material.
After you’ve put all your notes in, if you’ve got a lot of entries, you can easily search through them with our handy notes Search Notes by Keyword function.

Adding Follow-Ups + Copying to your external Calendar integration
You can add Follow-ups through the Action button via the Client Overview screen - to ensure no Clients are left behind. To get started, we click on the Action dropdown, then “Add Follow Up”.
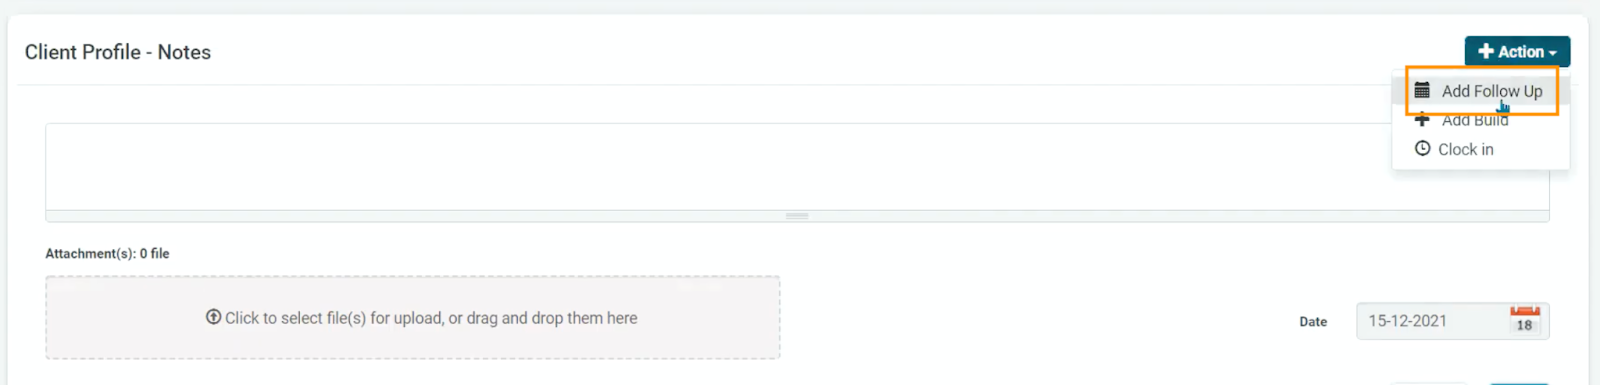
This will bring up the Add Client Follow-Up pop-up, where we fill out the fields relevant to this specific Follow Up.

You can fill in the Event details - making it as thorough and specific as you need. Assign staff members, and set the completed by date, any other necessary details, and click Save to load it in!

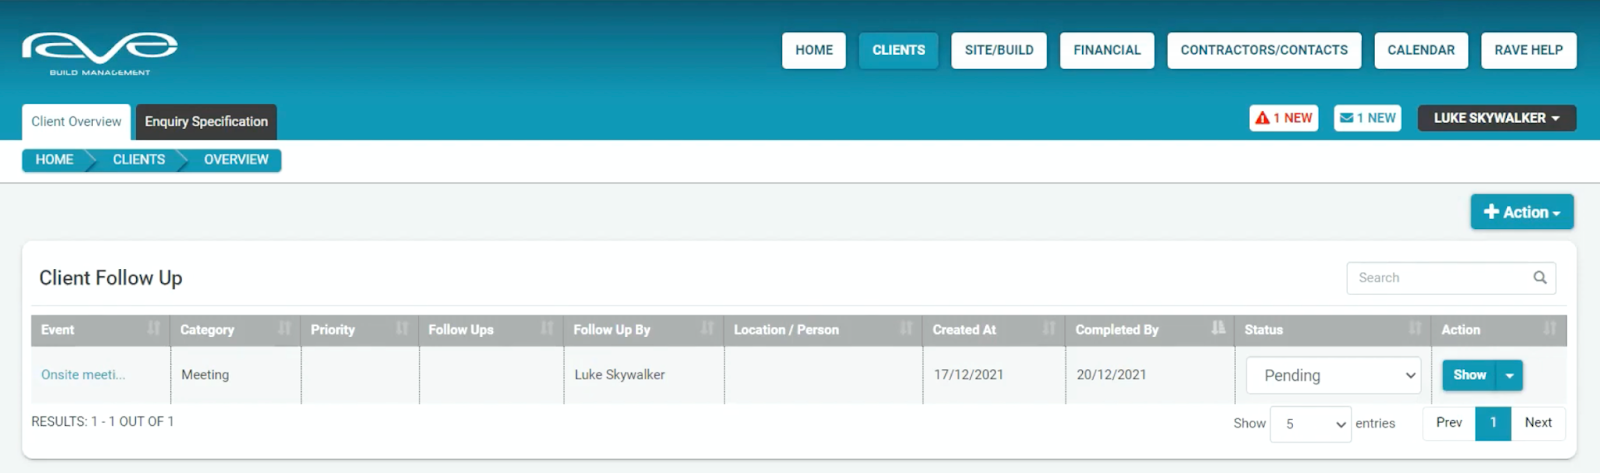
Once saved, the Follow Up will be displayed at the top of the Client Profile.
It will also appear in your Calendar, and in your Home screen “Next 7 days” table once it falls within that date range. Rave will also send an email to you with the record of the appointment, including a little link that will copy it into your external calendar. There’s an upgrade on the horizon (late 2022) that will see some additional integration with popular calendar apps to make this even easier!
Once the appointment is all loaded in, we click on “Show” to check it out in full detail, and we can Edit or Delete the appointment here as required.

Adding an additional build
Adding an Additional project to an existing Client Profile is really handy, and means you don’t need to set up a brand new Client profile whenever a client comes back to build with you again.
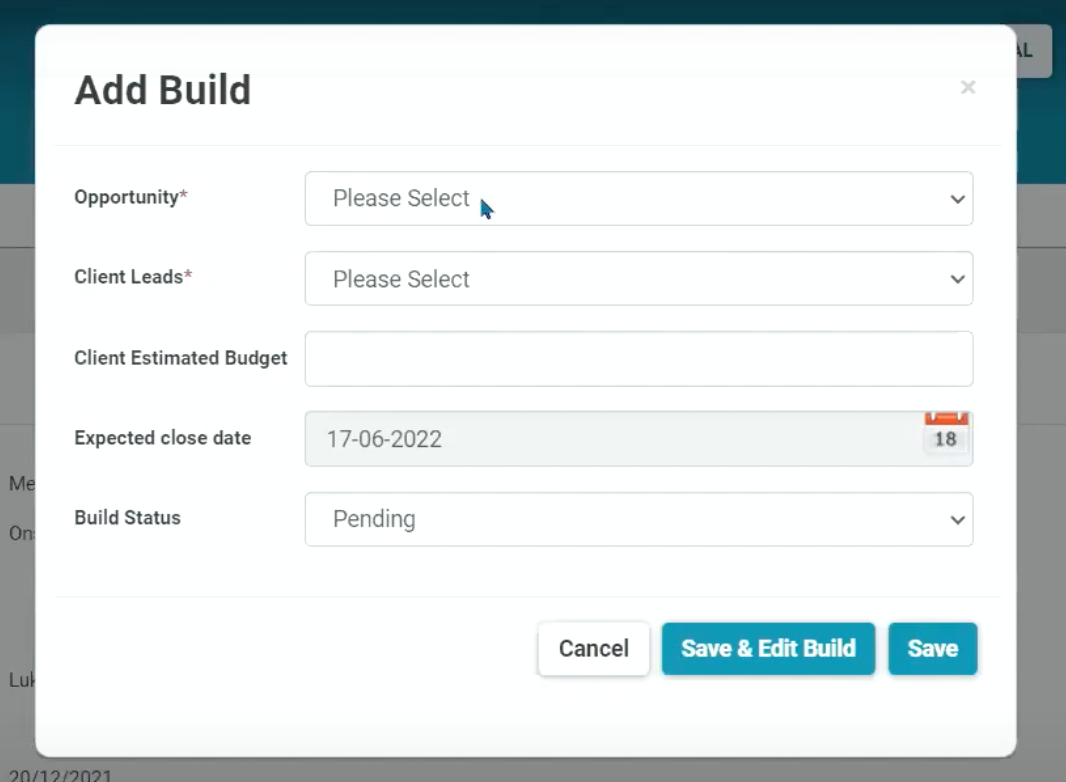
You can add a new build through the Action button via the Client Overview screen - by selecting “Add Build”.
You’ll then get a pop-up, with the fields from the Client Opportunity/Client Lead/Estimated Budget/Expected close date details when adding a new client, which you need to fill out. Starting with the Opportunity based on how they made contact, whether they are a Hot, Warm, or Cold lead, what is their Estimated Budget, and when are we hoping to sign a contract on the new build, and then click save!
This will add the additional project to your Client’s Profile.

The My Follow-Up Reporting Sub Tab
To help you avoid missing a sale simply by forgetting to give your lead a call, we’ve introduced a new Client’s reporting sub-tab titled “My Follow-Up” - available via the Clients button.

Clicking on the My Follow-up sub-tab, will give you access to three different reports.

Firstly, the “Clients without Follow-up” report allows you to see those Clients of yours that don’t have a follow-up loaded currently. This report displays the client’s name, their sales “Opportunity” stage, Lead Status, expected close date, when their profile was created, and key contact details.
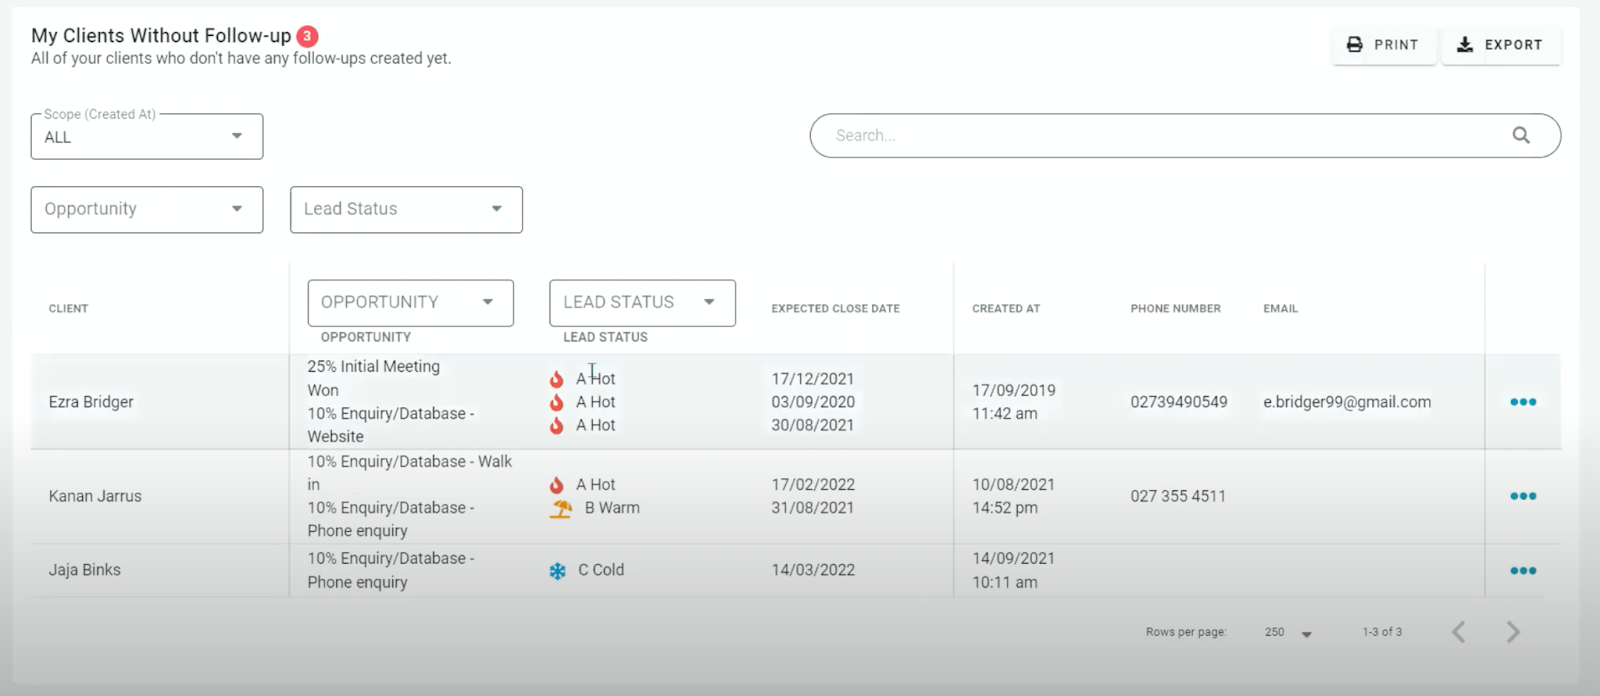
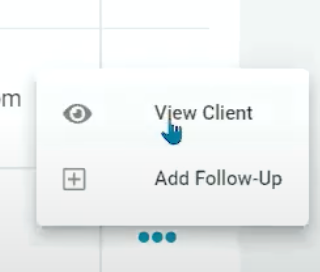
Clicking the “three dots” to the right, allows you to view the Client profile, or assign a follow-up to them. If we click on Add Follow-up and save one, we will notice that it automatically refreshes the list, and removes that particular Client, as they no longer have no follow-ups!

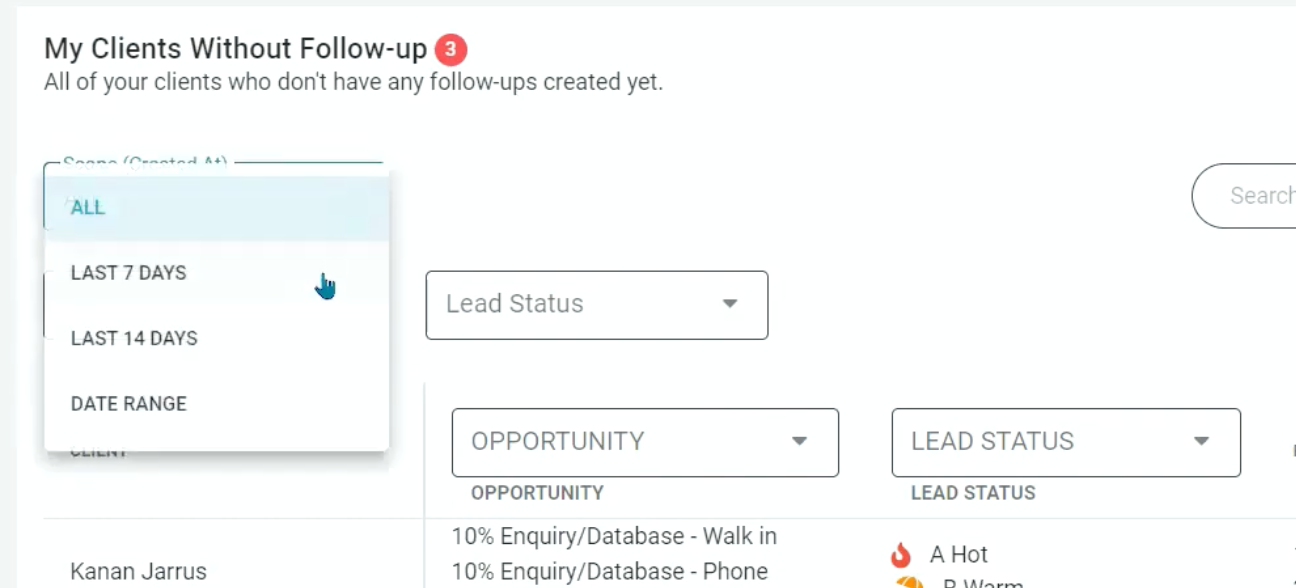
Looking back at the list, we can also filter the results through a few different metrics. This includes the scope (when the lead was created - either All, 14 days, 7 days, or a set date range), the Opportunity stage, Lead status, or if you’re searching through a large list, there is a search bar where you can search for a specific Client.
The “Latest follow-up report” lets you see your Clients as well as details on their most recent or future Follow-ups. Check out the screengrab below to see which details can be found in this report. You’ll notice you can change/mark the Status of the follow-up as required, too.

With this report as you also have the ability to either view the Client Profile or “Add a Follow-Up” too.
The “Assigned Follow-up” report shows you follow-ups that have been created for you when you’re not the Salesperson for that Client. Again, you can filter this list out in a variety of ways as seen below.

As with the other two follow-up reports, you can view the Client profile, and easily Add a Follow-up by clicking on the “Three Dots” on the right-hand side.
Note: Any of these reports can be filtered, and printed or exported by clicking the relevant buttons to the top right of each report.
The Show Home/Home Show Portal
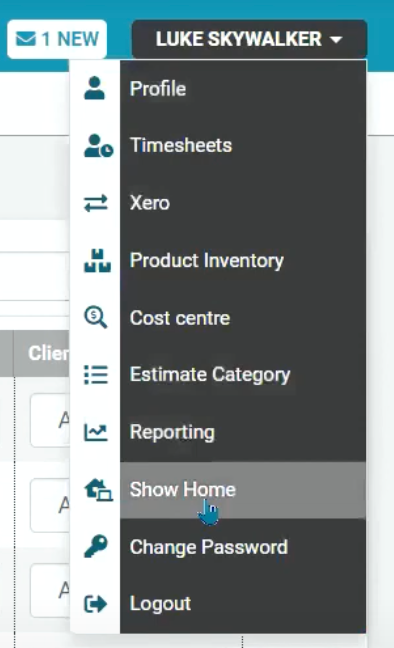
The Show Home Portal is easily accessed by clicking on your Profile Name, then moving down to “Show Home”.
This portal is basically a form designed to collect Client lead information - as long as you have an internet connection on the device, leads will be added to your RAVE client list in real time. It is branded with your company branding and is designed to sit on a tablet at any given Show Home, Home Show, or Expo event.

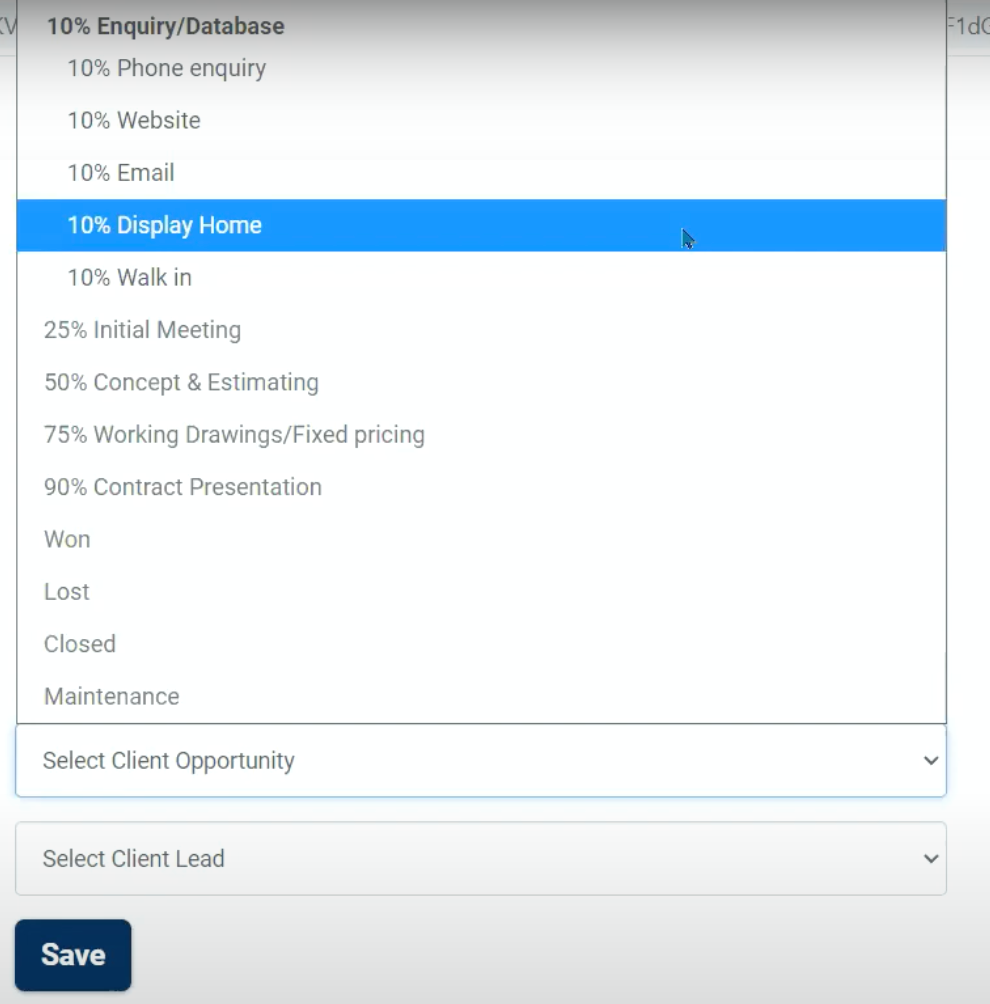
To set it up, we select the “Opportunity” which sets how many of these leads will be registered when they come through to RAVE i.e. if we are using the Show Home system at our Show Home we would select the relevant selection i.e. “10% Display Home”.
Then, select how you want the leads to be classified as they come through i.e. Hot, Warm or Cold - make your selection here, and once done, hit Save to complete the setup.
NOTE: Whichever salesperson is logged into Rave on the tablet, will have all leads gained from the Show Home form assigned to their Sales profile. Again, as long as the tablet is connected to Wi-fi or mobile data (3g, 4g, etc). Generally, one tablet is all you’ll need for a Show Home shift, but you can operate as many tablets as required at a Home Show or Expo event.
Once the set-up is complete, your form page will be ready to go - customised with your company's branding.

Whether you’re at your Show Home or an expo event, you can pass the tablet over to your Client to get them to fill in their details! This really helps avoid mistakes in their important contact details being recorded i.e. phone numbers and email addresses.
You can add as many or as few notes as you like in the notes section, and also whether they are keen to receive marketing emails from your company or not - whatever details to add here, this information will also be included in their Client profile once submitted.
Down the bottom of the form, you can also add a Follow-up right then and there.

Clicking this will bring up an extra field for you, to add in the follow-up notes/details, select a follow-up date and category/type.

Clicking submits will send this all to Rave, and refresh the form ready to load in the details of your next leads.
Homepage Hot Leads
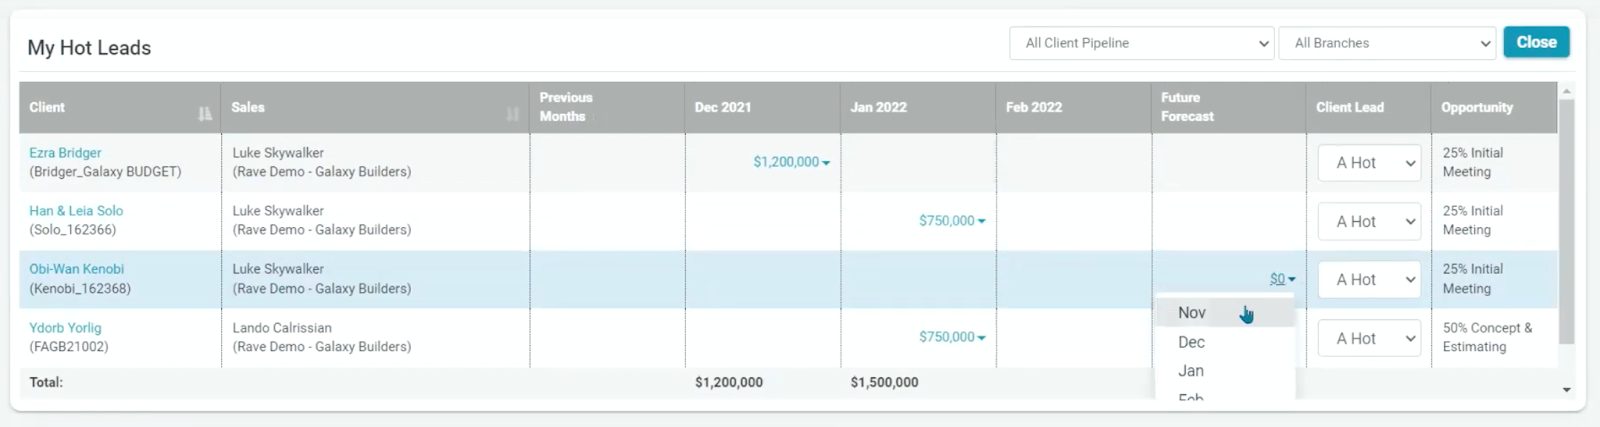
Any of your “Hot” leads, that have moved beyond a Sales Opportunities initial contact, will be displayed in your home page’s “My Hot Leads” section.

Here we provide a shortcut link back to the Client’s profile, who the salesperson is looking after this client, when are we looking to sign a contract with the client, and the client's expected signed contract value.
To update the expected contract close date/month, simply click on the dollar value figure below, and select the appropriate month from the drop-down.
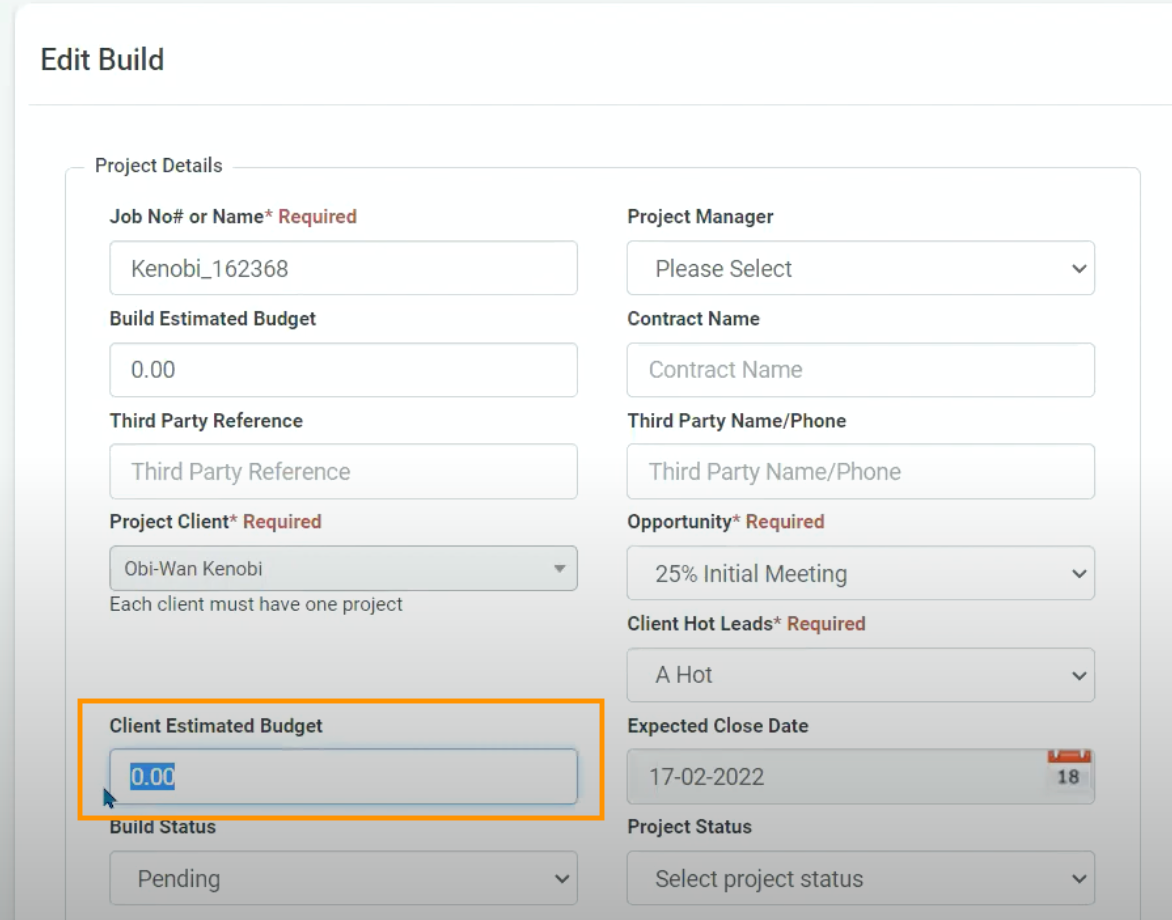
To edit the dollar amount displayed for the Client Build Estimate, you need to click on the Client’s name on the left, to head to the Client Profile. Once there, scroll down to the Project, and click “Edit”.
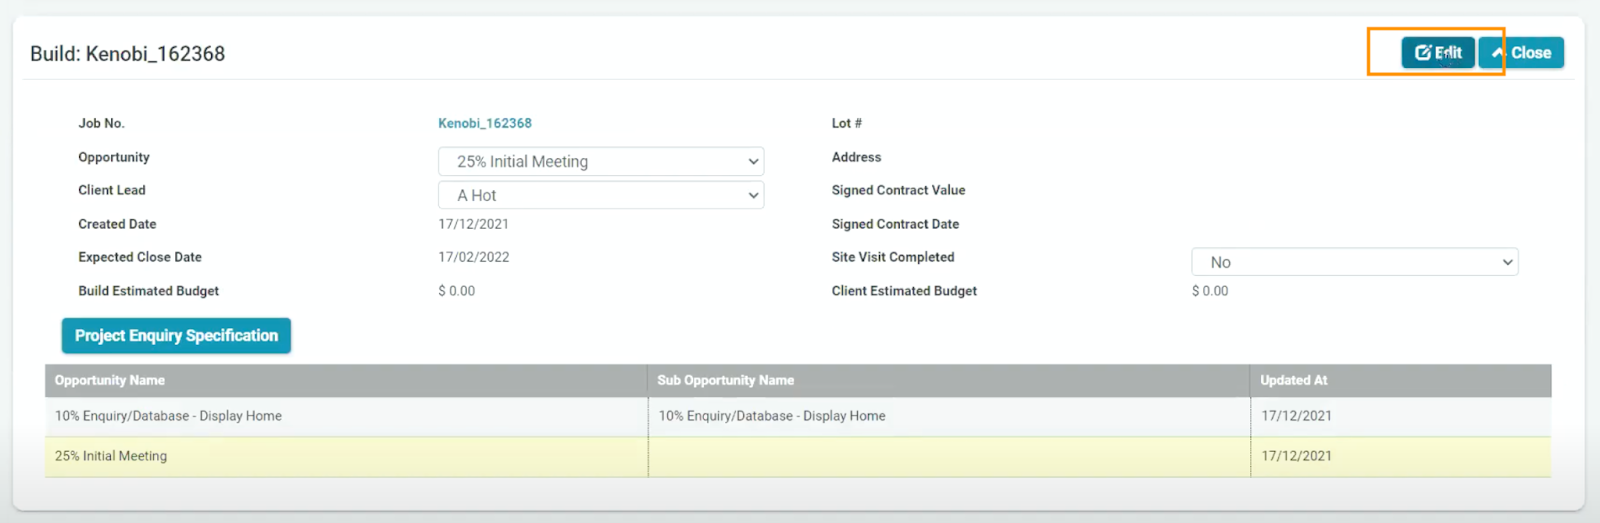
Then, from the Edit Build page, enter your new figure into the Client Estimate Budget field. Once saved, you’ll be able to see this new value loaded in on your home screen's Hot Leads section.
Reporting for the Sales Person
We have a range of Sales Reports that are available to help you better manage your sales performance. To check them out, go over to your profile name, and scroll down to “Reporting”

This will take you to the Sales Person reports page as shown below. First on the list to check out is the Salesperson Overview tab.
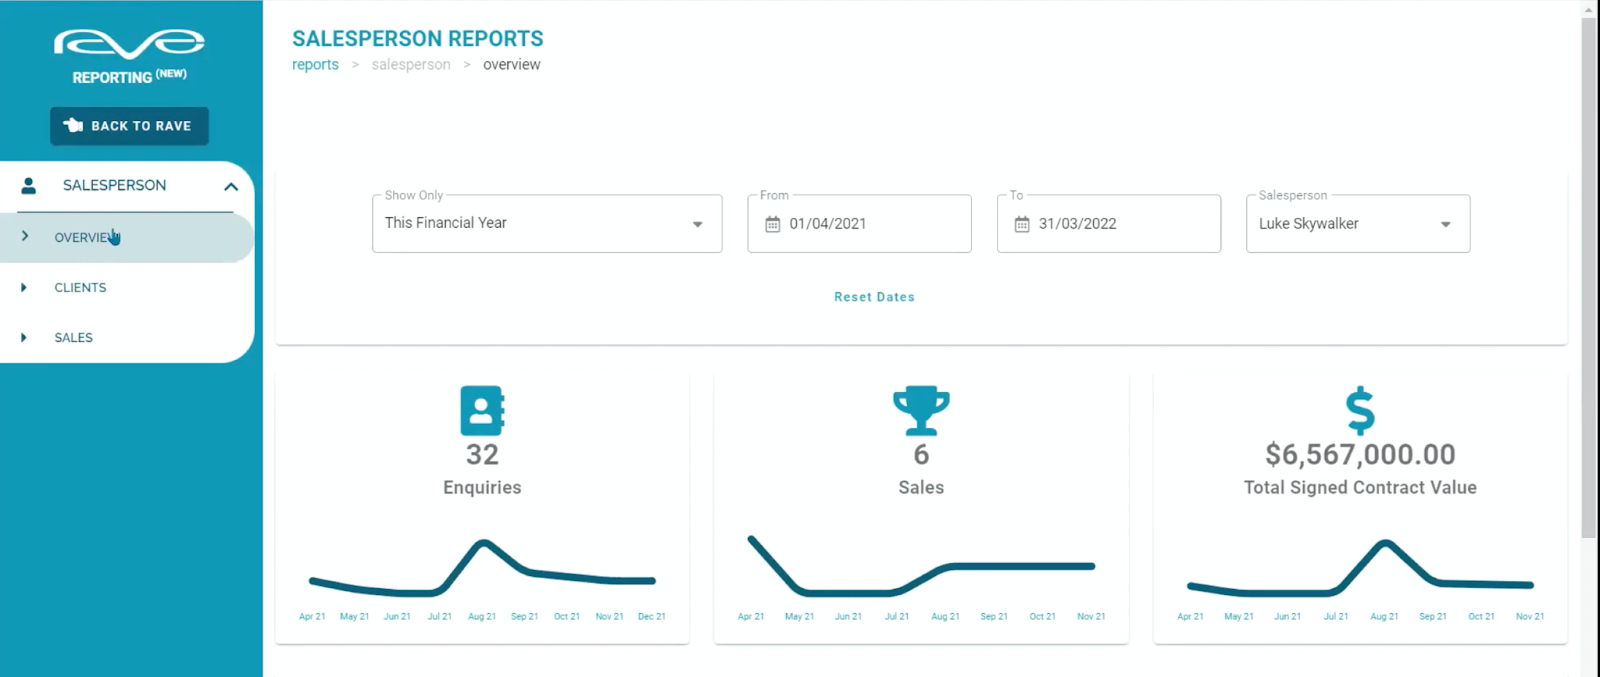
This is essentially a summary of your Sales activity, letting you know how you’re doing for a selected period of time. You can set your own custom date range for the report by clicking on the “From” and “To” calendar sections, or selecting from our handy list of pre-set date ranges.
The three metrics you’ll find here are Enquires, Sales, and Total Signed Contract Value.
- Enquires show the number of leads you’ve added or been assigned for the given date range.
- Sales show the number of signed contracts or leads marked as won for the given date range.
- Total Signed Contract Value is the value of signed contracts that have been marked as won, again for the selected date range.
Below these metrics, is the Sales Opportunity Stages graph.

This shows you the final state of any Clients added or moved along in the sales process, for the selected date range, it’s like a snapshot of where leads are at for the time period you’ve selected.
NOTE: As this graph shows new enquiries, as well as existing lead movement, the numbers in this graph, might be different from the enquiries figure above.
The Salesperson’s clients tab shows various ways to view and manage your Clients lists.
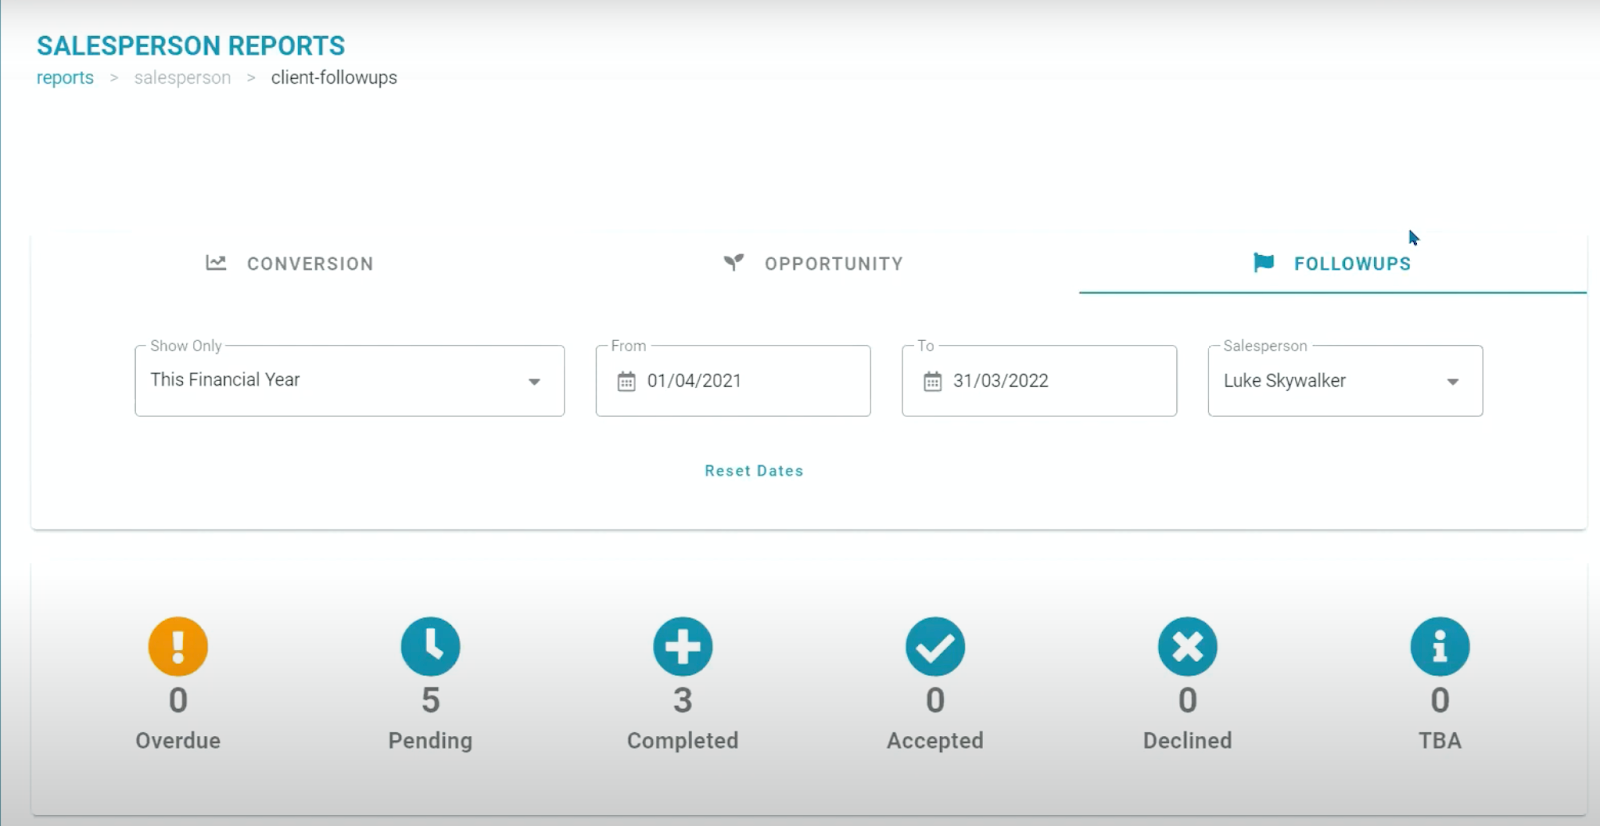
You’ll be taken to the Salesperson Follow-ups tab by default. This displays the number of follow-ups in the system for the given date range for this specific salesperson, you can edit the date range here as well as the salesperson whose reports you’d like displayed. To a certain extent, the report has been superseded by the three ‘My Follow-ups’ reports.
The Salesperson Client Conversion report displays a list of Clients won in the given date range, showing the Enquiry date, as well as the Signed Contract date.

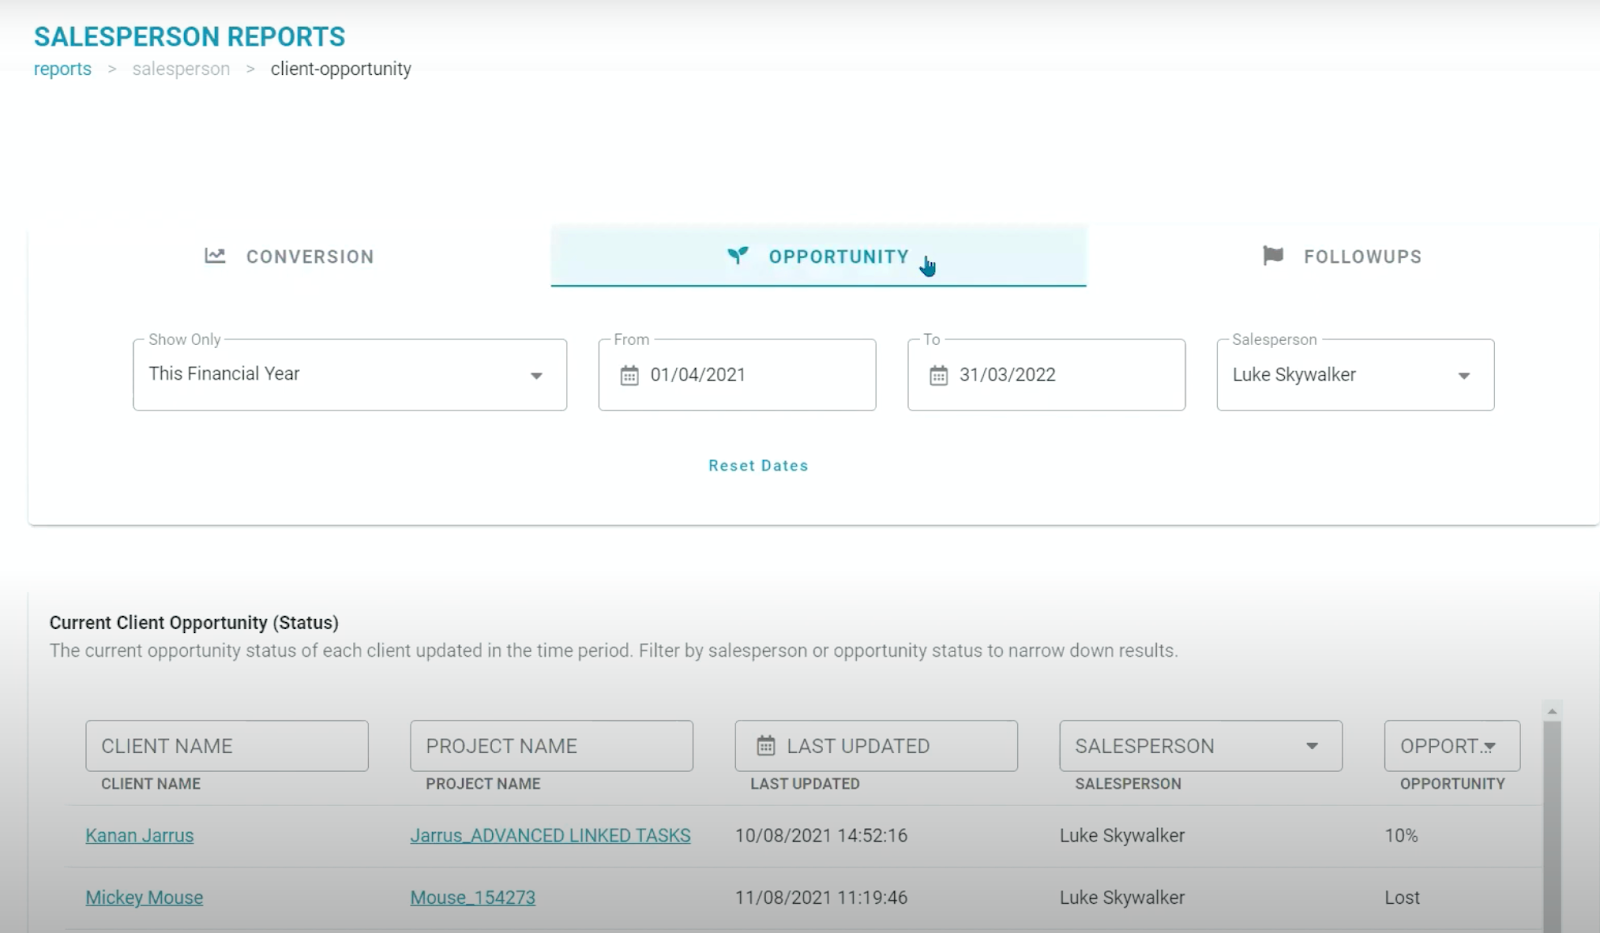
The Salesperson Client Opportunity report provides the details from the Sales Opportunity Stages graph that we looked at in the Overview.
The Current Client sales Opportunity table shows the final sales opportunity state for any Clients added, and any Clients who have been moved along the sales process in the given date range. Displaying the Client and Project name, when their opportunity was last updated, who the salesperson is that’s looking after them, and where they’re at in terms of their sales Opportunity. This is great to give you a look at a salesperson’s sales progress over a given period. By filtering by the opportunity, and then sorting by the Last Updated date, you can see leads than might require a follow-up.
Finally, we’ll check out the Salesperson Sales reports, which contain two awesome reports.
The first one is, The Salesperson Sales Overview report, which lists all of your sales leads, and their lead status (Hot/Warm/Cold), and very clearly displays the opportunity progress for the selected date range.

The current Opportunity state is displayed in the darker teal shade, and the dates of any opportunity movements are listed on the chart.
You can hide empty leads and/or lost/closed leads by checking the box on the top right-hand side of the screen.

The headers on this report act as both search and filter buttons, so if you need to find a specific Client, you can search for them via the Client header. You can also easily filter by Lead status using the Lead button.

The description of the Opportunity stage will be displayed when you hover over the percentage header.

Once you’ve finished customising the Sales Overview with your combination of filters and tick boxes - you can hit “Export” and easily export your report as a CSV file.
A handy tip is to use the Sales Overview report, filtered by Cold leads, to have a look at leads you might want to cast away.
The Salesperson Sales Pipeline deal stages funnel is similar to the Hot Leads sale forecast but displays all leads, not just the Hot ones. It gives you a breakdown of where each lead is sitting, given your expected contract close/sign date, and the value of each potential lead.

The months will match the reporting date range, plus a summary of the total to the right displays both the total number of leads in the range and the total expected value i.e. the “4” means four leads, and the “$2,500,000” means $2.5 million in total value.
Clicking on any of the individual fields, creates a table below the chart, with links to the Client profile, their project, the estimated budget, their current Opportunity stage, their email if you’ve got it loaded, and the Salesperson involved. It’s a great way to scan expected sales and to also identify leads you thought you might have signed in previous months, and reposition these with updated expected close dates.

Moving your Client through the Sales Opportunity (WON, Maintenance, Closed, and Lost)
From the Client's front page, you can move your Clients through their Sales Opportunity stages - your sales process. Click on the Opportunity field for that particular Client, and you’ll have a dropdown of options of where you’d like to move them too.
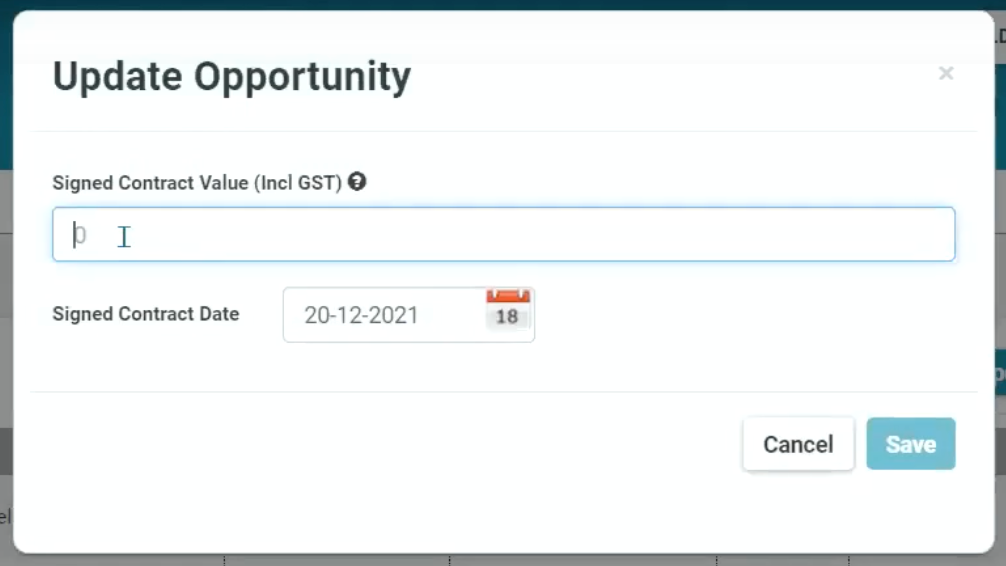
A Client who has decided to move forward after the contract presentation can be marked as “Won”. When you do so, a Client Won pop-up will be displayed, where you can add the signed contract value, and signed contract date (you can edit these details later if you do not have the correct details) and then hit save.
At the end of a build, you can choose to commence a maintenance stage. This is a period of a few weeks or months, which gives the Client the chance to identify any small fixes etc. that still need to be done.
After the maintenance period, or when you are ready, we can go ahead and mark the project as “Closed”. This will prompt the Client Closed pop-up to be displayed. We just select the category for why the Client is now closed and add any notes.
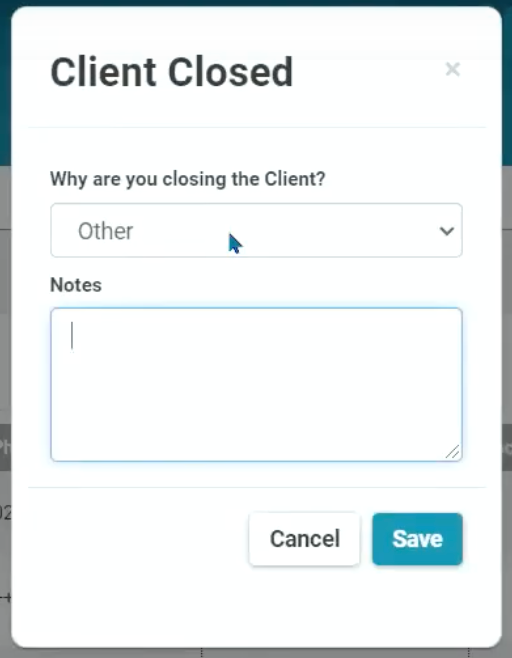
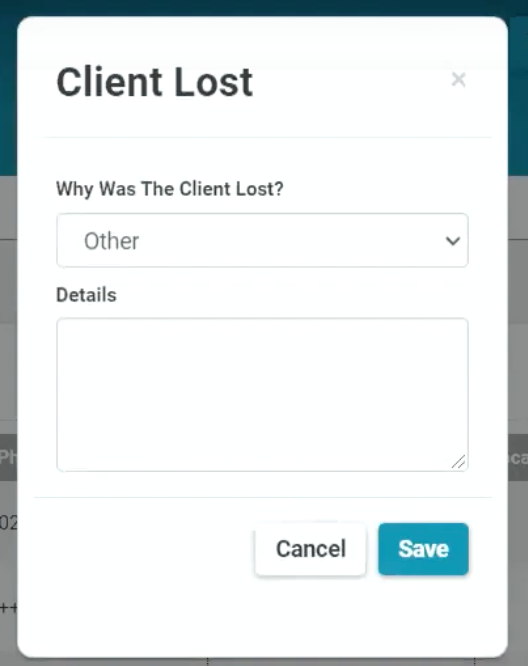
If a lead has decided not to build or has gone elsewhere, it can be marked as “Lost”, if you set this as their stage a Client Lost pop-up will appear. Select your category reason for marking them as Lost, add notes for why, and then hit save.
Once you’ve refreshed the page, you’ll see any lost or closed Clients will be moved away from your active My Client list and will now be available from the Closed Client list.
Creating the Client Login and Temporary Password
You can create a Client login and a temporary password by first clicking on the Clients button.
NOTE: If you haven't already added your first Client and created a project to share with them, or if you want to see how to set up a “dummy Client and project” to practice with, you can access our full Sales and CRM training here.
We need to find the Client with that we’re wanting to set up a log-in. We can do this by entering their name into the Client search bar as shown below.
Once the Client you’re looking for is up on the screen, click on “Show” to the right of the screen, to open their Client profile. Then click on “Edit”.
Scroll down to the bottom of the Client Edit screen, and click on the Client Log-in button to the left.

Copy the Client’s main email to use as their username (overwrite the existing username in this field), and ask Rave to generate a password or just enter one manually.
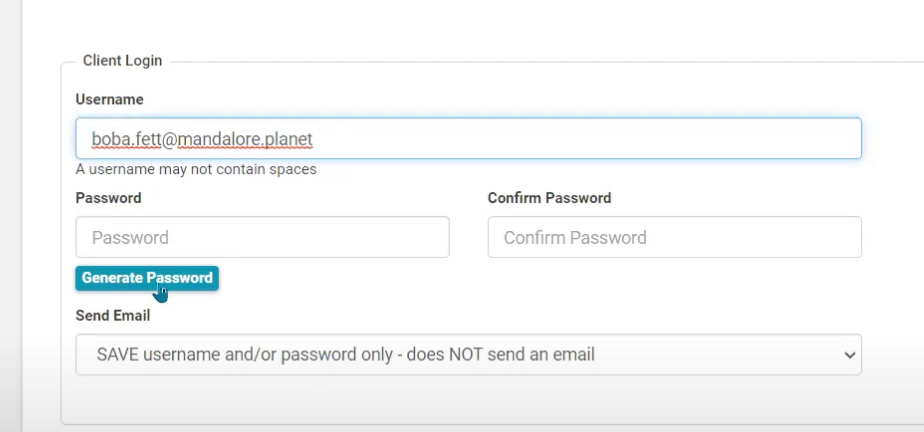
We then need to decide if we are sending an email to the Client or not, your options are shown in the dropdown and the screengrab below. Our options are to:

A). Update details only, and NOT send an email out
B). Send out a Welcome Email, with their login details
C). Send out an Update Email, with their UPDATED login details.
Each “send” option has a generic email message that you can preview, and edit as required, before sending. Any changes you make here can be saved as your own customised email template, which will be added to this Send Email drop-down for future use.
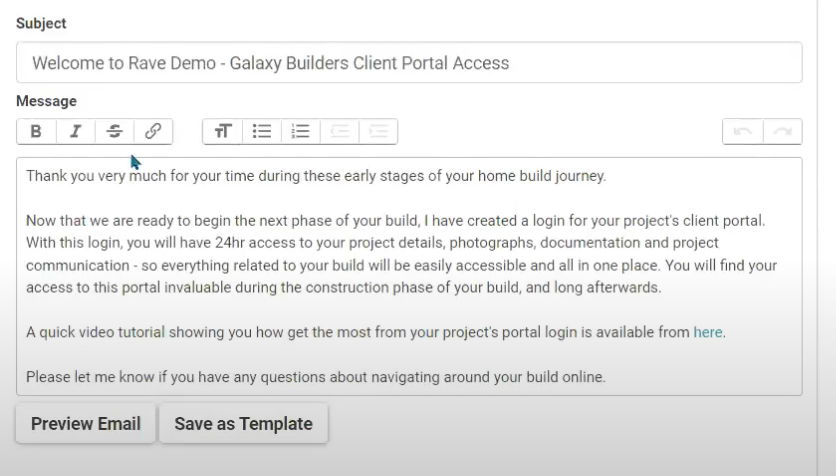
For example, both the Welcome and Update emails have a link to our generic Client portal training for your Clients. You might prefer to take your Client through this training yourself, and if that’s the case you can remove this part of the email from these messages. The generic Client’s project portal training video is linked here if you’d like to check it out.
Once you’re happy with the email, you can choose to save this message as a template, by clicking “Save as Template”, to give it a name and click save.
Finally, just click “Save Changes” once you’ve made all of the changes to your Client’s login. This is when (if selected) your Client will be sent an email with instructions for accessing their project portal.
Logging in as the Client - to double-check their level of Project access
It’s good practice to do a test login as the Client, before giving them their login details, to check that what they can access, is what we want them to see. A handy way to do this (If you’re using Google Chrome) is to open up a Google “Incognito” tab (or a private browsing session) so that we can log in via a completely separate session to your own login - preventing your session being logged out when logging in as the client. Another option here is to log in as the client through a different web browser i.e. Safari, Firefox, and The Edge.
So we go to the Rave Log-in page and enter the Client log-in credentials that we just created. You’ll notice that the Client login will provide a similar look and feel to your Rave log-in, but will be customised with your company's branding. To open up their job we either click on the job number or “Show”.
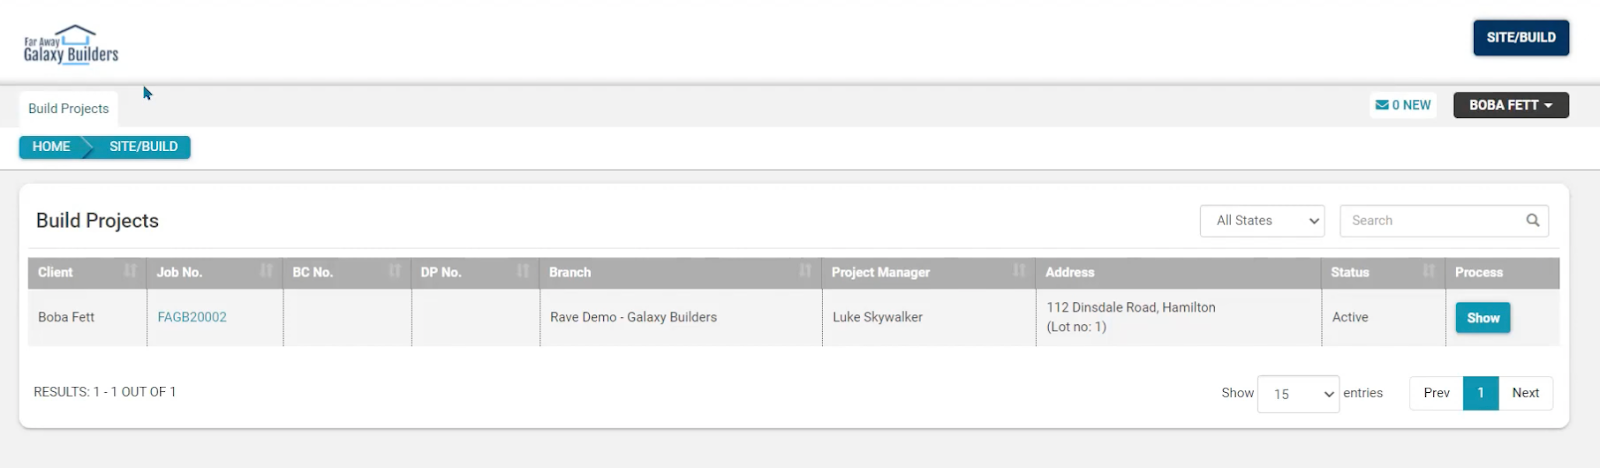
By default, the Client has basic access to their project -, that is the Project Overview, access to the Files sub-tab, and the project Messaging System.

You'll see that the project details are a slightly scaled-down version of what you can access through your own login as a Branch Level user.
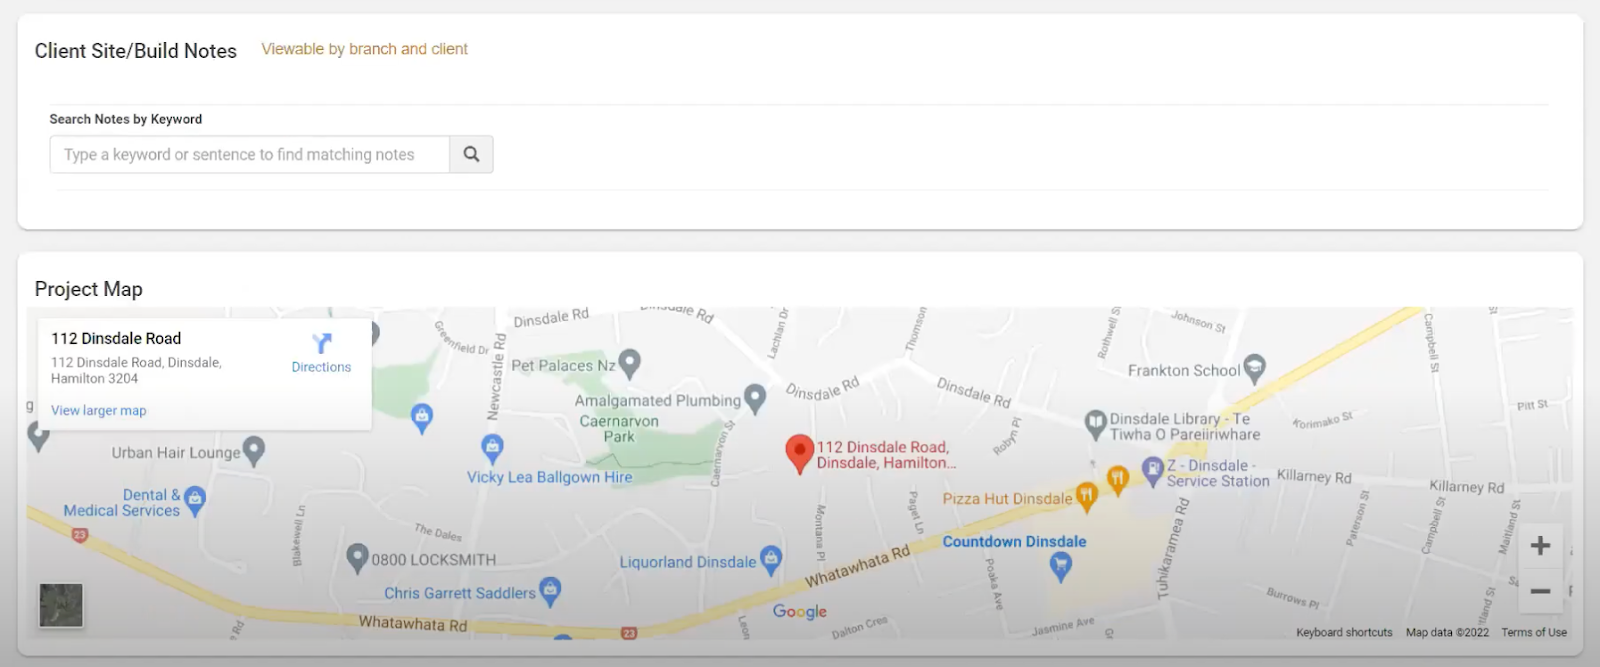
The Client will also have access to any Client notes you’ve added, and the Project map.
When it comes to Files, the Client will have access to a limited number of files, depending on their access permissions - with the ability to upload documentation as per those permission sets.

Clients also have access to the Rave Messaging system, which allows you to communicate with them with any updates and important details.
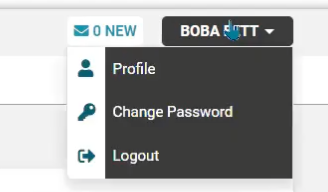
In the Client profile drop-down, we can see the Client has the ability to update any profile information, change their password, and log out.
Giving the Client access to the Schedule views
Access this demo here.
Giving your client access to their project schedule via RAVE is totally at your discretion. First you need to open the client’s project, go to the project’s“Schedule” sub tab.
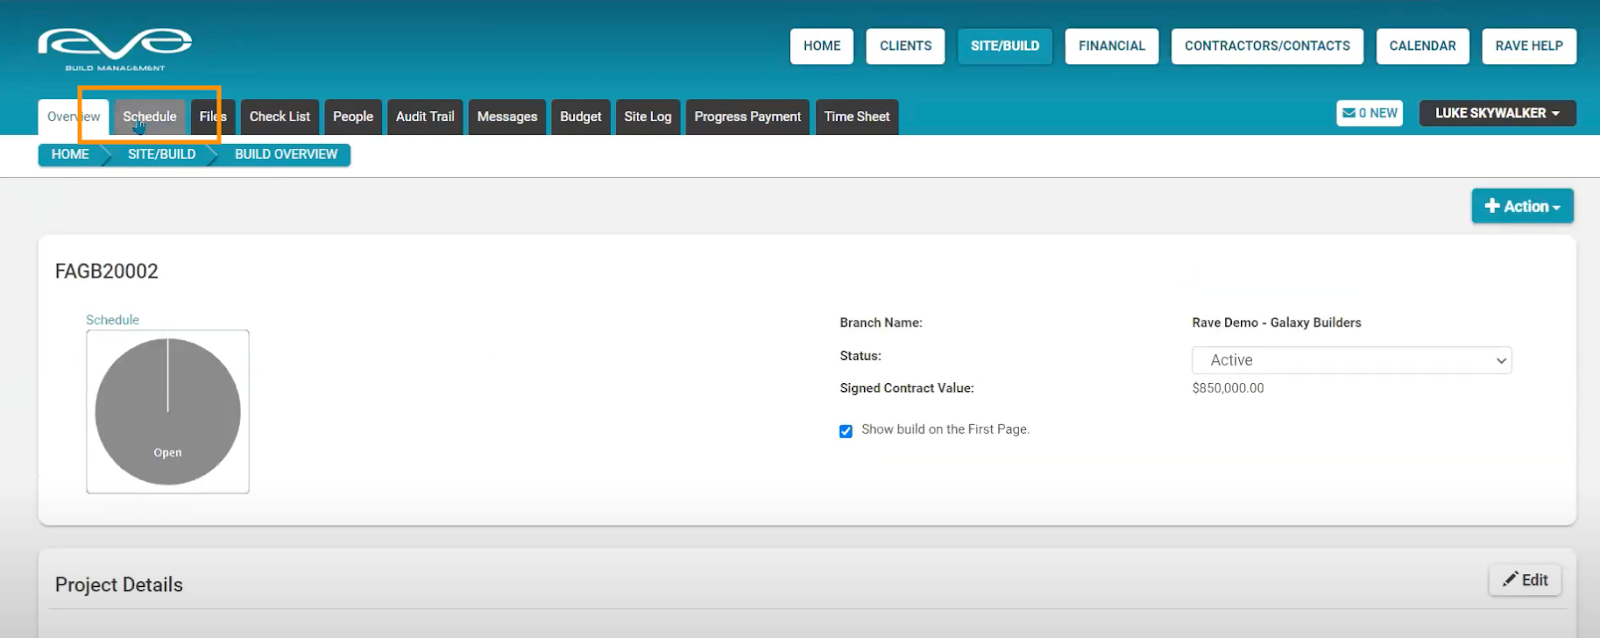
And then click on the schedules “Settings” sub tab.

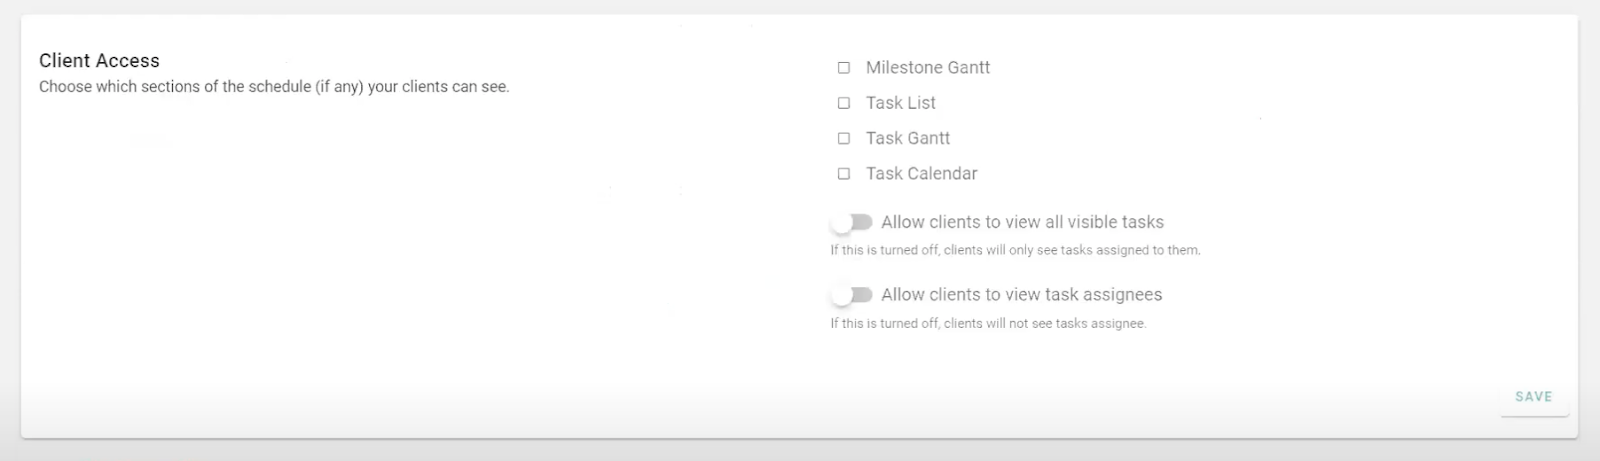
From here, we scroll down to the Client Access section. You can choose which sections of the Schedule (if any) that you want your clients to see - these are the same as your project schedule views. Typically these are all turned off by default, but we can easily click on the various views to give the Client access. Once you’ve selected the relevant views, hit “save” and “confirm”.

To test if this has worked, go back to your Client log-in view (via a chrome incognito or other web browsing session) and refresh your page. You’ll see their project’s Schedule sub-tab will now be displayed, and when you click on this, you will see the schedule views you’ve given access to.
Sharing assigned task ONLY access
Access this demo here.
If you've assigned a few tasks for your Client to action within the Schedule, and you ONLY want them to be able to see those assigned tasks, we need to turn the Task List and/or the Task Gantt view on, and you will need to ensure the “Allow clients to view all visible tasks” is switched off. This will allow the Client to see the tasks assigned to them only.
NOTE: Leaving this switch turned on will allow clients to see all of the visible (non hidden) tasks in the schedule.

To test this has worked, go back to your Client log in, and open the project’s schedule task list or task gantt view (via a chrome incognito or other web browsing session) and refresh your page - you should be able to see their updated project view accordingly.
Allow Clients to view all visible Scheduled Tasks and Task Assignees
Access this demo here.
Once you’ve provided your client access to either the Task List and/or the Task Gantt view, you can also allow Clients to view all visible (non-hidden) scheduled tasks and to view the task assignees. This is done via the client’s project / schedule sub-tab / settings, scrolling down to the Client Access section, and turning on either the Task List and/or the Task Gantt views.
Flicking the ‘Allow clients to view all visible tasks’ switch - will allow clients to see all of the visible (non-hidden) tasks in the schedule. Leaving this switch turned off, means clients will only see tasks assigned to them.

Flicking the ‘Allow clients to view task assignees’ switch - will allow clients to see whoever is the primary assignee of any visible (non-hidden) tasks in the schedule. Leaving this switch turned off, means clients will not see other primary task assignees.
To test this has worked, go back to your Client login, open the project’s schedule task list or task gantt view (via a Chrome incognito or other web browsing session), and refresh your page - you should be able to see their updated project view accordingly.
NOTE: If this is too much access to give your Clients, just head back to your Branch log-in view, and remove access from the portions of the Project Schedule that you’d like to keep hidden from the Client. Once again, feel free to test this in the Client log-in with a simple refresh, you should see their view update accordingly.
Sharing assigned task ONLY access
Access this demo here.
If you've assigned a few tasks for your Client to action within the Schedule, and you ONLY want them to be able to see those assigned tasks, we need to turn the Task List and/or the Task Gantt view on, and you will need to ensure the “Allow clients to view all visible tasks” is switched off. This will allow the Client to see the tasks assigned to them only.
NOTE: Leaving this switch turned on will allow clients to see all of the visible (non-hidden) tasks in the schedule.

To test this has worked, go back to your Client login, open the project’s schedule task list or task gantt view (via a Chrome incognito or other web browsing session), and refresh your page - you should be able to see their updated project view accordingly.
The Branch client access MASTER Settings button (restricted to branch owner access)
Access this demo here.
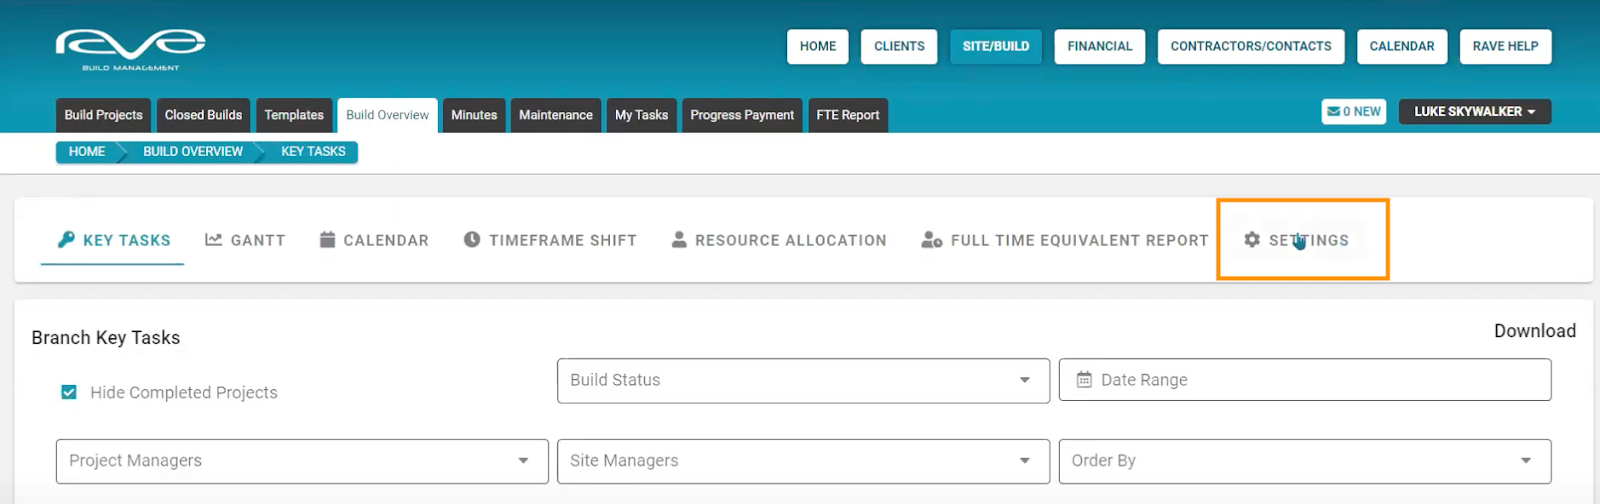
We have a Master Switch that allows you to control the default level of access for your Clients can see via their client login. You can access this by clicking Site|Build / Build Overview.

Then, click on the ‘Settings’ sub-tab, to access our Master Settings page for the Branch.
We then scroll down to the Client Access section. The level of access we set here, will become the default level for all Clients across all Projects - this action is restricted to Branch Owner Access only.

NOTE: You can always customise the client’s level of access to their project via the project’s schedule settings page.
Giving access to a Client weekly/daily Site Log
Access this demo here.
Giving a Client access to a weekly or daily Site log allows another avenue for you to communicate with a Client as well as keep them updated on the progress of their build. These logs can contain photos, video, comments, and documentation, so can be very thorough when it comes to keeping your Clients in the loop.
Rave will notify the Client each time a new comment is added, this will only be visible to the Client if you have allocated the Client to the task, and are sharing the Task List, and Task Gantt view of the job.
Adding in an entry is really easy to do, we just add in our comment, attach any documents and click submit!
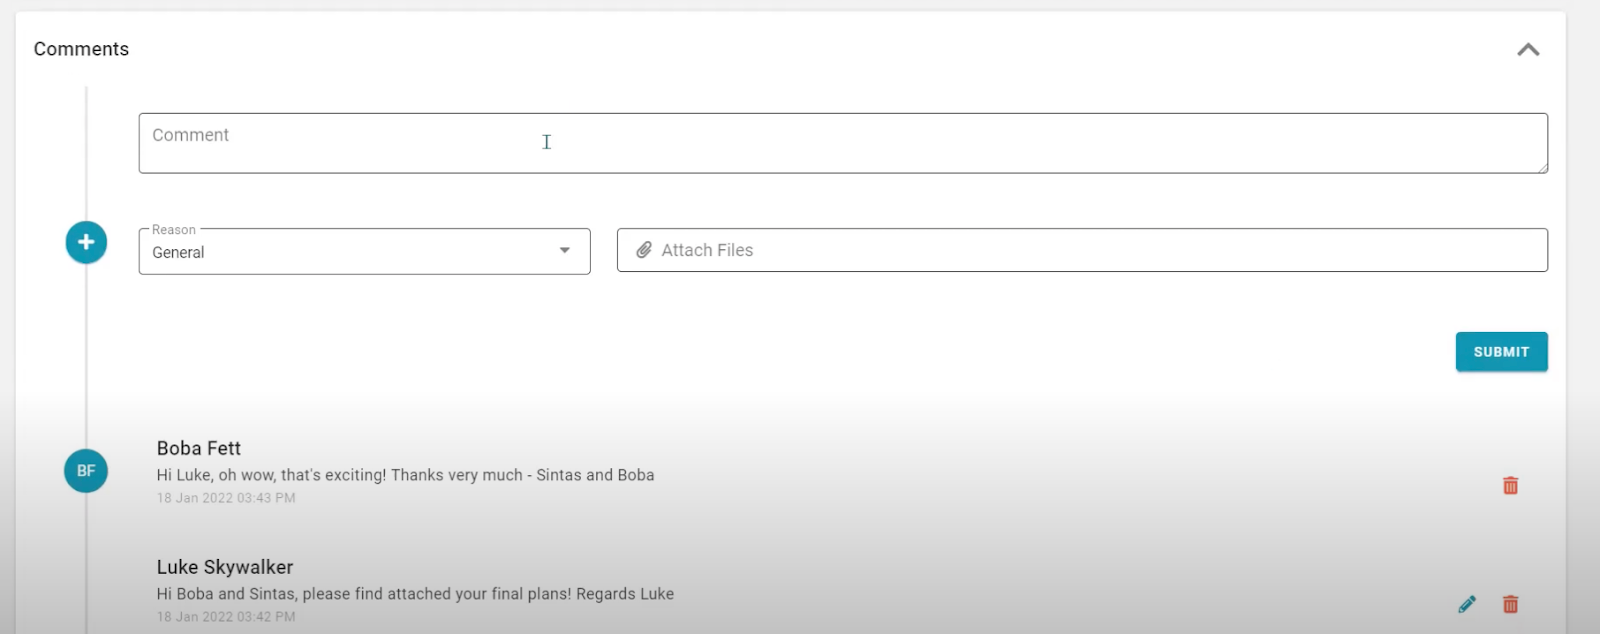
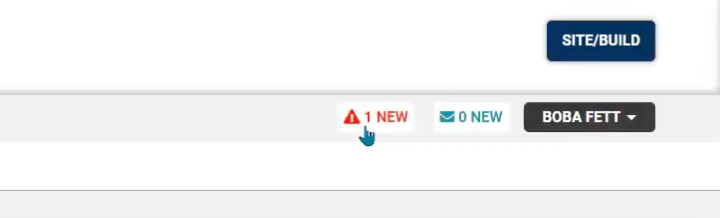
This is another thing we can test out by heading to our Client log in, and refreshing the screen. In the example below we can see that a new alert is loaded here, letting us know that the project manager has added a comment. Check out the demo we linked at the start of this section, to see how we can test the “back and forth” between the views.
You can also check out a comprehensive tutorial on creating a Client daily site log here.
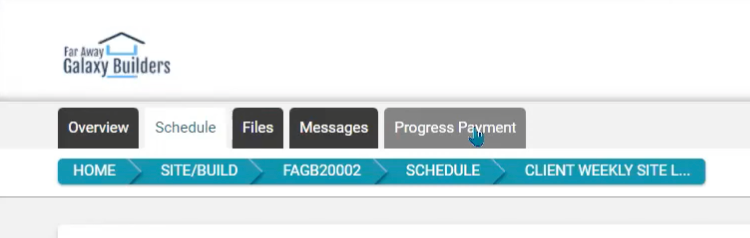
Giving the Client access to the Progress Payment sub-tab
Access this demo here.
The final Project sub-tab that we can choose to give the Client access to is the Progress Payment sub-tab.

This tab duplicates the client's contract payment schedule, listing all of the payments we will request from the Client - like Non-contract payments, Pre-consent and Unconditional deposits, Other items, Stage Claims payments, and any Variations. There’s also a summary at the bottom of this page of what is “to be paid” and what’s been paid to date.
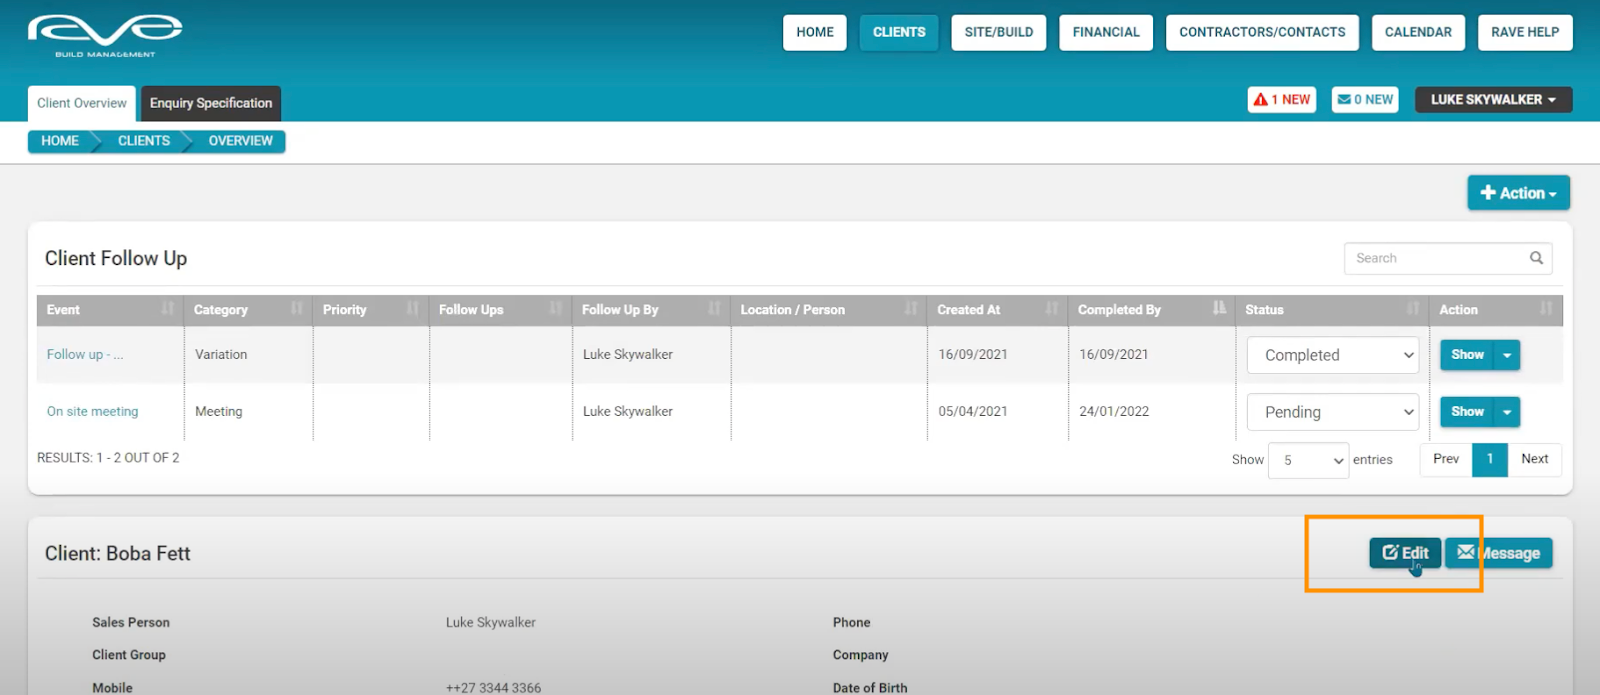
So, to give the Client access to this page, we scroll back to the top of the page, click on the Project Overview sub-tab, click on the Client profile link, and click on the Edit Client Profile button.
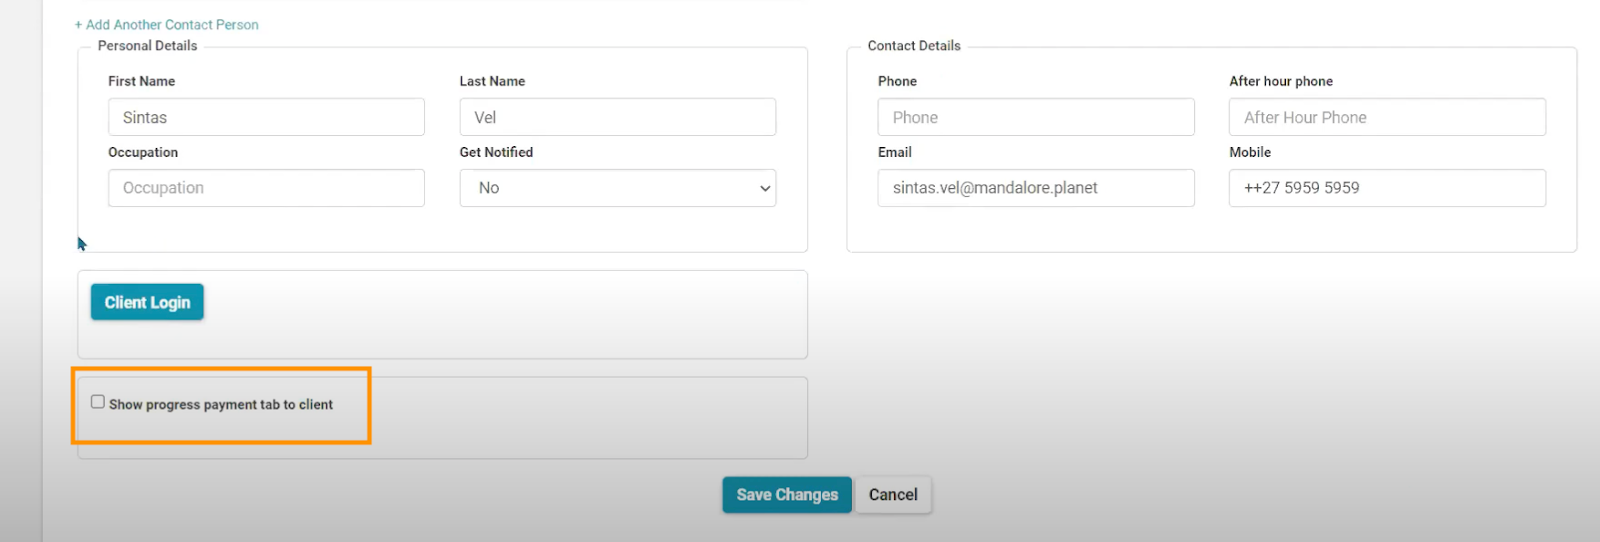
We scroll down to the Client log-in section, tick the “Show progress payment tab to Client” tick box, then save our changes.
If you have a Client log set up already, we can test out the client's access by heading to our Client log-in, and refreshing the screen. You’ll see the Progress payment tab has popped up. This view mirrors the branch view we just looked at - except the Client has the ability to view and print receipts for any payments made. They also have the option to print the whole Progress Payment page if they need documentation to take to the bank as proof of the sums required.