Your project's ‘Overview’ sub-tab page lists the key details for the project. Many of these details are shared with your site staff, contractors, and even your client - if they have been given access to the project via the project's people’s sub-tab. The idea here is that the more information you can provide for your sub-trades, the fewer unnecessary phone calls you should be getting each week.
TIP: Project managers who are really using RAVE's systems to the max, report that they are saving up to two hours per project, per week in reduced phone calls and rework.
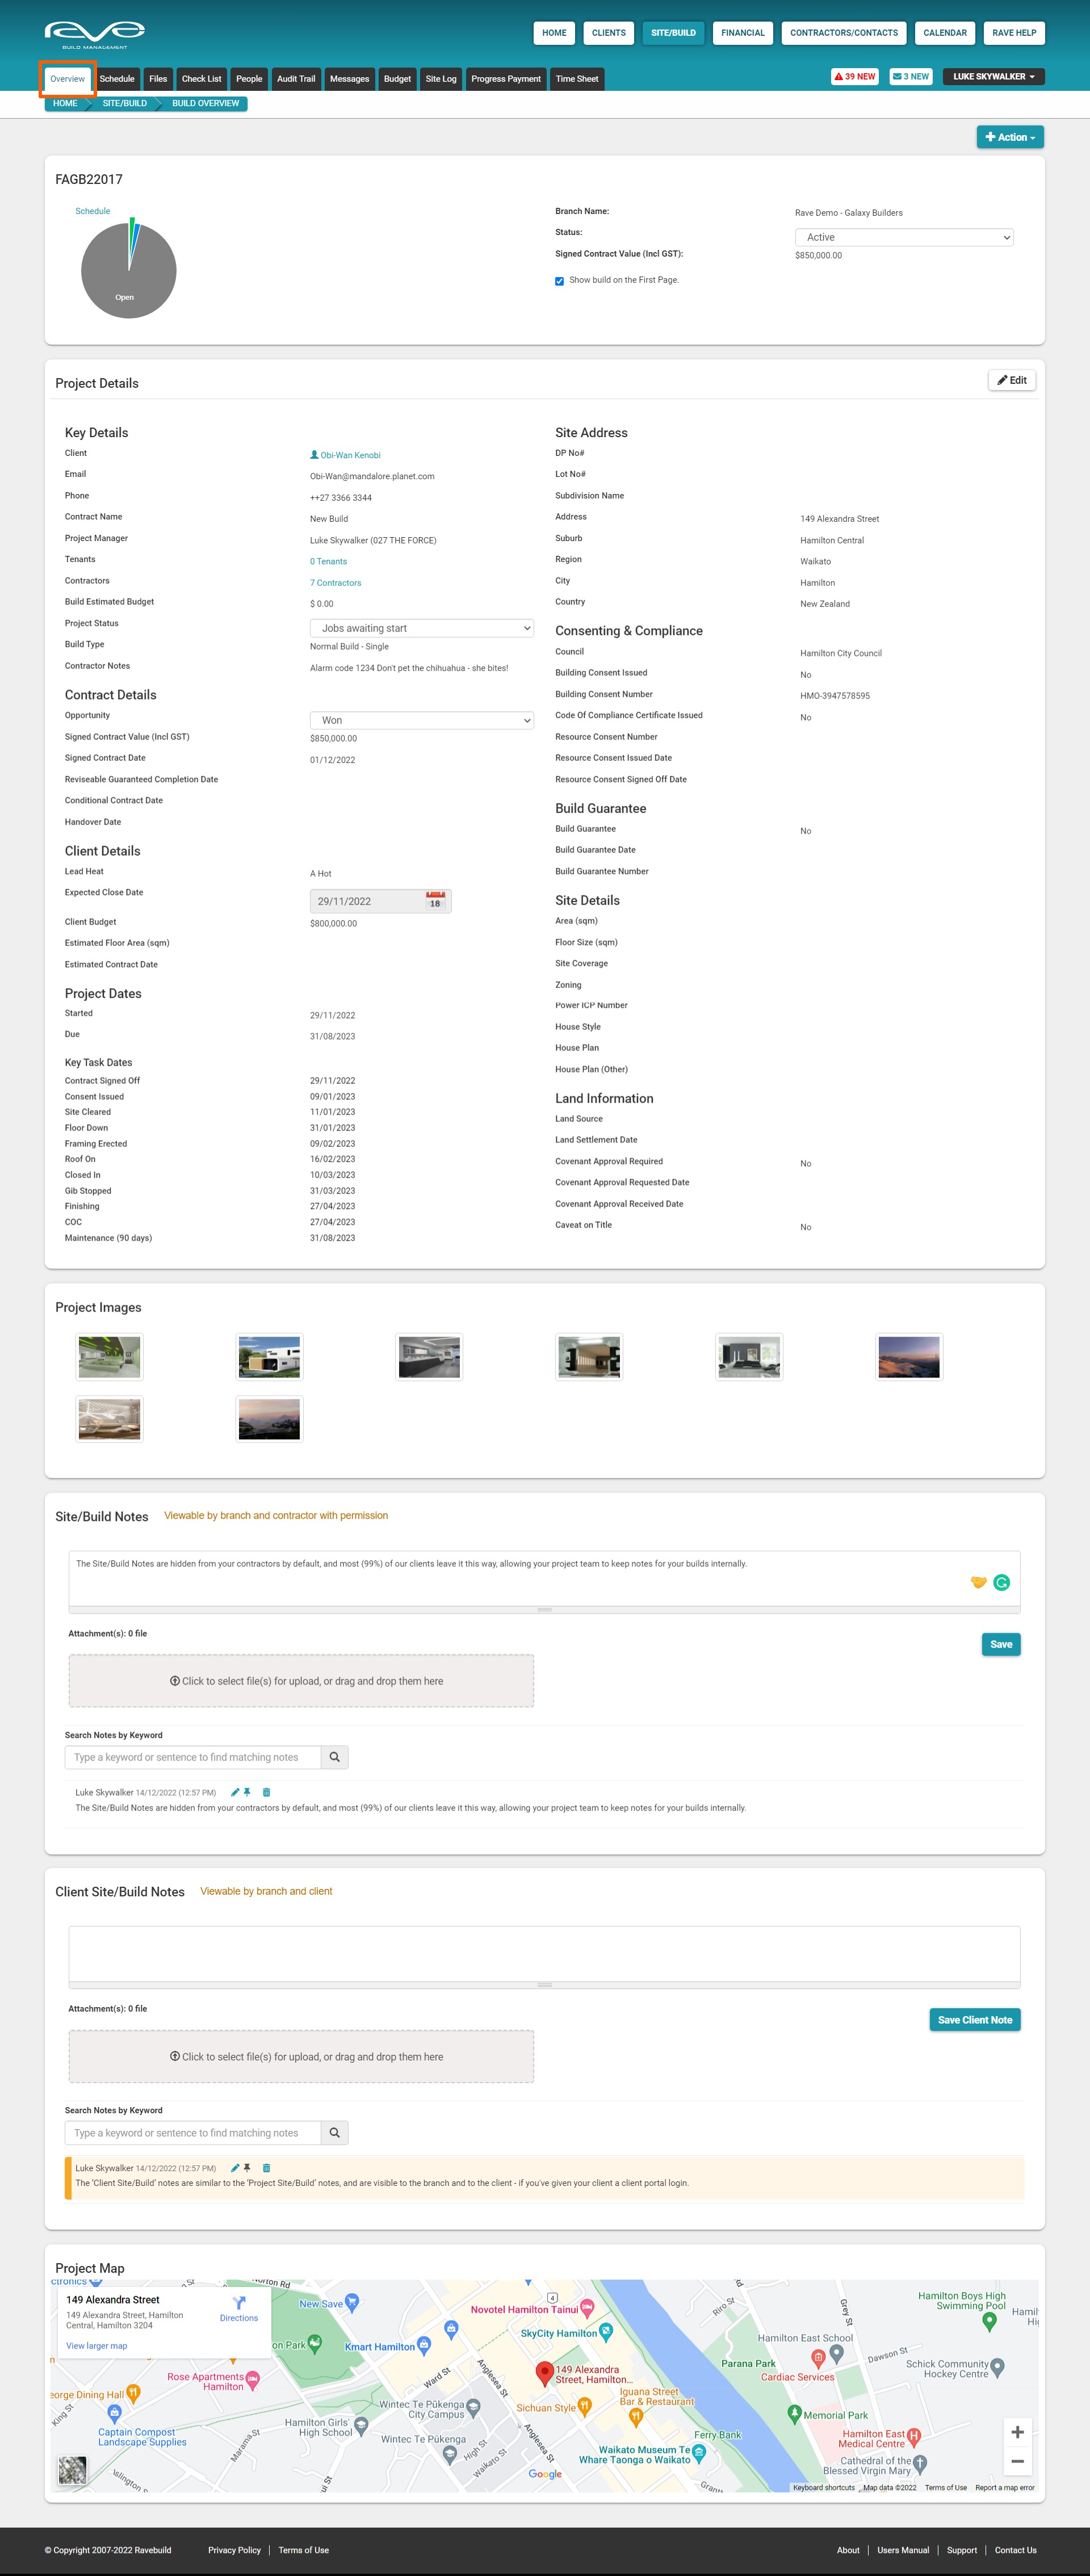
Working down the page, to the top left we see the job number, which may default to your clients last name + a reference number, but is typically adjusted to the site address, or whatever job numbering system you use.
Below the job number, is a shortcut link to the ‘Schedule’ sub-tab, plus a quick reference pie chart summary of the schedule's progression - if a schedule has been loaded to this project. As the job schedule progresses, the completed tasks (blue) will slowly expand out, until the full pie chart has turned blue - we go into more detail of this in our schedule trainings.
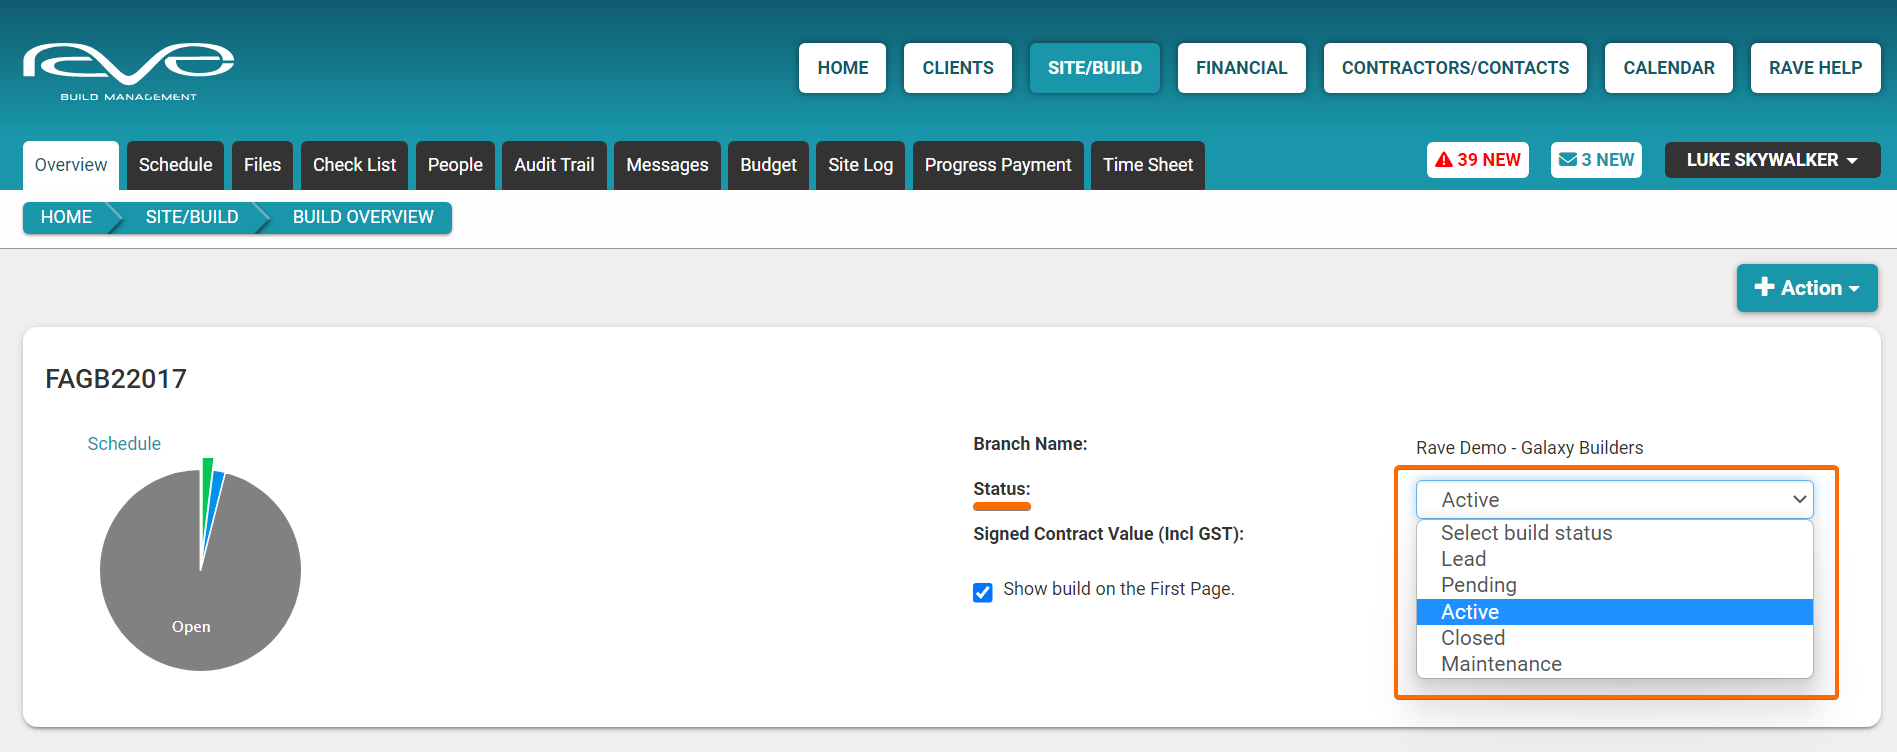
To the top right of this page, you will find your branch name, the Build 'Status' dropdown menu, the Signed Contract Value' if loaded, and the 'Show Build on the First Page' tick box.

The Build ‘Status’ dropdown menu, helps control the visibility of the project to your site staff, contractors, suppliers, and clients. Only projects in an ‘Active’ and/or ‘Maintenance’ state are visible to users outside of your business.
- The ‘Lead’ status is used when the project is still with the sales team - contractors do not need to access project's in this state, these project's are also hidden from the construction team when the 'All States excl Lead' project list filter is on.
- 'Pending' usually means that the job has been 'WON' but construction hasn't started yet, or you're wanting to keep the project hidden from external parties - this is generally the default setting for your projects.
- 'Active' means that construction has started, or you're ready to show the project to external parties.
- 'Maintenance' means the project has been completed, but you are now in your maintenance stage of the job (if any) - that period of time where you return to fix any maintenance issues that pop up.
- 'Closed' means the job has been finished, and any required maintenance work/period has been completed. This Status moves the project from your active project list to your closed project list.
Again, the default status is pending which means the project is kept hidden from anyone outside of the branch, and stays this way until the sales team has signed a contract to mark the job as WON, or you manually change the status to Active or Maintenance.
The 'Signed Contract Value' is added when the sales team has marked their contract as WON. It is only visible to the branch and your client - but only if you've given your client access to the job, which we cover in our Client Portal Setup training.
The 'Show build on the First Page' check box prioritises your jobs to the top of your build project list, and highlights them in bold also - this is a per login setting - meaning each project manager can prioritise their own builds. If you have more than a page's worth of prioritised builds, these will carry on at the top of the second page.

Moving down the rest of this page, we share the key details of the project, like the site address, consent number, project images (copied from the files 'Images' folder) Site/Build Notes, Client Site/Build Notes, and location map etc. We'll look at how to update these details shortly.
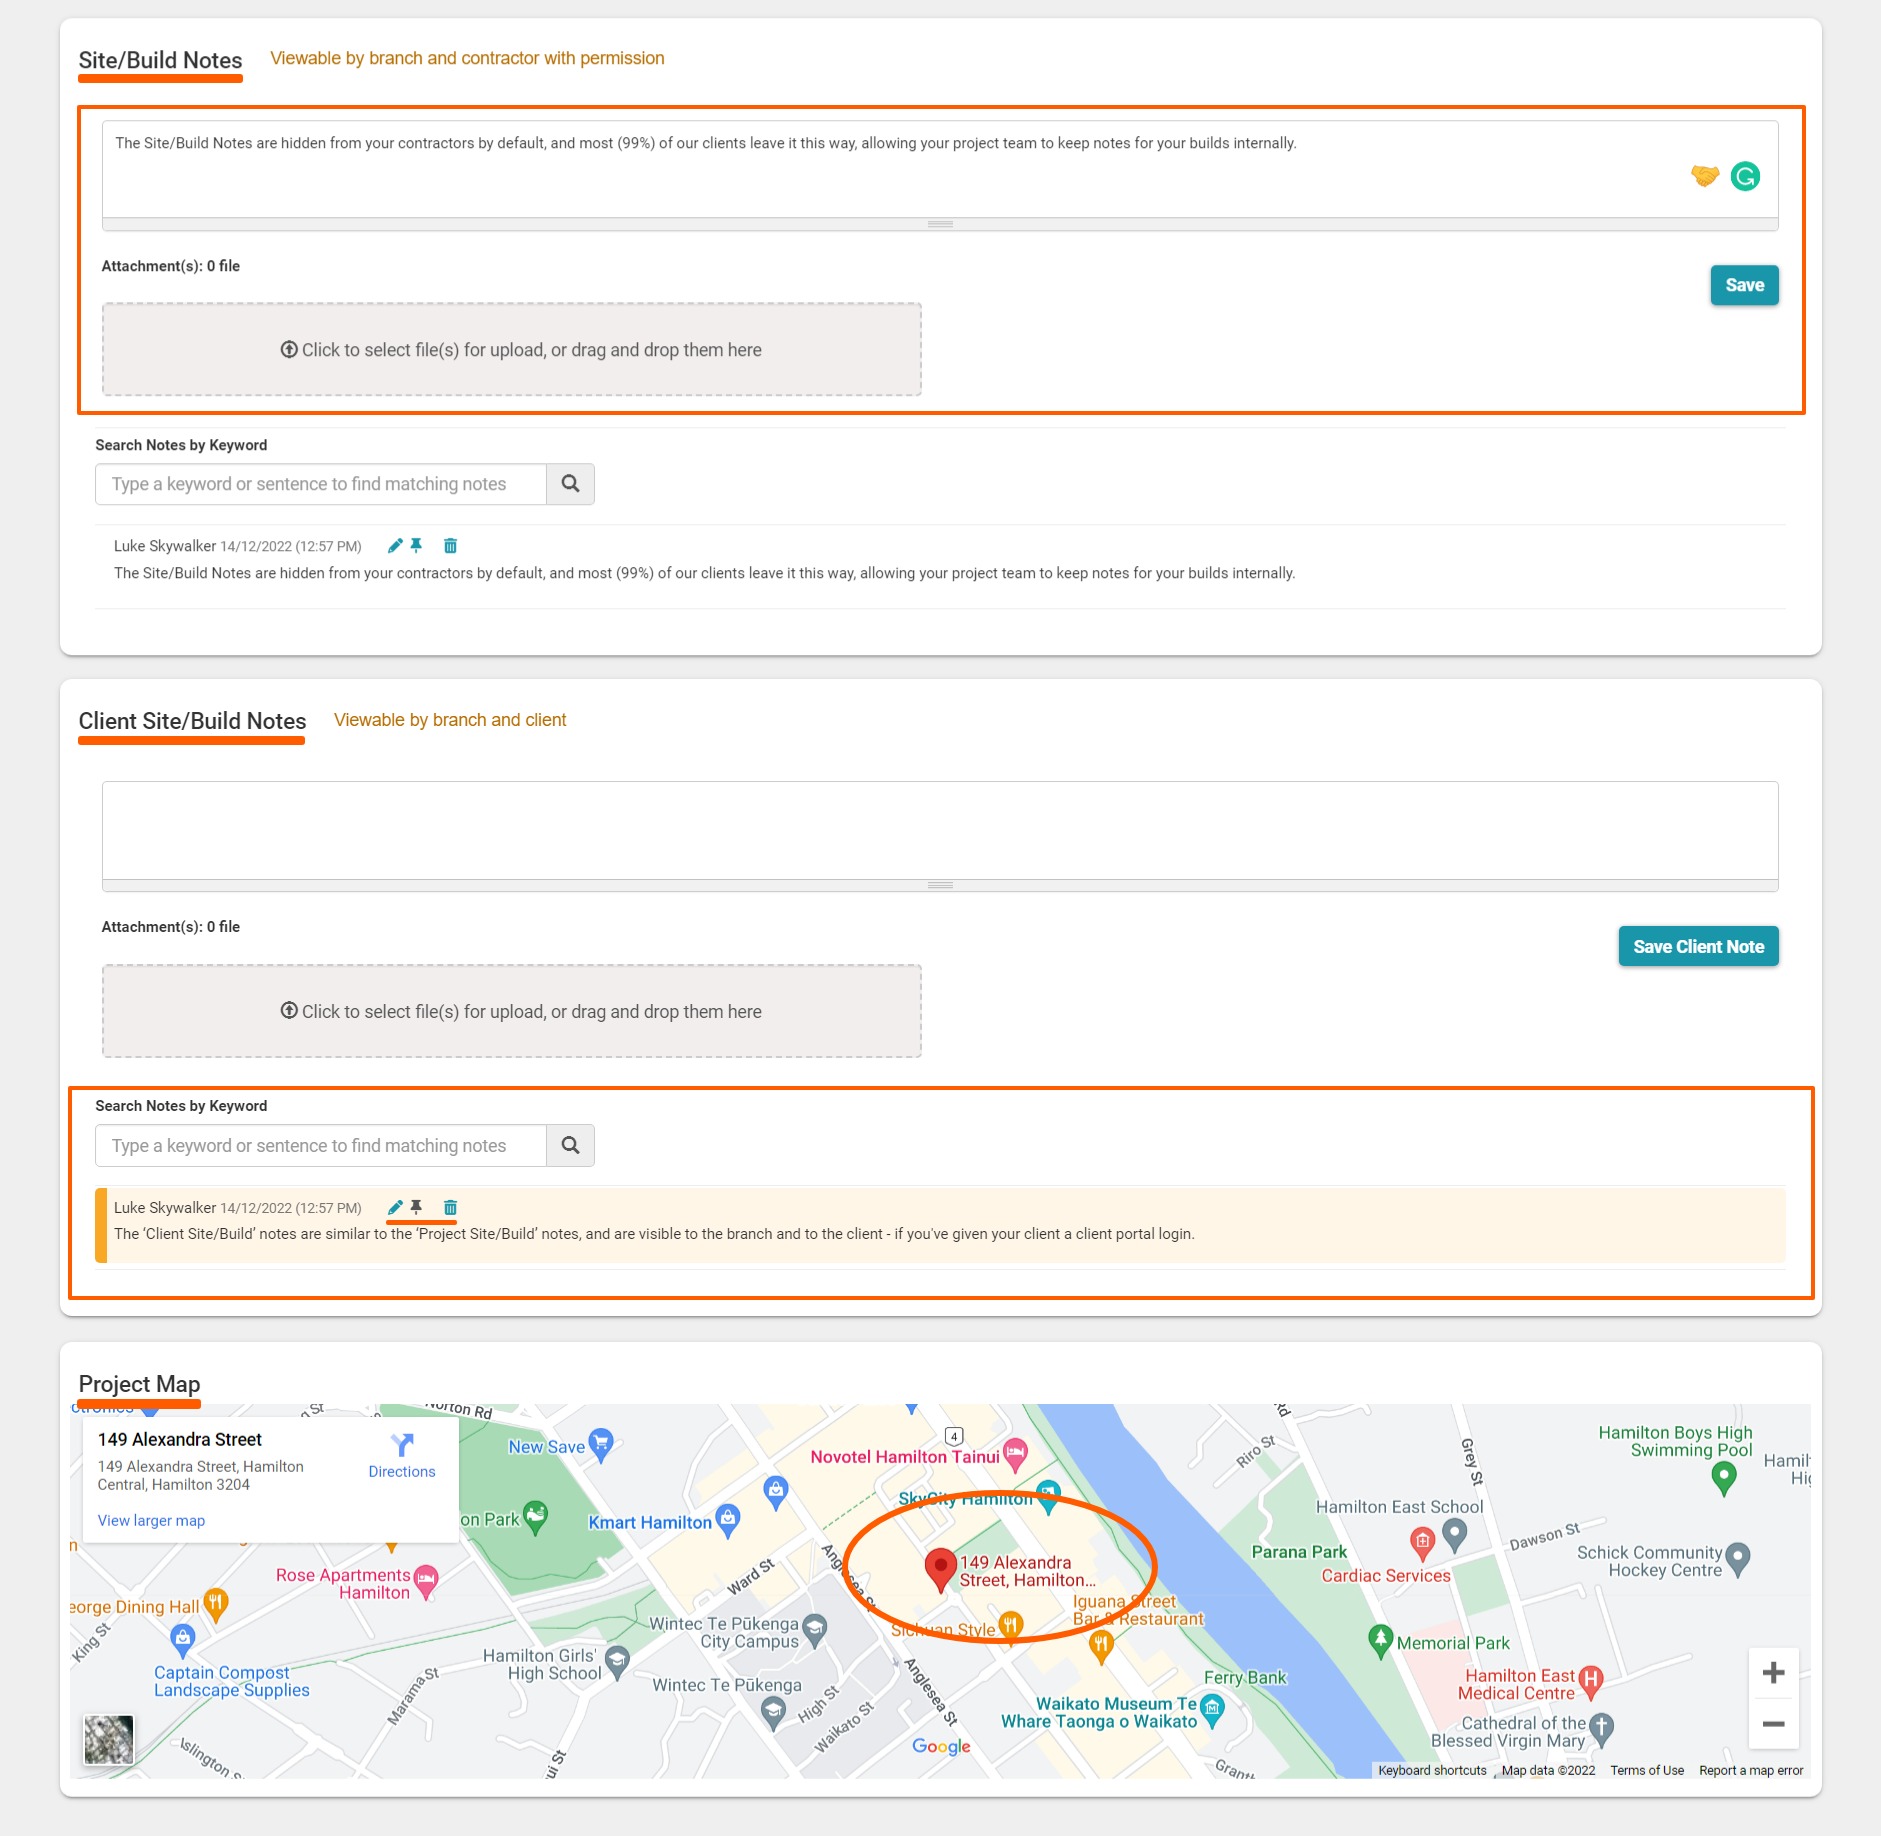
Site/Build Notes + Contractor Visibility
The Site/Build Notes are hidden from your contractors by default, and most (99%) of our clients leave it this way, allowing your project team to keep notes for your builds internally.
Adding notes is pretty straightforward - you can type in text and attach images and other documents via the 'Click to select file(s)' section. Notes are saved in date order, from oldest down to the newest, also highlighting who added the note. Notes can be edited, pinned to the top, and deleted via the pencil, thumbtack, and trash can icons.
NOTE: If you really want to turn on your contractor access, across ALL of your projects, contact us via phone 07 210 2228 or email help@ravebuild.co.nz to request this.
The Client Site/Build Notes
The ‘Client Site/Build’ notes are similar to the ‘Project Site/Build’ notes, and are visible to the branch and to the client - if you've given your client a client portal login.
NOTE: Adding a client site/build note WILL generate an email to your Client, letting them know their project has a new update - if you are not intending to give your client access to their project, do not add any Client Site/Build notes here.
The Project Map
The ‘Project Map’ section, is powered by google maps, and uses the site address entered into the project details, or the nearest location if the address is empty, or not recognised by google i.e. a new subdivision that hasn't been communicated to google yet. The project map is visible to all users who have been given access to the job.
Editing the Build Details
Generally, the more information we can provide our contractors via the project details, documents, the schedule etc, the fewer phone calls we should be answering. A great example of this is the project details, most of which are shared with our trades - the exception being financial information on this page and the clients details.
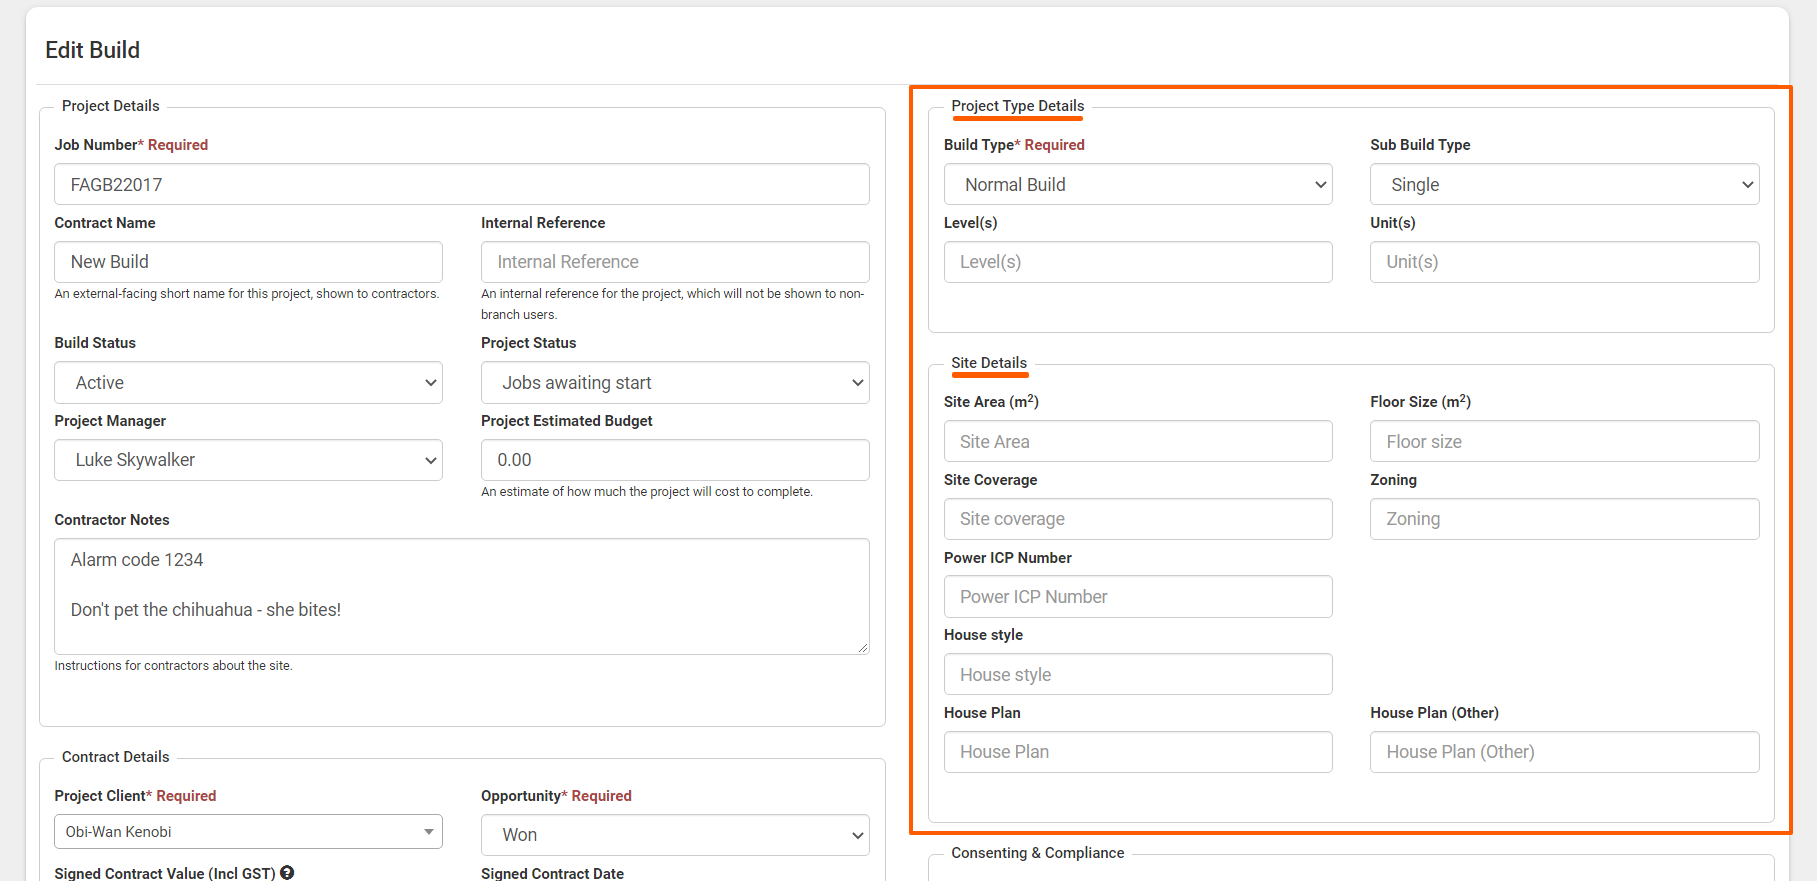
We can edit the Project Details information by clicking on the 'Edit' button over to the right. This takes us to the Edit Build screen, where we can fill in details as required.

Project Details
The 'Job Number' is located to the top left of the page - generally the job defaults to your clients last name + a six-digit code. You can overwrite this with the site address, the client's name, and/or your own internal numbering system.
The 'Contract Name' appends to the end of the Job Number on reports and outbound communications to your trades - it's a chance to add additional details - like the site address, or whether the job is a NEW build, a bathroom renovation, or extension, etc.
The 'Internal Reference' is an optional field to use, and is not visible to your trades.
The 'Build Status' and 'Project Status' can be updated here, as can the Project Manager assigned to the job.
The Contractor Notes' is where you can put key points for anyone coming on-site i.e. lock box and alarm codes, reminders and special instructions, health and safety issues, and any other key points for them to see.

The Project Type + Site sections
To the right we have the ‘Project Type’ and 'Site Details', while the 'Build Type' is a required field, the rest of these fields are optional.
The Contract Details + Client sections
Back to the right are the 'Contract + Client Details' - you can update the client attached to this project via 'Project Client' dropdown. The 'Opportunity' and 'Lead Heat' are populated at the time of adding the client, these details can be updated here, and again the rest of these fields are optional.
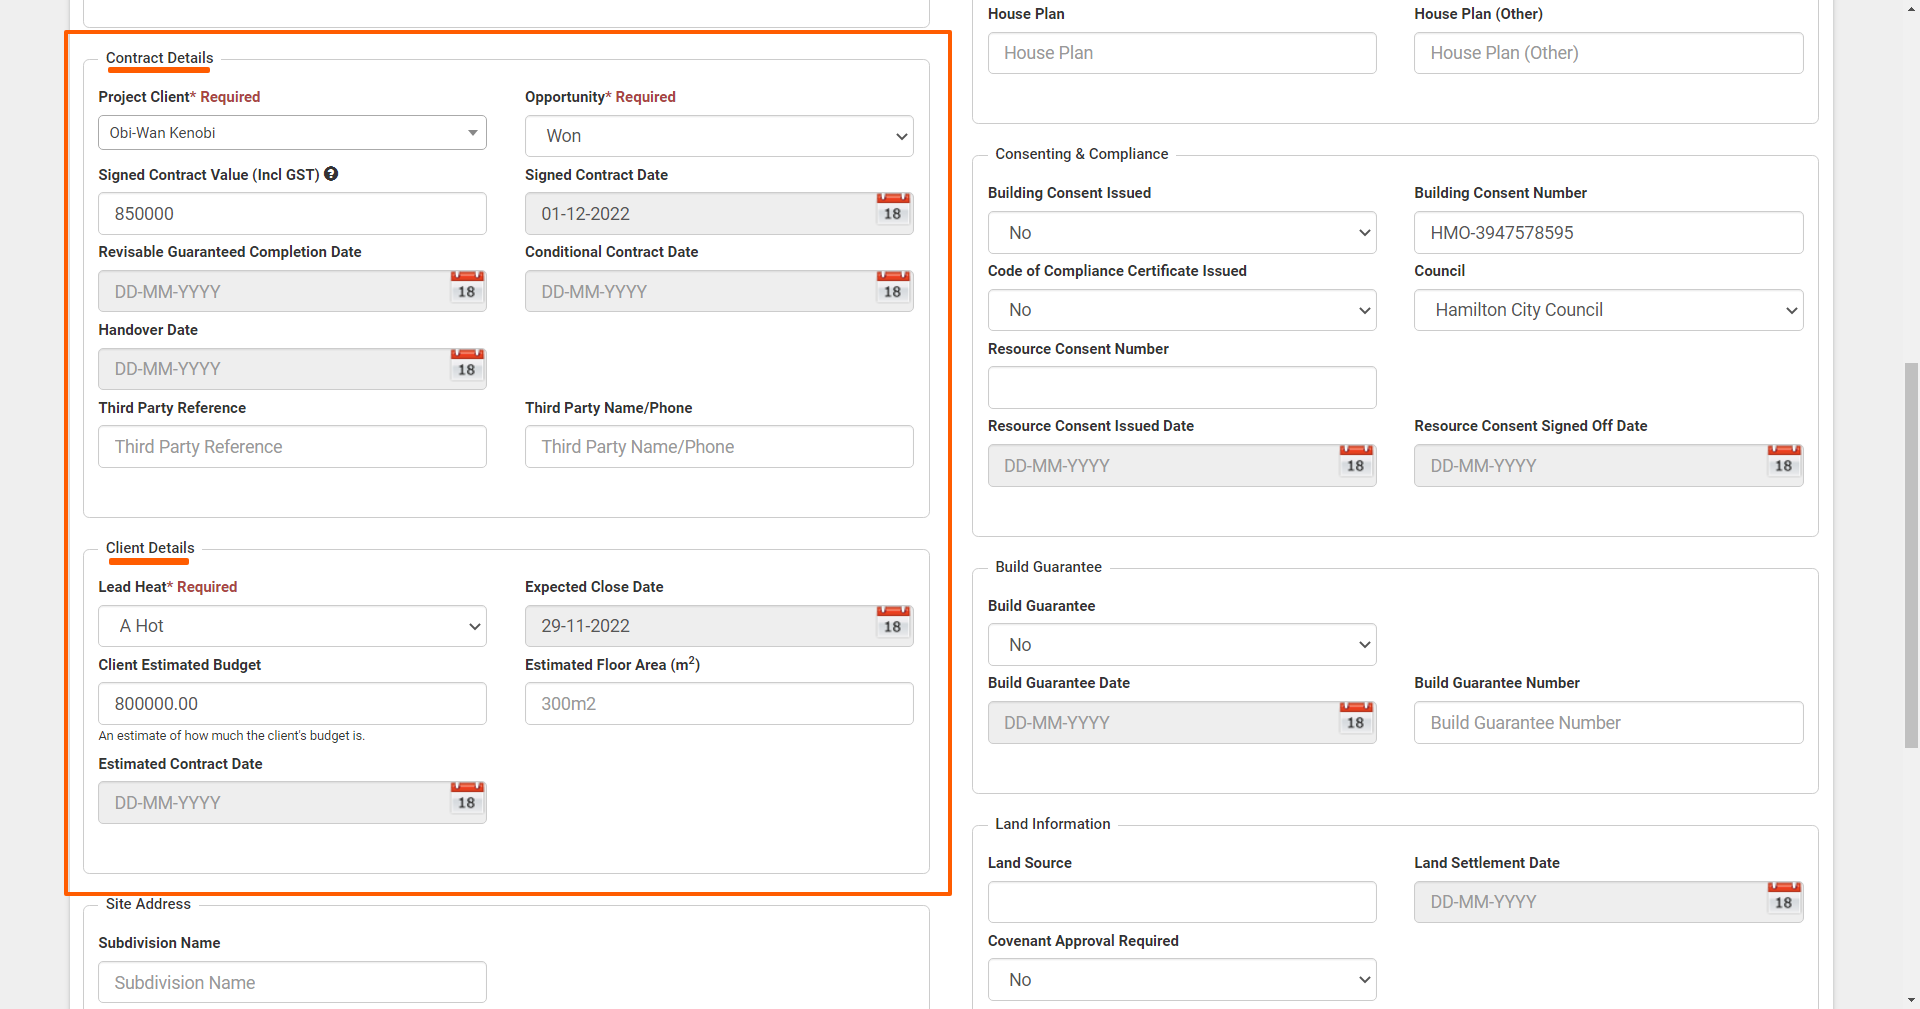
The Consenting & Compliance + Build Guarantee sections
Completing the 'Building Consent Issued', 'Building Consent Number', and 'Council' fields are another easy way of reducing unnecessary phone calls/emails to save you and your contractors time.
For example, a sparky has completed his electrical work and is ready to get his certificate to you. He completes his bookwork at night and realises that he doesn't have the consent number. Instead of calling you after hours, or sending you an email with a day or two's delay on your response - he can just pull up the consent number from RAVE, complete his certificate and send it through to you straight away, saving everyone time and stress.
The 'Build Guarantee' section keeps these details easily locatable too.

Adding a Site Address
As mentioned previously, adding a 'Site Address' here, powers the project's google map location. In most cases, you can use the 'Search Address' field to quickly populate this area. Or if it is a new, or unrecognized address, you can manually fill in the address fields to add it.
The Land Information + Project Settings section
These sections are also optional and are pretty straightforward to add in - though the 'Project Settings' section has two key fields which we'll cover now.
Message Visibility
Do you want project messages to be visible to 'All Branch Staff', or just to the recipients that the message has been sent to? This is set to 'All Branch Staff' by default.
Hide Client Details from Contractors
If enabled, this setting hides the client name, email & phone number from contractors on the project page - by default, this is set to 'No' - meaning the client's details are visible by default.
Once you've made all of your updates on this page, click ‘Save’ to update the details.
NOTE: If you are ever concerned about what your contractors can see, ensure you add yourself as a dummy contractor to the branch, add yourself to an 'active' project, and login in as the contractor to see what is visible to them. We'll cover adding a contractor next.
