The project's 'Files' sub-tab is where you store the project's files you want your contractors and the client (with permission) to access. That is via the Site/Build button / opening your project by clicking on the job number or the 'Show' button / clicking on the Files sub-tab. The files can be pdfs, word and excel documents, photo's and even video files.
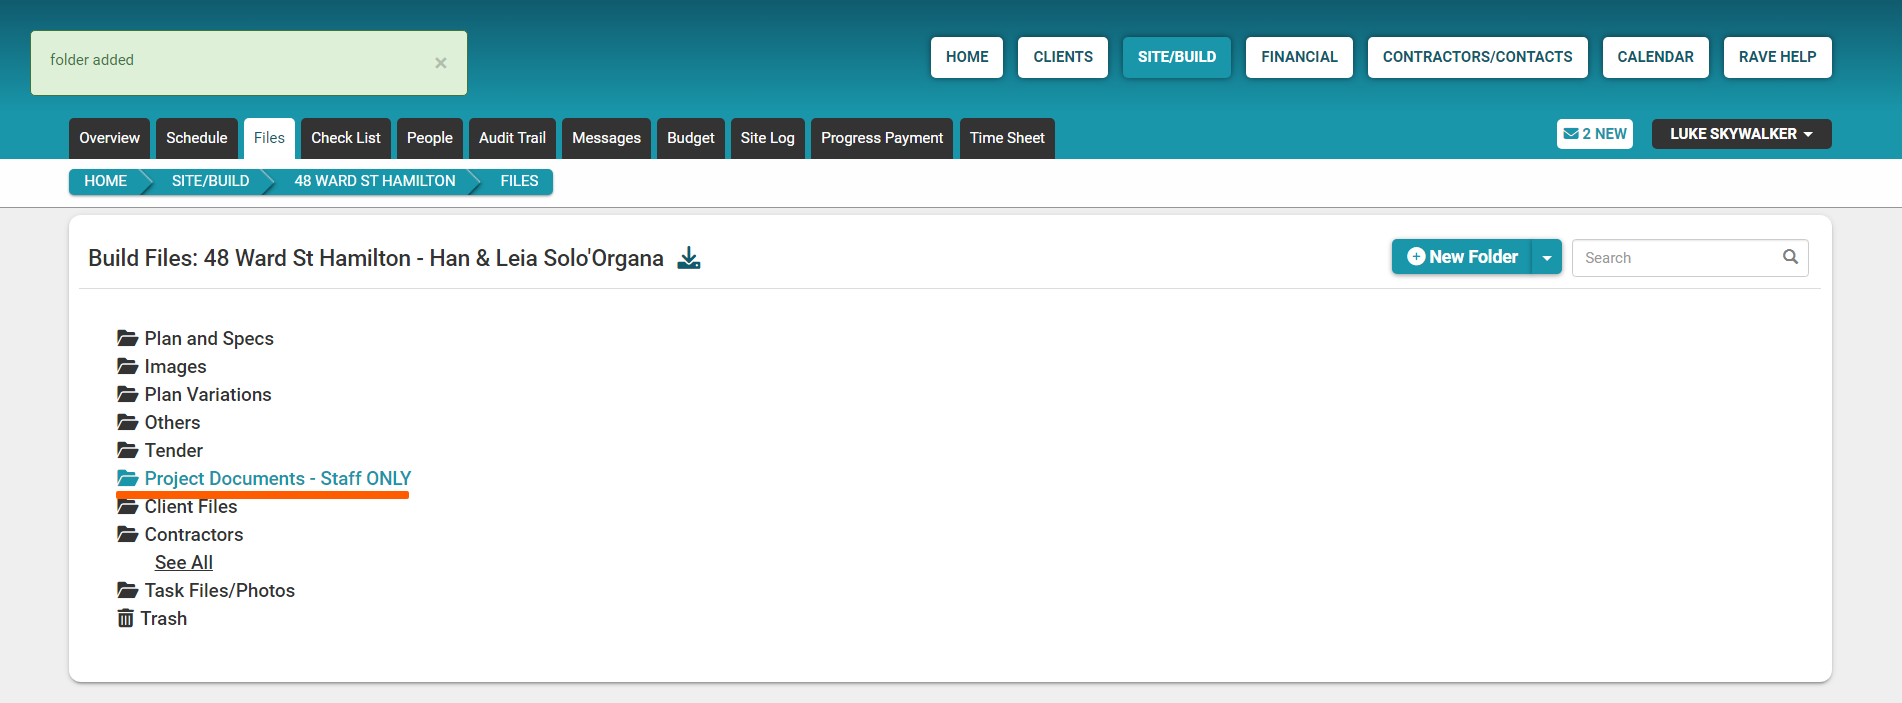
The ‘Files’ sub-tab page is broken down into a number of file folders. The dark charcoal folders are automatically loaded into each project, typically these are Plan and Specs, Images, Plan Variations, Others, Tender, Client Files, Contractors, Task Files/Photos, and Trash. You can create your own folders too these are a teal colour and we'll cover that later in this guide.
Folder viewing permissions
To the right of each File section, by the open (expand) and close (collapse) button, we have the folder's viewing permissions. As you can see, the first few folders have a 'Viewable by all' permission, this means that anyone you give access to a project (a contractor/supplier or the client) can see what has been uploaded into these folders.
Other folders have different viewing permissions - scrolling down the page and looking to the right will display the viewing permissions for each folder. i.e.
The ‘Others’ folder is viewable only by your branch staff and contractors (not the client) but contractors can see all of the files in this section.
The ‘Tender’ folder is viewable only by your branch staff and contractors only (not the client) - but contractors can only see their own files that they have uploaded.
The ‘Client Files’ folder is viewable only by your branch staff and the client - contractors and suppliers cannot see what's in this folder.
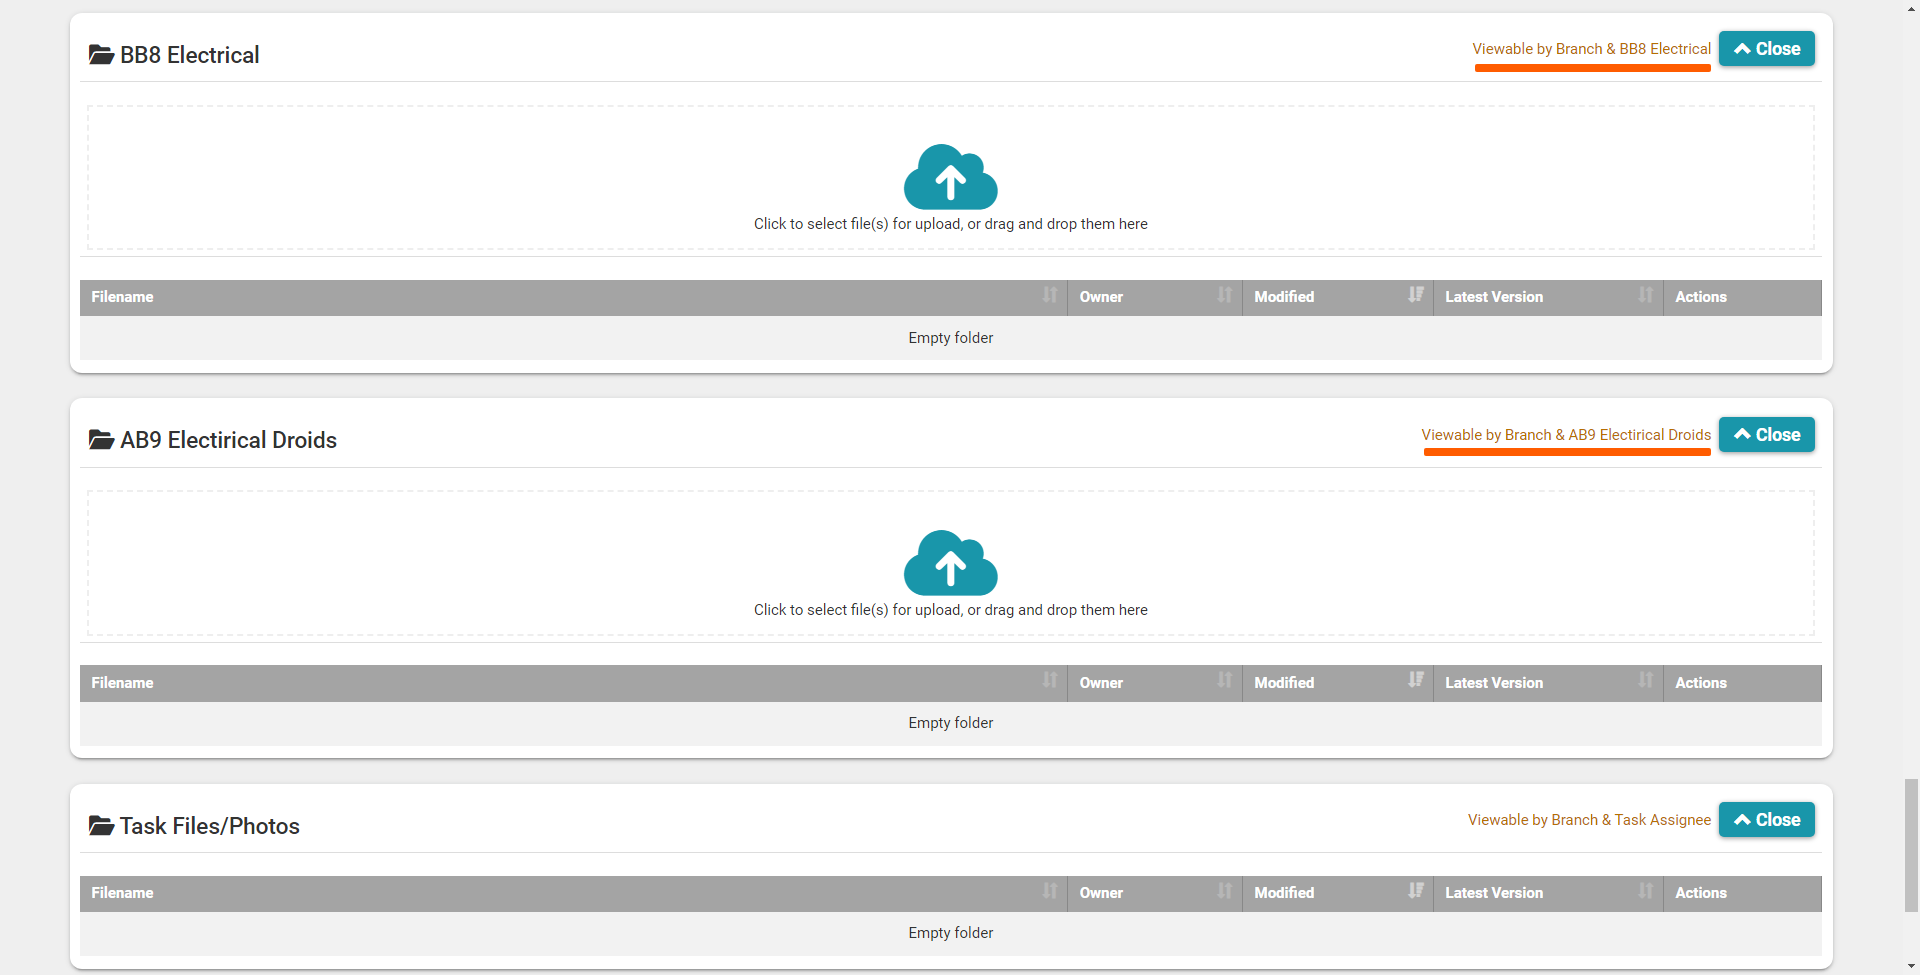
The ‘Task Files/Photos’ folder stores all the scheduled task attachments, viewable only by your branch staff and contractors of that task.

The Contractors Folder
Every contractor who has been given access to the project gets their own folder within the job also - these are displayed by clicking on the contractors ‘Show All’ button - this button will display when at least one contractor has been added to the project.
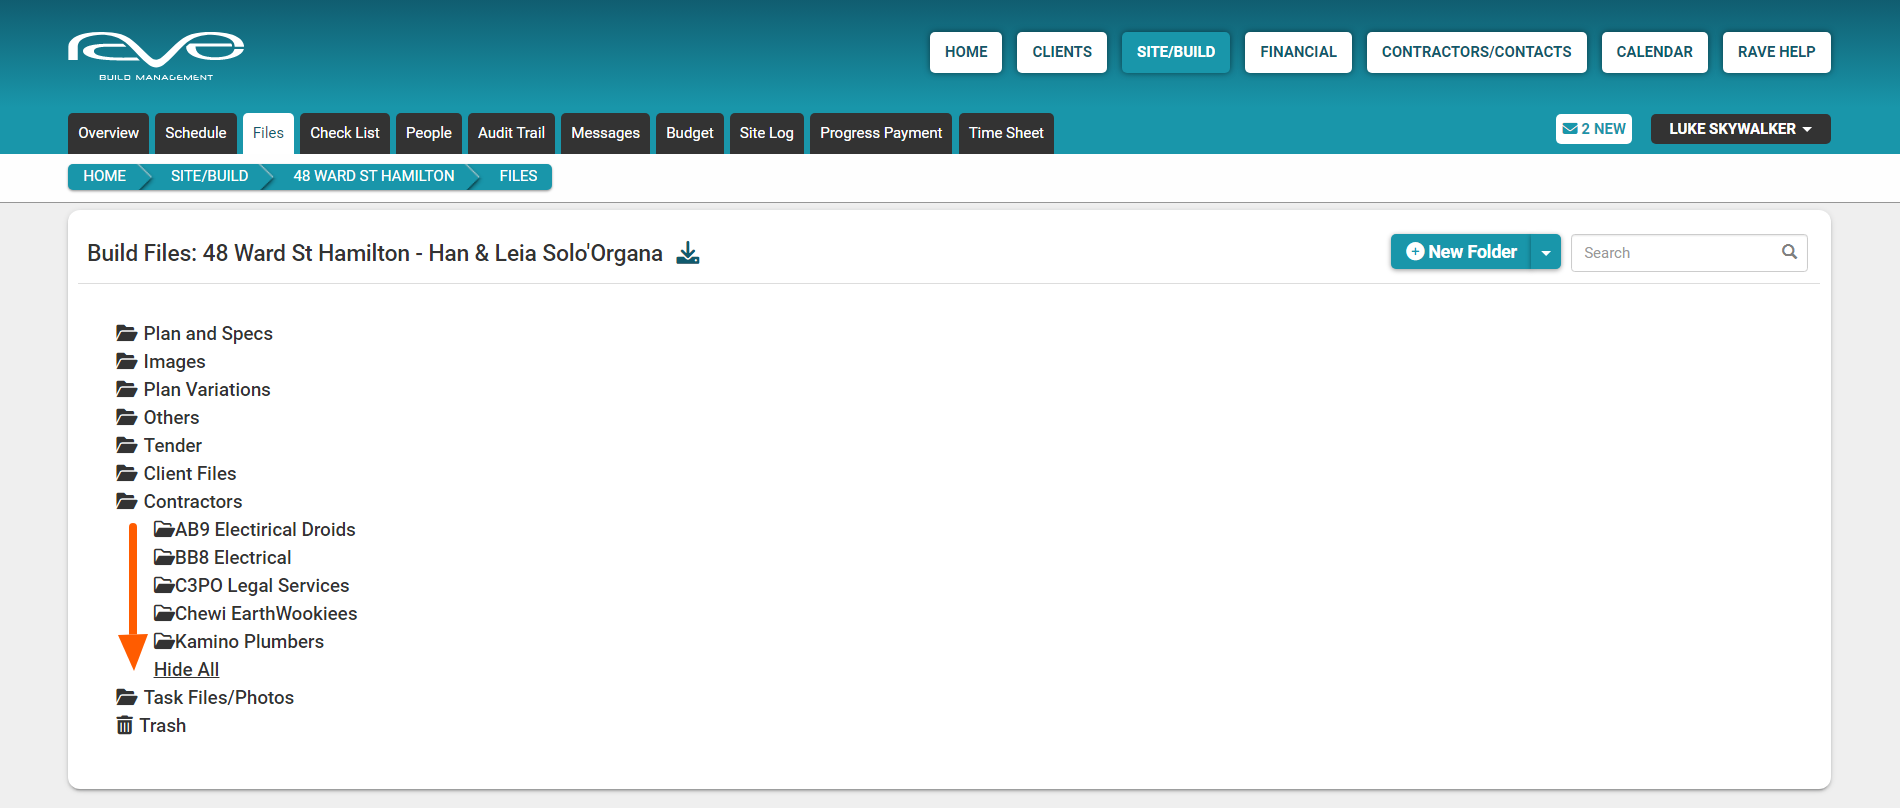
By selecting (clicking on) the BB8 Electrical contractor folder, we are taken to that folder, and can see that each contractor folders are only viewable by your branch staff and that contractor's company login only. No other trades have access to another trades contractor folder.
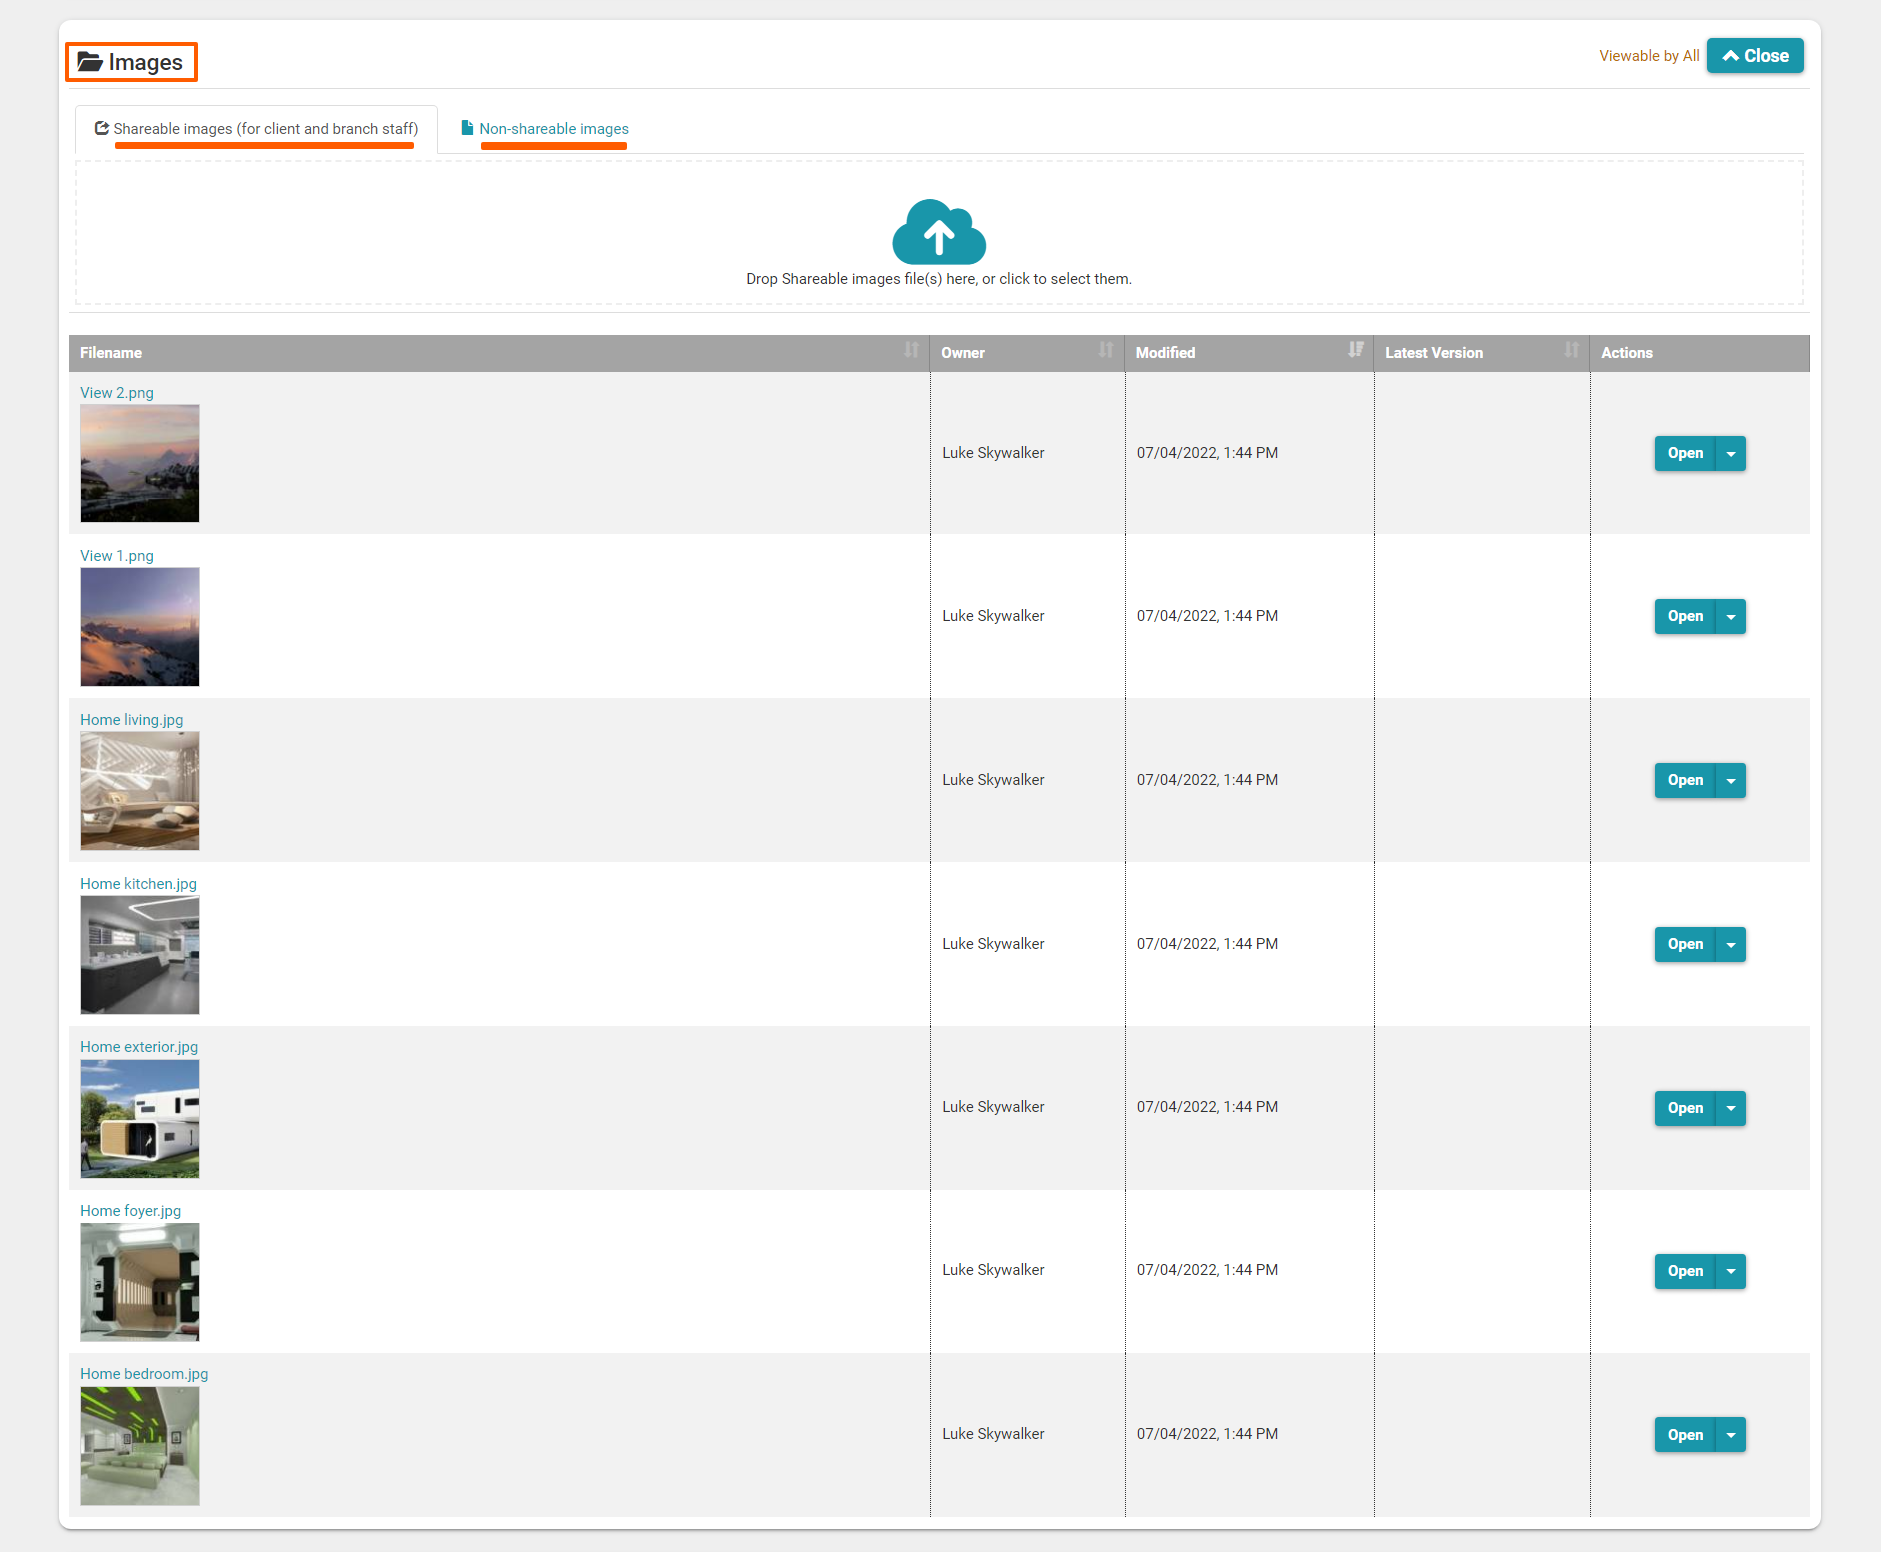
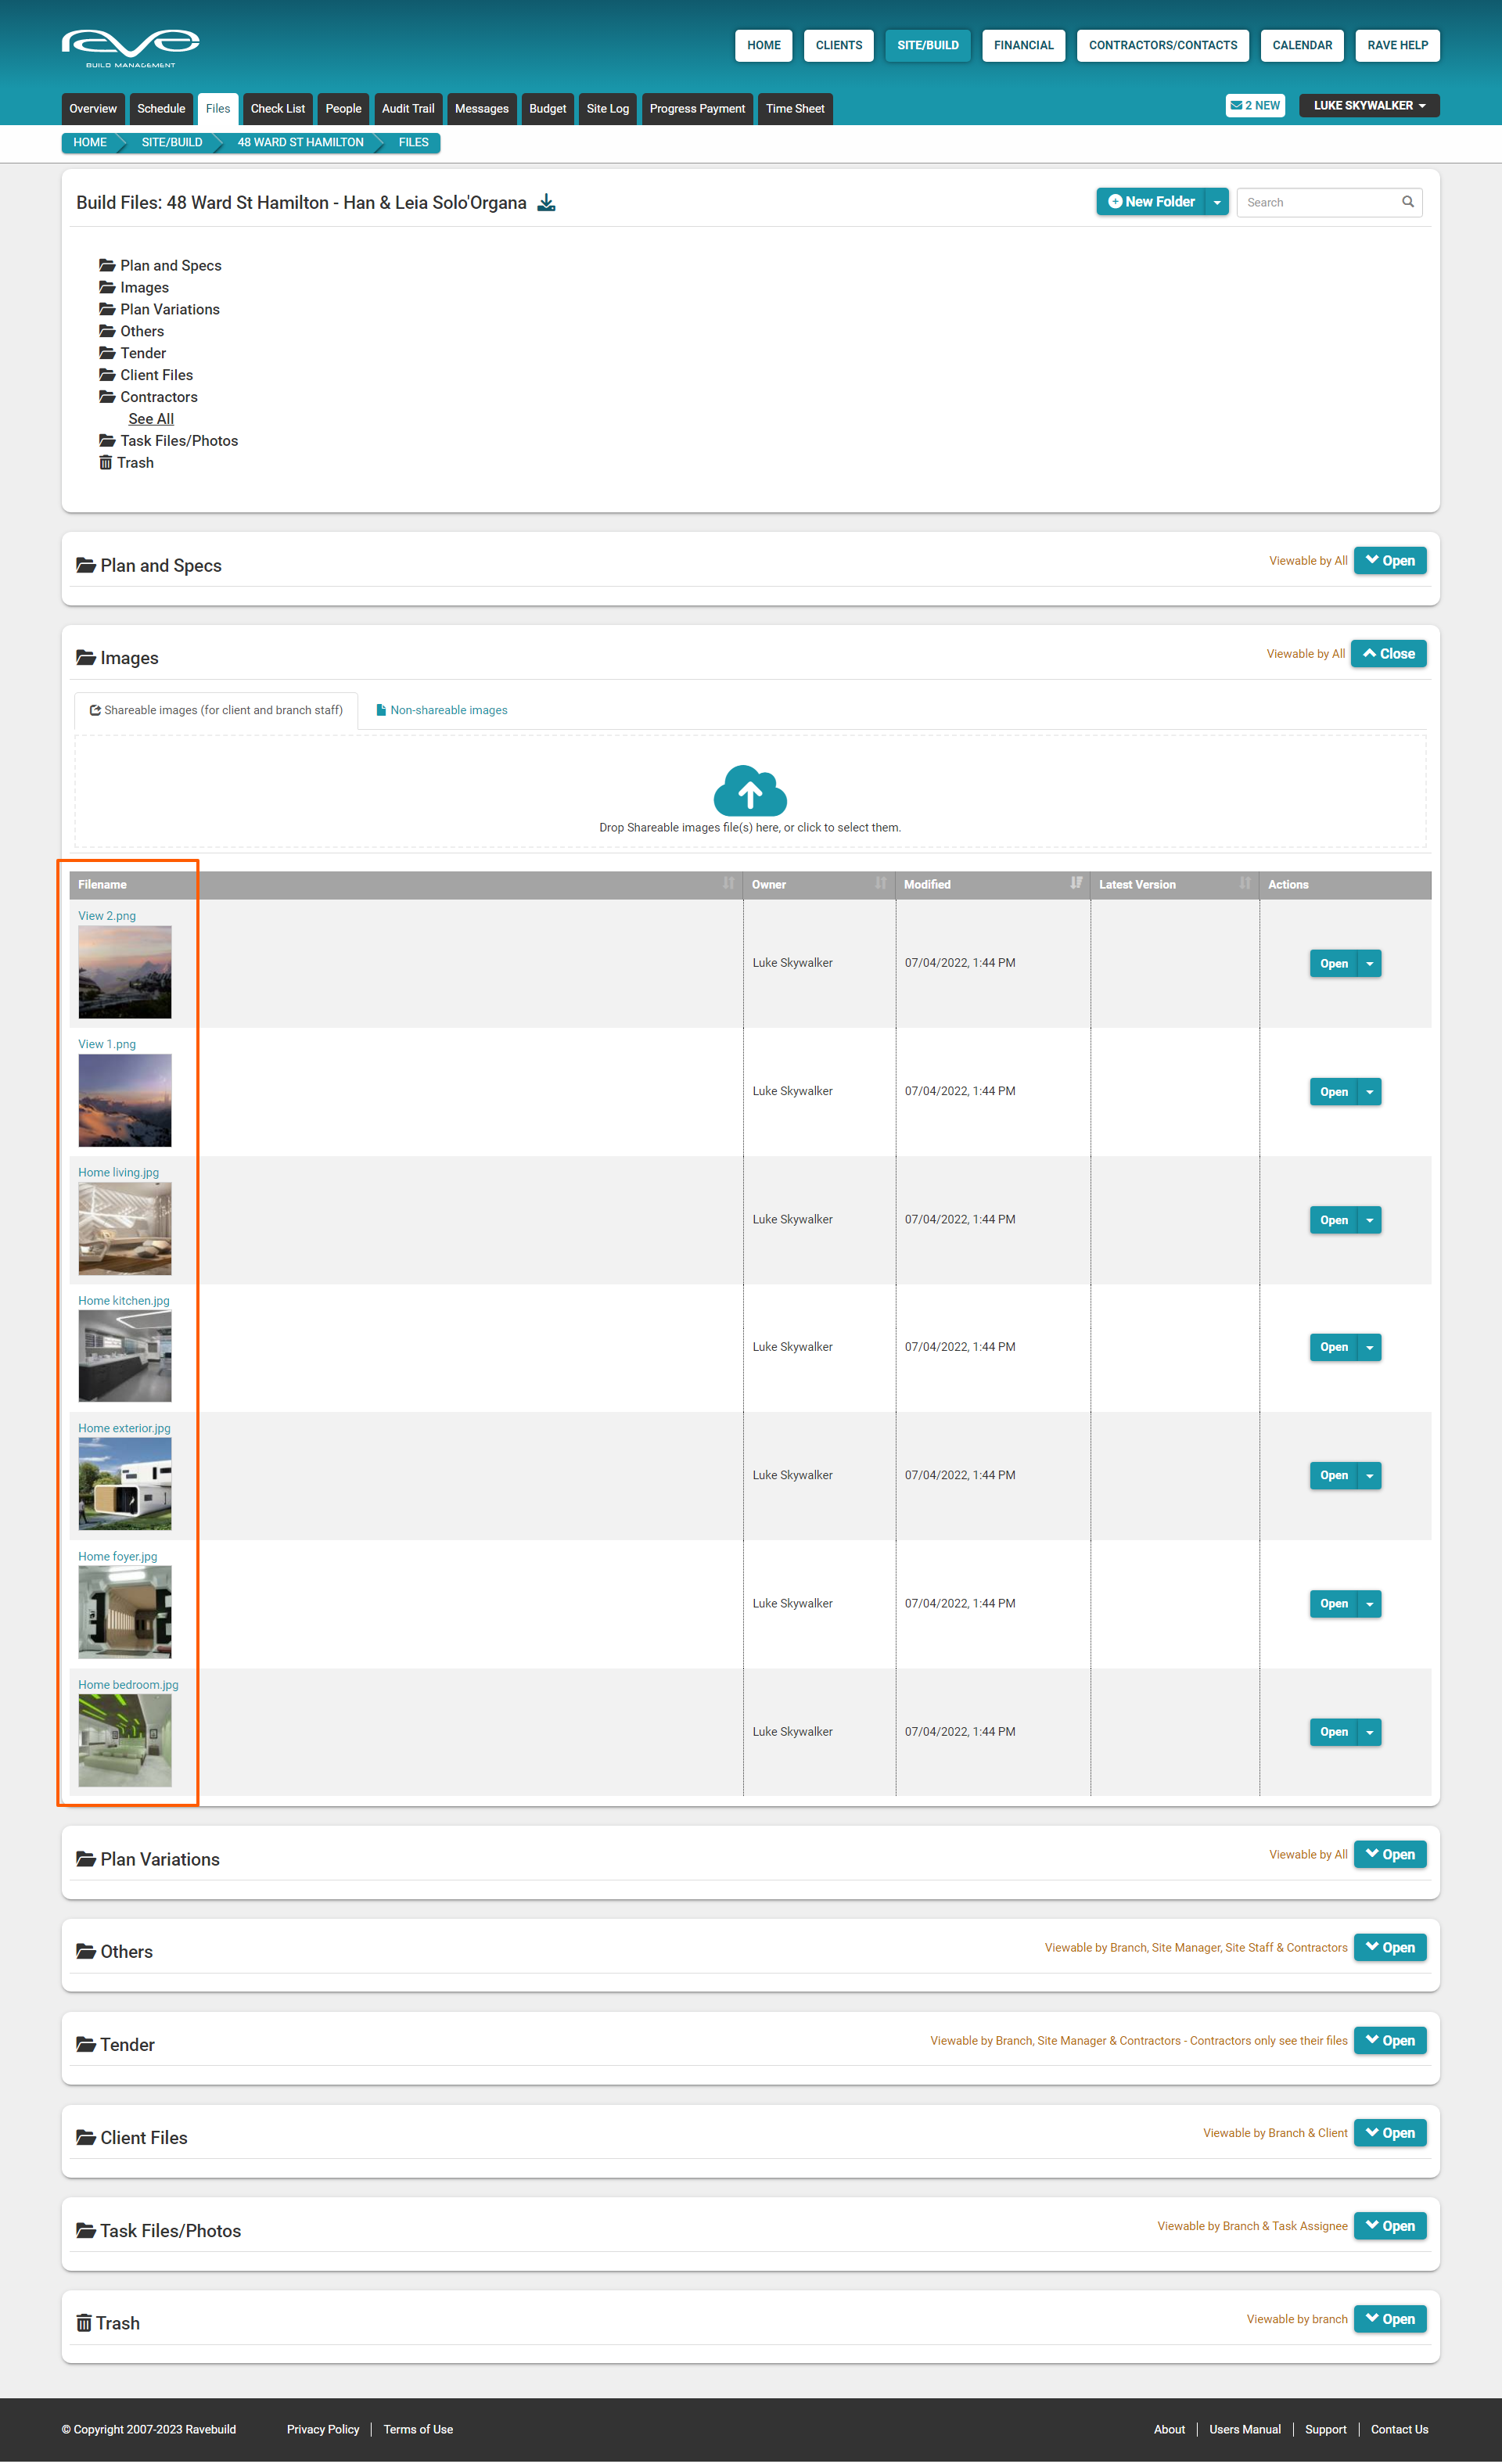
The Images folder
The ‘Images’ folder has two sub-tabs - the ‘Shareable images (for client and branch staff)’ allows you to share these photos via your Facebook account, while photos moved to the ‘Non-shareable images’ folder cannot be shared from RAVE.
Uploading + Managing Files
Uploading/Drag + Dropping files(s) into a Folder
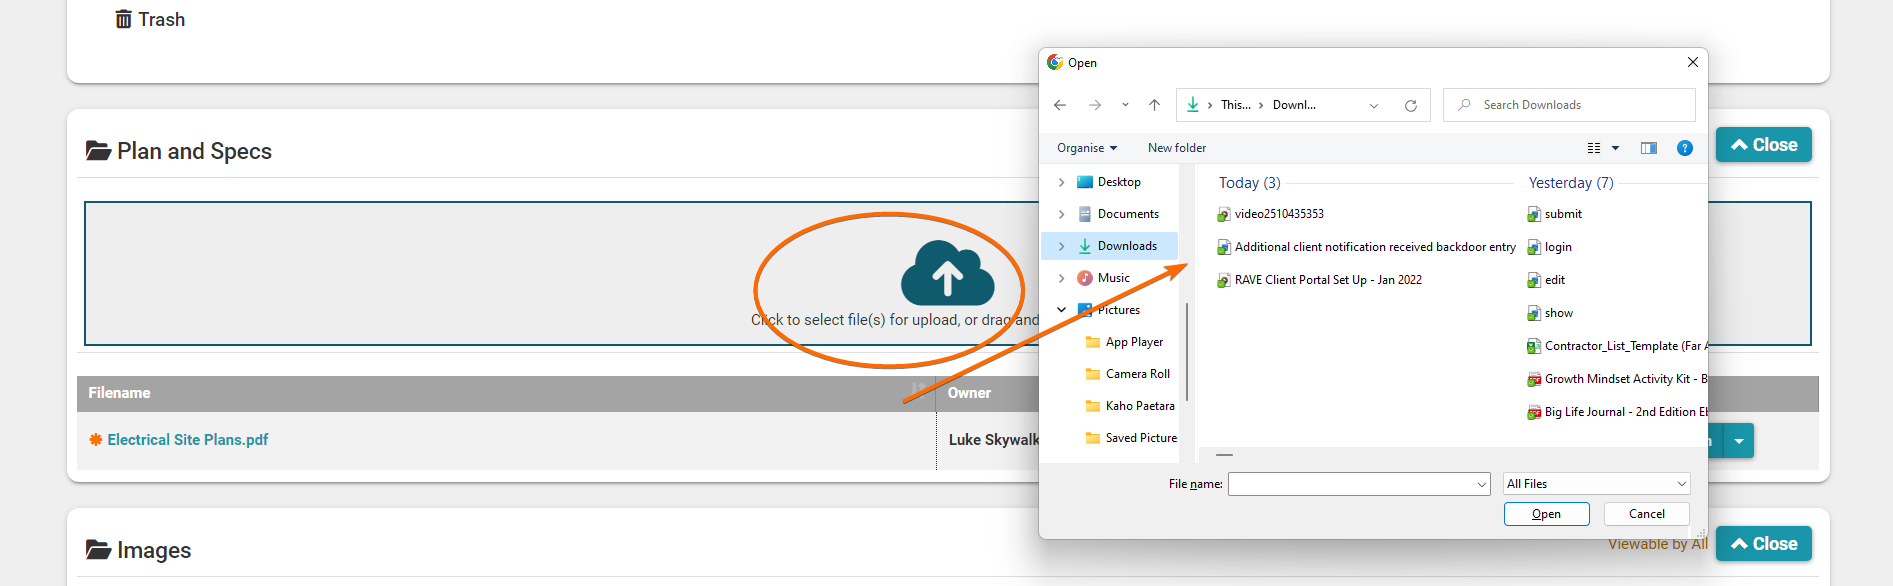
We can easily upload a file(s) by dropping it into the drag-and-drop field of a File's folder. Or you can double-click on this area to open your device's file browser/images gallery to select the file(s) you want to add.
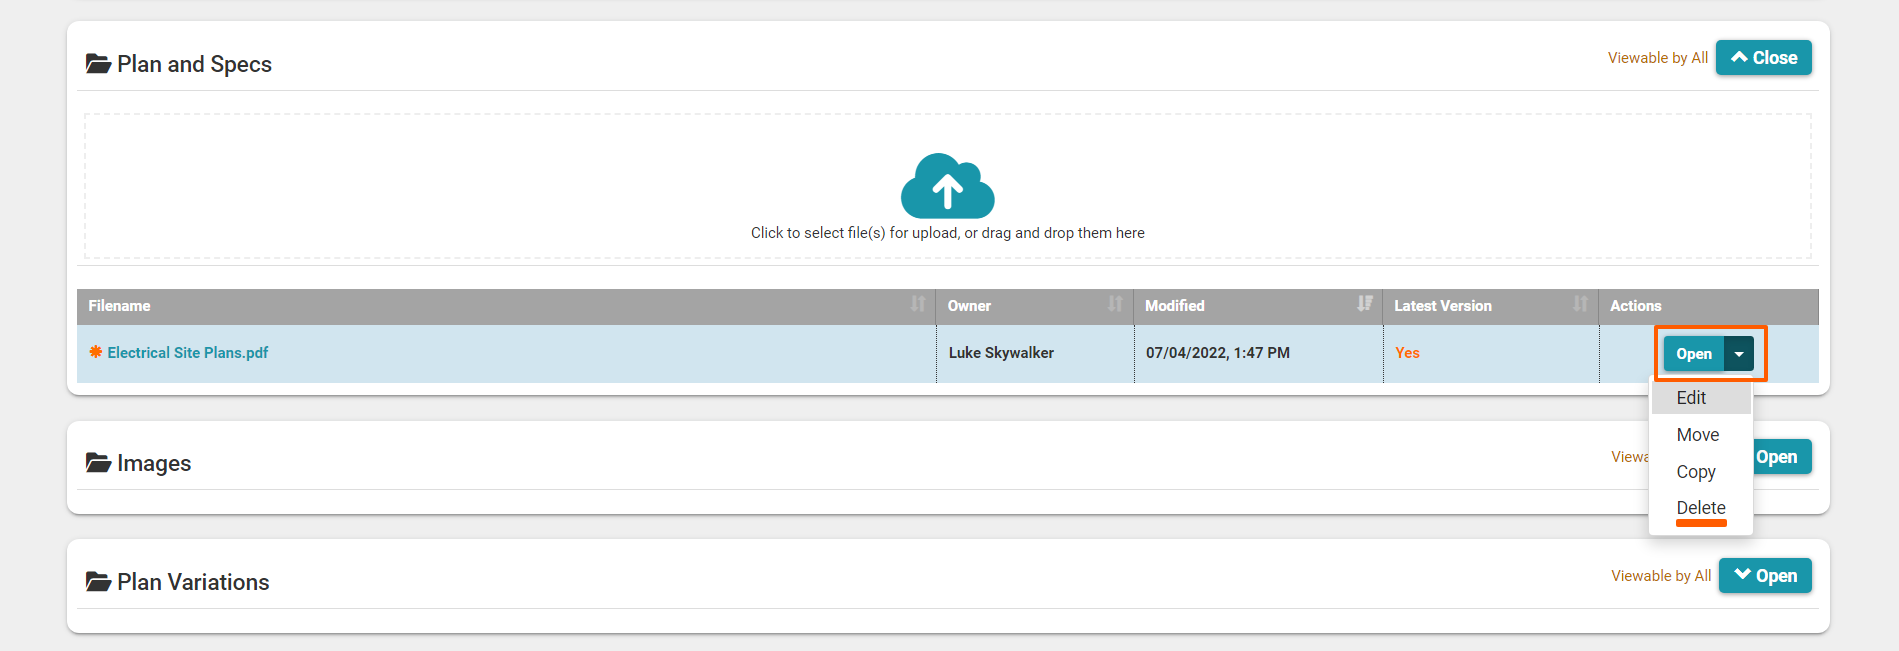
File action drop-down menu
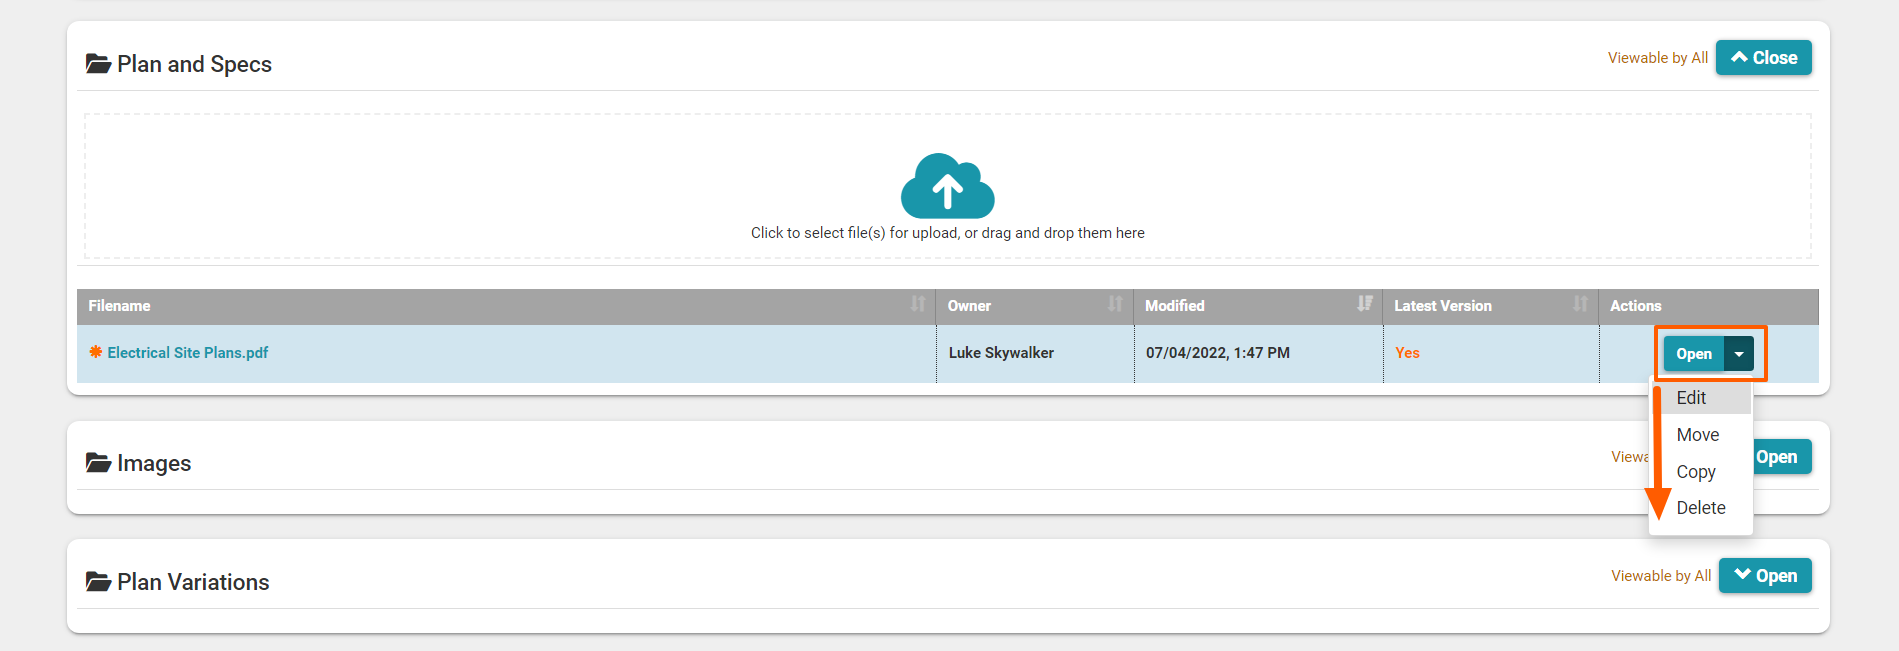
To the right of each file is a 'Show' button, plus an action drop-down menu - the show button will open the file, the drop-down menu allows you to Edit, Move, Copy and Delete the file as noted below.
Edit a Filename + Mark as the 'Latest Version'
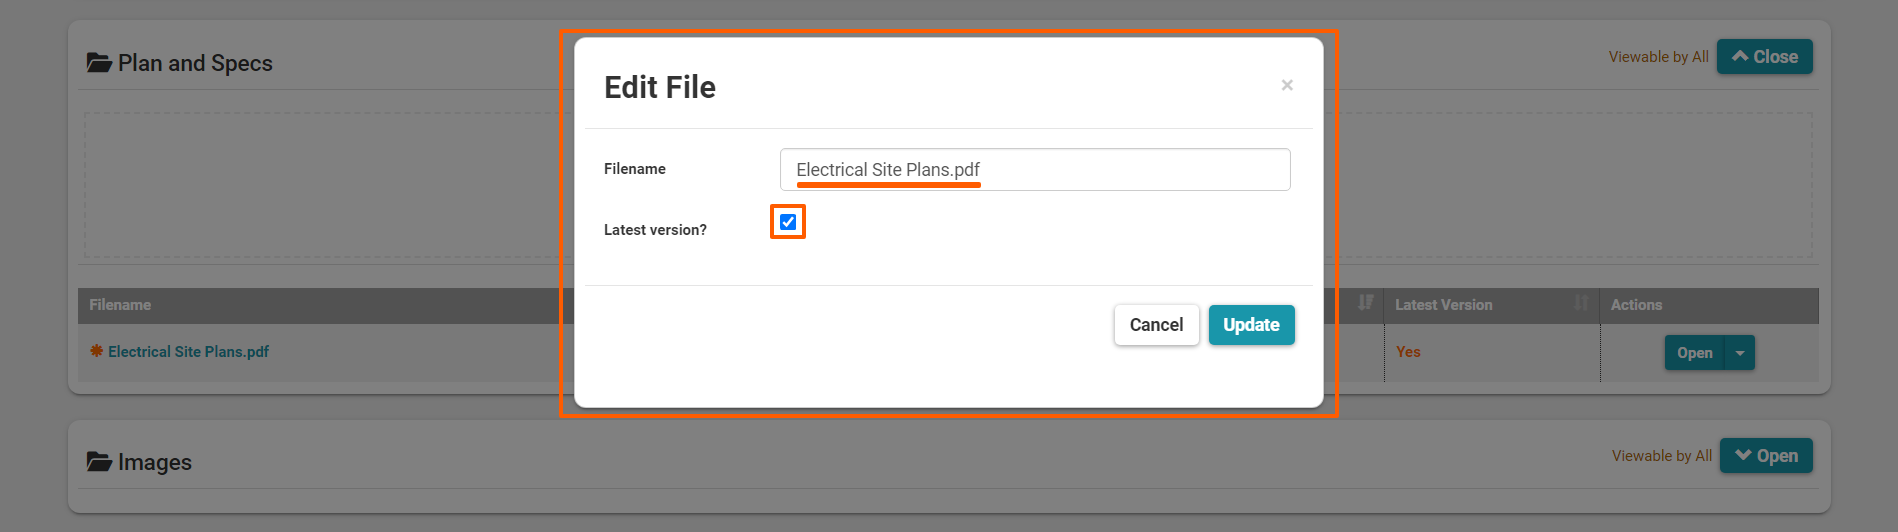
Once a file has been uploaded to a files folder, you can click the 'Edit' option to change the file name, mark the file as the 'Latest version', or allow the file to be shared via social media. The 'Lastest version' check box will add a 'Yes' to the Latest Version column, and add an orange asterisk to the left of the file name.

Move a file
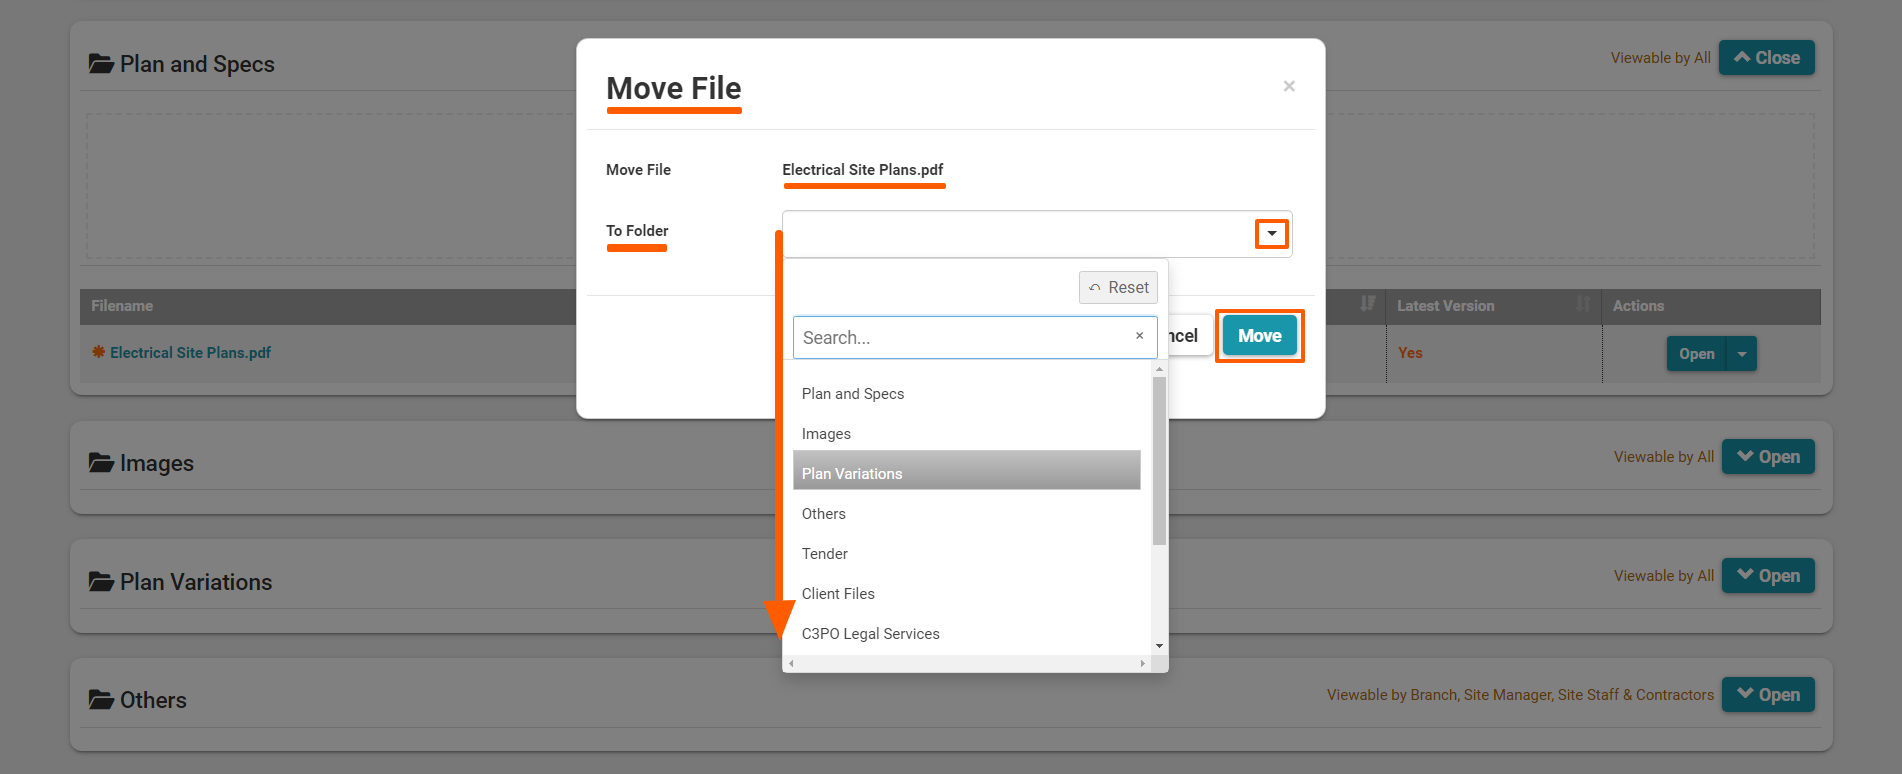
The 'Move' selection, allows you to move a file from one folder/section to another - this easily done, simply clicking ‘Move', choosing the folder that this file is to move to, before confirming via the 'Move' button.

Copy a file
As with the 'Move' selection, the 'Copy' selection, allows you to copy a file from one folder/section to another - simply clicking ‘Copy', then choosing the folder that this file is to be copied to, before confirming via the 'Copy' button.
Note: The difference between move and copy - is that move will delete the file from the original folder, will copy will leave the original file, and also copy it to the new target file.


Delete + Restore a file demo + explanation
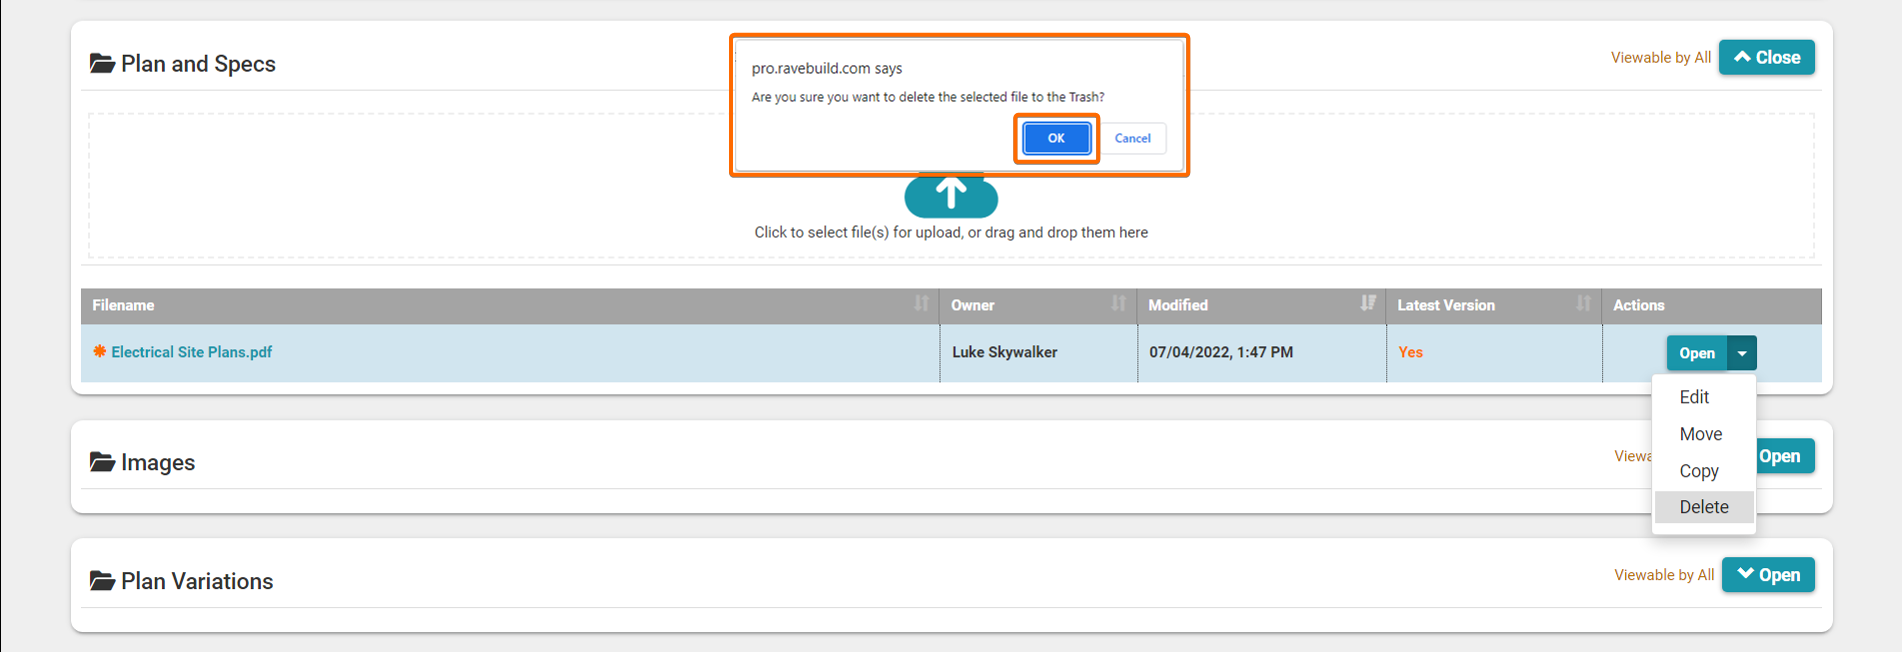
The 'Delete' selection, allows you to remove a file from it's folder/section and move it to the trash. To do this, simply click ‘Delete', then confirm by clicking the 'OK' confirmation button.
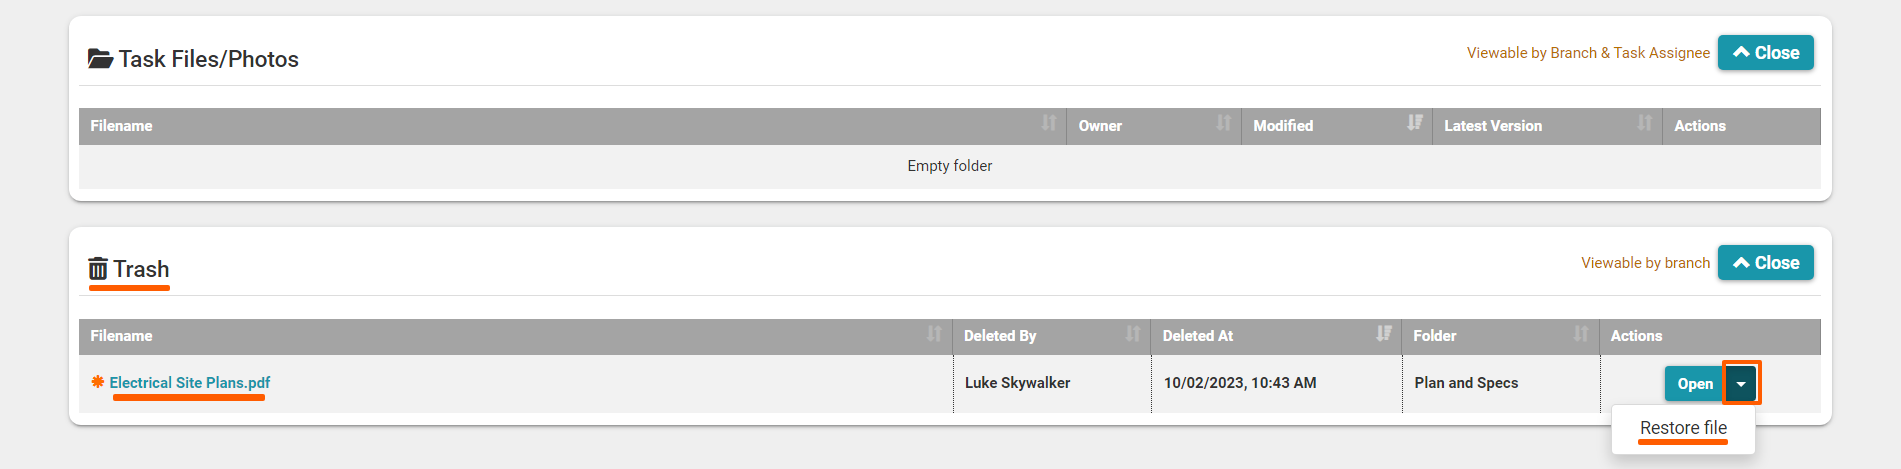
Note: We very rarely delete anything in RAVE. When you 'delete' something from the Files sub-tab, it actually gets sent to the Trash folder at the bottom of the ‘Files’ page. The 'Trash' folder is only visible to staff members, who can access the project. Any 'deleted' items that are sitting in the 'Trash' folder can be restored, by moving the deleted item back from the trash folder to its original location.
To restore a file, simply click on the action drop-down menu (to the right-hand side of each file) - then click ‘Restore', and confirm by clicking the 'OK' confirmation button.
The Image Folder + Build Overview + WARNING
The project's Files ‘Images’ folder is where we store project images that we do want our contractors (and the client if you've given them access to their project) to see. A special feature of the Files / ‘Images’ folder is that all images loaded here are also available via the ‘Build Overview’ project images section.
NOTE: This is an important point to save your contractors time and data when they're viewing your projects on their mobile or tablet i.e. the project's 'Images' folder should be used to store key project images - this is not where you would upload 20 photos of the concrete pour for the client to see. Those photos should be loaded in the ‘Client Files’ folder or you can create a new folder specifically for client photos.

Create and Edit a new Customised Folder
RAVE allows you to create your own files folder(s) with their own permission sets, with the option of saving a folder template to load your folders automatically into any future job, or as required. These customisable folders are displayed in a teal colour vs the dark charcoal of our default/set folders.
To create a new files folder:
- From the Files sub-tab, we click on the ‘New Folder’ button at the top right of the page

- Then via the 'Add New Folder' pop-up - we give our new folder a name
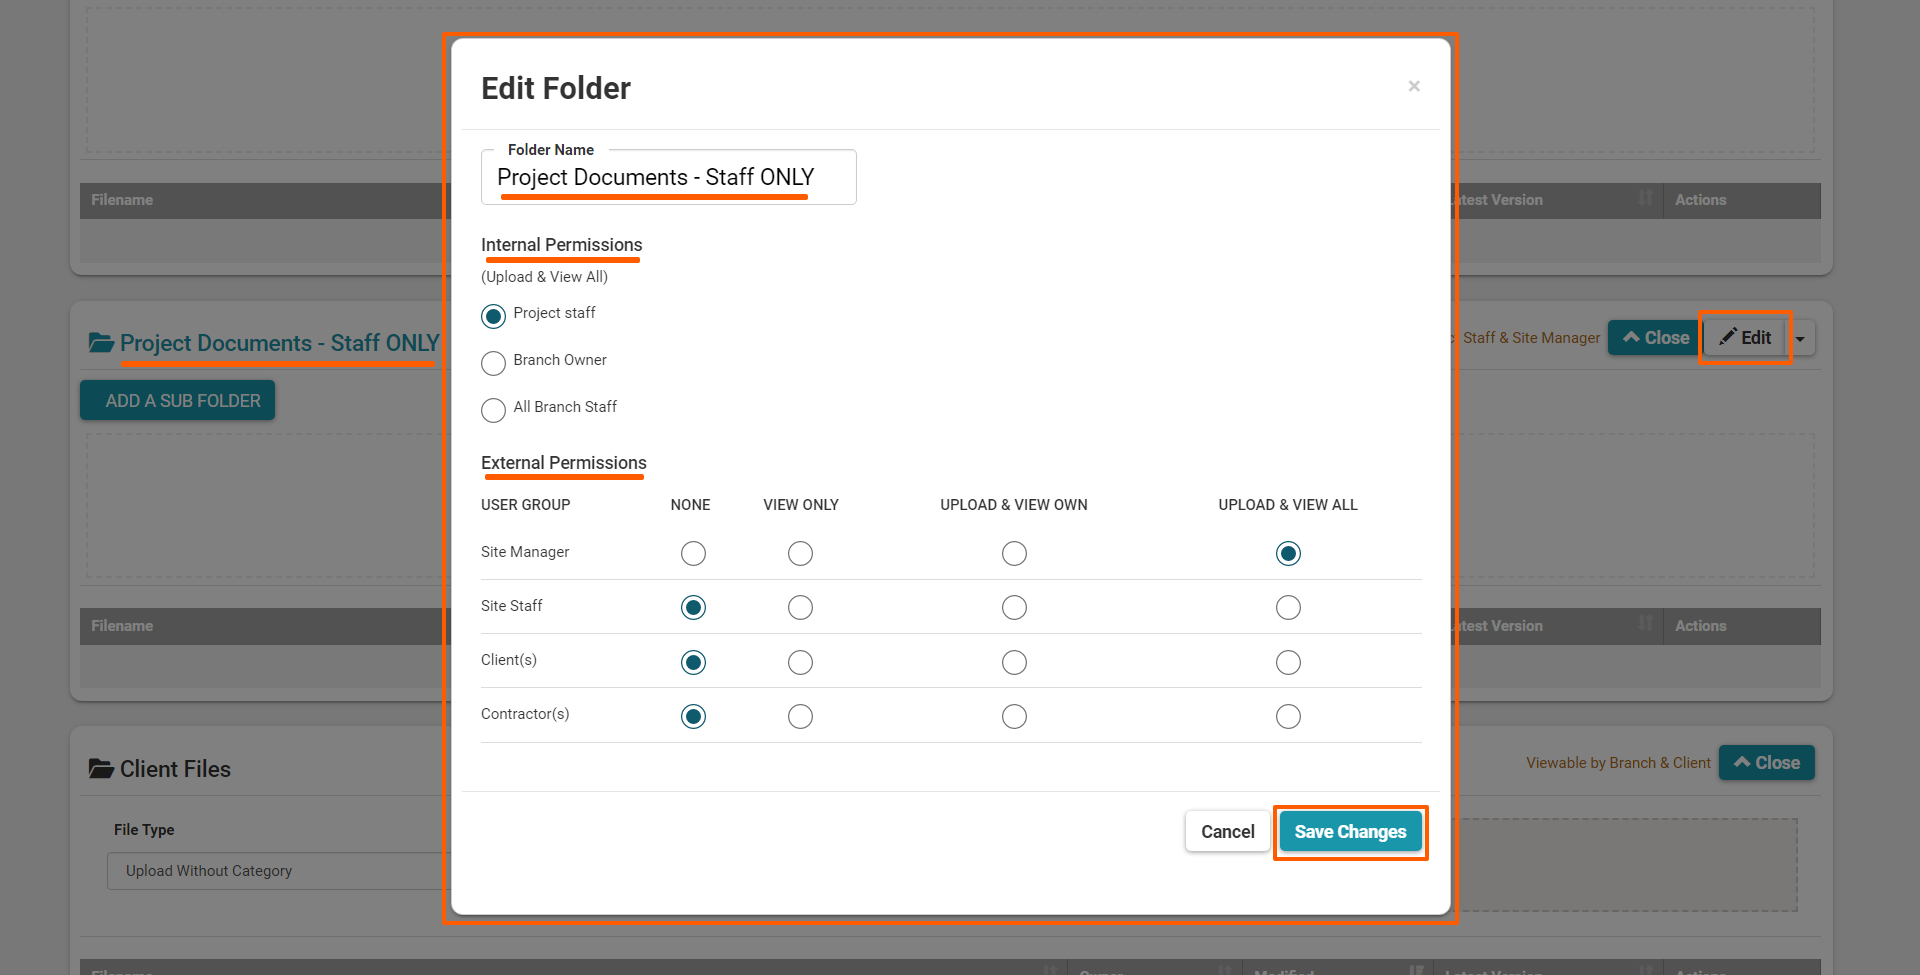
- Next, we set the folder's viewing (access) and upload permissions.
We have three internal permissions:- The ‘Project Staff’ permission - only allows Office Staff, as listed on the project's ‘People's tab, to view and access this folder.
- The ‘Branch Owner’ option - only allows those with Branch Owner permissions to view and access this folder.
- The ‘All Branch Staff’ permission - allows all banch staff users (office staff and projec managers) to view and access this folder.
We have four external permissions - 'Site Manager', 'Site Staff', 'Client(s)' and 'Contractors' - None' - no visibility/no access - is the default access level for external permissions
- ‘View Only’ - in which they can access/view but cannot upload any files to this folder
- ‘Upload & View Own’ - meaning they can only view the documents they have uploaded to this folder
- ‘Upload & View All’ - where they can view all the files in this folder + upload files to this folder too
- Once you are happy with the folder name and the access/viewing permissions - click the 'Save Changes' button to confirm
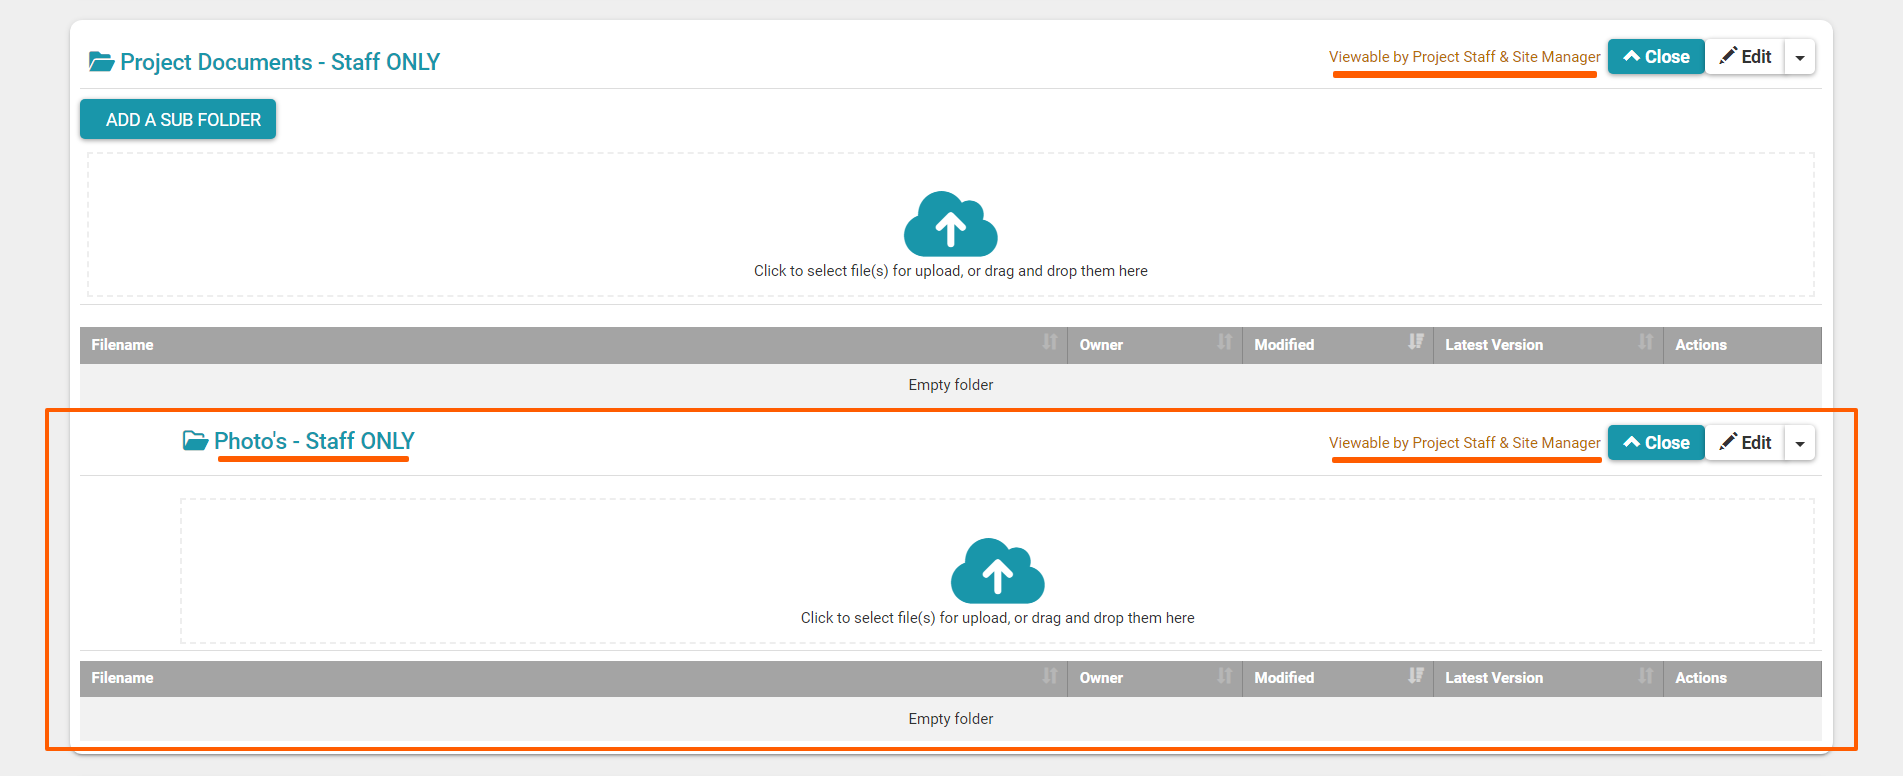
- This will create your new customised/teal-coloured folder


To edit (the name or viewing/access permissions) or delete a customised folder:
Only the teal-coloured/customisable folders can be edited - that is change the folder name and viewing/access permissions.
To edit a teal-coloured/customisable folder:
- From the Files sub-tab, scroll down the page until you find your customised folder name (on the right-hand side of the page)
- Look over to the right-hand side of the page, and click 'Edit' button to left-hand side of the page
- This will open the Edit Folder pop-up window - allowing you to update your name and viewing/access permission details as required.
- Once you've made all necessary changes, click the 'Save Changes' button to confirm, or 'Cancel' to cancel the update.
To delete a teal-coloured/customisable folder:
- From the Files sub-tab, scroll down the page until you find your customised folder name (on the left-hand side of the page)
- Look over to the right-hand side of the page, click the 'drop-down' option to the right of the 'Edit' button
- Click 'Delete' and confirm the deletion by clicking 'OK'

To create a sub-folder (within a customisable folder):
Access this demo here.
You also have the ability to add a subfolder(s) of any customisable folder.
To add a sub-folder:
- From the Files sub-tab, scroll down the page until you find your customised folder (on the right-hand side of the page)
- Click on the 'Add a Sub-Folder' button, found below the folder name
- This will open the 'Add a Sub-Folder' pop-up window - allowing you to give your sub-folder a name
Note: Unlike a customisable folder, the sub-folders viewing/access permissions mirror the parent folders permissions - these are NOT editable at a sub-folder level.
Once you've named your sub-folder, click the 'Save Changes' button to confirm, or 'Cancel' to cancel the action.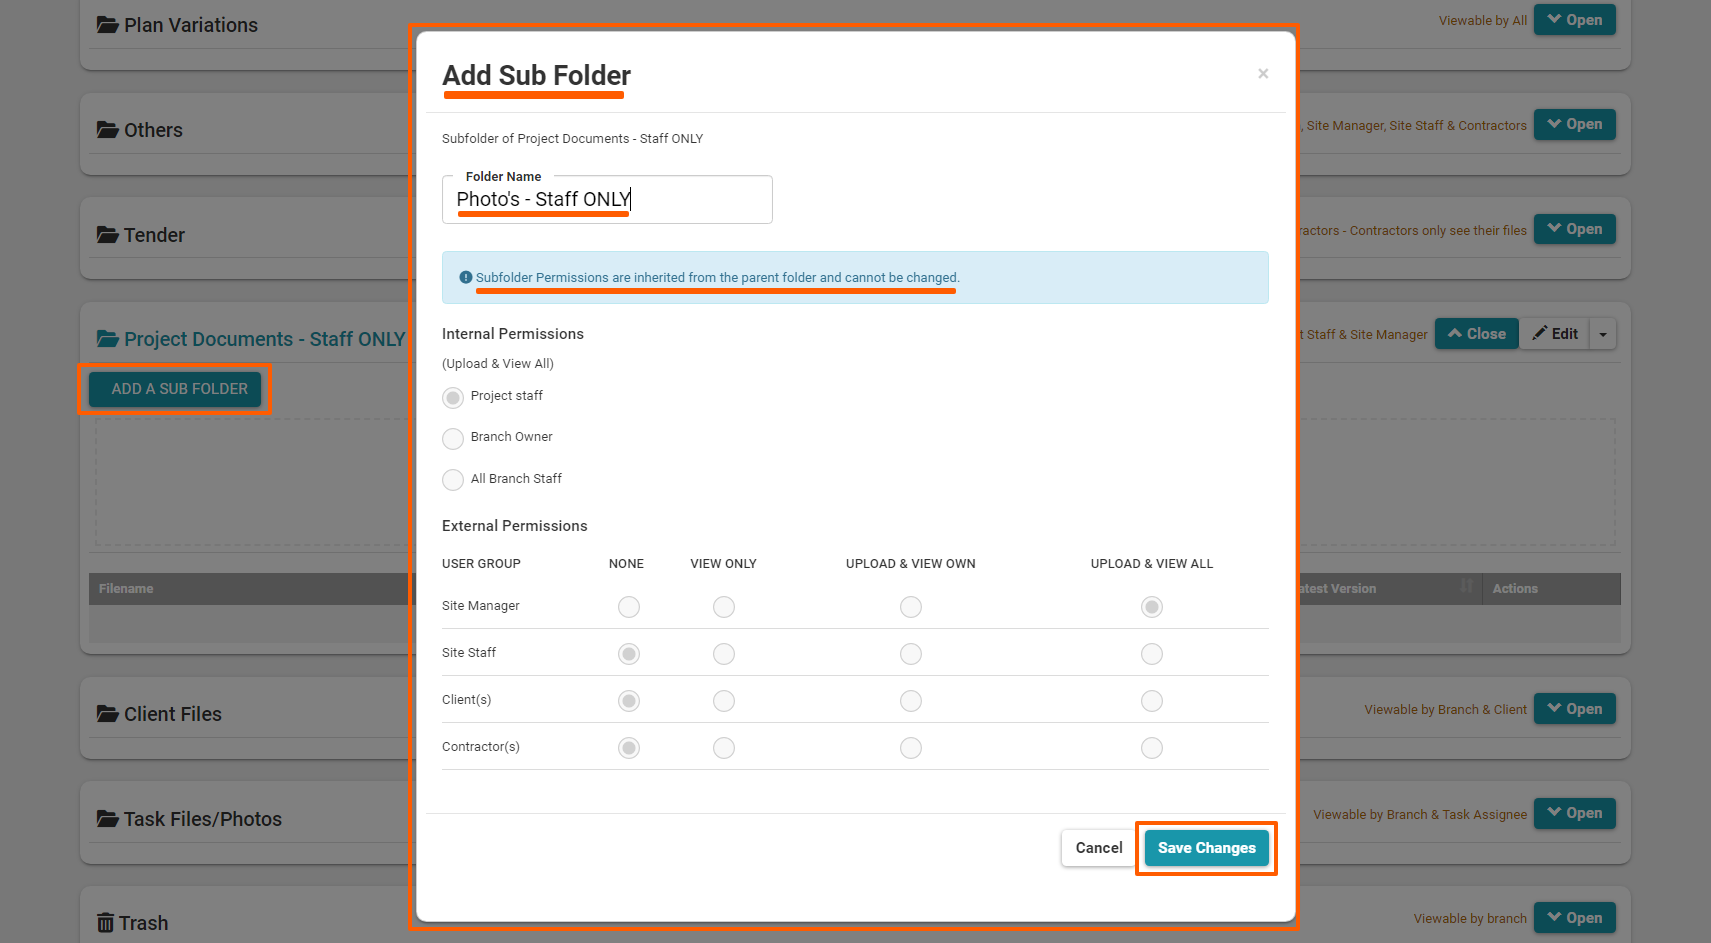
To edit a sub-folder:
- Look over to the right-hand side of the page, and click the 'Edit' button
- This will open the 'Edit Sub-Folder' pop-up window - allowing you to update your sub-folders name
Again, unlike a customisable folder, the sub-folders viewing/access permissions mirror the parent folders permissions - these are NOT editable at a sub-folder level.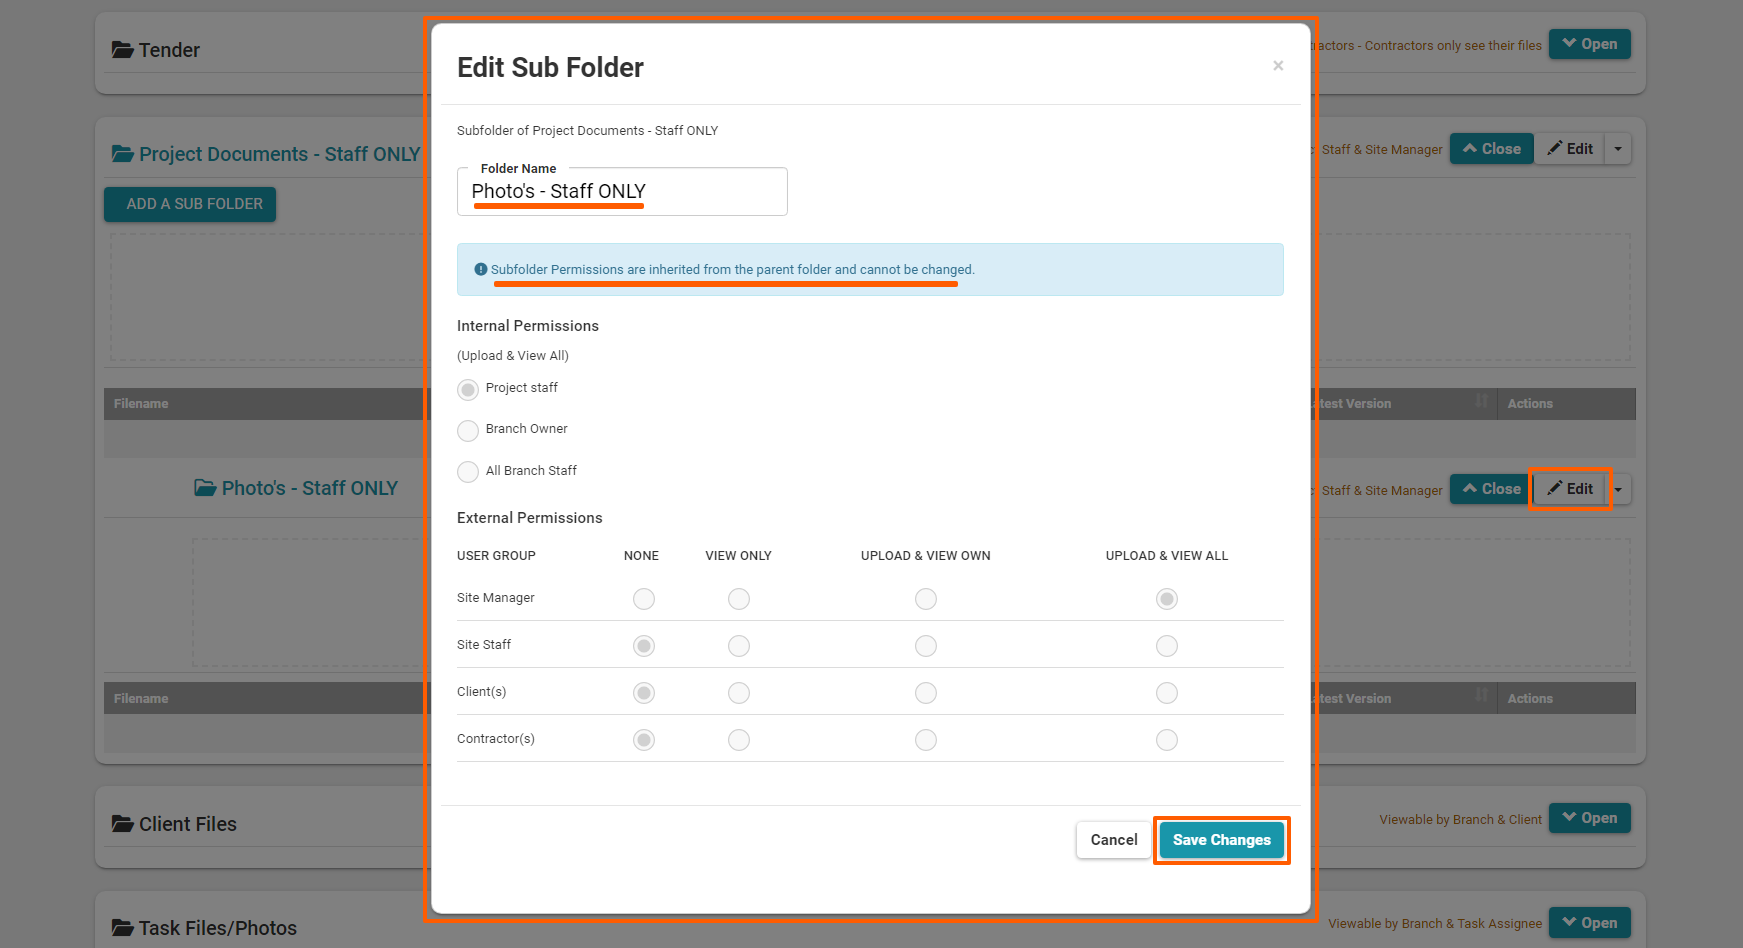
To delete a sub-folder:
- Look over to the right-hand side of the sub-folder click the 'drop-down' option to the right of the 'Edit' button
- Click 'Delete' and confirm the deletion by clicking the pop-ups 'OK' button

How to create a Folder Template
Once you've created all of the customised folders in your project, you can save all of these new folders (and folder viewing/access permissions) into a folder template - allowing you to load these folders up automatically against any future jobs, or to select and load manually as required.
To create a new folder template:
From the Files sub-tab:
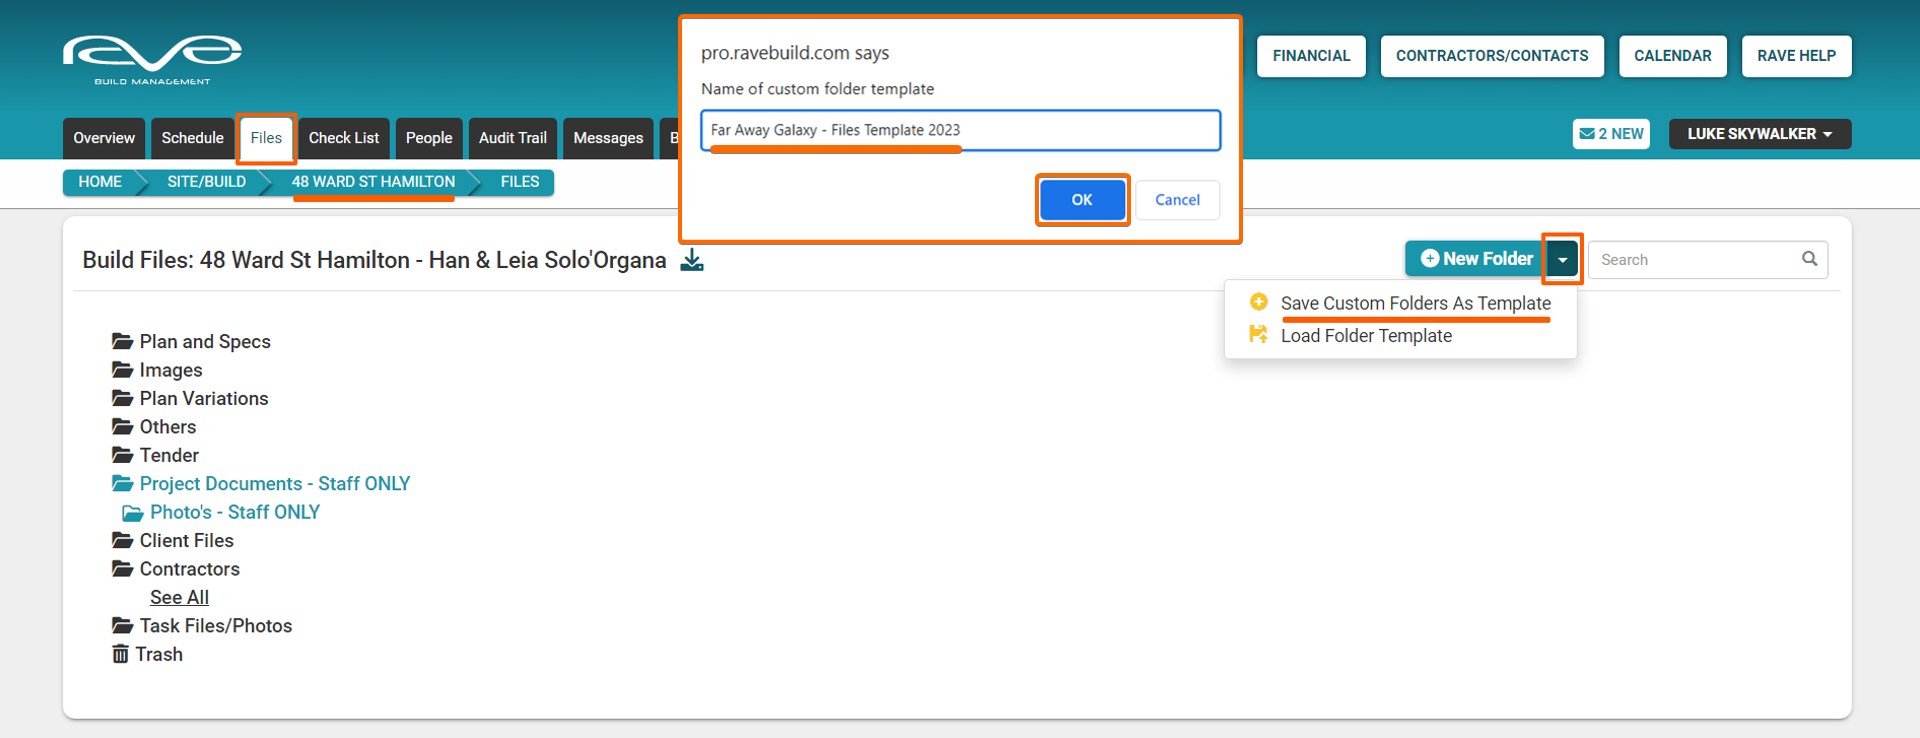
- Move to the top right of the page, and click on the drop-down option to the right of the ‘New Folder’ button
- Then select the 'Save Custom Folders As Template' option
- From the custom folders template pop-up - we give our new folder template a name
- And click OK
With your template saved, you can now load that template of folders and access permissions - or set it as a default template to automatically load for every new project created from that point onwards.
To load your folder template to another project:
From the Files sub-tab, of the target project:
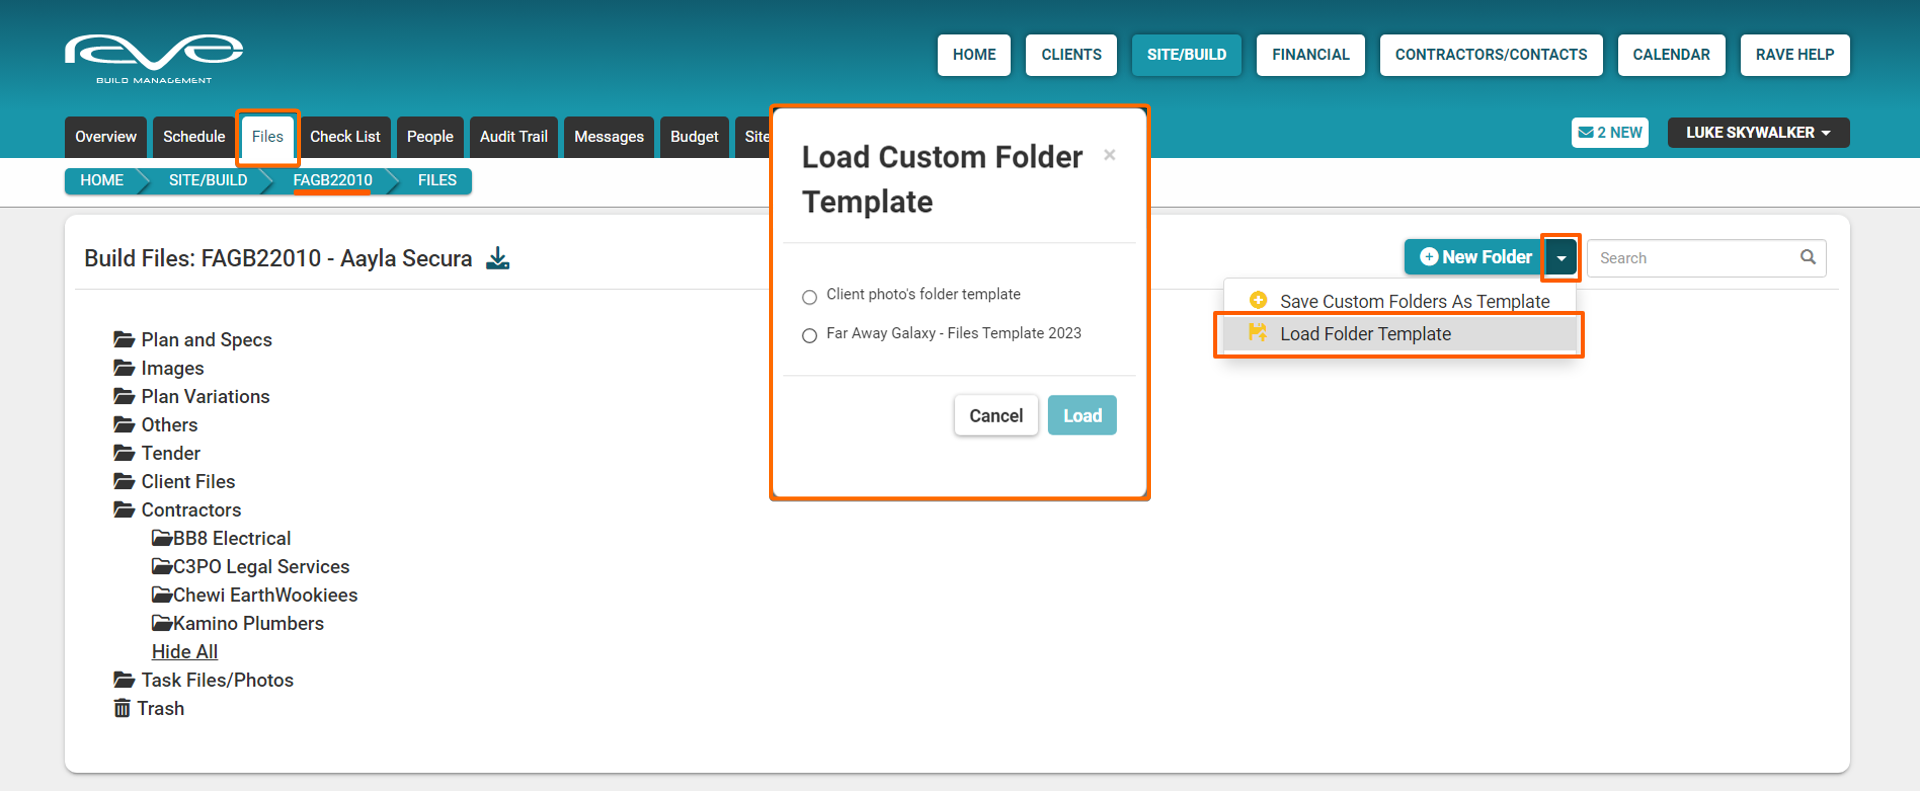
- Move to the top right of the page, and click on the drop-down option to the right of the ‘New Folder’ button
- Then select the 'Load Folder Template' option
- From the 'Load Custom Folder Template' pop-up - we tick the folder template we want to load
- And click Load
This will load the folders from the folder template with the folder permissions you originally set.
You can also set a folder template as a default to automatically load for every new project created from that point onwards.

To load your folder template to all future projects:
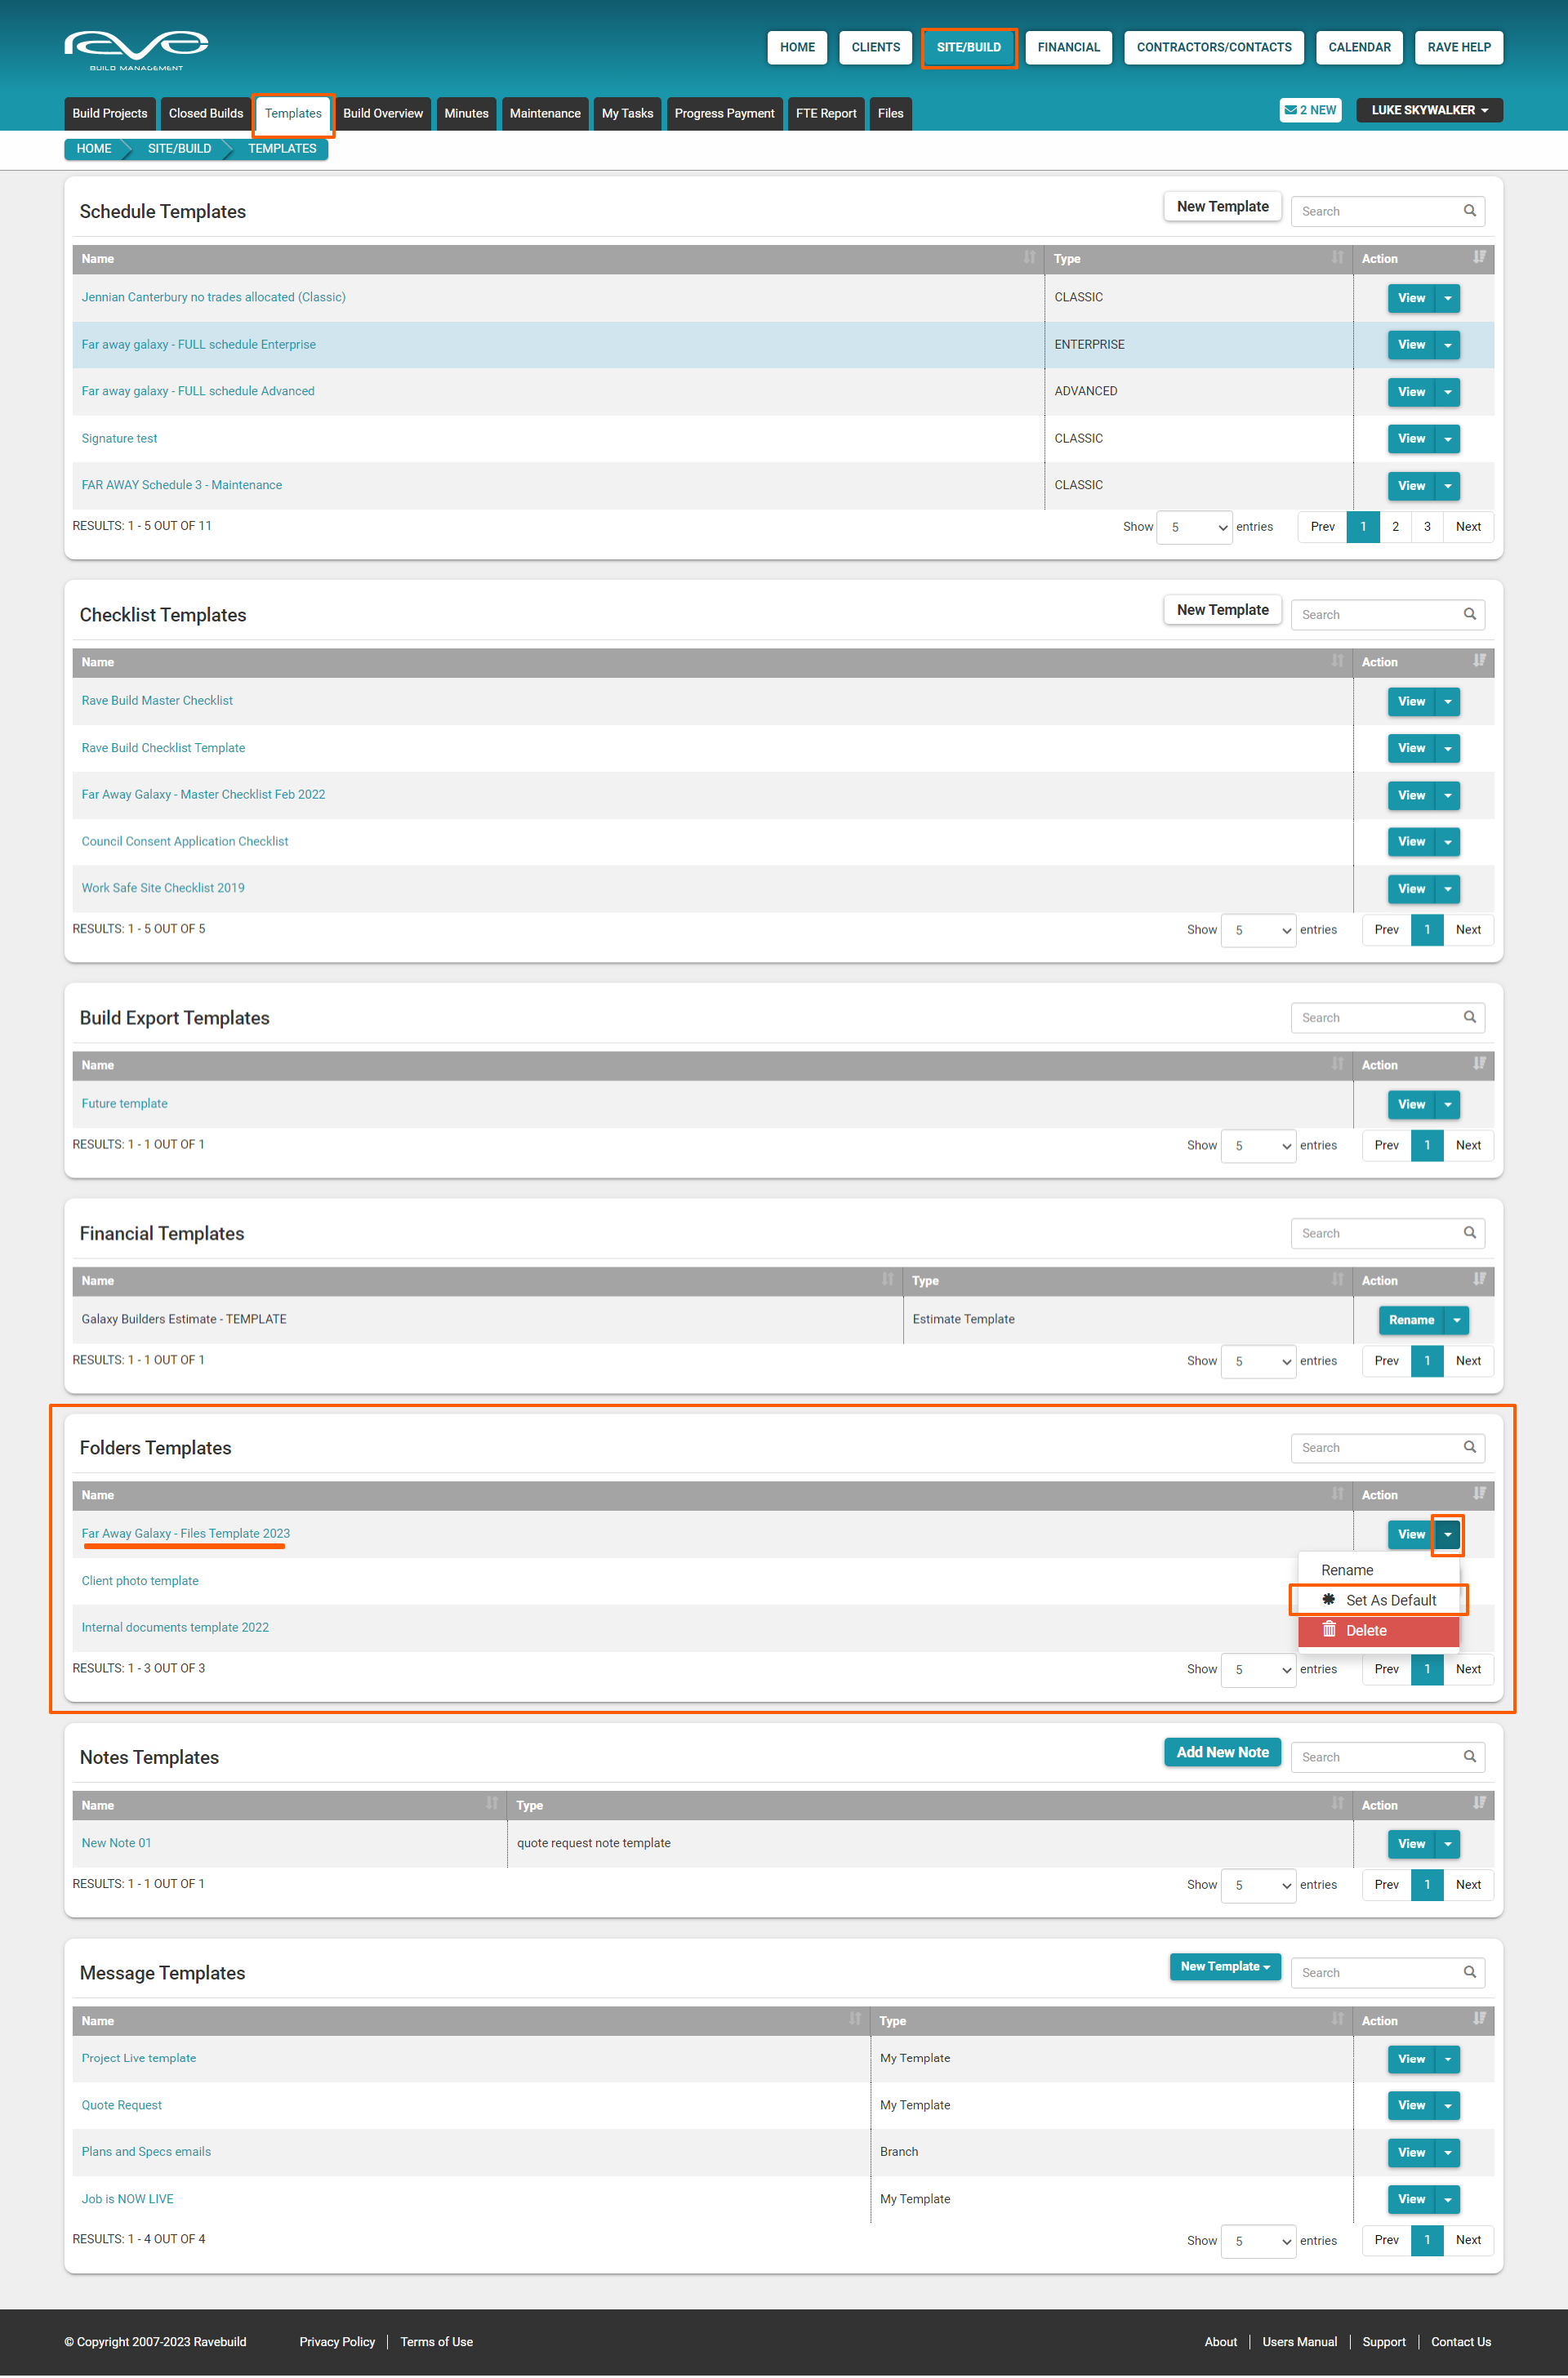
Click on the Site/Build button
- Then select the Templates sub-tab
- Scroll down the Templates page until you reach the 'Folders Templates' section
- Find the template name that you want to set as the default template - move over to the right hand side of that line, and click on the Action dropdown
- Then select the 'Set As Default' option, and click OK to confirm
This will add an asterisk (*) to the left of the Template name - confirming it as your default folder template moving forward. If you are not sure what is in a folder template, click on the view button over to the right.
You can also Rename and/or Delete a folder template via the action dropdown menu if required.