Rave’s Financial Management System is designed to help you manage every financial aspect of your project in one place. From budgeting through to invoicing and reporting, the system keeps your project finances accurate, organised, and easy to track.
Within each project, you can manage:
Prelim Budgets and Quotes – Create, review, and track budget allocations
Estimates and Variations - Create, Track, link to schedule and manage
Supplier Bills – Record and manage incoming invoices
Client Invoices – Generate and track outgoing invoices
Financial Reporting – Monitor financial performance and project profitability
Accessing your Project’s Budget Workflows
There are two ways to access a project’s financial information.
Option 1: Access via the Financial Menu
Click Financial in the main navigation.
Search for the relevant project.
Select one of the hyperlinks to open its financial workflows.
This method is useful when you want to quickly locate financial information without navigating through the full project list

Option 2: Access via the Projects Menu
Click Projects in the main navigation.
Find and open the relevant build.
Select Budget to access the project’s financial details.
This method is ideal when you are already working within a specific project.

The Estimate Sub-Tab is where you manage all estimate-related settings and client proposal actions. From this page, you can:
Add or review markup and margin
Set a fixed sell price
Add or edit a Client welcome message
Attach relevant documents
Manage variations
Send proposals to clients for acceptance or rejection
There are several features available within this section, so we’ll go through each one individually to explain how they work.

The Estimate Version section is where you select which estimate you are currently working on. You do this by selecting the circle to the left of Custom Reference and ensuring the Is Active is always checked. This may include toggling between:
The main proposal - Estimate Version 1
A duplicate proposal as the first has been rejected due to material changes Estimate Version 2+
A variation(s)
The version selected in this section determines which estimate proposal and pricing you are editing. Once selected, all other sections on the page will automatically update to display the details for that specific estimate.
You can also:
Edit the estimate version name
Access additional actions using:
The pencil icon (to edit)
The three-dot action menu (for additional options)
Add a new quote to the estimate
Generate or Regenerate the proposal
Accect on behalf of the client
Decline on behalf of the client
Turn on Custom Ordering - to re order the categories
Duplciate the version
Set Default Terms and Conditions
Manaage or add attachments
Save this version as a template to use in other projects
Add internal notes for your team around this specific version
Delete the version
This ensures you are always working within the correct estimate version before making any changes.

The Client Acceptance History section displays a record of all proposal acceptance activity.
This section allows you to track:
- Whether a proposal was accepted or declined
- The date and time the proposal was accepted or declined
- The date and time the proposal was locked or unlocked moving the state between draft, accepted and declined.
- Who actioned the proposal
- Any message added by the client
This provides a clear audit trail of client interactions with the proposal, ensuring full visibility of the acceptance process.

Located below the Client Acceptance History, the Version Markup & Margin section allows you to review or adjust the margin and markup for the selected Estimate Version.
In this section, you can:
- View the current markup and margin settings
- Adjust the version-level markup and margin editing one box will auto calculate the other
- Set a Fixed margin or sell price using the Check boxes
- Set a client contingency
The Estimate Version markup is applied in addition to your line item markup to help achieve your overall desired profit margin.
This ensures your final pricing aligns with your profitability targets before sending the proposal to the client.

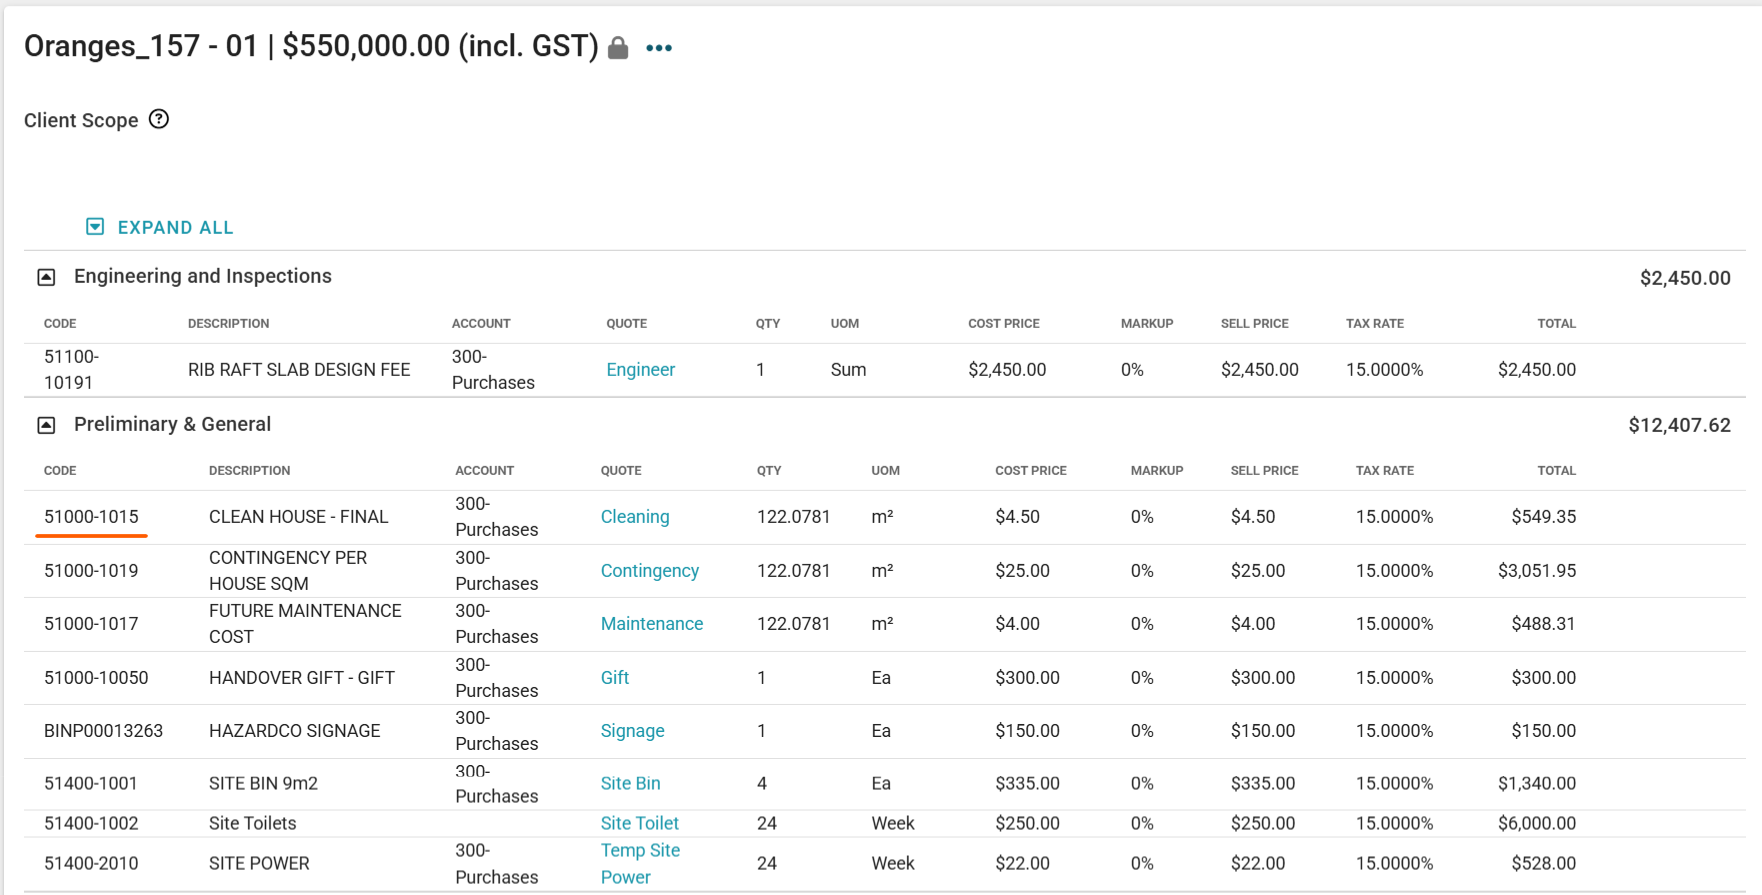
Below the Estimate Version Markup & Margin section is where your Estimate Quotes are displayed.
These quotes collectively make up the full Client Estimate.
Within this section, you can:
Add an overall Client Scope
Review all of the pricing via the estimate categories and sub categries if in use using the Expand and Collapse arows
Add any overall Inclusions and Exclusions
This allows you to clearly define the structure and scope of the proposal before it is sent to the client, ensuring all key details are presented in a logical and professional format.

Now that you have made all your adjustment we can review The Estimate Overview. This is the very top of the page and displays the current financial position of your proposal, including any variations and adjustments made in the Markup & Margin section.
At the top right of the screen, you will see a green Accept Estimate button.
Selecting this button confirms the proposal. Once accepted, any further changes made will be created as variations to the original proposal.

Understanding the Figures (Top Right Panel)
TOTAL Project Value (Excl. GST)
The full project value to the client excluding GST, including all markup.TOTAL Project Value (Incl. GST)
The full project value to the client including GST and all markup.Line Item Markup (A)
The total markup applied to individual line items at the quote level.Active Version Markup (B)
The total markup applied from the Markup & Margin section for the selected Estimate Version.GST Amount
The total GST applied to the estimate.Raw Cost
The total cost of all quotes (your cost) within the estimate, excluding GST and all markup.Calculated Margin
The total value of all markup applied to the project.
This is the combined total of:Line Item Markup (A), and
Active Version Markup (B)
Note: The circle icon with a ? is a tool tip hovering over this will give you some extra information or a tip on what that line includes.
If you are using Product Inventory your codes will pull through from your quotes onto the estimate or variation screen.
Creating a New Estimate Version
RAVE allows you to create multiple versions of a single quote, each with different pricing, markup, or scope. This is done using the Duplicate function.
Once you have presented your first version (emailed it or downloaded/printed it), you can duplicate it:
- Click the three-dot action menu next to the Estimate Version you want to duplicate.
- Select Duplicate.
- A confirmation pop-up will appear.
- Confirm that you would like to duplicate the estimate.
A new Estimate Version will then be created, which you can edit as required.

Editing a Duplicated Estimate Version
Once duplicated, Rave copies all quotes from the original estimate and adds “COPY” to the end of each quote name. You can then edit the duplicated version by removing or adding pricing, changing product quantities, adjusting materials, or making other required changes.
On the Quotes page, the original version quotes are locked and cannot be edited, while the duplicated quotes are unlocked and can be edited, removed, or added to. This protects the original proposal while allowing you to modify the new version.
The version you are currently viewing and working on is your Active Version. To switch versions, click the circle beside the Estimate Version and confirm the change. The “Is Active” tag shows which version you are working in. You cannot add quotes to a version that is not active. If you need to add quotes to another version, you must first make it active to ensure your back-costing remains intact.

You can add another quote to this job from someone else by clicking the ‘Add a Quote’ button - this will take you back to the quotes page to create the new quote. Or you can go directly to the quotes page create the quote a select approve and add to estimate.
You have the ability to add a personal message and/or a scope of works to the top of the estimate proposal (PDF), and as a welcome message to the body of the email i.e. "Dear Brooklyn, Thank you for the opportunity to price......" This is done via the 'Add Client Scope' box.

From the 3 dot drop down beside each version 'Manage attachments' allows you to add PDFs, plans, or anything you want here as long as its in PDF format. The order you add these in is how RAVE will append them to the client’s estimate/project.

If you are ready to present this estimate to your client, you can head to the middle of this page, and click the ‘Generate Proposal’ button on the right-hand side - as per the image below. If you have already generated the Proposal you can re generate via the 3 dot drop down.

Generate Proposal Page
On the left-hand side of the Generate Proposal page, you’ll see a preview of your Estimate Proposal. Your Welcome Message and/or Scope of Work appears above the first category (e.g., Framing Materials), and individual scopes (if included) are displayed beneath each category header.
On the right-hand side are your Proposal Options, where you can adjust the layout and level of detail, with a live preview of your changes.
Here you can:
Choose whether to generate an Estimate or a Quote
Set the number of working days the proposal is valid for (displayed below your logo at the top right)
Change the proposal style, selecting from different layout options depending on how much detail you want to present to the client
- Minimal - Line Items (with Qty, UOM, Unit Price and Total)
- Minimal without Prices - displays the Total Project Price only
- Simple - displays the Category Name with Total Project Price only
- Simple with Prices - displays the Category Name with Category Total, and Total Project Price
- Simple with Line Item Description - dislays the Category Name, Line item descriptions and Total Project Price
- Streamlined - displays the Category Totals and Line Items (with totals only)
- Streamlined No Pricing Lines - displays the Category Totals only i.e. hides pricing lines from the proposal
- Detailed - displays the Category Totals, Category Names, Line Items (with UOM, Qty, and Total), and Total Project Price
- Full - displays the Category Totals, Category Names, Line Items (with UOM, Qty, and Unit Price), and Total Project Price
- Include Inclusions & Exclusions – displayed immediately below the Total Cost section
- Include Scope of Works – located below each section’s Category Header
- Include Subcategories - For clients using subcategories, you can now include those on certain proposal styles: Simple with prices, Simple with Line Item Descriptions, Detailed and Full.

- Show Markup Breakdown – located below the Total Cost (inc GST & Markup)
- Show Markup % on Items – displayed on each inventory line entry
- Show Raw Cost Pricing - displays the raw cost pricing on the proposal (This is showing your costings to your client)
- Show Client Project Contingency – appearing as a % with a total cost including contingency, below the total cost amount

As you can see, the Markup Breakdown tells the client that this entire project has a 30.43% markup.

If you want to show an individual markup on line items you have the option to display this to the clients. You can display the individual markup alongside each item instead of an overall markup at the bottom.

If you do not want to send the proposal to your client just yet, click the ‘Generate the Proposal’ option, which will save a copy of your proposal in the files section of your project in RAVE - accessible via ‘Site/Build, your project number, Files then Generated Estimate Proposals or via your project number/Files.
Your Estimate Proposals file will stay stored there until you (or your team) replace it with a new one. Every time you send or generate a proposal, RAVE will save it for you and store it here, so you don’t have to worry that you might lose these files. We will also check the latest version box if you update that proposal and re-download or send it to the client with changes.
Sending proposals to clients
For information on how to send a proposal to clients, check out our Sending Proposals to Clients article.
Was this article helpful?
That’s Great!
Thank you for your feedback
Sorry! We couldn't be helpful
Thank you for your feedback
Feedback sent
We appreciate your effort and will try to fix the article