In this article, we overview RAVE's Financial Management System module, scroll down for more details on some of the key RAVE FMS workflow.
Preliminary Budget
Often referred to as a feasibility or affordability budget. You come into this tab and add dollar amounts to the categories in order to put together a very high-level costing report and then add margin to determine the sell price for this project. This can be downloaded and shared with a client or kept internally to track once this job is fully priced. This tab is not mandatory and if you don’t use it then the feature is greyed out on the back costing page. As you select each category and add a price it will disappear from the list meaning you won’t double allow for anything.

Quote Requests
The Quote Requests tab is used to generate either a quote request to a supplier or a contractor depending on how you operate your business. By clicking on the add quote request button at the top right it generates a reference number automatically for you. You can then either add attachments and load a message into the text box OR just click the include link to plans and specs folder (you can only use this link for contractors not suppliers) type a message in and press send. You have the ability to send these requests one by one to the suppliers or selecting multiple suppliers at one time. They do not see each others requests, so if you wants to select two painters at once to get pricing from you can do this. The date required back and the site contact are also editable.
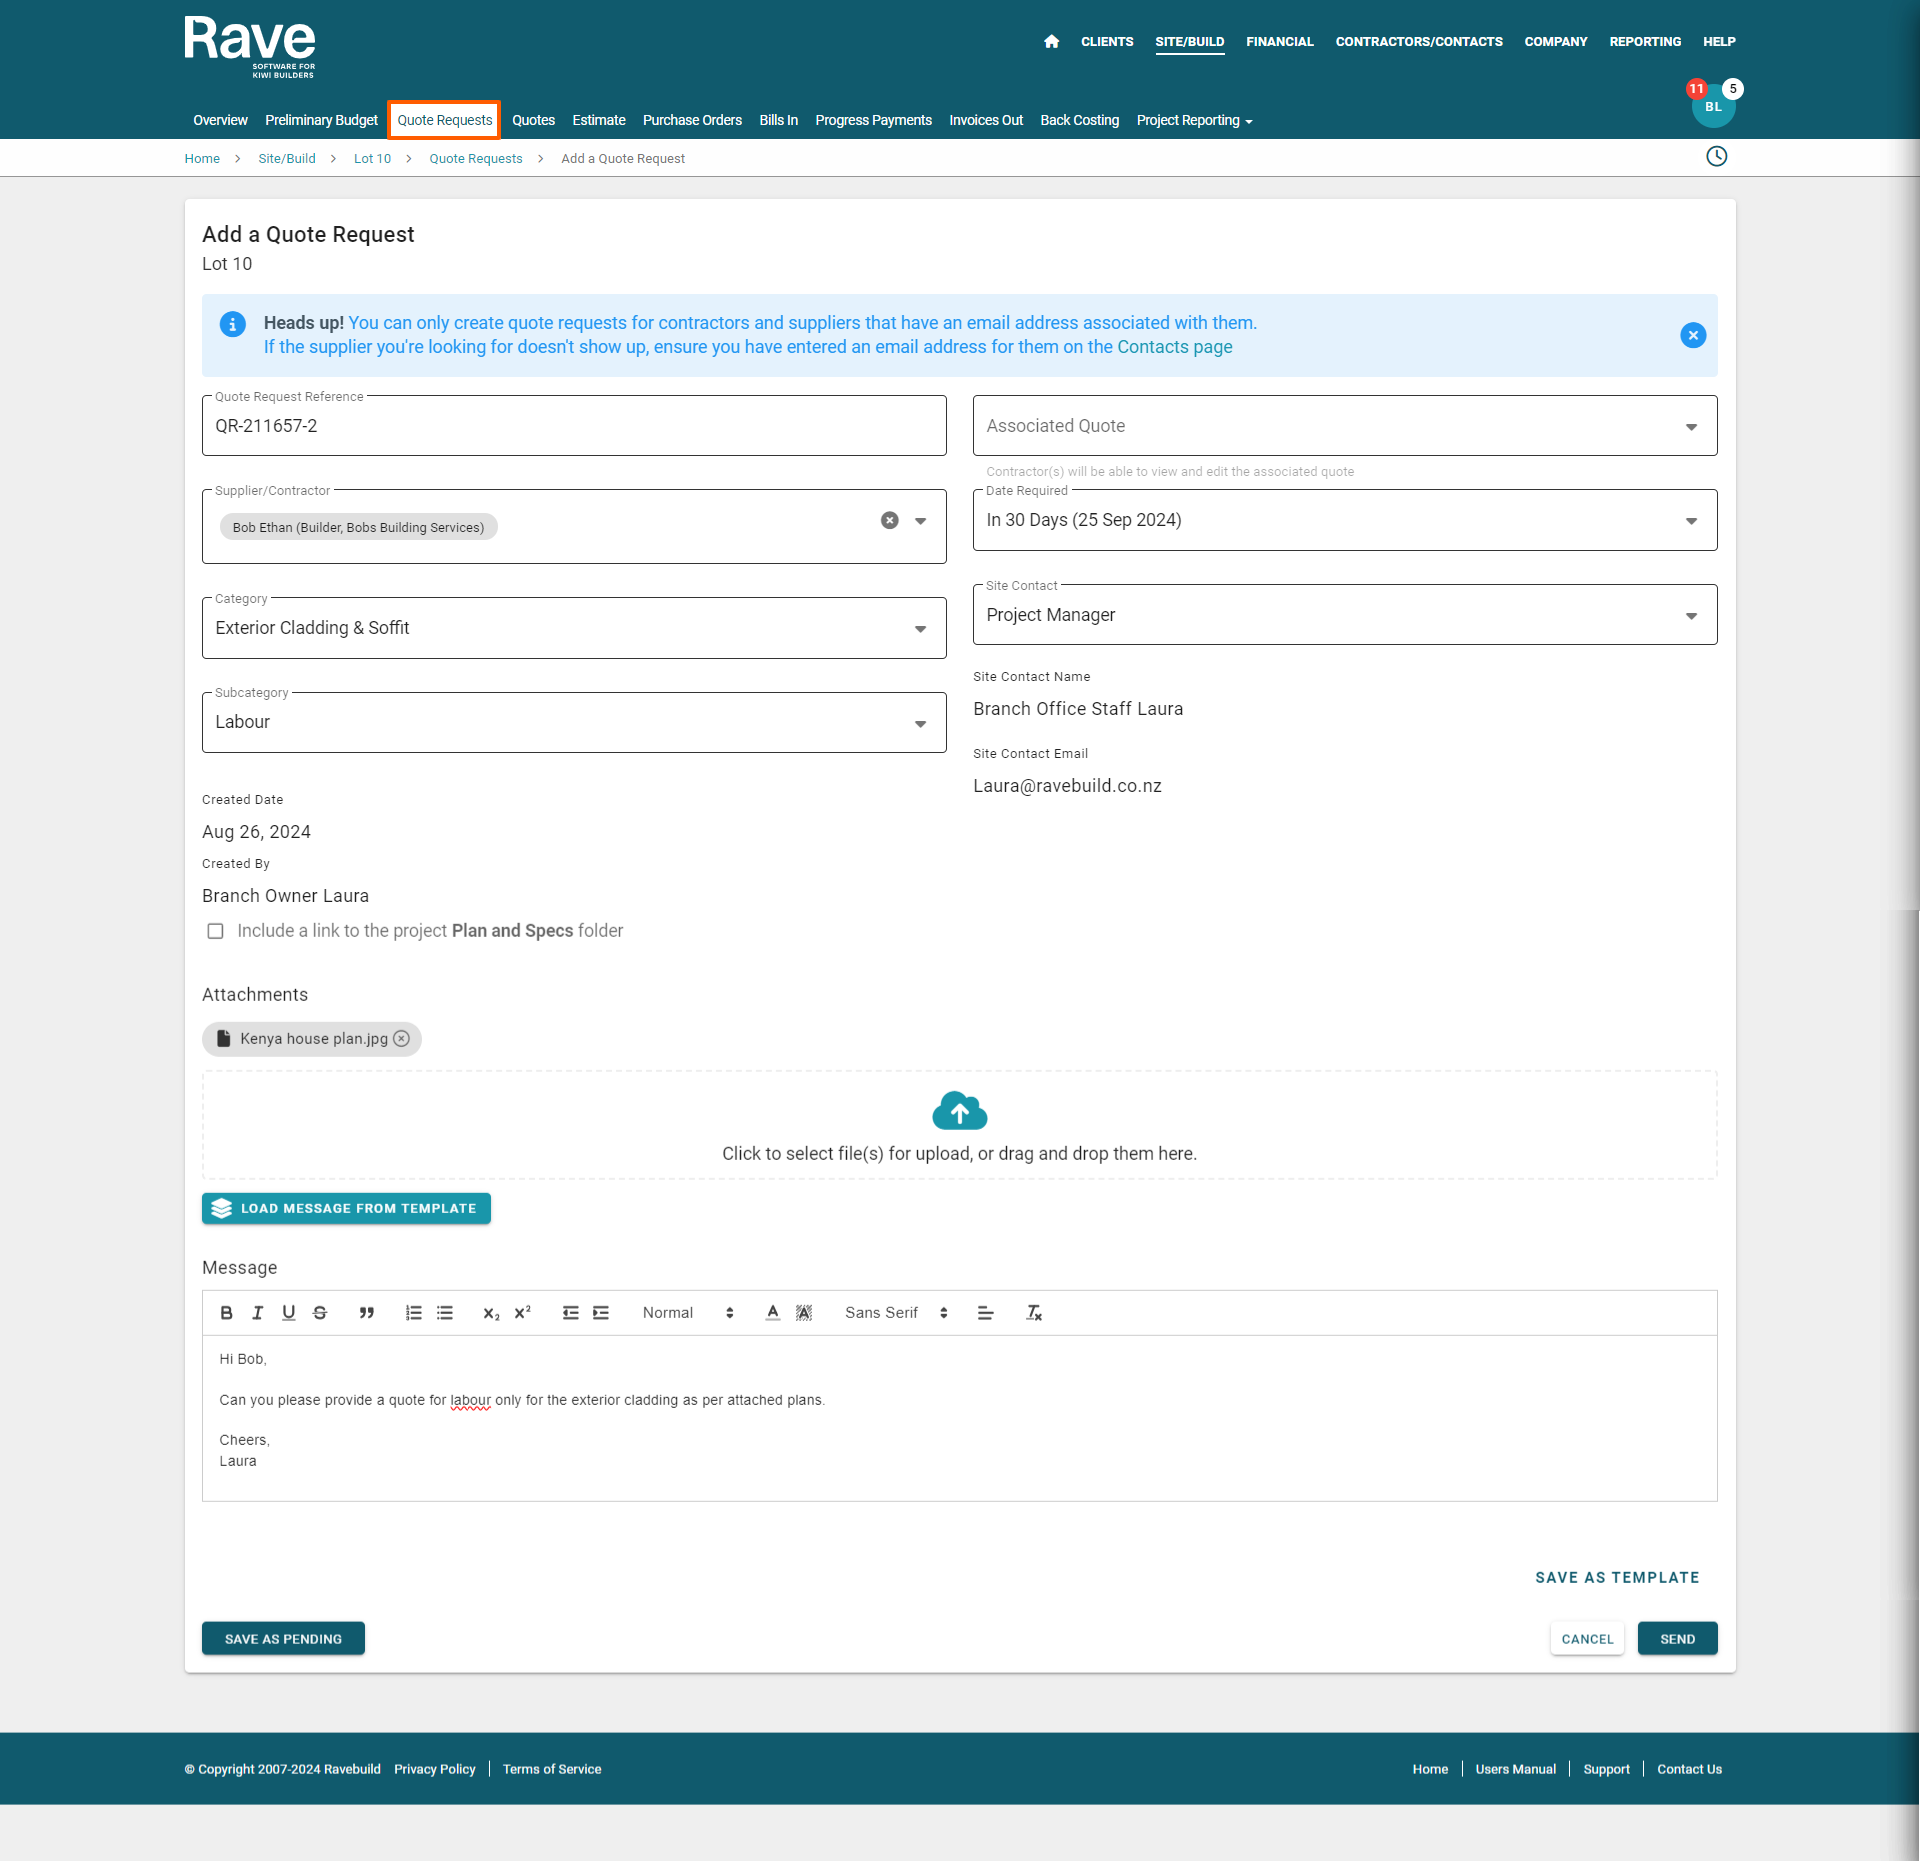
Linking a quote request to a QUOTE
If you have an existing quote loaded into RAVE that you want to link to a quote request and send to the supplier/contractor to confirm pricing, you can do this by selecting the Associated Quote from the drop-down. The quote must match the name of the person you are sending the request to, or it will not show up. The Quote is sent to the supplier/contractor as a PDF attachment and will also show the scope of works to them.
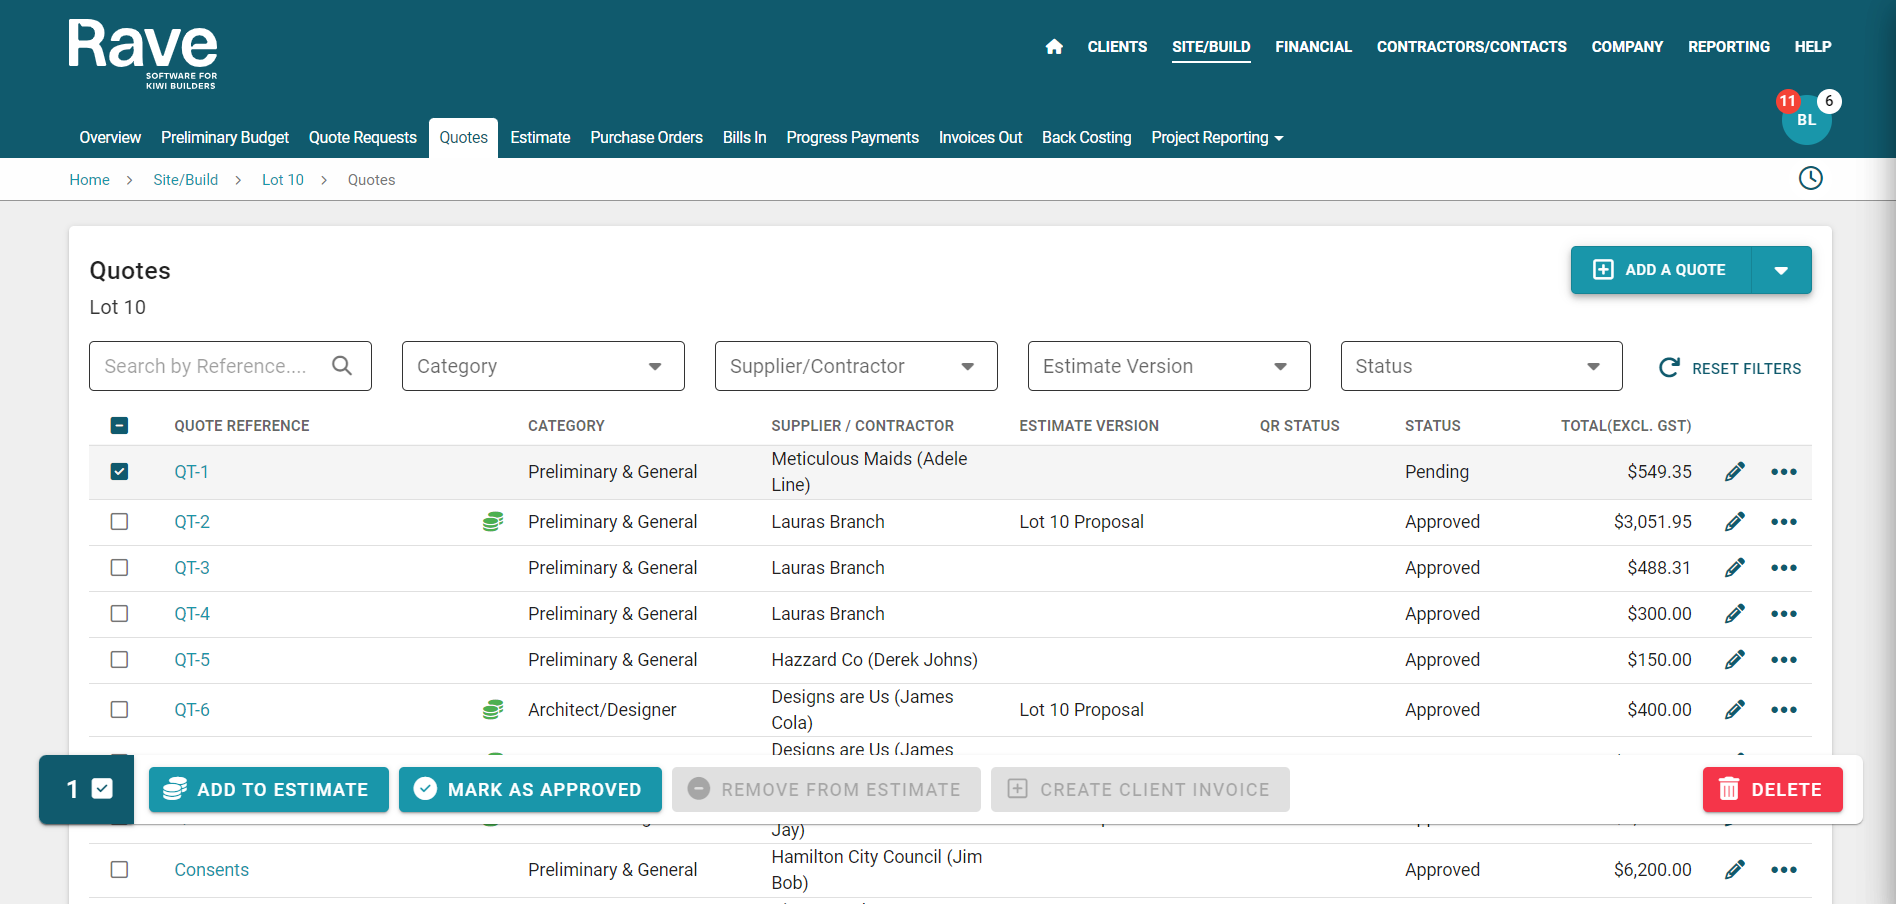
Quotes
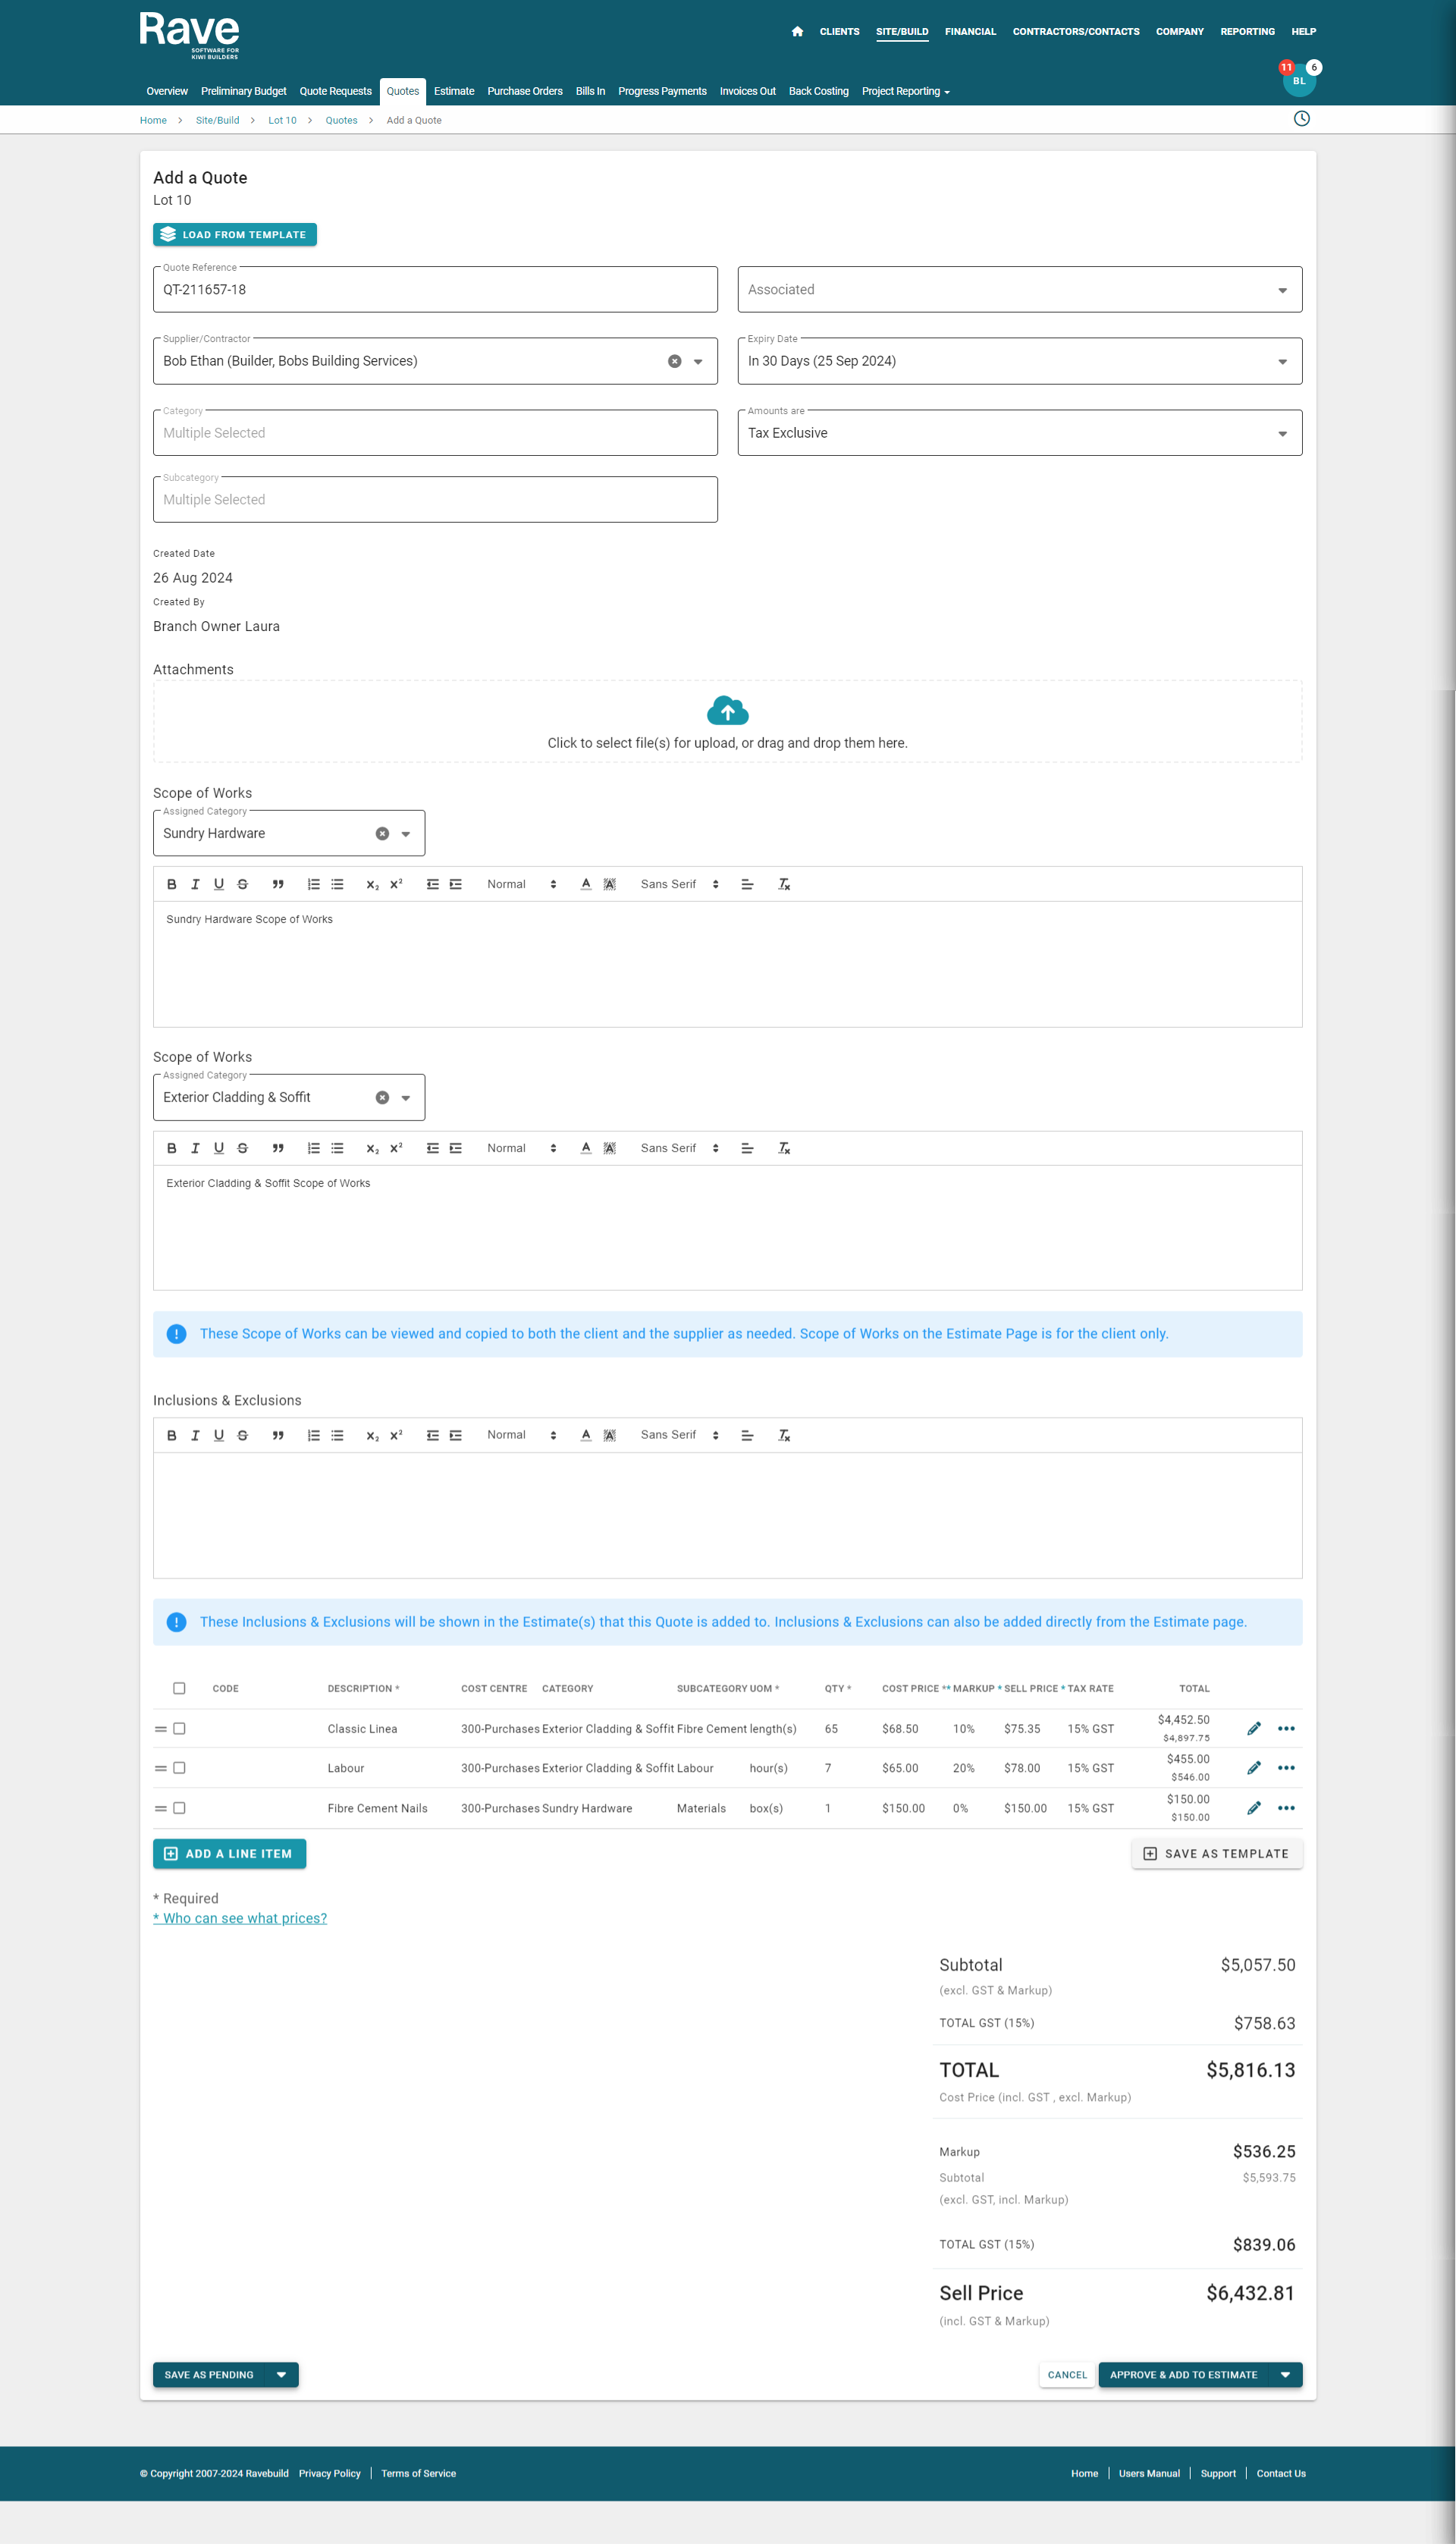
When adding quotes you have the ability to add in your category and subcategory on line items – this means you can load a quote from 1 supplier that has costs across multiple category/subcategories. We also have the ability to type a set sell price in and RAVE will calculate the markup or vice versa. This is especially handy for charge up jobs or variations. You can also specify the scope of works separately for each of the categories.
Note: The ability to load a sell price in on the line item will only stick if you don’t go and add a project level mark up or additional margin on the estimate page.
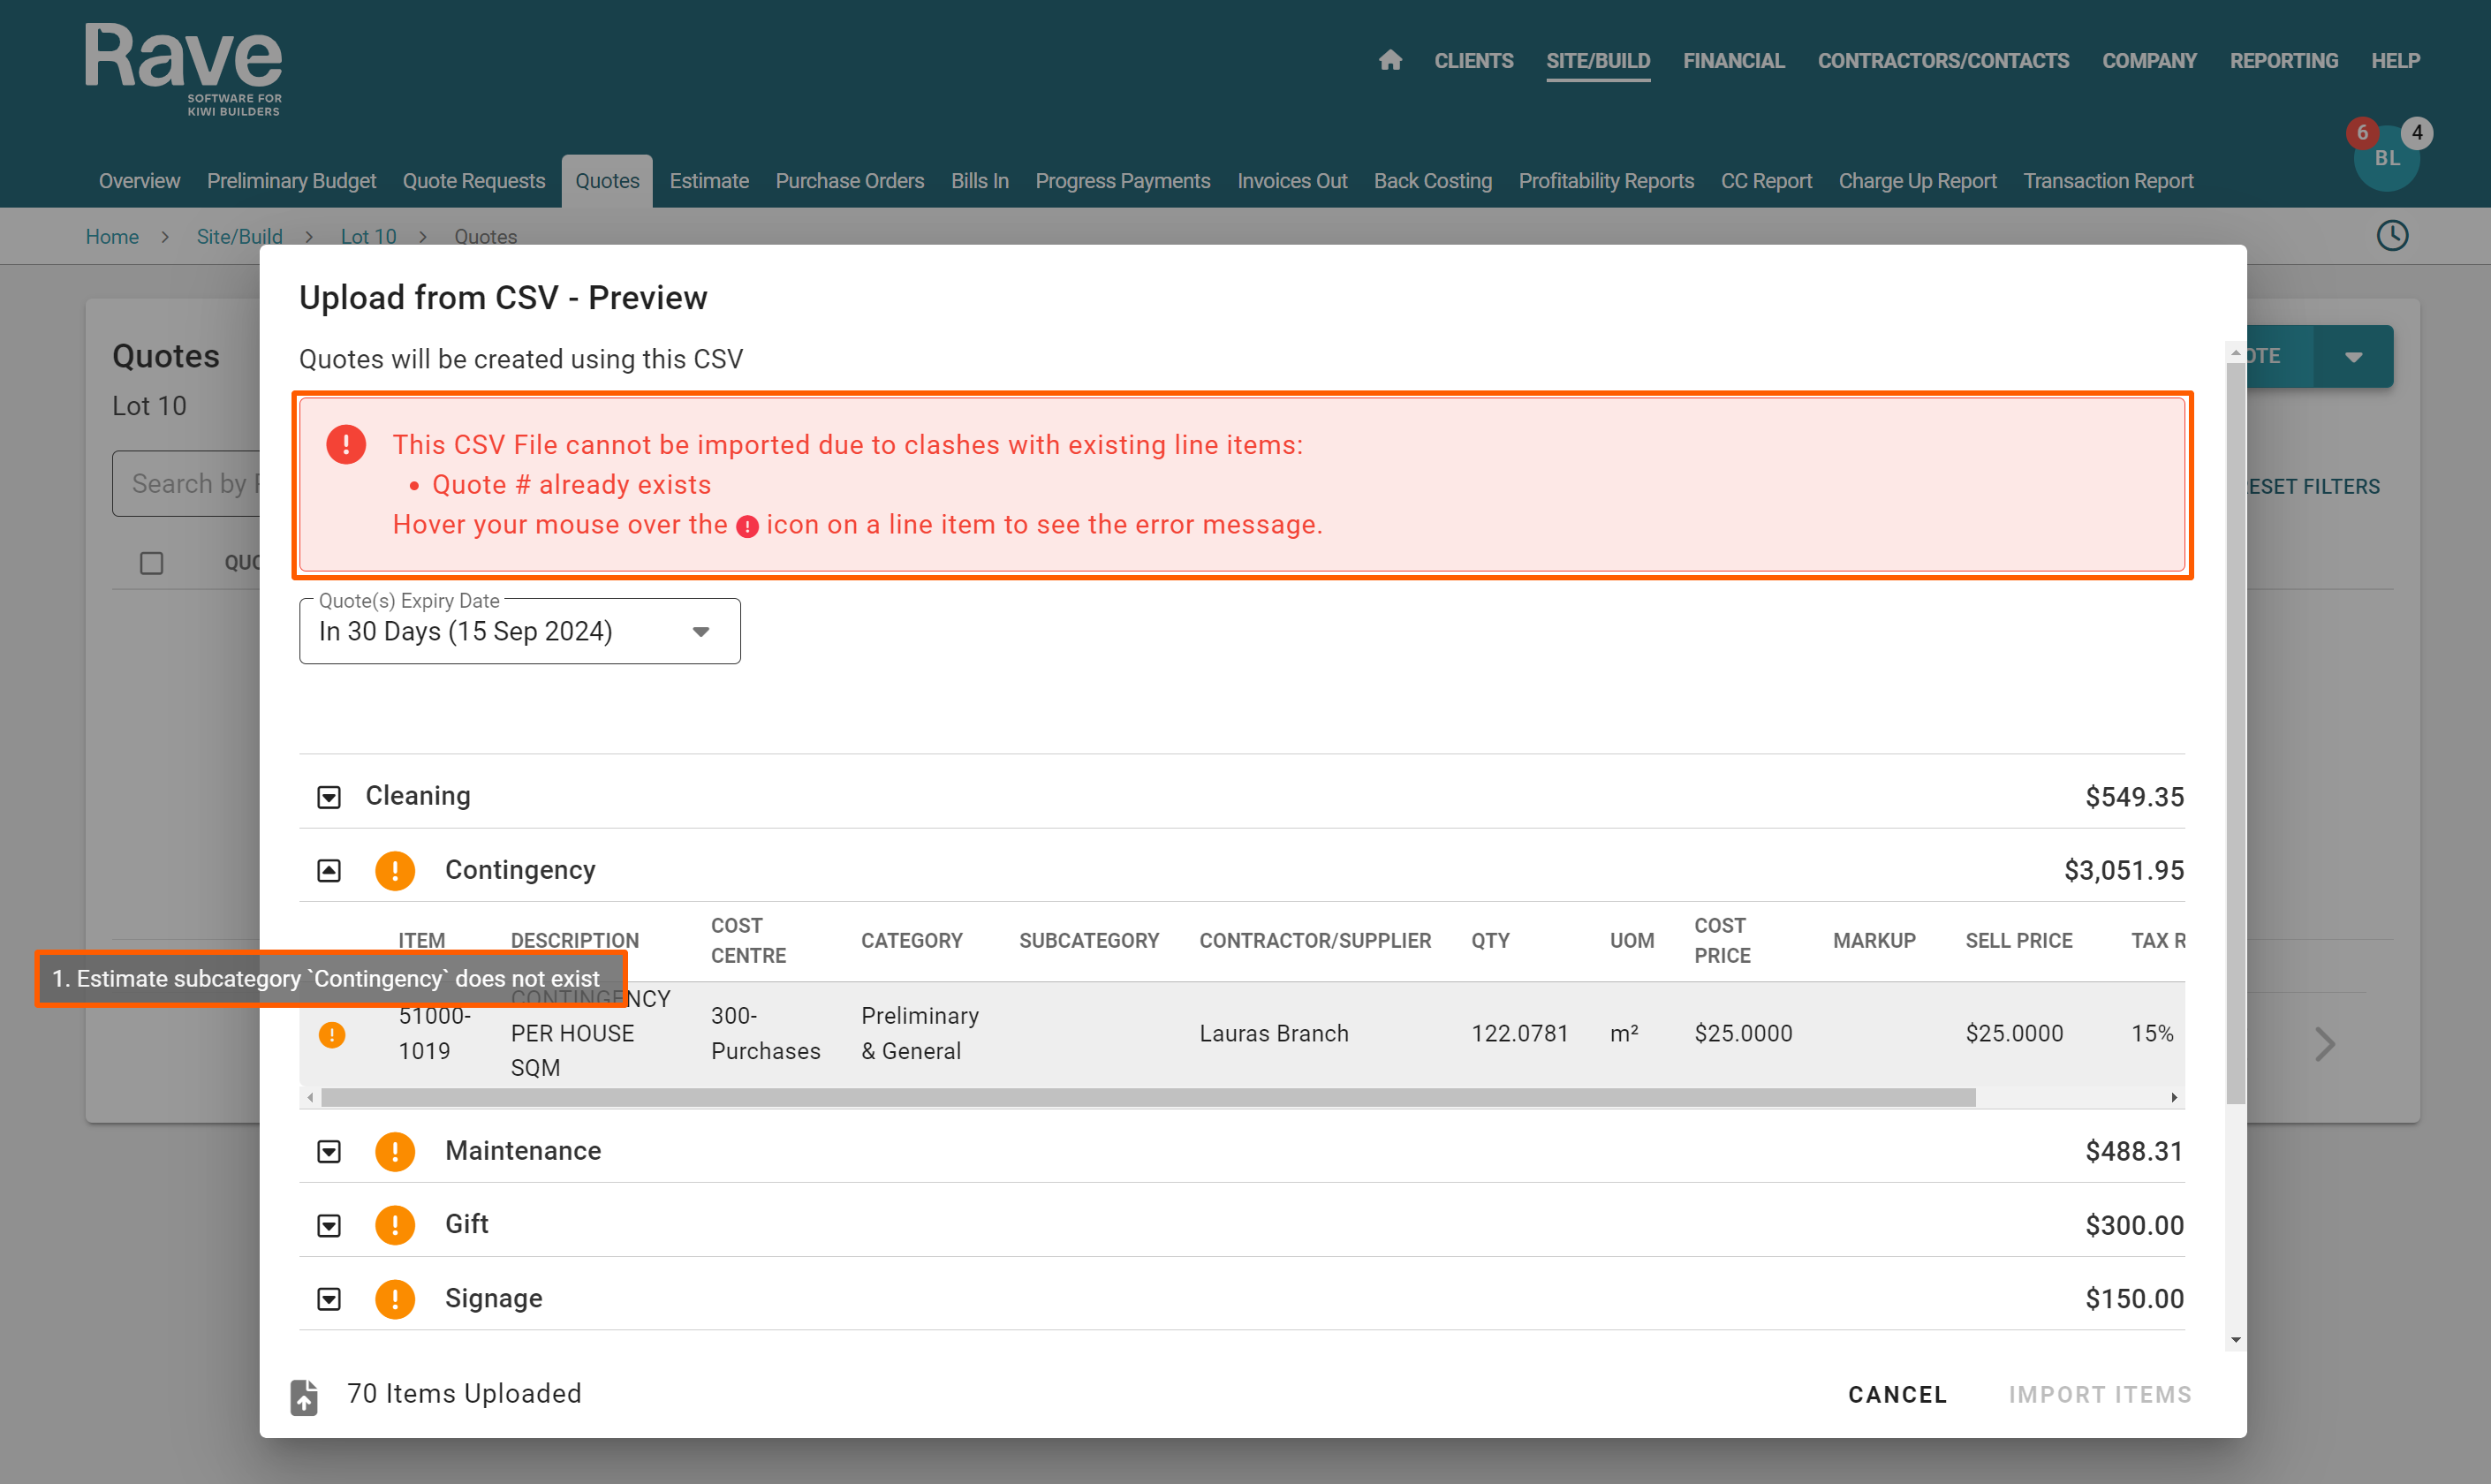
Quotes – From a CSV file
When uploading a quote CSV, Rave will tell you if there is an issue with your upload. The warning box will be red or orange. Red means you cannot proceed you must cancel and fix your csv. Orange means you can proceed but the message is a warning.
Adding a Quote to the Estimate or Back Costing
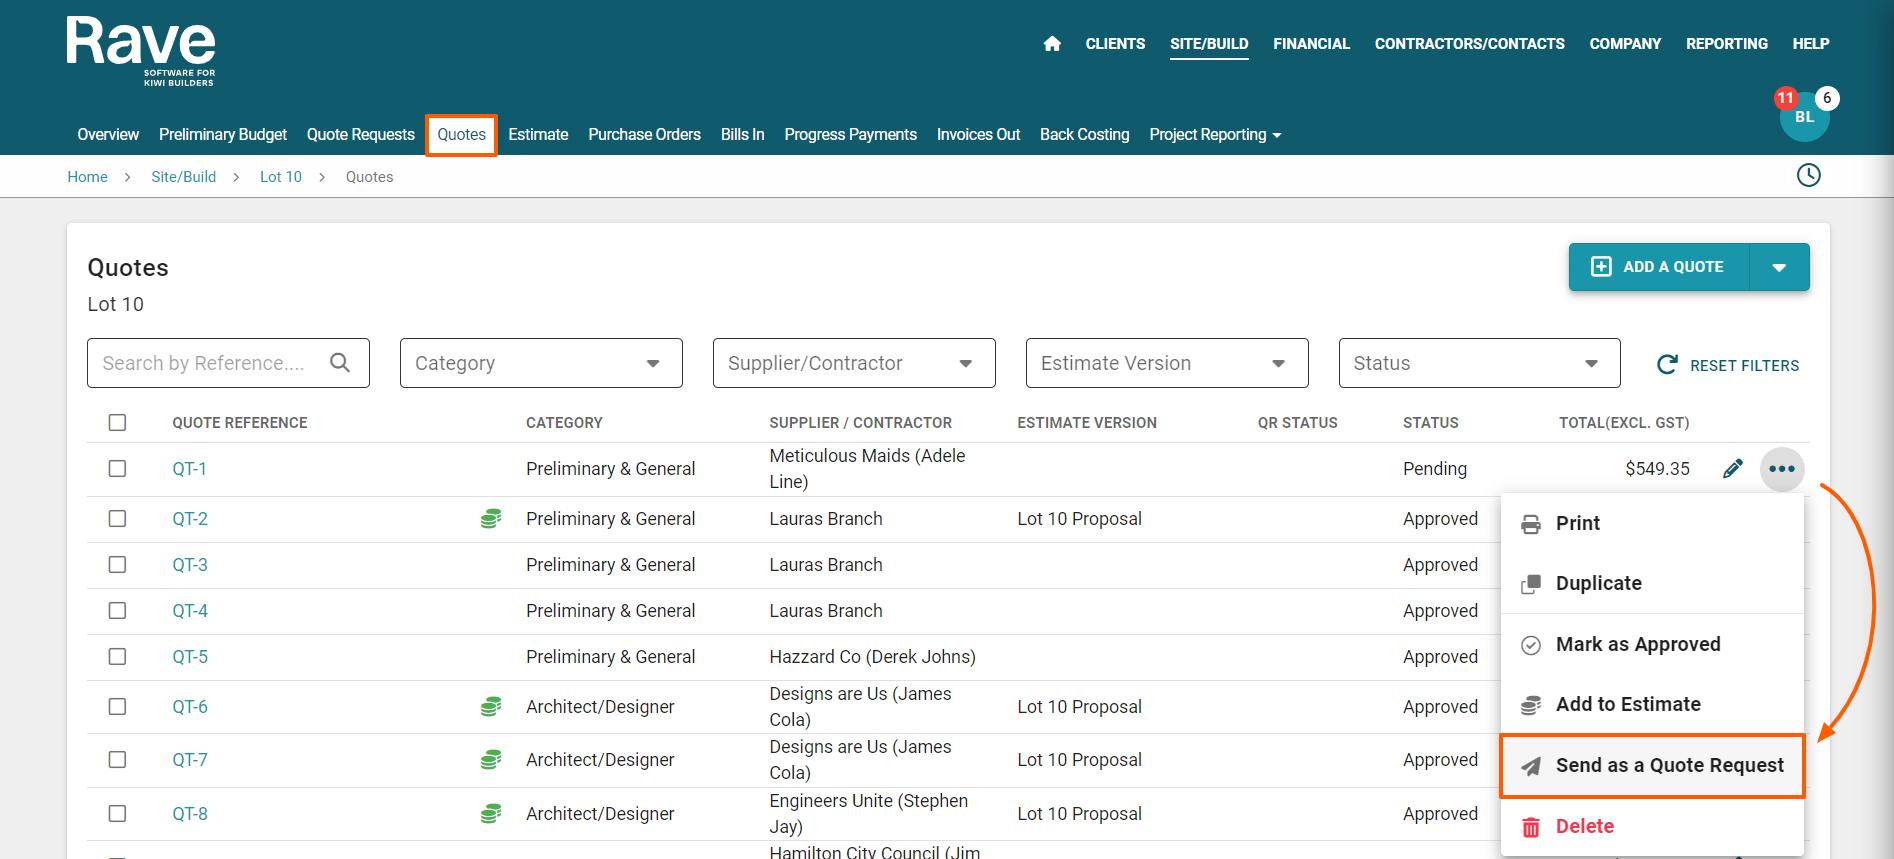
Once you have finished editing your quotes you can bulk select them and add them to the estimate or add them one by one.
If you want that price to not go to the estimate page but be included in back costing, you click on the quote and select Mark as approved. This will bypass the client page but still be added to the back costing report.
The quotes that are in the estimate will have a little green icon with two stacks of money. The quotes with documents attached will have a little paperclip.
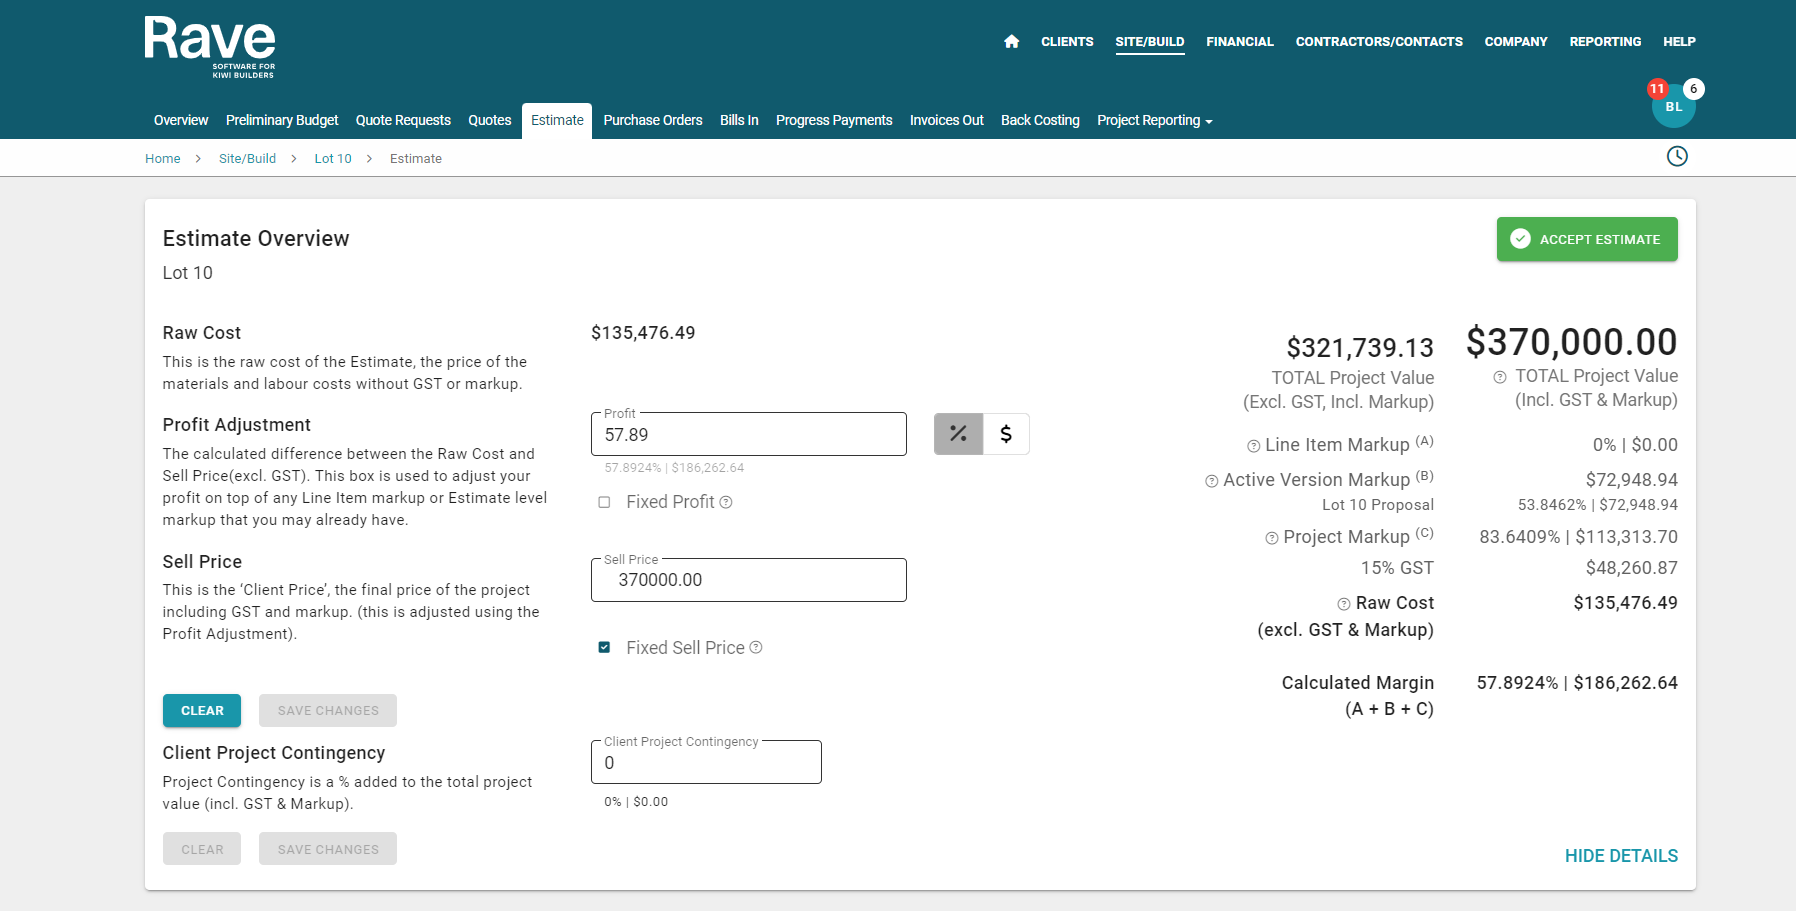
Estimate
When you first open the estimate tab there is a top section which is the Estimate Overview. This shows you your raw cost and any markup/margin and profit information. Once your estimate is locked these boxes are not able to be edited.
The next section is Estimate Version(s). This is where we show you the number of estimates or variations you have created and if they are currently a draft, generated proposal, sent proposal, accepted or declined.
Once you have your first proposal accepted we show an audit trail in the next section Client Acceptance History. If there is more than one client on a job, and you send a proposal, we will show you which client email and name accepted it and the date and time, and any message they left for you.
The next section is the current active proposals markup and margin. You can now generate project level markup at a proposal level. So individual proposals can have their own markup rather than relying on an overall project level one.
The bottom section shows a list of all of the quotes within each category. Each category that has a scope attached will show a little “scope” symbol. There is also an option to edit this information and drag the categories around in a new order. The two parallel lines beside the category name is where you click to move that category. The same two lines are available at the line item level to re-order them as well.
You can also add a client welcome message to your proposal under Client Scope.
Each estimate version has the ability to have its own terms and conditions, or documents added. This is via the 3 dots to the right of the total estimate price under Estimate Versions.
If an estimate is ready to send, you can click on Generate Proposal and a box will pop up allowing you to preview what is being sent to the client. Once you are happy with the styling of your proposal you can select Send Proposal (if the client email is missing this box is greyed out and you need to go back and add the client’s email via the Client Overview page). Once the email is sent, the clients will receive an email asking them to click the proposal. They can download it, and print or save as a PDF. They can then also accept or decline it online and add comments. This will be emailed back to the “Financial email that is set up in your RAVE settings”. You can now log back into RAVE and you will see the box showing the client has accepted it so you can lock your proposal down. Once it’s locked, NO quotes can be edited or changed without your having to unlock it first.
You can now create variation proposals and email them to the client following the same steps – except it will say CREATE new variation rather than new quote. You are also able to duplicate your first proposal and make changes to it, such as remove items to make the price cheaper, or add items. This will keep a copy of the original proposal and create a whole new one for you to edit. This way, if the client changes their mind you can revert back to your original proposal without to much hassle.
Each variation proposal must be accepted or declined by either the client or by someone in the branch/franchise. A copy of every proposal sent or downloaded by the branch is saved in PDF format in the files section. This is to prevent any miscommunication with your client when you are presenting multiple versions. We keep a copy of them all.


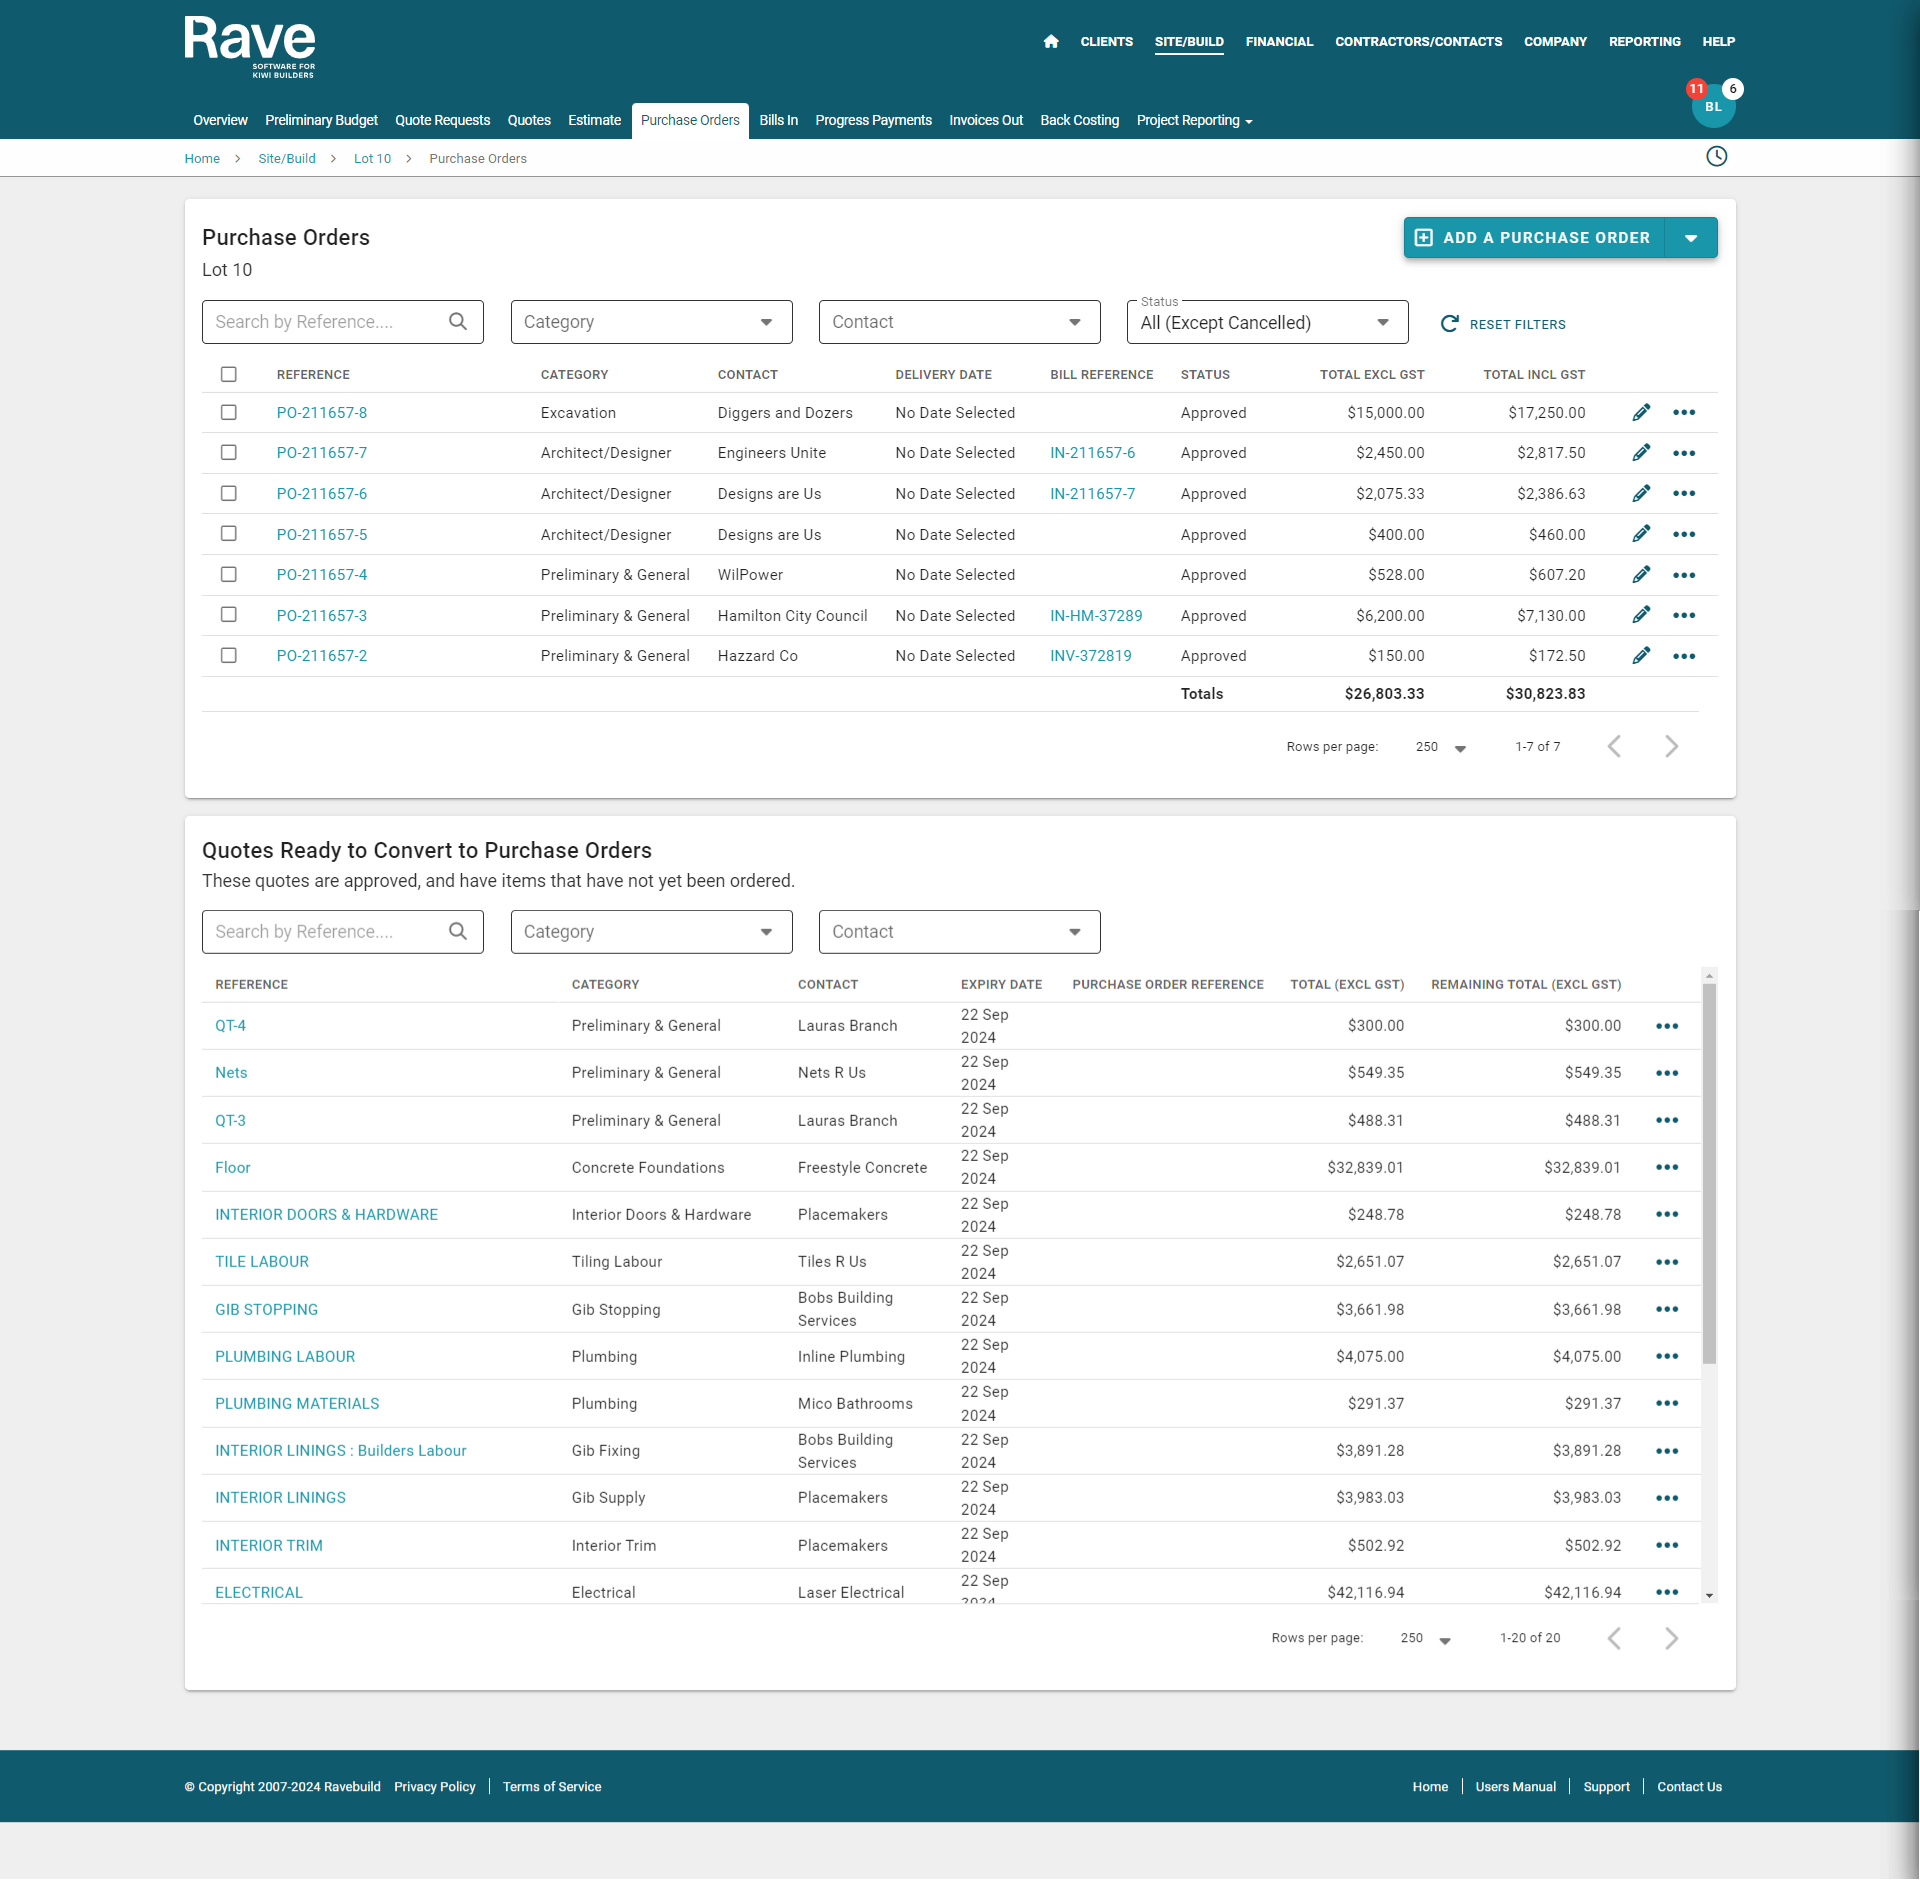
Purchase Orders
Purchase orders are not mandatory in RAVE but they are strongly recommended. This is the only notification email we send out for you to confirm pricing.
All of your accepted quotes are saved as Quotes ready to convert to a PO. You can come into this page, select the Quote you wish to turn into a PO, and click create a purchase order. We prepopulate the information for you off the quote. You can edit line items (change pricing, add quantity, remove items etc). Selecting hide pricing will remove all pricing off the email and PDF then send to your contractor/supplier. Selecting include quote scope of works in PDF will add the scope so the supplier can see what was quoted for. If you have more than one scope on the quote we send both. Suppliers/contractors do not see the markup/margin you have loaded into RAVE for charge up jobs, this box doesn’t exist on their pdf or their log in. Once you have selected everything you want to order and written a message or selected a template to load a message in, you can either – Approve which will save the PO but NOT send it or you can click Approve and Send and we will email it to the contractor/supplier on your behalf.
If you have more than one item on the quote and only order some of them, RAVE will keep the remaining items as a quote ready to convert to a PO.
If you don’t use purchase orders this page can be skipped entirely.
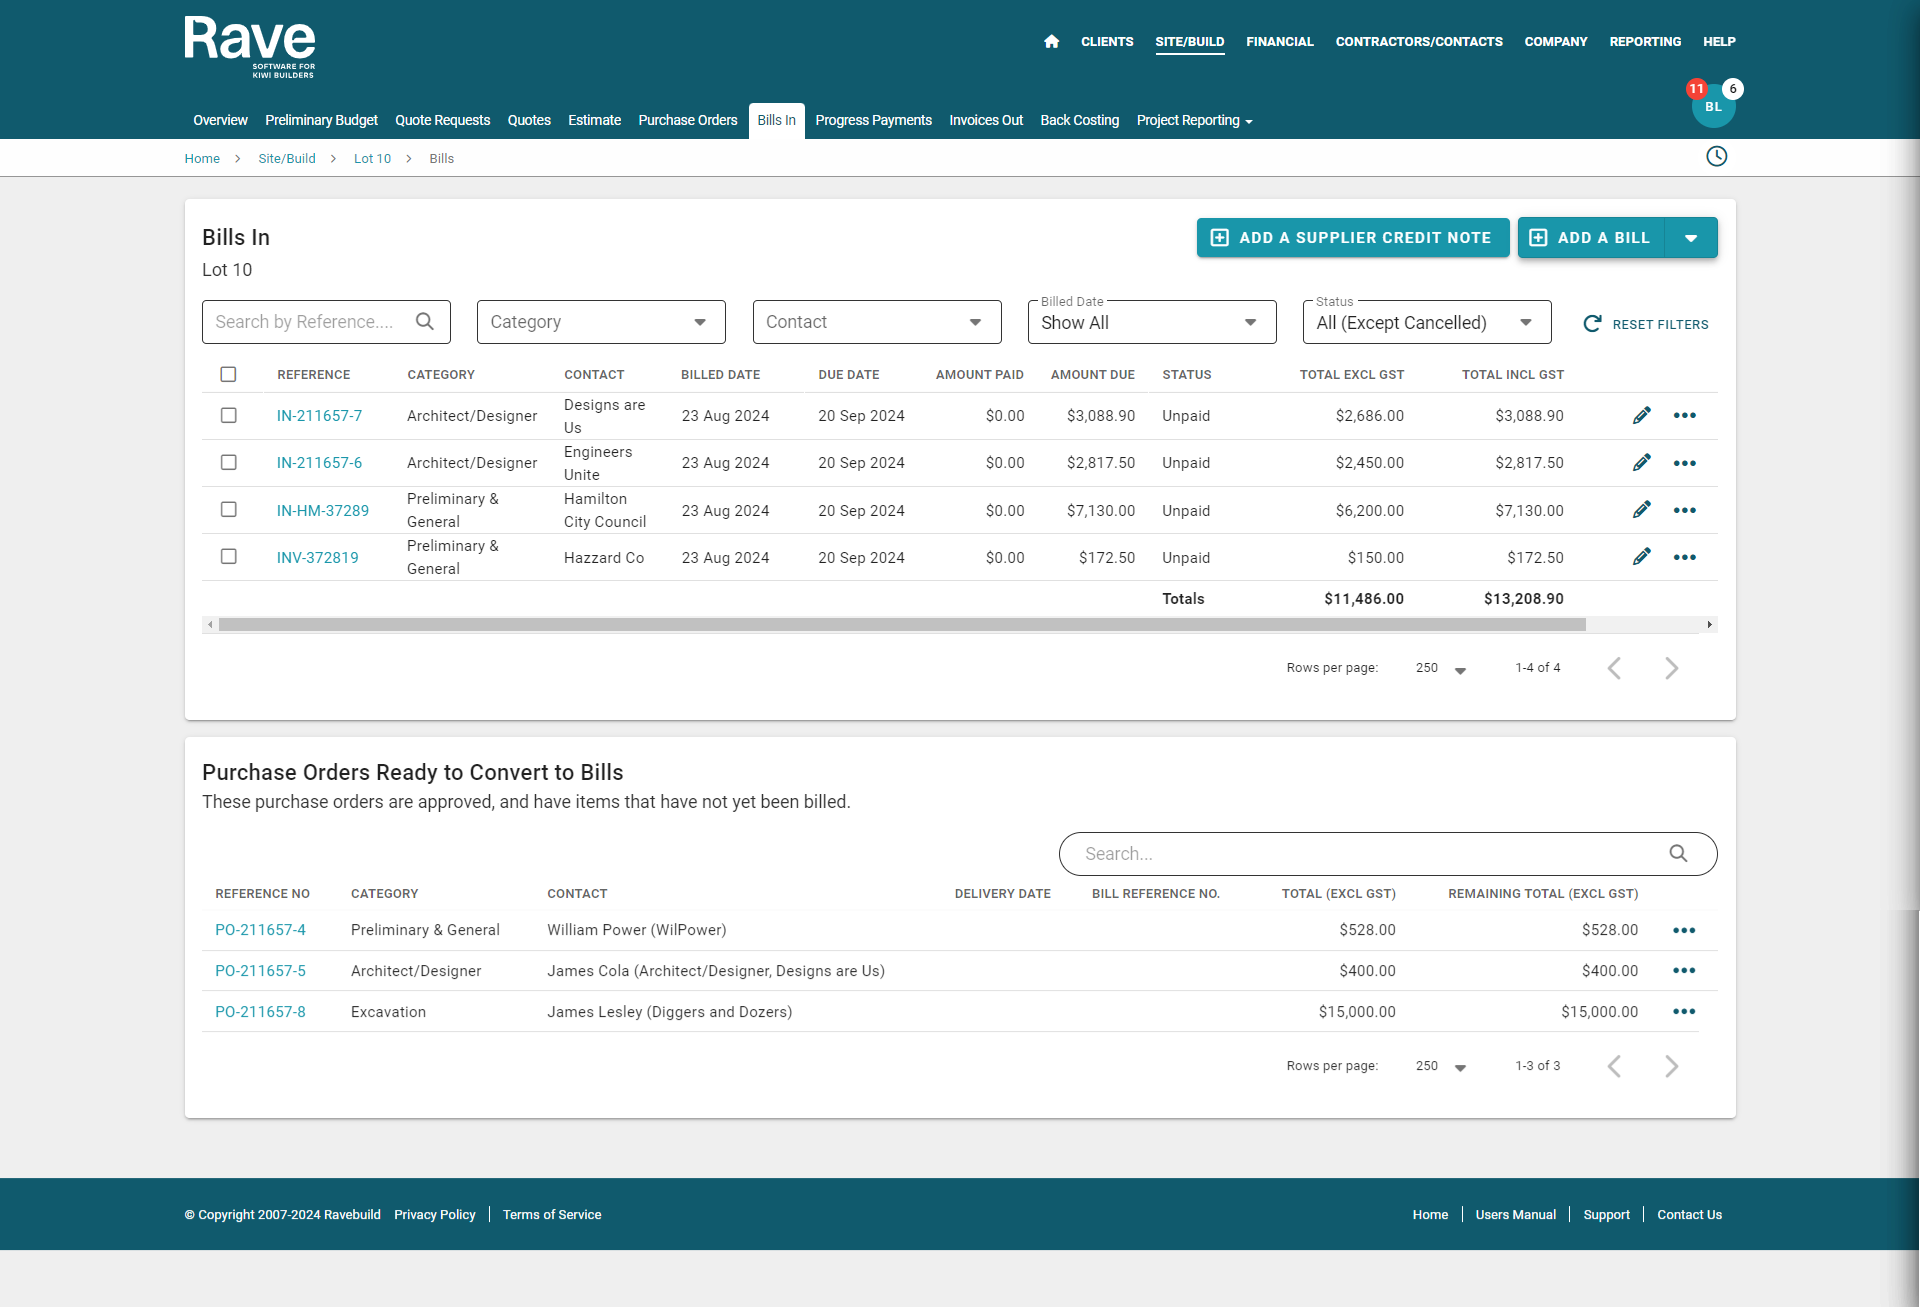
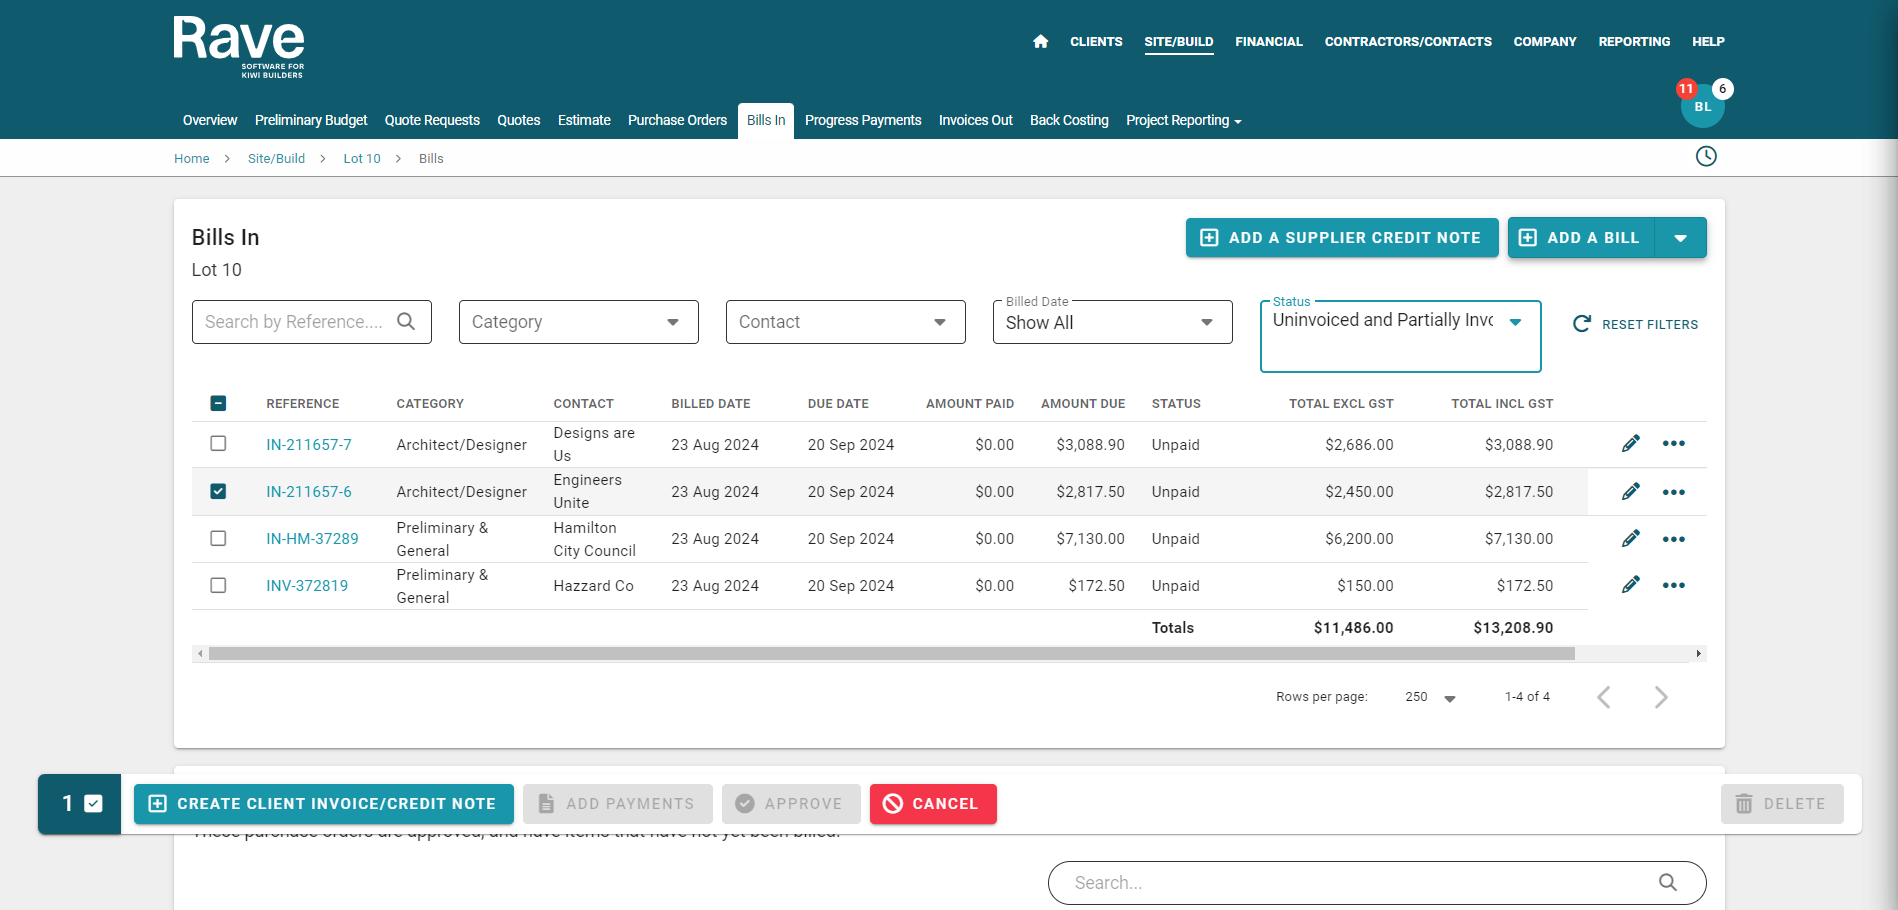
Bills in
Loading bills from a purchase order is as simple as selecting the purchase order and clicking on ADD bill. This will walk you through adding your supplier/contractor bill number, downloading a copy of their bill, checking the pricing and items all match, selecting the date of the bill, and the due date. If any items are missing you can manually add them.
If you don’t use PO ‘s, you click on ADD a bill, and select the quote or price in the estimate, then select the quote from the next section down which will prepopulate all of the information for you to continue checking.
If you don’t have a price in the estimate, a quote or a PO, you can add a bill manually and just select a category to load it to, and manually select all of the information and add line items. If you don’t link the bill to the PO or the Quote, and you have those, then the back costing page will be mismatched =- so it’s important to use either a PO or a quote before you manually add bills. You cannot create a link once it’s done.
You can create credit notes to your contractors/suppliers on this tab as well. As a credit note is a credit, you enter all of the information as a positive number not a negative. The Add a supplier credit note button sits along the top green bar.
Charge-up Invoices from Bills
To Create a charge-up invoice for a client from Bills, you need to select the date range from the Billed Date section. Then on the next drop down select uninvoiced and Partially invoiced. This will show you all of your bills and credit notes that haven’t been converted or only partially converted to a charge-up invoice. You can click the check boxes to the left of the reference number and then select Create a Client invoice. You will be taken through to create the client invoice. Make sure that each line item has a markup in the box, otherwise you will be charging your cost to the client. Once the invoice is created that Bill will drop off the uninvoiced option so you can’t over invoice it.
You can also create a charge-up invoice from a quote or from a Purchase Order by following the same steps.
Invoices Out
This tab shows you all of the client invoices for this job. Both the charge-up ones, and any you create on the Progress Payment Tab. You create credit notes to your clients on this tab as well. As a credit note is a credit, you enter all of the information as a positive number not as negative numbers.

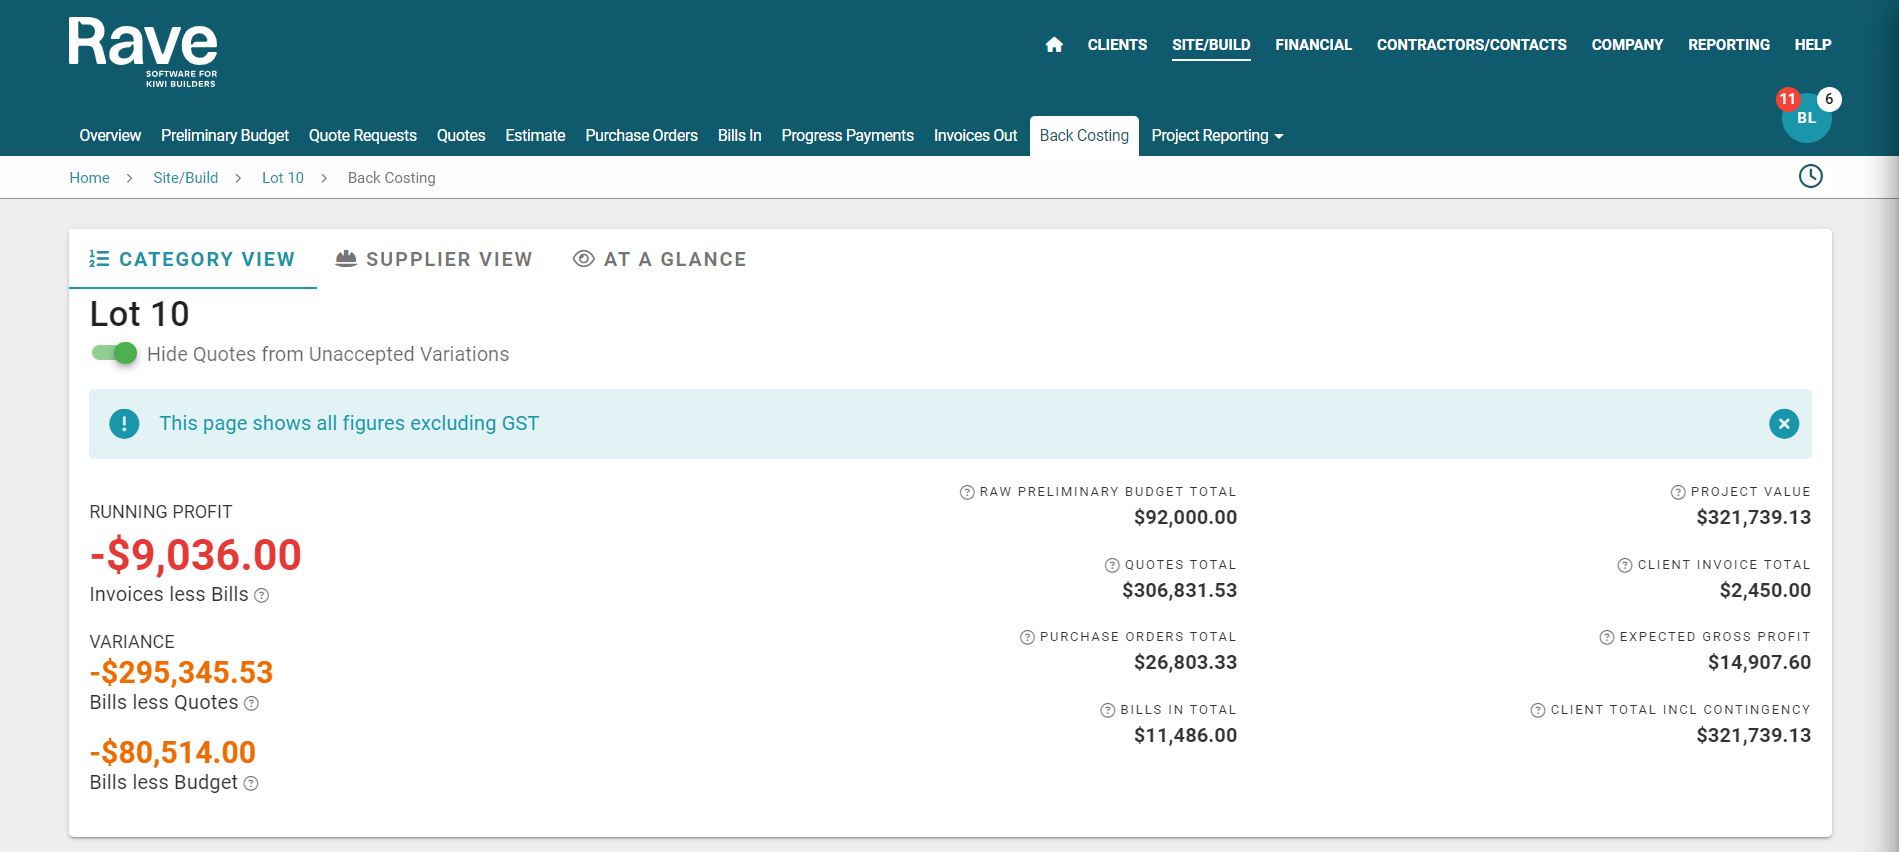
Back Costing
The Back Costing tab shows you all of the financial information from this job in an overview at the top.
Then it breaks down your Budget, Quotes, POs and Bills for detailed comparison.
If you have a green dollar value you are under, a red is over spend, and black is either on budget or there is nothing assigned. If figures are wrong or need editing you can expand the category, find the one that needs correcting, and click on it to take you to that page. A negative running profit indicates a higher bill value than you’ve invoiced out to the client. You can also export a charge-up report via PDF from this page, showing your Budget vs your Bills when doing open book charge-ups.

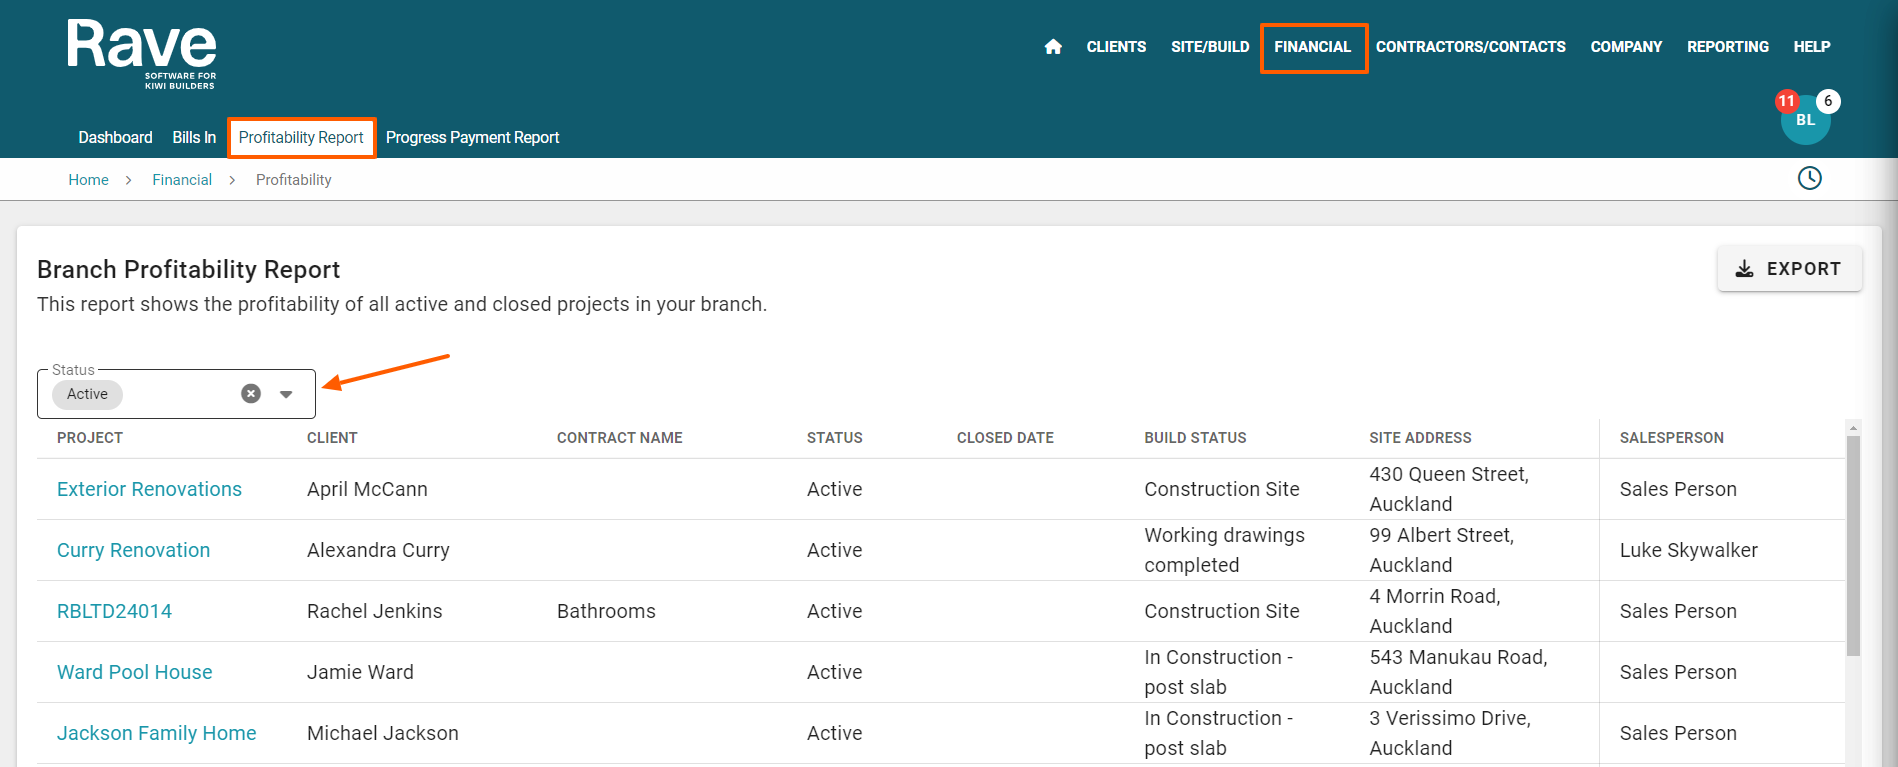
Profitability Reports
This is a high level overview of the profitability of your job. We display the expected gross profit vs the current/actual gross profit, and then the budget breakdown for overs and unders. The very bottom shows the number of client invoices sent, their dollar value, and invoice numbers. This report is also available at a company level in both reporting (where it is searchable by date range) as well as by export in CSV format from the Financial Tab under Profitability Reports.

Was this article helpful?
That’s Great!
Thank you for your feedback
Sorry! We couldn't be helpful
Thank you for your feedback
Feedback sent
We appreciate your effort and will try to fix the article